
MIC900S - Microphone Auna - Free user manual and instructions
Find the device manual for free MIC900S Auna in PDF.
| Product type | USB condenser microphone |
| Brand | Auna |
| Model | MIC900S |
| Polar pattern | Cardioid |
| Frequency response | 30 Hz - 18 kHz |
| Sensitivity | -32 dB |
| Power supply | Via USB (type B connector) |
| Cable length | Approximately 3 meters |
| Microphone dimensions | 16.5 cm (height) x 0.5 cm (diameter) |
| Microphone weight | Approximately 295 g |
| Shock mount dimensions | 9 x 9 x 6 cm |
| Shock mount weight | Approximately 180 g |
| Package contents | Microphone, shock mount, 3/8" to 5/8" adapter, protection bag, USB cable |
| System compatibility | Windows XP/Vista/7/8/10, Mac OS X 10.3.9 or higher |
| Minimum requirements | CPU 1 GHz, RAM 512 MB, USB 2.0 port |
| Warranty | 2 years |
| Manufacturer | Chal-Tec GmbH, Wallstraße 16, 10179 Berlin, Germany |
| Cleaning | Dry cloth only |
| Safety instructions | Do not open, avoid moisture and extreme heat |
| Recycling | Do not dispose of with household waste, take to collection point |
| Intended use | Voice and music recording, streaming |
| Thread adapter | 3/8" to 5/8" |
Frequently Asked Questions - MIC900S Auna
User questions about MIC900S Auna
0 question about this device. Answer the ones you know or ask your own.
Ask a new question about this device
Download the instructions for your Microphone in PDF format for free! Find your manual MIC900S - Auna and take your electronic device back in hand. On this page are published all the documents necessary for the use of your device. MIC900S by Auna.
USER MANUAL MIC900S Auna
Member of Berlin Brands Group
Handwerkerstr. 11
15366 Dahlwitz-Hoppegarten
Deutschland
Berlin Brands Group UK Ltd
PO Box 1145
Oxford
OX19UW
Großbritannien
Dear customer,
Congratulations on the purchase of your device. Please read the following instructions carefully and follow them to prevent potential damage. We accept no liability for damage caused by disregarding the instructions and improper use. Please scan the QR code to access the latest operating instructions and further information about the product.

TECHNICAL DATA
| Product code 10006515, 10011711, 10028868, 10028869, 10030363, 10030364, 10031503 | |
| Microphone type USB condenser microphone | |
| Characteristics Cardioid | |
| Frequency range 30 Hz - 18 KHz | |
| Sensitivity -32 dB | |
| Power supply Via USB (connection: type B) | |
| Dimensions / Weight Microphone: approx. 16.5 x 0.5 cm (H x Ø) Microphone spider: 9 x 9 x 6 cm (WxHxD) Cable length: approx. 3 metres Microphone weight: approx. 295 g Weight microphone spider: approx. 180 g | |
SCOPE OF DELIVERY
- Microphone
- Spider
- 3/8" to 5/8" - adapter,
- Protective bag
USB cable
WARNING
- These operating instructions are intended to familiarise you with the operation of this product. Therefore, always keep these instructions in a safe place so that you can access them at any time.
- When you purchase this product, you receive a two-year warranty against defects when used properly.
- Please use the product only in its intended manner. Any other use may lead to damage to the product or in the vicinity of the product.
- Modifying or changing the product will compromise product safety.
- Never open the unit without authorisation and never carry out repairs yourself!
- Handle the product carefully. It can be damaged by bumps, blows or falls from a small height.
- Keep the product away from moisture and extreme heat.
SAFETY INSTRUCTIONS
- These operating instructions are intended to familiarise you with the operation of this product.
- Therefore, always keep these instructions in a safe place so that you can access them at any time.
- Please use the product only in its intended manner. Any other
- use may lead to damage to the product or in the vicinity of the product.
- Modifying or changing the product will compromise product safety.
- Never open the unit without authorisation and never carry out repairs yourself!
- Handle the product carefully. It can be damaged by bumps, blows or falls from a small height.
- Keep the product away from moisture and extreme heat.
- Do not drop metal objects into this device.
- Do not place any heavy objects on the device.
- Only clean the device with a dry cloth.
- Only use accessories recommended by the manufacturer or a qualified service professional.
- The warranty is void if the unit is tampered with by third parties.
Small objects/packaging parts (plastic bags, cardboard, etc.):
Keep small objects and packaging parts (e.g. screws and other mounting material, memory cards) out of the reach of children so that they cannot be swallowed by them. Do not let small children play with plastic film. There is a danger of suffocation!
Transporting the unit
Please keep the original packaging. To achieve sufficient protection when transporting the unit, pack the unit in the original packaging.
Cleaning the outer surface
Do not use volatile liquids such as bug sprays. Excessive pressure when wiping the surface can cause damage. Rubber or plastic parts should not be in contact with the appliance for a long period of time. Use a dry cloth.
TECHNICAL REQUIREMENTS
Your microphone is equipped with a USB connection. This connector sends the audio signal from the microphone to the computer.
At the same time, the computer uses the USB connection to supply the microphone with the necessary power. The connection is made via the supplied USB cable with type B plug.
NOTE: Use only the supplied cable to ensure optimal signal quality and reliable power supply.
To operate the microphone, your computer must meet the following system requirements:
| Windows PC Mac | |
| Intel or AMD CPU, 1 GHz or better G4/G5, 800 MHz or better | |
| At least 512 MB RAM At least 512 MB RAM | |
| USB 2.0 port USB 2.0 port | |
| Windows XP/Vista/7/8/10 Mac OS | X 10.3.9 (Panther) or better |
INSTALLATION
Follow the steps below to put your microphone into operation:
- Start your computer.
- Connect the microphone to a free USB port. NOTE: The operating system automatically installs the required drivers.
- Select the microphone as the input source for the recording software you are using.
Windows:
- Adjust the recording volume using the Windows volume controls (speaker system on the taskbar).
- Optional: Select the microphone under System Settings > Sounds and Audio Devices > Audio (tab) as the sound recording device.
Mac OS:
- Adjust the recording volume via the Audio Midi Setup. Note: The microphone is now ready for use.
- (Optional:) Select Microphone in the Audio Midi Setup in the Audio Devices tab as the default sound recording device.
NOTES ON ASSEMBLY AND USE
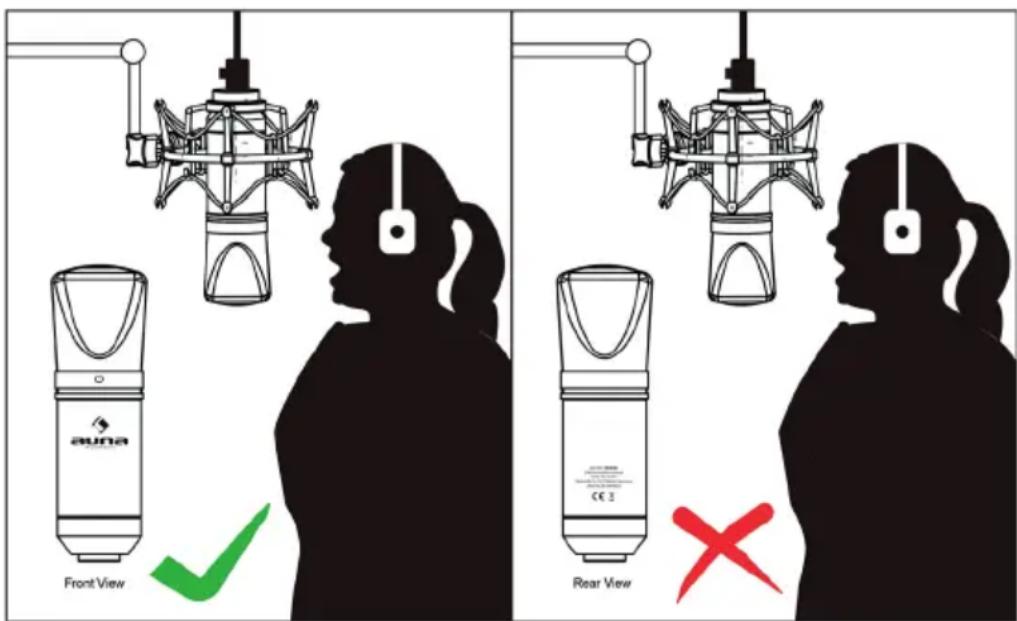
To achieve the desired sound, test different positions to the sound source.
Move the microphone quietly around the recording room and test different distances and angles. Only when you have reached the right basic tone should you use equalisers and sound processors.
Because of the microphone's extremely linear frequency response and high sound resolution, "EQing" should not be necessary for high frequencies. This only influences the input signal too much and increases the interference tone unnecessarily. The microphone has the clarity needed for recording and mixing.
The microphone has an adapter that fits European and American microphone holders. Detach the adapter from the microphone, attach it to the microphone holder and then fix the microphone on the adapter. The microphone should be mounted upright and the sound should hit it at a right angle. Test different positions until you achieve the desired sound. If necessary, you can also adjust it vertically with the hinge.
NOTE: Handle the microphone and the adapter with care. Do not subject the threads to excessive force.
Of course, you can also mount the microphone without this adapter on a suitable microphone stand purchased by you.
Sing/speak into the front (printed with auna logo) of the microphone for best results:
DISPOSAL CONSIDERATIONS

If there is a legal regulation for the disposal of electrical and electronic devices in your country, this symbol on the product or on the packaging indicates that this product must not be disposed of with household waste. Instead, it must be taken to a collection point for the recycling of electrical and electronic equipment. By disposing of it in accordance with the rules, you are protecting the environment and the health of your fellow human beings from negative consequences. For information about the recycling and disposal of this product, please contact your local authority or your household waste disposal service.
MANUFACTURER & IMPORTER (UK)
Manufacturer:
Chal-Tec GmbH, Wallstrasse 16, 10179 Berlin, Germany.
Importer for Great Britain:
Berlin Brands Group UK Ltd
PO Box 1145
Oxford
OX19UW
United Kingdom
Estimado cliente:
Berlin Brands Group UK Ltd
PO Box 1145
Oxford
OX19UW
United Kingdom
Cher client, chere clientele,
Berlin Brands Group UK Ltd
PO Box 1145
Oxford
OX19UW
United Kingdom
Gentile clientele,
PRODUTTORE E IMPORTATORE (UK)
Produtlore:
Chal-Tec GmbH, Wallstraße 16, 10179 Berlin, Germania.
Unit 6 Riverside Business Centre
Brighton Road
Shoreham-by-Sea
BN43 6RE
Regno Unito


- Member of Berlin Brands Group
- Handwerkerstr. 11
- Dahlwitz-Hoppegarten
- Deutschland
- Dear customer,
- TECHNICAL DATA
- SCOPE OF DELIVERY
- WARNING
- SAFETY INSTRUCTIONS
- Transporting the unit
- Cleaning the outer surface
- TECHNICAL REQUIREMENTS
- INSTALLATION
- Windows:
- Mac OS:
- NOTES ON ASSEMBLY AND USE
- DISPOSAL CONSIDERATIONS
- MANUFACTURER & IMPORTER (UK)
- Estimado cliente:
- Cher client, chere clientele,
- Gentile clientele,
- PRODUTTORE E IMPORTATORE (UK)
Brand : Auna
Model : MIC900S
Category : Microphone