Coolperfect 120 wifi - Air Conditioning Eurom - Free user manual and instructions
Find the device manual for free Coolperfect 120 wifi Eurom in PDF.
| Product type | Reversible mobile air conditioner (cooling, heating, dehumidification, ventilation) |
| Brand | Eurom |
| Model | Coolperfect 120 wifi |
| Dimensions (W × D × H) | 321 × 767 × 580 mm |
| Net weight | 33 kg |
| Power supply | 220-240 V ~ 50 Hz |
| Maximum power consumption (cooling) | 1345 W |
| Maximum power consumption (heating) | 1391 W |
| Cooling capacity | 12000 BTU/h (3500 W) |
| Heating capacity | 2900 W |
| Maximum air flow | 420 m³/h |
| Refrigerant | R290 (215 g) – flammable |
| Noise level | 65 dB(A) (sound pressure 55 dB(A)) |
| Minimum room area | 15 m² |
| Functions | Cooling, heating, dehumidification, ventilation, timer, WiFi |
| Fan speeds | 3 (high, medium, low) |
| Remote control | Yes (2 AAA 1.5 V batteries not included) |
| WiFi connectivity | Yes (dedicated app) |
| Timer | Programmable from 1 to 24 hours (automatic on/off) |
| Filter | Washable with warm water (clean every 2 weeks) |
| Included accessories | Window kit, air exhaust hose (∅150 mm × 1.5 m), remote control, drain hose, plugs |
| Warranty | Consult your retailer |
Frequently Asked Questions - Coolperfect 120 wifi Eurom
User questions about Coolperfect 120 wifi Eurom
0 question about this device. Answer the ones you know or ask your own.
Ask a new question about this device
Download the instructions for your Air Conditioning in PDF format for free! Find your manual Coolperfect 120 wifi - Eurom and take your electronic device back in hand. On this page are published all the documents necessary for the use of your device. Coolperfect 120 wifi by Eurom.
USER MANUAL Coolperfect 120 wifi Eurom
natural_image
White and black portable air conditioner unit with ventilation grilles (no visible text or symbols)Coolperfect 90 Wifi/Coolperfect 120 Wifi/Coolperfect 180 Wifi
Art.nr. 380729
Art.nr. 380750
Art.nr. 380781
Hartelijk dank!
natural_image
Illustration of open books, an open book with an open icon, and an open notebook with a wrench (no text or symbols)Accessoires
natural_image
Line drawing of a small air conditioner unit with a coiled tube, shown in technical line drawing without any text or symbols.Ontvochtigen
natural_image
Technical line drawing of a portable air purifier with internal components and a close-up view of its internal shaft (no text or symbols)Koelen
natural_image
Two-step diagram showing a hairpin being inserted into a jaw (labeled ① and ②), no text or symbols present.natural_image
Line drawing of a portable air conditioner unit with a coiled hose, mounted on a wall (no text or symbols)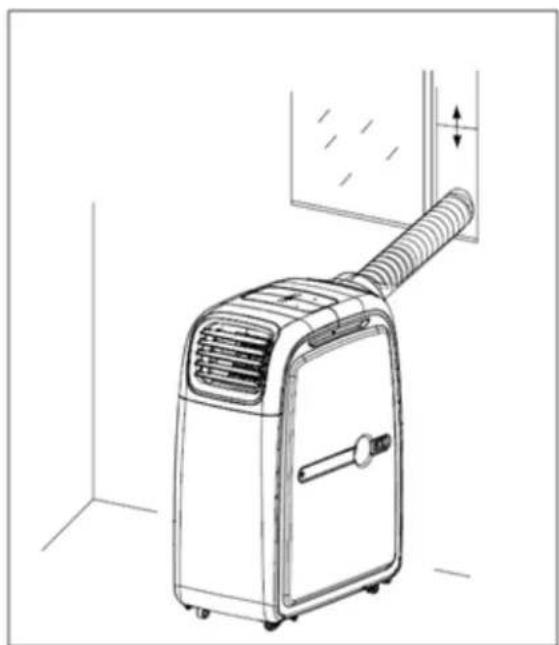
natural_image
Line drawing of a small air conditioner unit with a coiled tube and ventilation duct (no text or symbols)natural_image
Close-up of a gray industrial fan grille with mounting feet and a black upward arrow indicating a component (no text or symbols)Hierna kunt u de airconditioner weer gewoon in gebruik nemen.
natural_image
Technical line drawing of a portable air conditioner unit with a close-up view showing internal components (no text or symbols)Oververhittingsbeveiliging
natural_image
Diagram showing a vehicle interior layout with grid panels and ventilation grilles, no text or symbols presentnatural_image
Symbol of a trash bin crossed with a diagonal line, representing waste sorting or disposal (no text or labels)
natural_image
Illustration of open books, an open book with an open icon, and an open notebook with a wrench (no text or symbols)Zubehör
natural_image
Line drawing of a small air conditioner unit with a coiled hose, shown in technical sketch (no text or symbols)natural_image
Line drawing of a portable air conditioner unit with a hose and ventilation slots, shown in 3D perspective (no text or symbols)
natural_image
Line drawing of an air conditioner unit with a hose and ventilation slots, shown in 3D perspective (no text or symbols)natural_image
Close-up of a heat exchanger panel with ventilation grilles and mounting feet, no visible text or symbolsnatural_image
Technical line drawing of a portable air conditioner unit with a close-up view showing internal components (no text or symbols)Sicherheit
natural_image
Technical line drawing of a vehicle front panel with grid layout and side-mounted grating (no text or symbols)Reinigung Kühler
natural_image
Symbol of a trash bin crossed with no text or numbers, representing waste sorting or disposal (no text present)Thank you for choosing a EUROM air conditioner / dehumidifier. You have made a good choice! We hope that it will function to your full satisfaction.
To get the best out of your air conditioner / dehumidifier, it is important that you read and understand this operating manual carefully and thoroughly before use. Pay particular attention to the safety instructions; they are mentioned to protect you and your environment!
Then keep the operating manual for future reference. Also keep the packaging: that is the best protection for your air conditioner / dehumidifier during off-season storage. And if you ever transfer the air conditioner / dehumidifier to someone else, please supply the operating manual and packaging.
We wish you a lot of fun with your new air conditioner / dehumidifier.
Eurom
Kokosstraat 20
8281 JC Genemuiden (NL)
info@eurom.nl
www.eurom.nl
This manual has been compiled with the utmost care. Nevertheless, we reserve the right to optimize this manual at any time and to adjust it technically.
Symbol statement
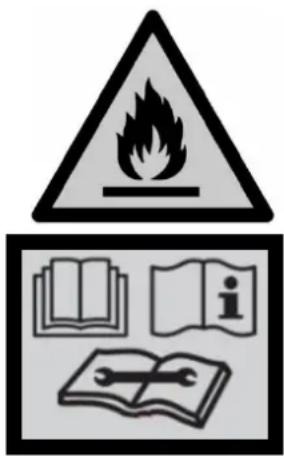
- This appliance is filled with Propane gas R 290. Follow strictly the manufacturer's instruction concerning use and repairs!
- Before using the machine, carefully read this entire instruction manual.
- Do not install, operate or store the device in a room smaller than:
12m² Coolperfect 90
15m² Coolperfect 120
15m² Coolperfect 180
Technical specification
| Type | Coolperfect 90 | Coolperfect 120 | Coolperfect 180 |
| Cooling capacity | 9000 BTU/hour2500 Watt | 12000 BTU/hour3500 Watt | 18000 BTU/hour5200 Watt |
| Heating capacity | 2400 Watt | 2900 Watt | 3800 Watt |
| Max. power usageCooling Heating | 1000 Watt1070 Watt | 1345 Watt1391 Watt | 2000 Watt1950 Watt |
| Air displacement max. | 350 m3/hour | 420 m3/hour | 480 m3/hour |
| Connected power | 220-240V~50Hz | ||
| Noise level | Sound Power Level 65 dB(A)Sound Pressure Level 55 dB(A) | ||
| Cooling fluid | R290/160g | R290/215g | R290/235g |
| Class of insulation | IP24 | ||
| Fan settings | 3 | ||
| Operating temperatureCooling Heating | 18-35°C7-27°C | ||
| Fuse | F, 250V AC, 2A | ||
| Waste pipe | ∅ 150mmx1500mm | ||
| Net weight | 31 kg | 33 kg | 34 kg |
| Dimensions | 321x767x580 mm | ||
Safety Warnings
Read all safety warnings and other instructions. Failure to follow all instructions can cause injury or material damage.
General safety warnings
- This unit is exclusively intended for household use.
- A mobile air conditioner needs air to be able to discharge heat to the outside!
Therefore, never use a mobile air conditioner in an airproof room. Always make sure there is sufficient ventilation. Without sufficient ventilation, a vacuum is created in an airproof room, while a mobile air conditioner is operating, and this vacuum can disrupt the safe operation of geysers, extractors, mechanical ventilation systems, ovens, fireplaces and gas heaters. The vacuum can cause the
exhaust gases, which these appliances usually discharge to the outside, to wind up either partially or entirely in the room.
-
Always ensure (even during transport!) that the unit remains upright. If the unit has been lying on its side, wait 2 hours before using. This time is required in order for the compressor to function correctly.
-
Ensure that the unit is always placed on a sturdy, flat and horizontal surface.
-
Ensure that the unit has a free space of at least 50 cm at the front and side edges during operation.
-
Make sure that the plug and socket remain visible and accessible at all times.
-
Do not place any objects in front of the air conditioning unit.
-
Never leave a functioning device unsupervised, not even for a moment!
-
Do not use the air conditioning unit in the vicinity of flammable or explosive substances or fuels. Never use any paint, cleaning sprays, anti-insect sprays or similar near the unit; this could deform the plastic or cause electrical damage.
-
Do not use the appliance:
-
close to a fire source;
- close to splashing oil;
- in direct sunlight;
- with splashing water;
-
in a bathroom or at a swimming pool.
-
Never block the grilles for incoming or outgoing air (not even partially).
-
In order to prevent over-heating, never cover the device!
-
Never insert fingers or objects such as pens into the device via the grilles.
-
Ensure that the ventilator does not become blocked.
-
Children, incapacitated persons and pets should be supervised.
-
This appliance is not a toy, so children should not play with the appliance. In particular, warn children of these dangers.
-
This appliance can be used by children aged from 8 years and above and persons with reduced physical, sensory or mental capabilities or lack of experience and knowledge if they have been given supervision or instruction concerning use of the appliance in a safe way and understand the hazards involved. Children shall not play with the appliance. Cleaning and user maintenance shall not be
made by children without supervision. Avoid children coming into contact or playing with the device.
- Cleaning and user maintenance shall not be made by children without supervision.
- Remove the plug from the socket when you hear strange noises, smell a strange smell, when there is smoke.
- Do not turn on the appliance if you have discovered damage to the appliance, cord or plug, if the appliance is malfunctioning, if it has been dropped or if there are signs of any other defect. Return the complete product to the vendor or to a certified electrician for inspection and/or repair. Always ask for original parts.
- The appliance (incl. cord and plug) may only be opened and/or repaired by properly authorised and qualified persons.
Electrical safety
- The air conditioning unit is only suitable for indoor use.
- Only use the plug that is installed on the device in the factory and no other form of connector!
- The appliance shall be installed in accordance with national
- wiring.
- Before use, check that the electrical outlet you want to use is earthed, has no defects, and that the power supply to the electrical outlet corresponds to that on the rating plate of the appliance. Damage caused by a faulty voltage is not covered by the warranty!
- If the appliance is not being used, or if you are cleaning, servicing or moving it, switch it off first and then unplug the appliance. Always move and / or move the device quietly!
- Even when you start using the appliance: firstly plug in the mains, then the switch to the ON position and only then use the control button!
- Do not use the device in a damp or wet environment, near a bath, shower or swimming pool and do not splash water, oil or any liquid on or in the appliance.
- Avoid using extension cords as much as possible. If this is unavoidable, use a cord with sufficient capacity (at least 3 × 1.5 mm^2 ) and keep it outside the walking route!
-
Do not move the appliance by pulling on the electrical cable and take the plug in your hand if you want to take it out of the socket.
-
Do not pull on, deform or modify the electrical cable or immerse it in water. Pulling or misuse of the electrical cable will cause damage to the device and cause an electric shock
- If the electrical cable, plug or the appliance itself is damaged, broken, or malfunctions, do not use it or switch it off immediately and remove the plug from the socket. Device, plug and / or cable must be repaired/replaced by an electrician or similarly qualified person. Repairs by inexperienced people will invalidate the warranty and can cause dangerous situations!
Safety in relation to coolant R290
- This device contains the coolant R290. R290 is a coolant that complies with the relevant European Directives. Never perforate the coolant circuit. R290 is flammable (GWP 3)!
- Never use substances other than those recommended by the manufacturer for the defrosting process.
- This device must be used and stored in a room that does not contain sources of ignition, such as open flames or gas and electrical devices in operation.
- Do not perforate any of the components of the cooling circuit and do not set light to the device
- If the device is installed, working or stored in an un-ventilated you must take measures to prevent fire or explosions caused by leaked coolant. Ensure that there are absolutely no sources of ignition (such as fire, heaters, sparking electrical equipment, lit cigarettes, etc.) in the same room!
- The device must be stored in such a way that mechanical defects are prevented.
- Do not install, operate or store the device in a room smaller than 12m^2 (Coolperfect 90) / 15m^2 (Coolperfect 120 & 180).
- R290 is odourless, which means that you cannot smell leaks!
- Persons working on the cooling circuit must be in possession of the correct qualifications that state the person in question is competent to use coolant in accordance with a special evaluation that is recognised by the sector association.
- The repairs must be executed on the grounds of the recommendations of the manufacturer of the device. Maintenance and repairs that require the assistance of other qualified persons must be executed under supervision of someone who is specialised in the use of flammable coolant.
Maximum effect
The maximum surface area, which this air conditioner can cool, depends on various conditions. Conditions that cause the air conditioner to cool smaller spaces are, for example:
- Higher outdoor temperature
- Many and/or large windows
- Flat roof
- Many people in the room
- Many electrical appliances in the room
If these conditions are present to a lesser extent (i.e. lower heat loads), the air conditioner can cool a larger surface area better than if more of these conditions are present (i.e. higher heat loads).
| Coolperfect 90 Wifi | Coolperfect 120 Wifi | Coolperfect 180 Wifi | |
| Lower heat loads | 29 m^2 | 38 m^2 | 58 m^2 |
| 80 m^3 | 105 m^3 | 160 m^3 | |
| Higher heat loads | 18 m^2 | 24 m^2 | 36 m^2 |
| 50 m^3 | 66 m^3 | 99 m^3 |
- Do not place the unit in the vicinity of a heat source or in direct sunlight.
- Close windows and doors and keep curtains or hatches closed during the sunniest hours in the day
- Keep filters clean
- Modify temperature and ventilation settings once the area has reached the required condition.
Description
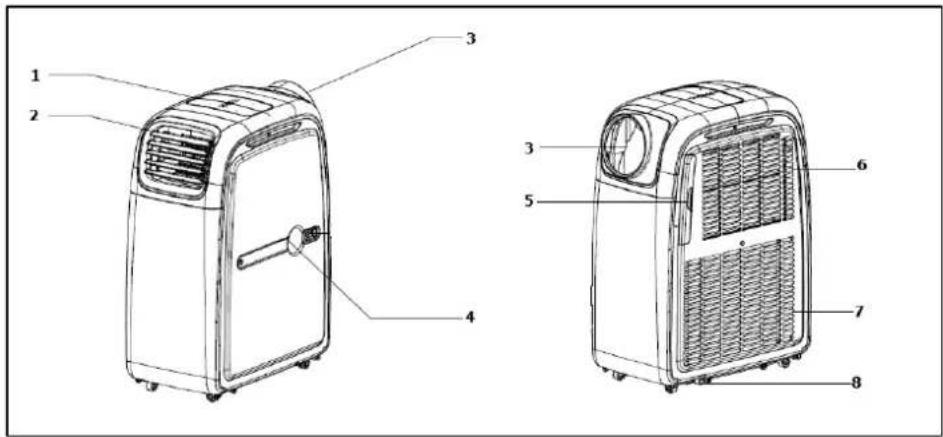
- Controlpanel
- Cold air outlet
- Hot air outlet
-
Water drain connection (high)
-
Filter
- Cold air inlet
- Hot air inlet
- Water drain connection (low)
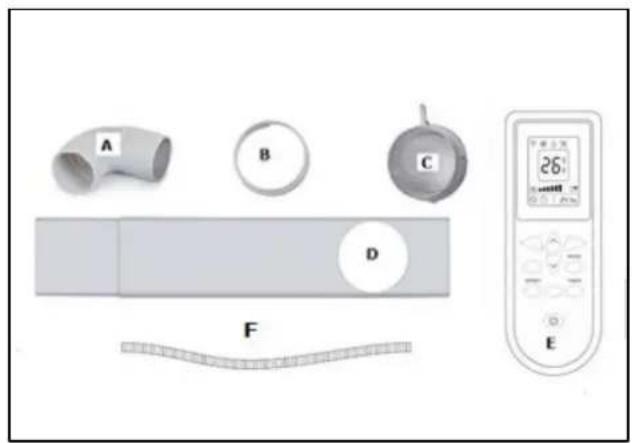
Accessories
A. Outlet hose hot air
B. Connector window panel
C. Wall connector
D. Window panel
E. Remote control
F. Drain hose
Installation
The Coolperfect 90, 120 and 180 are mobile airconditioning/heaters/dehumidifying units that can be moved from room to room. Install as follows:
- Remove all packaging material, keep it away from children and ensure that the unit remains in an upright position.
- Before use, check that all accessories are present and that there is no damage to the accessories or the unit itself. Do not use a damaged unit; take it back to your supplier!
- Place the unit on a sturdy, flat, dry and horizontal base near an electrical socket and a discharge point for hot air, e.g. a window that can be opened slightly. Make sure that the appliance has at least 50 cm at the front and sides free space and take into account all instructions from the safety instructions.
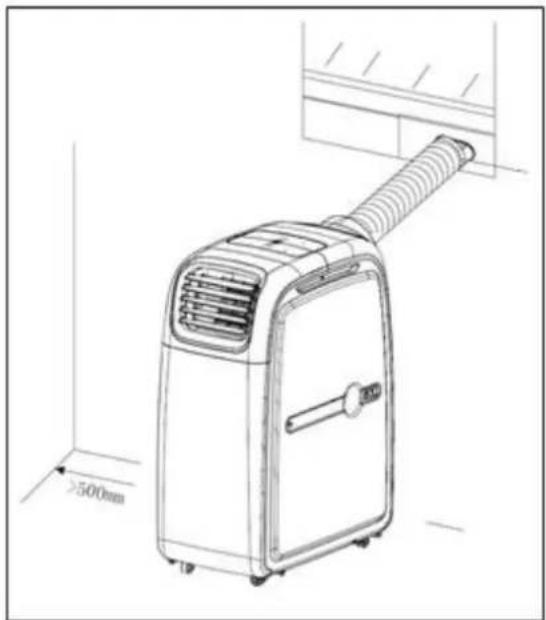
natural_image
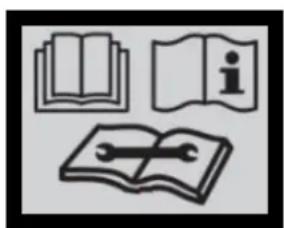
Line drawing of an air conditioner unit with a 500mm height dimension标注 (no text or symbols on the device itself)Dehumidification
- To dehumidify you now connect a water discharge hose to the water drain connection (high) (see image). You lead this hose to a bucket or drain. The hose cannot go upwards! Remove the sealing cap before you connect the hose. Store the sealing cap carefully, you need it for the cooling function.

natural_image
Technical line drawing of a portable air conditioner unit with a close-up view showing its internal components (no text or symbols present)Cool
• To cool you do not need to connect a water discharge hose.
- Check if the sealing caps of the water drain connections are in place.
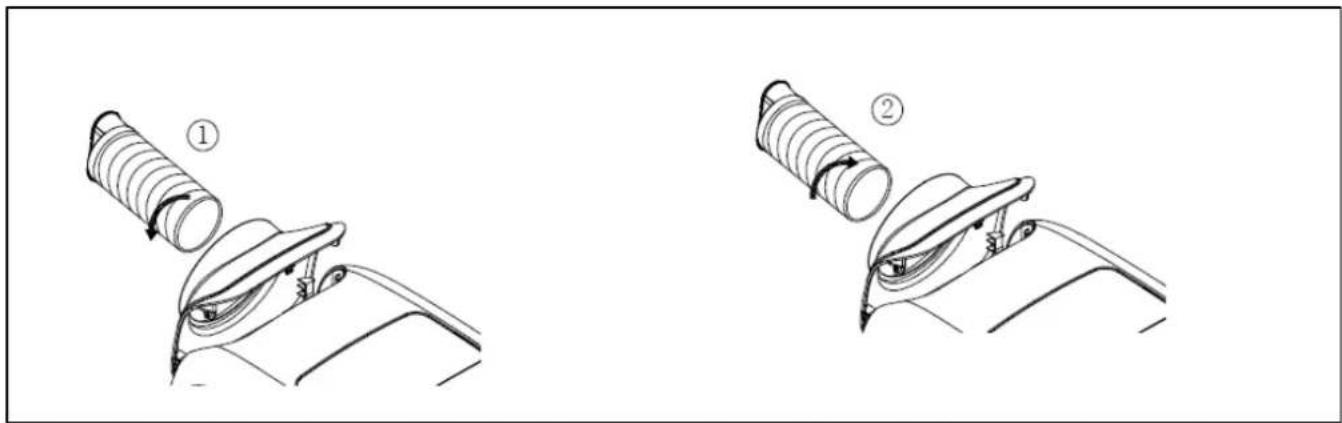
- Attach the air discharge hose before you put the device into use.
- Rotate the air discharge hose in the direction of arrow 1 and you attach it to the device. By rotating in the direction of arrow 2 you again remove the air discharge hose.
- Rotate the other end of the air discharge hose in the connection piece of the hose.
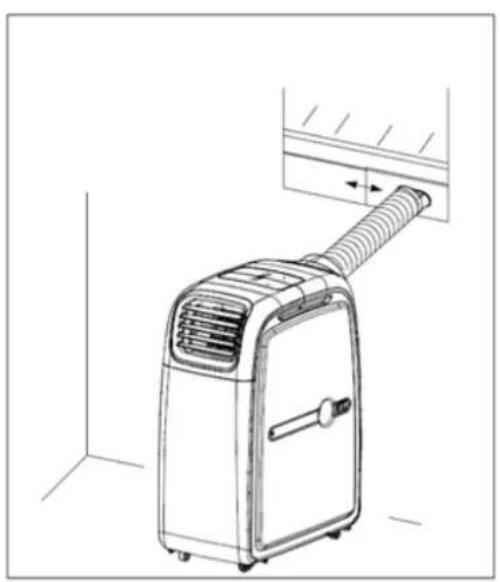
- Place the window beam fittingly in the opening of the window, see image. The length of the window beam is adjustable from 76.5 to 123 cm.
- Attach the other end of the drain hose to the opening in the window panel in order to direct the hot air to be discharged.
natural_image
Line drawing of a portable air conditioner unit with a hose and ventilation slots, shown in 3D perspective (no text or symbols)
natural_image
Line drawing of an air conditioner unit with a vertical pipe and ventilation grille (no text or symbols)- You can also hang the outlet hose out of an open window; this method is less efficient however.
- Avoid bends or pinches in the pipe. These will lead to a build-up of damp, waste air which can cause leaks, overheating or lead to the air conditioning unit switching off.
•
Heating
- Switch over to heat A (air grille connection) and B (hose connection) (see fig.)
- Reattach the air exhaust hose to the hose connection (B).
- Attach the other end of the drain hose to the opening window beam, to direct the air to be discharged.
- You can also hang the drain hose without a window beam from an open window; however, this method is less effective.
- Attach the other end of the drain hose to the
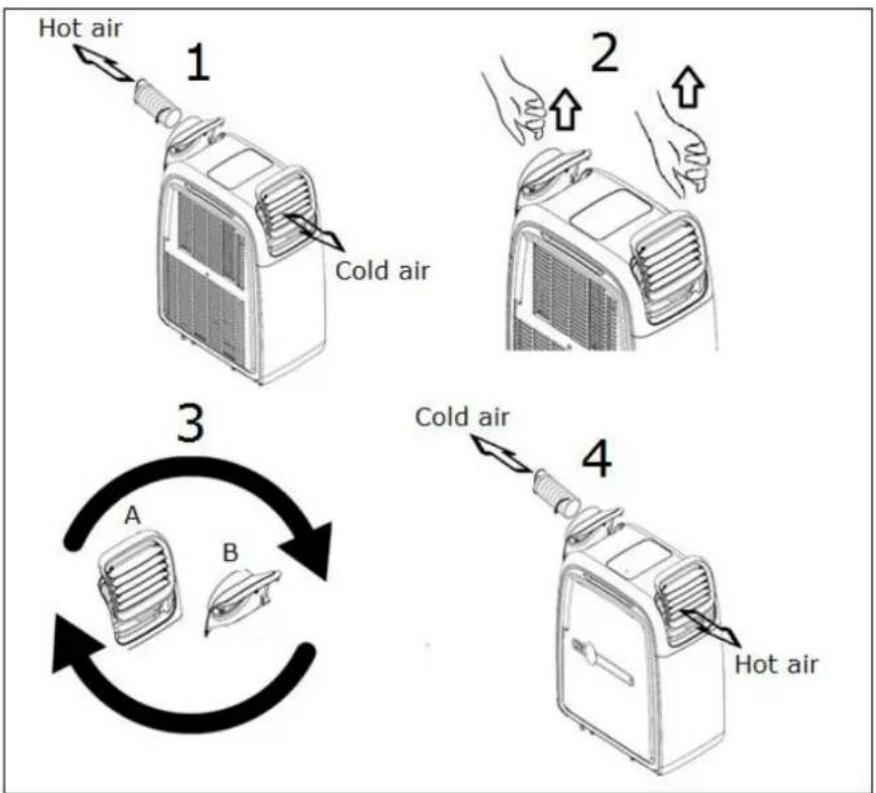
flowchart
graph TD
    A["Hot air"] --> B["1"]
    B --> C["Cold air"]
    C --> D["2"]
    D --> E["3"]
    E --> F["Cold air"]
    F --> G["4"]
    G --> H["Hot air"]
opening in the opening window bar, in order to direct the hot air to be discharged.
- Prevent kinks or bends in the drain hose. This causes accumulation of ejected humid air, which may result in leakage, overheating or shutdown of the heater.
- Please note: this device is in the first place an air conditioner. The appliance can heat when the ambient temperature is not lower than 7°C, otherwise the appliance will freeze internally.
- Warning! Do not use your air conditioner before it is installed according to the instructions described above!
• Warning! Ensure that no water can enter the device! - Warning! The length of the drain pipe is specially adapted to the technology of this device. Therefore do not replace it, and do not extend it with its own hose, as this can negatively affect the functioning of the appliance. The hose can be stretched, but in order to achieve an optimal effect you should keep the length as short as possible.
• Remember your burglary prevention!
Operation
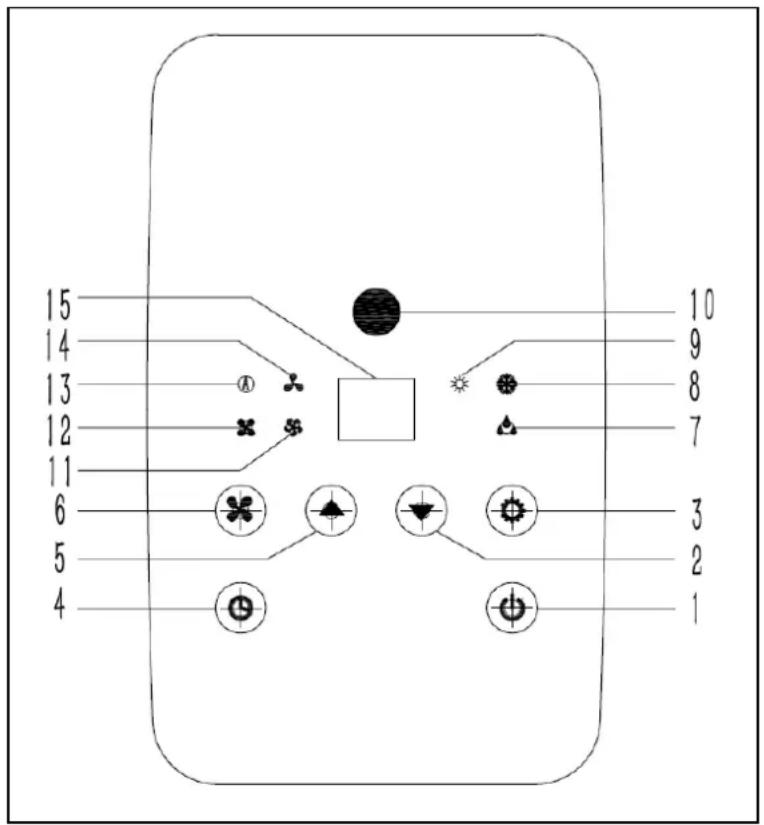
Description of the control panel
- On/Off button
- Lower temperature button
- Function switch mode button
- Timer button
- Higher temperature button
- Fan speed button
- Dehumidifying function light
- Cooling function lamp light
- Heating function light
- Signal reception screen light
- Fan speed medium light
- Fan speed high light
- Fan speed automatic light
- Fan speed low light
- Display
Description of the remote control
- On/Off button
- Timer On/Off
- Function selection mode
- No function
- Higher temperature
- Lower temperature
- No function
- No function
- Fan speed button
- No function
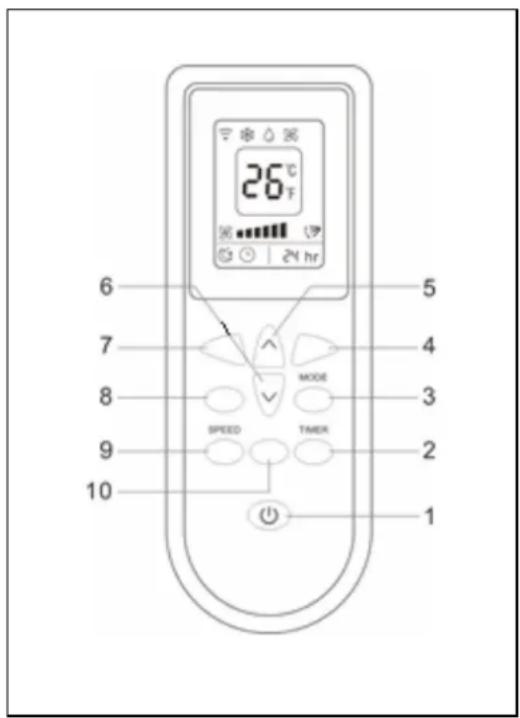
Attention! The display of the remote control does not change if you control the air conditioner using the control panel on the air conditioner! Therefore, the display of the air conditioner can show a different setting than the one on the display of the remote control. The display on the air conditioner takes precedence and therefore, the setting on the display on the air conditioner will be carried out.
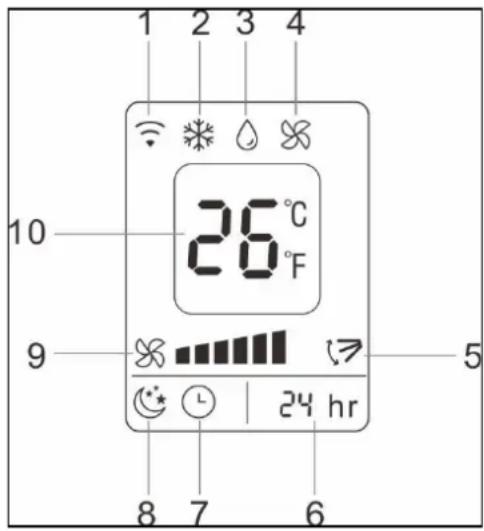
Description of the remote control LED display
- Wireless signal reception
- Cooling function
- Dehumidifying function
- Fan function
- Not on the Coolperfect
- Set time using the timer
- Timer On/Off
- Not on the Coolperfect
- Fan speed
- Temperature display
The control panel en the remote control have basically the same buttons. Insert 2 batteries (AAA-1.5V) in the battery compartment at the back on the remote control.
Before using the air conditioner, check:
- That it has been installed according to safety instructions
- That it is not damaged or broken
- That the electrical socket that you wish to use has the same voltage as is given on the unit's specification plate (220-240V / 50Hz)
- That no other devices are connected to the same socket
If this has all been checked, you can insert the plug into the socket.
Switch the device on using the Power button. The display shows the last set temperature.
1. Cooling function
➢ Press on Mode until the Cool light shows on the display.
➢ Set the desired temperature using the Temp▲/Temp▼ button.
The display shows the set temperature. The temperature can be set to between 16 and 31°C.
- Maintain an interval of at least 3 minutes between each on and off.
2. Dehumidifying function
➢ Press on Mode until the Dry light 📁 shows on the display.
➢ Display shows
➢ Check that the water outlet (high) is correctly connected.
The display automatically shows 2°C under room temperature.
The temperature cannot be changed.
The fan speed is set to low automatically.
- Maintain an interval of at least 3 minutes between each on and off.
3. Heating function

➢ Press on Mode until the Heat light shows on the display.
➢ Set the desired temperature using the Temp▲/Temp▼ button.
The display shows the set temperature. The temperature can be set to between 16 and 31°C.
- Maintain an interval of at least 3 minutes between each on and off.
4. Timer function
Automatic start:
➢ First set at which temperature and in which mode (cooling, dehumidifying or heating) you want the air conditioner to start.
Switch off the air conditioner using the
➢ Press the
Using the
➢ Press the
The air conditioner will automatically start with the entered settings after the lapsing of the set number of hours.
Automatic stop:
➢ Press the
Using the
➢ Press the
The air conditioner will automatically stop after the lapsing of the set number of hours.
LED display
The display shows the configured temperature or the timer settings. The display also shows the error codes, see further on in this manual.
Operation via the app
The Coolperfect can, via Wifi, also be operated with an app. See the separate app instruction for this.
General remarks
- When you start the Coolperfect and opt for a specific function or change function, the ventilator will work but the compressor will not start immediately: the latter to protect the internal components. The symbol that belongs to the configured function blinks on the display, a sign of the 'waiting mode'. This can last 3 to 4 minutes.
- The horizontal fins in front of the exhaust opening can be adjusted manually to change the exhaust direction.
- In case of prolonged strong cooling, ice accretion can occur on the interior of the Coolperfect. You notice this because the device performs less. To solve this you
switch off the device and give it time to defrost.
- When the required cooling or heating temperature has been attained, the Coolperfect will continue ventilating but the compressor discontinues operating.
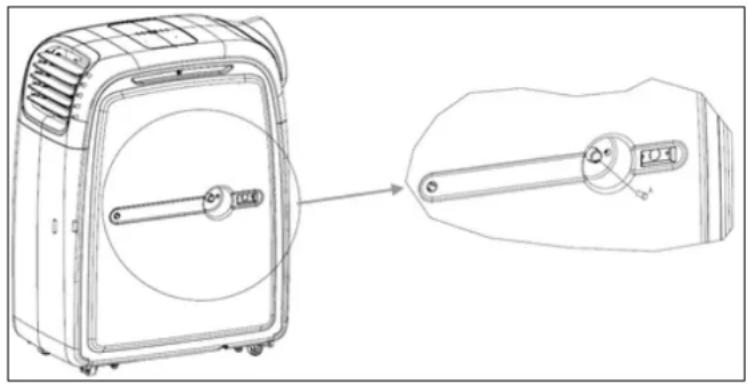
Water outlet by cooling
The air conditioner extracts water from the air during cooling. Under normal conditions, this water evaporates and is discharged to the outside together with the warm air. In extreme conditions, any excess water is collected in the air conditioner's water reservoir. When this internal water reservoir is full, the air conditioner will automatically stop and code E2 or E4 appears on the display. Switch off the air conditioner, pull the plug out of the wall socket and empty the water reservoir by removing the interior and exterior cap from the water drain at the bottom (see illustration). Empty the water reservoir in a pit or a receptacle. If necessary, connect a water discharge hose. Do not forget to place both caps back into the water drain.
Subsequently, you can use the air conditioner again.

natural_image
Close-up of a car air vent grille with an upward arrow indicator (no text or symbols)Wateroutlet dehumidifying
When dehumidifying, more water is removed from the air. This is why you must connect a hose to the water drainage connection (high) during dehumidifying and run this to a drain (at a lower point).
natural_image
Technical line drawing of a portable air purifier with a circular component and a separate view showing internal components (no text or symbols)Safety
The Coolperfect 90 / Coolperfect 120 / Coolperfect 180 are fitted with an overheating safeguard that switches the unit off if it overheats. If this should occur, you must remove the plug from the socket and leave the equipment to cool for at least 30 minutes. Remove the cause of overheating - has the device been (partially) covered? Is it too close to a wall or another obstacle, preventing it sucking in or dispelling sufficient air?
You can then use the device normally again but keep an eye on it for the first 30 minutes to ensure there are no further problems. If the device is showing signs of problems or the overheating recurs, even though there is no obvious assignable cause, ask your supplier or a recognised electrician to check/repair the unit.
Cleaning and maintenance
Note! Before cleaning or carrying out maintenance work on the air conditioning unit, always switch off and remove the plug from the socket! Regular cleaning is vital in order to keep the unit in good working order!
Cleaning the housing
Use a soft, damp cloth to wipe the housing.
Never use aggressive cleaning products, petrol, detergent, chemically-impregnated cloths or other cleaning solutions. These could damage the housing. Never spray the unit and ensure that water never penetrates the device! Dry the unit with a soft cloth.
Cleaning the filter
Clean the filter once every two weeks; a unit with a dirty filter will never work properly. The filter can be found behind the air inlet grilles on the side. You can easily open these grilles and remove the filter. Use a vacuum cleaner or gently beat the filter to remove loose dust and dirt. Rinse the filter with tepid water (not hotter than 40^ C) with a mild, neutral cleaning product.
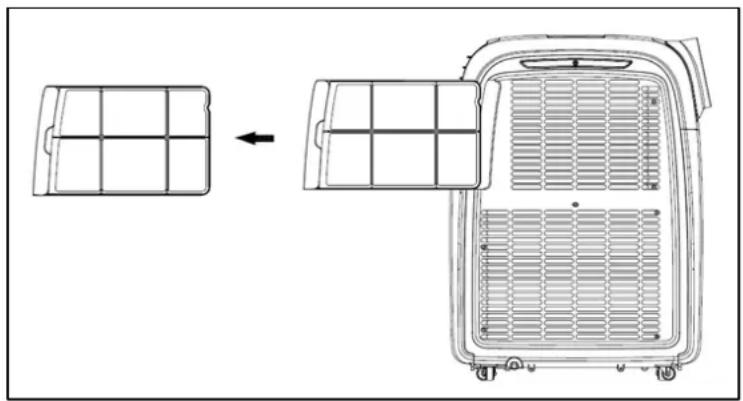
natural_image
Technical line drawing of a vehicle air vent assembly showing front panel, side panel, and rear vent (no text or symbols)Let the filter dry thoroughly in the shade before replacing in the unit. Take care! Never use the air conditioning unit without the filter!
Cleaning of radiator
Clean the radiator behind the filter carefully with, potentially, the brush of the vacuum cleaner.
End of season cleaning
If the device is to be stored for a long period, you must take the following measures!
- Open the water drain and completely remove the condensed water. Let the unit run for several hours, so that the air conditioning is dry on the inside.
- Then switch the air conditioning unit off and remove the plug from the socket.
- Clean the filter and reposition them or replace with a new one.
- Unscrew the waste pipe from the device in order to prevent damage.
- Pack the air conditioning unit in its original packaging or in a plastic bag and place in a dry place for storage. Place a heavy object on the unit.
- Remove the batteries from the remote control.
- Do not store the device in a room smaller than 12m^2 (Coolperfect 90) / 15m^2 (Coolperfect 120 & 180).
Troubleshooting and Error codes
Troubleshooting
The unit does not start if I press the ON/OFF button
- Is the plug in the socket?
- Is the earth leakage circuit breaker engaged? No power?
- Is the water tank full? Empty it.
- The room temperature is lower than the set temperature; amend the set temperature.
The unit doesn't seem to be very effective
- Measure the outlet temperature; this must be approx. 10° cooler than room temperature.
- Is there direct sunlight? Shut the curtains.
- Are windows or doors open? Shut them.
- Are there too many people in the room? They produce heat!
- Is the space too big?
- Is there an object in the room that is generating (a great deal of) heat? Switch it off or remove it.
- Is the filter dusty or covered in dirt? Clean it.
- Is the air inlet or outlet (hose) blocked? Make sure there is free air flow.
The unit is making a noise
- Is the surface underneath the machine sturdy and even?
- The flow of coolant in the unit also produces a little noise. This is perfectly normal.
The unit switches itself off
- The overheating safeguard may have switched the unit off. See 'Safety'
The device is on Fahrenheit instead of Celsius - The air conditioner shows the temperature in Fahrenheit instead of Celsius.
Simultaneously, press the
Error codes
| Error code | Cause | What to do |
| E0 | Error temperature sensor | Have it replaced. The unit works without temperature setting. |
| E2/E4 | Wasser tank is full | Switch off the appliance and manually empty both water reservoirs.Subsequently, switch on the appliance. |
| E3 | Coil sensor error | The coil sensor is open or of short circuit, but it does not affect the normal use. |
Warning: Never attempt to repair the device yourself!
Removal

natural_image
Symbol of a trash bin crossed with no text or numbers, representing environmental restriction (no text present)In the EU this symbol indicates that this product may not be disposed of as ordinary household waste. Old equipment contains valuable materials, suitable for recycling. These materials should be made suitable for reuse in order to prevent any adverse effects to health and the environment caused by unregulated waste collection. Therefore, please make sure that you bring old equipment to a designated n point. Alternatively, contact the original supplier, who can make sure that as many of the components as possible can be recycled.
CE conformity statement
See page 85.
Merci
natural_image
Illustration of open books, a book with an information icon, and an open notebook with a wrench (no text or symbols)Accessoires
natural_image
Line drawing of an air conditioner unit with a 500mm height dimension标注 (no text or symbols on the device itself)Déshumidifier
natural_image
Technical line drawing of a portable air purifier device with a circular vent and internal shaft, shown in two views (no text or symbols)Climatiser
natural_image
Line drawing of a portable air conditioner unit with airflow direction indicated (no text or symbols)
natural_image
Line drawing of a small air conditioner unit with a coiled tube, shown in 3D perspective (no text or symbols)natural_image
Close-up of a gray industrial ventilation grille with a black upward arrow pointing to it (no text or symbols visible)Sécurité
natural_image
Technical line drawing of a vehicle air vent assembly showing front and side views (no text or symbols)Nettoyage radiateur
natural_image
Symbol of a trash bin with crossed lines indicating no waste or discharge, and a solid black rectangle below (no text or labels)natural_image
Line drawing of an air conditioner unit with a 500mm height dimension label (no text or symbols on the device itself)Avfuktning
natural_image
Technical line drawing of a portable air purifier with internal components and a close-up view of its internal shaft (no text or symbols)Nedkylning
natural_image
Two-step illustration of a mechanical clamp or clip assembly, showing two stages (① and ②) with no text or symbols.natural_image
Line drawing of a portable air conditioner unit with airflow direction indicator (no text or symbols)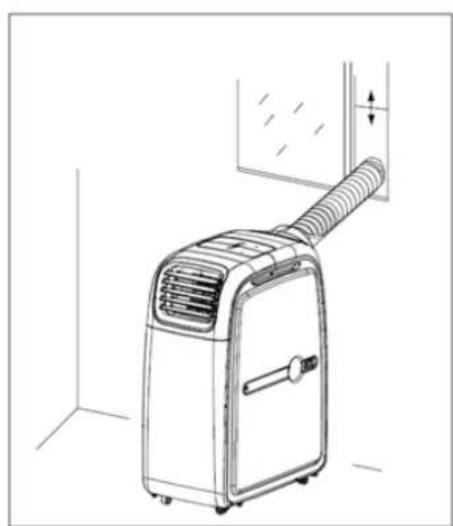
natural_image
Line drawing of an air conditioner unit with cooling fins and a hose, shown in 3D perspective (no text or symbols)natural_image
Close-up of a gray ventilation grille with mounting holes and an upward arrow indicator (no text or symbols)natural_image
Technical line drawing of a portable air conditioner unit with a close-up view of its internal components (no text or symbols)Överhettningsskydd
natural_image
Technical line drawing of a vehicle air vent assembly with grid layout and side panel (no text or symbols)natural_image
Symbol of a trash bin with crossed lines indicating no waste, above and below a solid black rectangle (no text or labels)declares the following device in sole responsibility:
Product: Mobile airconditioner / dehumidifier
Brand name: EUROM
Model: Coolperfect 90 Wifi / Coolperfect 120 Wifi / Coolperfect 180 Wifi
Item number: 380729 / 380750 / 380781
Complies with the following harmonization rules:
Low Voltage Directive: LVD 2014/35/EU
Electromagnetic compatibility Directive: EMC 2014/30/EU
Radio equipment Directive: RED 2014/53/EU
Restriction of Hazardous Substances RoHS Directive: 2011/65/EU&(EU)2015/863
Framework Directive Ecodesign requirements: ERP 2009/125/EC
EN 60335-1:2012+A2:2019
EN 60335-2-40:2003+A13:2012
EN 62233:2008
EN 55014-1:2017
EN 55014-2:2015
EN 61000-3-2:2014
EN 61000-3-3:2013
EN 61000-3-11:2000
EN 300 328 V2.1.1:2016
EN 301 489-1 V2.2.2:2017
EN 62311:2008
Genemuiden, 26-10-2020
W.J. Bakker, Alg. Dir.
Eurom
Kokosstraat 20
8281 JC Genemuiden
The Netherlands
info@eurom.nl
www.eurom.nl
261020