FN110013 - Fan Emerio - Free user manual and instructions
Find the device manual for free FN110013 Emerio in PDF.



| Product Type | Pedestal Fan |
| Brand | Emerio |
| Model | FN110013 |
| Power Supply | 220-240 V ~ 50 Hz |
| Rated Power | 44 W |
| Operating Consumption | 36.32 W |
| Standby Consumption | 0.00 W |
| Maximum Airflow | 40.19 m³/min |
| Service Value | 1.11 (m³/min)/W |
| Sound Power Level | 50.30 dB(A) |
| Maximum Air Speed | 2.09 m/s |
| Number of Speeds | 3 (low, medium, high) |
| Oscillation | Yes, oscillation button |
| Adjustable Height | Yes, telescopic tube with clamping knob |
| Protective Grille | Front and rear, clips and screws |
| Child Safety | Use by children aged 8 and above under supervision |
| Cleaning | Unplug, clean with a damp cloth, do not immerse |
| Recycling | WEEE compliant, do not dispose of with household waste |
| Spare Parts | Grilles, blade, nuts, screws: removable for cleaning |
| Warranty | Manufacturer's warranty, contact after-sales service |
Frequently Asked Questions - FN110013 Emerio
User questions about FN110013 Emerio
0 question about this device. Answer the ones you know or ask your own.
Ask a new question about this device
Download the instructions for your Fan in PDF format for free! Find your manual FN110013 - Emerio and take your electronic device back in hand. On this page are published all the documents necessary for the use of your device. FN110013 by Emerio.
USER MANUAL FN110013 Emerio
natural_image
Black desktop fan with three blades and a stand, no visible text or symbols
CE

Inhalt – Съдържание – Sadržaj – Obsah – Indhold – Contenido – Sisukord – Sisältö – Contenu – Content – Sadržaj – Tartalom – Innihald – Contenuto – Turinys – Saturs – Inhoud – Innhold – Содержание – Sadržaj – Obsah – Vsebina – Innehåll – İçerik
Inhalt – German.... - 2 -
Ръководство с инструкции – Bulgarian ...... - 6 -
Uputstvo – Bosnian.... - 10 -
Návod k použi – Czech ...... - 14 -
Brugsanvisning – Danish ...... - 18 -
Manual de Instrucciones – Spanish.... - 22 -
Kasutusjuhend – Estonian.... - 26 -
Käyöopas – Finnish.... - 30 -
Mode d'emploi – French ...... - 34 -
Instrucon manual – English.... - 38 -
Upute za rad – Croaan ....- 42 -
Használa útmutató – Hungarian ...... - 46 -
Leiðbeiningarhandbók – Icelandic.... - 50 -
Manuale d'istruzioni – Italian.... - 54 -
Instrukciju vadovas – Lithuanian.... - 58 -
Instrukciju rokasgrāmata – Latvian ...... - 62 -
Gebruiksaanwijzing – Dutch...... - 66 -
Brukermanual – Norwegian ...... - 70 -
Инструкция по эксплуатации – Russian ...... - 74 -
Uputstvo – Serbian-Lan ...... - 78 -
Návod na obsluhu – Slovakian ...... - 82 -
Priročnik za uporabo – Slovenian.... - 86 -
Bruksanvisning – Swedish ...... - 90 -
Kullanım talima – Turkish...... - 94 -
MONTAGEANLEITUNG
natural_image
Technical line drawing of a fan assembly with a cylindrical head and internal blades (no text or symbols)3.
natural_image
Diagram of a mechanical fan or impeller with internal blades and a rotation arrow (no text or symbols)4.
FN-110013.5 / FN-110013.6
UPUTSTVO ZA RAD
- Ukopčajte napojni kabl u odgovarajuću učnicu.
- Osciliranje: da biste omogućili glavi venlatora da oscilira, prisnite bravicu za oscilaciju. Da zaustavite osciliranje glave, izvucite bravicu za oscilaciju.
- Venlator se uključuje tasterima na kontrolnoj tabli, pri čemu je 0= isključeno, 1=sporo, 2=umjereno, 3=brzo.
OPREZ: Tastere zabrzinu prisnite samo jedan po jedan. Ako istovremeno prisnete jedan ili više tastera, možete izazva trajno oštećenje kućišta prekidača.
ČIŠĆENJE
- Prije servisiranja venlatora i nakon svakog korištenja, isključite uređaj i iskopčajte napojni kabl iz učnice.
- Nikada ne potapajte uređaj u vodu (opasnost od kratkog spoja). Da biste očisli uređaj, samo ga prebrišite vlažnom krpom, a zam ga pažljivo osušite. Uvijek prethodno iskopčajte ukač iz učnice.
- Postarajte se da se na rešetke na ulazu i izlazu zraka ne nakuplja prekomjerna prašina i povremeno ih očiste suhom četkom ili usisivačem.
TEHNIČKI PODACI
Radni napon: 220-240V \~ 50Hz
Potrošnja snage: 44W
| Zahtjevi za ekološki dizajn | |
| Zahtjevi za informacije o proizvodu | |
| Maksimalna brzina okretanja propelera (F) | 40.19 m^3/min |
| Ulazna snaga venlatora (P) | 36.32 W |
| Vrijednost opsluživanja (SV) | 1.11( m^3/min )/W |
| Mjerni standard za vrijednost opsluživanja | IEC 60879: 1986EN 50564: 2011EN 60704-2-7: 1998EN 60704-1: 2010 |
| Potrošnja snage pri mirovanju (PSB) | 0.00 W |
| Nivo jačine zvuka propelera (LWA) | 50.30 dB(A) |
| Maksimalna brzina zraka (c) | 2.09 metara/sekundi |
| Kontakt podaci za više informacija | BAHAG AGGutenbergstr. 2168167 MannheimGermany |

Recikliranje
Ova oznaka pokazuje da ovaj proizvod ne treba odlaga s ostalim otpadom iz domaćinstva, koliko je obuhvaćeno propisom 2012/19/EU. Kako bi se spriječila moguća šteta po okolinu i čovjekovo zdravlje usljed nekontrolisanog odlaganja otpada, molimo vas da odgovorno vršite recikliranje kako bi se
promovisala održiva ponovna upotreba resursa i materijala. Za povrat iskorištenog uređaja koriste sisteme za povrat i prikupljanje ili se obrate prodavcu kod koga ste kupili ovaj proizvod. Oni mogu preuze ovaj proizvod za recikliranje bez opasnos po okolinu.
BEZPEČNOSTNÍ INFORMACE
POKYNY K INSTALACI
natural_image
Technical line drawing of a fan with internal blades and a cylindrical component (no text or symbols)3.

natural_image
Diagram of a mechanical or biological structure with curved internal patterns and a rotation arrow (no text or symbols)4.
natural_image
Diagram of a mechanical device with labeled parts and directional arrows indicating motion (no text or symbols present)5.
NÁVOD K OBSLUZE
MONTERINGSVEJLEDNING
** Inden ibrugtagning skal produktet samles som beskrevet nedenstående.
- Samling af stavet
- Sæ t stavskaet ned i foden.
- Skru stavskaet (15) fast | foden (16).
- Den samlede montering
natural_image
Technical line drawing of a fan assembly with a cylindrical component and a separate circular fan blade (no text or symbols)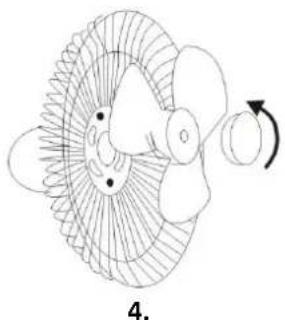
natural_image
Diagram of a mechanical fan or propeller with internal blades and a rotating arrow, labeled '4.' (no text or symbols on the diagram itself)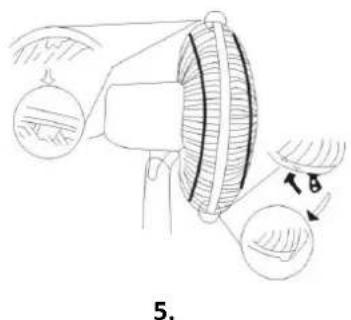
natural_image
Technical line drawing of a mechanical component with circular features and a labeled angle (no text or symbols)BETJENINGSVEJLEDNING
- Isæ t strømforsyningsskket i en passende lysnetkontakt.
- Svingning: Man får venlatorhovedet I at svinge fra side I side ved at trykke på svingningsknappen. Man stopper venlatorhovedets svingningsbevæ gelse ved at træ kke svingningsknappen op.
- Venlatoren startes ved hjæ lp af trykknapperne på betjeningspanelet, dvs. 0: Slukket, 1 = Lav hasghed, 2 = Middel hasghed, 3 = Høj hasghed.
INSTRUCCIONES DE MONTAJE
natural_image
Technical line drawing of a fan with internal blades and a separate open lid (no text or symbols)3.
natural_image
Diagram of a mechanical or fluidic component with internal fan-like structure and rotation arrow (no text or symbols)4.
natural_image
Diagram of a mechanical device with labeled parts and directional arrows (no text or symbols)5.
INSTRUCCIONES DE USO
natural_image
Technical line drawing of a fan with internal blades and a separate view of the blade (no text or symbols)3.
natural_image
Diagram of a fan-like mechanical component with internal blades and a rotation arrow (no text or symbols)4.
5.
KASUTUSJUHISED
KOKOAMISOHJEET
natural_image
Technical line drawing of a fan with internal blades and a separate view of the blade (no text or symbols)3.
natural_image
Diagram of a mechanical fan or impeller with internal blades and a rotation arrow (no text or symbols)4.
natural_image
Diagram of a mechanical device with a conical component and two circular components, showing directional arrows (no text or symbols)5.
KÄYTTÖ OHJEET
INSTRUCTIONS DE MONTAGE
natural_image
Technical line drawing of a fan with internal blades and a separate view of the blade (no text or symbols)3.
natural_image
Diagram of a fan-like structure with internal blades and a rotation arrow (no text or symbols)4.
natural_image
Technical line drawing of a mechanical component with no visible text or symbols5.
CONSIGNES D'UTILISATION
- This appliance can be used by children aged from 8 years and above and persons with reduced physical, sensory or mental capabilities or lack of experience and knowledge if they have been given supervision or instrucon concerning use of the appliance in a safe way and understand the hazards involved.
- Children shall not play with the appliance.
- Cleaning and user maintenance shall not be made by children without supervision.
- If the supply cord is damaged, it must be replaced by the manufacturer, its service agent or similarly qualified persons in order to avoid a hazard.
- Incorrect operaon and improper handling can lead to faults on the device and injuries to the user.
- In the event of improper use or incorrect handling, no liability can be accepted for any damage that may occur.
- Do not immerse the unit or mains plug in water or other liquids. There is danger to life due to electric shock! However, if this should occur, remove the mains plug immediately and then have the unit checked by an expert before using it again.
- Do not operate the device if the mains cable or the mains plug show signs of damage, if the device has fallen on the oor or has been otherwise damaged. In such cases take the device to a specialist for checking and repair, if necessary.
- Never remove the mains plug from the socket by pulling on the mains cable, or with wet hands.
- Ensure that the mains cable does not hang over sharp edges or allow it to become trapped.
- Keep the appliance away from damp, and protect from splashes.
- Keep the appliance away from hot objects (e.g. hotplates)
and open ames.
- Keep the appliance and its cord out of reach of children less than 8 years.
- Use the appliance on a at, dry and heat resistance surface.
- Never leave the device unaended during use.
- Do not store or operate the appliance in the open air.
- Keep the appliance in a dry place, inaccessible to children (in its packaging).
- Never put ngers or any other objects through the fan guards when the fan is running.
- Never operate the product without the fan guards in place, as serious personal injury may result.
- The appliance must be assembled completely before use.
- Watch out for long hair! It can be caught in the fan owing to the air turbulence.
- Do not point the air ow to the people for a long me.
- Ensure that the fan is switched o from the supply mains before removing the guard.
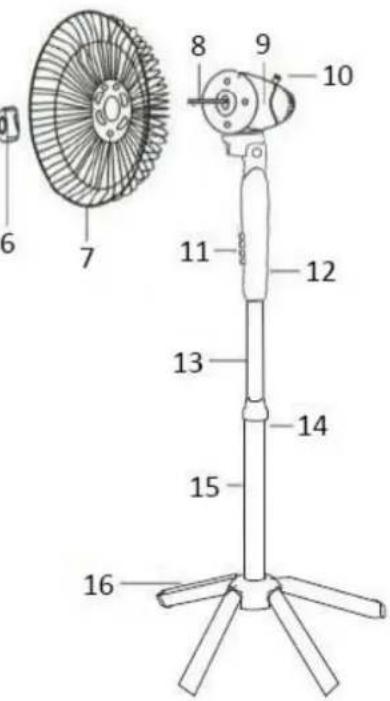
PARTS DESCRIPTION
-
Front guard
-
Guard clip screw
-
Guard clips
-
Blade fastening screw
-
Blade
-
Guard fastening screw
-
Rear guard
-
Motor sha
-
Rear shell
-
Oscillaon buon
-
Speed switch
-
Fastening screw
-
Height adjustment pipe
-
Fasten set
-
Standing sha
-
Standing base
ASSEMBLING INSTRUCTIONS
** Please assemble correctly by the following orders when using.
- Assemble the stand
- Put the standing sha on the standing base.
- Screw the standing sha (15) on the standing base (16).
- The whole assembly
- Pull the height adjustment pipe (13) out and ghten the fasten set (14).
- Link the fan main body and the height adjustment pipe together by the fastening screw (12) and then x them.
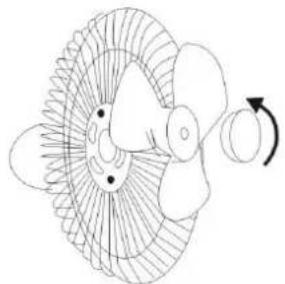
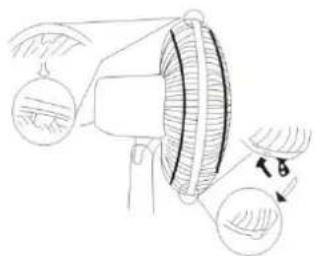
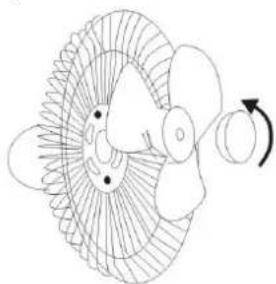
- Rear grille assembly
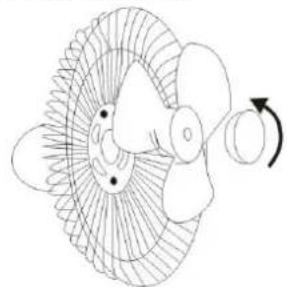
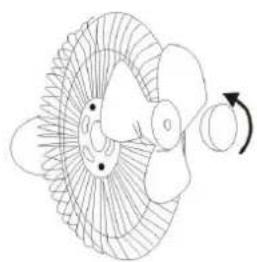
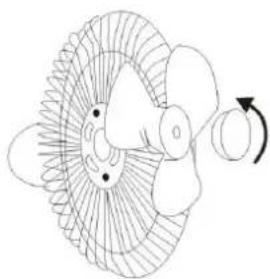
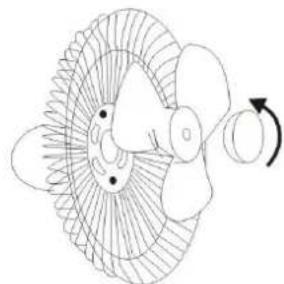
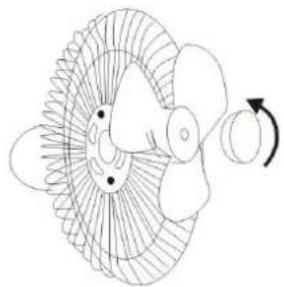
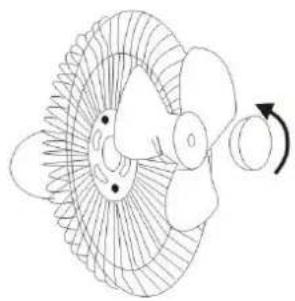
- Screw the guard fastening screw (6) out in an-clockwise direcon.
- Fix the rear guard (7) onto the two pillars of the motor front shell.
- Screw the guard fastening screw ghtly in clockwise direcon.
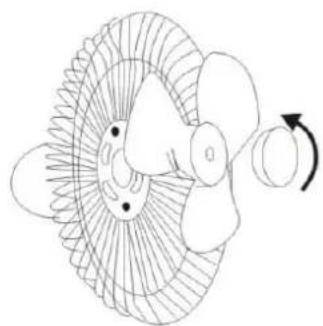
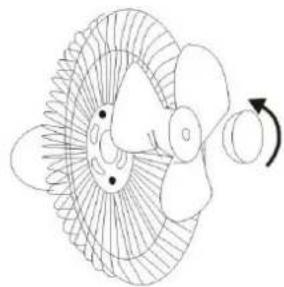
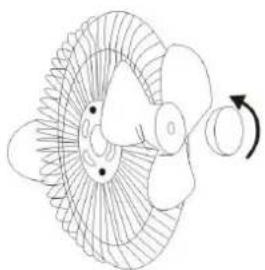
● Tighten blade screw onto sha. Note: Blade screw should be ghtened in an-clockwise.
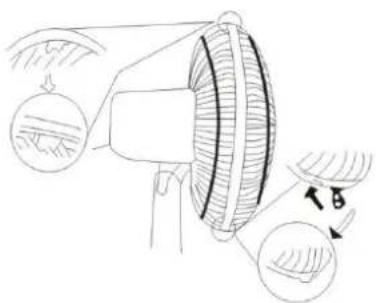
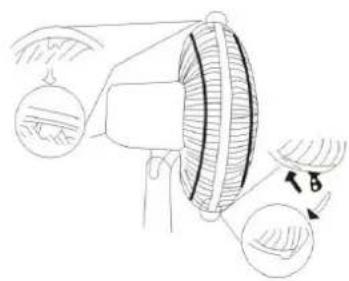
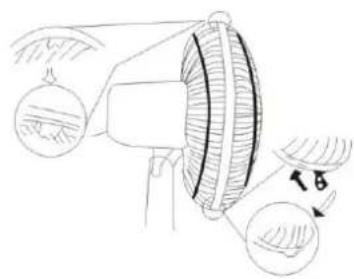
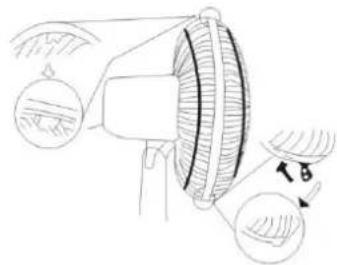
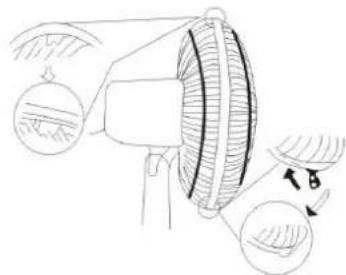
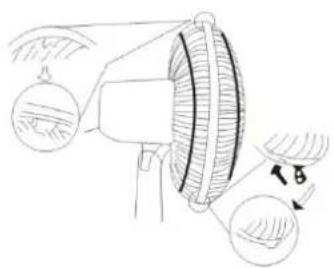
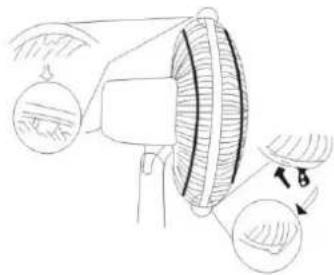
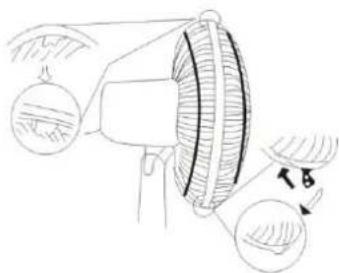
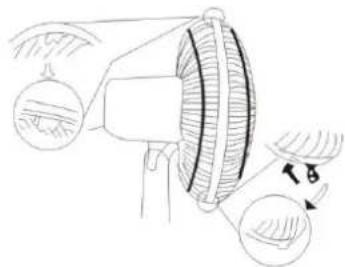
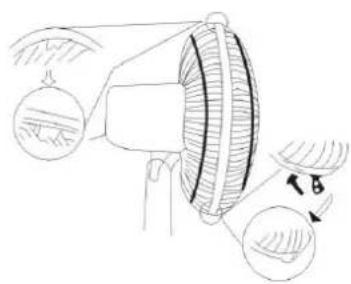
- Front grille assembly
- Put the hook of the front grille on the top of rear grille.
- Aach front grille to rear grille and then close clips and using the appropriate screw to secure grille together.
OPERATING INSTRUCTIONS
- Plug the power cord into a suitable socket.
- Oscillaon: To make the fan head oscillate, push down the oscillaon knob. To stop the fan head from oscillang, pull-up the oscillaon knob.
- The fan is switched on by using the push buons on the control panel, i.e. 0: 0, 1 = Low Speed, 2 = Medium speed, 3 = High speed.
CAUTION: Press only one of the speed control buon at a me. Permanent damage to the switch housing may result if two or more of the buons are pressed simultaneously.
CLEANING
- Before servicing the fan and aer each occasion of use, switch o the appliance and unplug the mains cable from the socket.
- Never immerse the appliance in water (danger of short-circuit). To clean the appliance, only wipe it down with a damp cloth and dry it carefully. Always take out the mains plug rst.
- Take care that excessive dust does not build up in the air-intake and air-outlet grille, and clean it occasionally using a dry brush or vacuum cleaner.
TECHNICAL DATA
Operang voltage: 220-240V \~ 50Hz
Power consumpon: 44W
| Eco design requirements | |
| Product informaon requirements | |
| Maximum fan ow rate (F) | 40.19 m3/min |
| Fan power input (P) | 36.32 W |
| Service value (SV) | 1.11 (m3/min)/W |
| Measurement standard for service value | IEC 60879: 1986EN 50564: 2011EN 60704-2-7: 1998EN 60704-1: 2010 |
| Standby power consumpon (PSB) | 0.00 W |
| Fan sound power level (LWA) | 50.30 dB(A) |
| Maximum air velocity (c) | 2.09 meters/sec |
| Contact details for obtaining more informaon | BAHAG AGGutenbergstr. 2168167 MannheimGermany |
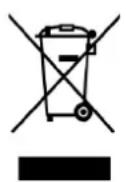
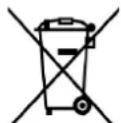
Recycling
This marking indicates that this product should not be disposed with other household wastes throughout the 2012/19/EU. To prevent possible harm to the environment or human health from uncontrolled waste disposal, recycle it responsibly to promote the sustainable reuse of material resources. To return your used device, please use the return and collecon systems or contact the
retailer where the product was purchased. They can take this product for environmental safe recycling.
SIGURNOSNE INFORMACIJE
UPUTE ZA SASTAVLJANJE
UPUTE ZA UPORABU
- Uključite kabel za napajanje u odgovarajuću učnicu.
- Osiliranje: Za osciliranje brzine venlatora prisnite gumb za osciliranje. Za zaustavljanje glave venlatora iz osciliranja, povucite gumb za osciliranje.
- Venlator se uključuje korištenjem prisnih gumbi na upravljačkoj ploči npr. 0: isključeno, 1 = mala brzina, 2 = srednja, 3 = velika brzina.
OPREZ: Prisnite samo jedan gumb za kontrolu brzine. Do trajnog oštećenje kućišta prekidača može doći istovremenim priskom ili-ili više gumba.
ČIŠĆENJE
- Prije servisiranja venlatora i nakon svakog korištenja, isključite uređaj i odspojite kabel za napajanje iz učnice.
- Nikada nemojte uranjati uređaj u vodu (opasnost od kratkog spoja). Za čišćenje uređaja samo ga obrišite s vlažnom krpom i potom pažljivo osušite. Uvijek prije uključivanja izvedite održavanje.
- Pazite da se ne nakupi prekomjerna prašina u ulaznoj i izlaznoj rešetki za zrak i povremeno je očiste sa suhom četkom ili usisavačem.
TEHNICKI PODACI
Radni napon: 220-240V \~ 50Hz
Potrosnja energije : 44W
| Zahtjevi u eko-dizajnu | |
| Zahtjevi informacija o uređaju | |
| Maksimalna brzina venlatora (F) | 40.19 m^3/min |
| Ulazna snaga venlatora (P) | 36.32 W |
| Servisna vrijednost (SV) | 1.11( m^3/min )/W |
| Standardne mjere za servisnu vrijednost | IEC 60879: 1986EN 50564: 2011EN 60704-2-7: 1998EN 60704-1: 2010 |
| Potrošnja energije u stanju čekanja (PSB) | 0.00 W |
| Razina zvučne snage venlatora (LWA) | 50.30 dB(A) |
| Maksimalna brzina zraka (c) | 2.09 meter/sek |
| Detalji za kontakt radi dobivanja više informacija | BAHAG AGGutenbergstr. 2168167 MannheimGermany |
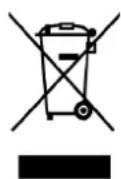
Recikliranje
Ova oznaka naznačuje da se ovaj proizvod ne smije odlaga s ostalim kućanskim otpadom u cijeloj 2012/19/EU. Kako biste spriječili moguće štete za prirodno okruženje ili ljudsko zdravlje od nekontroliranog zbrinjavanja otpada, odgovorno ga reciklirajte kako biste promicali održivu ponovnu upotrebu materijalnih resursa. Za vraćanje vašeg korištenog uređaja molimo vas da koriste
postojeće sustave za vraćanje i prikupljanje ili kontakrajte vašeg prodavača gdje je uređaj kupljen. Oni mogu uze ovaj uređaj za ekološki sigurno recikliranje.
BIZTONSÁGI ELŐÍRÁSOK
Ö SSZESZERELÉSI Ú TMUTATÓ
natural_image
Technical line drawing of a fan assembly with internal blades and a separate cylindrical component (no text or symbols)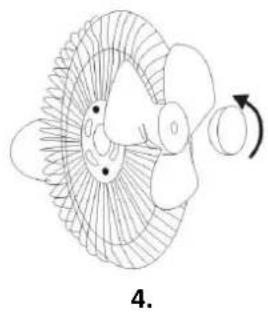
natural_image
Diagram of a biological structure with internal components and a curved arrow indicating rotation (no text or symbols)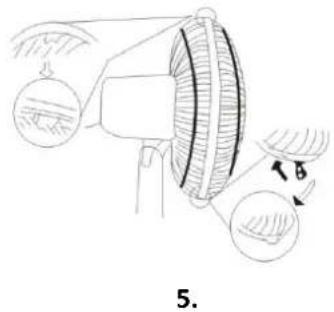
natural_image
Diagram of a mechanical device with labeled parts and directional arrows, no readable text or symbols present.HASZNÁLATI Ú TMUTATÓ
natural_image
Technical line drawing of a fan with internal blades and a cylindrical head (no text or symbols)3.
natural_image
Diagram of a mechanical fan or propeller with internal blades and a rotation arrow (no text or symbols)4.
natural_image
Diagram of a mechanical device with circular components and directional arrows indicating motion (no text or symbols)5.
NOTKUNARLEIDBEININGAR
natural_image
Technical line drawing of a fan with internal blades and a separate view of the blade (no text or symbols)3.
natural_image
Diagram of a mechanical fan or impeller with internal blades and a rotation arrow (no text or labels)4.
natural_image
Diagram of a mechanical device with labeled parts and directional arrows indicating motion (no text or symbols present)5.
SURINKIMO NURODYMAI
** Venliatoriø surinkite teisingai, vadovaudamiesi toliau nurodyta tvarka.
- Stovo surinkimas
natural_image
Technical line drawing of a fan with internal blades and a separate view showing internal structure (no text or symbols)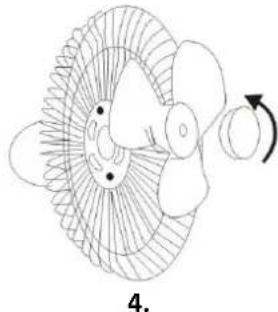
natural_image
Diagram of a fan or propeller with internal blades and a rotation arrow, labeled '4.' (no text or symbols on the diagram itself)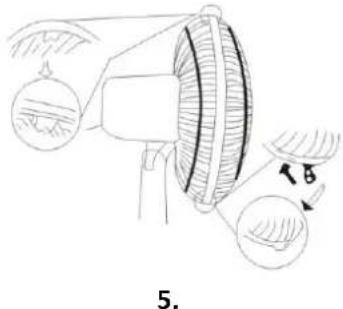
natural_image
Diagram of a mechanical device with labeled parts and directional arrows, no readable text or symbols present.NAUDOJIMO NURODYMAI
MONTĀŽAS NORĀDĪJUMI
MONTAGEINSTRUCTIES
natural_image
Technical line drawing of a fan assembly with labeled parts (no text or symbols present)
natural_image
Diagram of a biological structure with internal layered patterns and a curved arrow indicating rotation (no text or labels)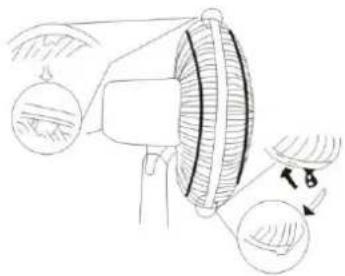
natural_image
Diagram of a mechanical device with labeled parts and directional arrows indicating motion (no text or symbols)GEBRUIKSAANWIJZING
natural_image
Technical line drawing of a fan with internal blades and a cylindrical head (no text or symbols)3.
natural_image
Diagram of a mechanical or fluidic component with internal fan-like structure and rotation arrow (no text or symbols)4.
natural_image
Diagram of a mechanical device with two circular components and directional arrows indicating motion (no text or symbols)5.
INSTRUKCIJE ZA SASTAVLIANJE
natural_image
Illustration of a fan blade assembly process showing four stages: opening, rotating, folding, and cutting (no text or symbols)UPUTSTVO ZA RUKOVANJE
- Priključite ukač u odgovarajuću učnicu.
- Kretanje venlatora: Da bi se glava venlatora kretala desno-levo prisnite nadole dugme za kretanje venlatora. Da biste prekinuli kretanje glave venlatora dugme povucite nagore.
- Venlator se uključuje pomoću tastera, to jest: 0 - isključeno, 1 - mala brzina, 2 - umerena brzina, 3 - velika brzina.
PAŽNJA: Prisnu samo jedno dugme. Može doći to trajnog oštećenja prekidačkog sklopa ukoliko se istovremeno prisnu dva ili više dugmadi.
ČIŠĆENJE
- Pre servisiranja venlatora i nakon svake upotrebe isključite uređaj i iskopčajte kabel iz strujne učnice.
- Nikada ne uranjajte uređaj u vodu (opasnost od kratkog spoja). Za čišćenje uređaja koriste vlažnu krpu, a potom ga pažljivo posušite. Uvek prvo iskopčajte uređaj iz mrežne učnice.
- Na ulaznoj i izlaznoj rešetki venlatora stvore se naslage i povremeno ih uklonite suvom četkom ili usisivačem.
TEHNICKI PODACI
Radni napon: 220-240V \~ 50Hz
Potrosnja struje: 44W
| Zahtevi za ekološki dizajn | |
| Zahtevi za informacije o proizvodu | |
| Maksimalna brzina okretanja propelera (F) | 40.19 m^3/min |
| Ulazna snaga venlatora (P) | 36.32 W |
| Vrednost opsluživanja (SV) | 1.11( m^3/min )/W |
| Merni standard za vrednost opsluživanja | IEC 60879: 1986EN 50564: 2011EN 60704-2-7: 1998EN 60704-1: 2010 |
| Potrošnja snage pri mirovanju (PSB) | 0.00 W |
| Nivo jačine zvuka propelera (LWA) | 50.30 dB(A) |
| Maksimalna brzina vazduha (c) | 2.09 metara/sekundi |
| Kontakt podaci za više informacija | BAHAG AGGutenbergstr. 2168167 MannheimGermany |
Reciklaža
POKYNY NA MONTÁŽ
natural_image
Technical line drawing of a fan with internal blades and a cylindrical component (no text or symbols)3.
natural_image
Diagram of a mechanical component with rotational arrow indicating motion (no text or symbols)4.

natural_image
Diagram of a mechanical device with a fan and adjustment knob, showing no text or symbols5.
FN-110013.5 / FN-110013.6
NÁVOD NA OBSLUHU
NAVODILA ZA MONTAŽO
NAVODILA ZA UPRAVLJANJE
- Napajalni kabel vstavite v ustrezno včnico.
- Nagibanje: Da se glava venlatorja nagiba, prisnite gumb za nagibanje. Če želite, da se glava preneha premika, gumb za nagibanje izvlecite.
- Venlator vklopite s posnimi gumbi na nadzorni plošči, npr. 0: Izklop, 1 = Nizka hitrost, 2 = Srednja, hitrost 3 = Visoka hitrost.
natural_image
Diagram of a megaphone and a fan blade assembly (no text or symbols)3.
natural_image
Diagram of a fan or propeller with internal blades and a rotation arrow (no text or symbols)4.
natural_image
Diagram of a mechanical device with labeled parts and directional arrows indicating motion (no text or symbols present)5.
ANVÄNDNINGSINSTRUKTIONER
MONTAJ TALİMATLARI
natural_image
Technical line drawing of a fan with internal blades and a separate view showing internal structure (no text or symbols)3.
natural_image
Diagram of a mechanical or biological structure with curved internal patterns and a rotation arrow (no text or symbols)4.
natural_image
Diagram of a mechanical device with a bell and handle, showing internal components and directional arrows (no text or symbols)5.
KULLANMA TALİMATLARI

- MONTAGEANLEITUNG
- UPUTSTVO ZA RAD
- ČIŠĆENJE
- TEHNIČKI PODACI
- BEZPEČNOSTNÍ INFORMACE
- POKYNY K INSTALACI
- NÁVOD K OBSLUZE
- MONTERINGSVEJLEDNING
- BETJENINGSVEJLEDNING
- INSTRUCCIONES DE MONTAJE
- INSTRUCCIONES DE USO
- KASUTUSJUHISED
- KOKOAMISOHJEET
- KÄYTTÖ OHJEET
- INSTRUCTIONS DE MONTAGE
- CONSIGNES D'UTILISATION
- PARTS DESCRIPTION
- ASSEMBLING INSTRUCTIONS
- OPERATING INSTRUCTIONS
- CLEANING
- TECHNICAL DATA
- Recycling
- SIGURNOSNE INFORMACIJE
- UPUTE ZA SASTAVLJANJE
- UPUTE ZA UPORABU
- TEHNICKI PODACI
- Recikliranje
- BIZTONSÁGI ELŐÍRÁSOK
- Ö SSZESZERELÉSI Ú TMUTATÓ
- HASZNÁLATI Ú TMUTATÓ
- NOTKUNARLEIDBEININGAR
- SURINKIMO NURODYMAI
- NAUDOJIMO NURODYMAI
- MONTĀŽAS NORĀDĪJUMI
- MONTAGEINSTRUCTIES
- GEBRUIKSAANWIJZING
- INSTRUKCIJE ZA SASTAVLIANJE
- UPUTSTVO ZA RUKOVANJE
- Reciklaža
- POKYNY NA MONTÁŽ
- NÁVOD NA OBSLUHU
- NAVODILA ZA MONTAŽO
- NAVODILA ZA UPRAVLJANJE
- ANVÄNDNINGSINSTRUKTIONER
- MONTAJ TALİMATLARI
- KULLANMA TALİMATLARI
Brand : Emerio
Model : FN110013
Category : Fan