WC126431 - Wine cellar Emerio - Free user manual and instructions
Find the device manual for free WC126431 Emerio in PDF.


| Product type | Wine cellar |
| Brand | Emerio |
| Model | WC126431 |
| Capacity | Up to 63 bottles (light Bordeaux type) |
| Temperature range | 5 to 20 °C |
| Climate class | N/ST (normal/subtropical) |
| Refrigerant | R600a (23g) |
| Rated voltage | 220-240 V~ |
| Rated frequency | 50 Hz |
| Rated current | 1.5 A |
| Protection class | I |
| Insulation blowing agent | Cyclopentane |
| Interior lighting | Yes, lighting button (K1) |
| Shelves | 2 adjustable metal shelves with wooden fronts |
| Reversible door opening direction | Possible (right/left) |
| Defrosting | Automatic (natural system) |
| Operating noise | Normal (gurgling, cracking) |
| Cleaning | With mild, non-abrasive detergent |
| Warranty | 2 years |
| Customer service | +49 (0) 3222 1097 600 / info.de@emerio.eu |
Frequently Asked Questions - WC126431 Emerio
User questions about WC126431 Emerio
0 question about this device. Answer the ones you know or ask your own.
Ask a new question about this device
Download the instructions for your Wine cellar in PDF format for free! Find your manual WC126431 - Emerio and take your electronic device back in hand. On this page are published all the documents necessary for the use of your device. WC126431 by Emerio.
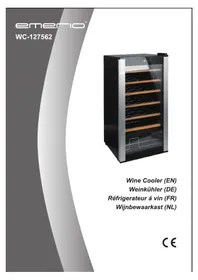
USER MANUAL WC126431 Emerio
natural_image
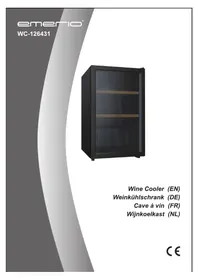
Exterior view of a black stainless steel refrigerator with open doors and two horizontal shelves (no text or symbols visible)Wine Cooler (EN)
Weinkühlschrank (DE)
Cave à vin (FR)
Wijnkoelkast (NL)
Content – Inhalt – Teneur – Inhoud
Instruction manual – English ...... - 2 -
Before use make sure to read all of the below instructions in order to avoid injury or damage, and to get the best results from the appliance. Make sure to keep this manual in a safe place. If you give or transfer this appliance to someone else make sure to also include this manual.
In case of damage caused by user failing to follow the instructions in this manual the warranty will be void. The manufacturer/importer accepts no liability for damages caused by failure to follow the manual, a negligent use or use not in accordance with the requirements of this manual.
- Read and save these instructions. Attention: pictures in the IM are for reference only.
- This appliance can be used by children aged from 8 years and above and persons with reduced physical, sensory or mental capabilities or lack of experience and knowledge if they have been given supervision or instruction concerning use of the appliance in a safe way and understand the hazards involved. Children shall not play with the appliance. Cleaning and user maintenance shall not be made by children without supervision.
- Children aged from 3 to 8 years are allowed to load and unload refrigerating appliances.
- If the supply cord is damaged, it must be replaced by the manufacturer, its service agent or similarly qualified persons in order to avoid a hazard.
- WARNING: Keep ventilation openings, in the appliance enclosure or in the built-in structure, clear of obstruction.
- WARNING: Do not use mechanical devices or other means to accelerate the defrosting process, other than those recommended by the manufacturer.
- WARNING: Do not damage the refrigerant circuit.
-
WARNING: Do not use electrical appliances inside the food storage compartments of the appliance, unless they are of the type recommended by the manufacturer.
-
Do not store explosive substances such as aerosol cans with a flammable propellant in this appliance.
-
This appliance is intended to be used in household and similar applications such as
-
staff kitchen areas in shops, offices and other working environments;
- farm houses and by clients in hotels, motels and other residential type environments;
- bed and breakfast type environments;
-
catering and similar non-retail applications.
-
Placed the appliance against a wall with a free distance not exceeding 75mm and more than 50mm.
-
WARNING: When positioning the appliance, ensure the supply cord is not trapped or damaged.
-
WARNING: Do not locate multiple portable socket-outlets or portable power supplies at the rear of the appliance.
-
To avoid contamination of food, please respect the following instructions:
-
Opening the door for long periods can cause a significant increase of the temperature in the compartments of the appliance.
- Clean regularly surfaces and accessible drainage systems.
- Clean water tanks if they have not been used for 48h; flush the water system connected to a water supply if water has not been drawn for 5 days. (Only applicable to water dispenser and water inlet system)
-
If the refrigerating appliance is left empty for long periods, switch off, defrost, clean, dry, and leave the door open to prevent mould developing within the appliance.
-
This refrigerating appliance is not intended to be used as a built-in appliance.
-
Climate class:
-
Extended temperate (SN): 'this refrigerating appliance is intended to be used at ambient temperatures ranging from 10°C to 32 °C';
- Temperate(N): 'this refrigerating appliance is intended to be used at ambient temperatures ranging from 16 °C to
32^' ;
- Subtropical (ST): 'this refrigerating appliance is intended to be used at ambient temperatures ranging from 16 °C to 38 °C';
-
Tropical(T): 'this refrigerating appliance is intended to be used at ambient temperatures ranging from 16 °C to 43 °C'.
-
This appliance is intended to be used exclusively for the storage of wine.
-
This refrigerating appliance is not suitable for freezing foodstuffs.
-
Unplug the appliance from outlet when not in use, before putting on or taking off parts, before cleaning.
-
Make sure to place the plug all the way into socket when connecting your appliance.
-
Insert the plug into a single grounded socket.
-
Never use the appliance in place where combustible and inflammable materials are kept.
-
For safety reason, be sure to repair or replace parts at an authorized service dealer.
-
The motor is permanently lubricated and will require no oil.
-
The appliance must be positioned so that the plug is accessible.
-
Please follow the local regulations regarding disposal of the appliance for its flammable blowing gas. Before you scrap the appliance, please take off the doors to prevent children trapped.
-
Ensure the refrigerator is unplugged before cleaning or if the product is not in use.
-
To clean the appliance, use only mild detergents or glass cleaning products. Never use harsh detergents or solvents.
-
It is not recommended to use this refrigerator with an extension cord or power board. Please ensure that the appliance is plugged directly into the electrical outlet.
-
Do not place hot food or drink into the refrigerator before
it cools down to room temperature.
-
Close the door immediately after putting in any items so the inside temperature will not rise dramatically.
-
Keep appliance away from any heat source or direct sunlight.
-
To fix stably, the appliance must be placed on a flat and solid surface. It should not be laid on any soft material.
-
Do not place any other appliance on top of the refrigerator, and do not wet it.
-
To avoid injury from electrical shock do not operate the appliance with wet hands, while standing on a wet surface or while standing in water.
-
Do not use outdoors or in wet conditions.
-
Never pull the cord to disconnect it from the outlet. Grasp the plug and pull it from the outlet.
-
Keep the cord away from heated surfaces.
-
Check that the voltage of the power supply in your home is the same as the voltage shown on the rating label of this product.
-
Turn on electricity only 5 minutes later after electricity goes off. Otherwise, the compressor may be damaged.
-
Children should be supervised to ensure that they do not play with the appliance.
-
The appliance is not intended to be operated by means of an external timer or a separate remote-control system.
-
It is recommended to check regularly the supply cord for any sign of possible deterioration, and the appliance should not be used if the cable is damaged.
-
Regarding the information pertaining to the installation, handing, use, servicing, replacement of lamp (if applicable), cleaning and disposal of the appliance, thanks to refer to the below paragraph of the manual.
-
Disposal of the appliance: To prevent possible harm to the environment or human health from uncontrolled waste disposal, recycle it responsibly to promote the sustainable reuse of material resources. And the disposal should only
be done through public collection points. Old refrigerators can contain CFC that destroy the ozone; contact the waste treatment center nearest your home for more details on the correct procedures for disposal.
46.

WARNING! Risk of fire / flammable
materials
Please keep the product far away fire source during using, service and disposal. There are flammable materials at the back of the appliance.
STRUCTURE ILLUSTRATION
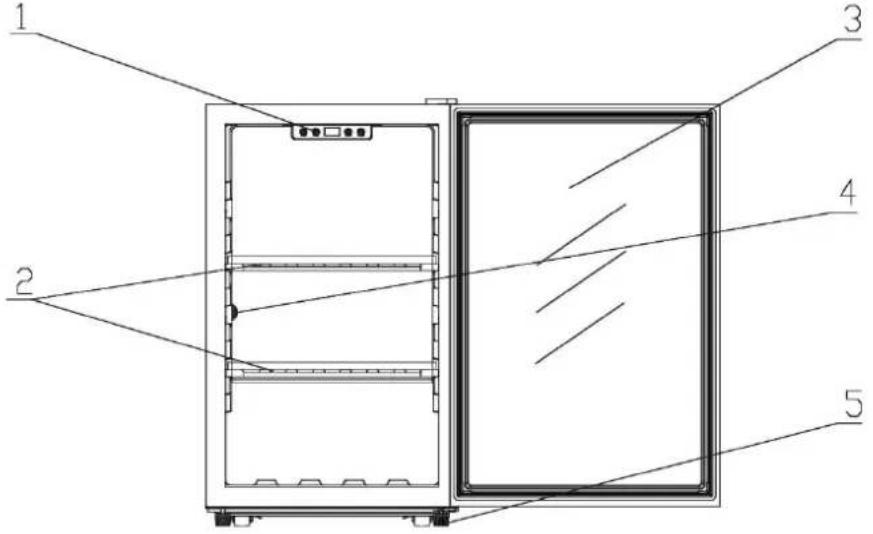
- Control panel
- Metal shelves with wooden pediment
- Door
- Sensor
- Adjustable foot
INSTALLATION
Recommendations:
The location you have selected for the appliance must be:
- free and well ventilated;
- far from any source of heat and direct sunlight;
- not be too wet (laundry, pantry, bathroom etc.);
- have a flat floor;
- obtain a reliable and standard electricity supply;
- away from the microwave oven. Some microwave ovens do not have a scramble wave shield. When placed less than 1 meter away from the appliance, it can affect the operation of the appliance.
Protect the appliance from heat (above 38^ C) and cold (below 16^ C), dust, moisture, water and splash water.
Location
In order to ensure adequate ventilation of the apparatus, observe a minimum spacing of 15 cm between walls of your appliance and the walls nearby (walls or worktop for example) as shown in the illustration below.
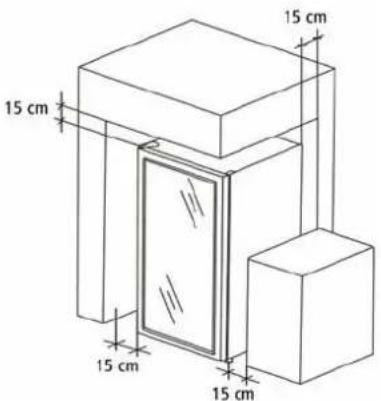
Your appliance is equipped with an adjustable foot for facilitate its upgrade.
It is recommended to adjust the front feet to upgrade the appliance. The right setting level and feet will limit vibration and noises that flow from it.
Turn the adjustable foot by hand (be careful of do not hurt your hands).
The appliance needs to be upgraded before loading of your wines, in a place where the soil can support the load.
Ambient temperature
The appliance should be placed in a room with temperature between 16-38°C. If the ambient temperature is above or below the climatic class, the performance of the appliance will be impacted. Cold or warm temperature can cause fluctuating fridge temperatures, the appliance may not reach the set temperature or may stop working.
FIRST USE
IMPORTANT: Wait for 24 hours before starting your appliance.
Meanwhile we recommend that leave your appliance upright, clean it and leave it open to eliminate residual odors.
Recommendations:
- Place the appliance in a cool place away from sunlight and heat sources.
- Certain parameters such as room temperature, door opening time or the number of bottles stored inside could affect the internal temperature of your appliance. We recommend that you check the internal temperature regularly and adjust it if necessary.
- Do not cover the vents.
Operating noise:
To reach the desired temperature, this appliance, like all wine fridges with compressor cooling systems, can produce certain noises, which are normal operating noises.
• Gurgling noise: caused by the refrigerant gas circulating in the refrigeration area of the unit.
• Cracking noise: resulting from the contraction and expansion of the gas to produce the cold.
The perception of noise by the individual is directly related to the environment in which the appliance is located.
Noise in normal operation is not a cause of the warranty's application.
TEMPERATURE CONTROL
Please note that depending on the selected settings and the loading, it can take 24 hours for the appliance to reach the desired temperature.
- Plug the power cord into a suitable power supply.
- Set the thermostat to adjust the temperature using the keys K2 and K3.
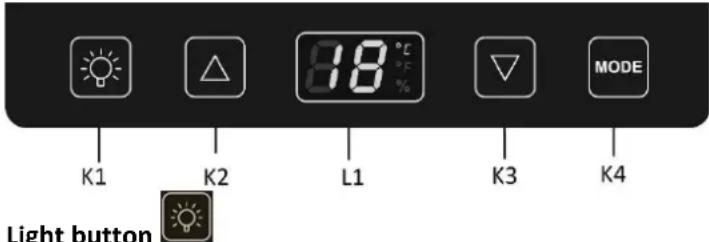
Light button
K1: Turns on / off the interior light
Increase button & Reduction button

Press the increase button K2, or reduction button K3 once, the LED display will flash indicating the current set temperature. Press again to adjust the temperature. The new set temperature will blink 5 seconds and then be saved. The LED display will indicate the actual temperature.
Temperature display

L1: The temperature can be adjusted from 5 to 20 degree according to the cycle below
$$ \begin{array}{l} \left\langle \begin{array}{l}5 - 6 - 7 - 8 - 9 - 10 - 11 - 12\ 20 - 19 - 18 - 17 - 16 - 15 - 14 - 13 \end{array} \right. \end{array} $$
Note: Symbol “%” in the lower right corner means humidity. It’s not applicable to this product/model you purchased.
K4: Switch the temperature display between Fahrenheit / Celsius by pressing the key.
Natural functioning of your appliance to take into account:
The internal temperature of the appliance will evolve permanently at + or - 3 degrees of temperature desired. If the internal temperature goes back to more than 3 degrees of the desired temperature, the thermostat will restart the engine to cool slowly the cavity. Once the temperature requested is again reached and even exceeded, then the thermostat will shut down the engine, this work is permanent, which explains why indoor temperature will work continuously between 9 and 15 degrees for example for a temperature required at 12 degrees.
So do not worry if you see that the temperature changes constantly. Do not open the doors too often to control the temperature at the risk of disturbing the thermostat by bringing in warm, moist air.
Attention
When the temperature sensor is failing due to power outage or bug, an error code appears.
E1: internal temperature problem
E2: ambient temperature problem
CE: communication problem
Power outage
In the event of a power outage, all temperature settings will be automatically preserved, unless you change the thermostat setting.
A power outage of an hour or two will not affect the temperature of your appliance. To avoid a sudden change in temperature when the power supply is turned off, you should avoid opening the door. In the event of a prolonged cut, storage alternatives must be found to preserve your wine.
If you plan to temporarily shut off the electrical power or if there is a power outage scheduled by your power provider, it is imperative to disconnect the power socket rather than have your power meter shut down. A sudden shutdown of the current could damage the mother board in your appliance.
STORAGE OF WINES
This appliance is intended to be used exclusively for the storage of wine.
Loading your appliance
You can load your wine bottles in single or double rows.
For loading, take note of the following: if you don't have enough bottles to completely fill your appliance, it's best to spread the load over the entire height of the appliance to avoid a thermal imbalance at the top or bottom of the appliance.
The balanced distribution of bottles throughout the height of the appliance is the most efficient way to use the energy of the appliance.
The filling capacity is expressed in bottles of the type "Bordeaux lightened 75cl". If larger bottles are stored, or if additional shelves are used, the maximum bottle capacity is reduced.
To accommodate the largest type of bottle or increase the capacity of the appliance by stacking the bottles, when necessary, the shelves must be removed or moved (see paragraph "Adjustable shelves").
Keep a gap between the bottom of the appliance and the bottles to allow air to flow. As in an underground wine cellar, air circulation is important for a homogeneous temperature inside your appliance. This will also reduce energy consumption.
Important information about the serving temperature of wine
Your appliance has been designed to allow you to set desired serving temperature of your wine. Each wine varietal is served at a different ideal temperature.
The temperature is adjustable from 5-20 °C. Unless the wine producer recommends a different temperature for your particular wine, champagne should be served at 7°C, white wine should be served at 12°C and red wine should be served at 18°C (see table in “Wine service temperatures”).
Some wines can be served young (2 to 3 years), while others are much better aged (10 years and older). Each wine peaks at a different age. Check the ideal drinking age for your wine with your wine merchant.
Setting types: Please note that depending on where your appliance is kept, how often the door is open, the ambient temperate and the loading, the time taken to reach the set temperate varies. Usually, it takes about 24 hours for the appliance to reach the desired temperature and indicate a stable temperature on the digital display.
The temperature displayed will change when the desired temperature is adjusted or whenever a large number of bottles are added to the appliance.
Loading plan
Your appliance can hold up to 63 bottles, lightweight Bordeaux type, with stacking based on two shelves. While loading several levels of bottles on the same shelf, please gently store your bottles in the 1st row to prevent them from colliding with the 2nd row. Store the bottles in a "head to tail" - crossing the neck and bottom of each bottle, so you can get close to the stated maximum capacity.
If you store larger bottles or add a shelf to more easily access of your bottles, storage capacity will be reduced. The appliance is called mono temperature, this means that the choice of temperature is unique, since the wine is eaten different temperatures, you have to either store only red wines at 16 or 18 degrees or white and rosé wines between 8 and 12 degrees.
Another option is possible to store all wines, using the natural phenomenon cold (fresh air falls, warm air rises), setting the thermostat on average between 11 and 13 degrees, it will be necessary to store the wines in a logical order with natural interior temperatures:
At the top: the bottles of red wine will require ideally unclog it and let it settle in a carafe a few hours before tasting (for rise slowly to 16 to 18 degrees).
In the middle: bottles of white wine, to refresh depending on your preferences (to decrease to 8 to 10 degrees). Bottom: the bottles of rosé and champagne, he will need to be refreshed for about an hour (for decrease to 6 to 8 degrees).
Adjustable shelves
The appliance has 2 adjustable shelves made of metal, which gives the strength to stack several rows of bottles head to tail (the bottom has moldings to store bottles also).
The 2 metal shelves, with a wooden pediment, can be adjusted depending of your needs and the fill level of your appliance.
- Door seal protection: Ensure you open the door completely before removing shelves from their rails.
- Do not slide multiple loaded shelves outwards as it may cause bottles to fall or may cause the appliance to tip forward.
- Do not cover shelves with material like aluminum foil or metal plate as this will impact internal airflow.
- Do not move your appliance while it is loaded with bottles. It could distort the inner of the appliance.
Table of service temperatures of wine:
The below table shows the temperature generally recommended for wine tasting concerned.
To bring the wine to the serving temperature, it is recommended to place it in your appliance at least 48 hours before serving.
| Wine | Recommended temperature |
| Champagne, sparkling wine | 6°C |
| White: Sémillon, Sauvignon Blanc | 8°C |
| Vintage champagne | 10°C |
| Dry white: Chardonnay | 10°C |
| Dry white: Gewürztraminer, Riesling, Pinot gris | 10 °C |
| Sweet late harvested white: Sauternes, Barsac, Monbazillac | 10°C |
| Beaujolais | 13°C |
| Sweet white wine: Sauternes ... | 14 °C |
| Vintage Chardonnay White | 14 °C |
| Red Pinot Noir | 16 °C |
| Red Grenache, Syrah | 16 °C |
| Red vintage Pinot Noir | 18°C |
DOOR REVERSE
The opening direction of the door can be changed to following the instructions below. This change requires the intervention of 2 people.
Instructions for changing the "right-hung" door and reassembling it so it is "left-hung":
| 1. Disconnect the power plug. Rock your appliance 45° backwards and hold or fix it firmly.2. Remove the upper hinge cover.3. Unscrew the screws of the upper hinge and remove it, then remove the door by lifting it gently | 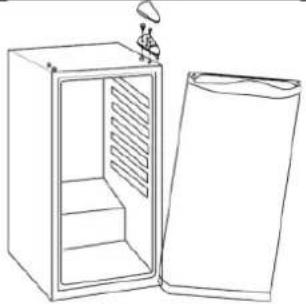 | |
| 4. Unscrew the big foot (front right) and remove it.5. Unscrew the screws of the lower hinge and remove it | 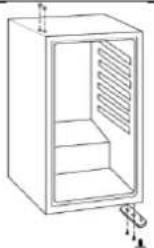 | |
| 6. Place the bottom hinge on the opposite side after having removed the left front foot, and fix the hinge by screwing the screw.7. Reattach the big foot, now placed on the left side. Also screw the foot on the right side.8. Bring back your appliance vertical position. | 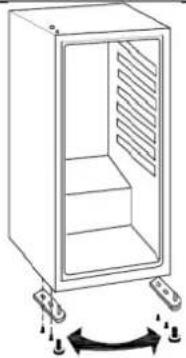 | |
| 9. Place the door on the lower hinge. Make sure the glass door is in the upright position and closes easily. | 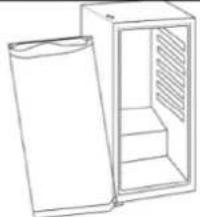 | |
| 10. Place the top hinge on the opposite side and the door and then replace the screws of the hinge without tightening permanently. | 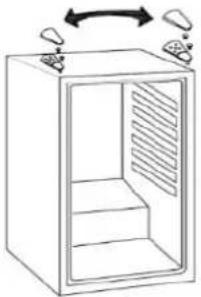 | |
| 11. Once the door is installed, adjust the distances to keep the vertical door and then finally tighten the screws of the upper hinge.12. Reassemble the upper hinge cover. | 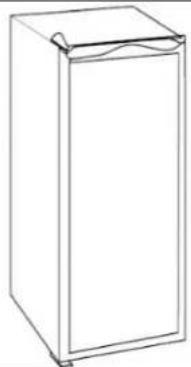 | |
Note: The door seal may come out of its place when changing the door. If you notice gaps between the seal and the appliance frame when the door is closed, pull carefully on the seal to close these openings. The correct positioning of the seal is important to ensure the appliance is waterproof.
Sometimes, it is necessary to heat the seal at a low temperature in order to give him back his elasticity, then he resumes its good position and tightness gradually.
CLEANING AND MAINTENANCE
Defrosting
Your appliance is designed with a "natural" defrosting system. When the engine is shut down, the refrigerated surfaces of the appliance will automatically defrost. The de-icing water descends into a drainage container near the compressor at the back of the appliance. This water is evaporated by the heat produced by the compressor.
Important: Keep the drain and gutter clean to prevent it to clog and water to flow inside the appliance.
Cleaning
Before cleaning or restarting, unplug at the socket.
Never use abrasive products or sponges with scrapers for cleaning inside or outside your device.
- Remove all accessories (e.g., shelves, water pan located at the bottom of the back of the appliance). Wash them with lukewarm water with a mild, odorless detergent (an unscented dish liquid, for example), rinse with water containing bleach and dry thoroughly.
- Wash the interior walls in the same way; take special care of the shelves.
- Wash the door seal without omitting to clean also under the door seal.
- Reconnect the device and get it back into operation.
Important!
When the appliance is not used:
- Unplug the appliance.
- Remove all objects inside.
- Clean and dry the interior space of the appliance per the above instructions.
- Leave the door slightly ajar to avoid mold.
TROUBLESHOOTING
Some issues can be easily resolved. Before using after-sales service or a repairman, please see the following table:
| PROBLEM | POSSIBLE CAUSES |
| The appliance doesn't work. | The appliance is not plugged in or it is switched off.The circuit breaker is triggered, or the fuse is damaged.Check to see if the power outlet is powered by connecting another electrical appliance. |
| The appliance is not cold enough. | Check the temperature setting. A high ambient temperature may require a lower setting.The door opens too often.The door is not completely closed.The door seal is not properly positioned. |
| The compressor works and goes out often. | The room temperature is warmer than normal.A large quantity of bottles has been added to the appliance.The door opens too often.The door is not completely closed.Temperature control is not properly defined.The door seal is not properly positioned. |
| The light doesn't work. | The socket is not plugged in.The circuit breaker has gone off or a fuse is damaged. |
| Vibration. | The appliance may not be level. |
| The appliance seems to be making too much noise. | Squeaking or slamming may come from the circulation of the refrigerant gas, which is normal.At the end of the cycle, the compressor emits a noise caused by the passage of the refrigerant into your appliance.The contraction and expansion of the gas inside the walls can emit hissing and crackling.The appliance is not level. Check the setting of the feet. |
| The door doesn't close properly. | The door has been reversed and not properly reinstalled.The seal is defective. (The magnet or rubber is altered)The shelves block the door closure. |
If your appliance doesn't seem to be working normally, unplug the device for a few minutes, then plug it in again to reset the appliance.
If the problem persists or for any other problems occurring at your device: contact the After-Sale Service.
Any service or repair on the cooling process must be carried out by a licensed professional who will have to carry out an inspection of the refrigeration circuit.
Similarly, any service or repairs on the electrical circuit must be carried out by a qualified electrician.
Note: Any repair by an unlicensed technician will result in cancellation of the warranty.
TECHNICAL SPECIFICATIONS
| Rated voltage: | 220-240V~ |
| Rated current: | 1.5A |
| Rated frequency: | 50Hz |
| Climate class: | N/ST |
| Refrigerant: | R600a(23g) |
| Protection against electrical shock: | I |
| Insulation blowing gas: | CYCLOPENTANE |
Climate class:
- Extended temperate (SN): 'this refrigerating appliance is intended to be used at ambient temperatures ranging from 10°C to 32°C';
- Temperate(N): 'this refrigerating appliance is intended to be used at ambient temperatures ranging from 16 °C to 32 °C';
- Subtropical (ST): 'this refrigerating appliance is intended to be used at ambient temperatures ranging from 16 °C to 38 °C';
- Tropical(T): 'this refrigerating appliance is intended to be used at ambient temperatures ranging from 16 °C to 43 °C';
Note: More data information, please scan the QR code on the energy label.
GUARANTEE AND CUSTOMER SERVICE
Before delivery our devices are subjected to rigorous quality control. If, despite all care, damage has occurred during production or transportation, please return the device to your dealer. In addition to statutory legal rights, the purchaser has an option to claim under the terms of the following guarantee:
For the purchased device we provide 2 years guarantee, commencing from the day of sale. If you have a defective product, you can directly go back to the point of purchase.
Defects which arise due to improper handling of the device and malfunctions due to interventions and repairs by third parties or the fitting of non-original parts are not covered by this guarantee. Always keep your receipt, without the receipt you can't claim any form of warranty. Damage caused by not following the instruction manual, will lead to a void of warranty, if this results in consequential damages then we will not be liable. Neither can we hold responsible for material damage or personal injury caused by improper use or if the instruction manual are not properly executed. Damage to accessories does not mean free replacement of the whole appliance. In such case please contact our service department. Broken glass or breakage of plastic parts is always subject to a charge. Defects to consumables or parts subjected to wearing, as well as cleaning, maintenance or
the replacement of said parts are not covered by the warranty and are to be paid.
The guarantee period of the spare parts is 2 years. If you need replacement, please contact our customer service.
ENVIRONMENT FRIENDLY DISPOSAL
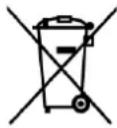
Recycling – European Directive 2012/19/EU
This marking indicates that this product should not be disposed with other household wastes. To prevent possible harm to the environment or human health from uncontrolled waste disposal, recycle it responsibly to promote the sustainable reuse of material resources. To return your used device, please use the return and collection systems or contact the retailer where the product was
purchased. They can take this product for environmental safe recycling.
For professional repair and ordering spare parts, please contact our customer service.
Emerio Deutschland GmbH (no service address)
Lerchenweg 3
40789 Monheim am Rhein
Deutschland
Customer service:
T: +49 (0) 3222 1097 600
E: info.de@emerio.eu
natural_image
Line drawing of a refrigerator with doors open and arrows indicating rotation (no text or symbols)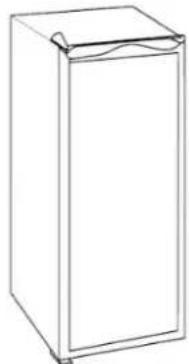
natural_image
Line drawing of a rectangular refrigerator with lid and frontrest (no text or symbols)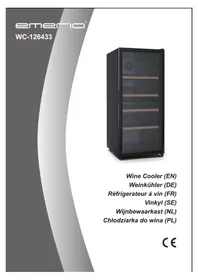
- Content – Inhalt – Teneur – Inhoud
- INSTALLATION
- Recommendations:
- Location
- Ambient temperature
- FIRST USE
- Operating noise:
- TEMPERATURE CONTROL
- Light button
- Increase button & Reduction button
- Temperature display
- Natural functioning of your appliance to take into account:
- Attention
- Power outage
- STORAGE OF WINES
- This appliance is intended to be used exclusively for the storage of wine.
- Loading your appliance
- Important information about the serving temperature of wine
- Loading plan
- Adjustable shelves
- Table of service temperatures of wine:
- DOOR REVERSE
- CLEANING AND MAINTENANCE
- Defrosting
- Cleaning
- Important!
- TROUBLESHOOTING
- Climate class:
- GUARANTEE AND CUSTOMER SERVICE
- ENVIRONMENT FRIENDLY DISPOSAL
- Customer service:
Brand : Emerio
Model : WC126431
Category : Wine cellar