Energy - Baby swing Foppapedretti - Free user manual and instructions
Find the device manual for free Energy Foppapedretti in PDF.
User questions about Energy Foppapedretti
0 question about this device. Answer the ones you know or ask your own.
Ask a new question about this device
Download the instructions for your Baby swing in PDF format for free! Find your manual Energy - Foppapedretti and take your electronic device back in hand. On this page are published all the documents necessary for the use of your device. Energy by Foppapedretti.
USER MANUAL Energy Foppapedretti
Valid only for toys and music device
Instruction manual, read carefully and keep for future reference.
This product is suitable for a child weighing up to 9kg
Do not use this product when the child is able to sit up unaided.

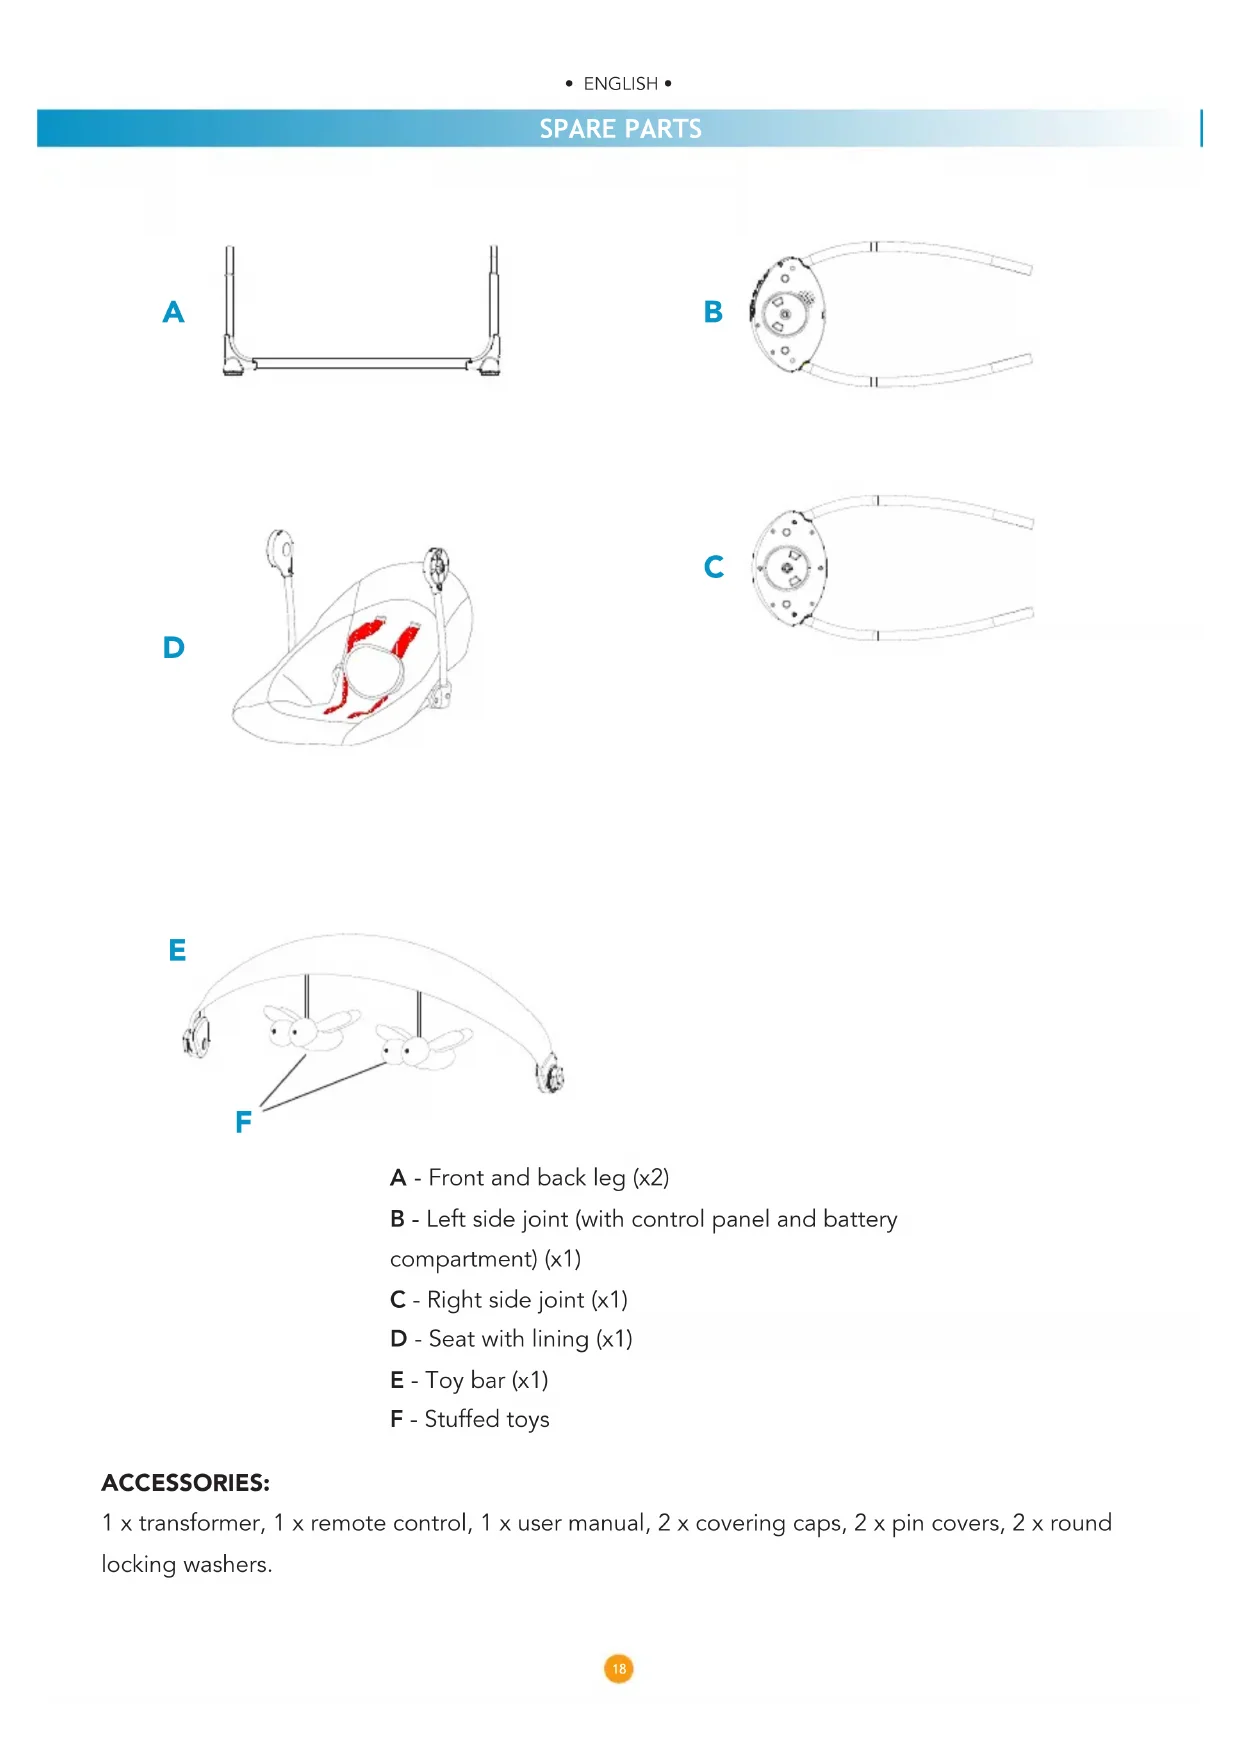
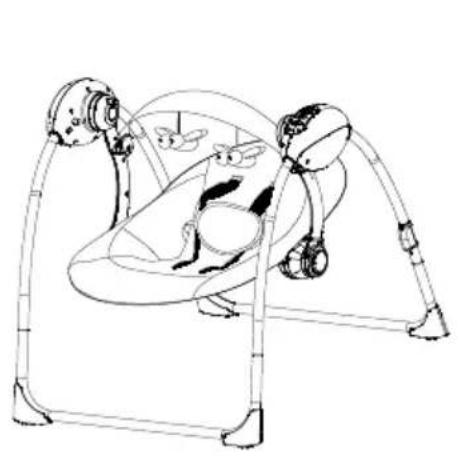
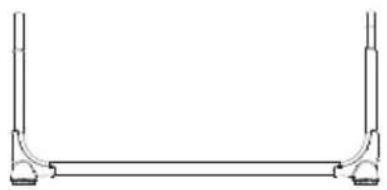
A - Front and back leg (x2)
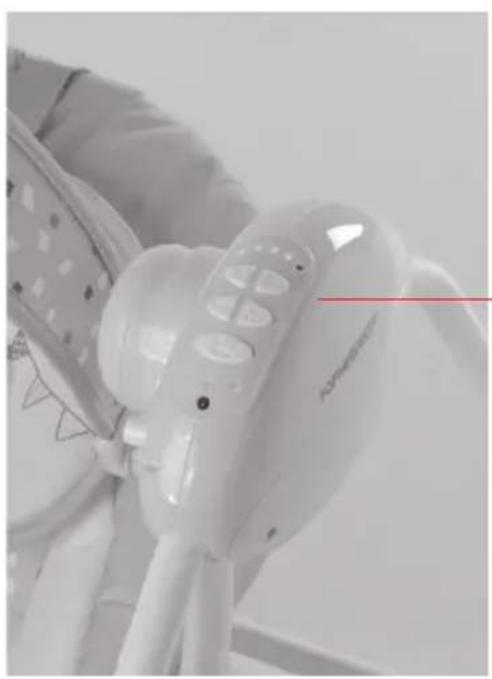
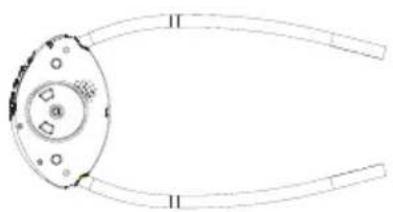
B - Left side joint (with control panel and battery compartment) (x1)
C - Right side joint (x1)
D - Seat with lining (x1)
E - Toy bar (x1)
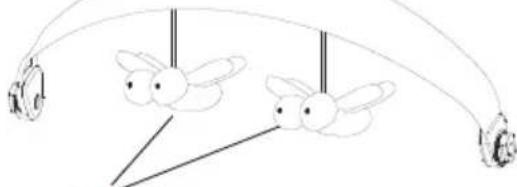
F - Stuffed toys
ACCESSIONS:
1 x transformer, 1 x remote control, 1 x user manual, 2 x covering caps, 2 x pin covers, 2 x round locking washers.
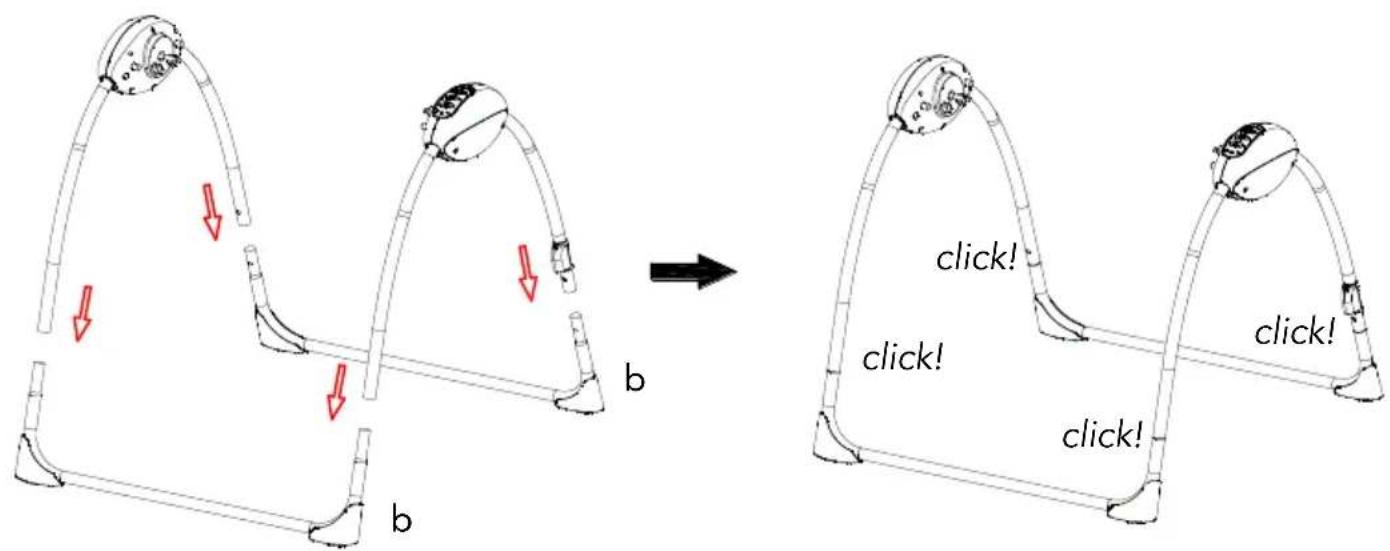
WARNING: The bouncer must only be assembled by an adult.
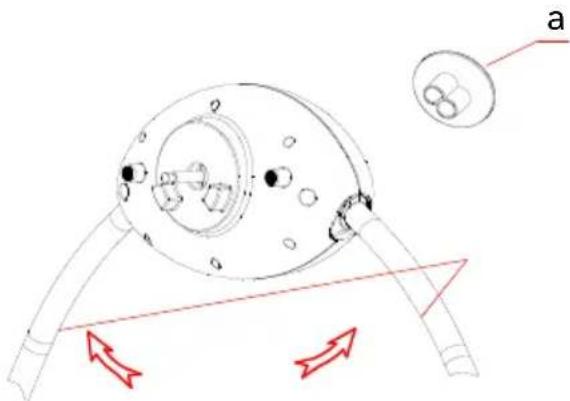
Open the 2 driving system parts and until a "click".
Remove the protective cap (a).
PLEASE NOTE: The protective cap is not a component necessary for the operation of the product, it merely protects the pin when you disassemble the product.
Install the front legs and rear legs (b) by insert the two legs into the upper part tube. When the components are assembled correctly, the metal pins will slot into the holes on the fixture tubes. At this point you will hear them click into place.
ASSEMBLY
Position the seat frame as shown in the figure, placing the joint with the control panel on the left side of the seat. Attach the seat support arms (1) and (2) to the corresponding joint, inserting the metal pin into the respective slot as shown in the figure. Once installed, insert the round locking washer (a) onto the metal pin, as shown in the figure, with the larger diameter facing the joint. Pressing, completely slide the round washer onto the pin, until it touches the joint, then insert the pin cover cap (b) and the covering cap (c). Repeat this assembly process also on the pin of the opposite joint. Once this is complete, check that it has been assembled correctly by pulling the seat frame inwards: the arm must not disengage from the joint.
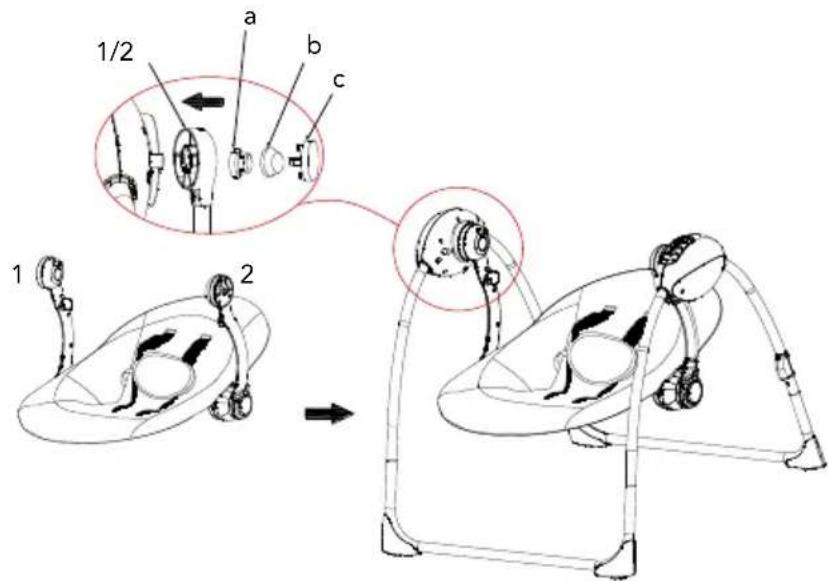
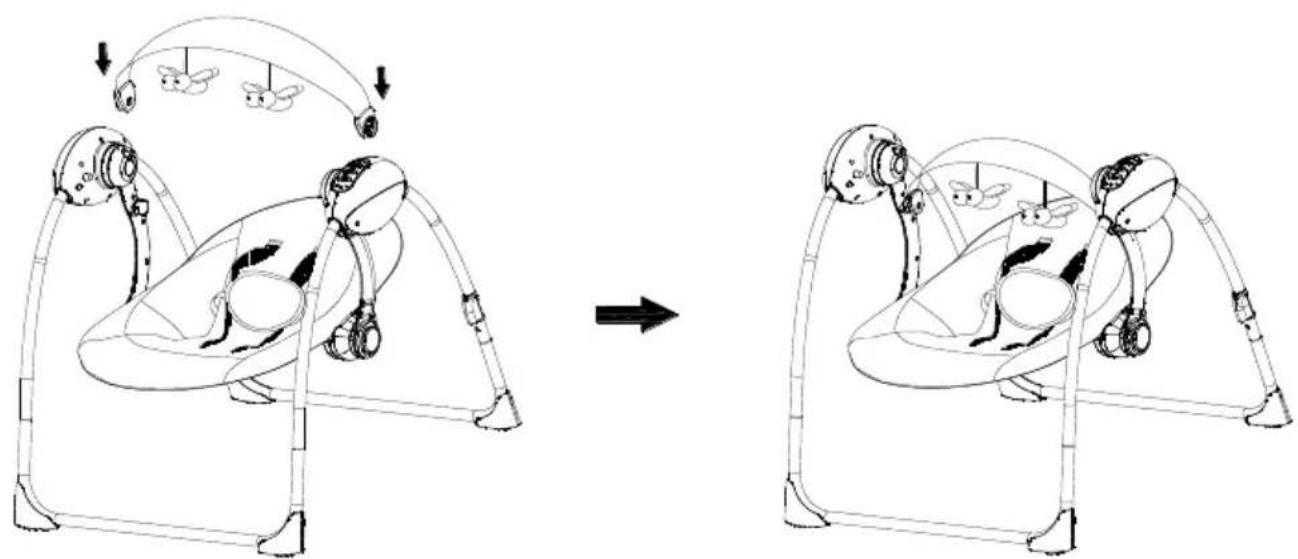
As shown, insert the two ends of the toy bar into the appropriate slots on the seat frame.
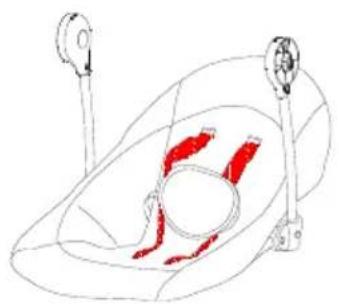
Follow the operations shown in the figures to attach the chest straps on the rear side of the backrest.
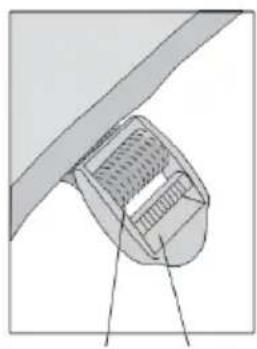
Upper loop
Thread the strap into the upper loop
Fold the strap and insert it into the lower loop
Tighten the strap to lock it
IN USE
Place the child in the seat as shown in figure. Insert the left and right sets of straps into the restraint latch. A "click" will indicate the correct fastening. Adjust the harness to fit the height of your child, using the restraint fits. The harness should fit snugly but not too tightly. The right regulation should allow to insert a finger.

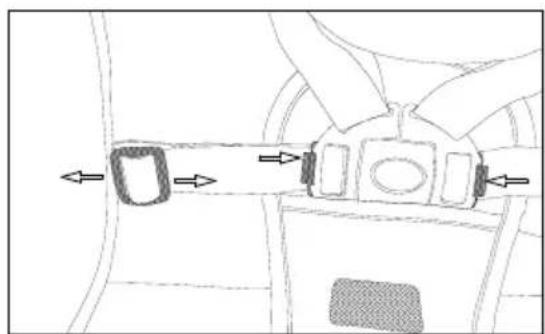
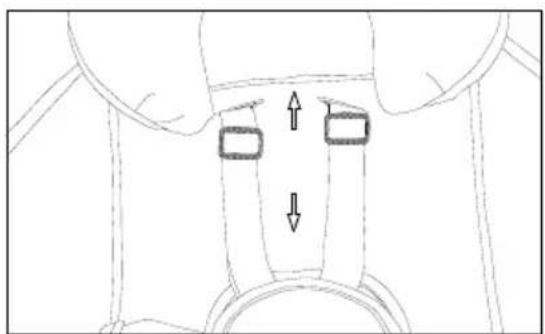
IMPORTANT: Adjust the chest belts according to the height of your child. The straps must pass through the slots closest to the height of the child's shoulders. In the backrest there are 3 pairs of slots that can be used to adjust the straps according to the height of the child.
IMPORTANT: Both the chest belts, jutting out from the back rest, have coincide with the height of the shoulders of the child and be at the same height. Always secure the child with the restraint latch correctly adjusted and hooked/locked.
TOY BAR ADJUSTMENT
The toy bar can be reclined in multiple positions.
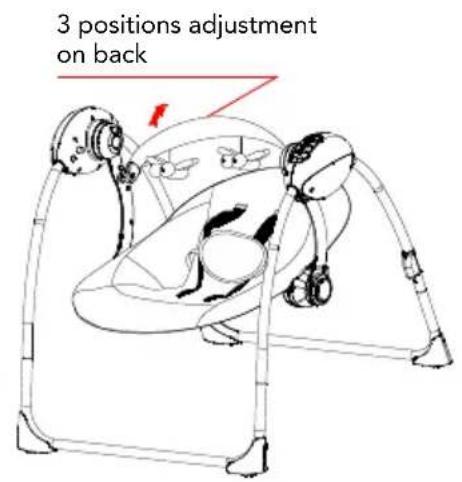
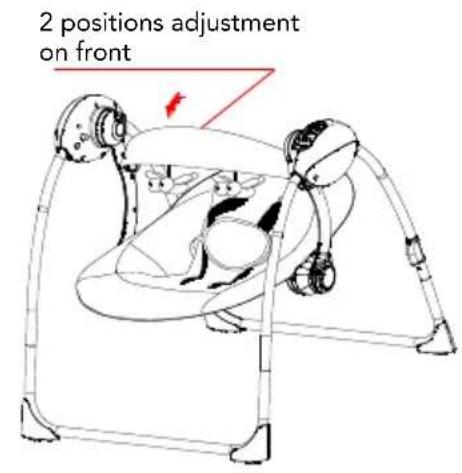
SEAT ADJUSTMENT
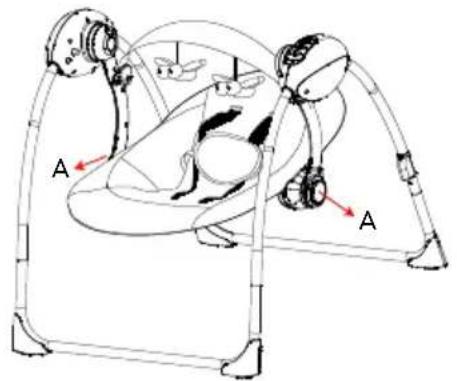
Simultaneously press the "A" adjustment buttons and tilt the seat into one of its possible positions. Release the buttons and make sure the seat is locked in the new position.
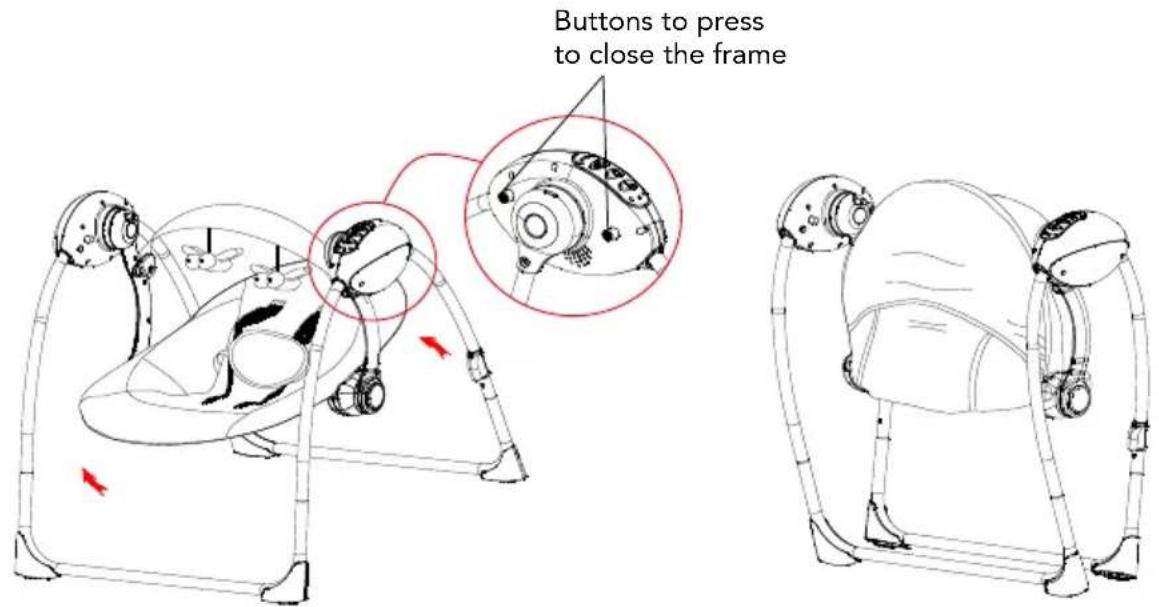
CLOSING
WARNING: before carrying out this process, make sure that the child is not placed inside or near the product.
Adjust the toy bar into the central position.
Press the "A" buttons on both side joints and close up the legs.
Lift the seat and backrest, folding them up as shown.
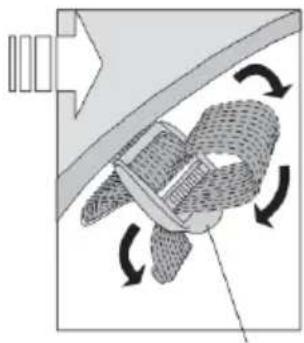
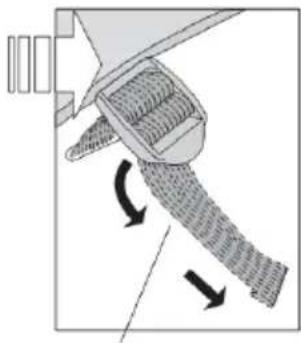
WASHING THE STUFFED TOYS

Clean with a damp cloth. Polyester padding.
FABRIC: 100% polyester.
PADDING: 100% polyester.
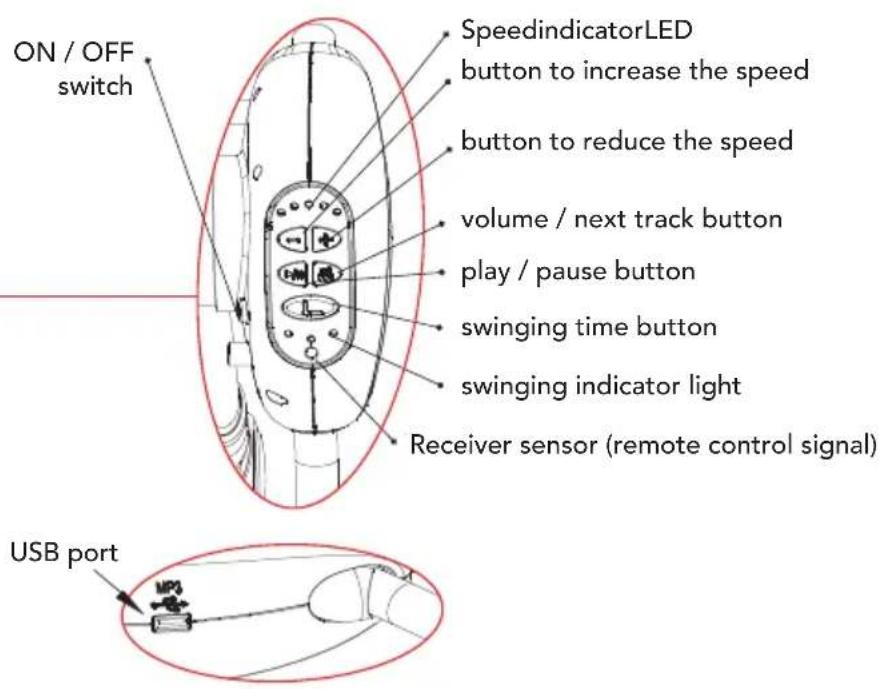
CONTROL PANEL FUNCTIONS
- Swinging function: 5 swinging speeds can be selected, indicated by a light signal. Press the button to activate the function; press "+" to increase the speed and "-" to decrease it.
- Time Function: (3 settings: 8 minutes, 15 minutes, 30 minutes, press the button to activate the function, to select the following TIMERS and to deactivate the function, a bright LED will indicate the timer selected). After the set time has elapsed, the swinging movement will automatically revert to the resting position. If no time is set and the function is activated, the bouncer will continue to swing until it is manually switched off.
- Melody button: Press the "play/pause" button once to start the melody, press it again to stop the melody. To go to the next track, press the "volume / next track" button once, to adjust the volume hold down the "volume" button.
- The bouncer also has a USB port that can be used with a USB memory stick with musical files saved in MP3 format. Connect the USB memory stick and refer to step (3) to play the music.

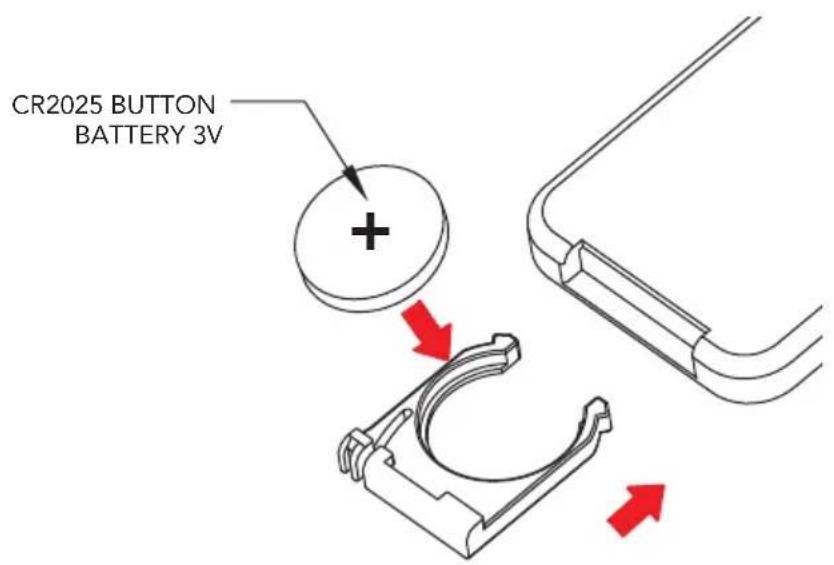
Battery power supply
Battery compartment
Anti-opening safety screw in the battery compartment
Unscrew the safety screws on the cover of the musical device with a Phillips screwdriver and remove the cover. Insert the batteries the right way round.
Close the cover and tighten the anti-opening safety screws.
To replace the batteries, repeat the same process.
Repeat this operation to replace the batteries.
Power supply with transformer
Insert the AC plug of the power transformer into the AC outlet 100-240 V 50/60 Hz 0.3 A. as shown in the picture.
IMPORTANT: Make sure that the power cord of the AC/DC adapter is completely out of the reach of the child. Secure the transformer cable to the frame using a clamp or fastening device.
IMPORTANT: READ THE INSTRUCTIONS CAREFULLY BEFORE USE AND KEEP THEM FOR FUTURE REFERENCE.
IMPORTANT: KEEP THIS INFORMATION FOR FUTURE REFERENCE.
WARNING: The product must be assembled by an adult.
WARNING: Never leave your child unattended.
WARNING: Do not use the product if some of its parts are broken, torn or missing.
WARNING: Do not use accessories or spare parts that are not approved by manufacturer.
- WARNING: Always use the restraint system! Always make sure the safety harness and the crotch strap are fastened properly when the child is placed in the seat.
- WARNING: Do not use this product when your child is able to sit up on his own or weights over 9 kg.
- WARNING: Using this product on raised surfaces such as tables, chairs etc can be very dangerous.
- WARNING: To prevent the risk of fire, never place the product near electrical appliances, gas cookers or other sources of intense heat.
WARNING: This product is not intended for prolonged periods of sleeping.
- WARNING: This product is not a replacement for a bed or cot. If the child needs to sleep, he should be moved to a bed or a cot.
WARNING: Make sure that the fabric is always fitted correctly on the seat and backrest frame.
- CAUTION: To avoid the risk of injury, keep children away when opening and closing the product.
WARNING: Never allow children to play with the product.
WARNING: Never move the swing when the child is sitting on it.
WARNING: Do not lift this product holding onto the toys bar
WARNING: Always use under the supervision of an adult.
- CAUTION: Do not use the product with more than one child at a time.
- WARNING: Never use the product on soft surfaces such as beds, sofas, cushions, as the swing could fall over and cause suffocation.
WARNING: Never leave the swing on surfaces which are not perfectly level.
WARNING: Do not allow other children to play unattended near the product.
WARNING: Never use this swing to carry a child in motorized vehicles.
WARNING: Always check that all the components are fitted and assembled correctly.
WARNING: Make sure the product is assembled properly before using it.
- WARNING: Periodically check for worn parts, loose screws, worn or frayed fabrics and immediately replace any damaged parts.
- CAUTION: Do not place the product near to windows or walls, or where there are cords, curtains or similar, which may be used by the child to climb or cause suffocation or strangulation.
- CAUTION: Do not put the product near to windows or walls to prevent the child from pushing with his feet, which may unbalance the product and make it fall over.
- WARNING: Always check there are no objects that can interfere with or block the movement of the swing.
- CAUTION: NEVER lift up the product with the baby inside.
- CAUTION: Do not attach toys or accessories onto the toy bar or directly on the product which have not been supplied by the manufacturer.
- WARNING Do not hang any toy or product on the toy bar or the hammock which has not been supplied with the hammock by the manufacturer.
WARNING: Do not make changes that might affect the safety of the child.
- WARNING: Remove the packaging and dispose of it safely. Bags can be dangerous when handled by children.
CAUTION: Never use the toy bar as a handle to lift up the product.
SAFETY OF THE ELECTRICAL PARTS:
- CAUTION: The product must always be turned on/off by an adult.
- CAUTION: Batteries must only be replaced and fitted by an adult.
- CAUTION: Batteries may leak acid or explode if thrown into a fire.
- CAUTION: Always dispose of leaking batteries immediately: They can cause burns or their types of injuries.
- CAUTION: Do not attempt to recharge no rechargeable batteries: they might explode.
- CAUTION: Do not leave the product out in the rain; water infiltrations will damage the electronic circuit.
- CAUTION: Only use batteries which are equivalent to those recommended.
- CAUTION: Make sure the batteries are fitted with their poles in the right direction.
- CAUTION: Never use new and old batteries together as this will not allow the swing to function properly.
- CAUTION: Remove the batteries when the product is not being used for long periods of time.
Always remove any dead batteries from the product. - CAUTION: Do not short-circuit the battery terminals.
- CAUTION: If the music console of the product is left inactive for long periods of time, it is recommended to remove the batteries from the battery compartment.
- CAUTION: Only use alkaline batteries of the same type or equivalent to the type recommended for the correct function of this product (AA- 1.5V).
- CAUTION: The use of rechargeable batteries is not recommended as the product may not work properly.
- CAUTION: Rechargeable batteries must only be recharged under adult supervision.
- CAUTION: Rechargeable batteries must be removed from the product during recharging.
- CAUTION: Remove the batteries from the product before disposing of the product.
- CAUTION: Always keep batteries and tools out of the reach of children.
- CAUTION: To replace batteries: loosen the screw on the battery compartment cover with a screwdriver and open the cover. Then remove the spent batteries and fit new ones, ensuring that they have been fitted in the correct polarity (as shown on the product), replace the battery cover, and tighten the screw.
- CAUTION: The transformer supplied can be used for this product. The input voltage
of the transformer must be 100 - 240V 50 / 60Hz0.3A MAX. Output voltage: 5.8 / 6V___800mA - 1A - CAUTION: Before using the transformer, always check that there is no damage to the cable, plug or other parts, otherwise it must not be used.
- Use only the transformer supplied.
CHANGING THE BATTERIES:
- To change the batteries unscrew the lid of the function box with a star screwdriver, place the batteries correctly, ensuring the correct polarity, then replace the lid and screw down.
INFORMATION ON THE BATTERIES:
IMPORTANT:
- Keep batteries out of the reach of children.
RECOMMENDED BATTERIES:
- 4 batteries AA - 1,5V (not included).
The use of alkaline batteries to be thrown away is recommended. - The use of rechargeable batteries is not recommended for this product.
- Replace the batteries when the sound or swing does not work correctly.
PRECAUTIONS WITH THE BATTERIES:
Always insert the batteries with the correct polarity.
- I Do absolutely not throw the batteries in a fire. They can explode.
- The batteries can easily be swallowed by children and cause dangerous consequences.
If you think that your child swallowed a battery, contact urgently a doctor.
- Never leave children to handle the batteries.
- Keep the batteries away from their reach.
- Never mix different types of batteries or new and old together. Always substitute all batteries at the same time.
- For safety, remove worn out batteries from the product.
- Never recharge normal not rechargeable or alkaline batteries. It could cause explosion or leakage of liquids.
- Remove the batteries if you won't use the product for long time.
- Do not short-circuit the power clamps.
- Do not throw batteries in the garbage, but bring them to collection points.
CORRECT DISPOSAL OF THIS PRODUCT (Waste Electrical & Electronic Equipment)
(Applicable in the European Union and other European countries with separate collection systems)
This marking shown on the product or its literature, indicates that it should not be disposed with other household wastes at the end of its working life. To prevent possible harm to the environment or human health from uncontrolled waste disposal, please separate this from other types of wastes and recycle it responsibly to promote the sustainable reuse of material resources. Household users should contact either the retailer where they purchased this product, or their local government office, for details of where and how they can take this item for environmentally safe recycling. This product should not be mixed with other commercial wastes for disposal. If the waste material should be disposed of illegally, fines may be applied, as provided for by the Decree Law in force.
The contents of this document as stated below will come into effect as from 01.01.2005 and replace, on every account and in full, any previous message referring to the guarantee provided by Foppa Pedretti S.p.A.
FORMAL GUARANTEE
Foppa Pedretti S.p.A. the head office of which is located at n. 11 Via Volta, Grumello del Monte (Italy), guarantees directly to the Consumer that this brand new product is free of faults with regard to the materials, design and manufacture and that it complies with the characteristics as declared by the manufacturer.
This formal guarantee is valid in all Member Countries of the European Union and it neither excludes nor limits the Consumer's rights in accordance with mandatory measures provided for by the law with regard to the Retailer of the Product.
To take advantage of this formal guarantee, the Consumer must return the faulty product to the Retailer, presenting to the same the proof of purchase of the Product which must clearly show the Retailer's address, the date of purchase of the Product with the Retailer's stamp and signature and an indication of the Product itself or, alternatively, the receipt which must not have been altered and which must clearly show the same information as that referred to above.
The formal guarantee is valid for twelve (12) months from the date of purchase of the Product. During this period, Foppa Pedretti S.p.A. will repair or replace the faulty product, at its own discretion. The formal guarantee is granted to the end buyer of the Product (Consumer) and it neither excludes nor limits the mandatory rights of the Consumer as provided for by the law and/or the rights that the Consumer may have with regard to the Dealer/Retailer of the Product.
EXCLUSIONS TO THE FORMAL GUARantee.
The formal guarantee is excluded in the case of damage caused to the Product for the following reasons: if the product is used in a way that does not comply with the information contained in the use and assembly instruction sheet, if the product is knocked or dropped, if the Product is exposed to humidity or extreme heat or environmental conditions, or to sudden changes in the same, corrosion, oxidation, unauthorized alterations or repairs to the Product, repairs using unauthorised spare parts, improper use, improper maintenance or failure to carry out the same, improper maintenance compared to the information given on the use and assembly instruction sheet, incorrect assembly, accidents, damage caused by food or drink, damage caused by chemical products, cases of force majeure.
In any case, Foppa Pedretti S.p.A. declines all responsibility for damage caused to persons or to property, other than the Product, when such damage is caused by a failure to comply with the instructions/advice/warnings cont a ined in the manua I or, alternatively, in the use and assembly instruction sheet provided with each Product for the owner/user. (Purely as an example, in the case of a cot : "Check your baby constantly.
Make sure that the sheets and blankets do not cover the baby's head...").
Furthermore, Foppa Pedretti S.p.A. declines all responsibility for damage to persons and to property when the breakage of its products is due to a deterioration in the components of the Product that are subject to wear. All the components of the Product made of plastic are considered to be components subject to wear.
COMPOSANTS

A

B
D

C

E
INFORMATIONS SUR LES PILES:
IMPORTANT:
EXCLUSIONS DE LA GARANTIE CONVENTIONNELLE.
OuHCTKAJIHOWEBbIXIgpyueK

OuNTka npo3BOIDTCa pni nmoou BnaXHO TkaHn. HanoHnteIb n3 noIN3ctepa.
TKAHb: 100% nonnactep.
HANOJIHHTeJb: 100% nonu3ctep.
TAPAHINHbIEOB3ATEJbCTBA
KOMnHaHn Foppa Pedretti S.p.A. oOuuaJIbHo 3apernctpnpoBaHHo no aDpecy: Grumello del Monte (Italia) Via Volta 11, KOTOPa rapaHTnpyET HeNOCpeDCTBENHO NToPe6nteHIO, YTO daHHoe H3dEJIne, TOIbKO yTO BbInyUeHHoe C fApRKn, He NMeet DeΦeKTOB Hm MaTePnaJIoB, Hn IpoeKTHpOBAHnA, Hn npOn3BOIDCTBEHHbIX, IN COOTBETCTByET 3aRBJIeHHbIM xapaKTePncTtKam.
HactozaarapaHTna DeiCTBHTbHa BO BCex CtpaHaxyHehE3Cn He NCKIIOUaETn He OrpaHnUBAe T npabaPb3OBateJI, B COOTBeTCTBnC 3aKOHOaTeJIbCTBOM,peIamEnHpUOUM B3aMOOTHOweHnC POn3BODHTeEM N3dJIIN.
YTo6bI BOCNoJIb3OBAbCЯDaHHoI rapaHTnei,
Ntpe6nteJIb DoJIkeH npInHeCTn DeΦeKTHoe N3dJIne
PpOaBcy, PpeIOCTaBbDOKyMeHT, yOcTOBepaUoiu o npno6peTeHn N3dJIy, c neYaTbIO I pOdnCbIO
PpOaBua n yka3aHHeM
Ha3BaHn Ha3deJIna, KaK aJIbTePHaTnBa, KaccobbI KeK, 6e3 KaKx-Jn6o H3MeHeHn, n3 KOtOPOrO YETKO BnHa BCy yKa3aHHa Do 3TOrO HOpMaun. IapaHTn IMeet cPoK DeiCTBn DBeHaDcAtb (12) MeCzEBC DaTbI npNo6peHn Ha3deJIn.
B TeueHne Bblweyka3aHHoro cpoKa KOMnHaH N Foppa Pedretti S.p.A. 063yeTcN OTPeMoHTnpoBaTb nn 3aMeHtB, Ha CBoi BbI6Op, DeΦeKTHoe N3dJIne. TapaHTnI npEIOCTabJIeTcN KOHeuHOMy NOKyNaTeJIIO N3dJIIN (POnb3OBATeJIIO)
H He NCKJIIOUaET H He OrpaHnUHbAe TnpaB DaHHoro POnb3OBaTeJIa, PnpdYcMOTpeHHbIX DeIcTByIOuIM 3aKoHOdaTeJIbCTBOM H/INn PpaBAMn POnb3OBaTeJIa, Ha npdeTbAJIeHHe CBOHX npab B aIpc Es DInlepa/ IpoDaBaHa N3dJIIN.
HE NOKPBIBAOTCRAPAHTHEN.
. TapaHTneH He NOKpbIBaetc yUep6, CB3aHHbI C HcNoJIb3OBaHHem N3dEJIIN, BO3HNI KIIO CLeDyIOHM IPruHNAM: HnPabNlBHOE NCNoJIb3OBaHHe, He COOTBeTCTByOUIe e YKa3aHnM, COePxAUMC8 BO BKlaDbIWe C INHCTpyKUINM NO MOHTaxy I EKcIIyaTaUN, YdApBI IN NaDEHnA N3dEJIIN, N3dEJIe IOdBepraJIOCB Bo3dEICTBNU
BlaJXHocTH HIN 3KCTpeMaIbHbIM TeMnepaTypam H He6IarOpnIaTHbIM YcIOBnAM OKpyKaIOUe CpeDbIC NOCToHHo CMeHO N 3TNX YcIOBn, KoppO3N IN OKnCJIeHNIO, a TaKKe HecaHKUOHNPOBaHOMy PemOHTy HIN MoINΦnKaUIN, N3dJIne NcNoIb3OBaIOCb He IIO Ha3NaueHIO HIN HeNPaBNbHO, 6e3 CO6JIIODeHIN yKa3AHN B INCTpyKUHX IO MOHTaXy N 3KcNlYaTaUIN, IPrN ILOXOM yXoDE HIN OTCyTCTBn TAKOBO, PemOHTe C INcNoIb3OBaHNEM HeOpNrHaJIbHbIX 3aNpAcTei, IIOpruHHe HnpaBNbHO C6OpKn, abApHn, BO3JeCTBn IINI HAnNTKOB, XmMueCKNX BeIeCTB, a TaKKe BCJeDCTBVe Upe3BbUaHbIX 06CTOReTbCTB.
B JIO6OM Cnyae, KOMnHaHn Foppa Pedretti S.p.A. He HecET HnKaKoI OTBeTCTBeHHocTH 3a yuep6, npuHHeHHbI JIOdAM HnnpedMeTaM,OTnUHbIM OT N3eJIy, No npuHHe HecO6LIODeHnY kA3AHn / npedncaHn / npedypeJxHn, cOpEkaunxC8 B DaHHOM pyKOBOdCTBe Hn, KaK aIbTePHaTHBa, B "INcHTpyKzHn NO MONTaxy n 3KcNlyaatauH", coNPoBoXdaUoSei KaXdoe H3dJeNe n npedHa3HaueHHOe Ira BnaDeIbua/NoIb3OBateJr. (HaNPmep, YnCTO B KaYeCTBe npimepa, B Cnyae DeTCKoN KPOBatKn: "HnkOrda He octaBnIte 6e3 npincMOtpa pe6eHka. KoHTpoJIpyTe, YTObI rOLOBa pe6eHka He OKa3aJacb NOKpbITOn pOcTBHeU Hn ODeJlOM...").
KomnaHn Foppa Pedretti S.p.A., Kpome npoero, He HecET HnKaKoN OTBeTCTBHeHOctn 3a yUep6, npuHHbI JIOdAM NnIMMyUeCTBy, eCIn NOJOMKa ee npOdyKcHn CBa3aHa C pa3pySeHHeM KOMNoHEtOB N3deJIH, NOBepraEmbIX HopMaJIbHOMy N3HOCy. KomnoHentAmN, NOBepraIoUcMMcR HOpMaJIbHOMy N3HOCy, CHTaOTcR BCE nJaCTMaCCOBbie KOMNoHETbl N3deJIH.
REZERVNI DIJELOVI
A
B

D

C
E
F
A - stražnja i prednja noga (x2)
B - lijeva strana spoja (s upravljackom pločom i odjeljkom za baterije) (x1)
C - desna strana spoja (x1)
D -sjedalo s postavom
E-dio s igračkama (x1)
F - plisane igračke
DODACI:
1x transformator, 1x daljinski upravljač, 1x korisnički prisučnik, 2xPoklopca, 2X prekrivač/poklopac zaobljenih vijaka, 2x podloška za zakljucavanje
UPOZORENJE: Samo odrasla osoba moze sastavlji proizvod.