
Foodlocker Pro - Vacuum packaging machines Klarstein - Free user manual and instructions
Find the device manual for free Foodlocker Pro Klarstein in PDF.

| Brand | Klarstein |
| Model | Foodlocker Pro |
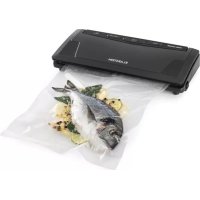
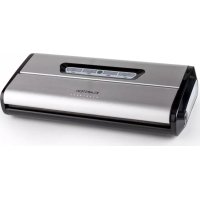
| Product type | Vacuum packaging machine |
| Power supply | 220-240 V ~ 50 Hz |
| Power | 120 W |
| Dimensions (approx.) | 40 x 20 x 10 cm |
| Weight (approx.) | 2 kg |
| Main functions | Automatic and manual vacuum sealing, sealing only, manual pump stop |
| Settings | Sealing time for dry or moist food (MOIST) |
| Sealing strip | With Teflon-coated heating element |
| Vacuum chamber | Yes, for placing the bag end |
| Bag making | Possible from vacuum film (variable size) |
| Safety | Do not expose to water, do not repair yourself, hot surface, emergency stop by unplugging |
| Care and cleaning | Clean with a dry cloth, do not use volatile liquids, check the seals |
| Spare parts / Repairability | Do not disassemble the appliance, repair only by qualified technician |
| Included accessories | Not specified in the manual, but compatible with standard vacuum bags |
| General information | Article number 10029742, manufacturer Chal-Tec GmbH, UK importer: Chal-Tec UK Limited |
| Warranty | Warranty voided if tampered with by unauthorized persons |
Frequently Asked Questions - Foodlocker Pro Klarstein
User questions about Foodlocker Pro Klarstein
0 question about this device. Answer the ones you know or ask your own.
Ask a new question about this device
Download the instructions for your Vacuum packaging machines in PDF format for free! Find your manual Foodlocker Pro - Klarstein and take your electronic device back in hand. On this page are published all the documents necessary for the use of your device. Foodlocker Pro by Klarstein.
USER MANUAL Foodlocker Pro Klarstein
INHALTSVERZEICHNIS
natural_image
Symbol of a trash bin crossed with a diagonal line, no text or numbers presentUnit 6 Riverside Business Centre
Brighton Road
Shoreham-by-Sea
BN43 6RE
United Kingdom
Dear Customer,
Congratulations on purchasing this device. Please read the following instructions carefully and follow them to prevent possible damages. We assume no liability for damage caused by disregard of the instructions and improper use. Scan the QR code to get access to the latest user manual and more product information.

CONTENT
Safety Instructions 14
product description 16
Operation 18
Hints For the Best Result 20
Troubleshooting 20
Note for Storage 21
Disposal Considerations 22
Manufacturer & Importer (UK) 22
TECHNICAL DATA
| Item number 10029742 | |
| Power supply 220-240 V ~ 50 Hz | |
| Power consumption 120 W |
SAFETY INSTRUCTIONS
- Do not expose this device to rain.
- Do not playe objects on the unit filled with liquids, such as vases.
- Use recommended accessories only.
- Do not repair this device yourself. Refer repairs to qualified service personnel.
- Do not drop any metal objects into this unit.
- Do not place heavy objects on top of this unit.
- Make sure that the power supply voltage corresponds to the specifications on this unit.
- Plug the power cord into the outlet securely.
- Do not pull the cable, do not bend it and do not place heavy objects on it.
- Do not handle the plug with wet hands.
- Grasp the plug when pulling out of the electrical outlet.
- Do not use a damaged power plug or a damaged electrical outlet.
- Install this unit so that the power cord can be unplugged immediately when a problem occurs.
- Set the appliance on a dry, flat, waterproof and heat-resistant surface.
- The socket must be readily accessible to disconnect the unit quickly in an emergency from the electrical circuit.
- Do not install or position this unit in a bookcase, built-in wardrobe or any other confined space. Ensure good ventilation of the unit.
- Do not place near to an amplifier or other equipment that may be hot. The heat can damage the unit.
- Do not expose this unit to direct sunlight, high temperatures, excessive moisture and excessive vibration.
- Repairs to the appliance should only be carried out by an authorized service center.
- A remodeling or modification of the affected product safety. Risk of injury!
- Open the product never arbitrarily and perform repairs never yourself!
- Incorrect reassembly may result in malfunction or total failure.
- Open in no case the unit. We assume no liability for consequential damages. The warranty expires at foreign interference with the device.
Small objects / Packaging Parts
Store small objects (eg screws and other mounting hardware, memory cards) and packaging parts out of the reach of children. Do not let you play with the film. Risk of suffocation!
Transport
Please keep the original packaging. To an adequate protection during transport of the device, pack the unit in its original packaging.
Cleaning
Do not use volatile liquids, such as insecticide spray. Dont clean the surface with strong pressure otherwise it could get damaged. Rubber or plastic should not be in contact with the device over a longer period. Clean the appliance and the floor using a soft cloth and warm water, if necessary, a soap solution. Never submerge the base in water or any other liquid.
Intended Use
This device is used for vacuum sealing food or other items. It is exclusively meant for this purpose and must only be used for this purpose. It may only be used in the manner as described in this manual. This product is not designed for use by persons (including children) who have reduced physical, sensory or mental capacities or persons with no experience or knowledge, unless they are instructed and supervised in the use of the appliance by a person responsible for their safety.
PRODUCT DESCRIPTION
Control Panel

| 1 | Auto | In standby mode: Press for automatic vacuum and sealing routine. When device is working, press to cancel. |
| 2 | Seal | Press to seal without prior vacuuming.When VACUUM&SEAL routine is currently running, press here to cancel vacuuming, and start sealing immediately, |
| 3 | Vacuum Device | Device vacuums as long as this button is pressed. |
| 4 | Seal Time | Press to choose sealing time according to food sort (options: dry/ moist; default: dry).. |
Overview
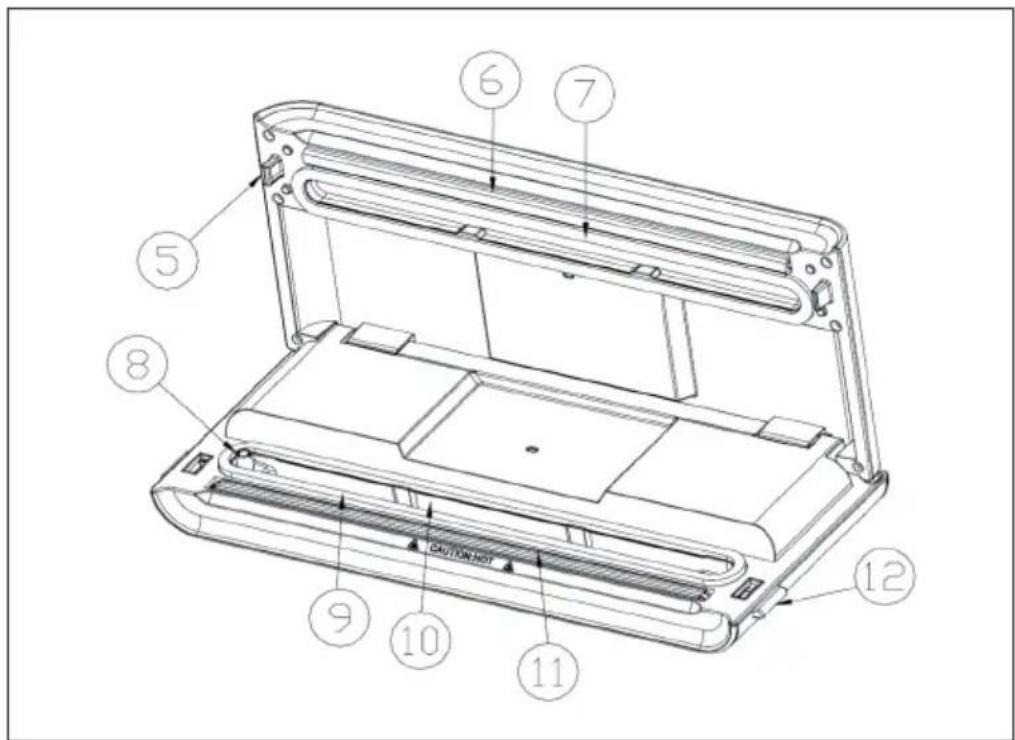
| 5 Hook Locks the cover to the base. | ||
| 6 Sealing strip Place the bag over this strip for sealing. | ||
| 7 Upper gasket | Clean and dry regularly. Replace it when distorted or broken. | |
| 8 Air intake | ||
| 9 Lower gasket | ||
| 10 Vacuum chamber | Position the open end of the bag inside the chamber; draws air out of bag and catches liquid overflow from the bag | |
| 11 Sealing element | Teflon-coated heating element which is hot and seals the bag | |
| 12 Release buttons | Press both sides to open the cover and release the vacuum pressure inside the machine. | |
OPERATION
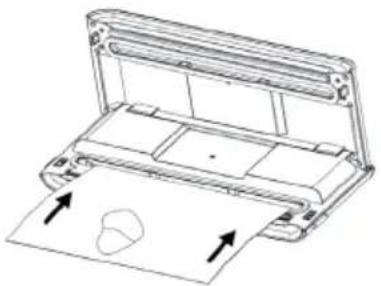
Making a bag out of a bag roll (variable in size)
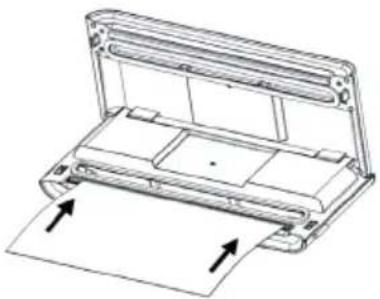 | Connect the device to a household AC outlet and cut commercial vacuum bag roll to pieces in the desired size. Open the lid and place one end of your future bag onto the sealing element without sliding it into the vacuum chamber. |
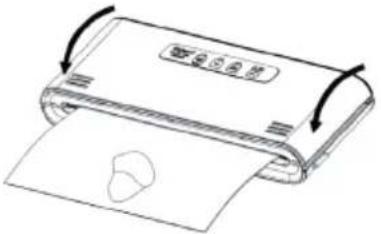
 | Close the lid (clicks distinctly when snapping in place). |
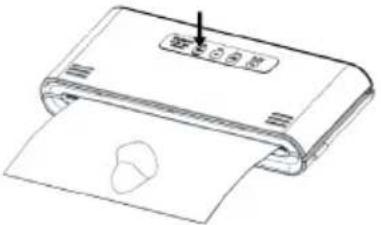
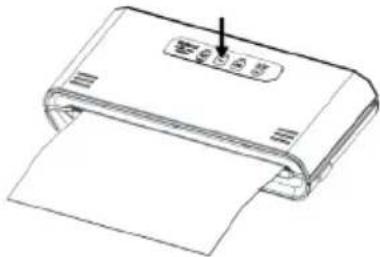 | Press Seal to start sealing. |
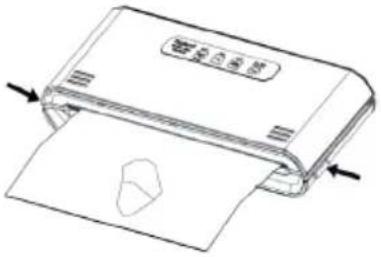
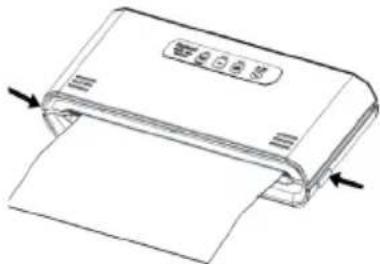 | Press the release buttons on both sides to oben the cover and take the bag out.Caution:The device heats up when in use. Let it cool down with its cover opened for about 1 minute after each sealing procedure. Allow the device to cool down completely before storing it. Do not wind the AC cord around it. |
Vacuum packaging with a bag
 | Put any fitting items into the bag.Make sure the open end of the bag is straightened, with no dust, crumbs, wrinkles, moist, grease or any damage to it. |
 | Close the lid (clicks distinctly when snapping in place).Check the LED status of the FOOD button and the VACUUM TIME button to confirm sealing time depending on the moisture status of packed items (moist or dry) and desired vacuum pressure (normal/gentle) according to the type of food; |
 | Then press VACUUM. The unit vacuums and seals the bag automatically. |
 | Press the release buttons on both sides to oben the cover and take the bag out.Caution:The device heats up when in use. Let it cool down with its cover opened for about 1 minute after each sealing procedure. Allow the device to cool down completely before storing it. Do not wind the AC cord around it. |
HINTS FOR THE BEST RESULT
- Fill the bag only to an extent that leaves it possible to place the bag opening in the vacuum chamber without wrinkles or ripples.
- Make sure the bag is dry. If the bag or its content are moist or wet, this will affect the vacuum performance negatively.
- Straighten the bag to remove as much air as possible from it - this will significantly speed up the process.
- Do not vacuum package objects with sharp edges like fish bones or shells as these might tear the bag
- Make sure there is no crack or deformation, or small particles resting on the foam gaskets around the vacuum chamber. If so, please take it out and wash and dry it thoroughly, or replace with a new one.
- During bag vacuum packaging process, small amounts of liquids, crumbs or food particles can be inadvertently pull into the vacuum chamber, clogging the pump and damaging your appliance. To avoid this, freeze moist and juicy foods first before sealing bags or place a folded paper towel near the inside top of the bag. For powdery or fine-grained foods, avoid overfilling bags. You may also place a coffee filter inside before vacuum packaging.
- Pre-freeze fruits and blanch vegetables before vacuum packaging for best results.
- The supplied bags are generally washable and reusable. Exceptions: Do not re-use bags you used for raw mear, fish, greasy food before. Also, do not re-use bags after using them in a microwave or for cooking.
TROUBLESHOOTING
| Nothing happens when I try to vacuum package | Please check the AC outlet, fuses and the power cord for damages.Make sure the bag is placed into the vacuum chamber correctly and does not block the air intake. |
| Air is not completely / not sufficiently removed from the bag | Make sure the bag opening is completely placed into the vacuum chamber, is clean and has no wrinkles to it. Also, make sure the bag is completely intact. |
| The machine does not turn to seal after vacuuming | Please check the sealing element. It must be free of ay kind of contamination and sit in its correct position-Make sure the bag is clean, free of wrinkles and contamination.Fresh fruit (fruit, vegetables, cereals, grain, mushrooms, etc.) emmit gases and ferment. All those are not suitable for vacuum packaging. |
| The bag is melting | Let it cool down with its cover opened for about 1 minute after each sealing procedure. Allow the device to cool down completely before storing it. Do not wind the AC cord around it.If a bag melts, clean the sealing element (disconnect from AC outlet and let cool down before!) and cut the damaged piece from the bag. |
NOTE FOR STORAGE
To protect the seals:
When storing the appliance after use, leave the lid open. Do not store the unit with the lid closed! Otherwise, the seals may deform and affect the operation of the unit.
DISPOSAL CONSIDERATIONS

natural_image
Symbol of a trash bin crossed with a diagonal line, no text or numbers presentIf there is a legal regulation for the disposal of electrical and electronic devices in your country, this symbol on the product or on the packaging indicates that this product must not be disposed of with household waste. Instead, it must be taken to a collection point for the recycling of electrical and electronic equipment. By disposing of it in accordance with the rules, you are protecting the environment and the health of your fellow human beings from negative consequences. For information about the recycling and disposal of this product, please contact your local authority or your household waste disposal service.
MANUFACTURER & IMPORTER (UK)
Manufacturer:
Chal-Tec GmbH, Wallstrasse 16, 10179 Berlin, Germany.
Importer for Great Britain:
Chal-Tec UK limited
Unit 6 Riverside Business Centre
Brighton Road
Shoreham-by-Sea
BN43 6RE
United Kingdom
Estimado cliente:
ÍNDICE DE CONTENIDOS
natural_image
Symbol of a trash bin crossed with a diagonal line, no text or numbers presentUnit 6 Riverside Business Centre
Brighton Road
Shoreham-by-Sea
BN43 6RE
United Kingdom
Cher client,
SOMMAIRE
natural_image
Symbol of a trash bin crossed with a diagonal line, no text or numbers presentUnit 6 Riverside Business Centre
Brighton Road
Shoreham-by-Sea
BN43 6RE
United Kingdom
Gentile Cliente,
INDICE
natural_image
Symbol of a trash bin crossed out by a diagonal line, with no text or labels present.PRODUTTORE E IMPORTATORE (UK)
Produttore:
Chal-Tec GmbH, Wallstraße 16, 10179 Berlino, Germania.
Unit 6 Riverside Business Centre
Brighton Road
Shoreham-by-Sea
BN43 6RE
Regno Unito

area
| Category | Value | |---|---| | 1 | 100 | | 2 | 100 | | 3 | 100 | | 4 | 100 | | 5 | 100 | | 6 | 100 | | 7 | 100 | | 8 | 100 | | 9 | 100 | | 10 | 100 | | 11 | 100 | | 12 | 100 | | 13 | 100 | | 14 | 100 | | 15 | 100 | | 16 | 100 | | 17 | 100 | | 18 | 100 | | 19 | 100 | | 20 | 100 | | 21 | 100 | | 22 | 100 | | 23 | 100 | | 24 | 100 | | 25 | 100 | | 26 | 100 | | 27 | 100 | | 28 | 100 | | 29 | 100 | | 30 | 100 | | 31 | 100 | | 32 | 100 | | 33 | 100 | | 34 | 100 | | 35 | 100 | | 36 | 100 | | 37 | 100 | | 38 | 100 | | 39 | 100 | | 40 | 100 | | 41 | 100 | | 42 | 100 | | 43 | 100 | | 44 | 100 | | 45 | 100 | | 46 | 100 | | 47 | 100 | | 48 | 100 | | 49 | 100 | | 50 | 100 | | 51 | 100 | | 52 | 100 | | 53 | 100 | | 54 | 100 | | 55 | 100 | | 56 | 100 | | 57 | 100 | | 58 | 100 | | 59 | 100 | | 60 | 100 | | 61 | 100 | | 62 | 100 | | 63 | 100 | | 64 | 100 | | 65 | 100 | | 66 | 100 | | 67 | 100 | | 68 | 100 | | 69 | 100 | | 70 | 100 | | 71 | 100 | | 72 | 100 | | 73 | 100 | | 74 | 100 | | 75 | 100 | | 76 | 100 | | 77 | 100 | | 78 | 100 | | 79 | 100 | | 80 | 100 | | 81 | 100 | | 82 | 100 | | 83 | 100 | | 84 | 100 | | 85 | 100 | | 86 | 100 | | 87 | 100 | | 88 | 100 | | 89 | 100 | | 90 | 100 | | 91 | 100 | | 92 | 100 | | 93 | 100 | | 94 | 100 | | 95 | 100 | | 96 | 100 | | 97 | 100 | | 98 | 100 | | 99 | 100 | | Note: The actual values in the 'Value' column are not provided in the code. I have used the label 'The Region' to represent the 'Region'. The values are estimated based on the provided code.
KLARSTEIN

- INHALTSVERZEICHNIS
- Dear Customer,
- CONTENT
- SAFETY INSTRUCTIONS
- Small objects / Packaging Parts
- Transport
- Cleaning
- Intended Use
- PRODUCT DESCRIPTION
- Overview
- OPERATION
- Vacuum packaging with a bag
- HINTS FOR THE BEST RESULT
- TROUBLESHOOTING
- NOTE FOR STORAGE
- To protect the seals:
- DISPOSAL CONSIDERATIONS
- MANUFACTURER & IMPORTER (UK)
- Manufacturer:
- Importer for Great Britain:
- Estimado cliente:
- ÍNDICE DE CONTENIDOS
- Cher client,
- SOMMAIRE
- Gentile Cliente,
- INDICE
- PRODUTTORE E IMPORTATORE (UK)
- Produttore:
- KLARSTEIN
Brand : Klarstein
Model : Foodlocker Pro
Category : Vacuum packaging machines