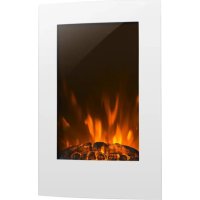
Studio Light & Fire 1 - Fireplace Klarstein - Free user manual and instructions
Find the device manual for free Studio Light & Fire 1 Klarstein in PDF.
Download the instructions for your Fireplace in PDF format for free! Find your manual Studio Light & Fire 1 - Klarstein and take your electronic device back in hand. On this page are published all the documents necessary for the use of your device. Studio Light & Fire 1 by Klarstein.
USER MANUAL Studio Light & Fire 1 Klarstein
Dear Customer, Congratulations on purchasing this device. Please read the following instructions carefully and follow them to prevent possible damages. We assume no liability for damage caused by disregard of the instructions and improper use. Scan the QR code to get access to the latest user manual and more product information. CONTENTS Safety Instructions22 Product Data Sheet23 Product Overview (100327725 & 10032727)25 Product Overview (10034486)26 Parts Supplied (10034486)27 Assembly28 Operation30 Safety Cut-Out33 Cleaning and Care33 Troubleshooting34 Disposal Considerations35 Manufacturer & Importer (UK)35 TECHNICAL DATA Item number 10032725, 10032727, 10034486 Power supply 220-240 V ~ 50 Hz Power max. 2000 W22
- Do not use the appliance until it is securely xed as described in this manual.
- Check that the voltage indicates on the data plate corresponds with that of the local network before connecting the appliance to the mains power supply.
- If the supply cord is damaged, it must be replaced by a quali ed engineer in order to avoid a hazard.
- The replace heater must not be positioned directly under the power socket.
- Keep furniture, curtains and other ammable material at least 1 meter away from the appliance.
- Do not leave the appliance unattended during use.
- Do not leave the appliance unattended whilst connected to the mains supply.
- Keep out of reach of children and do not allow them to operate this appliance.
- This appliance is intended for household use only and should not be used for industrial purposes.
- Do not operate this appliance after a malfunction or after being damaged in any way.
- Repairs to electrical appliances should only be performed by a quali ed electrician.
- Improper repairs may place user at serious risk.
- Do not run the mains cable under carpets, rugs, etc.
- Do not allow the mains cable to hang over sharp edges or come in contact with hot surfaces.
- In order to avoid overheating, do not cover the heater.
- Do not use this heater with a programmer, timer, separate remote control system or any other device that switches the heater on automatically, since a re risk exists if the heater is covered or positioned incorrectly.
- Never immerse the product in water or any other liquid for any reasons.
- Do not use this heater in the immediate surroundings of a bath, a shower or a swimming pool.
- Do not use the appliance outdoors.
- Do not use if you have wet hands.
- Never use the appliance on or near hot surfaces.
- Do not operate with a damaged cord.
- Before cleaning the appliance, make sure it is unplugged from the power and that it is completely cooled.
- Do not clean the appliance with abrasive chemicals.
- Never use accessories that are not recommended or supplied by the manufacturer. It could cause danger to the user or damage to the appliance.
- This device may be only used by children 8 years old or older and persons with limited physical, sensory and mental capabilities and / or lack of experience and knowledge, provided that they have been instructed in use of the device by a responsible person who understands the associated risks.
- Children should be supervised to ensure that they do not play with the appliance. CAUTION Risk of burns! Some parts of this product can become very hot and cause burns. Particular attention has to be given where children and vulnerable people are present.23
Model identier(s): 10032725, 10032727 Item Symbol Value Unit Item Unit Heat output Type of heat input, for electric storage local space heaters only Nominal heat output P nom
2.0 kW manual heat charge control, with integrated
Minimum heat output (indicative)
1.0 kW manual heat charge control with room and/or
outdoor temperature feedback
Maximum continuous heat output
2.0 kW electronic heat charge control with room and/or
outdoor temperature feedback
Auxiliary electricity consumption fan assisted heat output no At nominal heat output (fan motor)
Type of heat output/room temperature control At minimum heat output (fan motor)
0.027 kW single stage heat output and no room
0 kW Two or more manual stages, no room temperature control
with mechanic thermostat room temperature control
with electronic room temperature control no electronic room temperature control plus day timer
electronic room temperature control plus week timer yes Other control options (multiple selections possible) room temperature control, with presence detection
room temperature control, with open window detection yes with distance control option no with adaptive start control no with working time limitation yes with black bulb sensor no Contact details Chal-Tec GmbH, Wallstraße 16, 10179, Berlin, Germany24
2.0 kW manual heat charge control, with integrated
thermostat N/A Minimum heat output (indicative)
1.0 kW manual heat charge control with room and/or
outdoor temperature feedback N/A Maximum continuous heat output
2.0 kW electronic heat charge control with room and/or
outdoor temperature feedback N/A Auxiliary electricity consumption fan assisted heat output N/A At nominal heat output el max
0.990 kW single stage heat output and no room
with mechanic thermostat room temperature control
with electronic room temperature control no electronic room temperature control plus day timer
electronic room temperature control plus week timer yes Other control options room temperature control, with presence detection
room temperature control, with open window detection yes with distance control option no with adaptive start control no with working time limitation yes with black bulb sensor no Contact details Chal-Tec GmbH, Wallstraße 16, 10179, Berlin, Germany25
PRODUCT OVERVIEW (10034486) 1 Heater 2 Surround 3 Log set27
PARTS SUPPLIED (10034486) Fireplace Remote Control Screw x 6 Wall Plug x 6 Washer x 6 Pebbles 3,2 kg Note: Some parts are packaged within the cavity of the surround on the rear of the replace. Upper Wall Bracket28
ASSEMBLY WARNING Risk of electric shock and other injuries! Only assemble the dos device as described in the operating instructions. Required tools: 2mm pilot drill bit Drill bit (8 mm, you may need to be a masonry bit) Phillips screwdriver Power drill Assembly instructions Before you begin with the assembly, please note the following points:
- 2 persons are required for assembly.
- Keep your back straight when lifting.
- Avoid turning your hips. It is better to put your feet back on.
- Avoid strong bending of your upper body. Always go to your knees instead of bending your hips. Do not lean in front of or to one side while carrying the replace.
- Always grasp with the palm of your hand. Do not use your ngertips to hold the replace.
- Keep the replace as close to the body as possible to avoid unnecessary and disproportionate strain on the body.
- Use gloves for extra support.
- Ask for help if needed. Unpacking the contents The device is delivered in a single carton. When carefully removing the unit, observe the following instructions:
- Make sure that the device is in the correct position, as it is printed on the carton.
- Remove the tapes cuffs.
- Carefully lift the replace out of the carton.
- Remove the transport protection and the foils from the replace. Helpful advice before tting The appliance can be operated either by the switches located on the left hand side of the replace under its canopy or by the supplied remote control.29
1. The replace is designed to be permanently xed to o woll ot a minimum height of
300 mm. The wall bracket must be tted horizontally and the cable routed to the bottom right of the re. A height of 600 mm from the oor to the bottom of the wall re is recommended for optimum viewing of the fuel bed.
2. Use the bracket as a table template and mark ve drill positions on the wall. Ensure
that these holes are all level.
3. Put the bracket aside and drill
holes with a depth 35 mm using a 2 mm pilot drill bit & 8mm drill bit.
4. Clean the holes from dust and
debris and insert one plug in each hole. Make sure the edge of each hole is ush with the surface.
5. Hold the bracket in position
and x it in place with screws.
6. Carefully lilt the appliance
up, ensuring that the top rear ledge of wall re engages with the wall bracket and is sitting centrally. This process should be carried out by two people to avoid injury or damage to property or the appliance.
7. Do not let go of the appliance until you are sure it is safely attached to the bracket.
Gently bring the wall re down against the wall. Mark the lower xing brackets two xing hole positions on the wall, then remove the wall re.
8. Drill the wall and insert the wall plugs.
9. Ret the wall re to the wall and fasten the bottom xing bracket to the wall using
the screws provided to permanently x the wall re in place.
10. Remove the front panel and unpack the logs from the bag and place them along the
light unit in the desired position.
11. Put the front panel back in place.30
OPERATION Manual operation The On/Off switch is must be switched to ‚I‘ to begin operating the replace. It is operated via the buttons on the left side of the replace under the canopy. The replace will beep to indicate that it is powered up.
- Turn on the appliance by pressing the power switch on the main unit.
- To activate the Aame effect, press the Flame button. The indicator light will illuminate, this can be activated without the heater operating. Press 1x: low brightness Press 2x or 3x: Increase brightness Press 4x: Deactivate ame effect again
- The fan heater has two separate settings that are selected by pressing each function button: Button 1: 1000 W Button 2: 2000 W
Remote control and button functions 10032725 &10032727 Power Button Press this button to turn the appliance on and off. Flame Button Press this button to cycle between the three ame effect settings. Arrow Buttons Use the buttons to change the desired room temperature. The temperature currently selected will be displayed on the diplay. Heating Level Press this button to change between the available heating levels. Downlight Press this button to turn the downlights on and off. Timer Button Press to this button to turn the timer settings on and off. Power Button Press the button to turn the appliance On and Off. Flame Button Press the button to cycle between the three ame effects. Arrow Buttons Use the buttons to change the desired room temperature. The temperature currently selected will be displayed. Heating Level Button Press the button to change between the available heating levels. Timer Button Press the button to turn the timer On/Off.32
- Press the clock button, then use the arrow buttons to select the day.
- Press the clock button again, then use the arrow buttons to select the hour value (24 hour format).
- Press the clock button again, then use the arrow buttons to select the minute value. Week Timer Your replace includes a 7 day timer, which allows you to set two periods of operation per day. The re will operate with the previously used settings for the heating level, desired temperature, and ame colour. To set the timer press the week timer button. The unit will display the day, period, and if you are setting the On or Off time. For each period both the On and Off times must be set. For each Period:
1. Set the On hour value using the arrow buttons, press
the week timer button to conrm.
2. Set the On minute value using the arrow buttons, press
the week timer button to conrm.
3. Set the Off hour value using the arrow buttons, press
the week timer button to conrm.
4. Set the Off minute value using the arrow buttons, press
the week timer button to conrm. The re will then move onto the next period / rst period of following day, allowing this to be programmed in the same way. The days and periods can be scrolled through by repeatedly pressing the week timer button. To clear an operational period set the ON and OFF times to the same value. Open Window Detection Your replace includes „Open Window Detection“ which will stop the heating function after a period of time if the room temperature is not increasing, on the assumption that there is an open door or window. This is designed to save energy and can be turned on and off using the AUTO button. When the function has been activated, AUTO will ash on the screen.33
SAFETY CUT-OUT This appliance is tted with a safety cut-off which will operate if the replace overheats (e.g. due to blocked air vents). For safety reasons, the re will NOT automatically reset. To reset the appliance, disconnect the appliance from the mains supply for at least 15minutes. Reconnect to the mains supply and switch on the appliance.
Note: Turn off the unit and unplug it from the power outlet. Wait until the unit has completely cooled down before cleaning it.
- Use a vacuum cleaner to clean the ventilation slots and grilles.
- Remove dust on the outside surfaces with a damp (not wet) cloth.
- Do not use strong cleaning agents or abrasives.
- Do not allow water or other liquids to run into the interior of the product. Do not spray the device with liquids or immerse it in water or other liquids.
- Never open the heater housing. Storage Keep the unit in a dust-free place during the low season. Pack it in the original carton. Wind the heater cable cleanly to avoid damaging the cable.34
TROUBLESHOOTING Safety Cut-Out device To ensure against the potential hazard caused by blockage of the air outlet, this unit is equipped with an automatic overtemperature safety cut-out device. When the device is activated the heater will not operate. If this occurs, the unit can be reset using the following procedure: 1 Turn the re off by depressing the on/off switch on the unit. 2 Unplug the power cord form the electrical mains supply socket and leave it disconnected for at least 15 minutes. 3 Ensure that the air vents are free from obstruction. 4 Plug the power cord back in to the mains socket. 5 Turn the re back on. 6 If the re fails to operate, check the fuse in the plug. 7 If the fuse in the plug is OK and the re is still not functioning, contact a qualied service person. Problem Solution No operation / no fan Check that the safety cut-off has not operated. Check the fuse. If broken, a replacement is necessary. No light Check the LED, if broken a replacement is necessary.35
DISPOSAL CONSIDERATIONS If there is a legal regulation for the disposal of electrical and electronic devices in your country, this symbol on the product or on the packaging indicates that this product must not be disposed of with household waste. Instead, it must be taken to a collection point for the recycling of electrical and electronic equipment. By disposing of it in accordance with the rules, you are protecting the environment and the health of your fellow human beings from negative consequences. For information about the recycling and disposal of this product, please contact your local authority or your household waste disposal service. This product contains batteries. If there is a legal regulation for the disposal of batteries in your country, the batteries must not be disposed of with household waste. Find out about local regulations for disposing of batteries. By disposing of them in accordance with the rules, you are protecting the environment and the health of your fellow human beings from negative consequences. MANUFACTURER & IMPORTER (UK) Manufacturer: Chal-Tec GmbH, Wallstrasse 16, 10179 Berlin, Germany. Importer for Great Britain: Berlin Brands Group UK Ltd PO Box 1145 Oxford, OX1 9UW United Kingdom37