
Tastemaker Compact - Vacuum sealer Klarstein - Free user manual and instructions
Find the device manual for free Tastemaker Compact Klarstein in PDF.
| Product type | Vacuum sealer machine (immersion circulator) |
| Brand | Klarstein |
| Model | Tastemaker Compact |
| Item number | 10030114 |
| Power supply | 220-240 V ~ 50-60 Hz |
| Temperature range | 0 to 99 °C |
| Time range | 0 to 99.59 hours |
| Pumping volume | 12 liters/minute |
| Water absorption capacity | 5 to 22 liters |
| Display | Digital display with temperature and duration |
| Temperature setting | In steps of 0.1 °C or 1 °C |
| Duration setting | Setting in hours and minutes |
| Keep warm function | Automatic for 1 hour after end |
| Water level indicator | MIN and MAX marks |
| Mounting clip | For pot edge |
| Safety | Automatic shut-off in case of water shortage (code E04), overheating protection |
| Maintenance | Removable lid for cleaning the heating element |
| Dimensions (approx.) | Approx. 40 × 10 × 10 cm |
| Weight (approx.) | Approx. 1.5 kg |
Frequently Asked Questions - Tastemaker Compact Klarstein
User questions about Tastemaker Compact Klarstein
0 question about this device. Answer the ones you know or ask your own.
Ask a new question about this device
Download the instructions for your Vacuum sealer in PDF format for free! Find your manual Tastemaker Compact - Klarstein and take your electronic device back in hand. On this page are published all the documents necessary for the use of your device. Tastemaker Compact by Klarstein.
USER MANUAL Tastemaker Compact Klarstein
Unit 6 Riverside Business Centre
Brighton Road
Shoreham-by-Sea
BN43 6RE
United Kingdom
Dear Customer,
Congratulations on purchasing this device. Please read the following instructions carefully and follow them to prevent possible damages. We assume no liability for damage caused by disregard of the instructions and improper use. Scan the QR code to get access to the latest user manual and more product information.

CONTENT
Safety Instructions 14
Product Description 15
Display 16
Operation 17
Hints for Sous-vide Cooking 19
Cooking Temperature and Time Guidelines 20
Disposal Considerations 22
Manufacturer & Importer (UK) 22
TECHNICAL DATA
| Item number 10030114 | |
| Power supply 220-240 V ~ 50-60 Hz | |
| Temperature range 0-99 °C | |
| Time range 0-99.59 hours | |
| Pump volume 12 litres/minute | |
| Water capacity 5-22 litres |
SAFETYINSTRUCTIONS
- This device may be only used by children 8 years old or older and persons with limited physical, sensory and mental capabilities and / or lack of experience and knowledge, provided that they have been instructed in use of the device by a responsible person who understands the associated risks.
- Keep the appliance under constant supervision while in use. Keep an eye on any children in the vicinity of the appliance when it is in use. The appliance is not a toy.
- Incorrect use of this appliance may cause personal injury and damage the appliance.
- Use for its intended purpose only. The manufacturer is not responsible for any injury or damage resulting from incorrect use or handling (see also Warranty Terms).
- For domestic use only. Not for outdoor or commercial use.
- Remove all packaging and transport materials from the inside and outside of the appliance.
- Check that the appliance has no visible damage and that no parts are missing.
- Do not use with any cords other than that supplied.
- Check that it is not possible to pull or trip over the cord or any extension cord.
- The appliance must not be used together with a timer switch or a separate remote control system.
- Turn off the appliance and remove the plug from the socket before cleaning, or when the appliance is not in use.
- Avoid pulling the cord when removing the plug from the socket. Instead, hold the plug.
- Keep the cord and appliance away from heat sources, hot objects and naked flames.
- Ensure that the cord is fully extended.
- The cord must not be twisted or wound around the appliance.
- Check regularly that neither the cord nor plug is damaged and do not use the appliance if there is any damage, or if it has been dropped on the floor, dropped in water or damaged in any other way.
- If the appliance, cord or plug has been damaged, have the appliance inspected and if necessary repaired by an authorised repairer.
- Connect to 230V, 50 Hz only. The warranty is not valid if the appliance is connected to incorrect voltage.
- Unauthorised repairs or modifi cations will invalidate the warranty.
- Only place vacuum-packed foods in the appliance. Do not try to cook unwrapped food.
CAUTION
Risk of burns! Some parts of this product can become very hot and cause burns. Particular attention should be paid where children and vulnerable people are present.
PRODUCT DESCRIPTION
| Front Rear Bottom | ||
| A B MAX water level C MIN water level D Water outlet | E F G H | I J Bottom water inlet |
| A Display B MAX water level C MIN water level D Water outlet | E Power socket F Fixing clip G Reset switch. IF dry heating (without water) happens and the sous vide will shut itself down for self protection, use this button to reset. H Water inlet | I Removable cover J Bottom water inlet |
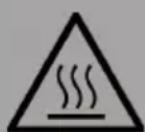
DISPLAY
OPERATION
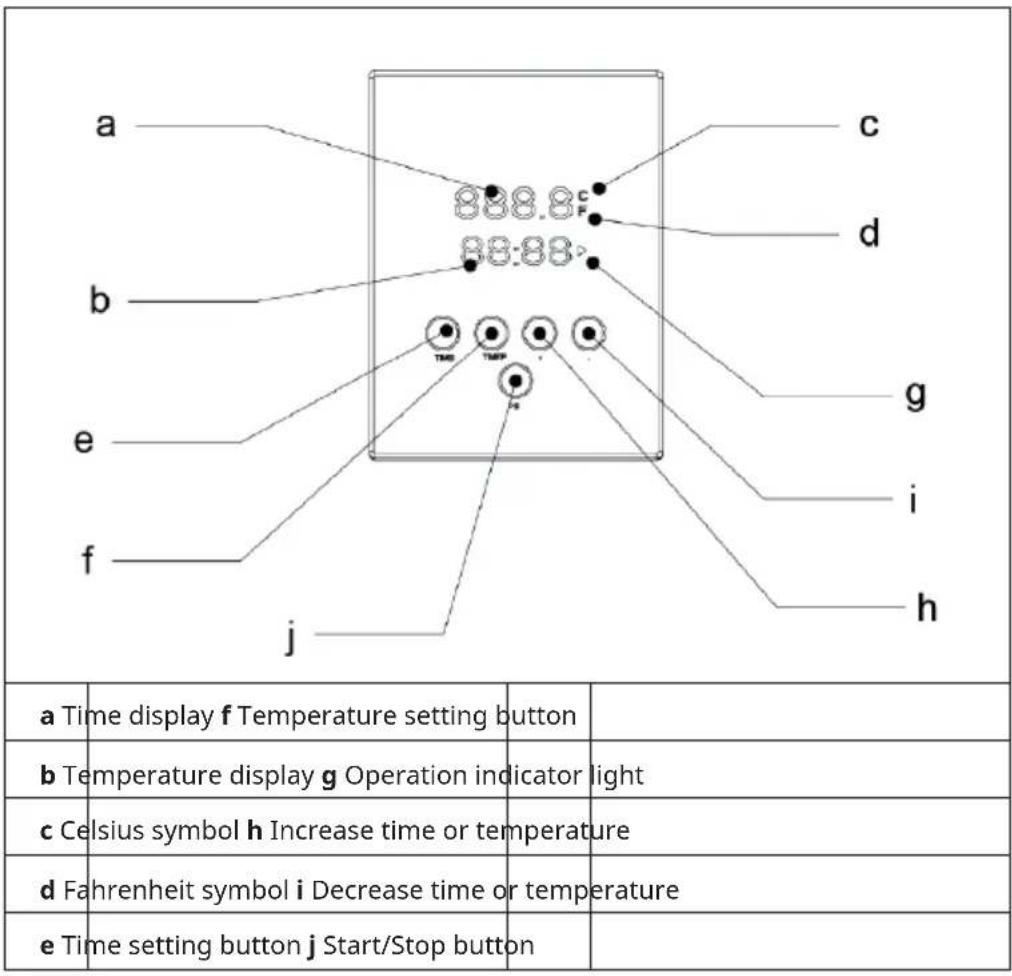
- Fill a large pot with water and secure the unit to the top of the pot using the retaining clip. IMPORTANT: Never place the device in the middle of the water bath and make sure that the water level is between the MAX and MIN marks.
- Insert the plug into the socket and press START for 0.5 seconds. The display turns on and the device is in standby mode.
- Press the TEMP button to set the temperature. Press and hold for 2 seconds to toggle between Celsius and Fahrenheit. Press and hold the [+] or [-] button to adjust the temperature in 1^ increments. Press the buttons once to adjust the temperature in 0.1^ increments.
- Press the TIME key to set the hours. Press the button again to set the minutes. Use the [+] or [-] key to adjust the time.
- Press START to start the cooking process. Place the vacuum-sealed food in the pot.
Note: If the unit is in standby mode and you press START for the first time without having set a temperature or time, the preset temperature will be 60 ^ C and the preset time will be 2 hours. If you do not use the device for the first time, the device starts with the last used settings.
- If the set time has elapsed and the unit is not stopped by the user, it will continue to run for 1 hour and then stop automatically.
Note: If water needs to be added during operation, press STOP to stop the unit. After adding water, press START to continue. 7.
- Press and hold the STOP button for 2 seconds to turn off the unit, then unplug the unit from the wall outlet.
Notes on operation
- Do not turn on the unit when the water level is below the MIN mark.
- If the unit runs dry or overheats, it will turn off automatically. In this case, let it cool down for a few minutes and then press the reset button on the back of the unit to restart it.
- When the unit is in operation, the E04 anti-dry program starts automatically. As soon as the water level drops below MIN or the unit is removed, the error message „EO4" appears in the display and the unit stops automatically.
- As long as the water temperature is below 70^ , the unit runs through. As soon as the temperature rises above 70^ , the device operates with interruptions.
- The device is not suitable for preparing open food or soups. The food must be packed in vacuum bags before cooking.
- If one of the bags runs out during cooking, remove it and empty the water. Fill with fresh water, make sure the unit is not blocked, and start cooking again with a tight bag.
- When you are done, remove the unit and let it dry.
- There is a cover on the back that you can remove to clean the heating element.
- If the error code „E08" is displayed, it means that the temperature sensor is not working properly.
In order to cook food with the Sous-vide cooker, the food must first be individually packed in vacuum bags and vacuumed.
Suitable Food
Meat is ideal for cooking in thr sous vide mode as it is more tender, succulent and flavour filled.
- Red meats like lamb, beef and pork.
- Poultry like chicken, turkey, duck.
- Fish and Seafood like fish, lobster tails, scallops.
- Root vegetables like potato, carrot, parsnip, beets, turnips.
- Tender vegetables like peas, asparagus, corn, broccoli, cauliflower, eggplant, onions, squash.
Firm fruits like apple, pear. - Tender fruit like mango, plum, apricot, peach, nectarine, papaya, strawberry.
Vacuum Sealing
Prior sealing you may add marinade, spices, butter oder other ingredients into the vacuum pouch, to enhance flavour. As oxygen and moisture in air cause food to degrade and lose flavour, texture and nutritional value, the vacuum sealing assists in opening the pores in food such as meat, poultry and seafood so that marinades and seasonings are more readily absorbed for highlighted flavour. After cooking you may roast the food quickly in a pan for extra flavour.
Cooking Tips
- Take care not to overfill the tub. The water level must always be between the MIN and MAX markings. The food should be completely covered with water.
- Cut the meat into smaller pieces to make the meat tender and shorten the cooking time. Thinner pieces shorten the cooking time. So that the food is ready at the same time, we recommend that you cut the food to be cooked into equally thick pieces.
- Condensation occurs during cooking. This may cloud the view into the appliance. Carefully lift the lid so that the condensation runs back into the tub. Open the lid as seldom as possible during cooking so that as little heat as possible escapes from the cooker.
COOKING TEMPERATURE AND TIME GUIDELINES
| Food Temperature Time | Thickness | ||
| Tenderloin, cutlets ≥49 °C | 1-6 hours 1-2 cm | ||
| Rib eye, T-bone ≥49 °C 2-8 hours 4-5 cm | |||
| Blade, chuck, leg of lamb | ≥49 °C 8-24 hours 4-6 cm | ||
| Pork belly 82 °C 10-12 hours 3-6 cm | |||
| Pork ribs 59 °C 10-12 hours 2-3 cm | |||
| Pork chops ≥56 °C 4-8 hours 2-4 cm | |||
| Pork roast ≥56 °C 10-12 hours 5-7 cm | |||
| Chicken breast with bone | 82 °C | 2-6 hours 3-5 cm | |
| Chicken breast without bone | 64 °C | 1-4 hours 3-5 cm | |
| Chicken thigh with bone | 82 °C | 2-6 hours | 3-5 cm |
| Chicken thigh without bone | 64 °C | 1-4 hours 3-5 cm | |
| Chicken legs | 82 °C | 2-6 hours 5-7 cm | |
| Duck brest | 64 °C | 3-8 hours 3-5 cm | |
| Lean fish | ≥47 °C 1-2 hours | 3-5 cm | |
| Fatty fish | ≥47 °C 1-2 hours | 3-5 cm | |
| Shrimp | 60 °C | 1 hours | 2-4 cm |
| Lobster tail | 60 °C | 1 hours | 4-6 cm |
| Scallops | 60 °C | 1 hours | 2-4 cm |
| Root vegetables | ≥83 °C 1-2 hours | 1-5 cm | |
| Tender vegetables | ≥83 °C 1-2 hours | 1-5 cm | |
The cooking time depends on the thickness and texture of the food used. The indicated times are approximate. Test different cooking times and temperatures until you get the desired result. The indicated thickness refers to vacuumed food. Thinner foods usually need a shorter cooking time.
We recommend the following temperatures
for a certain cooking degree:
| Beef, Lamb and Pork Rare: 40 °C | Medium rare: 56 °C Medium: 60 °C Medium well: 65 °C Well: 70 °C |
| Poultry With bones: 82 °C | Without bones: 64 °C |
| Fish Rare: 47 °C | Medium rare: 56 °C Medium: 60 °C |
| Vegetables 83-87 °C |
DISPOSAL CONSIDERATIONS

If there is a legal regulation for the disposal of electrical and electronic devices in your country, this symbol on the product or on the packaging indicates that this product must not be disposed of with household waste. Instead, it must be taken to a collection point for the recycling of electrical and electronic equipment. By disposing of it in accordance with the rules, you are protecting the environment and the health of your fellow human beings from negative consequences. For information about the recycling and disposal of this product, please contact your local authority or your household waste disposal service.
MANUFACTURER & IMPORTER (UK)
Manufacturer:
Chal-Tec GmbH, Wallstrasse 16, 10179 Berlin, Germany.
Importer for Great Britain:
Chal-Tec UK limited
Unit 6 Riverside Business Centre
Brighton Road
Shoreham-by-Sea
BN43 6RE
United Kingdom
Estimado cliente,
Unit 6 Riverside Business Centre
Brighton Road
Shoreham-by-Sea
BN43 6RE
United Kingdom
Chere cliente, cher client,
Unit 6 Riverside Business Centre
Brighton Road
Shoreham-by-Sea
BN43 6RE
United Kingdom
Gentile clientele,
PRODUTTORE E IMPORTATORE (UK)
Produtlore:
Chal-Tec GmbH, Wallstraße 16, 10179 Berlin, Germania.
Unit 6 Riverside Business Centre
Brighton Road
Shoreham-by-Sea
BN43 6RE
United Kingdom


KLARSTEIN