
Sanssouci - Vacuum sealer OneConcept - Free user manual and instructions
Find the device manual for free Sanssouci OneConcept in PDF.
| Product type | Vacuum machine (sous vide cooking) |
| Brand | OneConcept |
| Model | Sanssouci |
| Article numbers | 10028903, 10028904, 10030349 |
| Power supply | 220-240 V ~ 50/60 Hz |
| Power | 300 W |
| Capacity | 5 L |
| Temperature range | 40 °C to 99 °C |
| Timer | From 00:00 to 24:00 (adjustable in 30-minute increments) |
| Display | LED screen with color change (blue in standby, orange during operation) |
| Tank material | Stainless steel |
| Functions | Temperature and time adjustment, start/stop, standby mode with automatic shutdown after 1 minute |
| Safety | Automatic shutdown in standby, safety instructions to avoid burns |
| Maintenance | Cleaning with vinegar water and soft sponge; storage in a dry, ventilated place, preferably in the original packaging |
| Included accessories | Transparent lid |
| Recommended use | Cooking previously vacuum-packed foods |
| Recommended temperatures | Beef rare 40 °C, medium 56 °C, well done 70 °C; poultry with bone 82 °C, boneless 64 °C; fish rare 47 °C, etc. |
| Manufacturer | Chal-Tec GmbH, Wallstraße 16, 10179 Berlin, Germany |
Frequently Asked Questions - Sanssouci OneConcept
User questions about Sanssouci OneConcept
0 question about this device. Answer the ones you know or ask your own.
Ask a new question about this device
Download the instructions for your Vacuum sealer in PDF format for free! Find your manual Sanssouci - OneConcept and take your electronic device back in hand. On this page are published all the documents necessary for the use of your device. Sanssouci by OneConcept.
USER MANUAL Sanssouci OneConcept
text_image
QR code image containing encoded data, no visible human-readable textINHALTSVERZEICHNIS
natural_image
Symbol of a trash bin crossed with a diagonal line, no text or labels presentCongratulations on purchasing this device. Please read the following instructions carefully and follow them to prevent possible damages. We assume no liability for damage caused by disregard of the instructions and improper use. Scan the QR code to get access to the latest user manual and more product information.

text_image
QR code image containing encoded data, no visible human-readable textCONTENT
Safety Instructions 10
Product Description 11
Operation 12
Cleaning and Storage 12
Cooking Temperature and Time Guidelines 13
Hints on Disposal 14
Producer 14
TECHNICAL DATA
| Item number 10028903, 10028904, 10030349 | |
| Voltage and frequency rating 220-240 V ~ 50/60 Hz | |
| Power consumption 300 W | |
| Capacity 5 L | |
| Temperature range 40-99 °C | |
SAFETYINSTRUCTIONS
- This device may be only used by children 8 years old or older and persons with limited physical, sensory and mental capabilities and / or lack of experience and knowledge, provided that they have been instructed in use of the device by a responsible person who understands the associated risks.
- Keep the appliance under constant supervision while in use. Keep an eye on any children in the vicinity of the appliance when it is in use. The appliance is not a toy.
- Incorrect use of this appliance may cause personal injury and damage the appliance.
- Use for its intended purpose only. The manufacturer is not responsible for any injury or damage resulting from incorrect use or handling (see also Warranty Terms).
- For domestic use only. Not for outdoor or commercial use.
- Remove all packaging and transport materials from the inside and outside of the appliance.
- Check that the appliance has no visible damage and that no parts are missing.
- Do not use with any cords other than that supplied.
- Check that it is not possible to pull or trip over the cord or any extension cord.
- The appliance must not be used together with a timer switch or a separate remote control system.
- Turn off the appliance and remove the plug from the socket before cleaning, or when the appliance is not in use.
- Avoid pulling the cord when removing the plug from the socket. Instead, hold the plug.
- Keep the cord and appliance away from heat sources, hot objects and naked flames.
- Ensure that the cord is fully extended.
- The cord must not be twisted or wound around the appliance.
- Check regularly that neither the cord nor plug is damaged and do not use the appliance if there is any damage, or if it has been dropped on the floor, dropped in water or damaged in any other way.
- If the appliance, cord or plug has been damaged, have the appliance inspected and if necessary repaired by an authorised repairer.
- Connect to 230V, 50 Hz only. The warranty is not valid if the appliance is connected to incorrect voltage.
- Unauthorised repairs or modifications will invalidate the warranty.
- Only place vacuum-packed foods in the appliance. Do not try to cook unwrapped food.
CAUTION
Risk of burns! Some parts of this product can become very hot and cause burns. Particular attention should be paid where children and vulnerable people are present.
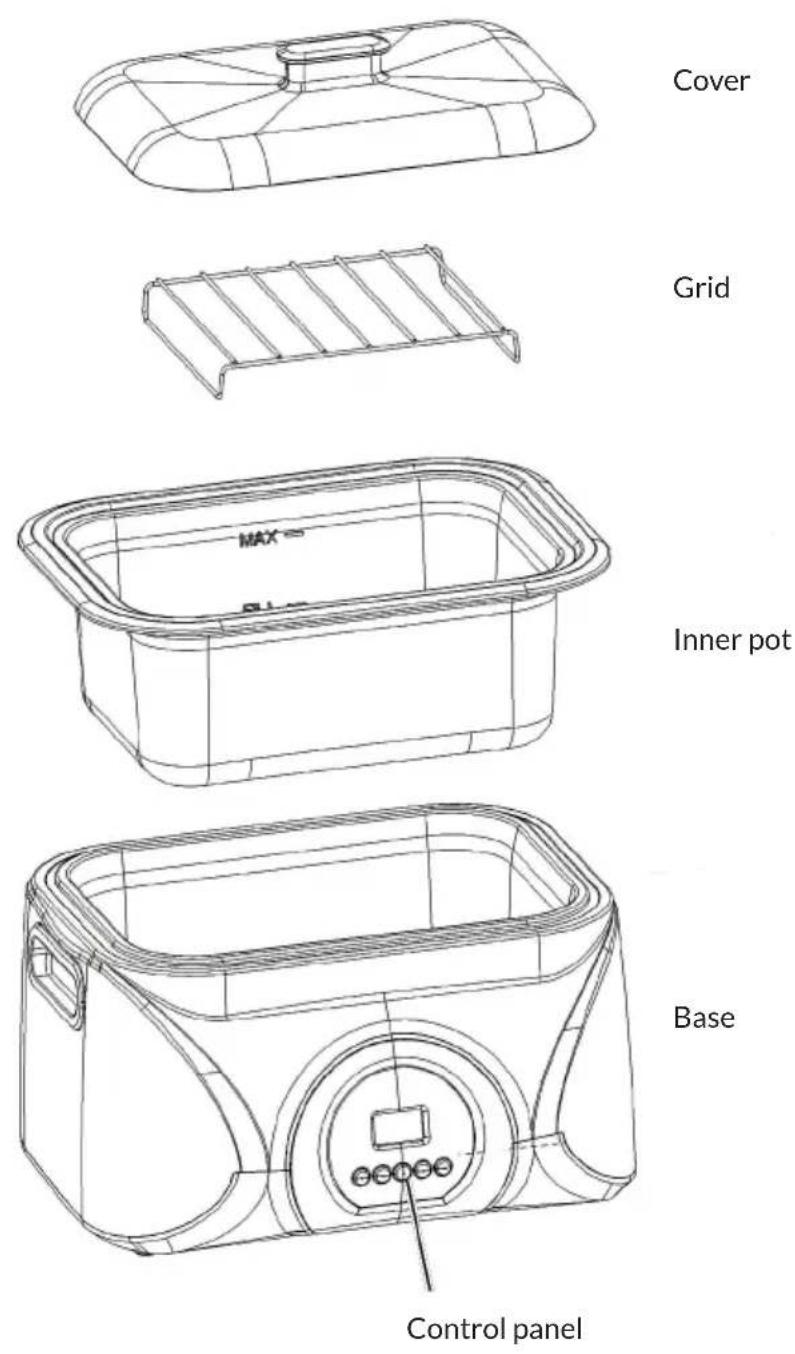
PRODUCT DESCRIPTION
OPERATION
Before cooking with the vacuum method, you must place the food in a vacuum-sealed bag. Put the bag with the food or soup into the cooker and put the transparent lid on. Connect the appliance to the mains. A beeping sound is heard. The blue display e lights up and goes into standby mode.
Setting the timer
Press „SET TIMER“ and enter the setting mode. Then press the „+“ key. You can set a time between 00:00 and 24:00. The time setting advances in 30-minute increments when you press the „+“ key. After setting the time, the display flashes for 3 seconds. This confirms the setting.
Setting the temperature
Press the „SET TEMP“ key and enter the time setting mode. Then press „+“. You can select a temperature from 49-99 °C. Pressing the „+“ key increases the temperature setting by 1 degree. After setting the temperature, the display flashes for 3 seconds. This confirms the setting.
Start/Stop
After setting the time and temperature, press the „START/STOP“ key to put the cooker into operation. The display turns orange and starts a countdown. If you want to stop the cooker, press „START/ STOP“. The device then goes into standby mode. After 1 minute, the display will go off.
Note: The temperature and time can be changed at any time during operation.
CLEANING AND STORAGE
If the inner pot is dirty, boil water with vinegar in it. Use a soft sponge and not hard objects such as steel wool sponges to avoid damaging the non-stick coating. If you do not use the appliance for a long time, clean it and put it back in the box. Store it in a dry and ventilated place.
COOKING TEMPERATURE AND TIME GUIDELINES
| Food Temperature Time Thickness | |||
| Tenderloin, cutlets ≥49 °C 1-6 hours 1-2 cm | |||
| Rib eye, T-bone ≥49 °C 2-8 hours 4-5 cm | |||
| Blade, chuck, leg of lamb ≥49 °C 8-24 hours 4-6 cm | |||
| Pork belly 82 °C 10-12 hours 3-6 cm | |||
| Pork ribs 59 °C 10-12 hours 2-3 cm | |||
| Pork chops ≥56 °C 4-8 hours 2-4 cm | |||
| Pork roast | ≥56 °C 10-12 hours 5-7 cm | ||
| Chicken breast with bone | 82 °C | 2-6 hours 3-5 cm | |
| Chicken breast without bone | 64 °C | 1-4 hours 3-5 cm | |
| Chicken thigh with bone | 82 °C | 2-6 hours 3-5 cm | |
| Chicken thigh without bone | 64 °C | 1-4 hours 3-5 cm | |
| Chicken legs | 82 °C | 2-6 hours 5-7 cm | |
| Duck brest | 64 °C | 3-8 hours 3-5 cm | |
| Lean fish ≥47 °C 1-2 hours 3-5 cm | |||
| Fatty fish ≥47 °C 1-2 hours 3-5 cm | |||
| Shrimp | 60 °C | 1 hours | 2-4 cm |
| Lobster tail | 60 °C | 1 hours | 4-6 cm |
| Scallops | 60 °C | 1 hours | 2-4 cm |
| Root vegetables | ≥83 °C 1-2 hours 1-5 cm | ||
| Tender vegetables | ≥83 °C 1-2 hours 1-5 cm | ||
The cooking time depends on the thickness and texture of the food used. The indicated times are approximate. Test different cooking times and temperatures until you get the desired result. The indicated thickness refers to vacuumed food. Thinner foods usually need a shorter cooking time.
We recommend the following temperatures for a certain cooking degree:
| Beef, Lamb and Pork Rare: 40 °C | Medium rare: 56 °CMedium: 60 °CMedium well: 65 °CWell: 70 °C |
| Poultry With bones: 82 °C | Without bones: 64 °C |
| Fish Rare: 47 °C | Medium rare: 56 °CMedium: 60 °C |
| Vegetables 83-87 °C |
HINTS ON DISPOSAL
natural_image
Symbol of a trash bin crossed with a diagonal line, no text or labels presentAccording to the European waste regulation 2012/19/EU this symbol on the product or on its packaging indicates that this product may not be treated as household waste. Instead it should be taken to the appropriate collection point for the recycling of electrical and electronic equipment. By ensuring this product is disposed of correctly, you will help prevent potential negative consequences for the environment and human health, which could otherwise be caused by inappropriate waste handling of this product. For more detailed information about recycling of this product, please contact your local council or your household waste disposal service.
PRODUCER
Chal-Tec GmbH, Wallstraße 16, 10179 Berlin, Germany.