
TS34A - Outdoor weather sensor HAMA - Free user manual and instructions
Find the device manual for free TS34A HAMA in PDF.
| Product type | Outdoor weather sensor |
| Brand | Hama |
| Model | TS34A |
| Power supply | 2 AAA batteries (1.5 V) |
| Temperature measurement range | -20°C to +60°C (-4°F to 140°F) |
| Humidity measurement range | 20% to 95% |
| Temperature measurement increments | 0.1°C / 0.2°F |
| Humidity measurement increments | 1% |
| Measurement cycle | Approximately 57 seconds |
| Radio frequency | 433 MHz |
| Radio power | 0.13 μW (max 0.015 mW) |
| Range | ≤ 30 meters in open space |
| Transmission channels | 3 (CH1, CH2, CH3) |
| Compatibility with base stations | Hama models: 76045, 113964, 123126, 123127, 123128, 123129, 136256, 136257, 136258, 136259, 186306, 186307, 186308, 186353, 186354, 186417, 186418 |
| Installation | Wall-mounted via slot or on a stand (flat surface) |
| Number of supported sensors | Up to 3 (one per channel) |
| Hygrometer | Yes |
| Thermometer | Yes |
| Barometer | No |
| Moon phases | No |
| Care and cleaning | Slightly damp lint-free cloth, avoid harsh detergents |
| Safety | Do not open, do not modify, observe battery polarity, keep out of reach of children |
| Package contents | TS34A outdoor sensor, instruction manual |
Frequently Asked Questions - TS34A HAMA
User questions about TS34A HAMA
0 question about this device. Answer the ones you know or ask your own.
Ask a new question about this device
Download the instructions for your Outdoor weather sensor in PDF format for free! Find your manual TS34A - HAMA and take your electronic device back in hand. On this page are published all the documents necessary for the use of your device. TS34A by HAMA.
USER MANUAL TS34A HAMA
OperatingInstructions
Bedienungsanleitung
Moded'emploi
Instruccionesdeuso
Gebruiksaanwijzing
Istruzioniperl'uso
Instrukcjaobsługi
Használatiútmutató
Manualdeutilizare
Návodkpoužití
Návodnapoužitie
Manualdeinstruções
Bruksanvisning


natural_image
Vertical columns of black rectangular blocks with white gaps, no text or symbols present5
1
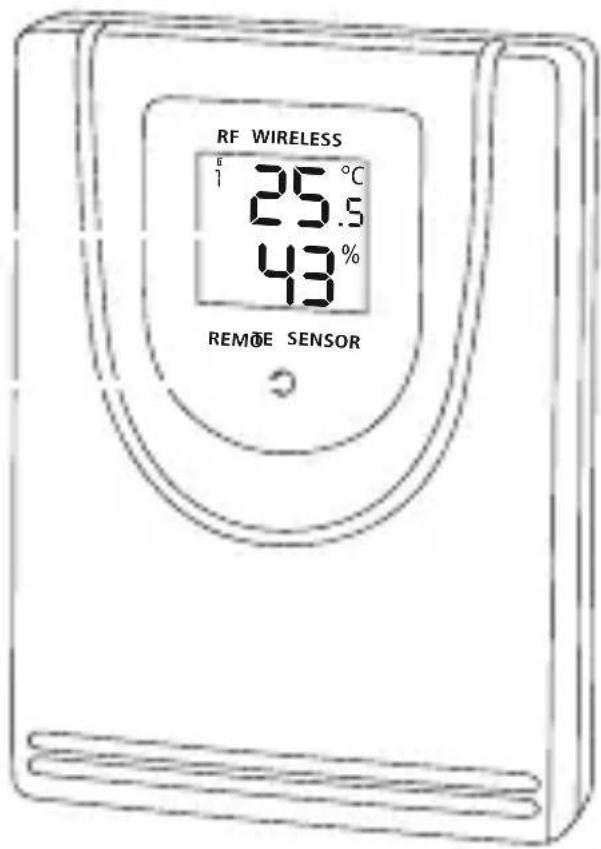
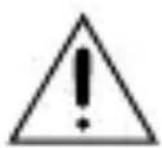
ControlsandDisplays
AMeasuringstation
1.LEDindicator
2. Batterycompartment
3.CHANNELslideswitch=selectschannel
4. Recessforwallmounting
5.LCDdisplay
1. ExplanationofWarningSymbolsandNotes
Warning
This symbol is used to indicate safety instructions to draw your attention to specific hazards and risks.
Note
This symbol is used to indicate additional information or important notes.

2.PackageContents
•TS34A Outdoor Sensor
• Theseoperatinginstructions
3.SafetyNotes
• The product is intended for private, non-commercial use only.
- Donotoperatetheproductoutsidethepowerlimitsgiveninthe specifications.
- Donotusetheproductinmoistenvirnmentsandavoidsplashes.
- Donotusetheproductintheimmediatevicinityofheatersorotherheat sourcesorindirectsunlight.
- Donotusetheproductinareaswheretheuseofelectronicdevicesis notpermitted.
- Do not put the product near interference fields, metal frames, computers, TVs, etc. Electronic devices and windowframes can negatively affect the product's functionality.
- Donotdroptheproductanddonotexposeittoanymajorshocks.
- Donotopenthedeviceorcontinuetooperateitifitbecomesdamaged.
- Donotattempttoserviceorrepairtheproductyourself.Leaveanyandall serviceworktoqualifiedexperts.
- Keep the packaging material out of there a each of child renduet other risk of suffocation.
- Disposeofpackagingmaterialimmediatelyaccordingtolocallyapplicable regulations.
- Donotmodifytheproductinanyway.Doingsovoidsthewarranty.
- Usetheproductforitsintendedpurposeonly.
- Keepthisproduct, asallelectricalproducts, outofthereachofchildren!
- Use the item only in moderate climatic conditions.
Warning-Batteries
- Wheninsertingbatteries, notethecorrectpolarity(+and-markings) andinsertthebatteriesaccordingly. Failuretodosocouldresultinthe batteriesleakingorexploding.
- Only use batteriest (or rechargeable batteries) that match the specified type.
- Beforeyouinsertthebatteries,cleanthebatterycontactsandthe polarcontacts.
- Donotallowchildrentochangebatterieswithoutsupervision.
- Donotmixoldandnewbatteriesorbatteriesofadifferenttypeor make.
- Removethebatteriesfromproductsthatarenotbeingusedforan extendedperiod(unlessthesarebeingkeptreadyforanemergency).
- Donotshort-circuitbatteries.
Warning-Batteries
- Donotchargebatteries.
- Donotthrowbatteriesinafire.
- Keepbatteriesoutofthereachofchildren.
- Neveropen,damageorswallowbatteriesorallowthemtoenter theenvironment.Theycancontaintoxic,environmentallyharmful heavymetals.
- Immediatelyremoveanddisposeofdeadbatteriesfromtheproduct.
- Avoidstoring, chargingorusingthedeviceinextremetemperatures andextremelylowatmosphericpressure(forexample,athigh altitudes).
4. Gettingstarted
- Unscrewthescrewsonthebatterycompartment(2)onthebackofthe measuringstationandopenit.
- MovetheCHslideswitch(4)totheleftorrighttoselectthechannelon whichthemeasuringstationtransmits.
- InserttwoAAAbatterieswiththecorrectpolarity.
- Thenclosethebatterycompartmentcover.
Replacingthebatteries
- Openthebatterycompartment(2),removeandproperlydisposeofthe deadbatteriesandinserttwonewAAAbatterieswiththecorrectpolarity. Thenclosethebatterycompartmentcover.

Note
Beforeuse, makesurethatyouinsertthebatteriesinthemeasuring stationfirstandtheninthebasestation.
5. Installation
Note-Installation
- Were recommend initially placing the base and measuring stations in the intended locations without installing them and making all these settings described in 6. Operation.
- Onlyinstallthestationsoncetheappropriatesettingshavebeenmade andastablewirelessconnectionisestablished.

Note-Installation
- Were recommend initially placing the base and measuring stations in the intended locations without installing them and making all these settings described in 6. Operation.
- Onlyinstallthestationsoncetheappropriatesettingshavebeenmade andastablewirelessconnectionisestablished.

Note
- Thewirelesstransmissionrangebetweenthemeasuringandbase stationsisupto30metresinopenspaces.
Beforeinstallation,ensurethatwirelesstransmissionwillnotbe disruptedbyinterferenceorobstacleslikebuildings,trees,vehicles, high-voltagelines,etc. - Before the final installation, ensure that there is sufficient reception between the intended installation locations.
- When installing themeasuring station, ensure that it is protected from direct sunlight and rain.
• The international standard height for measuring air temperature is 1.25 m(4ft) above ground.

Warning
- Buyspecialorsuitableinstallationmaterialfromaspecialiseddealer forwall-mounting.
- Ensure that no faulty ordamaged parts are installed.
- Neverapplyforceduringinstallation.Thiscoulddamagetheproduct.
- Beforeinstallation,ensurethatthechosenwallissuitableforthe weighttobeinstallation,andmakesurethattherearenoelectrical wires,water,gasorotherlinesinthewallattheinstallationsite.
-
Donotmounttheproductabovelocationswherepersonsmightlinger.
-
Youcanpositionthemeasuringstationonaleveloutdoorsurfaceusing thebase.
- Were recommend installing themeasuring station securely on an outdoor wall.
• Installananchor, screw, nail, etc. in the wall of your choice. - Hangthemeasuringstationusingtheopeningintendedforthispurpose (4).
6.Operation
6.1.Connectiontothemeasuringstation
• Toconnectthebasestationandthemeasuringstation, placethetwo devicesasclosetogeteraspossible.
- Afteryouinsertthebatteries, thebasestationautomaticallysearchesfor aconnectiontothemeasuringstationandperformsinitialsetup. If the devicedoesnotconnectautomatically, themanualsearchprogramonthe basestationmustbestarted.

Note
- Initialsetuptakesapproximately3minutes.
- During the connection attempt, theradiosymbol and the LED indicator (1) on themeasuring station will flash.
- Donotpressanybuttonsduringsetup. Otherwise, valuesmaynotbe transmittedcorrectlyandthereisariskofvalueerrorsandinaccuracies.
Note

- Thesetupprocessiscompletedwhentheindoorandoutdoor measurementdataisdisplayonthebasestation.
- Themeasuredvalueisautomaticallyupdatedbythebasedeviceabout every57seconds.
6.2. Selecting the channel/Other measuring stations

Note
- Ensure that the base station and measuring station a reset to the same channel. Suitable base stations can be found at www.hama.com
- Thetransmissionchannelonthesuppliedmeasuringstationcanbe changed/set(CH1,CH2,CH3).
• Themeasuringstationissuitableforthefollowingbasestations:76045, 113964,123126,123127,123128,123129,136256,136257,136258, 136259,186306,186307,186308;186353,186354,186417,186418
6.3.Lowbatterycharge

Note-Replacingthebatteries
- Notethatthestationshavetoberesynchronisedeachtimeafteryou changethebatteriesinthemeasuringorbasestation.
- Todothis, removethebatteriesfromtheotherstationandthenreinsert them,orchangethemasrequired.
7. CareandMaintenance
- Onlycleanthisproductwithaslightlydamp,lint-freeclothanddonotuse aggressivecleaningagents.
- Makesurethatwaterdoesnotgetintotheproduct.
8.WarrantyDisclaimer
HamaGmbH&CoKGassumesnoliabilityandprovidesnowarrantyfor damageresultingfromimproperinstallation/mounting,improperuseof theproductorfromfailuretoobservetheoperatinginstructionsand/or safetynotes.
9.TechnicalData
| Measuringstation |  |
| Powersupply | 1,5V2xAAAbatteries |
| MeasuringrangeThermometerHygrometerBarometer | -20°C-+60°C/-4°F-140°F20%-95% |
| MeasurementincrementsTemperatureHumidity | 0,1°C/0,2°F1% |
| Measuringcyclethermometer/hygrometerBarometer | ~57s- |
| HygrometerYes | |
| ThermometerYes | |
| BarometerNo | |
| Moonphases- | |
| Frequency433MHz | |
| Radio-frequency0.13μW |
Range≤30m
10. DeclarationofConformity

Hereby, HamaGmbH&CoKGdeclaresthattheradioequipment type[00186345,00176931] isincompliancewithDirective 2014/53/EU. The full text of the EU declaration of conformity is
availableatthefollowinginternetaddress:
www.hama.com->00186345,00176931->Downloads.
Maximumradio-frequency powertransmitted
0,015mW
www.hama.com->00186345,00176931 -> Downloads.
86652Monheim/Germany
Service&Support

www.hama.com

+499091502-0
D
GB
natural_image
Simple line drawing of a trash bin with crossed lines indicating no waste or discharge (no text or symbols)CE

PAP
RaccoltaCarta
Alllistedbrandsaretrademarksofthecorresponding companies.Errorsandomissionsexcepted, andsubjectto technicalchanges. Ourgeneraltermsofdeliveryandpayment areapplied.
- ControlsandDisplays
- AMeasuringstation
- ExplanationofWarningSymbolsandNotes
- Warning
- Note
- 2.PackageContents
- 3.SafetyNotes
- Warning-Batteries
- Gettingstarted
- Replacingthebatteries
- Installation
- Note-Installation
- 6.Operation
- 6.1.Connectiontothemeasuringstation
- Selecting the channel/Other measuring stations
- 6.3.Lowbatterycharge
- Note-Replacingthebatteries
- CareandMaintenance
- 8.WarrantyDisclaimer
- DeclarationofConformity
- 86652Monheim/Germany
- Service&Support
Brand : HAMA
Model : TS34A
Category : Outdoor weather sensor