RESTORE SC6085B - Water extractor Sanitaire - Free user manual and instructions
Find the device manual for free RESTORE SC6085B Sanitaire in PDF.

| Product Type | Carpet Water Extractor |
| Brand | Sanitaire |
| Model | RESTORE SC6085B |
| Recovery Tank Capacity | 37.8 L (10 gal) |
| Power Supply | 110-120 V ~, 60 Hz |
| Recommended Water Temperature | 49-57 °C (120-135 °F) for solution, max 62 °C (140 °F) |
| Intended Use | Commercial use |
| Warranty | 1 year limited |
| Main Functions | Vacuuming, solution spraying, drain hose drainage |
| Daily Maintenance | Clean lint filter, float cage, drain tanks, rinse system |
| Safety | Grounding required, float shut-off, do not immerse |
| Common Service Parts | Filters, belts, brushes, pump diaphragm, valve |
| Customer Service | Sanitaire Customer Service: 1-800-800-8975, Mon-Fri 9am-8:30pm EST |
| Website | www.sanitairecommercial.com |
| Included Accessories | Extension tube, vacuum hose, hose system (depending on model) |
| Grounding Instructions | Use a grounded outlet, do not modify plug |
Frequently Asked Questions - RESTORE SC6085B Sanitaire
User questions about RESTORE SC6085B Sanitaire
0 question about this device. Answer the ones you know or ask your own.
Ask a new question about this device
Download the instructions for your Water extractor in PDF format for free! Find your manual RESTORE SC6085B - Sanitaire and take your electronic device back in hand. On this page are published all the documents necessary for the use of your device. RESTORE SC6085B by Sanitaire.
USER MANUAL RESTORE SC6085B Sanitaire
Important safeguards .....2-3
General instructions .....4-6
How to maintain ....8
Storage of equipment 10
Problem solving .....12-13
Service information ....13
Warranty 18
ÍNDICE
Salvaguardias Importantes .....2-3
natural_image
Exterior view of a black and gray portable water heater (no visible text or symbols)IMPORTANT SAFETY INSTRUCTIONS
When using an electrical appliance, basic precautions should always be followed, including the following: READ ALL INSTRUCTIONS BEFORE USING THIS CARPET EXTRACTOR.
WARNING
TO REDUCE THE RISK OF FIRE, ELECTRIC SHOCK OR INJURY:
- Do not immerse.
- Use only on surfaces moistened by cleaning process.
• Always connect to a properly grounded outlet.
• See grounding instructions. - Unplug from outlet when not in use and before conducting maintenance or troubleshooting.
- Do not leave machine when it is plugged in.
- Do not service machine when it is plugged in.
- Do not use with damaged cord or plug.
- If appliance is not working as it should, has been dropped, damaged, left outdoors, or dropped into water, have it repaired at an authorized service center.
- Use indoors only.
- Do not pull or carry by cord, use cord as a handle, close door on cord, pull cord around sharp corners or edges, run appliance over cord, or expose cord to heated surfaces.
- Unplug by grasping the plug, not the cord.
- Do not handle plug or appliance with wet hands.
- Do not put any object into appliance openings, use with blocked opening or restrict air flow.
- Do not expose hair, loose clothing, fingers, or other body parts to openings or moving parts.
- Do not pick up hot or burning objects.
- Do not pick up flammable or combustible materials (lighter fluid, gasoline, kerosene, etc.) or use in the presence of explosive liquids or vapor.
- Do not use appliance in an enclosed space filled with vapors given off by oil-based paint, paint thinner, some mothproofing substances, flammable dust, or other explosive or toxic vapors.
- Do not pick up toxic material (chlorine bleach, ammonia, drain cleaner, gasoline, etc.).
- Do not modify the 3-prong grounded plug.
- Do not allow to be used as a toy.
- Do not use for any purpose other than described in this user guide.
- Do not unplug by pulling on the cord.
- Use only manufacturer's recommended attachments.
- Always install float before any wet pick-up operation.
- Use only cleaning products formulated by Sanitaire® for use in this appliance to prevent internal component damage. See the cleaning fluid section of this guide.
- Keep openings free of dust, lint, hair, etc.
- Do not point attachment nozzle at people or animals
- Keep appliance on a level surface.
- Do not use without intake screen filter in place.
- Turn OFF all controls before unplugging.
- Unplug before attaching the upholstery tool.
- Be extra careful when cleaning stairs.
- Close attention is necessary when used by or near children.
SAVE THESE INSTRUCTIONS
THIS MODEL IS FOR COMMERCIAL USE
Grounding Instructions
This appliance must be grounded. If it should malfunction or breakdown, grounding provides a path of least resistance for electric current to reduce the risk of electric shock. This appliance is equipped with a cord having an equipment-grounding conductor and grounding plug. The plug must be plugged into an appropriate outlet that is properly installed and grounded in accordance with all local codes and ordinances.
NOTE: In Canada, the use of a temporary adapter is not permitted by the Canadian Electrical Code.
Improper connection of an equipment-grounding conductor can result in risk of electric shock. Check with a qualified electrician or service person if you are in doubt as to whether the outlet is properly grounded. Do not modify the plug provided with the appliance. If it will not fit the outlet, have proper outlet installed by a qualified technician.
This appliance is for use on a nominal 120 volt circuit and has a grounding plug that looks like the plug illustrated in Figure A. A temporary adapter which looks like the adapter illustrated in Figure B may be used to connect this plug to a two-pole receptacle, as shown, if a properly grounded outlet is not available. The temporary adapter should be used only until a properly grounded outlet, Figure A, can be installed by a qualified electrician. The green colored rigid ear, lug, or the like extending from the adapter must be connected to a permanent ground such as a properly grounded outlet box cover. Whenever the adapter is used, it must be held in place by a metal screw.
PRECAUCIÓN
natural_image
Diagram showing a hand connecting a power plug to an electrical outlet with a dashed line indicating connection (no text or symbols present)Fig. B
ENGLISH
Extension cords
When using an extension cord with your unit, refer to the following table to determine the required A.W.G. wire size. Before using the cleaner, make sure the power cord and extension cord are in good working condition. Make repairs or replacements before using the vacuum cleaner.
Only use extension cords that are rated for outdoor use.
| Length of extension cord | ||||
| 25 feet 50 | feet 100 feet 1 | 50 feet | ||
| 110V-120V | 7.5 meter 1 | 5.25 meter 30.5 | meter 45.7 meter | |
| Amps A.W.G. wire size | ||||
| 0-6 18 16 | 16 14 | |||
| 7-10 18 16 | 16 14 | |||
| 11-12 16 16 | 14 12 | |||
| 13-16 14 12 Not recommended | ||||
General instructions
Shipping and damage
This equipment is thoroughly inspected, tested, and packaged to provide equipment in good operating condition. It is beyond our control after the equipment is turned over to a freight carrier. The freight carrier received and signed for the equipment in good condition. Consequently, it is important to protect your interest by carefully complying with the following instructions:
Please inspect your cartons for any damage (including concealed damage) that might have occurred during shipment. Any damage is the responsibility of the freight carrier and should be reported to the freight carrier immediately. It is your responsibility to issue a claim and to receive compensation from the freight carrier for any damage done in transit. Damage of this sort is not covered under warranty.
Follow these step-by-step instructions to ensure proper operating performance
- Fill up the fresh water solution tank with tap water that is 120-135° F (49-57° C) and approved carpet cleaning chemical, if you are not pre-spraying your chemical on the carpet (Fig. 1). Add de-foamer solution to the recovery tank per the de-foamer manufacturer's instructions.
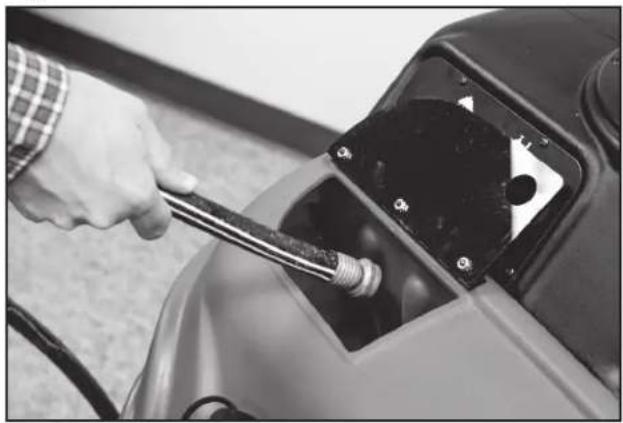
- Plug the extension cord into the pigtail cord located on the backside of the unit and secure the plug with the provided plug holder (Fig. 2).
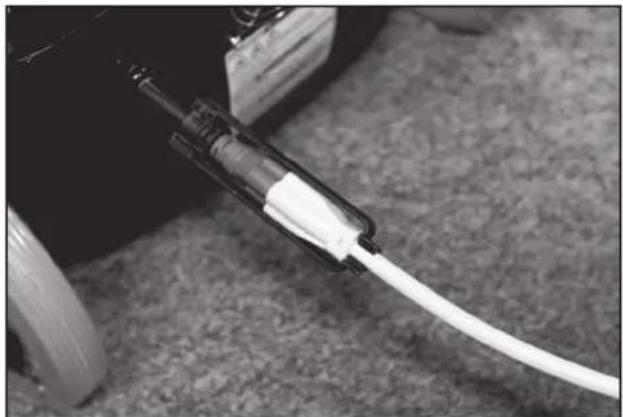
- Attach the hose system to the unit and to your carpet wand (Fig. 3).
General instructions (cont. pgs. 6-7)
Fig. 1
natural_image
Close-up of a hand using a tool to adjust or install a car engine component (no visible text or symbols)Fig. 2
natural_image
Close-up of a white cable inserted into a black plastic connector, lying on a textured floor (no text or symbols visible)Fig. 3

natural_image
Four-panel black-and-white photo showing hands connecting a fuel pump into a car, with no visible text or symbols.ESPAÑOL FRANÇAIS
Cables de extensión
General instructions cont.

CAUTION
Do not operate without the filter and ball float valve in place.
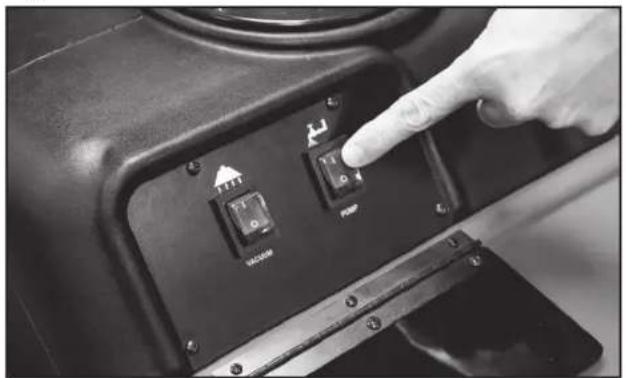
- Turn on the pump (Fig. 4).
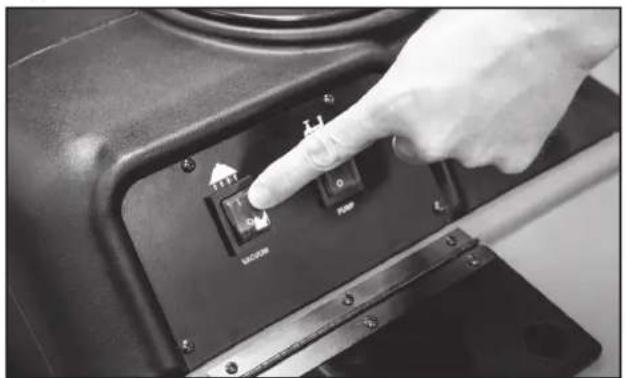
- Turn vacuum switch to the "on" position to begin cleaning (Fig. 5).
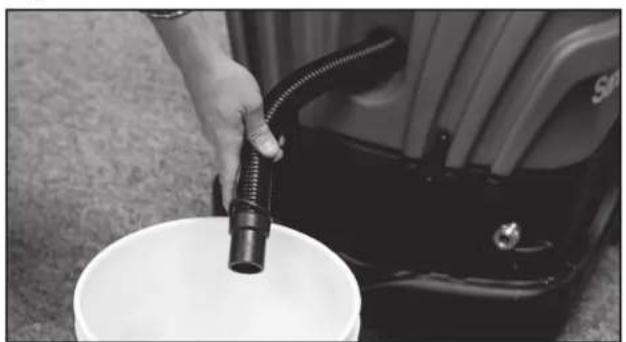
- When recovery tank is full, empty by using drain hose on the front of the machine. If a pail is used to empty the vacuum waste tank, do not use the same pail to fill the solution tank as this can result in putting dirt and grit into the solution line that can plug filters, orifices, and generally degrade the solution line system (do not reuse solution) (Fig. 6).
- To empty solution tank, detach the wand from the end of the vacuum hose and insert the vacuum hose into the solution tank. Turn the vacuum switch to "on" position and transfer solution to recovery tank (Fig.7). Dispose of solution as outlined in step 6.
Fig. 4
natural_image
Close-up of a hand pressing a button on a device panel with icons (no readable text or symbols)Fig. 5
natural_image
Close-up of a hand pressing a button on an electronic device (no visible text or symbols)Fig. 6
natural_image
Person pouring liquid from a hose into a white bucket, next to a black industrial machine (no visible text or symbols)Fig. 7

natural_image
Close-up of hands using a hose to adjust or install a vehicle inside a car hood (no visible text or symbols)ESPAÑOL FRANÇAIS
Instrucciones generales (cont). Instructions générales (suite)

PRECAUCIÓN
To receive reliable service from this equipment, regular daily maintenance is required
- Keep the equipment clean, both inside and out.
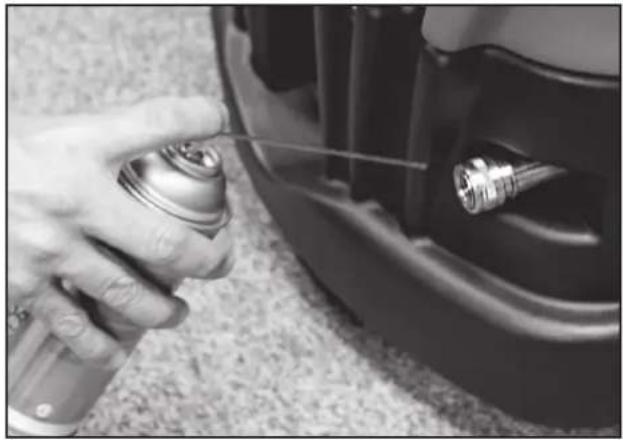
- Lubricate brass quick disconnects with a quality lubricant (Fig. 1).
- Flush solution systems after use with clear, clean water. (A white vinegar solution of 1 part vinegar to 8 parts water may also be used). This will counter-act hard water and alkaline deposits and aid in keeping orifices clean.
- Do not allow fluid, either in solution or waste tank, to sit overnight. The unit should be emptied and cleaned daily.
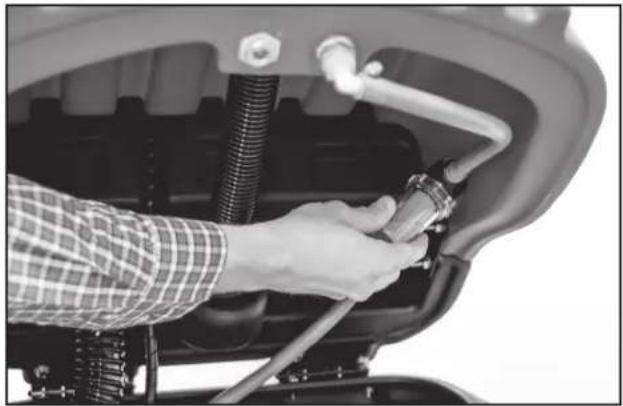
- Clean the strainer in the solution tank, the float cage and all lint filters in the inlet or vacuum tank daily (Fig. 2).
- When the unit is not in use, leave the vacuum tank lid open (Fig. 3).
- At the end of each day, run the vacuum for 3 minutes with lid open and float cage inside tank detached. Make sure to re-attach before next use (Figs. 3 & 4).
Fig. 3 Fig. 4

natural_image
Close-up of a mechanical device with a transparent lid and central shaft, no visible text or symbolsFig. 1
natural_image
Close-up of a hand using a spray gun to clean the car's front wheel (no text or symbols visible)Fig. 2
natural_image
Close-up of a hand adjusting a car engine component with hoses and tubing (no visible text or symbols)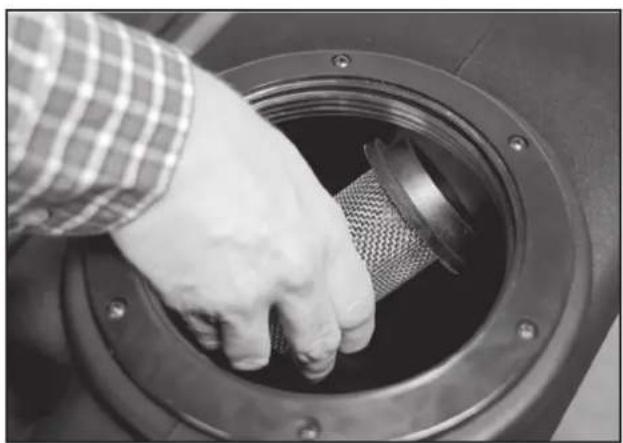
natural_image
Close-up of a hand opening a mechanical component with a mesh filter (no text or symbols visible)ESPAÑOL FRANÇAIS
- Do not use citrus-based (D-Limonene) cleaners in this machine.
- The use of any chemicals with abrasive additives voids the warranty.
- Do not use water in excess of 140^ (62°C) through the pump system.
- Failure to comply with the above warnings instructions will void the warranty.
Storage of equipment
- Store extractor indoors in dry area.
- Recovery and solution tank should be empty and clean when the extractor is not in use.
- Leave the recovery lid and dump valve open to air out the recovery tank.
- Do not store in freezing temperature.
- A small amount of windshield washer fluid may be left in the pump and internal solution line for protection against freezing.
ESPAÑOL FRANÇAIS

Advertencias
Make sure machine is turned off and electrical power cord is unplugged.
| Problem | Cause | Solution |
| No electrical power. | 1) Defective power cord.2) Circuit breaker off or blown fuse. | 1) Replace.2) Turn circuit breaker on or replace fuse.Unplug any equipment using the same circuit. |
| Intermittent power to motors. | 1) Faulty electrical cable.2) Defective switches.3) Loose or dirty terminals. | 1) Replace.2) Replace.3) Replace or clean. |
| Little or no vacuum at wand. | 1) Defective vacuum hose.2) Kinks in vacuum hose.3) Vacuum hose disconnected. | 1) Replace.2) Straighten hose.3) Check external and internal hose connections. |
| Low vacuum at the machine. | 1) Drain hose open.2) Lint screen clogged.3) Damaged recovery tank.4) Clogged vacuum motor exhaust port. | 1) Close drain hose.2) Clean.3) Replace.4) Clean. |
| Motor running and no vacuum. | 1) Faulty vacuum motor.2) Float activated. | 1) Replace.2) Empty tank or clean float cage. |
| Premature float activation or failure of float to release. | 1) Dirty or clogged float cage.2) Float coated with detergent or other debris.3) Float cage slightly out of round. | 1) Remove and clean float cage.2) Clean and rinse float.3) Carefully bend float cage by squeezing by hand. |
| Foam / dirty solution coming out of vacuum exhaust port. | 1) Foam from carpet bypassing float. 1) Add additional de-foamer. | |
| No spray from jets. | 1) Clogged or faulty solution control valve.2) Clogged or faulty quick disconnect.3) Punctured pump diaphragm.4) Clogged jets. | 1) Check valve for debris.2) Depress plunger on solution hose quick disconnect on against inside wall of solution tank housing. If solution is flowing at this point, the system is okay. If no solution flows, check the quick disconnect for lint and other foreign matter.3) Replace with diaphragm repair kit.4) Clean jets on wand or tool. |
ENGLISH
Problem solving cont.
Make sure machine is turned off and electrical power cord is unplugged.
| Problem | Cause | Solution |
| Uneven spray from jets. | 1) Clogged strainer in solution tank.2) Clogged jets. | 1) Remove debris.2) Remove and clean. |
| Leaking or stuck solution valve. | 1) Foreign material in valve.2) Loose brass hex nut.3) Worn valve or seals. | 1) Clean and replace.2) Reseal hex and plug.3) Replace worn parts. |
| Pump motor not working. | 1) Loose wiring.2) Defective pump pressure switch.3) Motor burned out. | 1) Tighten wiring.2) Replace switch.3) Replace. |
| Low pump pressure. | 1) Clogged strained in solution tank.2) Punctured pump diaphram.3) Defective rectifier or motor. | 1) Clean and replace.2) Replace.3) Replace. |
| Pump pressure varies. | 1) Defective pump. 1) Replace pressure control switch. | |
SERVICE INFORMATION
If your Sanitaire product should require service
You will find the nearest Sanitaire Authorized Service Center in your area online at sanitairecommercial.com under service locator or contact Sanitaire Customer Service.
If you need information about repairs or replacement parts, or if you have questions about your warranty, contact Sanitaire Customer Service.
Website:
9 a.m. - 8:30 p.m. EST
ESPAÑOL
This warranty gives you specific legal rights, and you may also have other rights which may vary from state to state. If you need additional instruction regarding this warranty or have questions regarding what it may cover, please contact Sanitaire® Customer Service by E-mail, telephone or regular mail as described below.
Limited one-year warranty
Subject to the *EXCEPTIONS AND EXCLUSIONS identified below, upon receipt of the product Sanitaire will repair or replace (with new, refurbished, lightly used, or remanufactured components or products), at Sanitaire's option, free of charge from the date of purchase by the original purchaser, for one year any defective or malfunctioning part.
See information below on "If your Sanitaire product should require service".
This warranty does not apply to fans or routine maintenance components such as filters, belts or brushes. Damage or malfunction caused by negligence, abuse, neglect, unauthorized repair, or any other use not in accordance with the user guide is not covered.
Some states do not allow the exclusion or limitation of incidental or consequential damages, so the above limitation or exclusion may not apply to you.
*EXCEPTIONS AND EXCLUSIONS FROM THE TERMS OF THE LIMITED WARRANTY
THIS WARRANTY IS EXCLUSIVE AND IN LIEU OF ANY OTHER WARRANTIES, EITHER ORAL OR WRITTEN. ANY IMPLIED WARRANTIES WHICH MAY ARISE BY OPERATION OF LAW, INCLUDING THE IMPLIED WARRANTIES OF MERCHANTABILITY AND FITNESS FOR A PARTICULAR PURPOSE, ARE LIMITED TO THE ONE-YEAR DURATION FROM THE DATE OF PURCHASE AS DESCRIBED ABOVE.
Some states do not allow limitations on how long an implied warranty last so the above limitation may not apply to you.
If your Sanitaire product should require service
You will find the nearest Sanitaire Authorized Service Center in your area online at sanitairecommercial.com under service locator or contact Sanitaire Customer Service. If you need information about repairs or replacement parts, or if you have questions about your warranty, contact Sanitaire Customer Service at 1-800-800-8975.
NOTE: Please keep your original sales receipt. It provides proof of date of purchase in the event of a warranty claim.
ESPAÑOL
GARANTÍA
*EXCEPTIONS ET EXCLUSIONS DES CONDITIONS DE LA GARANTIE LIMITÉE
CETTE GARANTIE EST EXCLUSIVE ET REMPLACE TOUTE AUTRE GARANTIE, VERBALE OU ÉCRITE. TOUTES LES GARANTIES IMPLICITES POUVANT RÉSULTER DE L'APPLICATION D'UNE LOI, Y COMPRIS LES GARANTIES IMPLICITES DE QUALITÉ MARCHANDE ET DE CONVENANCE À UN USAGE PARTICULIER, SONT LIMITÉES À LA DURÉE UN ANS À COMPTER DE LA DATE D'ACHAT, TEL QUE STIPULÉ CI-DESS.