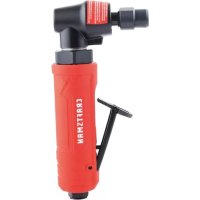
CMXPTSG1006NB - Grinder Craftsman - Free user manual and instructions
Find the device manual for free CMXPTSG1006NB Craftsman in PDF.



| Product Type | Pneumatic die grinder |
| Brand | Craftsman |
| Model | CMXPTSG1006NB |
| Dimensions (L x W x H) | Approximately 180 x 50 x 50 mm |
| Weight | Approximately 0.45 kg |
| Power Source | Compressed air (pneumatic) |
| Required Air Flow | 4.5 standard ft³/min at 90 psi |
| Operating Pressure | 90 psi (620 kPa) |
| No Load Speed | 21,000 rpm |
| Collet Capacity | 6.35 mm (1/4 in) |
| Air Inlet | 1/4 in NPT |
| Recommended Air Hose | Inner diameter of 9.53 mm (3/8 in) |
| Main Functions | Grinding, sharpening, polishing, stripping, etc. with 1/4 in shank accessories |
| Maintenance and Cleaning | Lubricate with pneumatic oil before each use; clean vents with dry air; do not use solvents |
| Safety | Wear safety glasses (ANSI Z87.1) and hearing protection; avoid loose clothing; disconnect air before maintenance; do not use near flammable substances |
| Spare Parts and Repairability | Parts list and repair kits available; repairs by authorized Craftsman service center |
| General Information | 3-year limited warranty; 90-day money-back guarantee; manufactured by Shining Golden Yida |
Frequently Asked Questions - CMXPTSG1006NB Craftsman
User questions about CMXPTSG1006NB Craftsman
0 question about this device. Answer the ones you know or ask your own.
Ask a new question about this device
Download the instructions for your Grinder in PDF format for free! Find your manual CMXPTSG1006NB - Craftsman and take your electronic device back in hand. On this page are published all the documents necessary for the use of your device. CMXPTSG1006NB by Craftsman.
USER MANUAL CMXPTSG1006NB Craftsman
IF YOU HAVE QUESTIONS OR COMMENTS, CONTACT US.
POUR TOUTE QUESTION OU TOUT COMMENTAIRE, NOUS CONTACTER.
SI TIENE DUDAS O COMENTARIOS, CONTÁCTENOS.
1-888-331-4569
WWW.CRAFTSMAN.COM
Definitions: Safety Alert Symbols and Words
This instruction manual uses the following safety alert symbols and words to alert you to hazardous situations and your risk of personal injury or property damage.

DANGER: Indicates an imminently hazardous situation which, if not avoided, will result in death or serious injury.

WARNING: Indicates a potentially hazardous situation which, if not avoided, could result in death or serious injury.

CAUTION: Indicates a potentially hazardous situation which, if not avoided, may result in minor or moderate injury.

(Used without word) Indicates a safety related message.
NOTICE: Indicates a practice not related to personal injury which, if not avoided, may result in property damage.
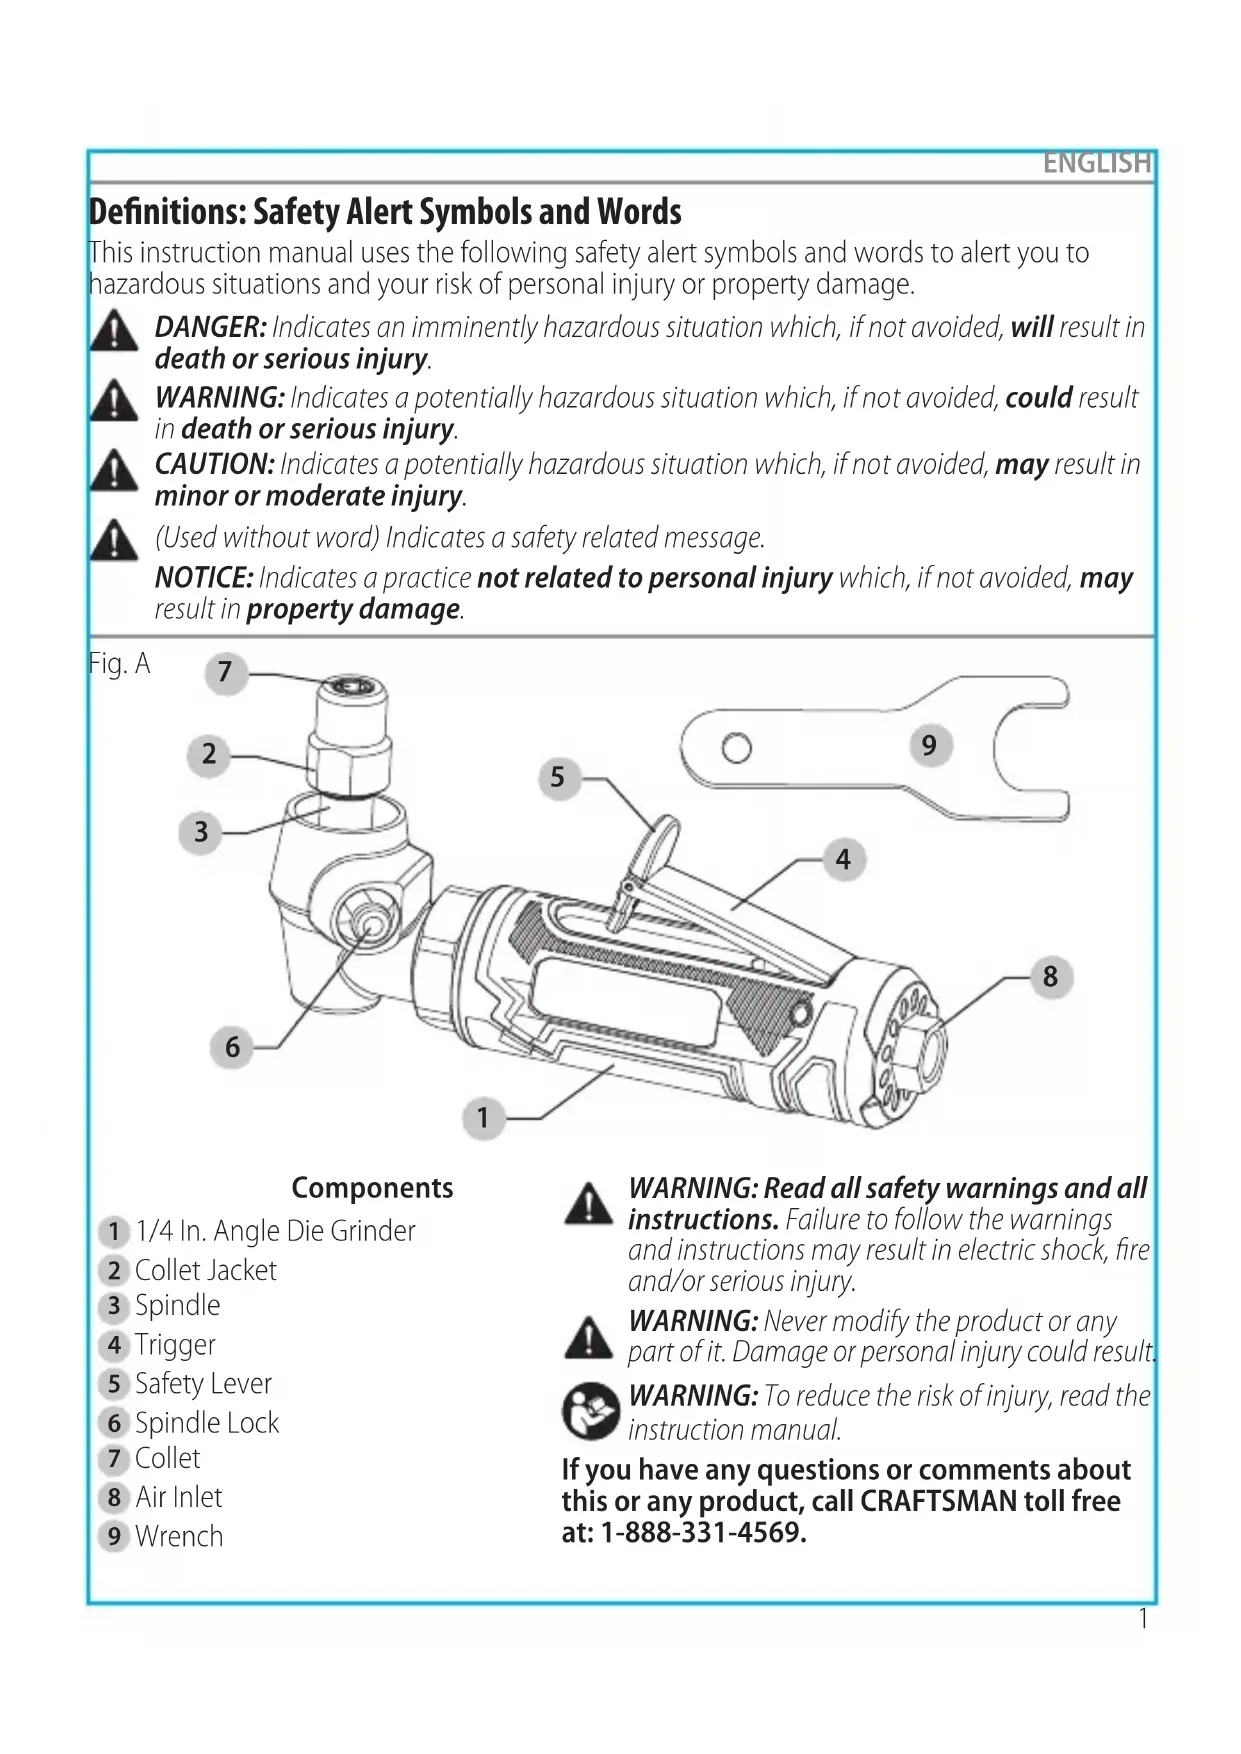
Fig. A
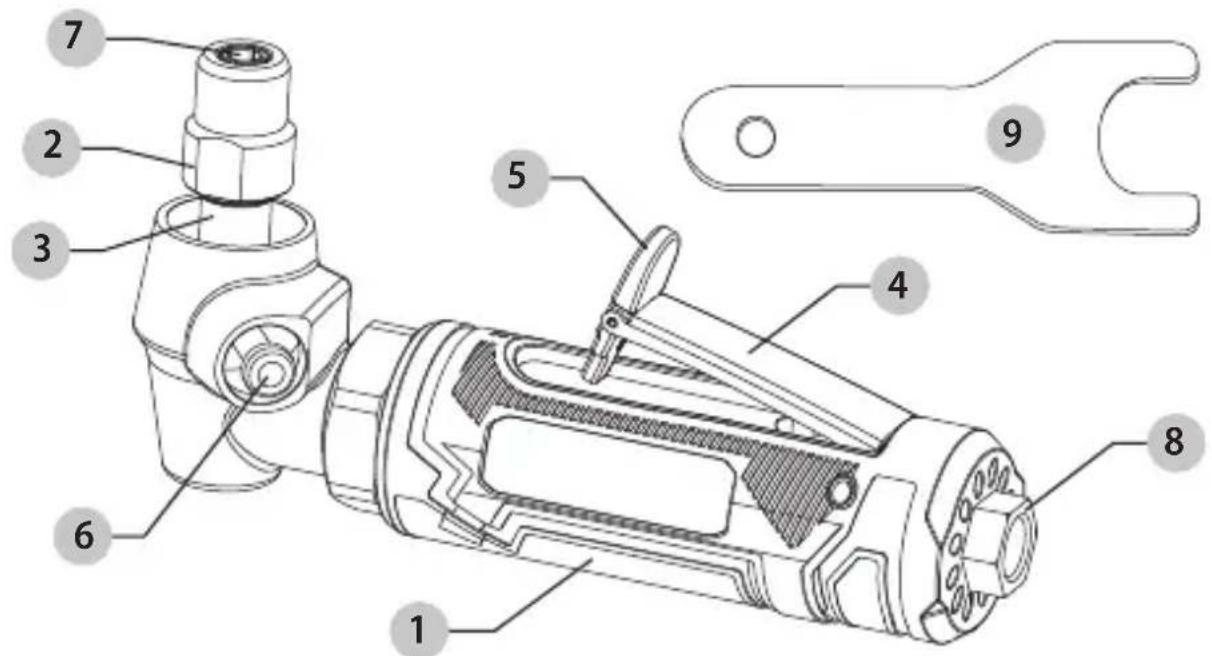
Components
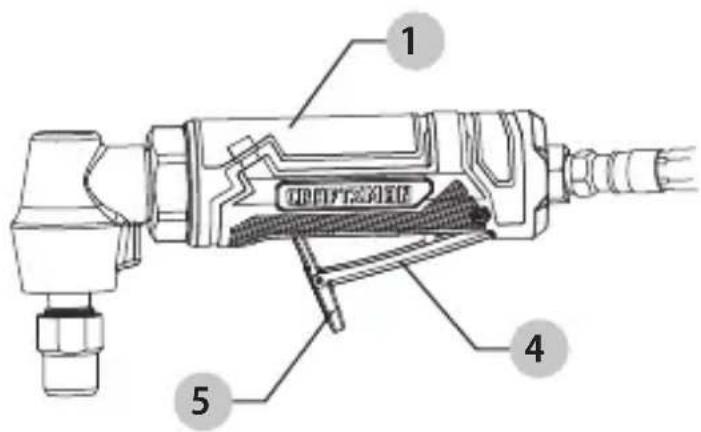
1 1/4 In. Angle Die Grinder
2 Collet Jacket
3 Spindle
4 Trigger
5 Safety Lever
6 Spindle Lock
7 Collet
8 Air Inlet
9 Wrench

WARNING: Read all safety warnings and all instructions. Failure to follow the warnings and instructions may result in electric shock, fire and/or serious injury.

WARNING: Never modify the product or any part of it. Damage or personal injury could result

WARNING: To reduce the risk of injury, read the instruction manual.
If you have any questions or comments about this or any product, call CRAFTSMAN toll free at: 1-888-331-4569.
ENGLISH
1/4 in. Angle Die Grinder CMXPTSG1006NB
Compressor requirements

Tool Requirements Exigences relatives aux outils Requisitos de herramientos
IMPORTANT: To operate correctly, this tool requires airflow that is at least 4.5 cubic feet per minute (SCFM) at 90 pounds per square inch (PSI). Check the specifications of your air compressor to be sure that it can support both the minimum SCFM and PSI required. The air hose length could affect how much air pressure the tool is actually receiving. You may need to adjust the air pressure higher on the air regulator to achieve the working pressure of 90 PSI.
Specifications
Model CMXPTSG1006NB
Collet 1/4" (6.35 mm)
Free Speed 21,000 rpm
Average Air Consumption 4.5 scfm
Air Inlet 1/4" npt
Air Hose
3/8" (9.53 mm)
Working Pressure 90 psi

WARNING: Improper operation or maintenance of this tool could result in serious injury and property damage. Read and understand all warnings and operation instructions before using this tool. When using any tool, basic safety precautions should always be followed to reduce the risk of personal injury. Anticipate and be alert for sudden changes in motion during startup and operation of any power tool. Do not operate tool if trigger does not turn the tool on or off. Do not use this tool at heights exceeding 6 feet (2m). Use each tool for its intended function only. Do not use this product in unsafe work conditions. It is always recommended to keep a fire extinguisher and first aid kit near work areas.

WARNING: User must also read the compressor manual and follow all compressor safety instructions.

WARNING: Failure to observe and follow safety instructions could result in injury or death.
SAVE ALL WARNINGS AND INSTRUCTIONS FOR FUTURE REFERENCE
WARNING RISK OF EYE OR HEAD INJURY
What can happen How to prevent it
| This air powered tool is capable of propelling materials such as fasteners, metal chips, and other debris at high speed which could result in serious injury. | Always wear ANSI approved Z87.1 safety glasses. |
| Never leave operating tool unattended. | |
| Disconnect tool from air supply when tool is not in use or when changing accessories to prevent accidental operation. | |
| Compressed air can be hazardous, propelling objects or particles that can cause injury into soft tissues such as eyes and ears. | For additional protection, use an approved face shield in addition to safety glasses. |
| Tool attachments can become loose or break and fly apart, becoming projectiles or propelling other objects at the operator or bystanders in the work area. | Do not use accessories with excessive wear. Make sure the attachment is securely fitted before operating tool. |
WARNING RISK OF LOSS OF HEARING
What can happen How to prevent it
| Exposure to noise produced by air tools can lead to permanent hearing loss. | Always wear ANSI S3.19 hearing protection. |
WARNING RISK OF FIRE OR EXPLOSION
What can happen How to prevent it
| This tool is capable of generating sparks, which can result in ignition of flammable materials. | Never operate tools near flammable substances such as gasoline, naphtha, cleaning solvents, etc. |
| Work in a clean, well-ventilated area free of combustible materials. | |
| Never use oxygen, carbon dioxide or other bottled gases as a power source for air tools. | |
| ENGLISH | |
| ⚠ WARNING RISK OF ENTANGLEMENT | |
| What can happen How to prevent it | |
| Loose hair, clothing, jewelry or other loose objects can become entangled in the moving elements of this tool and can cause serious injury. | Do not wear loose clothing, jewelry, or anything that may get caught or tangled when using tool. |
| Remove any jewelry which may be caught by the tool. | |
| Always keep hands and body parts away from moving parts. | |
| Always wear properly fitted clothing and other properly fitted safety equipment when using this tool. | |
| ⚠ WARNING RISK OF CUTS OR BURNS OR HAND ENTRAPMENT | |
| What can happen How to prevent it | |
| This tool is capable of causing serious injury if operated improperly, or in a manner for which the tool is not intended. | Keep the working part of the tool away from hands and body. |
| Understand the tool's limitations. | |
| Read and understand instruction manual. | |
| Accessories can become extremely hot through friction where they contact the workpiece. | Make sure hands are kept away from accessories during tool use. |
| ⚠ WARNING RISK OF ELECTRIC SHOCK | |
| What can happen How to prevent it | |
| This tool is not provided with an insulated gripping surface. Contact with a "live" wire will also make exposed metal parts of the tool "live" and can result in electrical shock, electrocution or death. | Never use air tools where they may come in contact with energized electrical wiring. |
| Air tool accessories that come into contact with hidden electrical wiring could cause electrocution or death. | Thoroughly investigate workpieces and work areas for possible hidden wiring before performing work. |
WARNING RISK OF PERSONAL INJURY
What can happen How to prevent it
| A tool left unattended or with the air hose attached can be activated by unauthorized persons leading to their injury or injury to others. | Remove air hose when the tool is not in use and store tool in a secure location away from reach of children and untrained users. |
| Air tools can propel materials throughout the work area. Use only parts and accessories recommended by the manufacturer. | |
| ENGLISH | |
| Loss of control of the tool can lead to operator injury or injury to others in the work area. | Keep proper footing at all times when handling tools. Slipping, tripping falling or over reaching are major causes of serious injury and/or death. |
| Keep tool handles dry, clean and free from oil/grease. | |
| Stay alert. Use common sense. Do not operate tools when you are tired. | |
| There is a risk of bursting if the tool is damaged. Follow lubrication instructions for best and safest operation. | |
| Poor quality, improper or damaged attachments can detach or fly apart during operation, sending projectiles through the work area and causing serious injury. | Always use tool attachments rated for the speed of the power tool. |
| Never use tools, which have been dropped, impacted, or are damaged. | |
| Do not apply excessive force to the tool; let the tool perform the work. | |
| Never use a tool that is leaking air, has missing or damaged parts, or requires repairs. | |
| Always follow assembly, operation, maintenance instructions. | |
| Improperly maintained tools and accessories can cause serious injury. | Do not use damaged, frayed or deteriorated air hoses and/or fittings. |
| Maintain the tool and accessories with care. | |
| Keep tools clean and properly oiled for best and safest performance. | |
| Do not lubricate tools with flammable or volatile liquids such as kerosene, diesel or jet fuel. | |
| Using an accessory not intended for a specific tool increases the risk of injury to the operator and everyone else in the work area. | Always use accessories and attachments designed for the tool and the work at hand. |
| Do not improvise or modify tools or accessories. | |
| Repetitive motions, awkward positions and exposure to vibration can be harmful to hands and arms. | Discontinue use of tool if discomfort, tingling feeling or pain occurs. |
| Consult a physician before resuming use if any of these symptoms occur. | |
| Do not remove any labels – replace any damaged label.FREE WARNING LABEL REPLACEMENT: If your warning labels become illegible or are missing, call 1-888-331-4569 for a free replacement. | |
PREPARATION
Before beginning the assembly of the product, make sure all parts are present. Compare parts with package contents list. If any part is missing or damaged, do not attempt to assemble the product.
Estimated Assembly Time: 1 – 3 minutes
Tools Required for Assembly (not included):
• 9/16 in. (14 mm) or adjustable wrench
ASSEMBLY
-
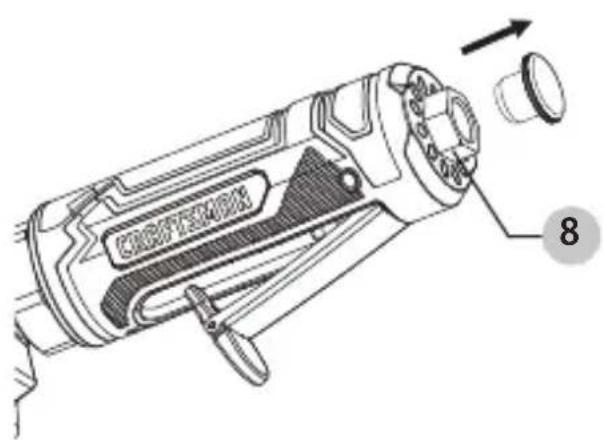
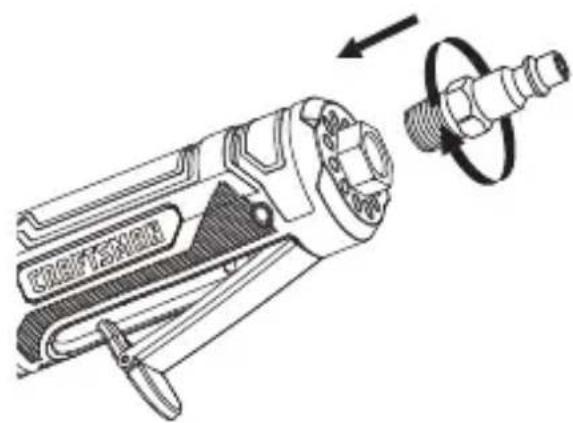
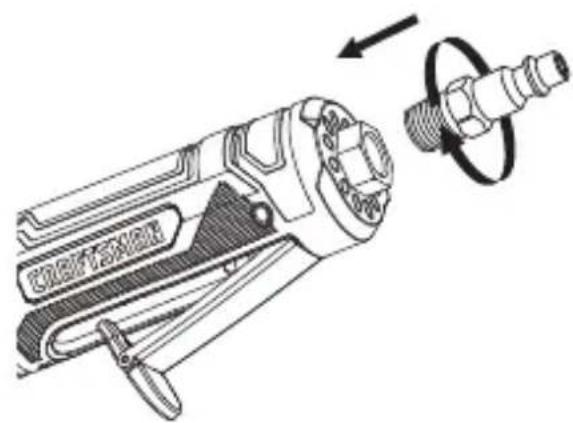
Remove plastic air inlet protective cap from air inlet 8.
-
Tighten male plug (not included), turning clockwise with a wrench (not included) for air tight connection. DO NOT OVERTIGHTEN.
NOTICE: Use threaded sealant tape (not included) on the threading of the male plug.
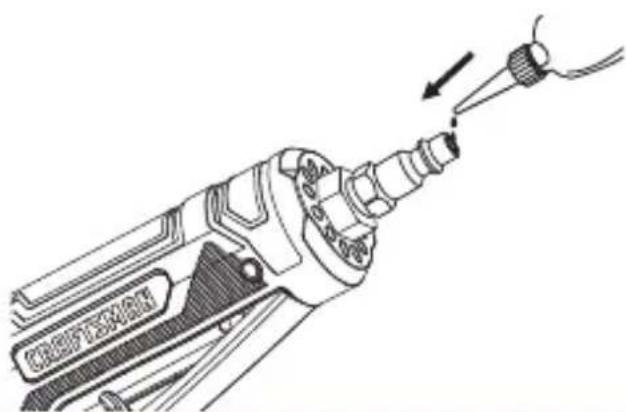
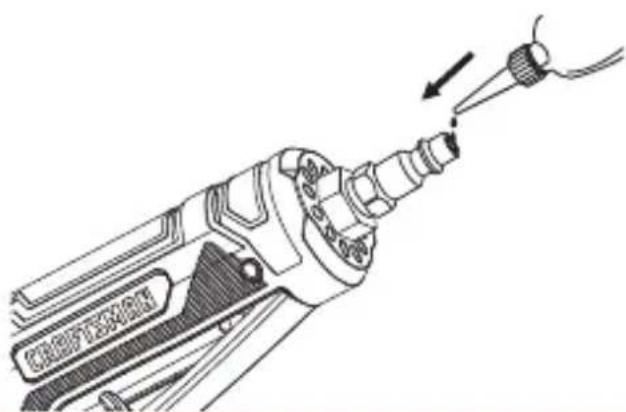
- Place 2 – 3 drops of air tool oil (not included) into the opening of the male air plug before each use.
natural_image
Technical line drawing of a mechanical tool with a probe inserted, showing no text or symbolsENGLISH
-
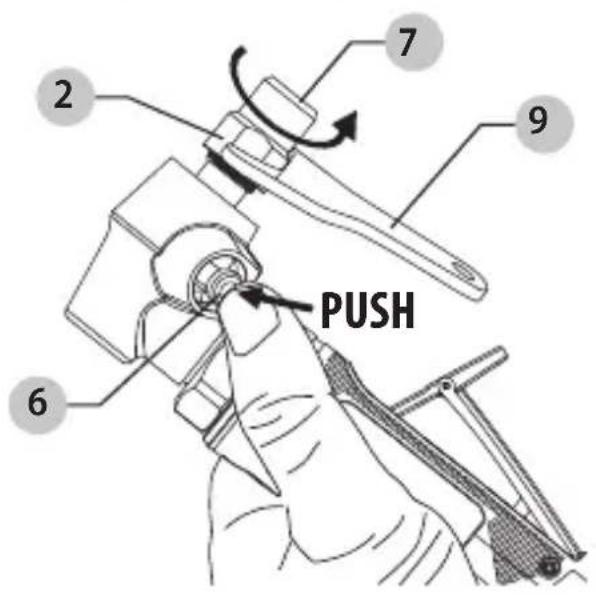
Loosen the collet 7 by depressing the Spindle Lock 6 and placing the wrench 9 on the flats of the collet and turning it counterclockwise.
-
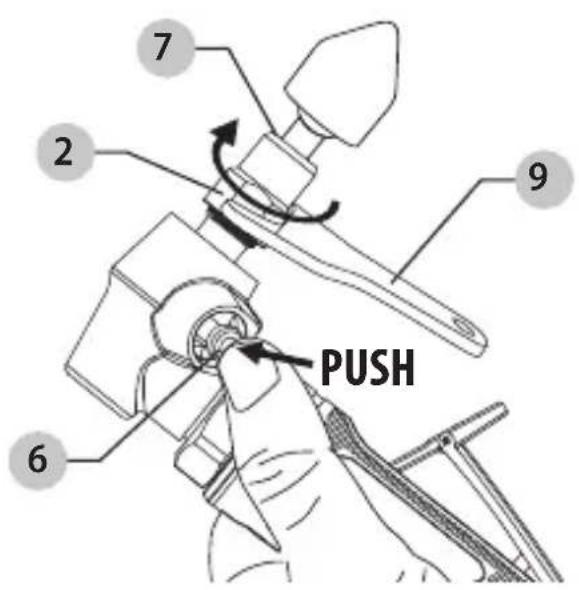
Insert a 1/4 in. shank accessory (not included) into the collet 7. Tighten the collet 7 by depressing the Spindle Lock 6 and placing the wrench on the flats of the collet and turning it clockwise. Make sure the 1/4 in. shank accessory is installed securely and tightly.

WARNING: Only use accessories that have an RPM rating equal to or greater than the tool itself. Also make sure any accessory is compatible with the collet opening. Before using tool, always make sure attachments are properly mounted/secured. If attachments are not properly mounted/secured, they can present a serious hazard and may cause bodily injury for the operator or anyone in or around the work area. Always follow the attachment manufacturer's specifications for properly attaching accessories to tool.
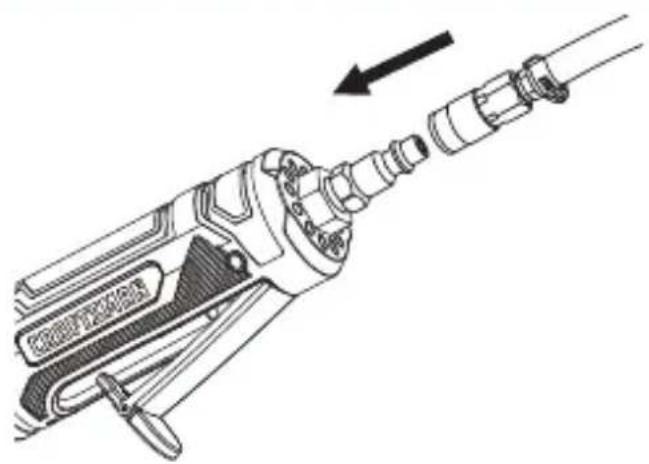
- Connect the air hose to the male plug. Set the working pressure at 90 PSI for best tool performance.
NOTICE: Working pressure is the amount of air pressure the tool sees when operating.
natural_image
Technical line drawing of a mechanical tool with a directional arrow indicating movement (no text or symbols present)OPERATING
- Push safety lever 5 forward and press down on the trigger 4 to start the tool 1.
ENGLISH
MAINTENANCE

WARNING: ALWAYS DISCONNECT TOOL FROM THE AIR SUPPLY BEFORE PERFORMING ANY MAINTENANCE ON THE TOOL.

WARNING: Always make sure the tool is properly lubricated during operation. Proper lubrication is shown in this instruction manual.
An in-line oiler (not included) is recommended to help increase tool life and keep the tool properly lubricated. The in-line oiler should be regularly checked and filled with air tool oil as needed. Proper adjustment of the in-line oiler can be performed by placing a sheet of paper next to the tool's exhaust ports while holding the throttle completely open for 30 seconds. When a light stain of oil collects on the paper, the oiler is properly adjusted. Excessive amounts of oil should be avoided.
Recommended lubricants: air-tool oil or any other high grade turbine oil containing moisture absorbent, rust inhibitors, metal wetting agents and an EP (Extreme Pressure) additive. Consult your local retailer for further assistance in selecting air tool oil best suited for proper lubrication.
Cleaning

WARNING: Blow dirt and dust out of all air vents with clean, dry air at least once a week. To minimize the risk of eye injury, always wear ANSI Z87.1 approved eye protection when performing this.

WARNING: Never use solvents or other harsh chemicals for cleaning the non-metallic parts of the tool. These chemicals may weaken the plastic materials used in these parts. Use a cloth dampened only with water and mild soap. Never let any liquid get inside the tool; never immerse any part of the tool into a liquid.
Repairs

WARNING: To assure product SAFETY and RELIABILITY, repairs, maintenance should be performed by a CRAFTSMAN factory service center or a CRAFTSMAN authorized service center. Always use identical replacement parts.
Accessories

WARNING: Since accessories, other than those offered by CRAFTSMAN, have not been tested with this product, use of such accessories with this tool could be hazardous. To reduce the risk of injury, only CRAFTSMAN recommended accessories should be used with this product.
Recommended accessories for use with your tool are available at extra cost from your local dealer or authorized service center. If you need assistance in locating any accessory, please visit CRAFTSMAN.COM or call 1-888-331-4569.
Storage
Before you store the tool, make sure you do the following:
- Review the Maintenance section on the preceding pages and perform scheduled maintenance as necessary.
- Tool must be well cleaned and lightly lubricated before storing.
- Store the tool in a dry, safe place out of the reach of children.
Register Online
Thank you for your purchase. Register your product now for:
- WARRANTY SERVICE: Registering your product will help you obtain more efficient warranty service in case there is a problem with your product.
- CONFIRMATION OF OWNERSHIP: In case of an insurance loss, such as fire, flood or theft, your registration of ownership will serve as your proof of purchase.
FOR YOUR SAFETY: Registering your product will allow us to contact you in the unlikely event a safety notification is required under the Federal Consumer Safety Act.
Register online at www.craftsman.com/registration
| ENGLISH | |
| TROUBLESHOOTINGWARNING: If the tool runs slowly or will not operate, check these possible problems and take the required corrective action: | |
| PROBLEM CAUSE CORRECTION | |
| Tool runs slowly or will not operate. | Grit or gum in tool. Flush the tool with air-tool oil or gum solvent. |
| Tool runs slowly or will not operate. | No oil in tool. Lubricate the tool. |
| Tool runs slowly or will not operate. | Low air pressure. Adjust the regulator on the tool to the maximum setting.Adjust the compressor regulator to tool maximum of 90 PSI.NOTE: Air hoses may cause up to 15 PSI loss in pressure, so you may need to set a higher compressor output to maintain the required pressure at the tool. |
| Tool runs slowly or will not operate. | Air hose leaks. Tighten and seal hose fittings if leaks are found. Use sealing tape. |
| Tool runs slowly or will not operate. | Low air pressure. Be sure the hose is the proper size. Long hoses or tools using large volumes of air may require an internal diameter of 1/2 in. I.D. or larger, depending on total hose length.Do not use multiple hoses connected together with quick-connect fittings. This causes additional loss of pressure and reduces the tool power. Use single hoses of the proper length. |
| Tool runs slowly or will not operate. | Worn rotor blade. Replace rotor blade. |
| Tool runs slowly or will not operate. | Moisture blowing out of tool exhaust. Water in compressor tank; drain tank (See air compressor manual).Oil the tool and run until no water is evident. Oil the tool again and run 1 – 2 seconds. |
Three Year Limited Warranty
CRAFTSMAN will repair or replace, without charge, any defects due to faulty materials or workmanship for three years from the date of purchase (two years for batteries). This warranty does not cover part failure due to normal wear or tool abuse. For further detail of warranty coverage and warranty repair information, visit www.craftsman.com or call
1-888-331-4569. This warranty does not apply to accessories or damage caused where repairs have been made or attempted by others. THIS LIMITED WARRANTY IS GIVEN IN LIEU OF ALL OTHERS, INCLUDING THE IMPLIED WARRANTY OF MERCHANTABILITY AND FITNESS FOR A PARTICULAR PURPOSE, AND EXCLUDES ALL INCIDENTAL OR CONSEQUENTIAL DAMAGES. Some states do not allow limitations on how long an implied warranty lasts or the exclusion or limitation of incidental or consequential damages, so these limitations may not apply to you. This warranty gives you specific legal rights and you may have other rights which vary in certain states or provinces.
90 DAY MONEY BACK GUARANTEE
If you are not completely satisfied with the performance of your CRAFTSMAN Power Tool, Laser, or Nailer for any reason, you can return it within 90 days from the date of purchase with a receipt for a full refund – no questions asked.
LATIN AMERICA: This warranty does not apply to products sold in Latin America. For products sold in Latin America, see country specific warranty information contained in the packaging, call the local company or see website for warranty information.
CRAFTSMAN®
is a registered trademark of Stanley Black & Decker, Inc., used under license. est une marque déposée de Stanley Black & Decker, Inc., utilisée sous licence. es una marca registrada de Stanley Black & Decker, Inc., utilizada bajo licencia.
© 2019 CRAFTSMAN
Product Manufactured by: SHINING GOLDEN YIDA Produit fabriqué par: SHINING GOLDEN YIDA Producto fabricado por: SHINING GOLDEN YIDA LICENSEE NAME: SHINING GOLDEN YIDA LICENSEE ADDRESS: PO BOX 6564 AKRON, OH 44312
Parts List
| Part Qty | Description | |
| 1 | Lock Nut | 1 |
| 2 | 1Collet head | |
| 3 | 1Collet | |
| 4 | 1Shaft | |
| 5 | 1Bearing | |
| 6 | 1Shaft Lock | |
| 7 | 1Half Moon Key | |
| 8 | 1Gear | |
| 9 | 2Bearing | |
| 10 | 1Wave Washer | |
| 11 | 1Gear Housing | |
| 12 | 1Retaining Ring | |
| 13 | 1Housing Nut | |
| 14 | 1Spring | |
| 15 | 1Shaft Lock Pin |
| Part QtyDescription |
| 16 1Retaining Nut |
| 17 1Retaining Screw |
| 18 1Gear Shaft |
| 19 1Front Plate Bearing |
| 20 1Front Plate |
| 21 1Bushing |
| 22 1Alignment Pin |
| 23 1Cylinder |
| 24 1Rotor |
| 25 2Blades |
| 26 1Rear Plate |
| 27 1Body |
| 28 1Valve Bushing |
| 29 1Switch Pin |
| 30 10-ring |
| Part Qty | Description |
| 31 1 | Spring |
| 32 10-ring | |
| 33 1Screw | |
| 34 1Spring Pin | |
| 35 1 | Spring |
| 36 1 | Safety Trigger |
| 37 1Lever | |
| 38 1Spring Pin | |
| 39 1Muffler | |
| 40 1Body Cover | |
| 41 10-ring | |
| 42 1Air Inlet | |
| 43 1Filter | |
Replacement Kits
| Part | Kit Number | Kit Description |
| 2 | K88000-CMX | Collect Head, Collect |
| K88000-CMX | Collect Head, Collect3 | |
| 34 | K88001-CMX Safety Tigger, Spring, Lever, Spring Pin (2) | |
| 35 | K88001-CMX Safety Tigger, Spring, Lever, Spring Pin (2) | |
| 36 | K88001-CMX Safety Tigger, Spring, Lever, Spring Pin (2) | |
| 37 | K88001-CMX Safety Tigger, Spring, Lever, Spring Pin (2) | |
| 38 | K88001-CMX Safety Tigger, Spring, Lever, Spring Pin (2) | |
FRANÇAIS
Composants
Tool Requirements
Exigences relatives aux outils
AVERTISSEMENT RISQUE DE COUPURES, DE BRÛLURES OU DE COINCEMENT DES MAINS
natural_image
Technical line drawing of a mechanical tool with a spring and connecting rod (no text or symbols)natural_image
Technical line drawing of a mechanical tool with a directional arrow indicating movement (no text or symbols present)UTILISATION
PROBLÈME CAUSE MESURE CORRECTIVE
FRANÇAIS
Liste des pièces
Componentes
Tool Requirements
Exigences relatives aux outils
natural_image
Technical line drawing of a mechanical tool with a directional arrow indicating movement or assembly (no text or symbols present)FUNCIONAMIENTO
Lista de piezas

- Definitions: Safety Alert Symbols and Words
- Components
- ENGLISH
- 1/4 in. Angle Die Grinder CMXPTSG1006NB
- Compressor requirements
- Specifications
- SAVE ALL WARNINGS AND INSTRUCTIONS FOR FUTURE REFERENCE
- WARNING RISK OF EYE OR HEAD INJURY
- WARNING RISK OF LOSS OF HEARING
- WARNING RISK OF FIRE OR EXPLOSION
- WARNING RISK OF PERSONAL INJURY
- PREPARATION
- Estimated Assembly Time: 1 – 3 minutes
- ASSEMBLY
- OPERATING
- MAINTENANCE
- Cleaning
- Repairs
- Accessories
- Storage
- Register Online
- Three Year Limited Warranty
- DAY MONEY BACK GUARANTEE
- CRAFTSMAN®
- FRANÇAIS
- Composants
- AVERTISSEMENT RISQUE DE COUPURES, DE BRÛLURES OU DE COINCEMENT DES MAINS
- UTILISATION
- Componentes
- FUNCIONAMIENTO
Brand : Craftsman
Model : CMXPTSG1006NB
Category : Grinder