
CMXEVBE17250 - Vacuum Cleaner Craftsman - Free user manual and instructions
Find the device manual for free CMXEVBE17250 Craftsman in PDF.

| Product Type | Wet/Dry Vacuum |
| Brand | Craftsman |
| Model | CMXEVBE17250 |
| Tank Capacity | 9.5 liters (2.5 gallons) |
| Power Supply | 120 V ~ 3 A, 60 Hz, 400 W |
| Functions | Liquid and dust vacuuming, blower |
| Filter Type | Filter bag (ref. CMXZVBE38737) |
| Warranty | 3-year limited |
| Included Accessories | Flexible hose, multi-purpose nozzle, flat nozzle |
| Safety | Grounding, safety float, automatic shut-off |
| Usage | Indoor only, do not expose to rain |
| Power | 400 W |
Frequently Asked Questions - CMXEVBE17250 Craftsman
User questions about CMXEVBE17250 Craftsman
0 question about this device. Answer the ones you know or ask your own.
Ask a new question about this device
Download the instructions for your Vacuum Cleaner in PDF format for free! Find your manual CMXEVBE17250 - Craftsman and take your electronic device back in hand. On this page are published all the documents necessary for the use of your device. CMXEVBE17250 by Craftsman.
USER MANUAL CMXEVBE17250 Craftsman
IF YOU HAVE QUESTIONS OR COMMENTS, CONTACT US.
POUR TOUTE QUESTION OU TOUT COMMENTAIRE, NOUS CONTACTER.
SI TIENE DUDAS O COMENTARIOS, CONTÁCTENOS.
1-888-331-4569
WWW.CRAFTSMAN.COM
Part No. SP7097 Printed in Mexico
Definitions: Safety Alert Symbols and Words
This instruction manual uses the following safety alert symbols and words to alert you to hazardous situations and your risk of personal injury or property damage.

DANGER:
Indicates a hazardous situation which, if not avoided, will result in death or serious

WARNING:
Indicates a hazardous situation which, if not avoided, could result in death or serious

CAUTION:
Indicates a hazardous situation which, if not avoided, may result in minor or moderate

(Used without word) Indicates a safety related message.
NOTICE: Indicates a practice not related to personal injury which, if not avoided, may result in property damage.
Fig. A

Components
① Carry Handle
② ON/OFF Switch
③ Powerhead Assembly
④ Inlet Port
⑤ Dust Drum
⑥ Filter Bag and Retainer Band
⑦ Filter Cage
⑧ Drum Latch
⑨ Power Cord
⑩ Accessory Holder
⑪ Blowing Port

WARNING: Read all safety
warnings and all instructions. Failure to follow the warnings and instructions may result in electric shock, fire and/or serious injury.

WARNING: Never modify the product or any part of it. Damage or personal injury could result.

WARNING: To reduce the risk of injury, read the instruction manual.
If you have any questions or comments about this or any product, call CRAFTSMAN toll free at:
1-888-331-4569.
IMPORTANT SAFETY INSTRUCTIONS
When using this Vac, always follow basic safety precautions including the following:
WARNING:
To reduce the risk of fire, electric shock, or injury:
- Read and understand this manual and all labels on the Vac before operating.
- Use only as described in this manual.
- Do not leave Vac running while unattended - you may fail to notice important signs indicating abnormal operation such as loss of suction, debris/liquid exiting exhaust, or abnormal motor noises. Immediately stop using Vac if you notice these signs.
- Do not leave Vac when plugged in. Unplug from outlet when not in use and before servicing.
- Sparks inside the motor can ignite flammable vapors or dust. To reduce the risk of fire or explosion, do not use near combustible liquids, gases, or dusts, such as gasoline or other fuels, lighter fluid, cleaners, oil-based paints, natural gas, coal dust, magnesium dust, grain dust, aluminum dust, or gun powder.
- Do not vacuum anything that is burning or smoking, such as cigarettes, matches, or hot ashes.
- To avoid the risk of self-ignition of drum debris, empty drum after each use. Combustible materials, such as rags or saw dust containing stain or urethane, can be sources of such overheating.
- Do not vacuum drywall dust, cold fireplace ash, or other fine dusts with standard filter. These may pass through the filter and be exhausted back into the air. Use a fine dust filter instead.
- To reduce the risk of inhaling toxic vapors, do not vacuum or use near toxic or hazardous materials.
- This Wet/Dry Vac is not intended for use by persons (including children) with reduced physical, sensory, or mental capabilities, or lack of experience and knowledge, unless they have been given supervision or instruction concerning use of the appliance by a person responsible for their safety.
- To reduce the risk of electric shock, do not expose to rain or allow liquid to enter motor compartment. Store indoors.
- Do not allow to be used as a toy. Close attention is necessary when used by or near children.
- Do not use with a torn filter or without the filter installed except when vacuuming liquids as described in this manual. Dry debris ingested by the impeller may damage the motor or be exhausted into the air.
• Turn off Vac before unplugging.
- To reduce the risk of injury from accidental starting, unplug power cord before changing or cleaning filter.
- Do not unplug by pulling on cord. To unplug, grasp the plug, not the cord.
- Do not use with damaged cord, plug, or other parts. If your Vac is not working as it should, has missing parts, has been dropped, damaged, left outdoors, or dropped into water, call customer service at 1-888-331-4569.
- Do not handle plug, switch, or the Vac with wet hands.
- Do not pull or carry by cord, use cord as handle, close a door on cord, or pull cord around sharp edges or corners. Do not run Vac over cord. Keep cord away from heated surfaces.
- Use only extension cords that are rated for outdoor use and have a grounding conductor. Extension cords in poor condition or too small in wire size can pose fire and shock hazards. To reduce the risk of these hazards, be sure the cord is in good condition and that liquid does not contact the connection. Do not use an extension cord with conductors smaller than 1,3 mm ^2 (16 AWG) in size.
- Connect only to a properly grounded outlet. See grounding instructions.
- Do not put any object into ventilation openings. Do not vacuum with any ventilation openings blocked; keep free of dust, lint, hair, or anything that may reduce air flow.
- Keep hair, loose clothing, fingers, and all parts of body away from openings and moving parts.
- To reduce the risk of falls, use extra care when cleaning on stairs.
- To reduce the risk of personal injury or damage to Vac, use only CRAFTSMAN recommended accessories.
- When using as a blower:
- Direct air discharge only at work area.
- Do not direct air at bystanders.
- Keep children away when blowing.
- Do not use blower for any job except blowing dirt and debris.
- Do not use as a sprayer.
- To reduce the risk of eye injury, wear safety eyewear. The operation of any utility Vac or blower can result in foreign objects being blown into the eyes, which can result in severe eye damage.

CAUTION:
- To reduce the risk of hearing damage, wear ear protectors when using for extended time or in a noisy area.
- For dusty operations, wear dust mask.
- Static shocks are common when the relative humidity of the air is low. Vacuuming fine debris with your Vac can deposit static charge on the hose or Vac. To reduce the frequency of static shocks in your home or when using this Vac, add moisture to the air with a humidifier.
Observe the following warnings that appear on the motor housing of your Vac:
WARNING:
- For your own safety, read and understand Instruction Manual.
- Do not run unattended.
- Do not pick up hot ashes, coals, flammable, combustible / self-igniting, toxic, or other hazardous materials.
- Do not use around explosive liquids or vapors.
WARNING:
To reduce the risk of electric shock - do not expose to rain - store indoors.
FREE WARNING LABEL REPLACEMENT: If your warning labels become illegible or are missing, call 1-888-331-4569 for a free replacement.
SAVE THESE INSTRUCTIONS
INTRODUCTION
This Wet/Dry Vac is intended for household use only. It may be used for light vacuuming of wet or dry media and may also be used as a blower. The light weight design allows usage for most small household vacuuming chores.
Read this Instruction Manual to familiarize yourself with the product features and to understand the specific usage of your new Wet/Dry Vac.
TABLE OF CONTENTS
| Section | Page | Section | Page |
| Important Safety Instructions. | 2-4 | ||
| Introduction | 4 | Maintenance. | 12-13 |
| Grounding Instructions. | 5 | Filter Cleaning | 12 |
| Carton Contents | 6 | Filter Removal and Replacement. | 12 |
| Installation | 7-8 | Cleaning and Disinfecting the Wet/Dry Vac | 13 |
| Vac Assembly | 7 | Storage | 13 |
| Insert Hose | 7 | Service / Repair Parts. | 14 |
| Accessory Storage | 8 | Warranty | 15 |
| Power Cord Storage | 8 | ||
| Hose Storage | 8 | ||
| Operation | 9-11 | ||
| Power Switch | 9 | ||
| Vacuuming Dry Materials | 10 | ||
| Vacuuming Liquids | 10 | ||
| Emptying the Drum | 11 | ||
| Blowing Feature | 11 |
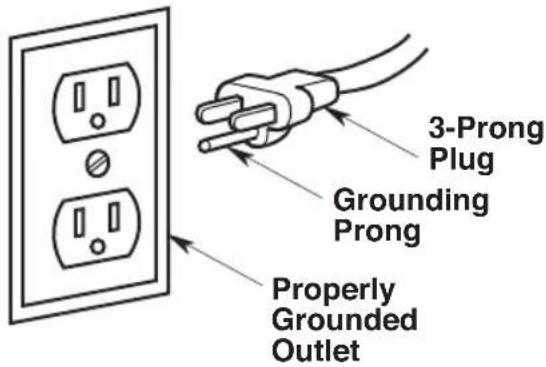
GROUNDING INSTRUCTIONS
This Vac must be Grounded. If it should malfunction or break down, Grounding provides a path of least resistance for Electric Current to reduce the risk of Electric Shock. This Vac is equipped with a Cord having an Equipment-grounding Conductor and Grounding Plug. The Plug must be inserted into an appropriate Outlet that is properly installed and Grounded in accordance with all Local Codes and Ordinances.
Fig. B

WARNING:
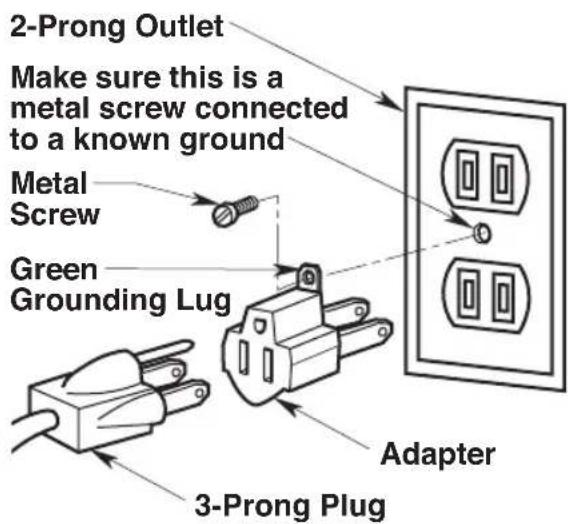
Improper connection of the equipment grounding conductor can result in a risk of electric shock. Check with a qualified electrician or service person if you are in doubt as to whether the outlet is properly grounded. Do not modify the plug provided with the appliance - if it will not fit the outlet, have a proper outlet installed by a qualified electrician.
This Vac is for use on a nominal 120 Volt Circuit, and has a Grounded Plug that looks like the Plug shown.
A Temporary Adapter that looks like the Adapter shown may be used to connect this Plug to a 2-Pole Receptacle, as shown. If a properly Grounded Outlet is not available, the Temporary Adapter should be used only until a properly Grounded Outlet can be installed by a Qualified Electrician.
The Green Colored Rigid Ear, Lug or the like extending from the Adapter must be connected to a Permanent Ground such as a properly Grounded Outlet Box Cover. Whenever the Adapter is used, it must be held in place by a Metal Screw.
NOTE: In Canada, the Use of a Temporary Adapter is Not Permitted by the Canadian Electrical Code.
Fig. C
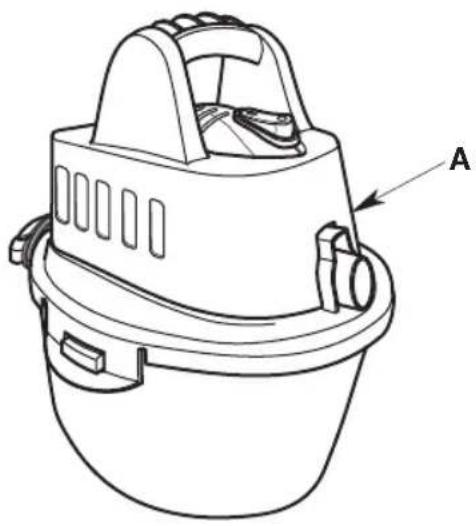
CARTON CONTENTS (Fig. D)
Remove entire contents of carton. Check each item against the Carton Contents List.
If any parts are damaged or missing, immediately call Customer Service at 1-888-331-4569.
Fig. D
natural_image
Technical line drawing of a mechanical component with labeled part A (no text or symbols beyond label)
natural_image
Diagram of a coiled tube or hose with labeled component B (no text or symbols on the diagram itself)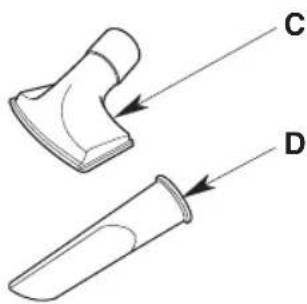
natural_image
Simple line drawing of a rectangular object with an arrow pointing to it, labeled 'E' (no text or symbols on the object itself)| CMXEVBE1725002.5 GallonKey Description (9.5 Liter) | ||
| A Vac Assembly 1 | ||
| B Hose Assembly 1 | ||
| C Utility Nozzle 1 | ||
| D Crevice Tool 1 | ||
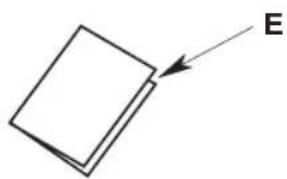
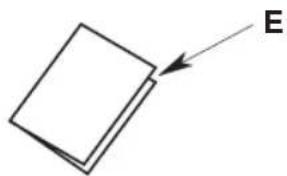
| E Instruction Manual 1 | ||
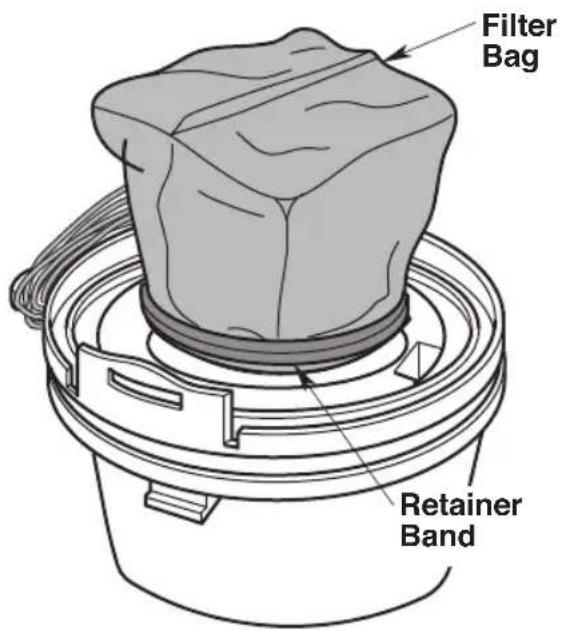
Filter Bag and Retainer Band (already assembled). Filter Bag is sold by Stock No. CMXZVBE38737.
INSTALLATION
Vac Assembly
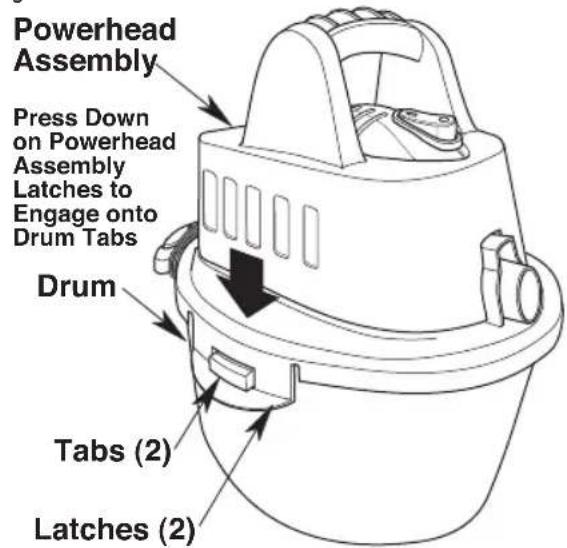
- To Attach the Powerhead Assembly (Fig. E): Line up the Powerhead Assembly Latches to the Notches located on each side of the Drum.
NOTE: Powerhead Assembly must be aligned with Drum for proper attachment.
- Place Powerhead Assembly on top of Drum.
- Be sure Powerhead Assembly completely covers the top of the Drum so leakage does not occur.
- Press down on the Powerhead Assembly Latches to securely attach the Powerhead Assembly to the Drum.
Fig. E
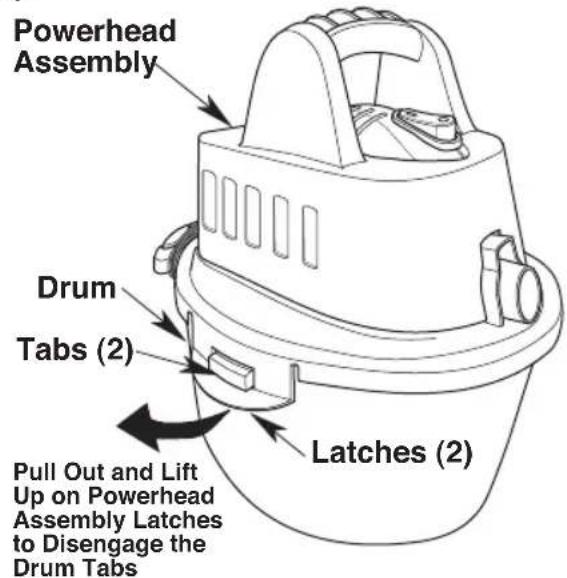
- To Remove the Powerhead Assembly (Fig. F): First unplug the unit from the electrical outlet. Then pull out and lift up on the Powerhead Assembly Latches to remove from Drum Tabs.
Fig. F
Insert Hose
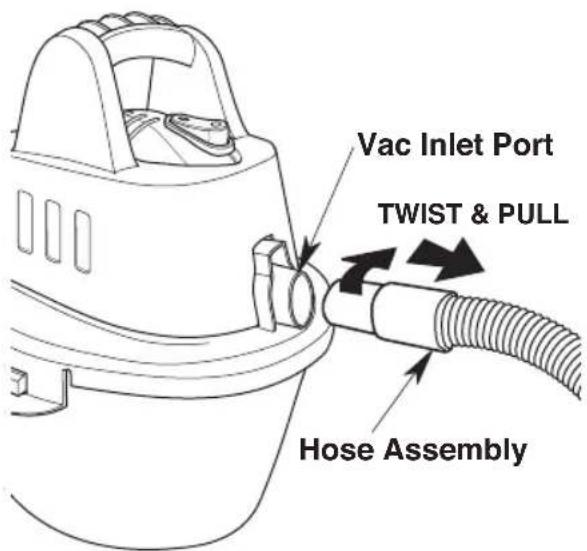
To Insert Hose Assembly into the Vac (Fig. G): Insert the End of the Hose Assembly into the Vac Inlet.
Fig. G

To Remove the Hose Assembly from the Vac (Fig. H): Twist and pull out on the Hose Assembly to release the Hose from the Vac Inlet.
Fig. H
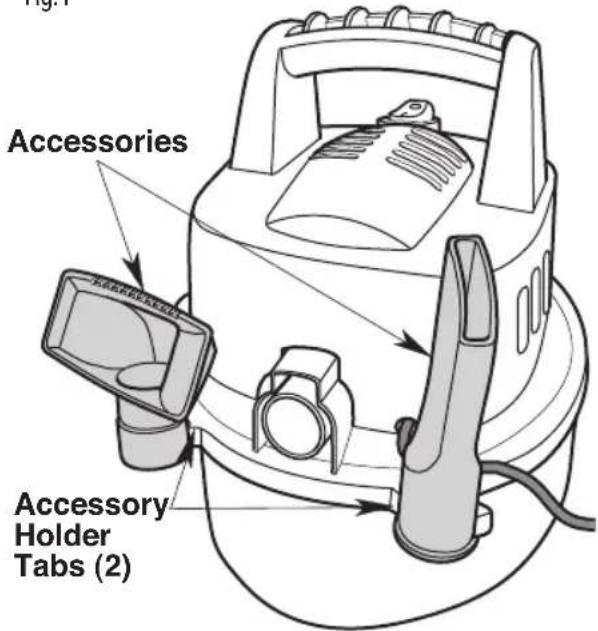
Accessory Storage (Fig. I)
Accessories can be stored in the Accessory Holder Tab Slots, located on the back of the Powerhead Assembly.
Fig. I
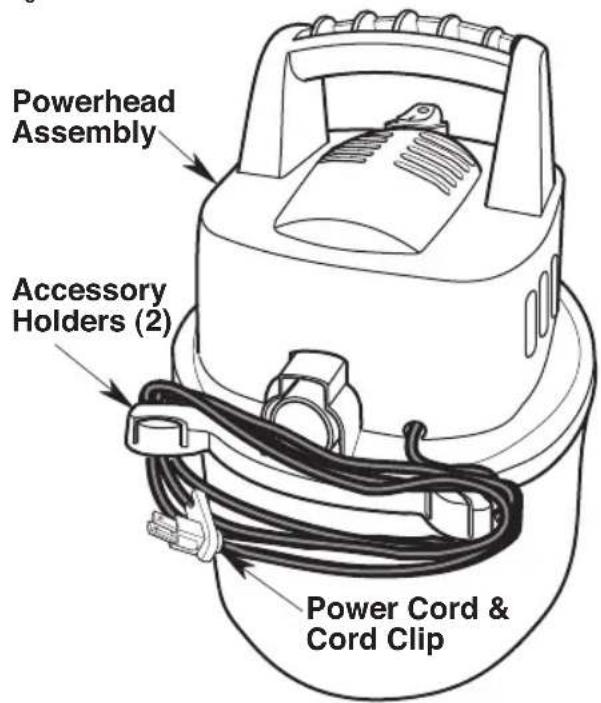
Power Cord Storage (Fig. J)
The Power Cord should be wrapped around both Accessory Holders, located on the back of the Powerhead Assembly. Snap the Cord Clip onto the Power Cord, to secure in place.
Fig. J
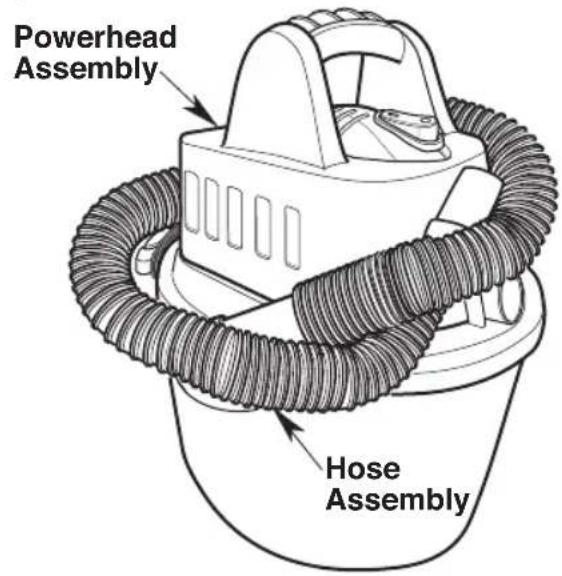
Hose Assembly Storage (Fig. K)
The Hose Assembly may be stored by wrapping it around the Powerhead Assembly, as shown.

CAUTION:
Do not operate vacuum while the hose is still wrapped around the powerhead assembly in the storage position.

WARNING:
Do not put any object into ventilation openings. Do not vacuum with any ventilation openings blocked; keep free of dust, lint, hair or anything that may reduce air flow.
Fig. K
OPERATION
WARNING:
To reduce the risk of fire, explosion, or damage to Vac:
- Do not leave Vac running while unattended - you may fail to notice important signs indicating abnormal operation such as loss of suction, debris/liquid exiting the exhaust, or abnormal motor noises. Immediately stop using Vac if you notice these signs.
- Do not leave Vac plugged in when not in use.
- Do not continue running when float has cut off suction.
- Sparks inside the motor can ignite airborne flammables. Do not operate Vac near flammable liquids or in areas with flammable gases, vapors, or explosive/ airborne dust. Flammable liquids, gases, and vapors include: lighter fluid, solvent-type cleaners, oil-based paints, gasoline, alcohol, and aerosol sprays. Explosive dusts include: coal, magnesium, aluminum, grain, and gun powder.
- Do not vacuum up explosive dusts, flammable liquids, or hot ashes.
- Do not leave sawdust or rags with stain or polyurethane residue inside Vac. Empty drum after picking up these potentially self-heating materials.
WARNING:
To reduce the risk of electric shock or injury:
- Do not expose to rain or allow liquid to enter motor compartment. Store indoors.
- Do not handle plug, switch, or Vac with wet hands.
- Unplug Vac before servicing. If your Vac is not working as it should, has missing parts, has been dropped, damaged, left outdoors, or dropped into water, call customer service at 1-888-331-4569.
- When using an extension cord, use only outdoor-rated cords that are in good condition. Do not allow the connection to come into contact with liquid.
CAUTION:
To reduce the risk of hearing damage, wear ear protectors when using the Vac/Blower for extended time or in a noisy area.
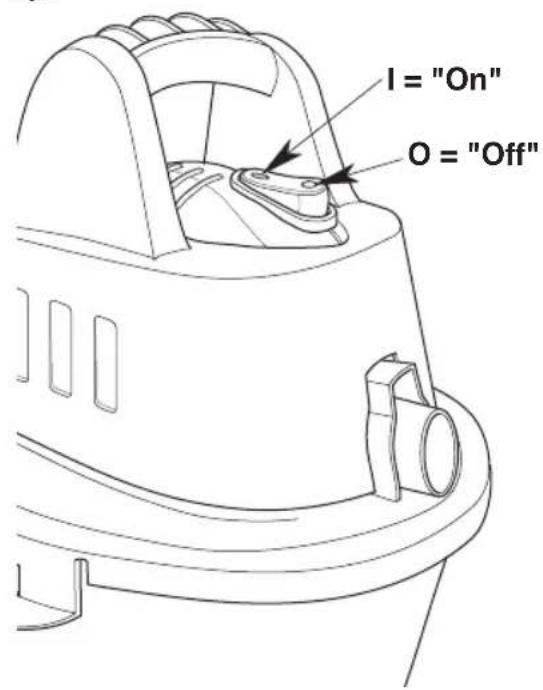
Power Switch (Fig. L)
After you Plug the Power Cord into the Outlet, turn the Unit on by pushing the Switch from position "O" to position "I". The symbols used on the Switch Actuator are International "On & Off" Symbols:
$$ \bigcirc = \text { OFF } \quad | = \text { ON } $$
Fig. L
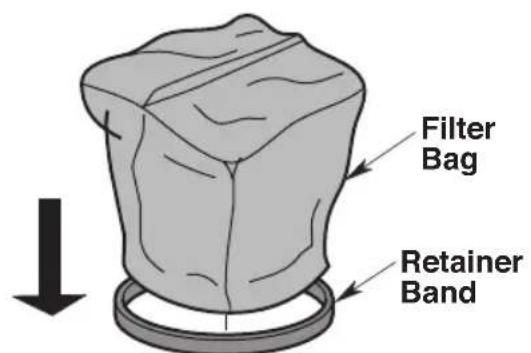
- The Filter Bag must always be in correct position to reduce the risk of leaks and possible damage to Vac. Make sure that the Filter Bag is completely covering the Filter Cage and that the Retainer Band is as close to the Powerhead Assembly as possible. Make sure there are no gaps between the Filter Bag and the Powerhead Assembly.
NOTE: It is very important to assemble the Filter Bag to the cage without allowing any possible leaks or tears. Any leaks will allow the picked up media to be blown out of the Blower Port and back into the surrounding environment.
- When using your Vac to pick up very fine dust, it will be necessary for you to empty the Dust Drum and clean or replace the Filter Bag at more frequent intervals to maintain peak Vac performance.
NOTE: A dry Filter Bag is necessary to pick up dry material. If you use your Vac to pick up dust when the Filter Bag is wet, the Filter Bag will clog quickly and be very difficult to clean. In case the Filter Bag gets wet, replace it before continuing to do dry pickups.
Replacement Filter Bags CMXZVBE38737 should be used.
Fig. M
Vacuuming Liquids (Fig. N)Vacuuming Dry Materials
WARNING:
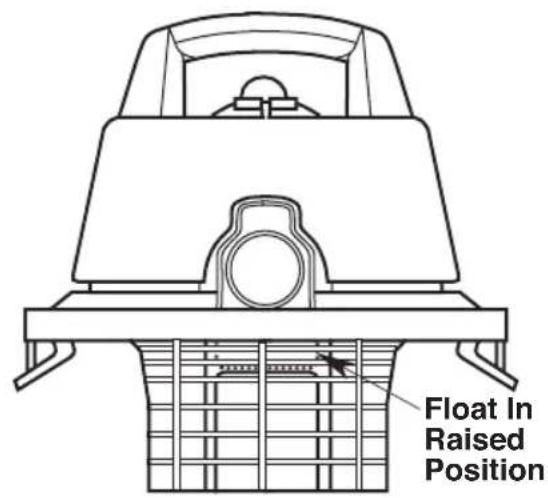
Do not operate without filter cage and float, as they prevent liquid from entering the impeller and damaging the motor. For dry material pick-up, do not operate without the filter bag in place to reduce the risk of damage to the motor.
WARNING:
To reduce the risk of fire or explosion, do not vacuum flammable or combustible liquids, gases or dust.
-
Removal of the Filter Bag is highly recommended for wet pickups.
-
This Wet/Dry Vac is equipped with a Float Mechanism which will rise automatically to cut off the airflow when the liquid in the Drum reaches a predetermined level. When this happens, turn OFF Vac, unplug the Power Cord, and empty the Dust Drum. You will know that the Float has shut the airflow off because the suction ceases and the motor noise becomes higher in pitch, due to increased motor speed. The liquid capacity may vary with the rate of pickup.
IMPORTANT: To reduce the risk of damage to the Vac do not run Motor with Float in raised position.
Fig. N
Emptying the Drum (Fig. O)
WARNING:
To reduce the risk of injury from accidental starting, unplug power cord before emptying the drum.
- Remove the Powerhead Assembly: Pull Powerhead Assembly Latches outward to release from the Drum.
- Lift the Powerhead Assembly up and away from the Drum.
- Lay Powerhead Assembly upside down on a clean area while emptying the Drum.
- Dump the Drum contents into the proper waste disposal container.
Fig. 0

natural_image
Simple line drawing of a bucket with a handle and silhouette below (no text or symbols)Blowing Feature (Fig. P)
Your Vac features a Blowing Port. It can blow sawdust and other debris. Follow the following steps to use your Vac as a Blower.
- Locate the Blowing Port on the back of your Vac.
- Insert one End of the Hose Assembly into the Vac Blowing Port. Twist the Hose to lock into place.
- Turn Vac ON and you are ready to use your Vac as a Blower.
- To Remove the Hose from the Vac: Turn OFF Vac. Twist and pull out on the Hose Assembly to release the Hose from the Vac Blowing Port.
WARNING:
Always wear safety eyewear complying with ANSI Z87.1 (or in Canada, CSA Z94.3) before using as a blower.
WARNING:
To reduce the risk of injury to bystanders, keep them clear of blowing debris.
CAUTION:
Wear a dust mask if blowing creates dust which might be inhaled.
CAUTION:
To reduce the risk of hearing damage, wear ear protectors when using the Vac / Blower for extended time or in a noisy area.
Fig. P

MAINTENANCE
Filter Cleaning
WARNING:
To reduce the risk of injury from accidental starting, unplug power cord before changing or cleaning filter.
Your Filter should be cleaned often to maintain peak Vac performance.
After dirty Filter Bag removal from the Vac, remove the dry debris by gently tapping Filter against the inside wall of the disposal container.
NOTE: Clean the Filter Bag in an open area. Cleaning should be done outdoors and not in the living quarters.
IMPORTANT: After cleaning, check the Filter Bag for tears or small holes. Tears and holes in the Filter Bag can cause debris and dust to be blown from the Vac. Do not use a Filter Bag with holes or tears. Replace immediately.
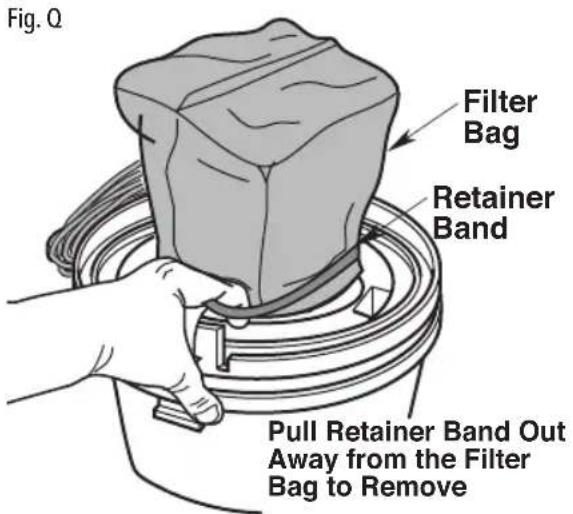
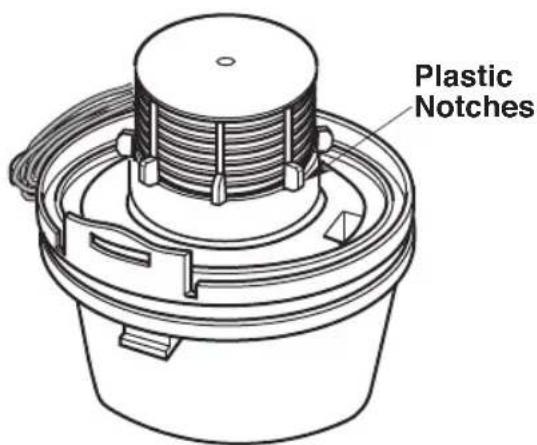
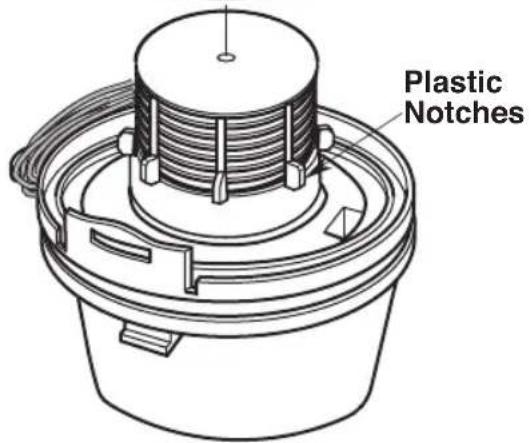
Filter Removal and Replacement (Fig. Q)
IMPORTANT: To avoid damage to the Blower Wheel and Motor, always reinstall the Filter Bag before using the Vac for dry material pick-up.
- Extend the Retainer Band around the Plastic Notches on the Powerhead Assembly.
- Remove Filter Bag off the Filter Cage.
- Place the replacement Filter Bag on the Filter Cage until open end touches bottom of the Powerhead Assembly.
- Release the Retainer Band from the Plastic Notches on the Powerhead Assembly, holding the Filter Bag secure to the Powerhead Assembly.
- Make sure the Retainer Band is positioned on the Filter Bag between the printed lines.
NOTE: Filter Bag is sold by Stock No. CMXZVBE38737.
NOTE: Before installing the Filter Bag on the Vac, clean the area of the Powerhead Assembly so that the Retainer Band will seal the bag against the Powerhead Assembly and stop small particles from bypassing the Filter Bag.
If the Filter Bag is clean and not damaged, replace it on the Filter Cage. If it cannot be reused, place a new Filter Bag over the Filter Cage.
Cleaning and Disinfecting the Wet/Dry Vac
To keep your Wet/Dry Vac looking its best, clean the outside with a cloth dampened with warm water and mild soap.
To clean the Drum:
- Dump debris out.
- Wash Drum thoroughly with warm water and mild soap.
- Wipe out with dry cloth.
Before prolonged storage or as needed (i.e., waste water pick up) the Drum should be disinfected.
To disinfect the Drum:
- Pour 1 gallon (4 L) of water and 1 teaspoon (5 mL) chlorine bleach into the Drum.
- Let solution stand for 20 minutes, carefully swishing every few minutes, making sure to wet all inside surfaces of the Drum.
- Empty Drum after 20 minutes. Rinse with water until bleach smell is gone. Allow Drum to dry completely before sealing the Motor on the Drum.
Storage
Before storing your Vac, the Dust Drum should be emptied and cleaned. The Power Cord should be wrapped around the Accessory Holder Tabs, located on the back of the Powerhead Assembly. The Hose should be stored as described in this manual. Accessories should be kept in the same area as the Vac so they can be readily available. The Vac should be stored indoors.
WARNING:
To assure product SAFETY and RELIABILITY, any other maintenance, repairs and adjustments should be performed by Authorized Service Centers, always using CRAFTSMAN replacement parts.
SERVICE / REPAIR PARTS
2.5 Gallon (9.5 Liter) Wet/Dry Vac
Model Number CMXEVBE172500
Electrical Rating: 120 V\~ 3 A 60 Hz / 400 W
⚠ WARNING: To reduce the risk of injury, unplug power cord before servicing the Wet/Dry Vac.
WARNING: All disassembly and repairs should be performed by qualified personnel.
Contact your Authorized Craftsman Dealer for Available Wet/Dry Vac Accessories
CRAFTSMAN® LIMITED WARRANTY - 3 YEARS
This limited warranty is provided by Emerson Tool Company, a division of Emerson Electric Co., ("We" or "Our" or "Us") to the original consumer owner ("Customer" or "You" or "Your") of the CRAFTSMAN product with which this limited warranty is provided (the "CRAFTSMAN Product").
What is Covered
We warrant to You that your CRAFTSMAN Product will be free from defects in materials and workmanship when used under normal conditions in accordance with the terms of the Instruction Manual provided to You with the CRAFTSMAN Product, subject to the exclusions described below, for a period of three years commencing on the date of purchase by You (the "Warranty Period"). This limited warranty terminates if the original purchaser transfers the CRAFTSMAN Product to any other person or entity.
THIS WARRANTY IS NOT VALID IN THE FOLLOWING CASES:
a) When the product has been used in abnormal conditions.
b) When the product has not been used according to the instruction manual provided.
c) When the product has been manipulated or repaired by an unauthorized person.
What is not Covered
This limited warranty does not extend to and expressly excludes:
- Normal wear and tear and/or replacement attachments or accessories, including, without limitation, power cords, hoses, filters, and other attachments or accessories that may be offered for sale by Us for use with the CRAFTSMAN Product.
- Damage or burnout of the CRAFTSMAN Product motor resulting from failure to clear a blockage occurring during the normal course of use.
- Loss or damage to the CRAFTSMAN Product resulting from conditions beyond Our control including without limitation, misuse, accident, abuse, neglect, negligence (other than Our's), overuse beyond intended capacity as set forth in the Instruction Manual, or modifications or alterations made by anyone other than Us.
- Loss or damage to the CRAFTSMAN Product resulting from failure to use the CRAFTSMAN Product in accordance with the written instructions, guidelines, and terms and conditions set forth in the Instruction Manual.
- TO THE EXTENT PERMITTED BY LAW, IN NO EVENT SHALL WE BE LIABLE FOR ANY INCIDENTAL, SPECIAL, INDIRECT, OR CONSEQUENTIAL DAMAGES, INCLUDING ANY ECONOMIC LOSS, WHETHER RESULTING FROM NONPERFORMANCE, USE, MISUSE OR INABILITY TO USE THE CRAFTSMAN PRODUCT OR FOR THE NEGLIGENCE OF ETC.
How to Obtain Service
US and Canada – To obtain warranty benefits contact us toll free at 1-888-331-4569. We will direct you to the nearest service center to review your vacuum for inspection, repairs or replacement.
Mexico - To obtain warranty benefits contact us toll free at 001-881-331-4569. We will direct you to the nearest service center to review your vacuum for inspection, repairs or replacement.
No Other Express Warranty Applies
This limited warranty is the sole and exclusive warranty provided to You. No other express warranty, written or verbal, applies including, WITHOUT LIMITATION, WARRANTIES OF MERCHANTABILITY OR FITNESS FOR A PARTICULAR PURPOSE. No employee, agent, dealer, or other person is authorized to alter this limited warranty or make any other warranty on behalf of Us.
What We will do to Correct Problems
YOUR SOLE AND EXCLUSIVE REMEDY UNDER THIS LIMITED WARRANTY SHALL BE LIMITED TO REPAIR, REPLACEMENT, REFUND OF THE CRAFTSMAN PRODUCT.
After You have contacted CRAFTSMAN Product Customer Service Department, We will initiate warranty proceedings, including a physical inspection, subject to the exclusions and the Warranty Period stated herein, to determine whether to repair or replace the CRAFTSMAN Product or provide You with a refund.
The decision to repair or replace your CRAFTSMAN Product or to provide a refund is at Our sole discretion. Repair or replacements provided to You by ETC are at no cost to You if covered under this limited warranty.
If we are unable to provide You with a suitable repaired or replacement CRAFTSMAN Product, we will provide you with a refund equal to the purchase price of your CRAFTSMAN Product or a credit to be used toward the purchase of a new CRAFTSMAN Product.
In the event of any dispute between CUSTOMER AND US, either party may choose to resolve the dispute by binding arbitration. THIS MEANS IF EITHER CUSTOMER OR US CHOOSE BINDING ARBITRATION, NEITHER PARTY SHALL HAVE THE RIGHT TO LITIGATE SUCH CLAIM IN COURT OR HAVE A JURY TRIAL. DISCOVERY AND APPEAL RIGHTS ARE LIMITED.
This limited warranty gives you specific legal rights, and you may also have other rights, which vary from State to State.
Some states do not allow the exclusion of incidental or consequential damages, so the above limitation may not apply. 15
CRAFTSMAN®
is a registered trademark of Stanley Black & Decker, Inc., used under license. es una marca registrada de Stanley Black & Decker, Inc., utilizada bajo licencio. est une marque déposée de Stanley Black & Decker, Inc., utilisée sous licence.
© 2019 CRAFTSMAN
Product Manufactured by: EMERSON TOOL COMPANY
Part No. SP7097 Form No. SP7097 -1 Printed in Mexico 05/2019
natural_image
Technical line drawing of a bucket pump with labeled component A (no text or symbols beyond label)
natural_image
Diagram of a coiled tube or hose with labeled component B (no text or symbols beyond label)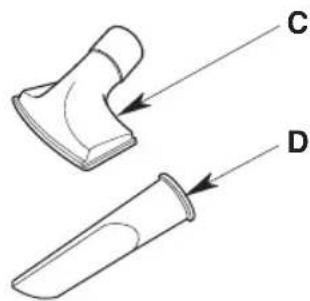
natural_image
Simple line drawing of a rectangular object with an arrow pointing to it, labeled 'E' (no text or symbols on the object itself)natural_image
Simple line drawing of a bucket with a handle and silhouette below (no text or symbols)VOTRÉ REMÈDE UNIQUE ET EXCLUSIF EN VERTU DE LA PRÉSENTE GARANTIE LIMITÉE EST LIMITÉ À LA RÉPARATION, AU REMPLACEMENT OU AU REMBOURSEMENT DU PRODUIT CRAFTSMAN.
Product Manufactured by: EMERSON TOOL COMPANY
natural_image
Technical line drawing of a mechanical component with labeled part A (no text or symbols beyond label)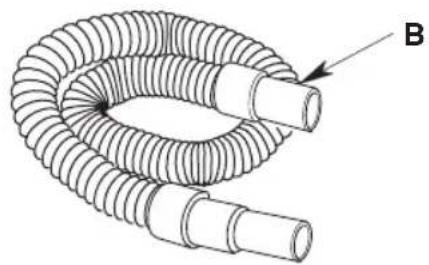
natural_image
Diagram of a coiled tube or hose with two ends, labeled B (no text or symbols on the diagram itself)

natural_image
Simple line drawing of a rectangular object with an arrow pointing to it, labeled 'E' (no text or symbols on the object itself)natural_image
Simple line drawing of a bucket with a handle and silhouette below (no text or symbols)Poniente 146 No. 669, Col. Industrial Vallejo,
is a registered trademark of Stanley Black & Decker, Inc., used under license.
Product Manufactured by: EMERSON TOOL COMPANY

- Definitions: Safety Alert Symbols and Words
- DANGER:
- WARNING:
- CAUTION:
- Components
- WARNING: Read all safety
- IMPORTANT SAFETY INSTRUCTIONS
- To reduce the risk of fire, electric shock, or injury:
- SAVE THESE INSTRUCTIONS
- INTRODUCTION
- GROUNDING INSTRUCTIONS
- CARTON CONTENTS (Fig. D)
- INSTALLATION
- Vac Assembly
- Insert Hose
- Accessory Storage (Fig. I)
- Power Cord Storage (Fig. J)
- Hose Assembly Storage (Fig. K)
- OPERATION
- Power Switch (Fig. L)
- Vacuuming Liquids (Fig. N)Vacuuming Dry Materials
- Emptying the Drum (Fig. O)
- Blowing Feature (Fig. P)
- MAINTENANCE
- Filter Cleaning
- Filter Removal and Replacement (Fig. Q)
- Cleaning and Disinfecting the Wet/Dry Vac
- Storage
- SERVICE / REPAIR PARTS
- CRAFTSMAN® LIMITED WARRANTY - 3 YEARS
- What is Covered
- THIS WARRANTY IS NOT VALID IN THE FOLLOWING CASES:
- What is not Covered
- How to Obtain Service
- No Other Express Warranty Applies
- What We will do to Correct Problems
Brand : Craftsman
Model : CMXEVBE17250
Category : Vacuum Cleaner