
98021SE - Vacuum Cleaner Craftsman - Free user manual and instructions
Find the device manual for free 98021SE Craftsman in PDF.


| Product Type | Vacuum Cleaner |
| Brand | Craftsman |
| Model | 98021SE |
| Dimensions (H x W x D) | 10.5 x 9.8 x 8.7 inches |
| Weight | 8.6 lbs |
| Power Supply | 120V AC, 60Hz |
| Power Cord Length | 15 feet |
| Suction Power | 150 Air Watts |
| Filtration System | Cyclonic and HEPA filter |
| Dirt Capacity | 0.8 liter |
| Cleaning Path Width | 11 inches |
| Brush Roll | Motorized brush roll with on/off |
| Attachments Included | Crevice tool, dusting brush, upholstery tool |
| Noise Level | 72 dB |
| Dust Cup Material | Clear polycarbonate |
| Filter Maintenance | Washable HEPA filter |
| Safety Features | Thermal overload protection, cord retractor |
| Replacement Parts | Filter (part #98021-1), brush roll (part #98021-2) |
| Warranty | 2 years limited |
Frequently Asked Questions - 98021SE Craftsman
User questions about 98021SE Craftsman
0 question about this device. Answer the ones you know or ask your own.
Ask a new question about this device
Download the instructions for your Vacuum Cleaner in PDF format for free! Find your manual 98021SE - Craftsman and take your electronic device back in hand. On this page are published all the documents necessary for the use of your device. 98021SE by Craftsman.
USER MANUAL 98021SE Craftsman
natural_image
Technical line drawing of a handheld electric shaver with visible internal components (no text or symbols)⚠️ CAUTION: Read, understand and follow all Safety Rules and Operating Instructions in this manual before using this product.
Sears Brands Management Corporation, Hoffman Estates, IL 60179 U.S.A.
See the full line of Craftsman® products at craftsman.com
*Maximum initial battery pack voltage (measured without a workload) is 40 volts. Measured under a workload, nominal voltage is 36.
FOR FOUR YEARS from the date of sale, this product is warranted against defects in material or workmanship.
FOR TWO YEARS from the sale date, a supplied battery pack or charger is warranted against material or workmanship defects.
WITH PROOF OF SALE, a defective product will be replaced free of charge.
For warranty coverage details to obtain free replacement, visit the web page: www.craftsman.com/warranty
This warranty is void if this product is ever used while providing commercial services or if rented to another person.
This warranty gives you specific legal rights, and you may also have other rights which vary from state to state.
Sears Brands Management Corporation, Hoffman Estates, IL 60179
SYMBOL SIGNAL MEANING
⚠ SAFETY ALERT SYMBOL: Indicates DANGER, WARNING, OR CAUTION. May be used in conjunction with other symbols or pictographs.
⚠️ DANGER: Indicates hazardous situation which, if not avoided, will result in death or serious injury.
⚠ WARNING: Indicates hazardous situation which, if not avoided, could result in death or serious injury.
⚠️ CAUTION: Indicates a hazardous situation which, if not avoided, could result in minor or moderate injury or property damage.
IMPORTANT SAFETY WARNINGS & INSTRUCTIONS
⚠ WARNING: TO REDUCE RISK OF INJURY:
- Before any use, be sure everyone using this unit reads and understands all safety instructions and other information contained in this manual.
- Save these instructions and review frequently prior to use and in instructing others.
- Do not point unit discharge at self or bystanders.
- Keep long hair and loose clothing away from openings and moving parts.
⚠ WARNING: WHEN USING AN ELECTRIC TOOL, BASIC SAFETY PRECAUTIONS SHOULD ALWAYS BE FOLLOWED TO REDUCE RISK OF FIRE, ELECTRIC SHOCK, AND PERSONAL INJURY, INCLUDING THE FOLLOWING.
⚠ WARNING: SOME DUST CREATED BY THIS PRODUCT CONTAINS CHEMICALS KNOWN TO THE STATE OF CALIFORNIA TO CAUSE CANCER, BIRTH DEFECTS OR OTHER REPRODUCTIVE HARM. SOME EXAMPLES OF THESE CHEMICALS ARE:
• compounds in fertilizers
• compounds in insecticides, herbicides and pesticides
• arsenic and chromium from chemically treated lumber
To reduce your exposure to these chemicals, wear approved safety equipment such as dust masks that are specially designed to filter out microscopic particles.
READ ALL AND UNDERSTAND ALL INSTRUCTIONS BEFORE USING.
GENERAL SAFETY WARNINGS AND INSTRUCTIONS FOR ALL TOOLS
⚠ WARNING: Read all safety warnings and all instructions. Failure to follow the warnings and instructions may result in electric shock, fire and/or serious injury.
- A BATTERY OPERATED UNIT with integral batteries or a separate battery pack must be recharged only with the specified charger for the battery. A charger that may be suitable for one type of battery may create a risk of fire when used with another battery.
- USE BATTERY OPERATED UNIT ONLY with specifically designated battery pack. Use of any other batteries may create a risk of fire.
- AVOID accidental starting. Be sure switch is in the locked or off position before inserting battery pack. Carrying units with your finger on the switch or inserting the battery pack into a unit with the switch on invites accidents.
- DO NOT use unit if switch does not turn it on or off. A unit that cannot be controlled with the switch is dangerous and must be repaired.
- DISCONNECT battery pack from unit or place the switch in the locked or off position before making any adjustments, changing accessories, or storing the unit. Such preventative safety measures reduce the risk of starting the unit accidentally.
- ALWAYS WEAR EYE PROTECTION – Wear safety glasses or goggles at all times when this unit is in use. Also use face or dust mask. Safety glasses are available at extra cost at your local Craftsman® Service Center or authorized service facility.
• DO NOT place outlet of sweeper near eyes or ears when operating.
- STORE IDLE UNITS. When not in use, the unit should be stored in a dry, high or locked-up place - out of reach of children.
- DON'T OVERREACH. Keep proper footing and balance at all times.
- MAINTAIN UNIT WITH CARE. Keep unit clean for best and safest performance. Follow instructions for proper maintenance.
- DO NOT attempt to repair the sweeper. To assure product safety and reliability take a malfunctioning sweeper to a qualified service dealer for inspection and possible repair.
- DO NOT operate sweeper in a gaseous or explosive atmosphere. Motors in these units normally spark, and the sparks might ignite fumes.
- AVOID DANGEROUS ENVIRONMENTAL CONDITIONS – Do not use electric units in damp or wet locations. Don't use the unit in the rain.
- STAY ALERT - Watch what you are doing. Use common sense. Do not operate unit when you are tired.
- USE THE RIGHT UNIT – Do not use this unit for any job except that for which it is intended.
- USE EXTRA CARE when cleaning on stairs.
- DO NOT allow to be used as a toy. Close attention is necessary when used by or near children. Not recommended for use by children.
- DO NOT attempt to clear clogs from unit without first removing battery.
• USE ONLY as described in this manual. Use only manufacturer's recommended attachments.
- DO NOT put any objects into openings. Do not use with any opening blocked; keep free of dust, lint, hair and everything that may reduce air flow.
- KEEP hair, loose clothing, fingers, and all parts of body away from openings and moving parts.
• DO NOT immerse any part of the unit in liquid.
• DO NOT handle charger, including charger plug, and charger terminals with wet hands.
- KEEP CHILDREN, BYSTANDERS AND ANIMALS AWAY from the work area a minimum of 30 feet (10 meters) when starting or operating the unit.
• INSPECT THE AREA before using the unit. Remove all debris and hard objects such as rocks, glass, wire, etc. that can ricochet, be thrown, or otherwise cause injury or damage during operation.
- USE ONLY charger supplied by the manufacturer to recharge.
- EXERCISE CARE in handling batteries in order not to short the battery with conducting materials such as rings, bracelets and keys. The battery or conductor may overheat and cause burns.
- DO NOT OPEN OR MUTILATE the batteries. Released electrolyte is corrosive and may cause damage to the eyes or skin. It may be toxic if swallowed.
• DO NOT CHARGE the unit outdoors.
⚠ WARNING: TO REDUCE THE RISK OF ELECTRICAL SHOCK; DO NOT EXPOSE TO RAIN. DO NOT USE ON WET SURFACES. STORE INDOORS.
SAVE THESE INSTRUCTIONS.
SYMBOLS
The label on your tool may include the following symbols. The symbols and their definitions are as follows:
| V...... volts | A......amperes |
| Hz...... hertz | W......watts |
| min...... minutes | ~ or AC ......alternating current |
| --- or DC... direct current | n_0 ......no load speed |
| !!...... Class I Construction(grounded) | ⊕......earthing terminal |
| ⚠......safety alert symbol | |
| ☐...... Class II Construction(double insulated) | ../min or rpm...revolutions orreciprocation per minute |
| .... Read instruction manual before use | ●......Use proper respiratory protection |
| .... Use proper eye protection | ○......Use proper hearing protection |
IMPORTANT SAFETY INSTRUCTIONS FOR BATTERY CHARGERS SAVE THESE INSTRUCTIONS: THIS MANUAL CONTAINS IMPORTANT SAFETY INSTRUCTIONS FOR BATTERY CHARGERS.
- Before using charger, read all instructions and cautionary markings on charger, battery pack, and product using battery pack.
⚠ WARNING: SHOCK HAZARD. Do not allow any liquid to get inside charger.
⚠️ CAUTION: BURN HAZARD. To reduce the risk of injury, charge only designated Craftsman® batteries. Other types of batteries may burst causing personal injury and damage.
⚠️ CAUTION: Under certain conditions, with the charger plugged in to the power supply, the charger can be shorted by foreign material. Foreign materials of a conductive nature such as, but not limited to, steel wool, aluminum foil, or any buildup of metallic particles should be kept away from charger cavities. Always unplug the charger from the power supply when there is no battery pack in the cavity. Unplug charger before attempting to clean.
⚠ WARNING: THE CHARGER SUPPLIED WITH THIS PRODUCT IS INTENDED TO BE PLUGGED IN SUCH THAT IT IS CORRECTLY ORIENTATED IN A VERTICAL OR FLOOR MOUNT POSITION.
- DO NOT attempt to charge the battery pack with any chargers other than the ones in this manual. The charger and battery pack are specifically designed to work together.
- These chargers are not intended for any uses other than charging designatedCraftsman® rechargeable batteries. Any other uses may result in risk of fire, electric shock or electrocution.
- Do not expose charger to rain or snow.
- Pull by plug rather than cord when disconnecting charger. This will reduce risk of damage to electric plug and cord.
- Make sure that cord is located so that it will not be stepped on, tripped over, or otherwise subjected to damage or stress.
- Do not use an extension cord unless it is absolutely necessary. Use of improper extension cord could result in risk of fire, electric shock, or electrocution.
- An extension cord must have adequate wire size (AWG or American Wire Gauge) for safety. The smaller the gauge number of the wire, the greater the capacity of the cable, that is 16 gauge has more capacity than 18 gauge. When using more than one extension to make up the total length, be sure each individual extension contains at least the minimum wire size.
| Minimum Gauge for Cord SetsVolts Total Length of Cord in Feet120V 0-25 26-50 51-100 101-150240V 0-50 51-100 101-200 201-300 | |||||
| Ampere RatingMore Not more American Wire GaugeThan Than | |||||
| 0 - 6 18 16 | 16 | 14 | |||
| 6 - 10 | 18 16 | 14 | 12 | ||
| 10- | 12 | 16 | 16 | 14 | 12 |
| 12- | 16 | 14 | 12 | Not Recommended | |
- Do not place any object on top of charger or place the charger on a soft surface that might block the ventilation slots and result in excessive internal heat. Place the charger in a position away from any heat source. The charger is ventilated through slots in the top and the bottom of the housing.
- Do not mount charger on wall or permanently affix charger to any surface. The charger is intended to use on a flat, stable surface (i.e., table top, bench top).
- Do not operate charger with damaged cord or plug — have them replaced immediately.
- Do not operate charger if it has received a sharp blow, been dropped, or otherwise damaged in any way. Take it to an authorized service center.
- Do not disassemble charger; take it to an authorized service center when service or repair is required. Incorrect reassembly may result in a risk of electric shock, electrocution or fire.
- Disconnect the charger from the outlet before attempting any cleaning. This will reduce the risk of electric shock. Removing the battery pack will not reduce this risk.
- NEVER attempt to connect 2 chargers together.
- The charger is designed to operate on standard household electrical power (120 Volts). Do not attempt to use it on any other voltage.
IMPORTANT SAFETY INSTRUCTIONS FOR BATTERY PACKS
⚠ WARNING: For safe operation, read this manual and manuals originally supplied with tool before using the charger.
The battery pack is not fully charged out of the carton. Before using the battery pack and charger, read the safety instructions below. Then follow charging procedures outlined.
READ ALL INSTRUCTIONS
- Do not incinerate the battery pack even if it is severely damaged or is completely worn out. The battery pack can explode in a fire. Toxic fumes and materials are created when battery packs are burned.
- Do not charge or use battery in explosive atmospheres, such as in the presence of flammable liquids, gases or dust. Inserting or removing the battery from the charger may ignite the dust or fumes.
- If battery contents come into contact with the skin, immediately wash area with mild soap and water. If battery liquid gets into the eye, rinse water over the open eye for 15 minutes or until irritation ceases. If medical attention is needed, the battery electrolyte for Li-ion batteries is composed of a mixture of liquid organic carbonates and lithium salts.
- Contents of opened battery cells may cause respiratory irritation. Provide fresh air. If symptoms persist, seek medical attention.
⚠ WARNING: BURN HAZARD. BATTERY LIQUID MAY BE FLAMMABLE IF EXPOSED TO SPARK OR FLAME.
- Charge the battery packs only in Craftsman® chargers.
- DO NOT splash or immerse in water or other liquids. This may cause premature cell failure.
- Do not store or use the tool and battery pack in locations where the temperature may reach or exceed 105^ (40°C) (such as outside sheds or metal buildings in summer).
⚠ WARNING: Never attempt to open the battery pack for any reason. If battery pack case is cracked or damaged, do not insert into charger. Do not crush, drop or damage battery pack. Do not use a battery pack or charger that has received a sharp blow, been dropped, run over or damaged in any way (i.e., pierced with a nail, hit with a hammer, stepped on). Damaged battery packs should be returned to service center for recycling.
⚠ WARNING: Fire hazard. Do not store or carry battery so that metal objects can contact exposed battery terminals. For example, do not place battery in aprons, pockets, tool boxes, product kit boxes, drawers, etc., with loose nails, screws, keys, etc. Transporting batteries can possibly cause fires if the battery terminals inadvertently come in contact with conductive materials such as keys, coins, hand tools and the like. The US Department of Transportation Hazardous Material Regulations (HMR) actually prohibit transporting batteries in commerce or on airplanes (i.e., packed in suitcases and carry-on luggage) UNLESS they are properly protected from short circuits. So when transporting individual batteries, make sure that the battery terminals are
protected and well insulated from materials that could contact them and cause a short circuit. NOTE: LI-ION batteries should not be put in checked baggage.
STORAGE RECOMMENDATIONS
- The best storage place is one that is cool and dry away from direct sunlight and excess heat or cold.
- Long-term storage will not harm the battery pack or charger, unless the battery is depleted.
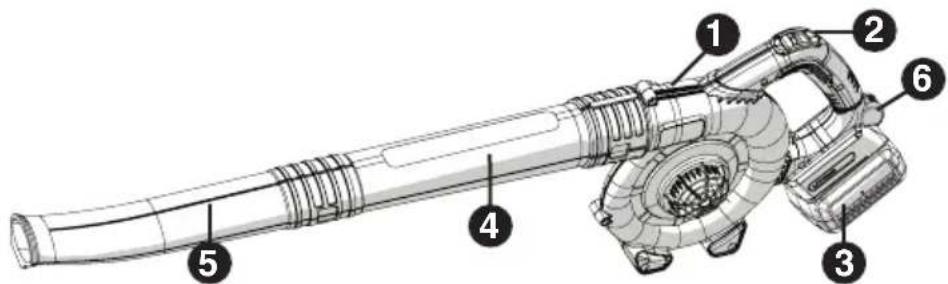
PARTS AND FEATURES
- Cordless Sweeper
- On / Off Switch
- Battery pack
- Inner tube
- Outer tube
- Power Command
CHARGING PROCEDURE
Craftsman ^® chargers are designed to charge Craftsman ^® battery packs.
-
Plug the charger into an appropriate outlet before inserting the battery pack.
-
Insert the battery pack into the charger.
-
The green LED will flash indicating that the battery is being charged.
- The completion of charge is indicated by the green LED remaining on continuously. The pack is fully charged and may be used at t his time or left on the charger.
Recharge discharged batteries as soon as possible after use or battery life may be greatly diminished.
CHARGER DIAGNOSTICS
This charger is designed to detect certain problems that can arise with the battery packs or the power source. Problems are indicated by one LED flashing in different patterns.
BAD BATTERY

The charger can detect a weak or damaged battery. The red LED flashes in the pattern indicated on the label. If you see this bad battery blink pattern, do not continue to charge the battery. Return it to a service center or a collection site for recycling.
HOT/COLD PACK DELAY

When the charger detects a battery that is excessively hot or excessively cold, it automatically starts a Hot/Cold Pack Delay, suspending charging until the battery has normalized.
After this happens, the charger automatically switches to the Pack Charging mode. This feature ensures maximum battery life. The red LED flashes in the pattern indicated on the label when the hot / cold pack delay is detected.
LEAVING THE BATTERY IN THE CHARGER
The charger and battery pack can be left connected with the green LED glowing indefinitely. The charger will keep the battery pack fresh and fully charged.
IMPORTANT CHARGING NOTES
-
Longest life and best performance can be obtained if the battery pack is charged when the air temperature is between 60^ F and 80^ F ( 16^-27^ C). DO NOT charge the battery pack in an air temperature below +40^ F (+4.5°C), or above +105^ F (+40.5°C). This is important and will prevent serious damage to the battery pack.
-
The charger and battery pack may become warm to touch while charging. This is a normal condition, and does not indicate a problem. To facilitate the cooling of the battery pack after use, avoid placing the charger or battery pack in a warm environment such as in a metal shed, or an uninsulated trailer.
-
If the battery pack does not charge properly:
a. Check current at receptacle by plugging in a lamp or other appliance
b. Check to see if receptacle is connected to a light switch which turns power off when you turn out the lights.
c. Move charger and battery pack to a location where the surrounding air temperature is approximately 60^ F and 80^ F ( 16^-27^ C).
d. If charging problems persist, take the tool, battery pack and charger to your local service center.
- The battery pack should be recharged when it fails to produce sufficient power on jobs which were easily done previously. DO NOT CONTINUE to use under these conditions. Follow the charging procedure. You may also charge a partially used pack whenever you desire with no adverse effect on the battery pack.
- Foreign materials of a conductive nature such as, but not limited to, steel wool, aluminum foil, or any buildup of metallic particles should be kept away from charger cavities. Always unplug the charger from the power supply when there is no battery pack in the cavity. Unplug charger before attempting to clean.
- Do not freeze or immerse charger in water or any other liquid.
⚠ WARNING: SHOCK HAZARD. Do not allow any liquid to get inside charger. NEVER ATTEMPT TO OPEN THE BATTERY PACK FOR ANY REASON. IF THE PLASTIC HOUSING OF THE BATTERY PACK BREAKS OR CRACKS, RETURN TO A SERVICE CENTER FOR RECYCLING.
INSTALLING / REMOVING BATTERY PACK
⚠ WARNING: MAKE CERTAIN THE TOOL IS SWITCHED OFF BEFORE REMOVING OR INSTALLING BATTERY.
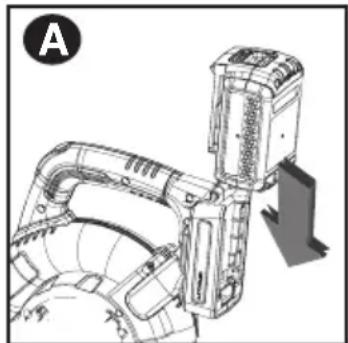
TO INSTALL BATTERY PACK:
Insert battery pack into tool until fully seated and an audible click is heard (figure A). Make sure battery pack is fully seated and fully latched into position. TO REMOVE BATTERY PACK: Depress the battery release button in the back of the battery pack and pull battery pack out of tool.
natural_image
Technical line drawing of a mechanical assembly with a directional arrow indicating movement (no text or symbols present)STATE OF CHARGE INDICATOR
The battery is equipped with a state of charge indicator. This can be used to display the current level of charge in the battery during use and during charging. It does not indicate tool functionality and is subject to variation based on product components, temperature and end-user application
CHECKING STATE OF CHARGE DURING USE (FIGURE B):
- Press the state of charge indicator button (B1).
- The four LEDs (B2) will illuminate indicating the percent of charge in the battery. See chart in figure B.
- If LED light does not illuminate, charge battery.

ASSEMBLY
NOTE: Ensure the sweeper is switched off and the battery is removed before attaching or removing the sweeper tubes. The tube assembly must be assembled to the housing before use.
- TUBE ASSEMBLY: To attach the inner tube to the sweeper, line up the tube with the sweeper housing as shown in figure C. Push the tube into the sweeper housing until the lock button engages the lock hole in the tube. Repeat this process for the outer tube.

natural_image
Diagram showing a mechanical component being processed into a cylindrical tube, with arrows indicating motion (no text or symbols present)OPERATION
ALWAYS WEAR SAFETY GLASSES. WEAR A FILTER MASK IF THE OPERATION IS DUSTY. USE OF RUBBER GLOVES AND SUBSTANTIAL FOOTWEAR IS RECOMMENDED WHEN WORKING OUTDOORS. FOR HOUSEHOLD USE ONLY.
⚠ WARNING: CUT HAZARD. When turning the tool off for tube installation or any other reason, wait 10 seconds for the fan to stop rotating before disassembly.
• Always switch off and remove the battery when:
- The power supply cord has become damaged or entangled.
• You leave sweeper unattended.
- Checking, adjusting, cleaning or working on sweeper.
Use sweeper only in daylight or good artificial light.
SWITCHING ON AND OFF (FIGURE D)
⚠ WARNING: USE BOTH HANDS TO GRIP THE PRODUCT FIRMLY WHEN SWITCHING ON.
To switch the sweeper on, slide the on/off switch forward. To switch the sweeper off, slide the on/off switch back.
⚠️ CAUTION: DO NOT POINT UNIT DISCHARGE AT SELF OR BYSTANDERS.
POWER COMMAND (FIGURE E) MAX POWER / MAX RUNTIME
The max power / max runtime feature (E1) is located on the tool handle. It allows you to optimize the tools performance and boost the power as needed.
• To choose max power, rotate dial to setting 6.
• To maximize runtime rotate dial to setting 1.
- For a combination of both, rotate dial to setting from 2 to 5.

natural_image
Technical line drawing of a mechanical component with two views (top and side), no visible text or symbols
SWEEPER OPERATION
⚠️ CAUTION: Always wear safety glasses. Wear a filter mask if the operation is dusty. Use of gloves, long pants and substantial footwear is recommended. Keep long hair and loose clothing away from openings and moving parts. THIS SWEEPER IS FOR HOUSEHOLD USE ONLY.
NOTE: Ensure the sweeper is switched off and the battery is removed before attaching or removing the sweeper tubes. The sweeper tube must be assembled to the housing before use. Install battery after assembly just prior to use.
- Hold the sweeper with one hand as shown in figure F and sweep from side to side with the nozzle several inches above the hard surface. Slowly advance keeping the accumulated pile of debris in front of you.

natural_image
Line drawing of a person holding a handheld device with a circular icon labeled 'F' (no text or symbols on the device itself)MAINTENANCE
CLEANING AND STORAGE
⚠ WARNING: SHOCK HAZARD. DO NOT POUR OR SPRAY WATER ON THE TOOL IN AN ATTEMPT TO CLEAN.
⚠️ CAUTION: TURN OFF AND REMOVE BATTERY FROM TOOL.
Use only mild soap and a damp cloth to clean the tool. Never let any liquid get inside the tool; never immerse any part of the tool into a liquid. Your Sweeper should be stored in a dry place. Do not store the tool on or adjacent to fertilizers or chemicals. Such storage can cause rapid corrosion of the metal parts.
This device complies with part 15 of the FCC rules. Operation is subject to the following two conditions: (1) This device may not cause harmful interference, and (2) this device must accept any interference received, including interference that may cause undesired operation.
NOTE: This equipment has been tested and found to comply with the limits for a Class B digital device, pursuant to Part 15 of the FCC Rules. These limits are designed to provide reasonable protection against harmful interference in a residential installation. This equipment generates, uses and can radiate radio frequency energy and, if not installed and used in accordance with the instructions, may cause harmful interference to radio communications. However, there is no guarantee that interference will not occur in a particular installation.
If this equipment does cause harmful interference to radio or television reception, which can be determined by turning the equipment off and on, the user is encouraged to try to correct the interference by one or more of the following measures:
• Reorient or relocate the receiving antenna.
- Increase the separation between the equipment and receiver.
- Connect the equipment into an outlet on a circuit different from that to which the receiver is connected.
- Consult the dealer or an experienced radio/TV technician for help.
Changes or modifications to this unit not expressly approved by the party responsible for compliance could void the user's authority to operate the equipment. This Class B digital apparatus complies with Canadian ICES-003.
ACCESSORIES
⚠ WARNING: DO NOT use this product with any type of accessory or attachment. Such usage might be hazardous.
THE RBRC™ SEAL
The RBRC ^™ (Rechargeable Battery Recycling Corporation) Seal on the LI-ION battery (or battery pack) indicates that the costs to recycle the battery (or battery pack) at the end of its useful life have already been paid by Craftsman ^® .
RBRC ^™ in cooperation with Craftsman ^® and other battery users, has established programs in the United States to facilitate the collection of spent LI-ION batteries. Help protect our environment and conserve natural resources by returning the spent LI-ION battery to an authorized Craftsman ^® service center or to your local retailer for recycling. You may also contact your local recycling center for information on where to drop off the spent battery. RBRC ^™ is a registered trademark of the Rechargeable Battery Recycling Corporation.

TROUBLESHOOTING
| Problem Possible Cause Possible Solution | ||
| • Unit will not start. • Battery pack not installed properly.• Battery pack not charged. | • Check battery pack installation.• Check battery pack charging requirements. | |
| • Battery pack will not charge. | • Battery pack not inserted into charger.• Charger not plugged in.• Surrounding air temperature too hot or too cold. | • Insert battery pack into charger until LED illuminates.• Plug charger into a working outlet. Refer to “Important Charging Notes” for more details.• Move charger and battery pack to a surrounding air temperature of above 40 degrees F (4,5°C) or below 105 degrees F (40,5°C). |
| • Unit shuts off abruptly. | • Battery pack has reached its maximum thermal limit.• Out of charge. (To maximize battery life, the battery pack is designed to shutoff abruptly when the charge is depleted.) | • Allow battery pack to cool down.• Place on charger and allow to charge. |
UN AÑO DE GARANTÍA LIMITADA PARA LOS PRODUCTOS CRAFTSMAN
Sears Brands Management Corporation, Hoffman Estates, IL 60179
natural_image
Technical line drawing of a mechanical assembly with no visible text or symbolsnatural_image
Technical illustration of a mechanical component with arrows indicating assembly or transformation (no text or symbols)OPERACIÓN
natural_image
Technical line drawing of a mechanical component with no visible text or symbolsnatural_image
Line drawing of a person holding a handheld device, no text or symbols presentMANTENIMIENTO LIMPIEZA Y ALMACENAMIENTO
Product questions or problems?
1-888-331-4569
Customer Care Hot Line
Get answers to questions, troubleshoot problems, order parts, or schedule repair service.
To help us help you, register your product at www.craftsman.com/registration
Join the Craftsman Club today!
CRAFTSMAN® CLUB
www.craftsman.com/signup
Receive exclusive member benefits including special pricing and offers, project sharing, expert advice, and SHOP YOUR WAY REWARDS!
- SYMBOL SIGNAL MEANING
- IMPORTANT SAFETY WARNINGS & INSTRUCTIONS
- GENERAL SAFETY WARNINGS AND INSTRUCTIONS FOR ALL TOOLS
- SYMBOLS
- IMPORTANT SAFETY INSTRUCTIONS FOR BATTERY CHARGERS SAVE THESE INSTRUCTIONS: THIS MANUAL CONTAINS IMPORTANT SAFETY INSTRUCTIONS FOR BATTERY CHARGERS.
- IMPORTANT SAFETY INSTRUCTIONS FOR BATTERY PACKS
- READ ALL INSTRUCTIONS
- STORAGE RECOMMENDATIONS
- PARTS AND FEATURES
- CHARGING PROCEDURE
- CHARGER DIAGNOSTICS
- BAD BATTERY
- HOT/COLD PACK DELAY
- LEAVING THE BATTERY IN THE CHARGER
- IMPORTANT CHARGING NOTES
- INSTALLING / REMOVING BATTERY PACK
- TO INSTALL BATTERY PACK:
- STATE OF CHARGE INDICATOR
- CHECKING STATE OF CHARGE DURING USE (FIGURE B):
- ASSEMBLY
- OPERATION
- SWITCHING ON AND OFF (FIGURE D)
- POWER COMMAND (FIGURE E) MAX POWER / MAX RUNTIME
- SWEEPER OPERATION
- MAINTENANCE
- ACCESSORIES
- THE RBRC™ SEAL
- UN AÑO DE GARANTÍA LIMITADA PARA LOS PRODUCTOS CRAFTSMAN
- OPERACIÓN
- MANTENIMIENTO LIMPIEZA Y ALMACENAMIENTO
- 1-888-331-4569
- Customer Care Hot Line
Brand : Craftsman
Model : 98021SE
Category : Vacuum Cleaner