
917.376658 - Vacuum Cleaner Craftsman - Free user manual and instructions
Find the device manual for free 917.376658 Craftsman in PDF.


| Product Type | Walk-Behind Rotary Lawn Mower |
| Brand | Craftsman |
| Model | 917.376658 |
| Engine | Briggs & Stratton 625 Series, 4-cycle |
| Cutting Width | 22 inches |
| Cutting Height Adjustment | 9 positions, lever on each wheel |
| Discharge Options | Mulching, rear bagging, side discharging |
| Propulsion | Power-propelled (self-propelled) with drive control bar |
| Engine Speed | Factory set, not adjustable |
| Fuel Type | Unleaded regular gasoline (87 octane minimum) |
| Fuel Capacity | 1.6 quarts |
| Oil Type | SAE 30 (above 32°F) or SAE 5W-30 (below 32°F); API SG-SL |
| Oil Capacity | 20 ounces (18 oz initial fill due to residual oil) |
| Spark Plug | Champion RJ19HX (gap 0.030 inches) |
| Blade Bolt Torque | 35-40 ft-lbs |
| Blade Type | 22-inch mulching blade (replaceable) |
| Grass Catcher Capacity | Cloth bag, included |
| Weight (approx.) | 90 lbs (estimated) |
| Warranty | 2-year full warranty (90 days for commercial use) |
| Safety Features | Operator presence control bar, rear deflector, blade brake |
| Maintenance Interval | Oil change every 25 hours; air filter every 100 hours; spark plug annually |
Frequently Asked Questions - 917.376658 Craftsman
User questions about 917.376658 Craftsman
0 question about this device. Answer the ones you know or ask your own.
Ask a new question about this device
Download the instructions for your Vacuum Cleaner in PDF format for free! Find your manual 917.376658 - Craftsman and take your electronic device back in hand. On this page are published all the documents necessary for the use of your device. 917.376658 by Craftsman.
USER MANUAL 917.376658 Craftsman
625 Series Briggs & Stratton Engine
Power-Propelled
22" Multi-Cut
Model No.
917.376658
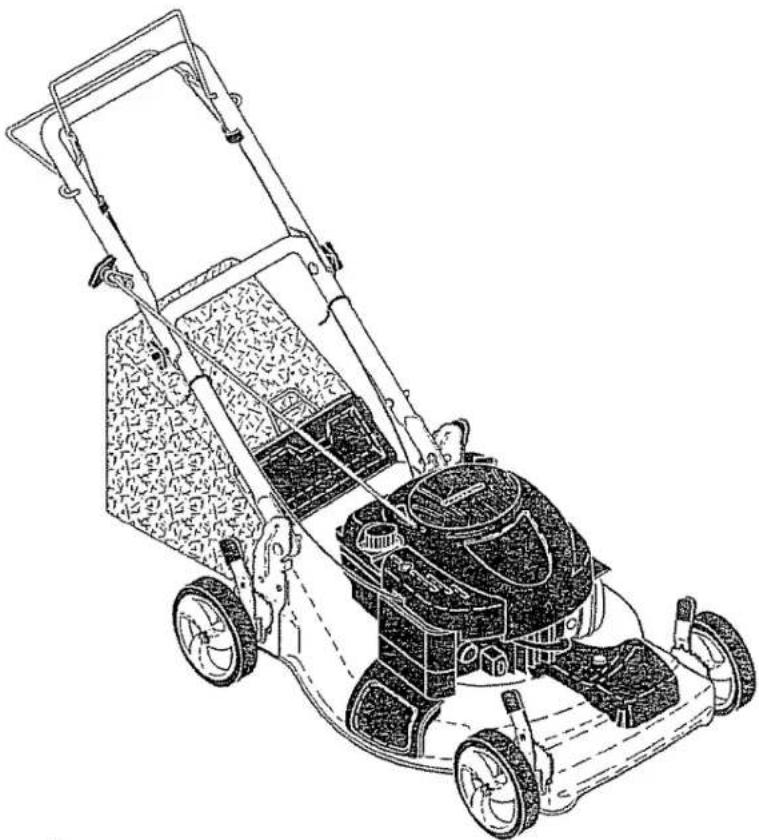
natural_image
Line drawing of a lawn mower with open lid and wheels (no text or symbols)- Español, p. 19
CAUTION:
Read and follow all
Safety Rules and Instructions
before operating this equipment
Sears, Roebuck and Co., Hoffman Estates, IL 60179 U.S.A.
Visit our Craftsman website: www.sears.com/craftsman
TABLE OF CONTENTS
Warranty 2
Safety Rules 2-4
Product Specifications 4
Assembly / Pre-Operation 6
Operation....7-11
Maintenance Schedule 12
Maintenance 12-15
Service and Adjustments 15-16
Storage 16-17
Troubleshooting 17-18
Repair Parts....36-45
Sears Service Back Cover
WARRANTY
2-YEAR FULL WARRANTY ON CRAFTSMAN LAWN MOWER
If this Craftsman Lawn Mower fails due to manufacturer defects in material or workmanship within two years from the date of purchase, return it to any Sears store, Parts & Repair Center or other Craftsman outlet for free repair (or replacement if repair proves impossible).
This warranty applies for only 90 days from the date of purchase if this Lawn Mower is ever used for commercial or rental purposes.
This warranty does not cover:
- Expendable items that become worn during normal use, such as rotary mower blades, blade adapters, belts, air cleaners and spark plug.
- Repairs necessary because of operator abuse or negligence, including bent crackshafts and the failure to assemble, operate or maintain this Lawn Mower according to all supplied product instructions.
This warranty applies only while this product is used in the United States.
This warranty gives you specific legal rights, and you may also have other rights which vary from state to state.
Sears, Roebuck and Co., Hoffman Estates, IL 60179
SAFETY RULES
IMPORTANT: This cutting machine is capable of amputating hands and feet and throwing objects. Failure to observe the following safety instructions could result in serious injury or death.
Look for this symbol to point out important safety precautions. It means CAUTION!!! BECOME ALERT!!! YOUR SAFETY IS INVOLVED.
⚠ WARNING: In order to prevent accidental starting when setting up, transporting, adjusting or making repairs, always disconnect spark plug wire and place wire where it cannot come in contact with plug.
WARNING: Engine exhaust, some of its constituents, and certain vehicle components contain or emit chemicals known to the State of California to cause cancer and birth defects or other reproductive harm.
⚠ WARNING: Battery posts, terminals and related accessories contain lead and lead compounds, chemicals known to the State of California to cause cancer and birth defects or other reproductive harm. Wash hands after handling.
CAUTION: Muffler and other engine parts become extremely hot during operation and remain hot after engine has stopped. To avoid severe burns on contact, stay away from these areas.

I. GENERAL OPERATION
- Read, understand, and follow all instructions on the machine and in the manual(s) before starting. Be thoroughly familiar with the controls and the proper use of the machine before starting.
- Do not put hands or feet near or under rotating parts. Keep clear of the discharge opening at all times.
- Only allow responsible individuals, who are familiar with the instructions, to operate the machine.
- Clear the area of objects such as rocks, toys, wire, bones, sticks, etc., which could be picked up and thrown by blade.
- Be sure the area is clear of other people before mowing. Stop machine if anyone enters the area.
- Do not operate the mower when barefoot or wearing open sandals. Always wear substantial foot wear.
- Do not pull mower backwards unless absolutely necessary. Always look down and behind before and while moving backwards.
- Never direct discharged material toward anyone. Avoid discharging material against a wall or obstruction. Material may richochet back toward the operator. Stop the blade when crossing gravel surfaces.
- Do not operate the mower without proper guards, plates, grass catcher or other safety protective devices in place.
• See manufacturer's instructions for proper operation and installation of accessories. Only use accessories approved by the manufacturer.
- Stop the blade(s) when crossing gravel drives, walks, or roads.
- Stop the engine (motor) whenever you leave the equipment, before cleaning the mower or unclogging the chute.
- Shut the engine (motor) off and wait until the blade comes to complete stop before removing grass catcher.
- Mow only in daylight or good artificial light.
- Do not operate the machine while under the influence of alcohol or drugs.
- Never operate machine in wet grass. Always be sure of your footing: keep a firm hold on the handle; walk, never run.
- Disengage the self-propelled mechanism or drive clutch on mowers so equipped before starting the engine.
- If the equipment should start to vibrate abnormally, stop the engine (motor) and check immediately for the cause. Vibration is generally a warning of trouble.
• Always wear safety goggles or safety glasses with side shields when operating mower.
II. SLOPE OPERATION
Slopes are a major factor related to slip & fall accidents which can result in severe injury. All slopes require extra caution. If you feel uneasy on a slope, do not mow it.
DO:
- Mow across the face of slopes: never up and down. Exercise extreme caution when changing direction on slopes.
- Remove obstacles such as rocks, tree limbs, etc.
- Watch for holes, ruts, or bumps. Tall grass can hide obstacles.
DO NOT:
- Do not trim near drop-offs, ditches or embankments. The operator could lose footing or balance.
- Do not trim excessively steep slopes.
- Do not mow on wet grass. Reduced footing could cause slipping.
III. CHILDREN
Tragic accidents can occur if the operator is not alert to the presence of children. Children are often attracted to the machine and the mowing activity. Never assume that children will remain where you last saw them.
- Keep children out of the trimming area and under the watchful care of another responsible adult.
- Be alert and turn machine off if children enter the area.
- Before and while walking backwards, look behind and down for small children.
- Never allow children to operate the machine.
- Use extra care when approaching blind corners, shrubs, trees, or other objects that may obscure vision.
IV. SAFE HANDLING OF GASOLINE
Use extreme care in handling gasoline. Gasoline is extremely flammable and the vapors are explosive.
- Extinguish all cigarettes, cigars, pipes and other sources of ignition.
• Use only an approved container.
- Never remove gas cap or add fuel with the engine running. Allow engine to cool before refueling.
• Never refuel the machine indoors.
- Never store the machine or fuel container where there is an open flame, spark or pilot light such as a water heater or on other appliances.
- Never fill containers inside a vehicle, on a truck or trailer bed with a plastic liner. Always place containers on the ground away from your vehicle before filling.
- Remove gas-powered equipment from the truck or trailer and refuel it on the ground. If this is not possible, then refuel such equipment with a portable container, rather than from a gasoline dispenser nozzle.
- Keep the nozzle in contact with the rim of the fuel tank or container opening at all times until fueling is complete. Do not use a nozzle lock-open device.
- If fuel is spilled on clothing, change clothing immediately.
- Never overfill fuel tank. Replace gas cap and tighten securely.
V. GENERAL SERVICE
- Never run a machine inside a closed area.
-
Never make adjustments or repairs with the engine (motor) running. Disconnect the spark plug wire, and keep the wire away from the plug to prevent accidental starting.
-
Keep nuts and bolts, especially blade attachment bolts, tight and keep equipment in good condition.
- Never tamper with safety devices. Check their proper operation regularly.
- Keep machine free of grass, leaves, or other debris build-up. Clean oil or fuel spillage. Allow machine to cool before storing.
- Stop and inspect the equipment if you strike an object. Repair, if necessary, before restarting.
- Never attempt to make wheel height adjustments while the engine is running.
- Grass catcher components are subject to wear, damage, and deterioration, which could expose moving parts or allow objects to be thrown. Frequently check components and replace with manufacturer's recommended parts, when necessary.
- Mower blades are sharp and can cut. Wrap the blade(s) or wear gloves, and use extra caution when servicing them.
- Do not change the engine governor setting or overspeed the engine.
- Maintain or replace safety and instruction labels, as necessary.
⚠ WARNING: This lawn mower is equipped with an internal combustion engine and should not be used on or near any unimproved forest-covered, brush-covered or grass-covered land unless the engine's exhaust system is equipped with a spark arrester meeting applicable local or state laws (if any). If a spark arrester is used, it should be maintained in effective working order by the operator. In the state of California the above is required by law (Section 4442 of the California Public Resources Code). Other states may have similar laws. Federal laws apply on federal lands. A spark arrester for the muffler is available through your nearest Sears Parts & Repair Center (See the REPAIR PARTS section of this manual).
PRODUCT SPECIFICATIONS
| Serial Number: | |
| Date of Purchase: | |
| Gasoline Capacity / Type: | 1.6 Quarts (Unleaded Regular) |
| Oil Type (API SG-SL): | SAE 30 (above 32°F); SAE 5W-30 (below 32°F) |
| Oil Capacity: | 20 Ounces |
| Spark Plug (Gap: .030") | Champion RJ19HX |
| Blade Bolt Torque: | 35-40 ft. lbs. |
| • The model and serial numbers will be found on a decal on the rear of the lawn mower housing. Record both serial number and date of purchase in space provided above. | |
Repair Protection Agreements
Congratulations on making a smart purchase. Your new Craftsman® product is designed and manufactured for years of dependable operation. But like all products, it may require repair from time to time. That's when having a Repair Protection Agreement can save you money and aggravation.
Purchase a Repair Protection Agreement now and protect yourself from unexpected hassle and expense.
Here's what's included in the Agreement:
• Expert service by our 12,000 professional repair specialists.
• Unlimited service and no charge for parts and labor on all covered repairs.
- Product replacement if your covered product can't be fixed.
• Discount of 10% from regular price of service and service-related parts not covered by the agreement; also, 10% off regular price of preventive maintenance check.
- Fast help by phone – phone support from a Sears representative on products requiring in-home repair, plus convenient repair scheduling.
Once you purchase the Agreement, a simple phone call is all that it takes for you to schedule service. You can call anytime day or night, or schedule a service appointment online.
Sears has over 12,000 professional repair specialists, who have access to over 4.5 million quality parts and accessories.
That's the kind of professionalism you can count on to help prolong the life of your new purchase for years to come. Purchase your Repair Protection Agreement today! Some limitations and exclusions apply. For prices and additional information call 1-800-827-6655.
Sears Installation Service
For Sears professional installation of home appliances, garage door openers, water heaters, and other major home items, in the U.S.A. call 1-800-4-MY-HOME®.
ACCESSORIES
These accessories were available when this lawn mower was produced. They are not shipped with your mower. They are also available at most Sears retail outlets and service centers. Some of these accessories may not apply to your lawn mower.
LAWN MOWER PERFORMANCE
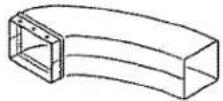 | CLIPPING DEFLECTORS FOR REAR DISCHARGE LAWN MOWERS |  | STABILIZER | 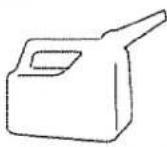 | GASCANS |
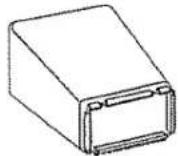 | GRASS CATCHERS FOR REAR DISCHARGE LAWN MOWERS | 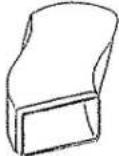 | GRASS CATCHERS FOR SIDE DISCHARGE LAWN MOWERS | ||
Read these instructions and this manual in its entirety before you attempt to assemble or operate your new lawn mower.
IMPORTANT: This lawn mower is shipped WITHOUT OIL OR GASOLINE in the engine. Your new lawn mower has been assembled at the factory with the exception of those parts left unassembled for shipping purposes. To ensure safe and proper operation of your lawn mower, all parts and hardware you assemble must be tightened securely. Use the correct tools as necessary to ensure proper tightness. All parts such as nuts, washers, bolts, etc., necessary to complete the assembly have been placed in the parts bag.
TO REMOVE MOWER FROM CARTON
- Remove loose parts included with mower.
- Cut down two end corners of carton and lay end panel down flat.
- Remove all packing materials except padding between upper and lower handle and padding holding operator presence control bar to upper handle.
- Roll lawn mower out of carton and check carton thoroughly for additional loose parts.
HOW TO SET UP YOUR MOWER
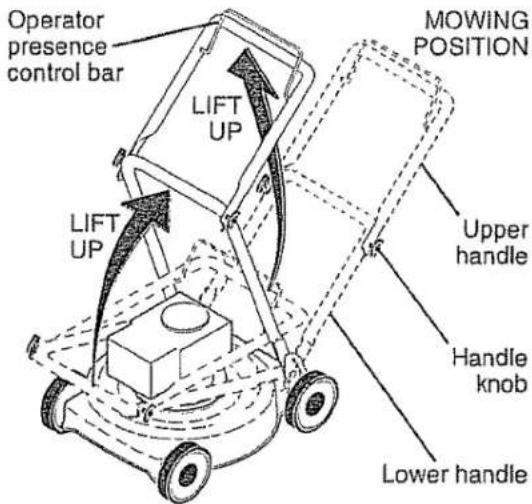
TO UNFOLD HANDLE
IMPORTANT: Unfold handle carefully so as not to pinch or damage control cables.
- Raise handles until lower handle section locks into place in mowing position.
- Remove protective padding, raise upper handle section into place on lower handle and tighten both handle knobs.
- Remove handle padding holding operator presence control bar to upper handle. Your lawn mower handle can be adjusted for your mowing comfort. Refer to "AD-JUST HANDLE" in the Service and Adjustments section of this manual.
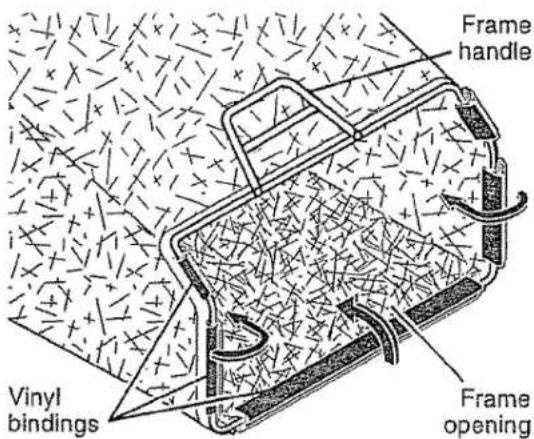
TO ASSEMBLE GRASS CATCHER
- Put grass catcher frame into grass bag with rigid part of bag on the bottom. Make sure the frame handle is outside of the bag top.
- Slip vinyl bindings over frame. NOTE: If vinyl bindings are too stiff, hold them in warm water for a few minutes. If bag gets wet, let it dry before using.
TO INSTALL ATTACHMENTS
Your lawn mower was shipped ready to be used as a mulcher. To convert mower to bagging or discharging, see "TO CONVERT MOWER" in the Operation section of this manual.
OPERATION
KNOW YOUR LAWN MOWER
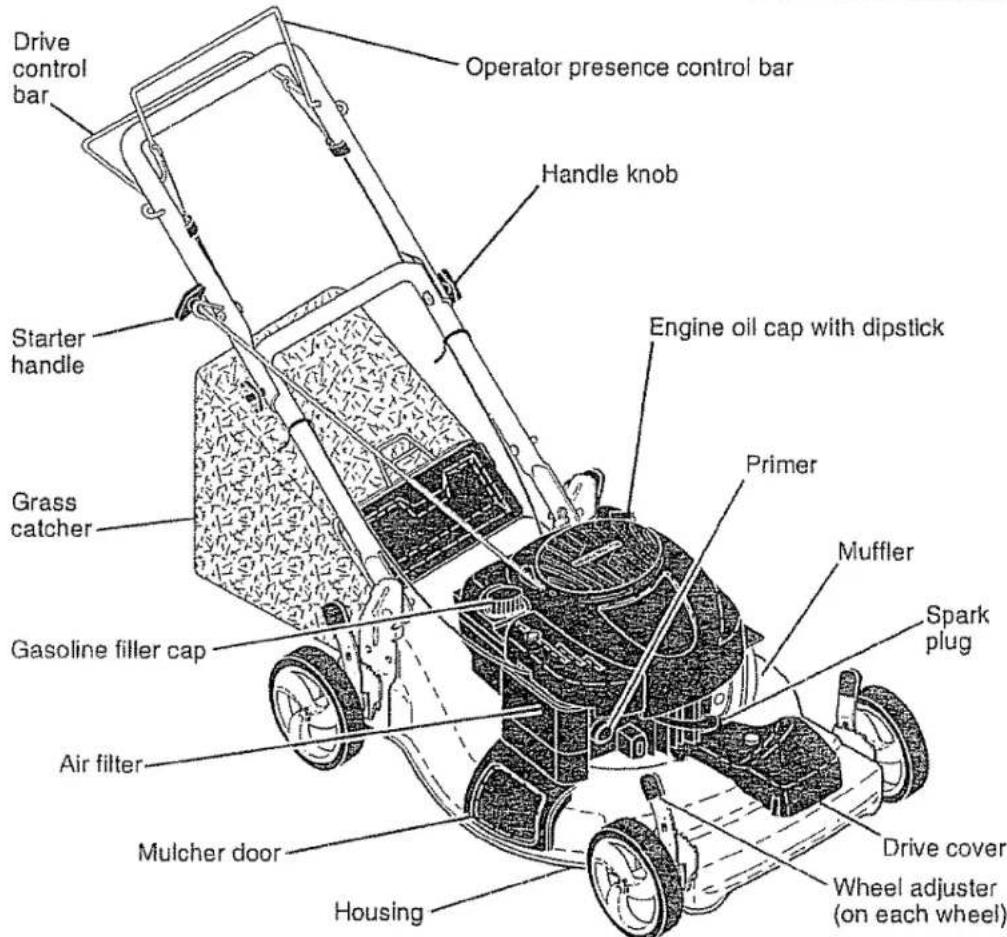
READ THIS OWNER'S MANUAL AND ALL SAFETY RULES BEFORE OPERATING YOUR LAWN MOWER. Compare the illustrations with your lawn mower to familiarize yourself with the location of various controls and adjustments. Save this manual for future reference.
These symbols may appear on your lawn mower or in literature supplied with the product. Learn and understand their meaning.

IMPORTANT: This lawn mower is shipped WITHOUT OIL OR GASOLINE in the engine.
MEETS CPSC SAFETY REQUIREMENTS
Sears rotary walk-behind power lawn mowers conform to the safety standards of the American National Standards Institute and the U.S. Consumer Product Safety Commission. The blade turns when the engine is running.
Operator presence control bar -- must be held down to the handle to start the engine. Release to stop the engine.
Primer—pumps additional fuel from the carburetor to the cylinder for use when starting a cold engine.
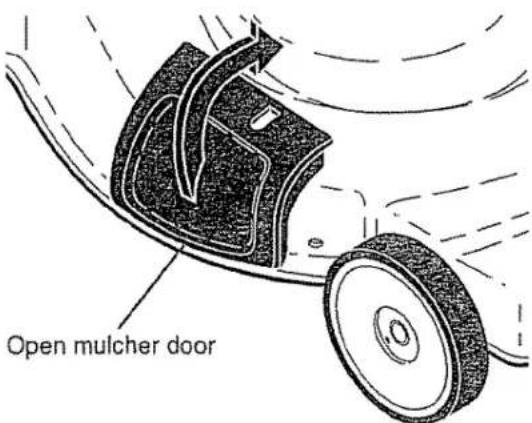
Starter handle – used for starting engine. Mulcher door – allows conversion to discharging or bagging operation. Drive control bar – used to engage power-propelled forward motion of mower.

The operation of any lawn mower can result in foreign objects thrown into the eyes, which can result in severe eye dam-
age. Always wear safety glasses or eye shields while operating your lawn mower or performing any adjustments or repairs. We recommend a standard safety glasses or wide vision safety mask worn over spectacles.
HOW TO USE YOUR LAWN MOWER
ENGINE SPEED
The engine speed was set at the factory for optimum performance. Speed is not adjustable.
ENGINE ZONE CONTROL
⚠️CAUTION: Federal regulations require an engine control to be installed on this lawn mower in order to minimize the risk of blade contact injury. Do not under any circumstances attempt to defeat the function of the operator control. The blade turns when the engine is running.
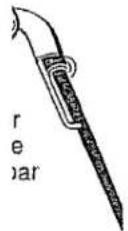
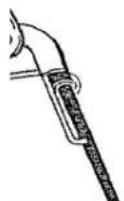
- Your lawn mower is equipped with an operator presence control bar which requires the operator to be positioned behind the lawn mower handle to start and operate the lawn mower.
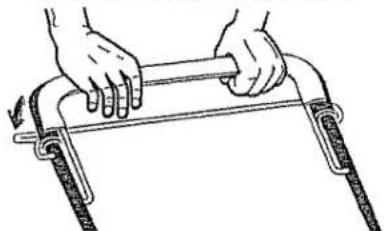
• To start forward motion, lift drive control bar up to handle.
• To stop forward motion, release drive control bar.
IMPORTANT: Always keep drive control fully engaged against handle when in use.
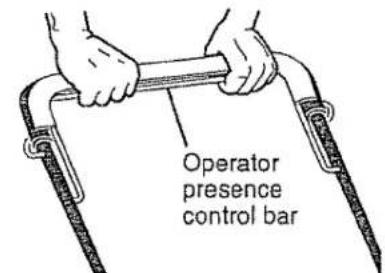
DRIVE CONTROL ENGAGED
natural_image
Illustration of hands using a tool to lift a curved pipe (no text or symbols)DRIVE CONTROL DISENGAGED
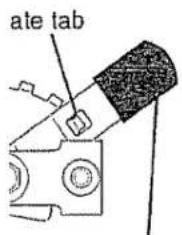
Raise wheels for low cut and lower wheels for high cut, adjust cutting height to suit your requirements. Medium position is best for most lawns.
- To change cutting height, squeeze adjuster lever toward wheel. Move wheel up or down to suit your requirements. Be sure all wheels are in the same setting.
NOTE: Adjuster is properly positioned when plate tab inserts into hole in lever. Also, 9-position adjusters (if so equipped) allow lever to be positioned between the plate tabs.
natural_image
Technical illustration showing hands adjusting a mechanical component with a close-up view of the assembly (no text or symbols present)LEVER FORWARD TO RAISE MOWER Lever
TO CONVERT MOWER
Your lawn mower was shipped ready to be used as a mulcher. To convert to bagging or discharging:
REAR BAGGING
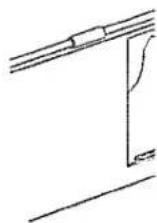
- Open rear door and remove mulcher plug. Store mulcher plug in a safe place.
- You can now install the grass catcher or optional clipping deflector.
- To convert to mulching or discharging operation, install mulcher plug into rear discharge opening of mower.
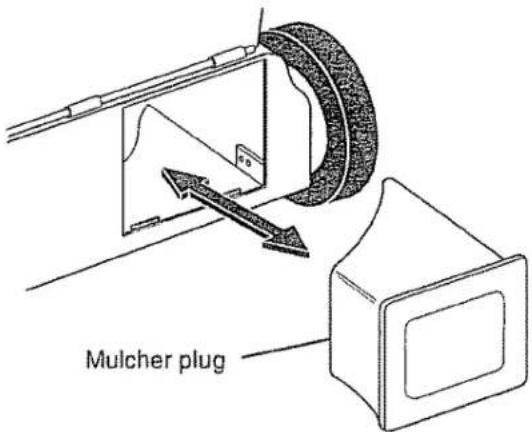
SIDE DISCHARGING
- Mulcher plug must be installed into rear discharge opening of mower.
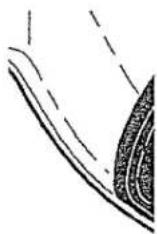
- Open mulcher door and install discharge deflector under door as shown.
- Mower is now ready for discharging operation.
• To convert to mulching or bagging operation, discharge deflector must be removed and mulcher door closed.
natural_image
Technical line drawing of a mechanical component with no visible text or symbols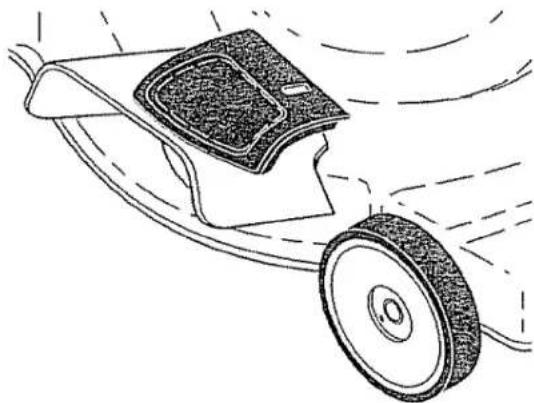
natural_image
Diagram of a lawn mower with motion lines indicating motion (no text or symbols)SIMPLE STEPS TO REMEMBER WHEN CONVERTING YOUR LAWN MOWER
FOR MULCHING -
- Rear mulcher plug installed.
- Mulcher door closed.
FOR REAR BAGGING -
- Rear mulcher plug removed.
- Grass catcher installed.
- Mulcher door closed.
- Rear mulcher plug installed.
- Discharge deflector installed.
A CAUTION: Do not run your lawn mower without mulcher plug or approved grass catcher in place. Never attempt to operate the lawn mower with the rear door removed or propped open.
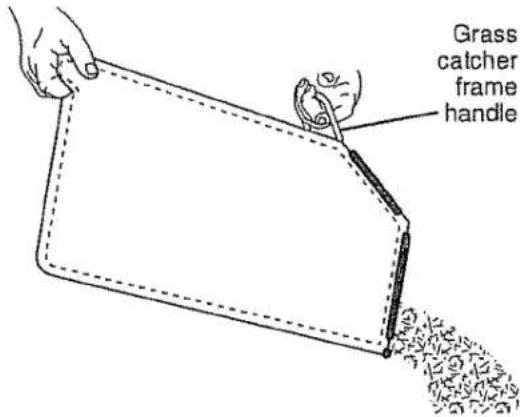
TO EMPTY GRASS CATCHER
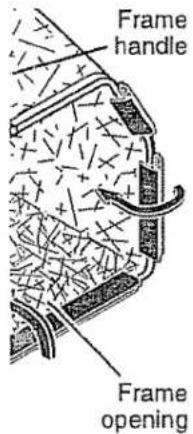
- Lift up on grass catcher using the frame handle.
- Remove grass catcher with clippings from under lawn mower handle.
- Empty clippings from bag.
NOTE: Do not drag the bag when emptying; it will cause unnecessary wear.
BEFORE STARTING ENGINE
ADD OIL
Your lawnmower is shipped without oil in the engine. For type and grade of oil to use, see "ENGINE" in the Maintenance section of this manual.
CAUTION: DO NOT overfill engine with oil, or it will smoke heavily from the muffler on startup.
- Be sure lawnmower is level.
- Remove oil dipstick from oil fill spout.
- You receive a container of oil with the unit. Slowly pour the entire container down the oil fill spout into the engine.
NOTE: Initial oil fill requires only 18 oz. due to residual oil in engine from the manufacturers 100% quality testing. When changing oil you may need 20 oz.
- Insert and tighten dipstick.
IMPORTANT:
- Check oil level before each use. Add oil if needed. Fill to full line on dipstick.
- Change the oil after every 25 hours of operation or each season. You may need to change the oil more often under dusty, dirty conditions. See "TO CHANGE ENGINE OIL" in the Maintenance section of this manual.
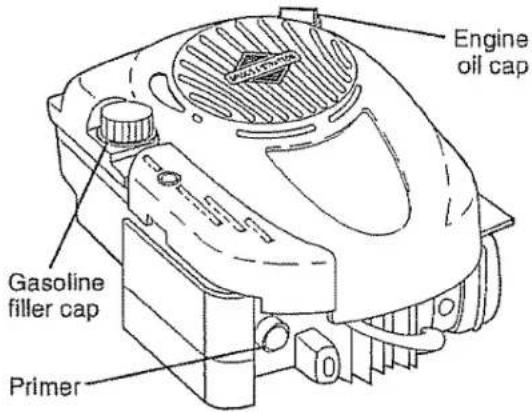
ADD GASOLINE
- Fill fuel tank to bottom of tank filler neck. Do not overfill. Use fresh, clean, regular unleaded gasoline with a minimum of 87 octane. Do not mix oil with gasoline. Purchase fuel in quantities that can be used within 30 days to assure fuel freshness.
CAUTION: Wipe off any spilled oil or fuel. Do not store, spill or use gasoline near an open flame.
CAUTION: Alcohol blended fuels (called gasohol or using ethanol or methanol) can attract moisture which leads to separation and formation of acids during storage. Acidic gas can damage the fuel system of an engine while in storage. To avoid engine problems, the fuel system should be emptied before storage of 30 days or longer. Empty the gas tank, start the engine and let it run until the fuel lines and carburetor are empty. Use fresh fuel next season. See Storage Instructions for additional information. Never use engine or carburetor cleaner products in the fuel tank or permanent damage may occur.
TO STOP ENGINE
- To stop engine, release operator presence control bar.
TO START ENGINE
NOTE: Due to protective coatings on the engine, a small amount of smoke may be present during the initial use of the product and should be considered normal.
-
To start a cold engine, push primer three (3) times before trying to start. Use a firm push. This step is not usually necessary when starting an engine which has already run for a few minutes.
-
Hold operator presence control bar down to the handle and pull starter handle quickly. Do not allow starter rope to snap back.
NOTE: In cooler weather it may be necessary to repeat priming steps. In warmer weather over priming may cause flooding and engine will not start. If you do flood engine, wait a few minutes before attempting to start and do not repeat priming steps.
MOWING TIPS
CAUTION: Do not use de-thatcher blade attachments on your mower. Such attachments are hazardous, will damage your mower and could void your warranty.
- Under certain conditions, such as very tall grass, it may be necessary to raise the height of cut to reduce pushing effort and to keep from overloading the engine and leaving clumps of grass clippings. It may also be necessary to reduce ground speed and/or run the lawn mower over the area a second time.
- For extremely heavy cutting, reduce the width of cut by overlapping previously cut path and mow slowly.
- For better grass bagging and most cutting conditions, the engine speed should be set in the FAST position.
- Pores in cloth grass catchers can become filled with dirt and dust with use and catchers will collect less grass. To prevent this, regularly hose catcher off with water and let dry before using.
- Keep top of engine around starter clear and clean of grass clippings and chaff. This will help engine air flow and extend engine life.
MULCHING MOWING TIPS
IMPORTANT: For best performance, keep mower housing free of built-up grass and trash. See "CLEANING" in the Maintenance section of this manual.
- The special mulching blade will recut the grass clippings many times and reduce them in size so that as they fall onto the lawn they will disperse into the grass and not be noticed. Also, the mulched grass will biodegrade quickly to provide nutrients for the lawn. Always mulch with your highest engine (blade) speed as this will provide the best recutting action of the blades.
- Avoid cutting your lawn when it is wet. Wet grass tends to form clumps and interferes with the mulching action. The best time to mow your lawn is the early afternoon. At this time the grass has dried, yet the newly cut area will not be exposed to direct sunlight.
- For best results, adjust the lawn mower cutting height so that the lawn mower cuts off only the top one-third of the grass blades. If the lawn is overgrown it will be necessary to raise the height of cut to reduce pushing effort and to keep from overloading the engine and leaving clumps of mulched grass. For extremely heavy grass, reduce your width of cut by overlapping previously cut path and mow slowly.
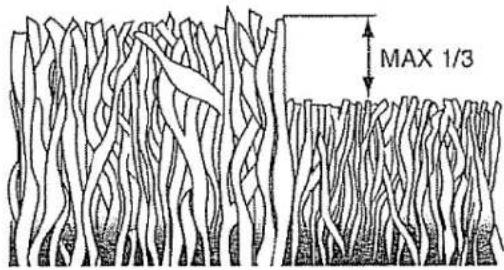
- Certain types of grass and grass conditions may require that an area be mulched a second time to completely hide the clippings. When doing a second cut, mow across (perpendicular) to the first cut path.
- Change your cutting pattern from week to week. Mow north to south one week then change to east to west the next week. This will help prevent matting and graining of the lawn.
MAINTENANCE
| MAINTENANCE SCHEDULE | BEFORE EACH USE | AFTER EACH USE | EVERY 10 HOURS | EVERY 25 HOURS OR SEASON | EVERY 100 HOURS | BEFORE STORAGE | |
| LAWN MOWER | Check for Loose Fasteners | √ | √ | ||||
| Clean / Inspect Grass Catcher * | √ | √ | √ | ||||
| Check Tires | √ | ||||||
| Check Drive Wheels *** | √ | ||||||
| Clean Lawn Mower **** | √ | √ | |||||
| Clean under Drive Cover *** | √ | ||||||
| Check Drive Belt / Pulleys *** | √ | ||||||
| Check / Sharpen / Replace Blade | √3 | ||||||
| Lubrication | √ | ||||||
| Clean and Recharge Battery ** | √ | √4 | |||||
| ENGINE | Check Engine Oil level | √5 | |||||
| Change Engine Oil | √1,2 | ||||||
| Clean Air Filter | √2 | ||||||
| Inspect Muffler | √ | ||||||
| Replace Spark Plug | √ | ||||||
| Replace Air Filter Paper Cartridge | √2 | ||||||
| Empty fuel system or add Stabilizer | √ | ||||||
* (if so equipped)
** Electric-Start mowers
*** Power-Propelled mowers
**** Use a scraper to clean under deck
1 - Change more often if operating under a heavy load or in high outdoor temperatures.
2 - Service more often if operating in dirty or dusty conditions
3 - Replace blades more often when mowing in sandy soil
4 - Charge 48 hours at end of season.
5 - And after each 5 hours of use.
GENERAL RECOMMENDATIONS
The warranty on this lawn mower does not cover items that have been subjected to operator abuse or negligence. To receive full value from the warranty, operator must maintain unit as instructed in this manual. Some adjustments will need to be made periodically to properly maintain your unit. At least once a season, check to see if you should make any of the adjustments described in the Service and Adjustments section of this manual.
- At least once a year, replace the spark plug, clean or replace air filter element and check blade for wear. A new spark plug and clean/new air filter element assure proper air-fuel mixture and help your engine run better and last longer.
- Follow the maintenance schedule in this manual.
BEFORE EACH USE
- Check engine oil level.
- Check for loose fasteners.
LUBRICATION
Keep unit well lubricated (See "LUBRICATION CHART").
LUBRICATION CHART
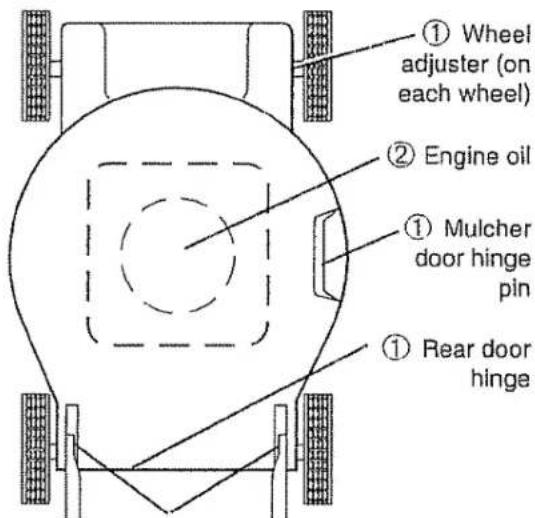
① Handle bracket mounting pins
① Spray lubricant
② See "ENGINE" in Maintenance section.
IMPORTANT: Do not oil or grease plastic wheel bearings. Viscous lubricants will attract dust and dirt that will shorten the life of the self-lubricating bearings. If you feel they must be lubricated, use only a dry, powdered graphite type lubricant sparingly.

15
LAWN MOWER
Always observe safety rules when performing any maintenance.
TIRES
- Keep tires free of gasoline, oil, or insect control chemicals which can harm rubber.
- Avoid stumps, stones, deep ruts, sharp objects and other hazards that may cause tire damage.
DRIVE WHEELS
Check front drive wheels each time before you mow to be sure they move freely.
The wheels not turning freely means trash, grass cuttings, etc. are in the drive wheel area and must be cleaned to free drive wheels. If necessary to clean the drive wheels, be sure to clean both front wheels.
- Remove hubcaps, locknuts & washers.
- Remove wheels from wheel adjusters.
-
Remove any trash or grass cuttings from inside the dust cover, pinion and/or drive wheel gear teeth.
-
Put wheels back in place.
NOTE: If after cleaning, the drive wheels do not turn freely, contact a Sears or other qualified service center.
BLADE CARE
For best results, blade must be kept sharp. Replace a bent or damaged blade.
⚠️ CAUTION: Use only a replacement blade approved by the manufacturer of your mower. Using a blade not approved by the manufacturer of your mower is hazardous, could damage your mower and void your warranty.
TO REMOVE BLADE
- Disconnect spark plug wire from spark plug and place wire where it cannot come in contact with plug.
- Turn lawn mower on its side. Make sure air filter and carburetor are up.
- Use a wood block between blade and mower housing to prevent blade from turning when removing blade bolt.
NOTE: Protect your hands with gloves and/or wrap blade with heavy cloth.
-
Remove blade bolt by turning counterclockwise.
-
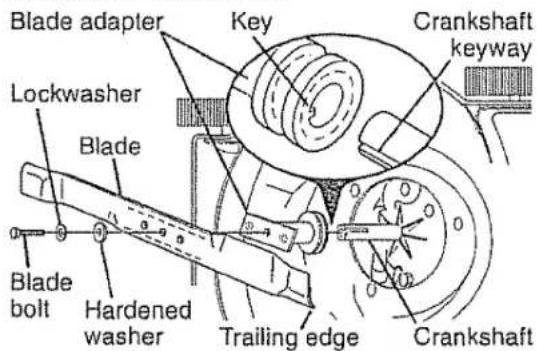
Remove blade & attaching hardware (bolt, lock washer & hardened washer).
TO REPLACE BLADE
- Position blade on the blade adapter aligning the two (2) holes in the blade with the raised lugs on the adapter.
- Be sure the trailing edge of blade (opposite sharp edge) is up toward the engine.
-
Install the blade bolt with the lock washer and hardened washer into blade adapter and crankshaft.
-
Use block of wood between blade and lawn mower housing and tighten the blade bolt, turning clockwise.
Recommended tightening torque:35-40ft.lbs.
IMPORTANT: Blade bolt is heat treated. If bolt needs replacing, replace only with approved bolt shown in the Repair Parts section of this manual.
TO SHARPEN BLADE
NOTE: We do not recommend sharpening the blade - but if you do, be sure the blade is balanced. Care should be taken to keep the blade balanced. An unbalanced blade will cause eventual damage to mower or engine.
- The blade can be sharpened with a file or on a grinding wheel. Do not attempt to sharpen while on the mower.
- To check blade balance, drive a nail into a beam or wall. Leave about one inch of the straight nail exposed. Place center hole of blade over the head of the nail. If blade is balanced, it should remain in a horizontal position. If either end of the blade moves downward, sharpen the heavy end until the blade is balanced.
GRASS CATCHER
• The grass catcher may be hosed with water, but must be dry when used.
- Check your grass catcher often for damage or deterioration. Through normal use it will wear. If catcher needs replacing, replace only with approved replacement catcher shown in the Repair Parts section of this manual. Give the lawn mower model number when ordering.
GEAR CASE
- To keep your drive system working properly, the gear case and area around the drive should be kept clean and free of trash build-up. Clean under the drive cover twice a season.
- The gear case is filled with lubricant to the proper level at the factory. The only time the lubricant needs attention is if service has been performed on the gear case.
- If lubricant is required, use Total Multis EP00 semi-liquid Grease or comparable grade (quantity 1.15oz).
ENGINE
LUBRICATION
Use only high quality detergent oil rated with API service classification SG-SL. Select the oil's SAE viscosity grade according to your expected operating temperature.
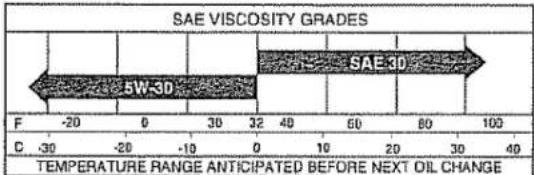
NOTE: Although multi-viscosity oils (5W30, 10W30 etc.) improve starting in cold weather, these multi-viscosity oils will result in increased oil consumption when used above 32°F. Check your engine oil level more frequently to avoid possible engine damage from running low on oil. Change the oil after every 25 hours of operation or at least once a year if the mower is not used for 25 hours in one year. Check the crankcase oil level before starting the engine and after each five (5) hours of continuous use. Tighten oil plug securely each time you check the oil level.
TO CHANGE ENGINE OIL
NOTE: Before tipping lawn mower to drain oil, empty fuel tank by running engine until fuel tank is empty.
- Disconnect spark plug wire from spark plug and place wire where it cannot come in contact with plug.
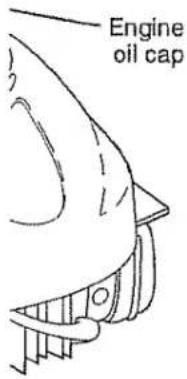
- Remove engine oil cap; lay aside on a clean surface.
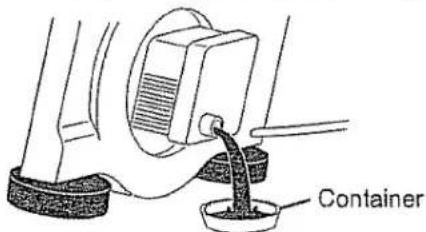
- Tip lawn mower on its side as shown and drain oil into a suitable container. Rock lawn mower back and forth to remove any oil trapped inside of engine.
- Wipe off any spilled oil from lawn mower or side of engine.
- Slowly pour oil down the oil fill spout, stopping every few ounces to check the oil level with the dipstick.
- Stop adding oil when you reach the FULL mark on the dipstick. Wait a minute to allow oil to settle.
- Continue adding small amounts of oil, rechecking the dipstick until oil level settles at FULL. DO NOT overfill, or
engine will smoke heavily from the muffler on startup.
- Always be sure to retighten oil dipstick before starting engine.
- Reconnect spark plug wire to spark plug.
AIR FILTER
Your engine will not run properly and may be damaged by using a dirty air filter. Replace the air filter cartridge every 100 hours of operation or every season, whichever occurs first. Service air cleaner more often under dusty conditions.
TO CLEAN AIR FILTER
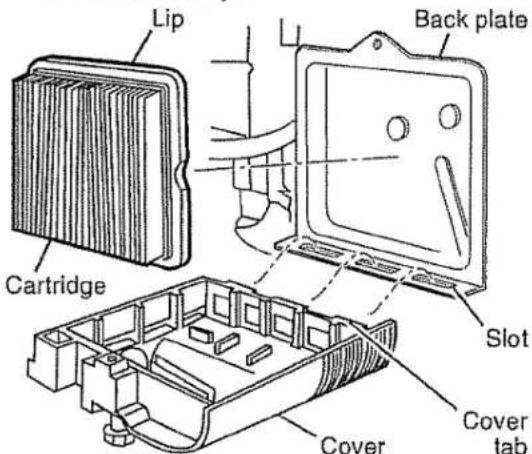
- Loosen screw and tilt cover to remove.
- Carefully remove cartridge.
- Clean by gently tapping on a flat surface. If very dirty, replace cartridge.
ACAUTION: Petroleum solvents, such as kerosene, are not to be used to clean cartridge. They may cause deterioration of the cartridge. Do not oil cartridge. Do not use pressurized air to clean or dry cartridge.
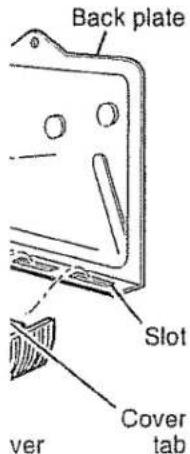
4. Install cartridge, then replace cover making sure the tabs are aligned with the slots in the back plate. Fasten screw securely.
MUFFLER
Inspect and replace corroded muffler as it could create a fire hazard and/or damage.
SPARK PLUG
Replace spark plug at the beginning of each mowing season or after every 100 hours of operation, whichever occurs first. Spark plug type and gap setting are shown in the "PRODUCT SPECIFICATIONS" section of this manual.
CLEANING
IMPORTANT: For best performance, keep mower housing free of built-grass and trash. Clean the underside of your mower after each use.
⚠️CAUTION: Disconnect spark plug wire from spark plug and place wire where it cannot come in contact with plug.
- Clean the underside of your lawn mower by scraping to remove build-up of grass and trash.
- Clean engine often to keep trash from accumulating. A clogged engine runs hotter and shortens engine life.
- Keep finished surfaces and wheels free of all gasoline, oil, etc.
• We do not recommend using a garden hose to clean lawn mower unless the electrical system, muffler, air filter and carburetor are covered to keep water out. Water in engine can result in shortened engine life.
CLEAN UNDER DRIVE COVER
Clean under drive cover at least twice a season. Scrape underside of cover with putty knife or similar tool to remove any build-up of trash or grass on underside of drive cover.
SERVICE AND ADJUSTMENTS
⚠ WARNING: To avoid serious injury, before performing any service and adjustments:
- Release control bar and stop engine.
- Make sure the blade and all moving parts have completely stopped.
- Disconnect spark plug wire from spark plug and place wire where it cannot come in contact with plug.
LAWN MOWER
See "TO ADJUST CUTTING HEIGHT" in the Operation section of this manual.
REAR DEFLECTOR
The rear deflector, attached between the rear wheels of your mower, is provided to minimize the possibility that objects will be thrown out of the rear of the mower into the operator mowing position. If the deflector becomes damaged, it should be replaced.
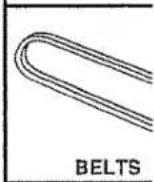
TO REMOVE DRIVE BELT
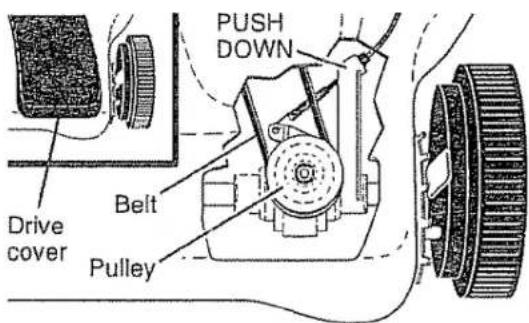
- Remove drive cover.
- Remove belt from gearcase pulley by pushing down on arm and rolling belt off pulley.
- Turn lawn mower on its side with air filter and carburetor down.
- Remove blade, engine pulley and debris shield.
- Remove engine pulley and belt from debris shield.
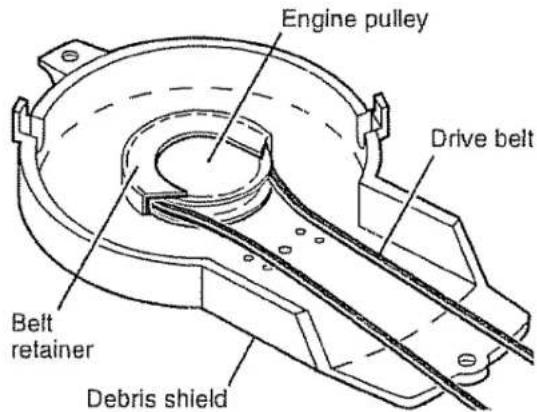
TO REPLACE DRIVE BELT
-
Place new drive belt in engine pulley and belt retainer of debris shield.
-
Route the other end of the new drive belt through hole in housing.
-
Reinstall debris shield.
-
Reinstall blade.
-
Return mower to upright position.
-
Push down on arm, install new belt on gearcase pulley. Release arm slowly.
NOTE: Always use factory approved belt to assure proper fit and long life.
- Reinstall drive cover.
TO ADJUST HANDLE
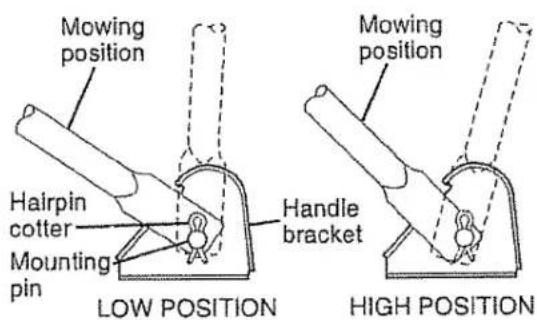
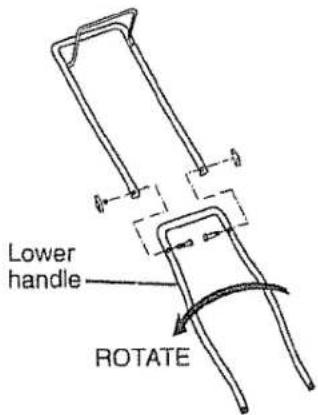
The handle can be mounted in a high or low position. The mounting holes in the bottom of lower handle are off center for raising or lowering the handle.
- Remove upper handle and wire tie(s) securing cable(s) to lower handle.
- Remove hairpin cotters from lower handle bracket mounting pin.
- Squeeze lower handle in to remove it from mounting pins.
- Turn lower handle over to raise or lower handle.
- Squeezelowerhandleinandpositionholes onto mounting pins on handle bracket.
- Reassemble upper handle and all parts removed from lower handle.
ENGINE
ENGINE SPEED
Your engine speed has been factory set. Do not attempt to increase engine speed or it may result in personal injury. If you believe that engine is running too fast or too slow, take your mower to a Sears or other qualified service center for repair and adjustment.
CARBURETOR
Your carburetor is not adjustable. If your engine does not operate properly due to suspected carburetor problems, take your lawn mower to a Sears or other qualified service center for repair and/or adjustment.
IMPORTANT: Never tamper with the engine governor, which is factory set for proper engine speed. Overspeeding the engine above the factory high speed setting can be dangerous. If you think the engine-governed high speed needs adjusting, contact a Sears or other qualified service center, which has proper equipment and experience to make any necessary adjustments.
STORAGE
Immediately prepare your lawn mower for storage at the end of the season or if the unit will not be used for 30 days or more. When setting up your handle from the
LAWN MOWER
When lawn mower is to be stored for a period of time, clean it thoroughly, remove all dirt, grease, leaves, etc. Store in a clean, dry area.
- Clean entire lawn mower (See "CLEANING" in the Maintenance section of this manual).
- Lubricate as shown in the Maintenance section of this manual.
- Be sure that all nuts, bolts, screws, and pins are securely fastened. Inspect moving parts for damage, breakage and wear. Replace if necessary.
- Touch up all rusted or chipped paint surfaces; sand lightly before painting.
HANDLE
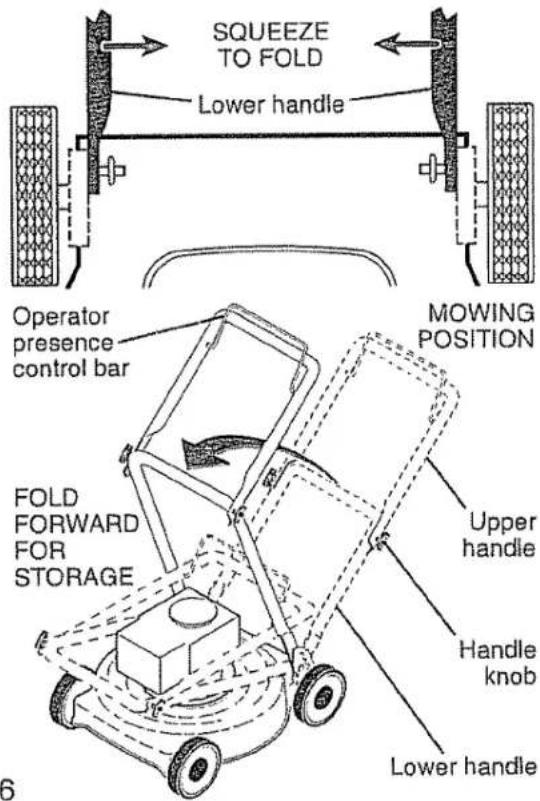
You can fold your mower handle for storage.
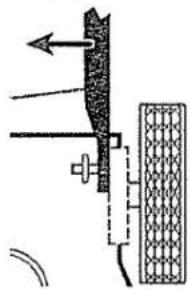
- Squeeze the bottom ends of the lower handle toward each other until the lower handle clears the handle bracket, then move handle forward.
- Loosen upper handle mounting bolts enough to allow upper handle to be folded back.
IMPORTANT: When folding the handle for storage or transportation, be sure to fold the handle as shown or you may damage the control cables.
- When setting up your handle from the storage position, the lower handle will automatically lock into mowing position.
- Vuelva a las partes
IMPORTANT: It is important to prevent gum deposits from forming in essential fuel system parts such as carburetor, fuel filter, fuel hose, or tank during storage. Alcohol blended fuels (called gasohol or using ethanol or methanol) can attract moisture which leads to separation and formation of acids during storage. Acidic gas can damage the fuel system of an engine while in storage.
• Empty the fuel tank by starting the engine and letting it run until the fuel lines and carburetor are empty.
- Never use engine or carburetor cleaner products in the fuel tank or permanent damage may occur.
• Use fresh fuel next season.
NOTE: Fuel stabilizer is an acceptable alternative in minimizing the formation of fuel gum deposits during storage. Add stabilizer to gasoline in fuel tank or storage container. Always follow the mix ratio found on stabilizer container. Run engine at least 10 minutes after adding stabilizer to allow the stabilizer to reach the carburetor. Do not empty the gas tank and carburetor if using fuel stabilizer.
ENGINE OIL
Drain oil (with engine warm) and replace with clean engine oil. (See "ENGINE" in the Maintenance section of this manual).
CYLINDER
- Remove spark plug.
- Pour one ounce (29 ml) of oil through spark plug hole into cylinder.
- Pull starter handle slowly a few times to distribute oil.
- Replace with new spark plug.
OTHER
- Do not store gasoline from one season to another.
- Replace your gasoline can if your can starts to rust. Rust and/or dirt in your gasoline will cause problems.
- If possible, store your unit indoors and cover it to protect it from dust and dirt.
- Cover your unit with a suitable protective cover that does not retain moisture. Do not use plastic. Plastic cannot breathe, which allows condensation to form and will cause your unit to rust.
IMPORTANT: Never cover mower while engine and exhaust areas are still warm.
A CAUTION: Never store the lawn mower with gasoline in the tank inside a building where fumes may reach an open flame or spark. Allow the engine to cool before storing in any enclosure.
TROUBLESHOOTING - See appropriate section in manual unless directed to a Sears Parts & Repair Center.
| PROBLEM | CAUSE | CORRECTION |
| Does not start | 1. Dirty air filter.2. Out of fuel.3. Stale fuel.4. Water in fuel.5. Spark plug wire is disconnected.6. Bad spark plug.7. Loose blade or broken blade adapter.8. Control bar in released position.9. Control bar defective.10. Fuel valve lever (if so equipped) in OFF position.11. Weak battery (if equipped).12. Disconnected battery connector (if equipped). | 1. Clean/replace air filter.2. Fill fuel tank.3. Empty fuel tank and refill tank with fresh, clean gasoline.4. Empty fuel tank and refill tank with fresh, clean gasoline.5. Connect wire to plug.6. Replace spark plug.7. Tighten blade bolt or replace blade adapter.8. Depress control bar to handle.9. Replace control bar.10. Turn fuel valve lever to the ON position.11. Charge battery.12. Connect battery to engine. |
TROUBLESHOOTING - See appropriate section in manual unless directed to a Sears Parts & Repair Center.
| PROBLEM | CAUSE | CORRECTION |
| Loss of power | 1. Rear of mower housing or blade dragging in grass.2. Cutting too much grass.3. Dirty air filter.4. Buildup of grass, leaves, and trash under mower.5. Too much oil in engine.6. Walking speed too fast. | 1. Raise cutting height.2. Raise cutting height.3. Clean/replace air filter.4. Clean underside of mower housing.5. Check oil level.6. Cut at slower walking speed. |
| Poor cut – uneven | 1. Worn, bent or loose blade.2. Wheel heights uneven.3. Buildup of grass, leaves and trash under mower. | 1. Replace blade. Tighten blade bolt.2. Set all wheels at same height.3. Clean underside of mower housing. |
| Excessive vibration | 1. Worn, bent or loose blade.2. Bent engine crankshaft. | 1. Replace blade. Tighten blade bolt.2. Contact a Sears or other qualified service center. |
| Starter rope hard to pull | 1. Engine flywheel brake is on when control bar is released.2. Bent engine crankshaft.3. Blade adapter broken.4. Blade dragging in grass. | 1. Depress control bar to upper handle before pulling the starter rope.2. Contact a Sears or other qualified service center.3. Replace blade adapter.4. Move lawn mower to cut grass or to hard surface. |
| Grass catcher not filling (If so equipped) | 1. Cutting height too low.2. Lift on blade worn off.3. Catcher not venting air. | 1. Raise cutting height.2. Replace blade.3. Clean grass catcher. |
| Hard to push | 1. Grass is too high or wheel height is too low.2. Rear of mower housing or blade dragging in grass.3. Grass catcher too full.4. Handle height position not right for you. | 1. Raise cutting height.2. Raise rear of mower housing one (1) setting higher.3. Empty grass catcher.4. Adjust handle height to suit. |
| Loss of drive or slowing of drive speed | 1. Belt wear.2. Belt off of pulley.3. Drive cable worn or broken.4. "Loose" drive control system. | 1. Check/replace drive belt.2. Check/reinstall drive belt.3. Replace drive cable.4. Adjust drive control. |
NEED MORE HELP?
You'll find the answer and more on managemyhome.com -- for free!
• Find this and all your other product manuals online.
• Get answers from our team of home experts.
• Get a personalized maintenance plan for your home.
• Find information and tools to help with home projects.
Sears, Roebuck and Co., Hoffman Estates, IL 60179
REGLAS DE SEGURIDAD
natural_image
Line drawing of a hand holding a rectangular object with dashed lines indicating hidden edges (no text or symbols)ANTES DE MOTOR
natural_image
Simple line drawing of a mechanical device with a handle and base, no text or symbols present
natural_image
Diagram of a wheel with motion lines indicating wind or spray (no text or symbols))AR GADORA
iera instalada. arga cerrada. ERO -
IMPORTANTE: Este cortacésped viene SIN ACEITE O GASOLINA en motor.
natural_image
Illustration of hands using a tool to lift a curved pipe (no text or symbols)natural_image
Technical line drawing of a mechanical component with no visible text or symbols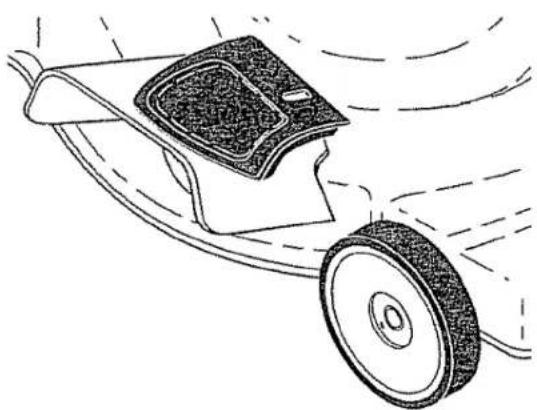
natural_image
Line drawing of a lawn mower with visible tire and blade motion (no text or symbols)s or other e center.
I bar to efore
er rope.
s or other
a center.
adapter.
ver to cut I surface.
eight.
tcher.
eight.
ower housing higher.
tcher.
eight to suit.
drive belt. drive belt. able.
vtrol.
Sears
FUEL SYST IMPORTANT gum deposit system parts fuel hose, or blended fuel ethanol or m which leads of acids duri damage the in storage.
• Empty the gine and li and carbu
• Never use products in damage m
• Use fresh NOTE: Fue ternative in r gum deposit to gasoline in Always follow container. F after adding s reach the ca tank and car
TROUBLE to a Sears
PROBLEM
Does not s
n factory set. engine speed jury. If you g too fast or a Sears or r for repair
stable. If your erly due to sus- take your lawn qualified service stment. r with the ctory set verspeeding high speed f you think peed needs other ch has proper o make any
1 or if the unit
dle from the handle will wing position.
natural_image
Pure mechanical diagram showing a gear and cam mechanism without any text or symbols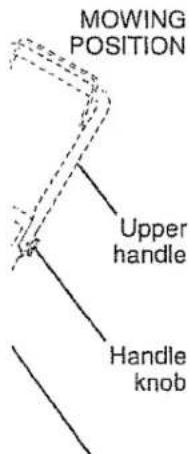
Lower handle
CAUTION from spark p cannot come
• Clean the by scrapir and trash.
• Clean eng
accumula
hotter anc
- Keep finis of all gasc
⚠️ WARNING before perfo adjustments
- Release
- Make su parts hay
- Disconne plug and come in
LAWN MO
TO ADJUST See "TO AD the Operatic
REAR DEFI
The rear def rear wheels minimize the be thrown on into the ope deflector be replaced.
TO REMOV
- Remove
- Remove pushing off pulley
- Turn law filter and
- Remove debris st
- Remove debris sh
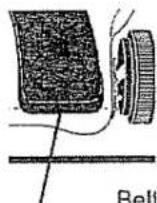
Drive cover
Bell
Pulley
/ from the
en oil dipstick
e to spark plug.
berly and dirty air urtridge every ery season, ice air cleaner ditions.
/er to remove. je.
on a flat sur- cartridge.
Ivents, such sed to clean leterioration artridge. Do ean or dry
lace cover aligned with a. Fasten
d muffler as it nd/or damage.
beginning of or every 100 er occurs ap setting T SPECIFIC- ual.
ormance, buill-grass ide of your
LAWN MO
Always obese forming any
TIRES
- Keep tires control ch
- Avoid stur objects ar cause tire
DRIVE WHE
Check front you mow to The wheels grass cutting and must be If necessary sure to clear
- Remove
- Remove
-
Remove from inside or drive v
-
Put whee
NOTE: If af do not turn f qualified ser
BLADE CAI
For best res Replace a b
CAUTION approved by Using a black facturer of your damage you
TO REMOV
- Disconne plug and come in
- Turn law sure air f
- Use a wo mower h turning w
NOTE: Prot and/or wrap
-
Remove clockwise
-
Remove (bolt, loc
TO REPLAC
-
Position aligning with the
-
Be sure t site shar
-
Install the washer a blade ad
| RY0RS | BEFORESTORAGE |
| √ | |
| √ | |
| √ | |
| √4 | |
| √ |
tdoor temperatures
HART
① Wheel adjuster (on each wheel)
② Engine oil
grease plastic lubricants will orten the life of If you feel they dry, powdered gly.
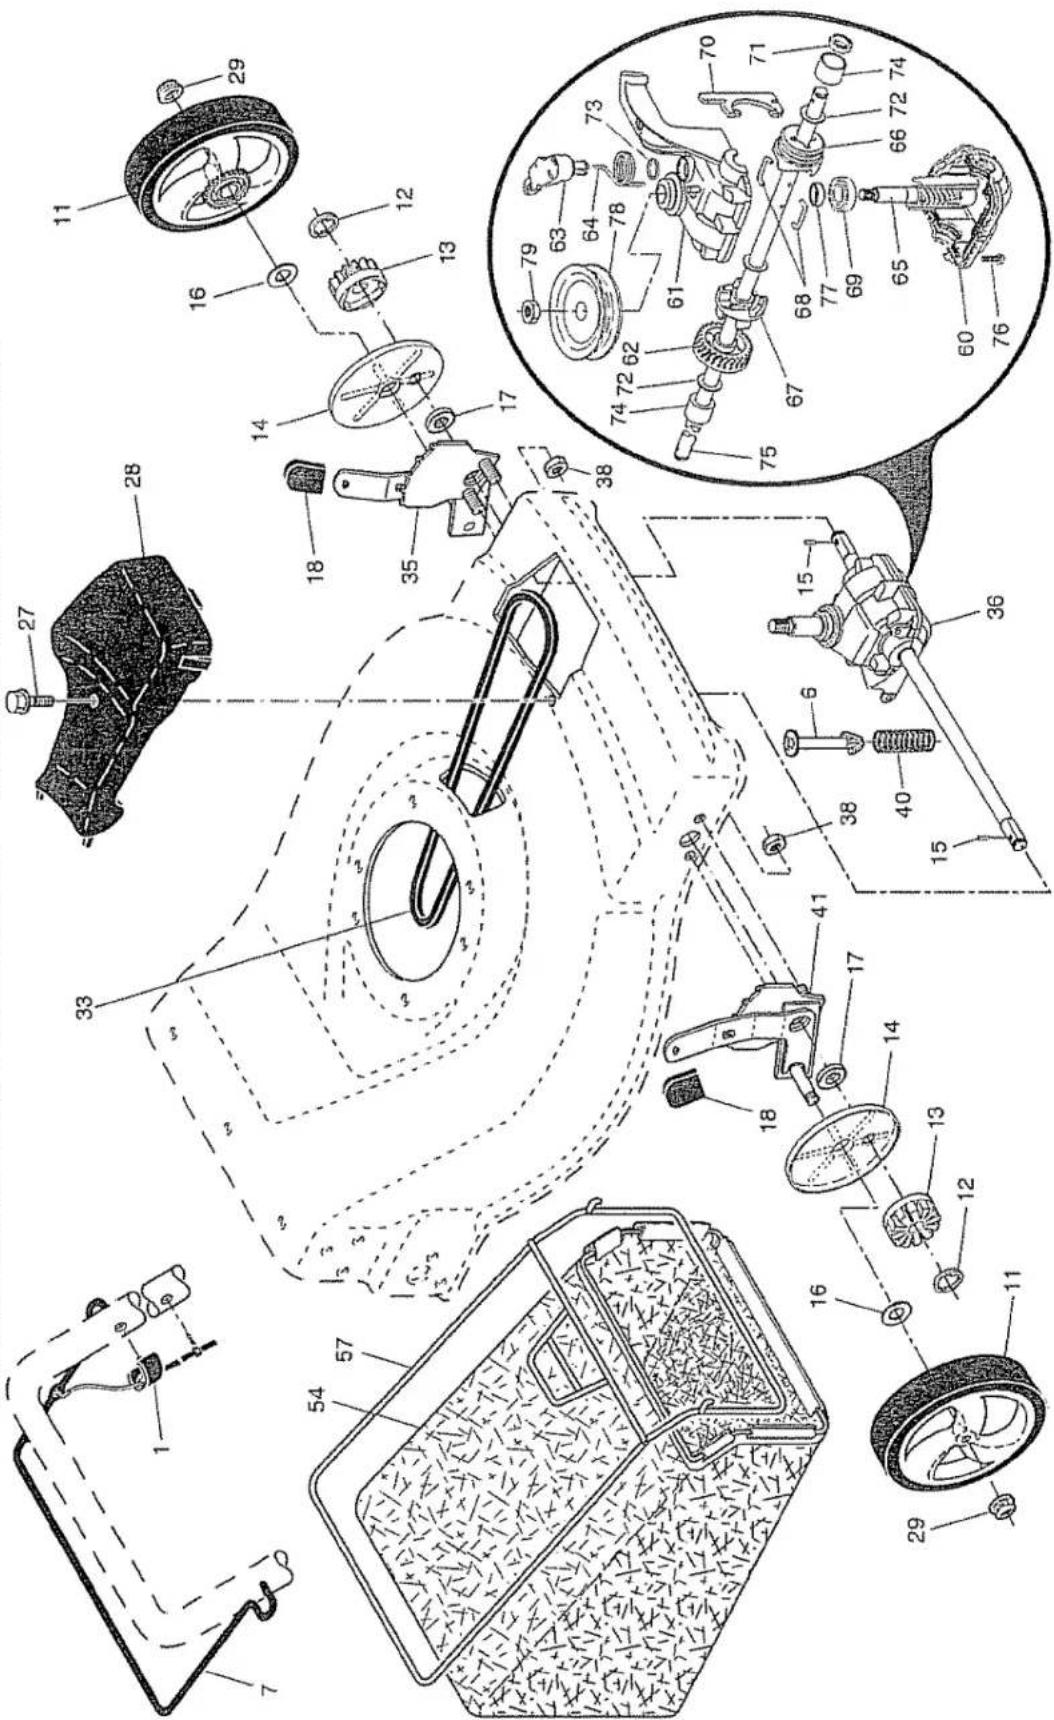
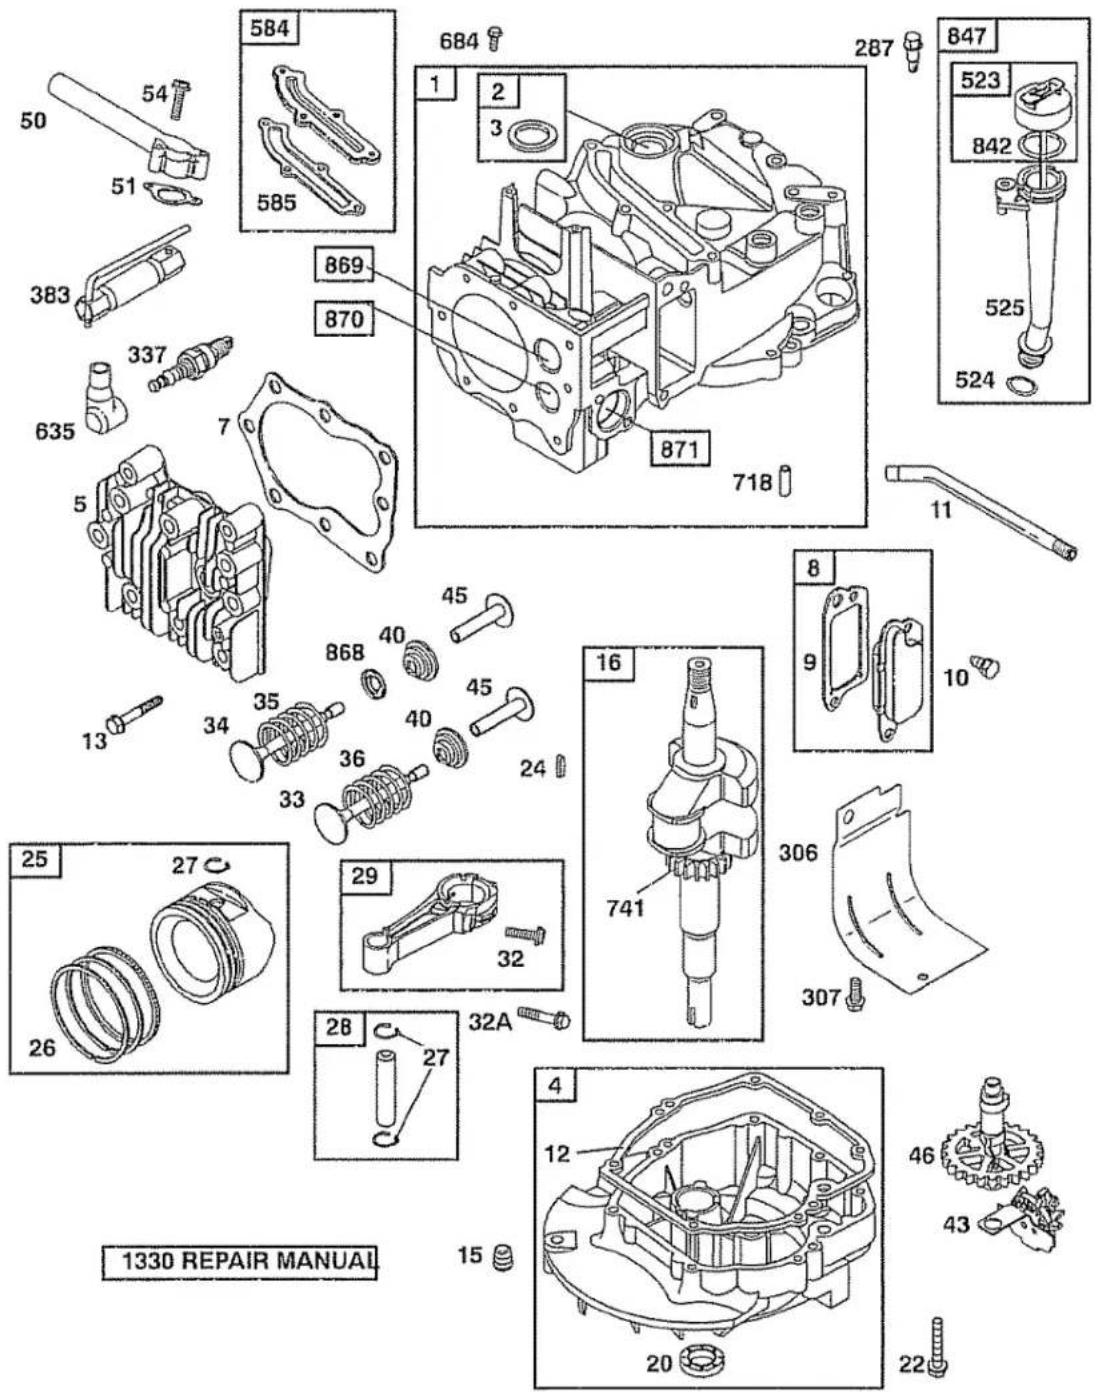
CRAFTSMAN ROTARY LAWN MOWER -- MODEL NUMBER 917.376658
| KEY NO. | PART NO. | DESCRIPTION | KEY NO. | PART NO. | DESCRIPTION | KEY NO. | PART NO. | DESCRIPTION |
| 1 | 194203X479 | Upper Handle | 30 | 401179X004 | Axle Arm Assembly | 53 | 17600406 | Screw, Serrated, Type TT 1/4-20 |
| 2 | 183567 | Engine Zone Control Cable | 31 | 701037 | Selector Knob | |||
| 3 | 850733X004 | Bracket, Upstop | 32 | 401621X004 | Selector Spring | 55 | 73930600 | Nut, Hex 3/8-16 |
| 4 | 166649 | Mulcher Plug | 33 | 189917X428 | Mulcher Door | 56 | 88652 | Hinge Screw 1/4-20 x 1-1/4 |
| 5 | 66426 | Wire Tie | 34 | 401629 | Spacer | 57 | 51793 | Hairpin Cotter |
| 6 | 189713X428 | Handle Knob | 35 | 407492X005 | Wheel Adjusting Bracket, RH | 58 | 151590X479 | Lower Handle |
| 7 | 750634 | Screw | 36 | 175735 | Hinge Bracket Assembly | 59 | 191574 | Handle Bolt |
| 8 | 194199X428 | Control Bar | 37 | 150078 | Screw, Sems, Thread Cutting | 61 | 188839X004 | Mounting Bracket, Debris Shield |
| 9 | 401813X428 | Rear Door Assembly | 5/16-18 x 3/4 | |||||
| 10 | 128415 | Pop Rivet | 38 | 402574X428 | Discharge Deflector | 62 | 405843 | Debris Shield |
| 11 | 150050 | Screw, Self-Tapping #10-24 x 5/8 | 39 | 195916X479 | Handle Bracket Assembly, LH | 63 | 192325 | Screw, Debris Shield |
| 40 | 195917X479 | Handle Bracket Assembly, RH | 64 | --- | Engine, Briggs & Stratton, Model Number | |||
| 12 | 54583 | Screw, Hex Hex Head, Sems 1/4-20 x 1/2 | 41 | 150406 | Screw, Hex Head, Threaded, Rolled 3/8-16 x 1-1/8 | 122T02-1027-E1 (See Breakdown) | ||
| 14 | 195622X479 | Back Plate | 42 | 193000 | Spring, Torsion | |||
| 15 | 410545X479 | Side Baffle | 43 | 73800400 | Nut, Hex, Nylock | 68 | 407493X005 | Wheel Adjusting Bracket, LH Clip, Cable |
| 16 | 176655X479 | Discharge Baffle | 44 | 416534 | Kit, Mower Housing (Includes Key Numbers 14, 15 and 51) | 69 | 197991 | Warning Decal (not shown) |
| 17 | 140661X479 | Rear Baffle | -- | 404764 | ||||
| 18 | 132004 | Keps Locknut 1/4-20 | 45 | 175650 | Rod, Hinge | -- | 420804 | Owner's Manual (English / Spanish) |
| 19 | 194788 | Rope Guide | 46 | 189179 | Blade Adapter / Pulley | |||
| 20 | 413160 | Rear Skirt | 47 | 406713 | Blade, 22" | |||
| 21 | 405421 | Spring, Rear Door, LH | 48 | 851074 | Washer, Hardened | Available accessories not included with mower: | ||
| 24 | 405423 | Spring, Rear Door, RH | 49 | 850263 | Washer, Helical | |||
| 25 | 409148 | Nut, Hex, Flanged | 50 | 851084 | Screw, Machine, Hex Head 3/8-24 x 1-3/8 Grade 8 | -- | 71 33623 | Gas Can (2.5 Gallon Container) |
| 26 | 184193 | Bolt, Rear Door | ||||||
| 27 | 400246X427 | Wheel & Tire Assembly, Rear | 51 | 170031 | Kit, Front Baffle (Includes Key Number 53) | -- | 71 33500 | Fuel Stabilizer |
| 28 | 142748 | Bolt, Shoulder 3/8-16 x 1 | -- | 71 33000 | SAE 30W Oil (20 Ounce Bottle) | |||
| 29 | 401630 | Washer, Curved, Cylindrical | 52 | 404763 | Danger Decal | |||
NOTE: All component dimensions given in U.S. inches. 1 inch = 25.4 mm. IMPORTANT: Use only Original Equipment Manufacturer (O.E.M.) replacement parts. Failure to do so could be hazardous, damage your lawn mower and void your warranty.
CRAFTSMAN ROTARY LAWN MOWER -- MODEL NUMBER 917.376658
TO STOP I
• To stop er ence cont
TO START
NOTE: Due engine, a sn present durit and should I
-
To start a three (3) Use a fin usually n engine w minutes.
-
Hold ope down to handle q rope to s
NOTE: In ce necessary to warmer wea flooding and flood engine attempting to priming step
MOWING
CAUTION blade attach attachments your mower
• Under certain tall grass, the height effort and engine an pings. It mduce grou mower ov
• For extrem width of cut path a
• For better ting condit be set in t
• Pores in c come filled and catch prevent th with water
- Keep top and clean This will h engine life
ank filler neck. clean, regular minimum of with gasoline. : that can be sure fuel fresh-
spilled oil or e gasoline
ed fuels unol or metha- ch leads to acids during age the fuel storage. To uel system orage of 30 as tank, start the fuel lines se fresh fuel instructions for r use engine ls in the fuel nay occur.
CRAFTSMAN ROTARY LAWN MOWER -- MODEL NUMBER 917.376658
| KEY NO. | PART NO. | DESCRIPTION | KEY NO. | PART NO. | DESCRIPTION |
| 1 | 194653 | Drive Control Assembly (Includes Cable) | 57 | 411952 | Frame, Grassbag |
| 6 | 150495 | Retainer, Spring | 60 | 183497 | Case, Lower |
| 7 | 194185X428 | Bar, Drive Control | 61 | 183498 | Case, Upper |
| 11 | 194231X427 | Wheel & Tire Assembly, Front | 62 | 183499 | Gear, 27 Teeth |
| 12 | 12000058 | E-Ring | 63 | 183500 | Lever, Clutch |
| 13 | 403849 | Pinion | 64 | 183501 | Spring, Return |
| 14 | 189403 | Dust Cover | 65 | 416988 | Shaft, Input |
| 15 | 404845 | Pawl, Drive | 66 | 183503 | Dog, Movable |
| 16 | 67725 | Washer, Flat 3/8 | 67 | 183504 | Dog, Fixed |
| 17 | 191039 | Bearing, Wheel Adjuster | 68 | 183505 | Wire, Formed |
| 18 | 701037 | Selector Knob | 69 | 183506 | Bearing, Ball |
| 27 | 175262 | Pan Head Tapping Screw #10-24 x 2-3/4 | 70 | 183507 | Fork, Shift |
| 28 | 401271X428 | Drive Cover | 71 | 183508 | Seal, Output Shaft |
| 29 | 409148 | Locknut, Hex | 72 | 183509 | Washer |
| 33 | 146527 | V-Belt | 73 | 183510 | Seal, Case |
| 35 | 408862 | Kit, Wheel Adjuster, LH(Includes Knob and Bearing) | 74 | 183511 | Bushing |
| 75 | 196561 | Shaft, Output | |||
| 36 | 415226 | * Gear Case Assembly, Complete | 76 | 183513 | Screw |
| 38 | 73800400 | Locknut 1/4-20 | 77 | 183514 | Seal, Input Shaft |
| 40 | 137090 | Spring | 78 | 416987 | Pulley, Drive |
| 41 | 408861 | Kit, Wheel Adjuster, RH(Includes Knob and Bearing) | 79 | 416986 | Locknut, Hex |
| 54 | 410276 | Grassbag Assembly | * NOTE: We advise Total Multis EP00 semi-liquid grease or a comparable grade (quantity 1.15 oz) | ||
NOTE: All component dimensions given in U.S. inches. 1 inch = 25.4 mm. IMPORTANT: Use only Original Equipment Manufacturer (O.E.M.) replacement parts. Failure to do so could be hazardous, damage your lawn mower and void your warranty.
TO CONVEI
Your lawn it used as a m or dischargit
REAR BAGI
- Open real plug. Sto place.
• You can r optional c
• To convert operation, discharge
Mulch
SIDE DISCH
• Mulcher p discharge
- Open mul charge de
• Mower is operation
• To convert operation, removed;
Open mulche
GAGED
VGAGED
ЭНТ
I lower wheels eight to suit position is
, squeeze ad- l. Move wheel quirements. Be same setting. positioned ple in lever. so equipped) between the
LOWER Lever

to assemble or
in the engine. of those parts on of your lawn Use the correct ers, bolts, etc.,
TCHER
into grass bag he bottom. idle is outside
ame. too stiff, hold v minutes. If e using.
TS
ed ready to be ert mower to "TO CON- ation section
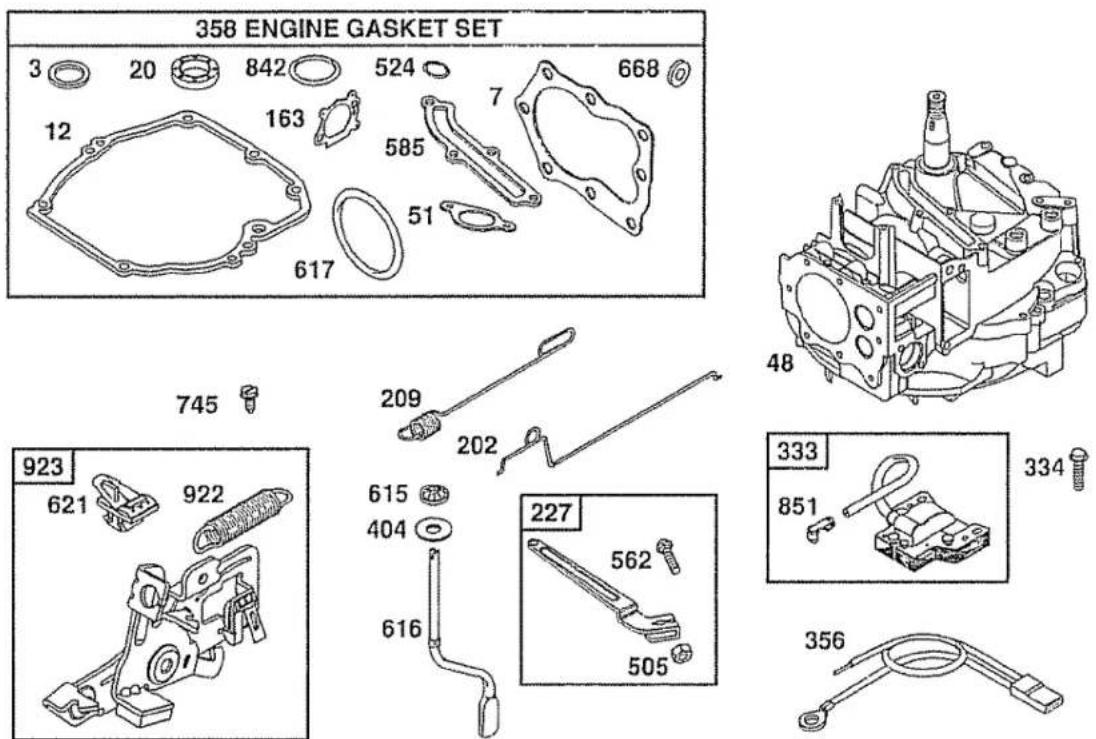
Engine Power Rating Information
The gross power rating for individual gas engine models is labeled in accordance with SAE (Society of Automotive Engineers) code J11940 (Small Engine Power & Torque Rating Procedure), and rating performance has been obtained and corrected in accordance with SAE J1995 (Revision 2002-5). Actual gross engine power will be lower and is affected by, among other things, ambient operating conditions and engine-to-engine variability. Given both the wide array of products on which engines are placed and the variety of environmental issues applicable to operating the equipment, the gas engine will not develop the rated gross power when used in a given piece of power equipment (actual "on-site" or net horsepower). This difference is due to a variety of factors including, but not limited to, accessories (air cleaner, exhaust, charging, cooling, carburetor, fuel pump, etc.), application limitations, ambient operating conditions (temperature, humidity, altitude), and engine-to-engine variability. Due to manufacturing and capacity limitations, Briggs & Stratton may substitute an engine of higher rated power for this Series engine.
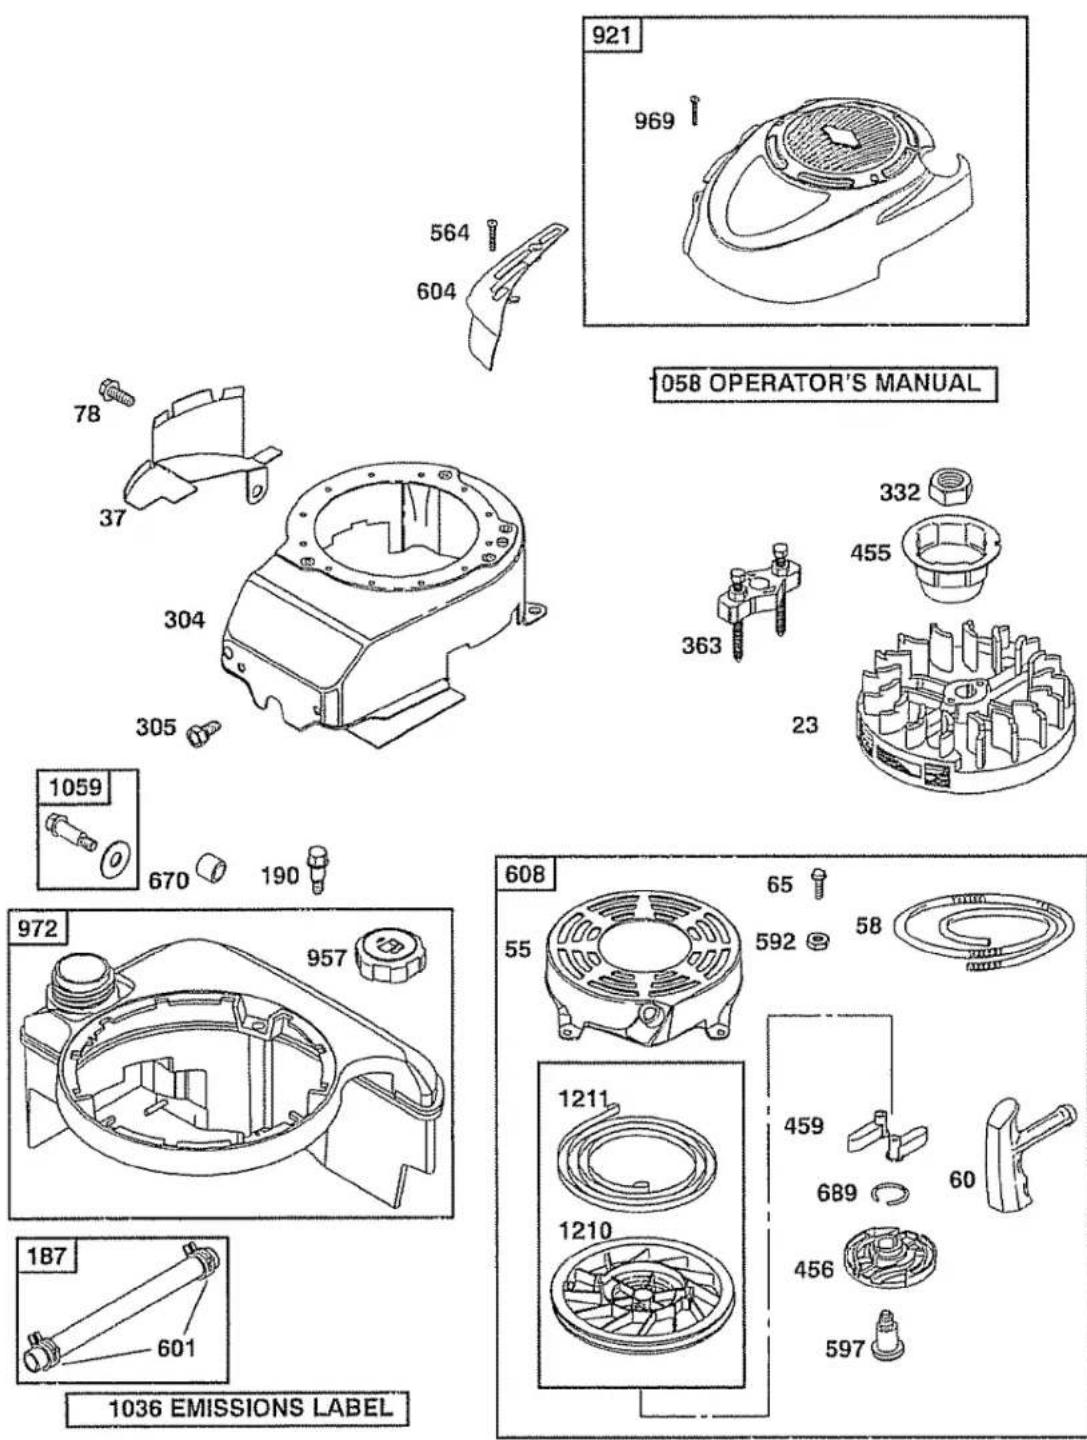
| KEYNO. | PARTNO. | DESCRIPTION | KEYNO. | PARTNO. | DESCRIPTION |
| 1 | 697322 | Cylinder Assembly | 65 | 690837 | Screw (Rewind Starter) |
| 2 | 399269 | Kit-Bushing/Seal | 78 | 691108 | Screw (Flywheel Guard) |
| 3 | 299819s | • Seal-Oil (Magneto Side) | 81 | 691740 | Lock-Muffler Screw |
| 4 | 493279 | Sump-Engine | 95 | 691636 | Screw (Throttle Valve) |
| 5 | 691160 | Head-Cylinder | 97 | 696565 | Shaft-Throttle |
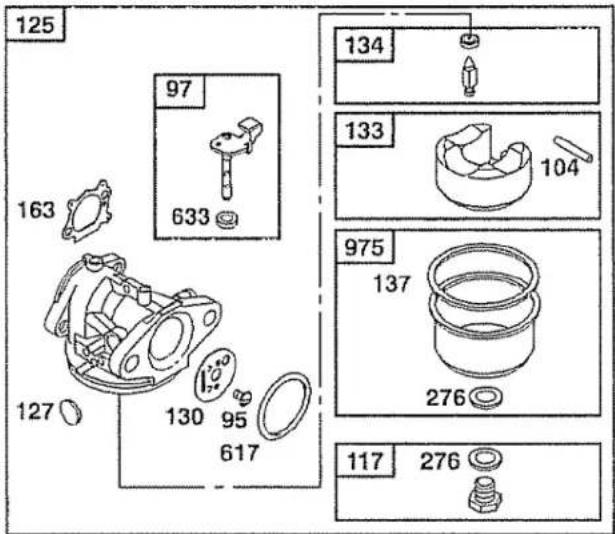
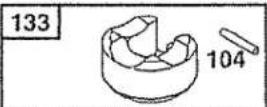
| 7 | 692249 | • Gasket-Cylinder Head | 104 | 691242 | ∅ Pin-Float Hinge |
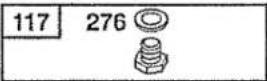
| 8 | 695250 | Breather Assembly | 117 | 494870 | Jet-Main (Standard) |
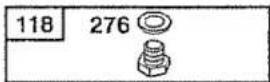
| 9 | 696125 | Gasket-Breather | 118 | 498667 | Jet-Main (High Altitude) |
| 10 | 691125 | Screw (Breather Assembly) | 121 | 498260 | Kit-Carburetor Overhaul |
| 11 | 691781 | Tube-Breather | 125 | 790821 | Carburetor |
| 12 | 692232 | • Gasket-Crankcase | 127 | 694468 | ∅ Plug-Welch |
| 13 | 690912 | Screw (Cylinder Head) | 130 | 696564 | Valve-Throttle |
| 15 | 691680 | Plug-Oil Drain | 133 | 398187 | Float-Carburetor |
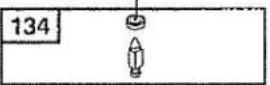
| 16 | 691450 | Crankshaft | 134 | 398188 | ∅ Valve-Needle/Seat |
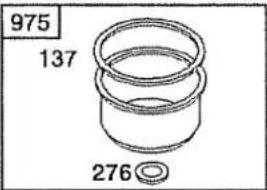
| 20 | 399781s | • Seal-Oil (PTO Side) | 137 | 693981 | ∅‡ Gasket-Float Bowl |
| 22 | 691092 | Screw (Engine Sump) | 159 | 691753 | Bracket-Air Cleaner Primer |
| 23 | 691987 | Flywheel | 163 | 272653s | ∅‡ Gasket-Air Cleaner |
| 24 | 222698s | Key-Flywheel | 187 | 791766 | Line-Fuel |
| 25 | 790359 | Piston Assembly (Standard) | (Cut to Required Length) | ||
| 26 | 790360 | Ring Set-Piston (Standard) | 188 | 693399 | Screw (Control Bracket) |
| 27 | 691866 | Lock-Piston Pin | 190 | 690940 | Screw (Fuel Tank) |
| 28 | 499423 | Pin-Piston | 202 | 691829 | Link-Mechanical Governor |
| 29 | 499424 | Rod-Connecting | 209 | 699056 | Spring-Governor |
| 32 | 691664 | Screw (Connecting Rod) | 222 | 793754 | Bracket-Control |
| 32A | 695759 | Screw (Connecting Rod) | 227 | 690783 | Control Lever-Governor |
| 33 | 262651s | Valve-Exhaust | 276 | 271716 | ∅‡ Sealing Washer |
| 34 | 262652s | Valve-Intake | 287 | 690940 | Screw (Dipstick Tube) |
| 35 | 691270 | Spring-Valve (Intake) | 300 | 692038 | Muffler |
| 36 | 691270 | Spring-Valve (Exhaust) | 304 | 695892 | Housing-Blower |
| 37 | 694086 | Guard-Flywheel | 305 | 691108 | Screw (Blower Housing) |
| 40 | 692194 | Retainer-Valve | 306 | 690450 | Shield-Cylinder |
| 43 | 691997 | Slinger-Governor/Oil | 307 | 690345 | Screw (Cylinder Shield) |
| 45 | 690548 | Tappet-Valve | 332 | 690662 | Nut (Flywheel) |
| 46 | 691449 | Camshaft | 333 | 802574 | Armature-Magneto |
| 48 | 792741 | Short Block | 334 | 691061 | Screw (Armature Magneto) |
| 50 | 497465 | Manifold-Intake | 337 | 802592s | Plug-Spark |
| 51 | 272199s | • Gasket-Intake | 356 | 692390 | Wire-Stop |
| 54 | 691650 | Screw (Intake Manifold) | 358 | 794307 | Engine Gasket Set |
| 55 | 691421 | Housing-Rewind Starter | 363 | 19069 | Flywheel Puller |
| 58 | 697316 | Rope-Starter(Cut to Required Length) | 365 | 692524 | Screw (Carburetor) |
| 383 | 89838s | Wrench-Spark Plug | |||
| 60 | 281434s | Grip-Starter Rope | 404 | 690272 | Washer (Governor Crank) |
Congratulati chase. Your designed and dependable ucts, it may time. That's tion Agreem aggravation.
Purchase a now and pro hassle and e
Here's what'
• Expert s sional rej
• Unlimited parts and
• Product product c
• Discoun service a covered off regular nance ch
These access shipped with service center
LAWN MOI
natural_image
Pure technical line drawing of a mechanical component with no text or symbolsLAWN MOI
cially blade I keep equip-
devices. Check larly. ss, leaves, or an oil or fuel cool before
ment if you necessary,
eel height ine is running. s are subject erioration, ing parts or . Frequently place with ided parts,
nd can cut. gloves, and rving them. governor set- ne. and instruc-
engine and 'ered or a spark is used, it
a California Iws apply on earest Sears
:low 32°F)
e lawn mower ided above.
| KEYNO. | PARTNO. | DESCRIPTION | KEYNO. | PARTNO. | DESCRIPTION |
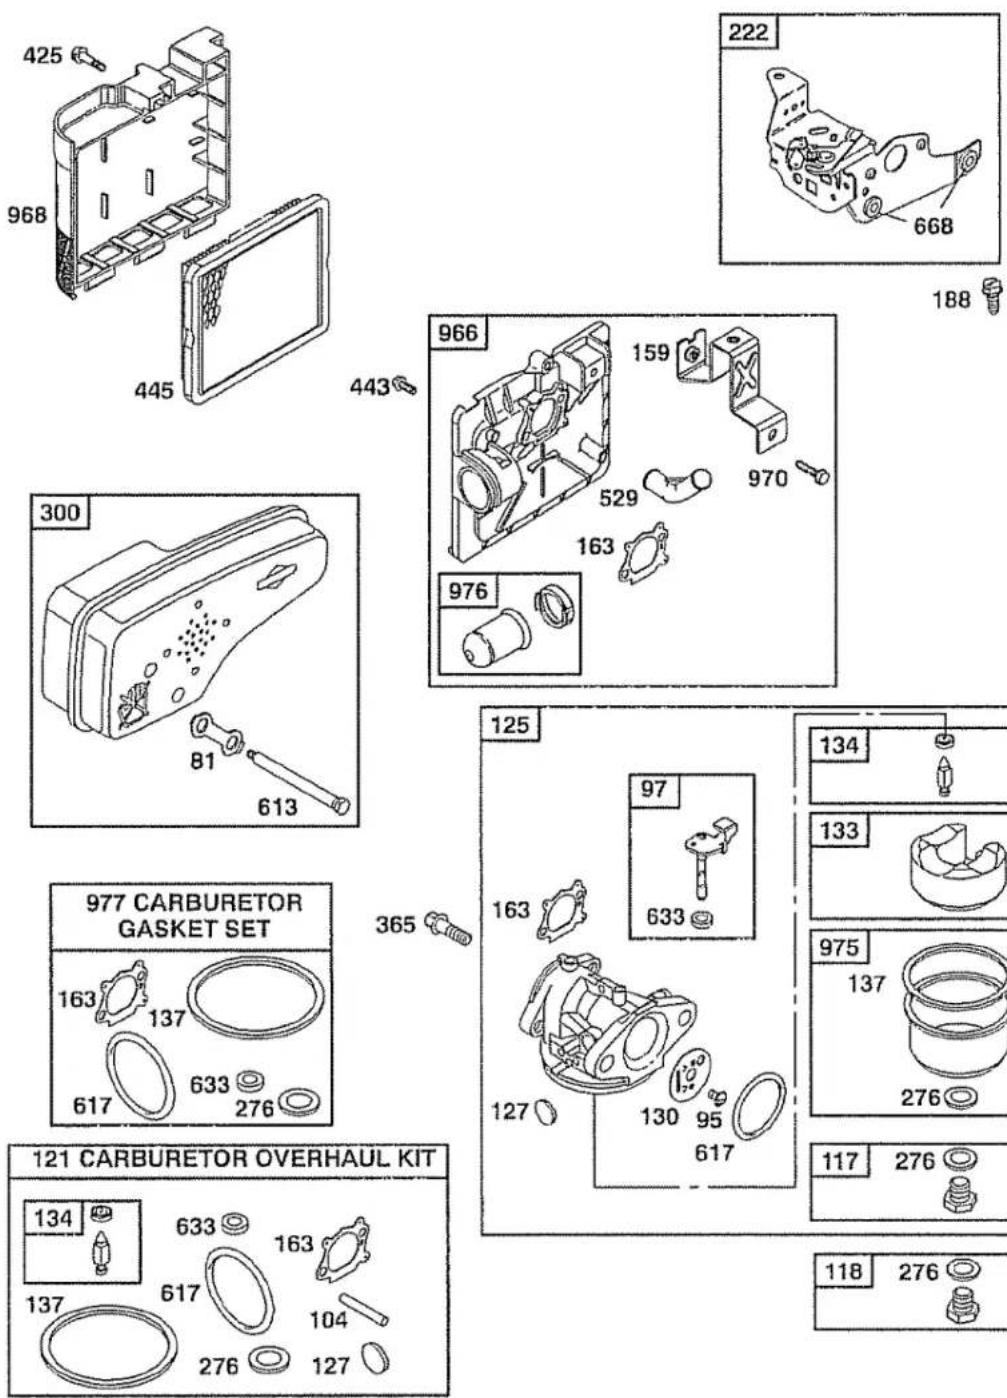
| 425 | 690670 | Screw (Air Cleaner Cover) | 869 | 691155 | Seat-Valve (Intake) |
| 443 | 692523 | Screw(Air Cleaner Primer Base) | 870 | 690380 | Seat-Valve (Exhaust) |
| 871 | 262001 | Bushing-Guide (Exhaust) | |||
| 445 | 491588s | Filter-Air Cleaner Cartridge | 63709 | Bushing-Guide (Intake) | |
| 455 | 791960 | Cup-Flywheel | 921 | 790701 | Cover-Blower Housing |
| 456 | 692299 | Plate-Pawl Friction | 922 | 692135 | Spring-Brake |
| 459 | 281505s | Pawl-Ratchet | 923 | 695891 | Brake |
| 505 | 691251 | Nut(Governor Control Lever) | 957 | 699985 | Cap-Fuel Tank |
| 966 | 792040 | Base-Air Cleaner Primer | |||
| 523 | 499621 | Dipstick | 968 | 692298 | Cover-Air Cleaner |
| 524 | 692296 | Seal-Dipstick Tube | 969 | 690700 | Screw |
| 525 | 495265 | Tube-Dipstick | (Blower Housing Cover) | ||
| 529 | 691923 | Grommet | 970 | 691669 | Screw (Air Cleaner |
| 562 | 691119 | Bolt(Governor Control Lever) | 972 | 699374 | Primer Bracket) |
| Tank-Fuel | |||||
| 564 | 698589 | Screw (Control Cover) | 975 | 493640 | Bowl-Float |
| 584 | 697734 | Cover-Breather Passage | 976 | 496115 | Primer-Carburetor |
| 585 | 691879 | Gasket-Breather Passage | 977 | 498261 | Set-Carburetor Gasket |
| 592 | 690800 | Nut (Rewind Starter) | 1036 | --- | Label-Emissions (Available from an Authorized Briggs & Stratton Service Dealer) |
| 597 | 691696 | Screw (Pawl Friction Plate) | |||
| 601 | 791850 | Clamp-Hose | |||
| 604 | 790703 | Cover-Control | 1058 | 277039TRI | Operator's Manual |
| 608 | 497680 | Starter-Rewind | 1059 | 692311 | Kit-Screw/Washer |
| 613 | 691340 | Screw (Muffler) | 1210 | 498144 | Assembly-Pulley/Spring (Pulley) |
| 615 | 690340 | Retainer-Governor Shaft | |||
| 616 | 698801 | Crank-Governor | 1211 | 498144 | Assembly-Pulley/Spring (Spring) |
| 617 | 270344s | Seal-O Ring(Intake Manifold) | 1329 | 126T02-0025 | Replacement Engine (Replacement Engine listed is not available in the State of California Repair with individual parts.) |
| 621 | 692310 | Switch-Stop | |||
| 633 | 691321 | Seal-Throttle Shaft | |||
| 635 | 66538s | Boot-Spark Plug | |||
| 668 | 493823 | Spacer (Includes 2) | |||
| 670 | 692294 | Spacer-Fuel Tank | 1330 | 270962 | Repair Manual |
| 684 | 690345 | Screw(Breather Passage Cover) | -- | 398067 | Spark Arrester (available accessory) |
| 689 | 691855 | Spring-Friction | |||
| 718 | 690959 | Pin-Locating | Included in Engine Gasket Set, Key No. 358 | ||
| 741 | 790345 | Gear-Timing | Included in Carb. Overhaul Kit, Key No. 121 | ||
| 745 | 691648 | Screw (Brake) | |||
| 842 | 691031 | Seal-O Ring (Dipstick Tube) | Included in Carb. Gasket Set, Key No. 977 | ||
| 847 | 692047 | Assembly-Dipstick/Tube | |||
| 851 | 493880s | Terminal-Spark Plug | NOTE: All component dimensions given in U.S. inches. | 1 inch = 25.4 mm | |
| 868 | 697338 | Seal-Valve | |||
SERVICE NOTES
I. GENERA
- Read, und instruction manual(s); familiar w use of the
- Do not pu rotating p, charge op
• Only allow are familiar ate the mi
• Clear the toys, wire could be
• Be sure that before me enters the
• Do not op foot or we wear subs
• Do not pu absolutely and behind backward - Never dire anyone. I against a may richo tor. Stop surfaces.
• Do not op proper gu other safe
• See manl proper op accessori proved by - Stop the t drives, wa
- Stop the e leave the mower or
- Shut the e the blade removing
- Mow only light.
• Do not op the influer
• Never open Always be firm hold
• Disengag anism or equipped
• If the equi abnormal check imr tion is ger
I or ears store, ment if repair
wn Mower is
y mower
g bent 1 Mower
rights which
et and throw- t in serious
terminals and ead and lead n to the State and birth harm. Wash
her engine during er engine has ns on contact,
SERVICE NOTES
NEED MORE HELP?
You'll find the answer and more on managemyhome.com - for free!
• Find this and all your other product manuals online.
- Get answers from our team of home experts.
- Get a personalized maintenance plan for your home.
- Find information and tools to help with home projects.
manage

home
brought to you by Sears
Get it fixed, at your home or ours!
Your Home
For repair – in your home – of all major brand appliances, lawn and garden equipment, or heating and cooling systems, no matter who made it, no matter who sold it!
For the replacement parts, accessories and owner's manuals that you need to do-it-yourself.
For Sears professional installation of home appliances and items like garage door openers and water heaters.
1-800-4-MY-HOME®
(1-800-469-4663)
www.sears.com
Anytime, day or night
(U S A. and Canada)
www.sears.ca
Our Home
For repair of carry-in products like vacuums, lawn equipment, and electronics, call or go on-line for the nearest Sears Parts and Repair Center.
1-800-488-1222 Anytime, day or night (U S.A. only)
www.sears.com
To purchase a protection agreement (U.S.A.)
or maintenance agreement (Canada) on a product serviced by Sears:
1-800-827-6655 (U.S.A.)
1-800-361-6665 (Canada)
⑤ Registered Trademark / ^TM Trademark / ^SM Service Mark of Sears Brands. LLC
© Marca Registrada / 19 Marca de Fábrica / 3 Marca de Servicio de Sears Brands. LLC
- CAUTION:
- TABLE OF CONTENTS
- WARRANTY
- 2-YEAR FULL WARRANTY ON CRAFTSMAN LAWN MOWER
- SAFETY RULES
- GENERAL OPERATION
- SLOPE OPERATION
- DO:
- DO NOT:
- CHILDREN
- SAFE HANDLING OF GASOLINE
- GENERAL SERVICE
- Repair Protection Agreements
- Sears Installation Service
- ACCESSORIES
- TO REMOVE MOWER FROM CARTON
- HOW TO SET UP YOUR MOWER
- TO UNFOLD HANDLE
- TO ASSEMBLE GRASS CATCHER
- TO INSTALL ATTACHMENTS
- OPERATION
- KNOW YOUR LAWN MOWER
- MEETS CPSC SAFETY REQUIREMENTS
- HOW TO USE YOUR LAWN MOWER
- ENGINE SPEED
- ENGINE ZONE CONTROL
- TO CONVERT MOWER
- REAR BAGGING
- SIDE DISCHARGING
- SIMPLE STEPS TO REMEMBER WHEN CONVERTING YOUR LAWN MOWER
- FOR MULCHING -
- FOR REAR BAGGING -
- TO EMPTY GRASS CATCHER
- BEFORE STARTING ENGINE
- ADD OIL
- IMPORTANT:
- ADD GASOLINE
- TO STOP ENGINE
- TO START ENGINE
- MOWING TIPS
- MULCHING MOWING TIPS
- MAINTENANCE
- GENERAL RECOMMENDATIONS
- BEFORE EACH USE
- LUBRICATION
- LAWN MOWER
- TIRES
- DRIVE WHEELS
- BLADE CARE
- TO REMOVE BLADE
- TO REPLACE BLADE
- TO SHARPEN BLADE
- GRASS CATCHER
- GEAR CASE
- ENGINE
- TO CHANGE ENGINE OIL
- AIR FILTER
- TO CLEAN AIR FILTER
- MUFFLER
- SPARK PLUG
- CLEANING
- CLEAN UNDER DRIVE COVER
- SERVICE AND ADJUSTMENTS
- REAR DEFLECTOR
- TO REMOVE DRIVE BELT
- TO REPLACE DRIVE BELT
- TO ADJUST HANDLE
- CARBURETOR
- STORAGE
- HANDLE
- ENGINE OIL
- CYLINDER
- OTHER
- NEED MORE HELP?
- REGLAS DE SEGURIDAD
- ANTES DE MOTOR
- )AR GADORA
- TROUBLE to a Sears
- PROBLEM
- Does not s
- CAUTION from spark p cannot come
- ⚠️ WARNING before perfo adjustments
- LAWN MO
- TO ADJUST See "TO AD the Operatic
- REAR DEFI
- TO REMOV
- DRIVE WHE
- BLADE CAI
- TO REPLAC
- HART
- TO STOP I
- TO START
- MOWING
- TO CONVEI
- REAR BAGI
- SIDE DISCH
- ЭНТ
- TCHER
- TS
- Engine Power Rating Information
- SERVICE NOTES
- GENERA
- Get it fixed, at your home or ours!
- Your Home
- Our Home
Brand : Craftsman
Model : 917.376658
Category : Vacuum Cleaner