
CMXEVBE17585 - Vacuum Cleaner Craftsman - Free user manual and instructions
Find the device manual for free CMXEVBE17585 Craftsman in PDF.

| Product Type | Ash Vacuum |
| Brand | Craftsman |
| Model | CMXEVBE17585 |
| Drum Capacity | 18 liters (5 gallons) |
| Power Supply | 120 V ~, 7.6 A, 60 Hz |
| Filter | HEPA particulate filter with metal screen |
| Hose Type | Lockable flexible hose with metal lining (dual metal) |
| Hose Length | Approximately 2.1 m (7 ft) |
| Included Accessories | Metal extension tube, nozzle tube, nozzle with LED light, extension wand |
| Lighting | Nozzle with LED light (CR2016 batteries) |
| Weight | Approximately 5.4 kg (12 lb) |
| Dimensions (height x diameter) | Approximately 45 cm x 33 cm |
| Drum Material | Rugged plastic |
| Lid Material | Metal |
| Thermal Protection | Automatic reset thermal circuit breaker |
| Grounding | Yes, 3-prong grounded plug |
| Intended Use | Pick up COLD ashes (fireplaces, grills, ovens) and dry debris |
| Noise Level | Approximately 80 dB (estimated) |
| Warranty | 3 years limited |
| Filter Maintenance | Regular cleaning by tapping or washing with water (HEPA filter) |
| Storage | Power cord wrapped around handle, hose wrapped around motor head, accessories stored on back |
| Country of Manufacture | Mexico |
Frequently Asked Questions - CMXEVBE17585 Craftsman
User questions about CMXEVBE17585 Craftsman
0 question about this device. Answer the ones you know or ask your own.
Ask a new question about this device
Download the instructions for your Vacuum Cleaner in PDF format for free! Find your manual CMXEVBE17585 - Craftsman and take your electronic device back in hand. On this page are published all the documents necessary for the use of your device. CMXEVBE17585 by Craftsman.
USER MANUAL CMXEVBE17585 Craftsman
IF YOU HAVE QUESTIONS OR COMMENTS, CONTACT US.
POUR Toute QUESTION DU TOUT COMMENTAIRE, NOUS CONTACTER.
SI TIENE DUDAS O COMENTARIOS, CONTACTENOS.
1-888-331-4569
Part No. SP7088 Printed in Mexico
WWW.CRAFTSMAN.COM
Definitions: Safety Alert Symbols and Words
This instruction manual uses the following safety alert symbols and words to alert you to hazardous situations and your risk of personal injury or property damage.

DANGER:
Indicates a hazardous situation which, if not avoided, will result in death or serious

WARNING:
Indicates a hazardous situation which, if not avoided, could result in death or serious

CAUTION:
Indicates a hazardous situation which, if not avoided, may result in minor or moderate

(Used without word) Indicates a safety related message.
NOTICE: Indicates a practice not related to personal injury which, if not avoided, may result in property damage.
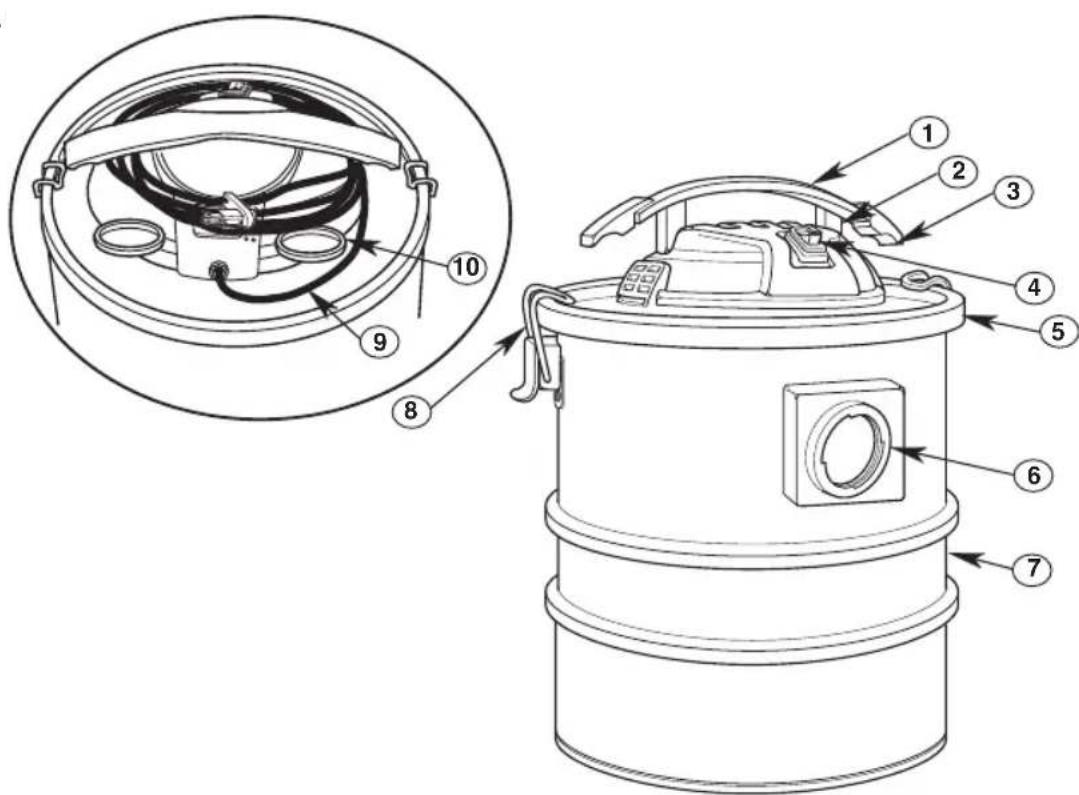
Fig.A
Components
1 Carry Handle
Gord Wrap Area
3 Hose Wrap Area
4 ON/OFF Switch
Powerhead Assembly
Vacuum Inlet Port
⑦ Drum
Drum Latches (2)
Power Cord
10 Accessory Storage Slots (2)

WARNING: Read all safety warnings and all instructions. Failure to follow the warnings and instructions may result in electric shock, fire and/or serious injury.

WARNING: Never modify the product or any part of it. Damage or personal injury could result.

WARNING: To reduce the risk of injury, read the instruction manual.
If you have any questions or comments about this or any product, call CRAFTSMAN toll free at: 1-888-331-4569.
IMPORTANT SAFETY INSTRUCTIONS
When using this Vacuum, always follow basic safety precautions including the following:
WARNING:
To reduce the risk of fire, electric shock, or injury:
This vacuum is intended to pick up COLD ash from fireplaces, grills, ovens, ashtrays, etc. Read and understand this manual and all labels on this Ash Vacuum before operating.
- Read and understand this manual and all labels on the Vacuum before operating.
- Use only as described in this manual.
- Do not pick up anything that is burning or smoking, like cigarettes, matches or hot, glowing, or burning embers. Pick up cold ash only. Be aware that ash/embers can be hot for days after use.
- Use caution when vacuuming materials that appear to have cooled, but may actually be hot inside. First check for hot spots by raking through the ashes/coals. Air flow created during vacuuming may cause hot ash to re-ignite. As you vacuum, constantly check the nozzle, hose, drum, and motor for excessive temperatures. If you notice an increase in temperature, turn off the vacuum immediately. Unplug the vacuum and remove the vacuumed material from the drum.
- The drum must be emptied and cleaned after each use, and before picking up other household debris.
- Allow the vacuum to cool before storage, especially enclosed storage.
- Do not use paper dust bags.
To reduce the risk of damage from accidental hot emitter pickup, do not place the vacuum on surfaces susceptible to heat damage, such as carpeting, vinyl flooring, or wood surfaces. - Do not leave vacuum running while unattended - you may fail to notice important signs indicating abnormal operation such as loss of suction, or abnormal motor noises. Immediately stop using vacuum if you notice these signs.
- Do not leave vacuum when plugged in. Unplug from outlet when not in use and before servicing.
- Sparks inside the motor can ignite flammable vapors or dust. To reduce the risk of fire or explosion, do not use near combustible liquids, gases, or dusts, such as gasoline or other fuels, lighter fluid, cleaners, oil-based paints, natural gas, coal dust, magnesium dust, grain dust, aluminum dust, or gun powder.
- To reduce the risk of inhaling toxic vapors, do not vacuum or use near toxic or hazardous materials.
To reduce the risk of electric shock, do not expose to rain or allow liquid to enter motor compartment. Store indoors.
- This Ash Vacuum is not intended for use by persons (including children) with reduced physical, sensory, or mental capabilities, or lack of experience and knowledge, unless they have been given supervision or instruction concerning use of the appliance by a person responsible for their safety.
- Only use extension cords that are intended for outdoor use. Use only three-wire outdoor extension cords that have three-prong grounding plugs and grounding receptacles that accept the vacuum's plug. Extension cords in poor condition or too small in wire size can pose fire and shock hazards. To reduce the risk of these hazards, be sure the cord is in good condition and that liquid does not contact the connection. Do not use an extension cord with conductors smaller than 1,3mm^2 (16 AWG) in size.
- Do not use with damaged cord, plug, or other parts. If your Vacuum is not working as it should, has missing parts, has been dropped, damaged, left outdoors, or dropped into water, call customer service at 1-888-331-4569 (Mexico 001-881-331-4569).
- Connect only to a properly-grounded outlet. See grounding instructions
- Do not put any object into ventilation openings. Do not vacuum with any ventilation openings blocked; keep free of dust, lint, hair or anything that may reduce air flow.
- Keep hair, loose clothing, fingers, and all parts of body away from openings and moving parts.
- To reduce the risk of falls, use extra care when cleaning on stairs.
To reduce the risk of personal injury or damage to Vacuum, use only CRAFTSMAN recommended accessories.
- To reduce the risk of eye injury, wear safety eyewear. The operation of any utility vacuum can result in foreign objects being blown into the eyes, which can result in severe eye damage.
- Do not allow to be used as a toy. Close attention is necessary when used by or near children.
- Turn off Vac before unplugging.
To reduce the risk of injury from accidental starting, unplug power cord before changing or cleaning filter.
- Do not unplug by pulling on cord. To unplug, grasp the plug, not the cord.
- Do not pull or carry by cord, use cord as handle, close a door on cord, or pull cord around sharp edges or corners. Keep cord away from heated surfaces.
CAUTION:
To reduce the risk of hearing damage, wear ear protectors when using for an extended time or in a noisy area.
- For dusty operations, wear dust mask.
Static shocks are common when the relative humidity of the air is low. Vacuming fine debris with your Vac can deposit static charge on the hose or Vacuum. To reduce the frequency of static shocks in your home or when using this Vacuum, add moisture to the air with a humidifier.
Observe the following warnings that appear on the Lighted Nozzle.
WARNING:
- Keep batteries out of reach of small children. Consult a physician immediately if a battery is swallowed; severe burning or injury may occur.
- Battery contains Perchlorate Material - Special handling may apply.
See www.dtsc.ca.gov/hazardouswaste/perchlorate.
Observe the following warnings that appear on the Vacuum.
WARNING:
Risk of fire and Heat Damage.
This vacuum is intended to pick up COLD ash from fireplaces, grills, ovens, ash-trays, etc. Do not pick up hot, glowing, or burning ash/embers. Pick up cold ash only. Be aware that ash/embers can be hot for days after use. To reduce the risk of damage from accidental hot emitter pickup, do not place the vacuum on surfaces susceptible to heat damage such as carpeting, vinyl flooring, or wood surfaces. Empty drum after each use. Allow to cool before storing, especially in enclosed spaces. Do not use dust collection bags.
WARNING:
- For your own safety, read and understand Instruction Manual.
- Do not run unattended.
- Do not pick up hot ashes, coals, flammable, combustible / self-igniting, toxic, or other hazardous materials.
- Do not use around explosive liquids or vapors.
To reduce the risk of electric shock, do not use on wet surfaces. - Do not expose to rain. Store indoors.
- This is a dry vacuum only; NEVER vacuum liquids with this product.
FREE WARNING LABEL REPLACEMENT: If your warning labels become illegible or are missing, call 1-888-331-4569 for a free replacement.
SAVE THESE INSTRUCTIONS
INTRODUCTION
This Ash Vacuum is intended for household use. It may be used for vacuuming of dry debris, including cold ash from fireplaces, grills, ovens, ash-trays, etc. It should not be used to pick up liquids.
Read this Instruction Manual to familiarize yourself with the product features and to understand the specific usage of your new vacuum.
TABLE OF CONTENTS
| Section | Page | Section | Page |
| Important Safety Instructions | 2-4 | Operation | 12-13 |
| Introduction | 5 | Motor / Electrical | 12 |
| Grounding Instructions | 6 | Emptying the Drum | 13 |
| Carton Contents | 7 | Maintenance | 14-15 |
| Installation | 8-11 | HEPA Media Filter | 14 |
| Powerhead Assembly | 8 | Filter Removal and Replacement | 14 |
| Powerhead Disassembly | 8 | Filter Removal | 14 |
| Insert Locking Hose | 9 | Filter Installation | 14 |
| Hose Assembly | 9 | Cleaning a Dry Cartridge Filter | 15 |
| LED Lighted Nozzle Usage | 10 | Cleaning and Disinfecting the Ash Vacuum | 15 |
| LED Lighted Nozzle Battery Replacement | 10 | Cord Maintenance & Storage | 15 |
| Power Cord Storage | 11 | Ash Vacuum Storage | 15 |
| Accessory Storage | 11 | Service / Repair Parts | 16 |
| Hose Assembly Storage | 11 | Warranty | 17 |

GROUNDING INSTRUCTIONS
This Vacuum must be Grounded. If it should malfunction or break down, Grounding provides a path of least resistance for Electric Current to reduce the risk of Electric Shock. This Vacuum is equipped with a Cord having an Equipment-grounding Conductor and Grounding Plug. The Plug must be inserted into an appropriate Outlet that is properly installed and Grounded in accordance with all Local Codes and Ordinances.
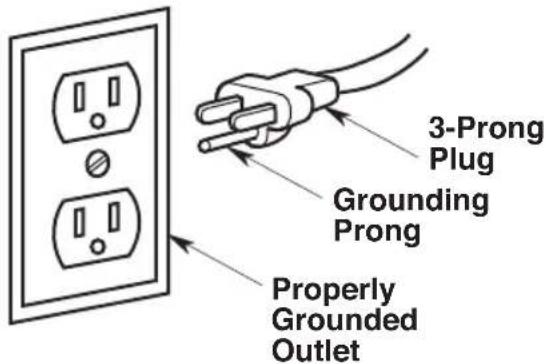
Fig. B
WARNING:
Improper connection of the equipment grounding conductor can result in a risk of electric shock. Check with a qualified electrician or service person if you are in doubt as to whether the outlet is properly grounded. Do not modify the plug provided with the appliance - if it will not fit the outlet, have a proper outlet installed by a qualified electrician.
This Vacuum is for use on a nominal 120 Volt Circuit, and has a Grounded Plug that looks like the Plug shown.
A Temporary Adapter that looks like the Adapter shown may be used to connect this Plug to a 2-Pole Receptacle, as shown. If a properly Grounded Outlet is not available, the Temporary Adapter should be used only until a properly Grounded Outlet can be installed by a Qualified Electrician.
The Green Colored Rigid Ear, Lug or the like extending from the Adapter must be connected to a Permanent Ground such as a properly Grounded Outlet Box Cover. Whenever the Adapter is used, it must be held in place by a Metal Screw.
NOTE: In Canada, the Use of a Temporary Adapter is Not Permitted by the Canadian Electrical Code.
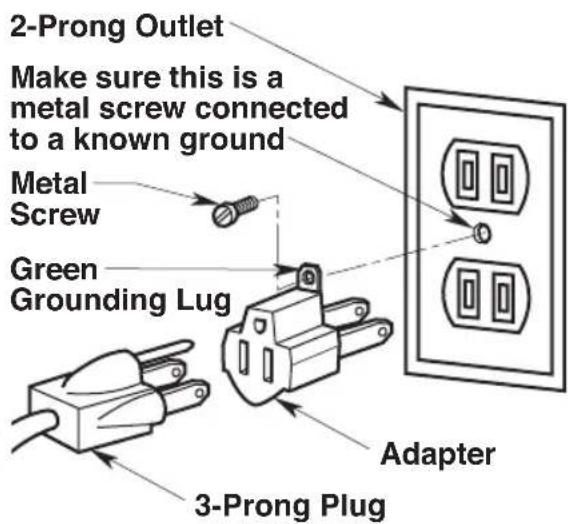
Fig. C
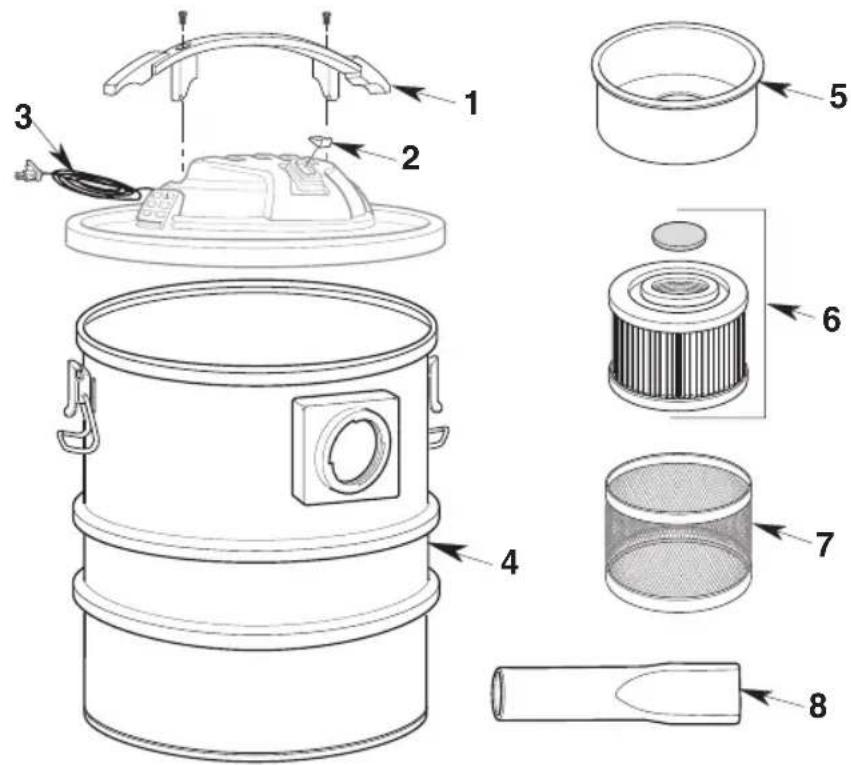
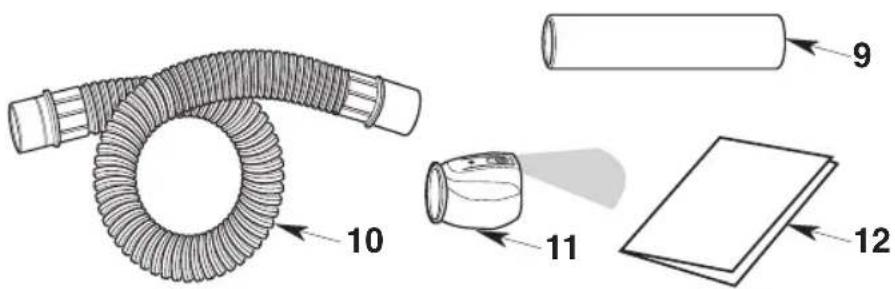
CARTON CONTENTS (Fig. D)
Remove entire contents of carton. Check each item against the Carton Contents List.
If any parts are damaged or missing, return the product to the retailer from which is was purchased for exchange.
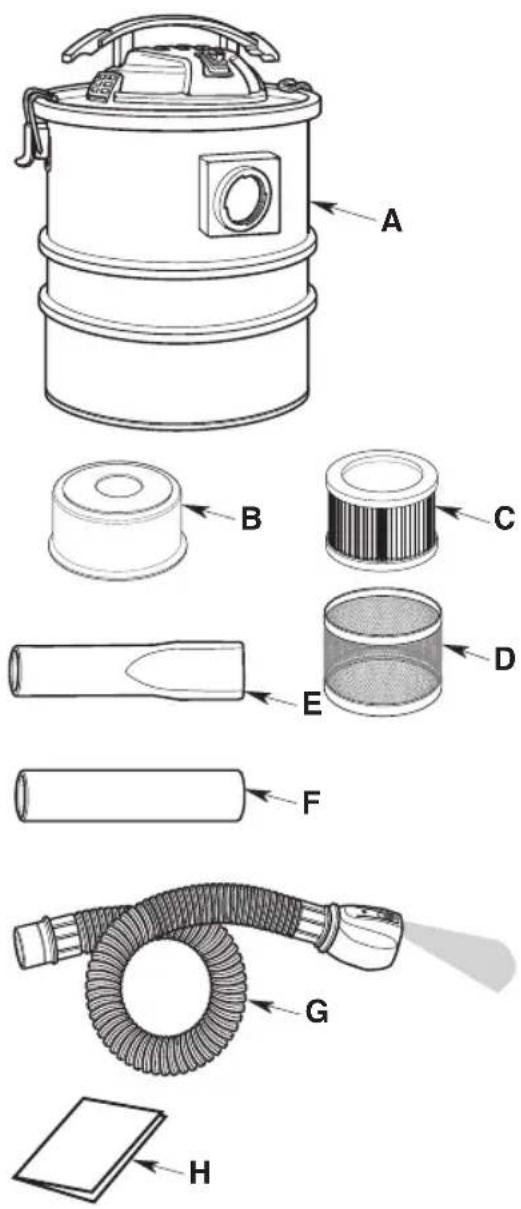
Fig. D
| Key | Description Qty. | |
| A Ash Vacuum (5 Gallon/18 Liters) 1 | ||
| B Metal Cover 1 | ||
| C HEPA Media Filter 1 | ||
| D Filter Screen 1 | ||
| E Extension Nozzle 1 | ||
| F Wand Nozzle 1 | ||
| G Locking Hose (metal lined) with LED Lighted Nozzle | 1 | |
| H Instruction Manual | 1 | |
Some items may come preassembled.
If they are not present in the carton, check the vacuum powerhead to see if they are preassembled.
INSTALLATION
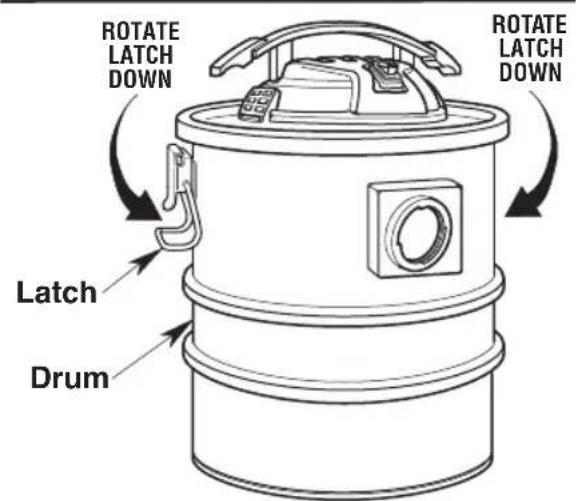
Powerhead Assembly (Figs. E & F)
- Line up front of Powerhead Assembly with Vacuum Port located on the front of the Drum, as shown.
- Place Powerhead Assembly on top of Drum.
- Be sure Powerhead Assembly completely covers the top of the Drum so leakage does not occur.
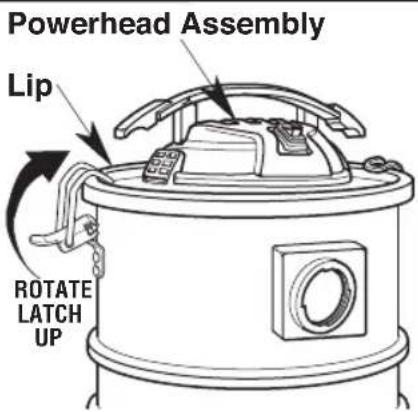
- Rotate the Latches on each side of the Drum, positioning the Latch Hooks over the Lip of the Powerhead Assembly.
- Snap down the bottom edge of the Latches to secure the Powerhead Assembly to the Drum.
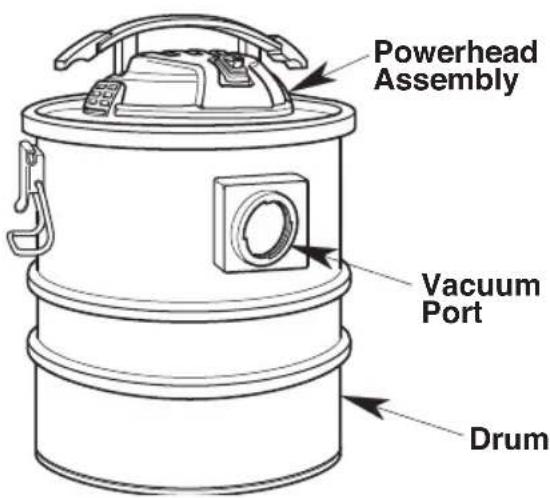
Fig. E
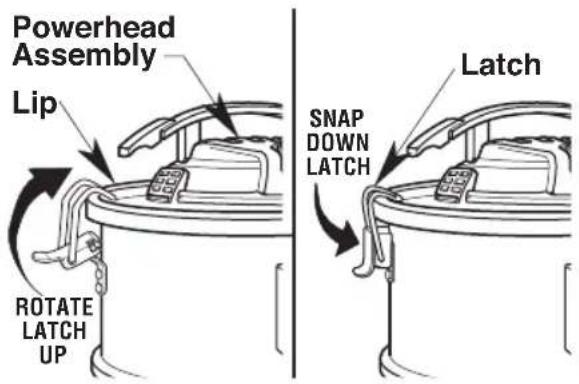
Fig. F
Powerhead Disassembly (Fig. G)
WARNING:
For your own safety, never connect plug to power source outlet until all assembly steps are complete and you have read and understood the safety and operation instructions. Do not operate vacuum with any parts damaged or missing.
- Grasp the Drum Latches on both the right and left side of the Vacuum.
- Slowly pull the bottom of the Latches up and away from the Drum.
- The top of the Latches will then be free of the Powerhead Assembly.
- Lift the Powerhead Assembly from the Drum and place it on a dry surface.
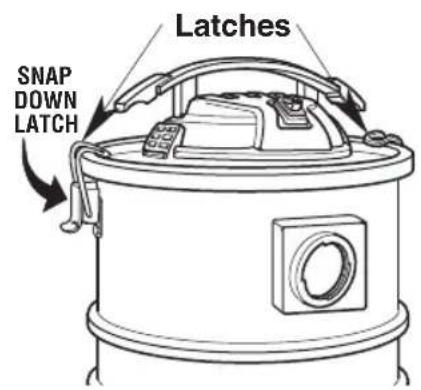
Fig. G
Insert Locking Hose (Fig. H)
NOTE: Use ONLY the Metal Lined Hose and Metal Accessories provided with this Ash Vacuum.
- Align Hose Tabs with Vacuum Inlet and insert the Locking End of the Hose into the Vacuum Inlet of the Vacuum Drum, as shown.
- Rotate the Hose clockwise to lock into place.
- To remove the Hose from the Vacuum, rotate the Locking Hose Counterclockwise and pull the Hose out of the Vacuum Inlet.
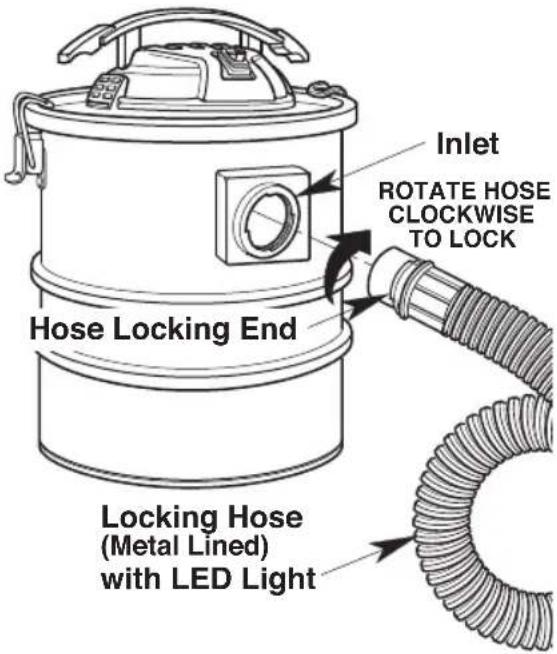
Fig. H
Hose Assembly (Figs. I & J)
- Slide the Round End of the Extension Nozzle into the smaller Tapered End of the Wand Nozzle.
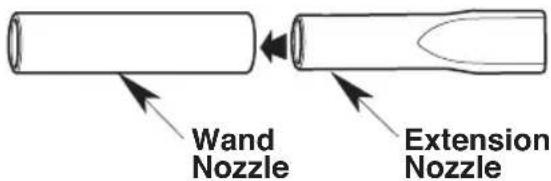
Fig.1
- Loosen the Two LED Assembly Screws, located at the bottom of the LED Lighted Nozzle.
3 Slide the Wand Nozzle through the LED Assembly and into the Rubber Hose Fitting. - Retighten the Two LED Assembly Screws to secure the LED Assembly to the Hose Assembly.
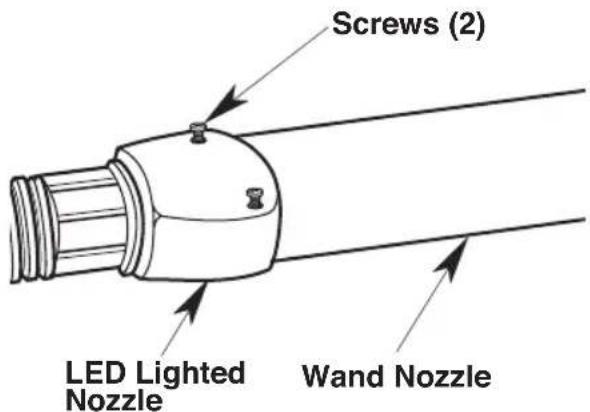
Fig.J
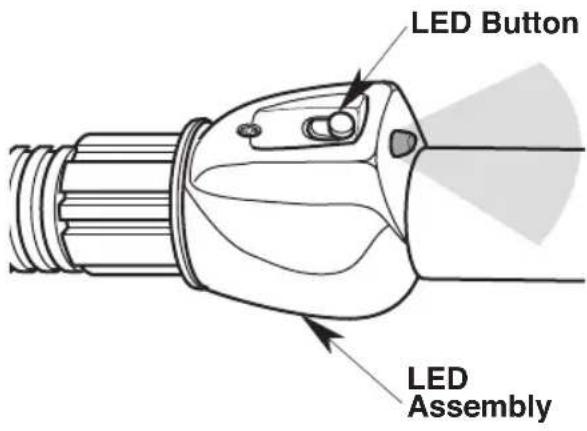
LED Lighted Nozzle Usage (Fig. K)
- Press Button to activate LED light while Vacuuming.
- Slide the Switch Forward to Lock the LED Light in the ON position.
- Slide the Switch Back to the OFF position after use.
Fig. K
LED Lighted Nozzle Battery Replacement (Fig. L)
- To access Batteries, remove and retain the Battery Access Panel Screw.
- Remove and retain the Four Screws from the LED Assembly, releasing the Switch Button Module.
- The Two Batteries are located under the Switch Button module. Dispose Batteries in the proper waste disposal container.
- The LED Light uses Two CR2016 Lithium Batteries that are replaceable.
- Reposition the Switch Button Module over the Battery Compartment. Install the previously removed Four Screws into the Switch Button Module to secure.
- Reposition the Battery Access Panel over the Switch Button Module. Install the previously removed Screw into the Battery Access Panel to secure.
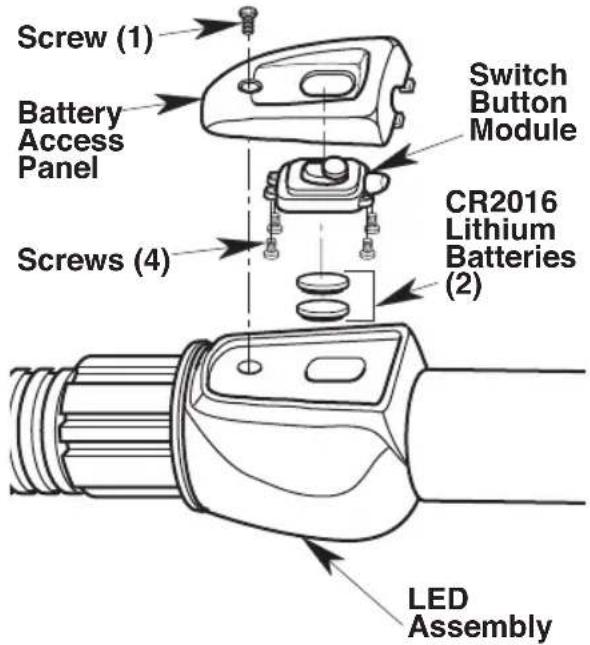
Fig. L

WARNING:
Keep batteries out of reach of small children. Consult a physician immediately if a battery is swallowed. Severe burning or injury may occur.
Battery contains Perchlorate Material - Special handling may apply.
See www.dtsc.ca.gov/hazardouswaste/perchlorate.
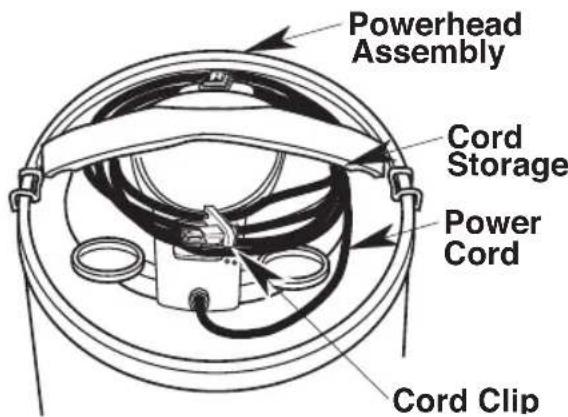
Power Cord Storage (Fig. M)
The Power Cord should be wrapped around the Powerhead Assembly Carry Handle.
Snap the Cord Clip onto the Power Cord, to secure in place.
Fig. M

WARNING:
To prevent serious injury from electrical shock, stop vacuum use immediately if the power cord is damaged. Take the vacuum to a qualified service dealer for inspection and possible repair.
Accessory Storage (Fig. N)
The Accessories can be stored on the rear of the Powerhead Assembly by placing each Accessory into the Powerhead Assembly Slots.

Fig. N
Hose Assembly Storage (Fig. 0)
Wrap the Hose around the top of the cooled Powerhead Assembly, positioning the Hose under the Carry Handle/ Hose Wrap Area.

CAUTION:
Do not operate vacuum while the hose or accessories are stored on the wet/dry vacuum's powerhead assembly.

WARNING:
Do not put any object into ventilation openings. Do not vacuum with any ventilation openings blocked; keep free of dust, lint, hair or anything that may reduce air flow.
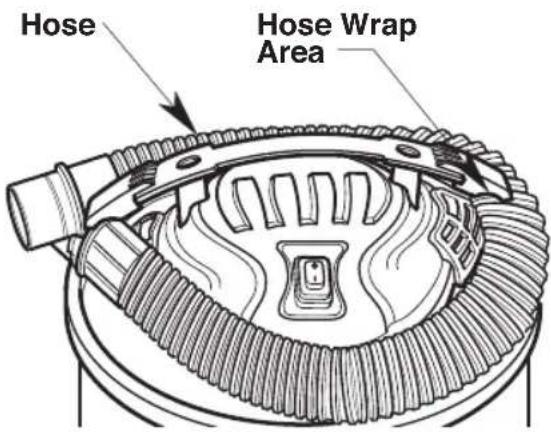
Fig. 0
OPERATION
WARNING:
To reduce the risk of fire, explosion, or damage to Vacuum:
- Do not leave Vacuum running while unattended - you may fail to notice important signs indicating abnormal operation such as loss of suction, debris exiting the exhaust, or abnormal motor noises. Immediately stop using Vacuum if you notice these signs.
- Do not leave Vacuum plugged in when not in use.
- Sparks inside the motor can ignite airborne flammables. Do not operate Vacuum near flammable liquids or in areas with flammable gases, vapors, or explosive / airborne dust. Flammable liquids, gases, and vapors include: lighter fluid, solvent-type cleaners, oil-based paints, gasoline, alcohol, and aerosol sprays. Explosive dusts include: coal, magnesium, aluminum, grain, and gun powder.
- Do not vacuum up explosive dusts, flammable liquids, or hot ashes.
The drum must be emptied and cleaned after each use, and before picking up other household debris.
WARNING:
To reduce the risk of electric shock or injury:
- Do not expose to rain or allow liquid to enter motor compartment. Store indoors.
- Do not handle plug, switch, or Vacuum with wet hands.
- Unplug Vacuum before servicing. If your Vacuum is not working as it should, has missing parts, has been dropped, damaged, left outdoors, or dropped into water, call customer service at 1-888-331-4569 (Mexico 001-881-331-4569).
- When using an extension cord, use only outdoor-rated cords that are in good condition. Do not allow the connection to come into contact with liquid.
CAUTION:
To reduce the risk of hearing damage, wear ear protectors when using the Vacuum for an extended time or in a noisy area.
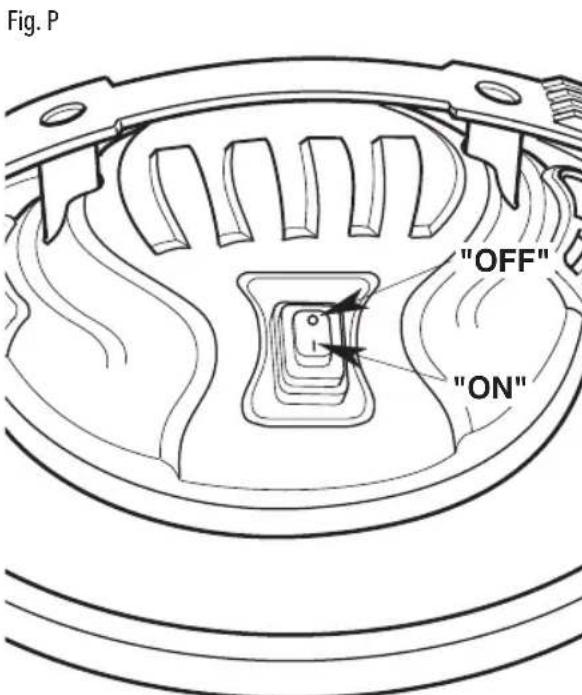
Motor / Electrical (Fig. P)
This Ash Vacuum is rated for use with 120 Volt 60Hz supply. The Vacuum is equipped with a Thermal Protection Cutoff Switch which will remove Power from the Vacuum Motor if excessively high Operating Temperatures are detected. This condition may arise as the result of a blocked Vacuum passage, or clogged Filter. If a Thermal trip takes place, immediately Toggle the Vacuum's Switch to OFF, Unplug the Unit and inspect for an airflow blockage in the Hose and verify the condition of the Filters (see Maintenance). Clean or replace the Filters as required. The Vacuum will require several minutes to cool down to a safe operating temperature. When this temperature is attained, the Thermal Switch will automatically Reset and the Vacuum will be able to be used in the normal manner.
After you Plug the Power Cord into the Outlet, turn the Unit on by pushing the Switch from position "0" to position "1". The symbols used on the Switch Actuator are International "On & Off" Symbols:
$$ \bigcirc = O F F \quad | = O N $$
Emptying the Vacuum Drum (Figs. Q & R)
WARNING:
To reduce the risk of injury from accidental starting, unplug power cord before emptying the vacuum drum.
NOTE: Do not store the Vacuum immediately after Ash removal or other use in a confined area or enclosed space. Allow the Powerhead Assembly to cool and remove Ash from Drum before storage.
- Grasp the Drum Latches on both sides of the Powerhead Assembly.
- Slowly Pull Up on the Drum Latches, away from the Drum.
- The top of the Latches will be free of the Powerhead Assembly.
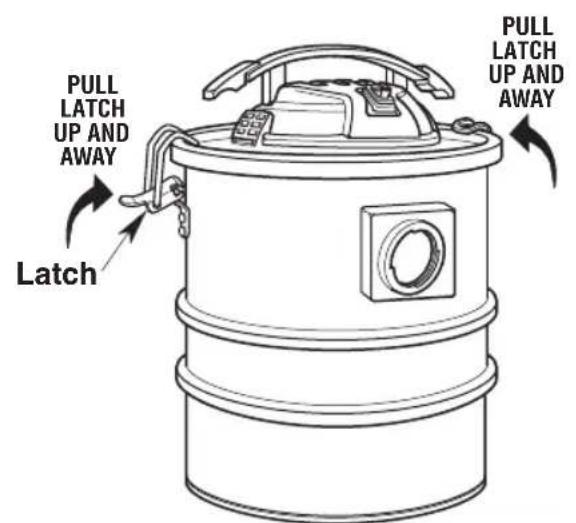
Fig. Q
NOTE: Be sure the Ash is cool prior to dumping the contents into the proper waste disposal container.
- Lift up on the Powerhead Assembly and set it on a clean dry area.
- Empty the Drum into the proper waste disposal container.
- Inspect the Filter per the "Filter Removal and Installation" Section of this Manual.
- Reassemble the Powerhead Assembly to the Drum.
CAUTION:
To reduce the risk of hearing damage, wear ear protectors when using the Vacuum for an extended time or in a noisy area.
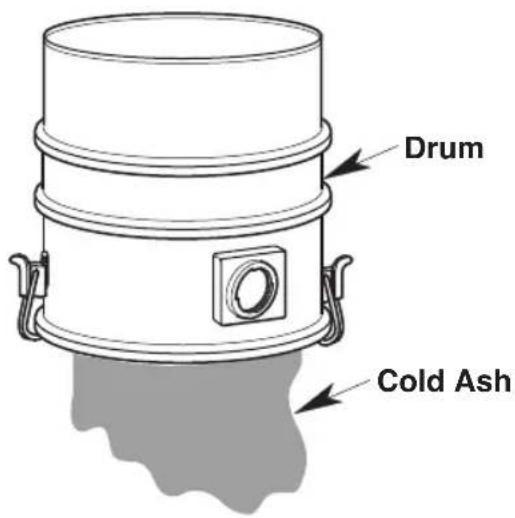
Fig. R
MAINTENANCE
HEPA Media Filter
WARNING:
To reduce the risk of injury from accidental starting, unplug power cord before changing or cleaning filter.
Your HEPA Media Filter should be cleaned often to maintain peak Vacuum performance.
IMPORTANT: It is very important that the screen filter is installed prior to use.
NOTE: The HEPA Media Filter is made of high quality material designed to stop dust and smaller particles. Handle the HEPA Media Filter carefully when removing to clean or installing a new HEPA Media Filter. Creases in the HEPA Media Filter pleats may occur from installation but creases will not affect the performance of the HEPA Media Filter.
Filter Removal and Installation Filter Removal (Fig. S):
- Rotate the Filter Screen / HEPA Media Filter Counter-Clockwise.
- Remove the HEPA Media Filter from the Filter Screen. NOTE: The Filter Screen should be cleaned with a brush.
- Check the Motor Inlet Filter, clean or replace, if necessary.
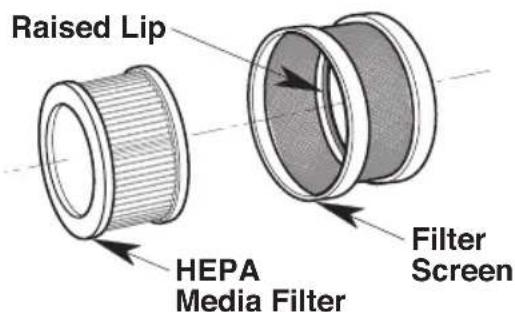
Fig. S
Filter Installation (Fig. T):
- Replace Motor Inlet Filter.
- Replace the HEPA Media Filter into the Filter Screen.
NOTE: Be sure to orient the HEPA Media Filter and the Filter Screen in the correct position, as shown. The Filter Screen has a raised lip on the inside of the Screen to hold it in place.
- Rotate the Filter Screen/HEPA Media Filter Clockwise onto the Powerhead Metal Cover.
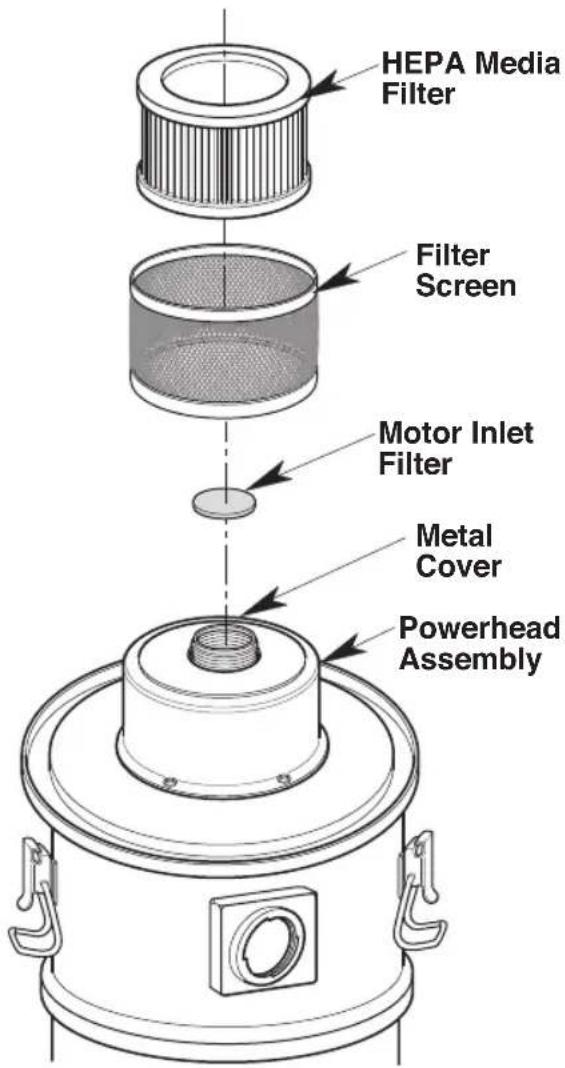
Fig. T
Cleaning A Dry Cartridge Filter
NOTE: For best cleaning results due to accumulated dust, clean the Filter in an open area. Cleaning SHOULD be done outdoors and not in the living quarters.
- Light cleaning of some dry debris from the Filter can be accomplished without removing the Filter from the Vacuum. Simply slap your hand on top of the handle while the Vacuum is turned off.
- Remove Filter from Vacuum. Gently tap the Filter against the inside wall of your Drum, or against the floor, and the debris will loosen and fall.
Cleaning and Disinfecting the Ash Vacuum
To keep your Vacuum looking its best, clean the outside with a cloth dampened with warm water and mild soap.
To clean the Drum:
- Dump debris out.
- Wash the Drum thoroughly with warm water and mild soap.
- Wipe out with dry cloth.
Cord Maintenance & Storage
When vacuuming is complete, unplug the Power Cord and wrap it around the Powerhead Handle. Accessories can be stored on the rear of the Powerhead Assembly.
WARNING:
To prevent serious injury from electrical shock, stop vacuum use immediately if the power cord is damaged. Take the vacuum to a qualified service dealer for inspection and possible repair.
Ash Vacuum Storage
Before storing your Vacuum, the Drum should be emptied and cleaned. The Power Cord should be wrapped around the Carry Handle. Positioning the Hose under the Carry Handle. Accessories should be kept in the same area as the Vacuum so they can be readily available. The Vacuum should be stored indoors.
WARNING:
To assure product SAFETY and RELIABILITY, any other maintenance, repairs and adjustments should be performed by Authorized Service Centers, always using CRAFTSMAN replacement parts.
SERVICE / REPAIR PARTS
Gallon (18 Liter) Ash Vacuum
Model Number CMXEVBE175850
Electrical Ratings: 120 V 7.6 A60 Hz
WARNING:
To reduce the risk of injury, unplug power cord before servicing the Wet/Dry Vacuum.
WARNING:
All disassembly and repairs should be performed by qualified personnel.
Always order by Part Number - Not by Key Number
| Key No. | Part No. Description | |
| 1 83 | 6247-3 Handle, Carry | |
| 2 83 | 6248 Switch, Toggle | |
| 3 83 | 6265 Power Cord | |
| 4 83 | 6506 Drum Assembly (Includes Drum, Drum Inlet, Drum Latches, Carton & Label) | |
| 5 83 | 6257 Metal Cover | |
| 6 CMXZVBE38740 HEPA Media Filter w/Motor Inlet Filter |
| Key No. | Part No. | Description |
| 7 83 | 6270 | Metal Filter Screen |
| 8 83 | 6276 | Metal Extension Nozzle |
| 9 83 | 6275 | Metal Wand Nozzle |
| 10 | 836277 | Locking Hose (Metal Lined) |
| 11 | 836279 | LED Lighted Nozzle Assembly |
| 12 | SP7088 | Instruction Manual |
CRAFTSMAN® LIMITED WARRANTY - 3 YEARS
This limited warranty is provided by Emerson Tool Company, a division of Emerson Electric Co., ("We" or "Our" or "Us") to the original consumer owner ("Customer" or "You" or "Your") of the CRAFTSMAN product with which this limited warranty is provided (the "CRAFTSMAN Product").
What is Covered
We warrant to You that your CRAFTSMAN Product will be free from defects in materials and workmanship when used under normal conditions in accordance with the terms of the Instruction Manual provided to You with the CRAFTSMAN Product, subject to the exclusions described below, for a period of three years commencing on the date of purchase by You (the "Warranty Period"). This limited warranty terminates if the original purchaser transfers the CRAFTSMAN Product to any other person or entity.
What is not Covered
This limited warranty does not extend to and expressly excludes:
- Normal wear and tear and/or replacement attachments or accessories, including, without limitation, power cords, hoses, filters, and other attachments or accessories that may be offered for sale by Us for use with the CRAFTSMAN Product.
- Damage or burnout of the CRAFTSMAN Product motor resulting from failure to clear a blockage occurring during the normal course of use.
- Loss or damage to the CRAFTSMAN Product resulting from conditions beyond Our control including without limitation, misuse, accident, abuse, neglect, negligence (other than Our's), overuse beyond intended capacity as set forth in the Instruction Manual, or modifications or alterations made by anyone other than Us.
- Loss or damage to the CRAFTSMAN Product resulting from failure to use the CRAFTSMAN Product in accordance with the written instructions, guidelines, and terms and conditions set forth in the Instruction Manual.
- TO THE EXTENT PERMITTED BY LAW, IN NO EVENT SHALL WE BE LIABLE FOR ANY INCIDENTAL, SPECIAL, INDIRECT, OR CONSEQUENTIAL DAMAGES, INCLUDING ANY ECONOMIC LOSS, WHETHER RESULTING FROM NONPERFORMANCE, USE, MISUSE OR INABILITY TO USE THE CRAFTSMAN PRODUCT OR FOR THE NEGLIGENCE OF ETC.
How to Obtain Service
US and Canada - To obtain warranty benefits contact us toll free at 1-888-331-4569 (Mexico 001-881-331-4569). We will direct you to the nearest service center to review your vacuum for inspection, repairs or replacement.
Mexico - To obtain warranty benefits contact us toll free at 001-881-331-4569. We will direct you to the nearest service center to review your vacuum for inspection, repairs or replacement.
No Other Express Warranty Applies
This limited warranty is the sole and exclusive warranty provided to You. No other express warranty, written or verbal, applies including, WITHOUT LIMITATION, WARRANTY OF MERCHANTABILITY OR FITNESS FOR A PARTICULAR PURPOSE. No employee, agent, dealer, or other person is authorized to alter this limited warranty or make any other warranty on behalf of Us.
What We will do to Correct Problems
YOUR SOLE AND EXCLUSIVE REMEDY UNDER THIS LIMITED WARRANTY SHALL BE LIMITED TO REPAIR, REPLACEMENT, REFUND OF THE CRAFTSMAN PRODUCT.
After You have contacted CRAFTSMAN Product Customer Service Department, We will initiate warranty proceedings, including a physical inspection, subject to the exclusions and the Warranty Period stated herein, to determine whether to repair or replace the CRAFTSMAN Product or provide You with a refund.
The decision to repair or replace your CRAFTSMAN Product or to provide a refund is at Our sole discretion. Repair or replacements provided to You by ETC are at no cost to You if covered under this limited warranty.
If we are unable to provide You with a suitable repaired or replacement CRAFTSMAN Product, we will provide you with a refund equal to the purchase price of your CRAFTSMAN Product or a credit to be used toward the purchase of a new CRAFTSMAN Product.
In the event of any dispute between CUSTOMER AND US, either party may choose to resolve the dispute by binding arbitration. THIS MEANS IF EITHER CUSTOMER OR US CHOOSE BINDING ARBITRATION, NEITHER PARTY SHALL HAVE THE RIGHT TO LITIGATE SUCH CLAIM IN COURT OR HAVE A JURY TRIAL. DISCOVERY AND APPEAL RIGHTS ARE LIMITED.
This limited warranty gives you specific legal rights, and you may also have other rights, which vary from State to State. Some states do not allow the exclusion of incidental or consequential damages, so the above limitation may not apply.
CRAFTSMAN
is a registered trademark of Stanley Black & Decker, Inc., used under license.
Product Manufactured by: EMERSON TOOL COMPANY
Part No. SP7088 Form No. SP7088-2 Printed in Mexico 10/2019
Product Manufactured by: EMERSON TOOL COMPANY
Poniente 146 No. 669, Col. Industrial Vallejo,
is a registered trademark of Stanley Block & Decker, Inc., used under license.
Product Manufactured by: EMERSON TOOL COMPANY

- Definitions: Safety Alert Symbols and Words
- DANGER:
- WARNING:
- CAUTION:
- Components
- IMPORTANT SAFETY INSTRUCTIONS
- Risk of fire and Heat Damage.
- WARNING:
- SAVE THESE INSTRUCTIONS
- INTRODUCTION
- TABLE OF CONTENTS
- GROUNDING INSTRUCTIONS
- CARTON CONTENTS (Fig. D)
- INSTALLATION
- Powerhead Assembly (Figs. E & F)
- Powerhead Disassembly (Fig. G)
- Insert Locking Hose (Fig. H)
- Hose Assembly (Figs. I & J)
- LED Lighted Nozzle Usage (Fig. K)
- LED Lighted Nozzle Battery Replacement (Fig. L)
- Power Cord Storage (Fig. M)
- Accessory Storage (Fig. N)
- Hose Assembly Storage (Fig. 0)
- OPERATION
- Motor / Electrical (Fig. P)
- Emptying the Vacuum Drum (Figs. Q & R)
- MAINTENANCE
- HEPA Media Filter
- Filter Removal and Installation Filter Removal (Fig. S):
- Filter Installation (Fig. T):
- Cleaning A Dry Cartridge Filter
- Cleaning and Disinfecting the Ash Vacuum
- Cord Maintenance & Storage
- Ash Vacuum Storage
- SERVICE / REPAIR PARTS
- Gallon (18 Liter) Ash Vacuum
- Model Number CMXEVBE175850
- CRAFTSMAN® LIMITED WARRANTY - 3 YEARS
- What is Covered
- What is not Covered
- How to Obtain Service
- No Other Express Warranty Applies
- What We will do to Correct Problems
Brand : Craftsman
Model : CMXEVBE17585
Category : Vacuum Cleaner