SC6010D - Floor cleaner Sanitaire - Free user manual and instructions
Find the device manual for free SC6010D Sanitaire in PDF.
| Brand | Sanitaire |
| Model | SC6010D |
| Product Type | Commercial Floor Cleaner |
| Use | Commercial |
| Power Supply | 120 V, 60 Hz |
| Functions | Scrubbing, polishing, stripping, spraying and polishing |
| Brush Type | Polyester, poly, interchangeable pads |
| Grounding | Yes, three-prong plug |
| Circuit Breaker | Resettable, 2-minute cool-down |
| Handle Assembly | In two sections, with bolt and washers |
| Brush Installation | Align notches, push and turn counterclockwise |
| Direction | Lift handle to go right, lower to go left |
| Transport | Tilt machine onto rear wheels |
| Monthly Maintenance | Clean motor with vacuum |
| Cord Inspection | Check for punctures, cuts or loose prongs |
| Warranty | 1 year limited, from date of purchase |
| Customer Service | 1-800-800-8975, Mon-Fri 9am-8:30pm EST |
| Spare Parts | Drive disc, brushes, pads available at sanitairecommercial.com |
| Accessories Sold Separately | Drive disc, pads, brushes of various sizes |
| Cord Storage | Wrap around upper handle and hook |
Frequently Asked Questions - SC6010D Sanitaire
User questions about SC6010D Sanitaire
0 question about this device. Answer the ones you know or ask your own.
Ask a new question about this device
Download the instructions for your Floor cleaner in PDF format for free! Find your manual SC6010D - Sanitaire and take your electronic device back in hand. On this page are published all the documents necessary for the use of your device. SC6010D by Sanitaire.
USER MANUAL SC6010D Sanitaire
Commercial Floor Machine
SC6010
SC6025
SC6030
SC6045
Safety instructions 2
Product view 3
Assembly 4-5
Brush and pad driver installation . . .5
General instructions 6
How to order replacement parts . . .6
Operation. 7
Maintenance 8
Troubleshooting 9
Warranty 10
Service information 10

IMPORTANT SAFETY INSTRUCTIONS
READ ALL INSTRUCTIONS BEFORE USING YOUR COMMERCIAL FLOOR MACHINE
When using an electrical appliance, basic precautions should be observed, including the following:
WARNING
TO REDUCE THE RISK OF FIRE, ELECTRIC SHOCK OR INJURY:
Do not immerse.
» Use only on surfaces moistened by cleaning process.
Always connect to a properly grounded outlet.
» See grounding instructions.
Unplug from outlet when not in use and before conducting maintenance or troubleshooting.
» Do not leave machine when it is plugged in.
Do not service machine when it is plugged in.
» Do not use with damaged cord or plug.
If appliance is not working as it should, has been dropped, damaged, left outdoors, or dropped into water, have it repaired at an authorized service center.
» Use indoors only.
Do not pull or carry by cord, use cord as a handle, close door on cord, pull cord around sharp corners or edges, run appliance over cord, or expose cord to heated surfaces.
Unplug by grasping the plug, not the cord.
» Do not handle plug or appliance with wet hands.
Do not put any object into appliance openings, use with blocked opening or restrict air flow.
Do not expose hair, loose clothing, fingers, or other body parts to openings or moving parts.
Do not use appliance in an enclosed space filled with vapors given off by oil-based paint, paint thinner, some moth-proofing substances, flammable dust, or other explosive or toxic vapors.
Do not modify the 3-prong grounded plug.
» Do not allow to be used as a toy.
Do not use for any purpose other than described in this user guide.
Do not unplug by pulling on the cord.
Keep openings free of dust, lint, hair, etc.
Keep appliance on a level surface.
Turn OFF all controls before unplugging.
Close attention is necessary when used by or near other people.
SAVE THESE INSTRUCTIONS
THIS MODEL IS FOR COMMERCIAL USE
WARNING
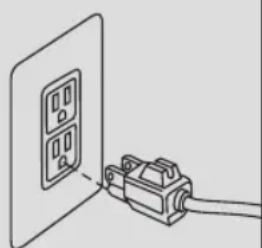
Improper connection of the equipment-grounding conductor can result in a risk of electrical shock. Check with a qualified electrician or service person if you aren't sure if the outlet is properly grounded. DO NOT MODIFY THE PLUG. If it will not fit the outlet, have a proper outlet installed by a qualified electrician. This appliance is designed for use on a nominal 120-volt circuit, and has a grounding attachment plug that looks like the plug in the drawing to the right. Make certain that the appliance is connected to an outlet having the same configuration as the plug. No plug adapter should be used with this appliance.
GROUNDING INSTRUCTIONS
This appliance must be connected to a grounded wiring system. If it should malfunction or break down, grounding provides a safe path of least resistance for electrical current, reducing the risk of electrical shock. The cord for
this appliance has an
equipment-grounding conductor and a grounding
plug. It must only be plugged into an outlet that is properly installed and grounded in accordance with all local codes and ordinances.
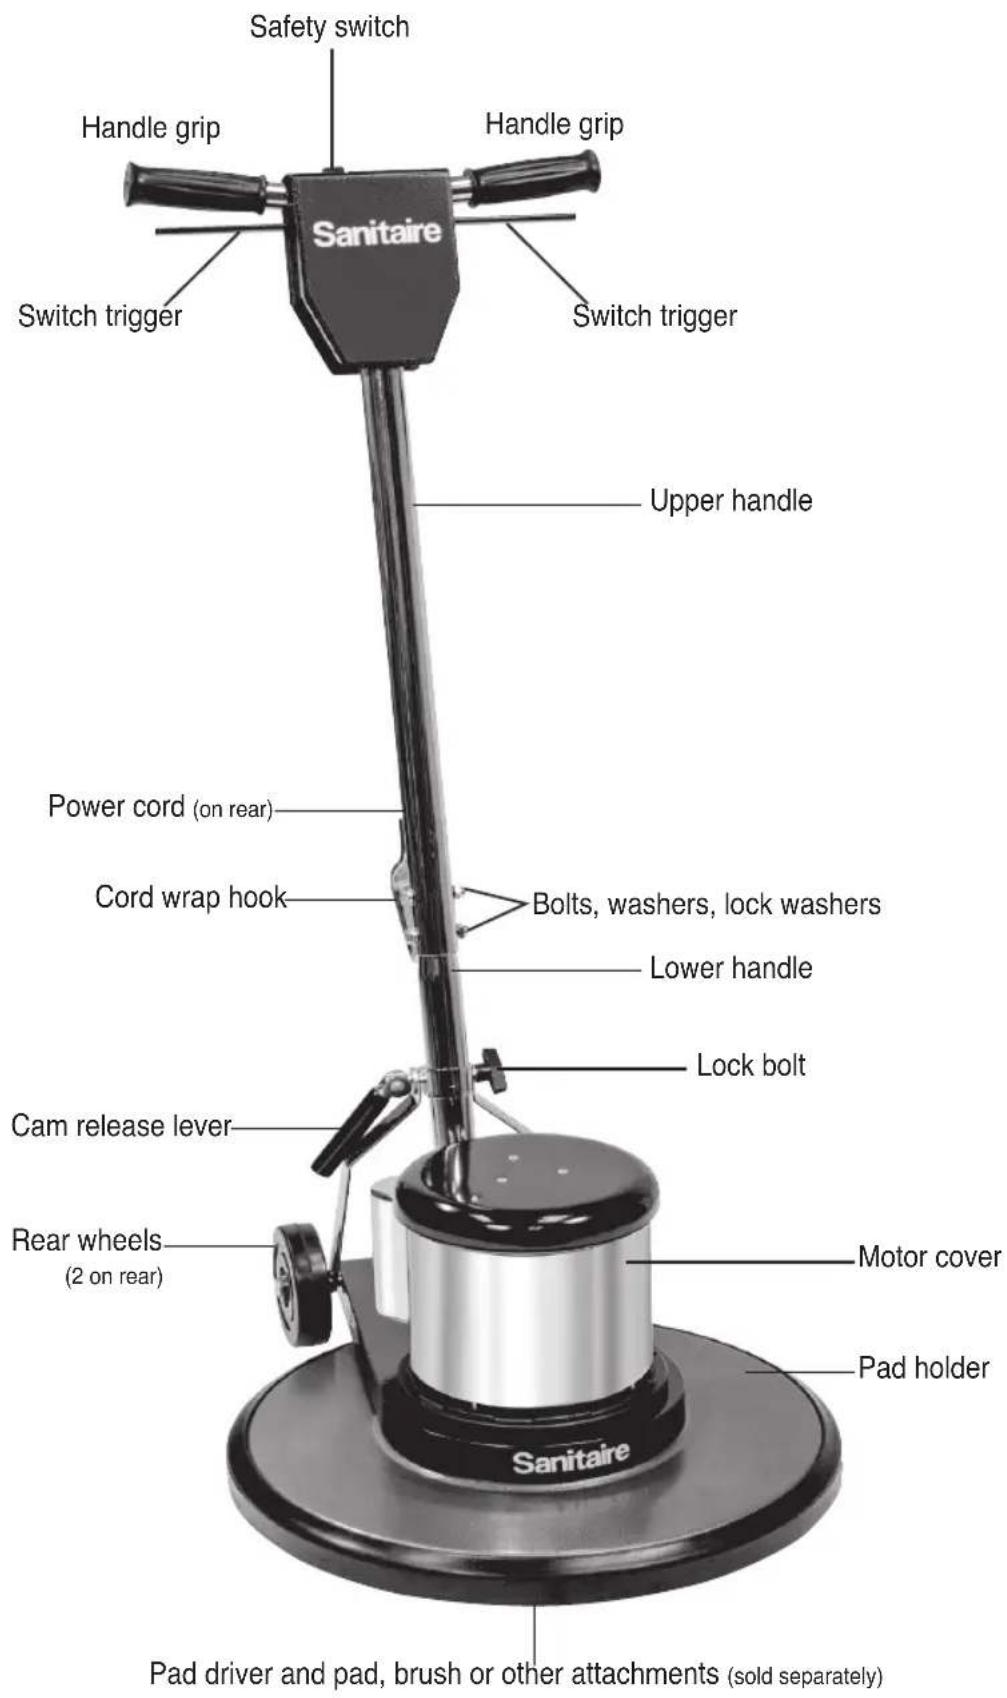
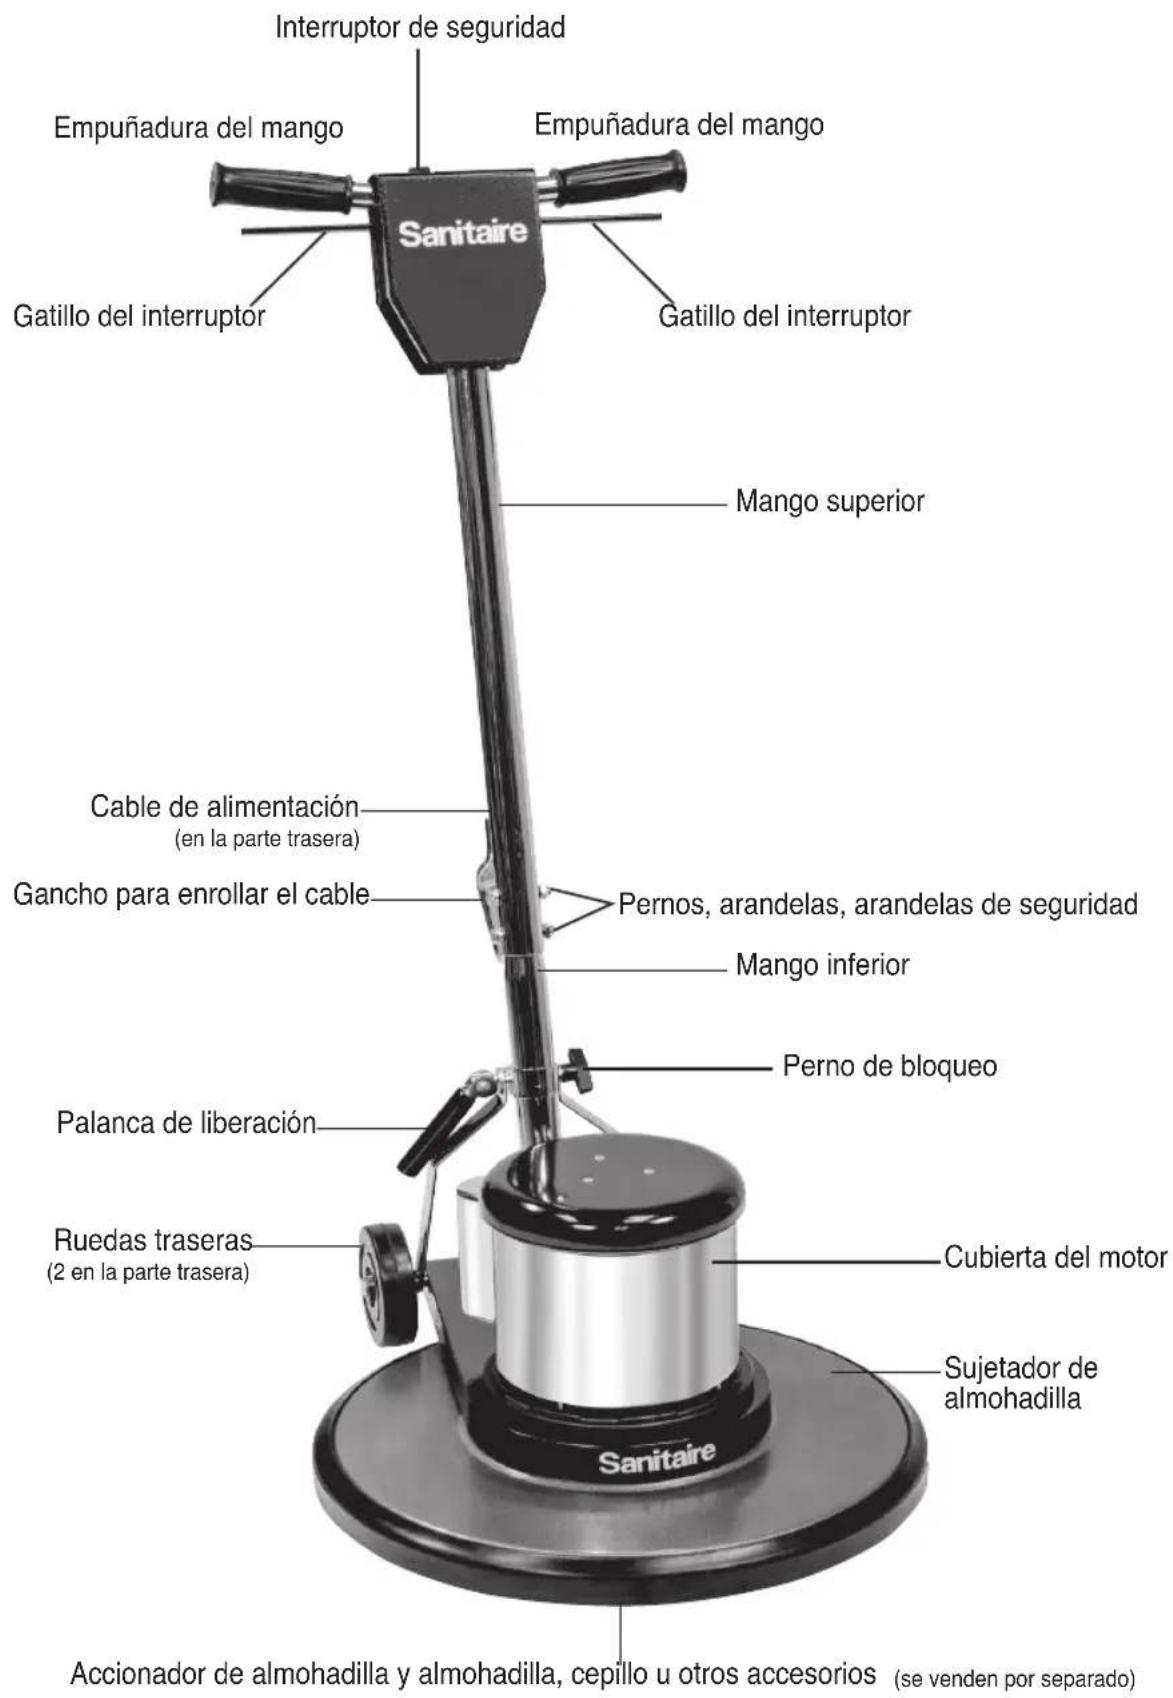
PRODUCT VIEW
N3
乙
HOW TO ASSEMBLE HANDLE AND REMOVE FLOOR MACHINE FROM BOX
The floor machine comes with a two piece handle in the box. This handle will need to be assembled before removing the floor machine from the box.
- Open the box and remove the cardboard inserts.
- Then, attach a nut on the end of the bolt and fasten tightly.
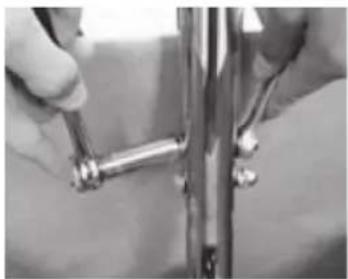
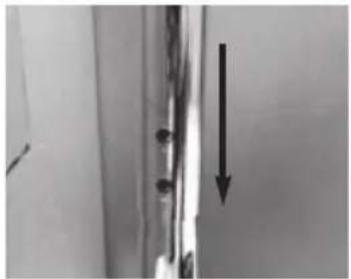
- Lift the upper handle and place it over the lower handle. Slide the
upper handle down until all the holes are aligned.
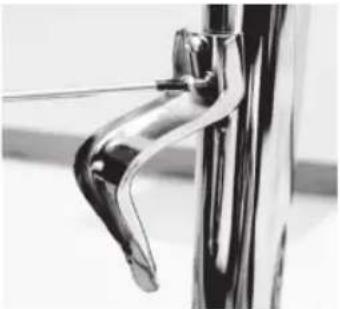
- After the handle is completely assembled, secure the cam lever
by pushing it down to lock the handle in place.
- Slide the washer onto the bolt. Insert the bolt with the washer into the aligned holes. If needed, use a screwdriver to line up the holes to
help guide the bolt through the handle.
- After the handle is completely assembled, secure the cam lever
by pushing it down to lock the handle in place.
- Once the bolt and washers are through the holes, place the lock
washer at the end of the bolt.
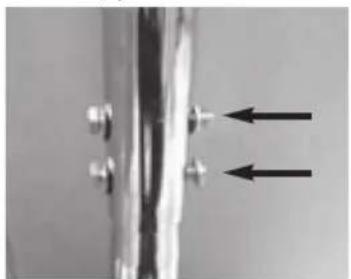
- With the machine in the upright position, remove the cord wrap hook and two (2) Phillips head screws from the bag. With the hook pointing towards the ground, position the cord
wrap hook over the 2 holes on the back of the handle. Insert the two screws into the holes and tighten with a screwdriver.
- When storing the machine, wrap the power cord around the operator
handle grips and the cord wrap hook.

BRUSH AND PAD DRIVER INSTALLATION
CAUTION: Disconnect the power cord from the electrical outlet before installing a brush or pad driver.
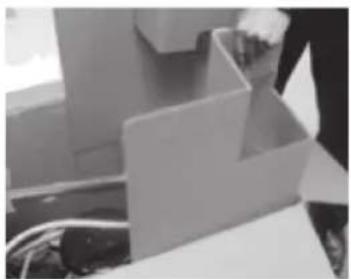
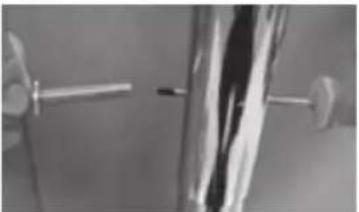
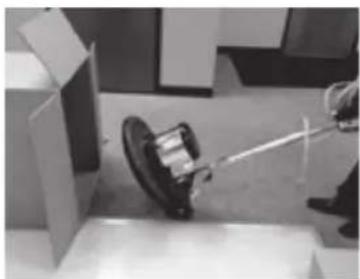
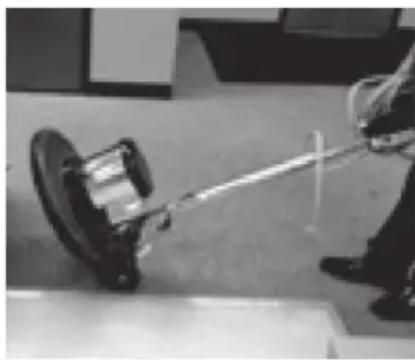
- To install a brush or pad driver, leave the handle in the upright position and tip the machine backwards so it rests on its wheels and upper handle section (Fig. 1).
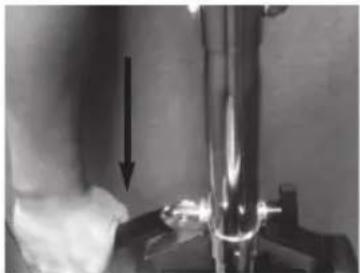
- The brush and pad driver both attach in the same manner: align the cutouts on the inner ring of the brush or pad driver with the tabs on the inside of the ring of the drive hub (Fig. 2). Push the brush or pad driver firmly in position, then turn it counterclockwise until it locks into place. To remove, turn the brush or pad driver clockwise until it stops, then lift it off.
Note: Always remove the brush or pad driver when the machine is not in use.
CAUTION: This is the only proper way to install a drive block, brush or attachment. NEVER put a drive block, brush or attachment on the machine by placing it on the floor and moving the running machine over it, or by placing the machine over the block or attachment and then starting the motor.
- Return the floor machine to upright position and adjust handle to operating position. Recommended handle position is close to the waist with arms extended down. Lock the cam release lever into position. Note: The lock bolt does not require extreme tightening to effectively hold the cam release lever in position. Overtightening will shorten the functional life of the lock bolt.
PAD DRIVER, PADS AND ALL ACCESSORIES ARE SOLD SEPARATELY
- With the machine in the upright position, remove the cord wrap hook and two (2) Phillips head screws from the bag. With the hook pointing towards the ground, position the cord wrap over the 2 holes on the back of the handle. Insert the two screws into the holes and tighten with a screwdriver.
- When storing the machine, wrap the power cord around the operator handle grips and the cord wrap hook.
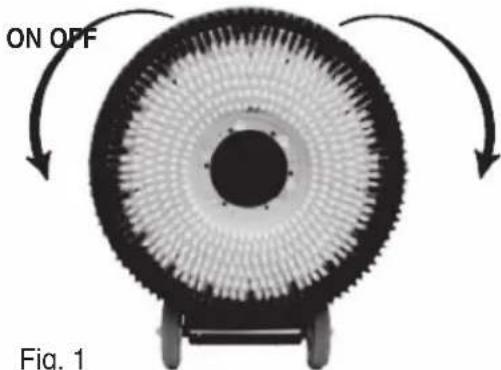
Fig. 1

Fig. 2
FLOOR MACHINE APPLICATIONS (Sold separately)
- Spray buffing with red spray buff pad and spray buff chemical.
- Dry buffing a buffable finish with a tan, beige or white pad or brush.
- Scrubbing with green or blue pad or scrubbing brush.
- Stripping with a black pad and a stripping chemical.
PAD CENTERING LOCK
To install a pad, tip the machine backwards so it rests on the rear wheels and handle. After centering the pad on the pad holder, insert the Pad Centering Lock and twist it clockwise until it securely locks in place. To remove, twist the lock counterclockwise.
HOW TO ORDER REPLACEMENT PARTS
To order pad driver and accessories, go to: www.sanitairecommercial.com/collections/floor-machine-accessories
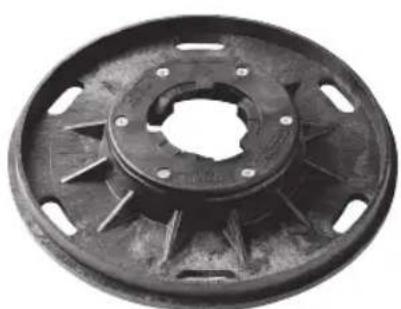
Pad driver (Available in various sizes)
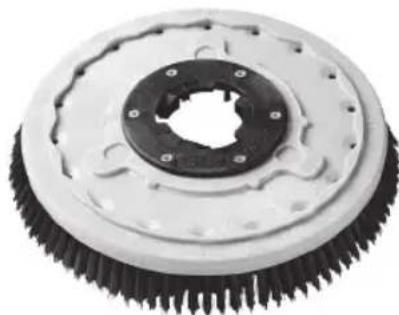
Poly brush (Available in various sizes)

Floor pads (Available in various sizes)
HOW TO OPERATE THE FLOOR MACHINE
- First install the pad driver and pad, brush or other attachments to be used.
- Plug the machine in as directed and lower the handle to the desired operating height and lock in place using the cam lever handle. (Does not apply to the SC6045 burnisher)
- Push the safety switch forward and squeeze the switch triggers beneath the handle grips. This activates the motor and starts the block, brush or attachment in operation. Each time you release the triggers the safety switch will reset. You will need to follow the direction above to restart the machine.
CAUTION: When leaving the machine unattended, disconnect the wall plug and return the handle to the "locked" upright position to prevent accidental starting.
TOGUIDE YOUR FLOOR MACHINE
To move to the Right: Raise handle slightly. The higher the handle is lifted, the faster the machine will move to the right.
To move to the Left: To change direction, lower the handle until the machine travels to the left. The more the handle is lowered, the faster the movement to the left. If you are not experienced in the operation of this floor machine, practice in an open area away from any people, furniture or other obstacles.
DRIVE BELT ADJUSTMENT SC6045 ONLY
See Fig. 1
- Remove three (3) Phillips head screws holding the pad center grip.
- Remove four (4) large, slot head screws holding drive pad.
- Loosen pulley mount bolts with 9/16" deep socket wrench. Do not remove the bolts.
- Using a 1/2 box wrench, turn adjustment nut until it touches the adjustment bolt head. Turn the adjustment bolt to tighten or loosen the belt tension.
- Correct belt tension allows belt no more than 1/4 of side movement.
- Tighten the four (4) pulley mount bolts with the 9/16" socket wrench.
- Loosen the adjusting bolt until it is snug against adjustment stop molded in housing and turn adjustment nut against pulley mount bracket.
- Replace pad driver and pad center grip.
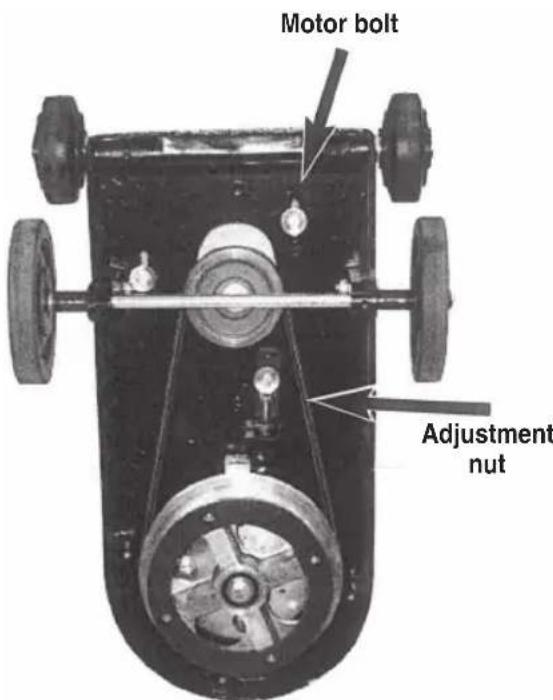
Fig. 1
TRANSPORTING THE FLOOR MACHINE
- Place the handle in the upright position.
- Lock the handle cam release lever.
- Tip the machine back and transport on the wheels.
MAINTENANCE GUIDE
Once a month remove the motor cover and vacuum out any dust or debris which has accumulated on the motor.
Replace the motor cover by setting it over the holes in the housing and replace all of the screws. Check and maintain the tightness of all the fasteners.
WARNING: Do not over-tighten the switch housing screws.
Keep the machine clean, especially at the handle tube and collar so the handle tube will move freely through the collar. Inspect the power cord for cuts, gashes, or loose prongs; replace as needed.
NOTE: Disassembly of this motor voids the warranty. Improper disassembly and assembly of this motor can permanently damage the field or rotor.
TROUBLESHOOTING

WARNING
To reduce the risk of fire, electric shock or injury, turn power OFF and disconnect plug from electrical outlet before performing maintenance or troubleshooting.
| Problem Possible | causes Remedies | |
| Machine does not run. | The circuit breaker has tripped. | The circuit breaker has tripped. Allow the circuit breaker 2 minutes to cool before resetting. |
| Plug is broken or has loose contact. | Replace. | |
| There is a circuit overload. | Check the pad and change it if it is rough or dirty. | |
| Spray buffing or spray cleaning is not a substitute for scrubbing or mopping a floor. | ||
| Prepare the floor surface before spray buffing. | ||
| Eliminate any extension cord that is smaller than 12/3 wire or greater than 25 feet in length. | ||
| Unplug anything other than the machine from the circuit or locate another circuit. | ||
| Machine will not start. | Circuit breaker is not reset. | Reset breaker. |
| Plug is broken or has a loose contact. | Replace. | |
| Circuit breaker is defective or weak. | Replace. | |
| Switch is defective. Replace switch. | ||
| Rectifier is defective. Replace rectifier. | ||
| Machine will not reach operating speed. | Unplug anything else other than the machine from the circuit or locate another circuit. | |
| Motor runs but brush or pad does not turn. | Coupling is broken. Note: Coupling is not covered under warranty. | Replace. Note: Do not attempt to place a running machine over a block or brush. Always install and remove the block or brush by hand. |
Read all instructions, warnings and cautions before using equipment
These guidelines are presented for your protection and convenience. Please read them carefully, since a failure to heed these precautions could result in discomfort or injury. When using an electrical appliance, basic safety precautions should always be followed.
WARRANTY
This warranty gives you specific legal rights, and you may also have other rights which may vary from state to state. If you need additional instruction regarding this warranty or have questions regarding what it may cover, please contact Sanitaire® Customer Service by E-mail, telephone or regular mail as described below.
Limited One-Year Warranty
Subject to the *EXCEPTIONS AND EXCLUSIONS identified below, upon receipt of the product Sanitaire will repair or replace (with new, refurbished, lightly used, or remanufactured components or products), at Sanitaire's option, free of charge from the date of purchase by the original purchaser, for one year any defective or malfunctioning part.
See information below on "If your Sanitaire product should require service".
This warranty does not apply to fans or routine maintenance components such as filters, belts or brushes. Damage or malfunction caused by negligence, abuse, neglect, unauthorized repair, or any other use not in accordance with the user guide is not covered.
Some states do not allow the exclusion or limitation of incidental or conse quential damages, so the above limitation or exclusion may not apply to you.
*EXCEPTIONS AND EXCLUSIONS FROM THE TERMS OF THE LIMITED WARRANTY
THIS WARRANTY IS EXCLUSIVE AND IN LIEU OF ANY OTHER WARRANTYES, EITHER ORAL OR WRITTEN. ANY IMPLIED WARRANTYES WHICH MAY ARISE BY OPERATION OF LAW, INCLUDING THE IMPLIED WARRANTYES OF MERCHANTABILITY AND FITNESS FOR A PARTICULAR PURPOSE, ARE LIMITED TO THE ONE-YEAR DURATION FROM THE DATE OF PURCHASE AS DESCRIBED ABOVE.
Some states do not allow limitations on how long an implied warranty last so the above limitation may not apply to you.
NOTE: Please keep your original sales receipt. It provides proof of date of purchase in the event of a warranty claim.
SERVICE INFORMATION
If your Sanitaire product should require service
You will find the nearest Sanitaire Authorized Service Center in your area online at sanitairecommercial.com under service locator or contact Sanitaire Customer Service.
If you need information about repairs or replacement parts, or if you have questions about your warranty, contact Sanitaire Customer Service.
Website:
9 a.m. - 8:30 p.m. EST
Sanitaire®
THE ULTIMATE TIME MACHINE
GUIA DEL USUARIO
DIAGRAMA DEL PRODUCTO
告