Titus - Fireplace Blumfeldt - Free user manual and instructions
Find the device manual for free Titus Blumfeldt in PDF.
User questions about Titus Blumfeldt
0 question about this device. Answer the ones you know or ask your own.
Ask a new question about this device
Download the instructions for your Fireplace in PDF format for free! Find your manual Titus - Blumfeldt and take your electronic device back in hand. On this page are published all the documents necessary for the use of your device. Titus by Blumfeldt.
USER MANUAL Titus Blumfeldt
Unit 6 Riverside Business Centre
Brighton Road
Shoreham-by-Sea
BN436RE
United Kingdom
SICHERHEITSHINWEISE

WARNING
Congratulations on purchasing this equipment. Please read this manual carefully and take care of the following hints to avoid damages. Any failure caused by ignoring the items and cautions mentioned in the instruction manual is not covered by our warranty and any liability. Scan the QR code to get access to the latest user manual and other information about the product

CONTENT
Safety Instructions 14
Product Overview 15
Hardware Contents 16
Assembly 16
Cleaning and Care 20
MANUFACTURER & IMPORTER (UK)
Manufacturer:
Chal-Tec GmbH, Wallstrasse 16, 10179 Berlin, Germany.
Importer for Great Britain:
Chal-Tec UK limited
Unit 6 Riverside Business Centre
Brighton Road
Shoreham-by-Sea
BN436RE
United Kingdom
SAFETY INSTRUCTIONS

WARNING
Risk of suffocation! This fire pit is for outdoor use only and shall not be used in a building, garage or any other enclosed area.
Toxic carbon monoxide fumes can accumulate and cause asphyxiation.
- This fire pit is not for commercial use.
- This fire pit should only be used by adults and all children and pets should be kept at a safe distance.
- Do not use petrol, white spirit, lighter fluid, alcohol or other similar chemicals to light a fire as a rapid increase in temperature could damage the fire pit. This fire pit is only suitable for use with charcoal, untreated wood or dry logs. Do not use coal.
- Do not use this fire pit until it is completely assembled and all parts are securely fastened and tightened.
- Do not use the fire pit on decking or any other flammable surfaces such as dry grass, wood chips, leaves.
- Always empty this fire pit after use. Leave a thin layer of ash to protect the bottom. Do not remove ashes or charcoal until they are completely and fully extinguished.
- Do not touch the fire pit until it is completely cooled unless you are wearing heat resistant gloves as it is hot when in use.
- Do not handle or move the fire pit when in use as it is hot.
- Do not attempt to store the fire pit until all ashes and charcoals are completely extinguished.
- Always use a safety tool and heat resistant gloves when adding or moving fuel.
- Do not leave a burning fire unattended.
- Fire hazard-Hot embers may emit while in use.
- Do not overload the fire pit with fuel. Do not add additional fuel until the fire burns down. If an portion of the fire bowl is growing red, it is overloaded.
- Do not burn fuel directly on the fire bowl base.
- Do keep the fuel away from the wall of the fire pit as the high temperature may damage it.
- Avoid breathing smoke from the fire and avoid getting it into your eyes.
- Always thoroughly inspect the fire pit before use.
- A slight discolouration of finish may occur after use.
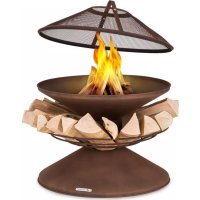
PRODUCT OVERVIEW

| A Chimney cap (1x) G Upper stove assembly | (bw) (1x) | |
| B Chimney mesh cover (1x) H Lower stove | bowl (1x) | |
| C Chimney body (1x) I Ash tray assembly | (1x) | |
| D Sliding door assembly (1x) J Leg (4x) | ||
| E Screen assembly (1x) K Poker (1x) | ||
| F Charcoal grid (2x) L Log rack assembly | (1x) |
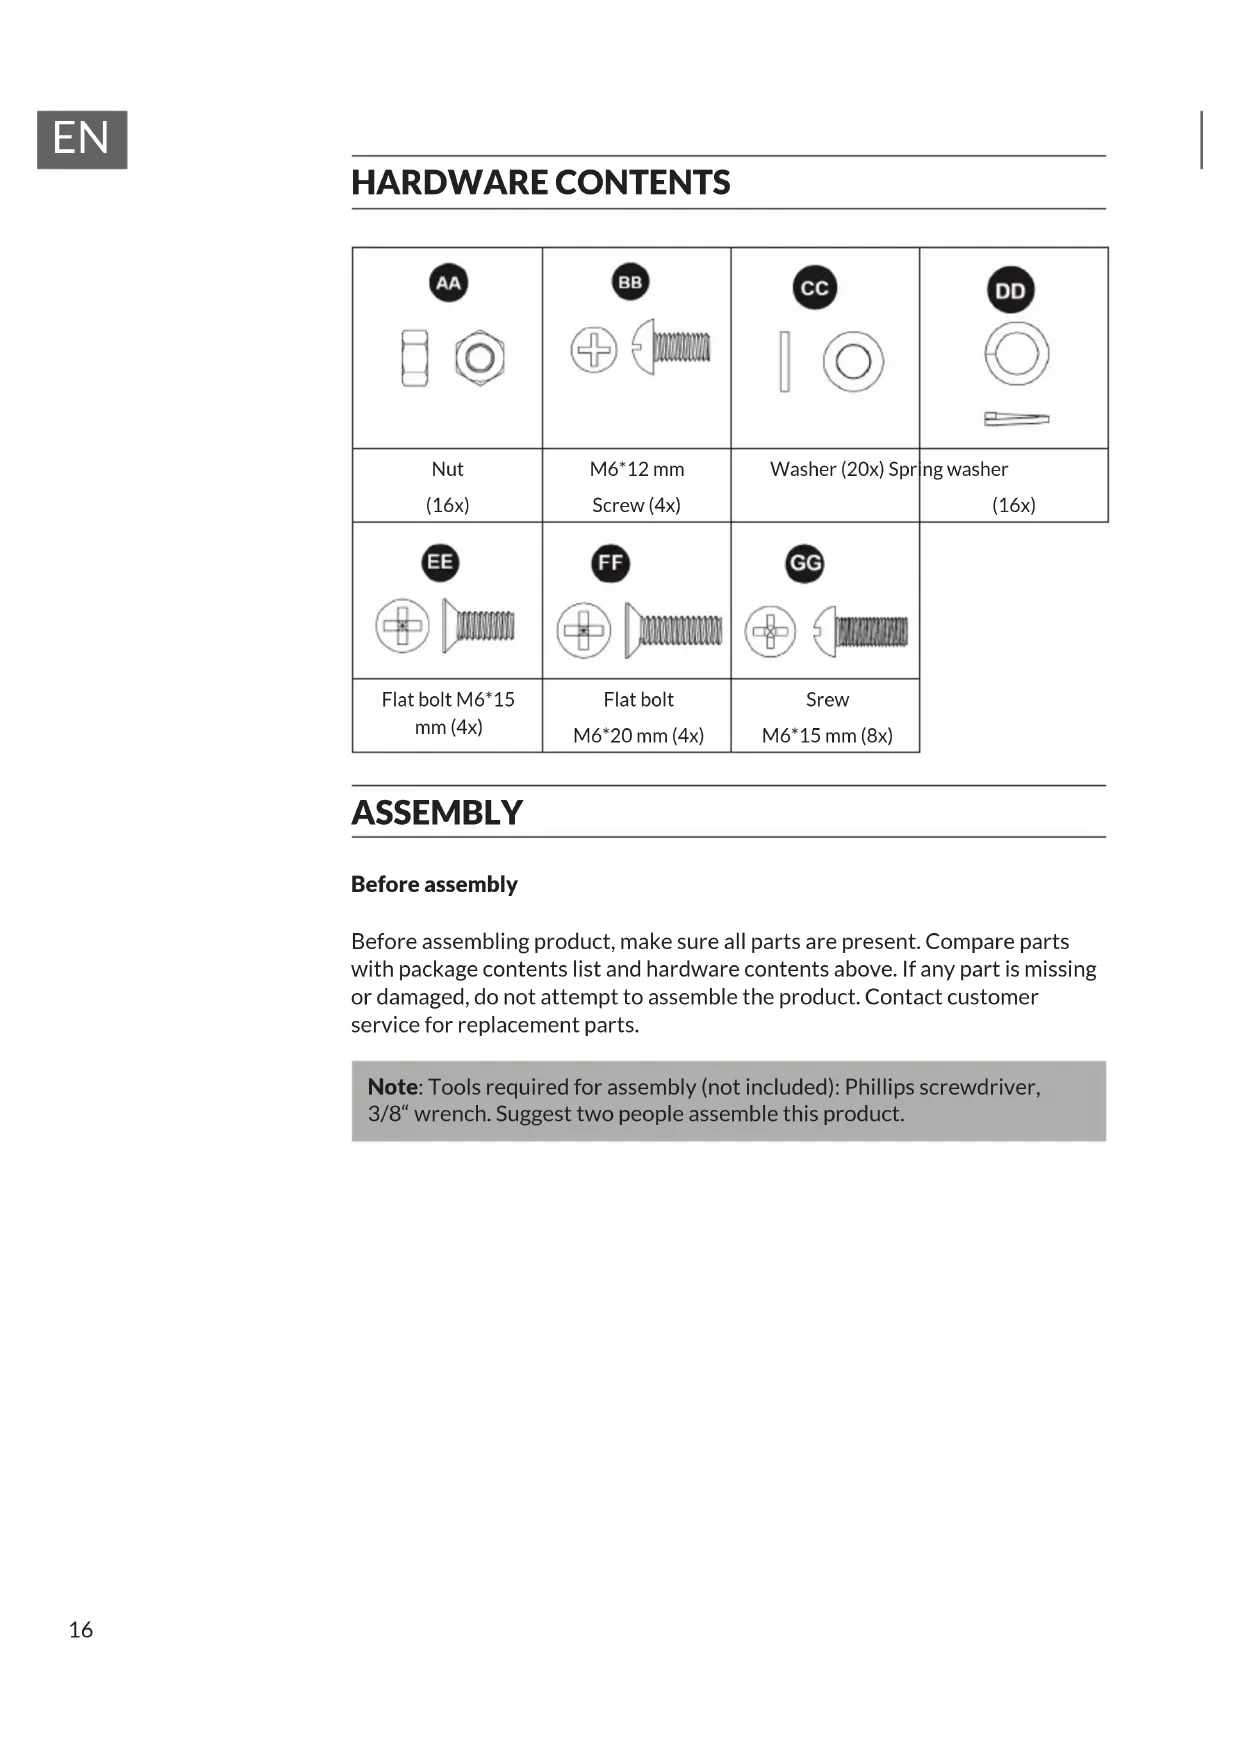
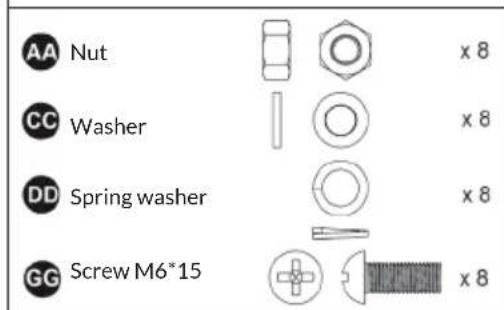
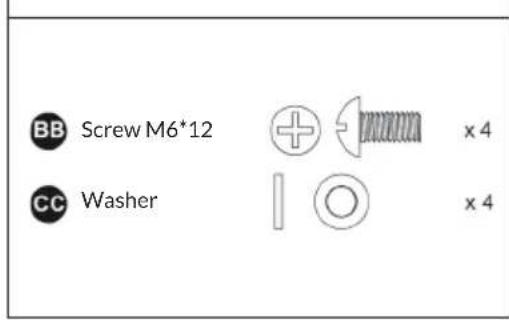
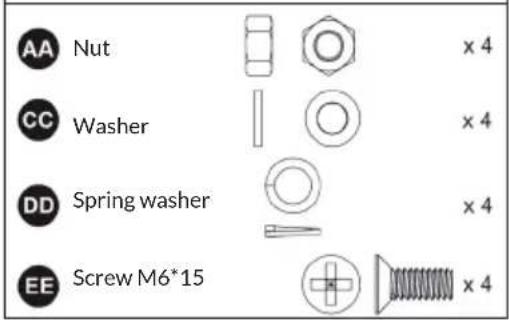
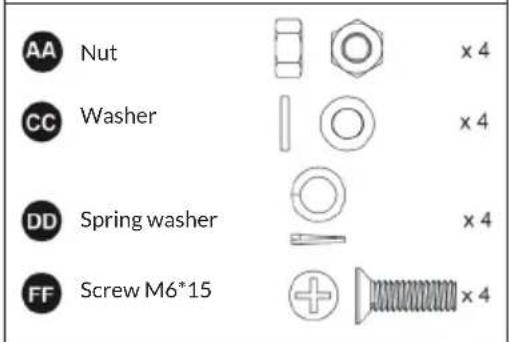
HARDWARE CONTENTS
| AA | BB | CC | DD |
| Nut (16x) | M6*12 mm Screw (4x) | Washer (20x) Spring washer (16x) | |
| EE | FF | GG | |
| Flat bolt M6*15 mm (4x) | Flat bolt M6*20 mm (4x) | Screw M6*15 mm (8x) |
ASSEMBLY
Before assembly
Before assembling product, make sure all parts are present. Compare parts with package contents list and hardware contents above. If any part is missing or damaged, do not attempt to assemble the product. Contact customer service for replacement parts.
Note: Tools required for assembly (not included): Phillips screwdriver, 3/8'' wrench. Suggest two people assemble this product.
Assembly
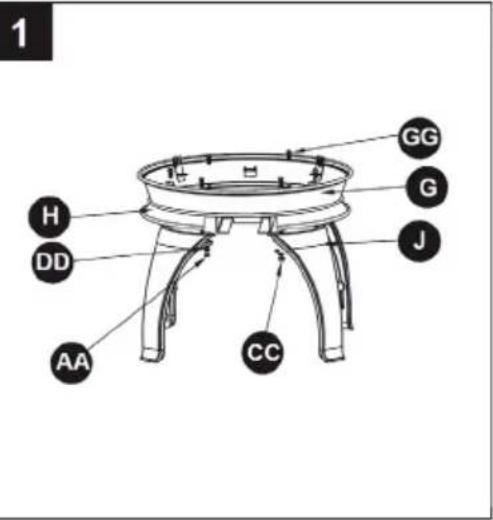
Line up the upper stove assembly (G) and lower stove bowl (H). Position the legs (J) beneath bowl (H) and attach using M6 x 15 mm bolts (GG), nuts (AA), washers (CC) and spring washers (DD).
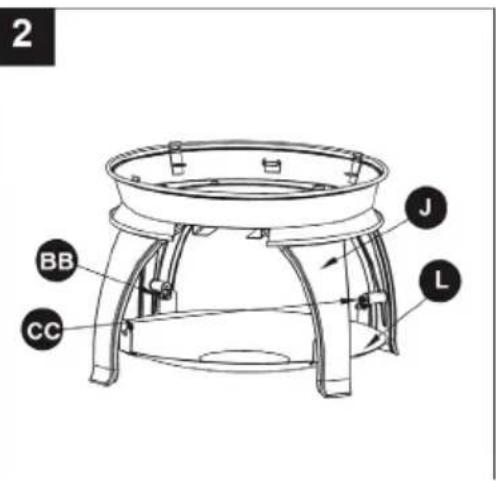
Place log rack assembly (L) in the center of unit and attach to legs (J) with M6 x 12 mm bolts (BB) and washers (CC).
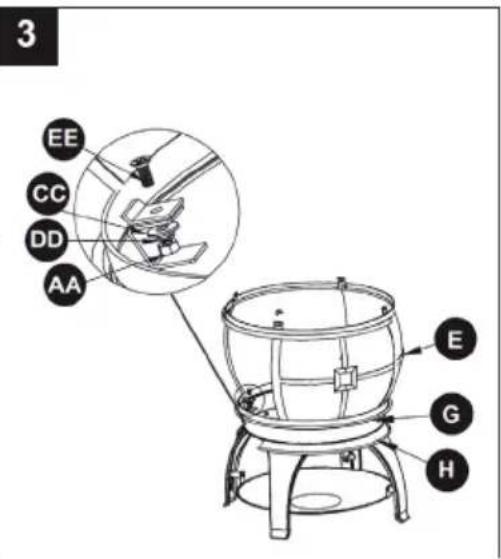
Align the door of screen assembly (E) and gap of lower stove bowl (H). Attach the smaller end of screen assembly (E) onto upper stove assembly (G) with washers (CC), spring washers (DD), nuts (AA), and M6 x 15 mm flat bolts (EE).

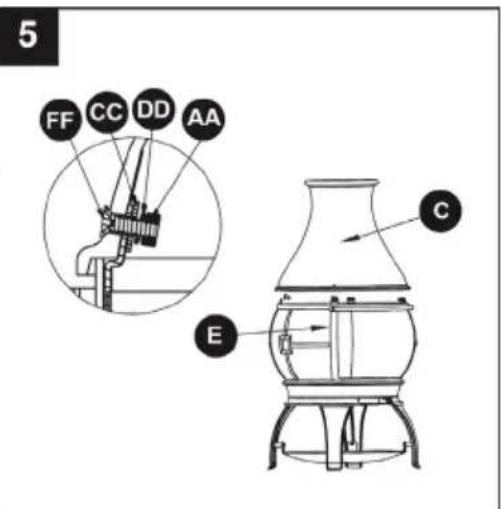
Attach chimney body (C) on the top of screen assembly (E) with washers (CC), spring washers (DD), M6 x 20 mm flat bolts (FF) and nuts (AA).
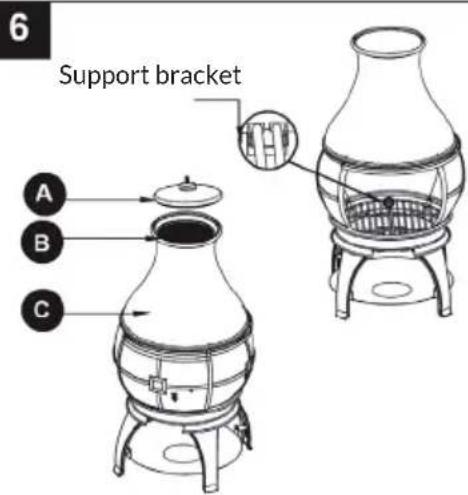
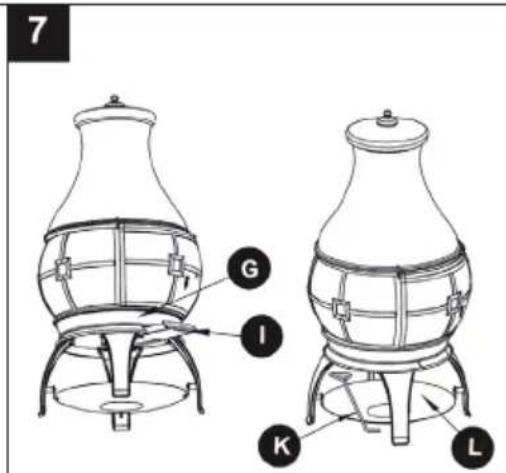
Place the charcoal grid (F) in upper stove assembly (G) and attach it onto the support bracket. Then place chimney mesh cover (B) and chimney cap (A) on top of chimney body (C).
Insert the ash tray assembly (I) into the track on upper Place the poker (K) on the log rack assembly (L).
Lighting instructions
Open the sliding door using the poker, and put the logs (less than 1.5kg ) on the charcoal grid.
Note: Make sure log does not extend to the charcoal grid edge, and the log height does not extend 35cm . The fire height should not extend 3/4 the height of screen.
Light dry wood chips under logs. Close the sliding door with poker.
CLEANING AND CARE
CAUTION
Risk of burns! Do not attempt to inspect this outdoor chiminea until the fire is completely out and cooled down.
Inspecting
Inspect this chiminea on a regular basis to ensure product safety and longer product life.
- Check handles to make sure they are secure.
- Check components for any signs of damage or rust.
- If you detect damage to any component, do not operate until you make repairs.
Cleaning
- Make sure the fire is completely out when you are no longer using the chiminea.
- Make sure the fire is completely out before you clean the ash tray. Sweep the ash into the ash tray, pull ash tray out and empty it.
- Use a damp cotton cloth to remove the smoke stain from the mesh cover and chimney cap. Clean this outdoor chiminea on a regular basis to promote safer experiences and longer product life.
Note: After repeated use, the finish may become discolored.
- Do not attempt to clean this outdoor chiminea until the fire is completely out and cooled down.
- Do not use oven cleaner or abrasive cleaners as they will damage this product.
- Do not clean any part of this outdoor chiminea in a self-cleaning oven as it may damage the finish.
- Wipe exterior surface with a mild dishwashing detergent or baking soda.
- For stubborn surface stains use a citrus-based degreaser and a nylon scrubbing brush.
- Rinse clean with water.
- Remove built-up creosote from components with a chiminea cleaning product.
Storage
Note: Do not move or store this outdoor chiminea until the fire is completely out and cooled down.
- Once the fire is out, (coals are cold and outdoor chiminea is cool to touch), remove ashes and properly dispose.
- Cover outdoor chiminea with the PVC cover (M).
- Store assembled in a location away from children and pets.
- If you do not use a cover, store this outdoor chiminea in a dry location to maximize product life.
Chere cliente, cher client,
Chal-Tec UK limited
Unit 6 Riverside Business Centre
Brighton Road
Shoreham-by-Sea
BN43 6RE
United Kingdom
CONSIGNES DE SECURITÉ

MISE EN GARDE
Unit 6 Riverside Business Centre
Brighton Road
Shoreham-by-Sea
BN43 6RE
United Kingdom

ADVERTENCIA
PRODUTTORE IMPORTATORE (UK)
Produtlore:
Chal-Tec GmbH, Wallstraße 16, 10179 Berlin, Germania.
Unit 6 Riverside Business Centre
Brighton Road
Shoreham-by-Sea
BN436RE
United Kingdom
AVVERTENZE DISICUREZZA