321 - Toilet DOMETIC - Free user manual and instructions
Find the device manual for free 321 DOMETIC in PDF.


| Product Type | Gravity-flush toilet for recreational vehicles |
| Brand | Dometic |
| Model | 321 |
| Series | 320 (low) |
| Bowl Material | Vitreous ceramic |
| Seat Material | Enameled wood |
| Base Material | Polypropylene |
| Water Valve Material | Polypropylene |
| Flush Ball Seal | Nitrile-butyl rubber |
| Seat Height | 13.5 in (343 mm) |
| Width | 15 in (381 mm) |
| Depth | 22 in (559 mm) |
| Overall Height (Lid Up) | 31 in (787 mm) |
| Required Water Pressure | 30–100 PSI (206.8–689.5 kPa) |
| Recommended Water Flow | 3–5 gal/min (11.4–18.9 l/min) |
| Water Inlet Connection | 0.5 in NPT |
| Floor Flange Inner Diameter | 3 in (76 mm) |
| Main Function | Pedal-operated gravity flush |
| Routine Maintenance | Clean regularly with a soft-bristle brush and non-abrasive cleaner (e.g., SeaLand) |
| Winterization | Use non-toxic antifreeze (propylene glycol) or completely drain water |
| Replacement Parts Available | Flush ball seal, water valve, anti-siphon device, seat, floor flange |
| Warranty | Limited warranty, contact Dometic (see full notice) |
Frequently Asked Questions - 321 DOMETIC
User questions about 321 DOMETIC
0 question about this device. Answer the ones you know or ask your own.
Ask a new question about this device
Download the instructions for your Toilet in PDF format for free! Find your manual 321 - DOMETIC and take your electronic device back in hand. On this page are published all the documents necessary for the use of your device. 321 by DOMETIC.
USER MANUAL 321 DOMETIC
Installation and Operation Manual ..... 2
FR
Cancer and Reproductive Harm www.P65Warnings.ca.gov
Attention Consumers: This product is intended to replace an existing toilet in your RV. If you are creating a new installation or planning a more complicated project, please consult a qualified service professional.
Service Center & Dealer Locations
Visit: www.dometic.com
Read these instructions carefully. These instructions MUST stay with this product.
Contents
1 Explanation of Symbols and Safety Instructions .... 2
2 Pre-Installation ....3
3 Installation....7
4 Operation....9
5 Maintenance ....10
6 Troubleshooting....15
7 Disposal 17
8 Warranty Information......17
1 Explanation of Symbols and Safety Instructions
This manual has safety information and instructions to help you eliminate or reduce the risk of accidents and injuries.
1.1 Recognize Safety Information

This is the safety alert symbol. It is used to alert you to potential physical injury hazards. Obey all safety messages that follow this symbol to avoid possible injury or death.
1.2 Understand Signal Words
A signal word will identify safety messages and property damage messages, and also will indicate the degree or level of hazard seriousness.

DANGER!
Indicates a hazardous situation that, if not avoided, will result in death or serious injury.

WARNING
Indicates a hazardous situation that, if not avoided, could result in death or serious injury.

CAUTION
Indicates a hazardous situation that, if not avoided, could result in minor or moderate injury.
NOTICE: Used to address practices not related to physical injury.
Indicates additional information that is not related to physical injury.
1.3 Supplemental Directives
To reduce the risk of accidents and injuries, please observe the following directives before proceeding to install, operate, or service this appliance:
- Read and follow all safety information and instructions.
- Read and understand these instructions before installing, operating, or servicing this product.
- The installation must comply with all applicable local or national codes, including the latest edition of the following standards:
U.S.A.
- ANSI/NFPA70, National Electrical Code (NEC)
- ANSI/NFPA 1192, Recreational Vehicles Code
- ANSI Z21.57, Recreational Vehicles Code
Canada
- CSA C22.1, Parts I & II, Canadian Electrical Code
– CSA Z240 RV Series, Recreational Vehicles
1.4 Personal and Product Safety
NOTICE: Failure to adhere to the instructions in the following statements could result in personal, product, and/or property damage.
-
Modifying this product may result in property damage.
• Always turn off the water supply before removing, installing, or repairing a plumbing fixture. -
Do not use chlorine or caustic chemicals, such as laundry bleach or drain-opening products, in the system. These products damage the seals in toilets and other plumbing valves.
- Do not flush foreign objects (paper towels, paper cups, diapers, sanitary napkins, etc.).
- Mechanical seal toilets are designed to only discharge directly into a holding tank. Avoid horizontal pipe runs (often found in conventional residential or commercial plumbing systems).
- The toilet bowl must be regularly cleaned and the system winterized according to the procedures in this manual, or your warranty coverage may be voided. Refer to "Performing Routine Toilet Cleaning" on page 11 and "Winterizing and Storing the Toilet" on page 12.
2 Pre-Installation
This section provides product information, including specifications, and helps you prepare to install your new toilet.
2.1 Intended Use
The Dometic 300, 310, and 320 Series Gravity-Flush Toilets are designed for use in recreational vehicles (RVs). These products are lightweight, residential-size toilets for installation directly above a holding tank.
The manufacturer accepts no liability for damage in the following cases:
• Faulty assembly or connection
- Damage to the product resulting from mechanical influences and excess voltage
• Alterations to the product without express permission from the manufacturer
- Use for purposes other than those described in the operating manual
Dometic Corporation reserves the right to modify appearances and specifications without notice.
The images are for reference purposes only. Parts and part locations may vary according to specific product models. Measurements may vary ±0.38 in. (10 mm).
2.2 Package Contents
This section shows the package contents provided with the toilet models. Actual package contents may vary. Refer to the complete parts list (available online at www.dometic.com) for additional information.
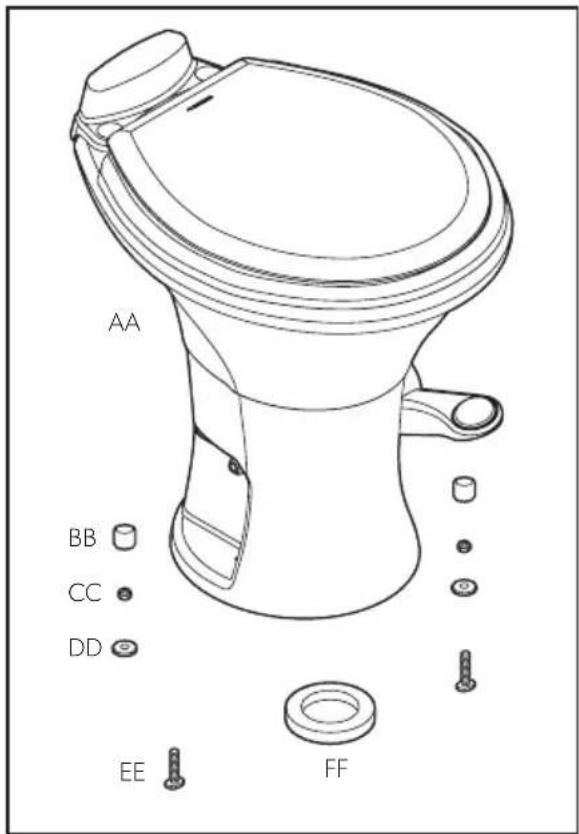
1 Contents
(AA) Assembled Toilet (DD) Floor Mounting Washer (x2)
(BB) Floor Mounting Cap (x2)
(CC) Floor Mounting Nut (x2)
(EE) Floor Mounting T-bolt (x2)
(FF) Floor Flange Seal
2.3 Model Identification
The toilet model identification label is located on the toilet base under the water valve. Have the information from this label ready, if contacting Dometic for service.

2 Model ID Label Location
2.4 Product Composition
| Toilet Bowl | Vitreous ceramic (310, 311, 320, 321 models) Polypropylene (300, 301 models) |
| Toilet Seat | Polypropylene (300, 301, 310, 311 models) Enameled wood (320, 321 models) |
| Flush Ball Seal | Nitrile butyl rubber |
| Toilet Base | Polypropylene |
| Foot Pedal | Polypropylene |
| Water Valve | Polypropylene |
| Vacuum Breaker | ABS/polypropylene |
| Floor Seal | Nitrile rubber, foam |
2.5 Toilet Dimensions
This section provides the product dimensions for both the standard-height and low-profile toilet models.
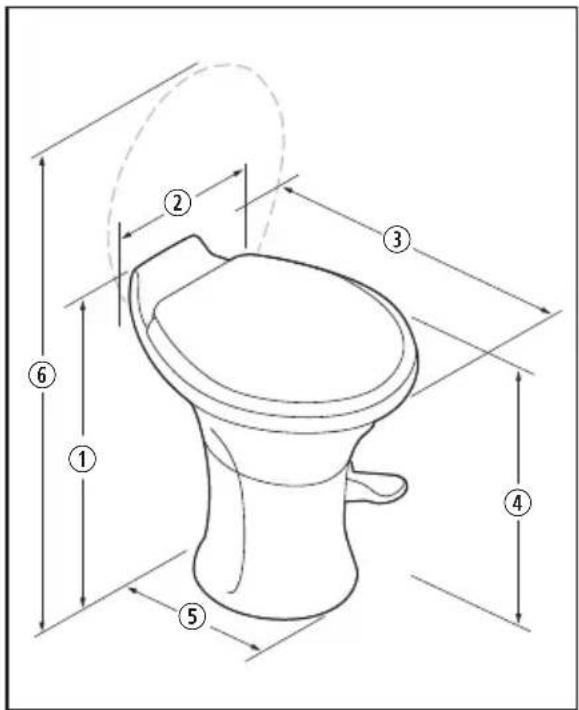
3 Product Dimensions: Both Heights
2.5.1 Standard-Height Toilet Dimensions
| Ref | 300Modelin. (mm) | 310Modelin. (mm) | 320Modelin. (mm) |
| 1 | 19.75(502) | 20 (508) 19.75(502) | |
| 2 | 16 (406) | 15 (381) 14.75 (375) | |
| 3 | 19.75(502) | 19 (483) 22 (559) | |
| 4 | SeatHeight:18.25(464) | SeatHeight:18 (457) | SeatHeight:18.25(467) |
| 5 | 13.25(337) | 14.75 (375) | 16 (406) |
| 6 | Seat LidUp:33.5(851) | Seat Lid Up:33 (838) | Seat Lid Up:35 (889) |
2.5.2 Low-Profile Toilet Dimensions
| Ref | 301Modelin. (mm) | 311Modelin. (mm) | 321Modelin. (mm) |
| 1 | 15.5 (394) | 15.25 (387) | 15 (381) |
| 2 | 16 (406) | 15 (381) | 14.75 (375) |
| 3 | 19.75 (502) | 19 (483) | 22 (559) |
| 4 | SeatHeight:14 (356) | SeatHeight:13.75 (349) | SeatHeight:13.5 (343) |
| 5 | 13 (330) | 14.75 (375) | 15.75 (400) |
| 6 | Seat Lid Up:30 (762) | Seat Lid Up:29.5 (749) | Seat Lid Up:31 (787) |
2.6 Installation Requirements
This manual will help you replace an existing toilet. To create a new location for your new toilet, contact a qualified service professional.
Verify that your existing toilet:
- Has a flexible water supply line coming through the floor or wall. If the line comes out of the floor, you will need an elbow adapter kit.
- Is attached to the floor with two bolts that are perpendicular to the back wall.
- If there are four bolts, you will need a Universal Mounting Kit, in the appropriate color.
- If you are changing the toilet orientation (the angle of the toilet to the room), you can use a Universal Mounting Kit, or remove the floor flange and install a new one in your preferred orientation.
- Is level with the floor. If the flange is installed in the sub-floor, you may need a taller seal than the one provided.
Make sure there is enough space for your new toilet. Compare the dimensions for your model listed in "Toilet Dimensions" on page 4 to the measurements listed in "Minimum Space Requirements" on page 5. Verify:
- The rough-in size (from the centerline of the flange to the back wall)
• The door swing clearance
- That the foot pedal, when depressed, will touch the same flat surface on which the toilet is installed.
For a more pleasant installation day, empty the holding tank before you begin.
2.6.1 Minimum Space Requirements

4 Required Clearances, Including Rough-In
| 1 | 300 Model: 8.5 (216) | 10 (254) 11 (279) |
| 301 Model: 8.75 (222) | ||
| 2 | 11 (279) | |
| 3 | 11 (279) | |
| 4 | Floor Flange | |
| 5 | Left Wall | |
| 6 | Back Wall | |
| 7 | Right Wall | |
2.6.2 Required Specifications
| Water Supply Fitting | 0.5 in. NPT |
| Static Water Pressure | 30-100 PSI (206.8-689.5 kPa) |
| Recommended Flow Rate ^1 | 3-5 gpm (11.4-18.9 lpm) |
| Minimum Flow Rate | 2 gpm (9.5 lpm) |
| Discharge Floor Flange ID | 3 in. (76 mm) |
| Discharge Floor Flange Thickness | 0.25-0.44 in. (7-11 mm) |
Water supply that exceeds 5.0 gpm (18.9 lpm) may require a flow restrictor at the toilet inlet.
2.7 Tools and Materials
Dometic recommends the following tools and materials to install the product:
Required Tools and Materials (Not Included)

Pliers,
Adjustable Wrench,
or Torque Wrench
Small Bucket
Putty Knife (to remove flange seal)
Optional Materials (Not Included)

4 - Floor Flange Screws (8 preferred)
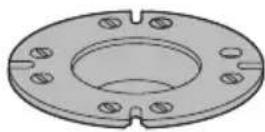
Floor Flange (must match the one you are replacing)

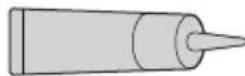
Screwdriver Caulk (if installed in a wet area)

natural_image
3D rendering of a pipe elbow joint (no text or symbols)Elbow Adapter (depends on water supply line)

Universal
Mounting Kit
3 Installation
Make sure to follow the recommended installation requirements in this manual.
This section provides instructions for removing an existing toilet, replacing the floor flange (if necessary), and installing your new toilet.
3.1 Removing an Existing Toilet
Follow these steps when replacing an older toilet, to prepare for the new installation:
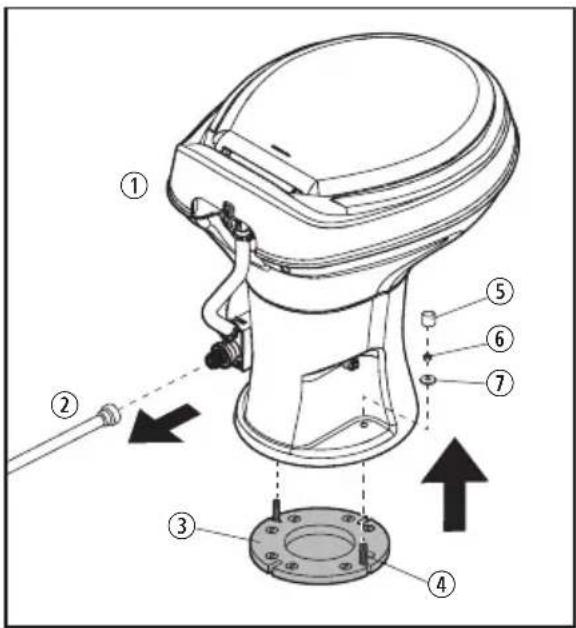
5 Removing an Old Toilet
① Old Toilet
⑤ Existing Mounting Cap
② Water Supply Line
⑥ Existing Mounting Nut
③ Existing Floor Flange
⑦ Existing Mounting Washer
④ Existing T-bolts
-
Turn off the water supply.
-
Disconnect and drain the water supply line.
-
Remove the existing floor mounting caps, floor mounting nuts, and floor mounting washers.
-
Lift the existing toilet off the bolts.
-
Remove and discard the existing floor mounting T-bolts.
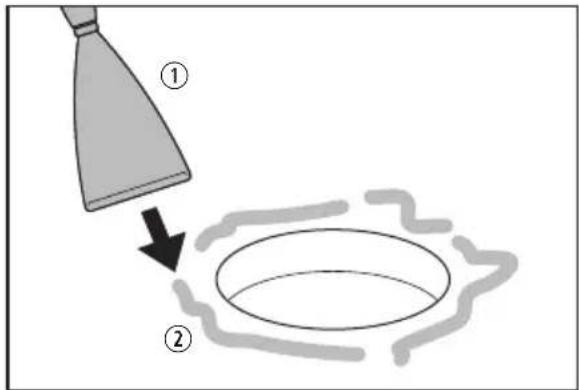
6 Removing the Existing Seal Material
① Putty Knife
② Old Seal Material
- Use a putty knife to remove and discard any existing seal material from the floor and the floor flange.
- Evaluate the floor flange. If it is damaged, remove it and install a new one, following the steps in "Installing a New Floor Flange" on page 7.
- If you are installing a Universal Mounting Kit, follow the instructions that came with the kit.
- Make sure the top surface of the floor is clean and free of any debris or sealant.
3.2 Installing a New Floor Flange
If you will use the existing floor flange, skip to "Installing the New Toilet" on page 8.
Consider engaging a qualified service professional if you must install a new floor flange.
- Remove the existing floor flange by unfastening and discarding the existing screws. If the floor flange is glued down, you may need additional tools to remove it.
-
Before fastening the new floor flange, refer to "Installation Requirements" on page 5 to verify:
-
The toilet mounting holes are located at your preferred orientation.
- The center of the floor flange is at least the recommended distance from the back wall for your toilet model.
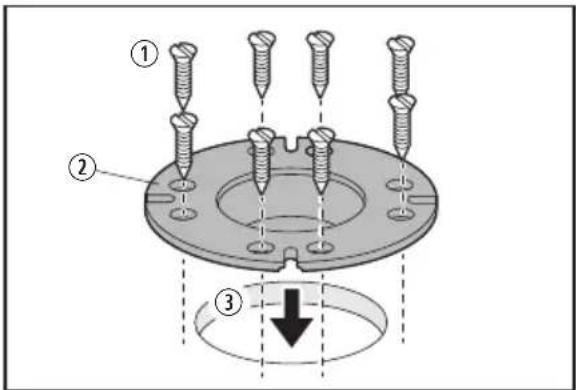
7 Installing the New Floor Flange
① Screws
③ Outlet hole
② New floor flange
- Place the new floor flange into the outlet hole and secure it to the floor with a minimum of four screws (eight are preferred).
3.3 Installing the New Toilet
Follow these steps to install your new toilet:
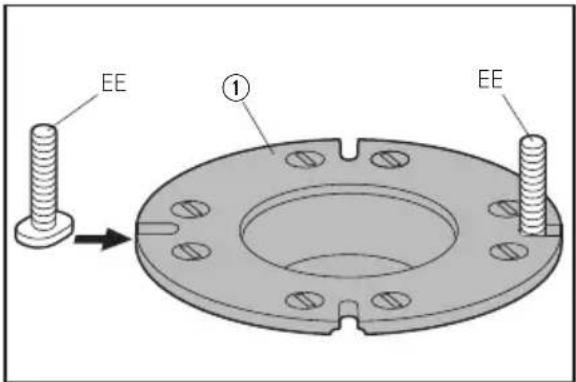
8 Inserting the T-bolts
① Floor flange
- Insert the new floor mounting T-bolts (EE) into the slots in the floor flange.

9 Installing the Floor Flange Seal (FF)
- Install the new floor flange seal (FF) to the base of the toilet (AA). On some models, it is already installed.
- Carefully position the toilet (AA) over the floor flange.
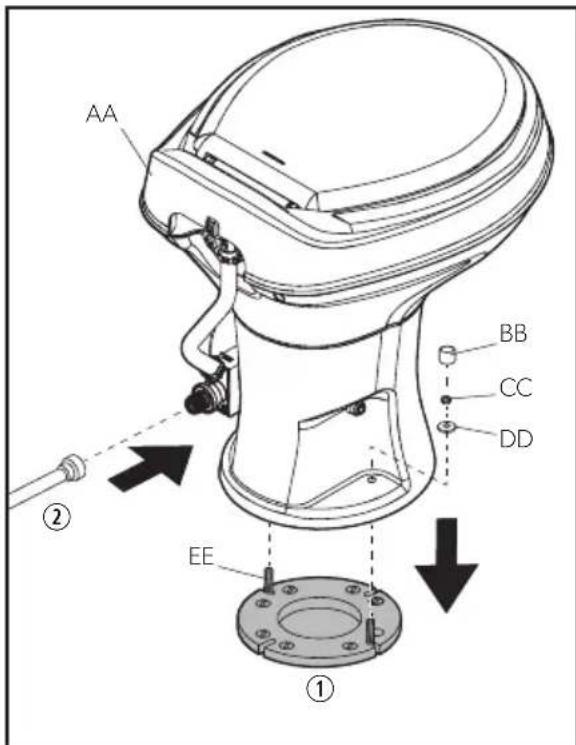
10 Securing the New Toilet
① Floor Flange
② Water Supply Line
- Align the holes in the toilet base with the floor mounting T-bolts (EE) as you lower the toilet (AA) onto the floor flange.
Be sure the entire outlet drain of the toilet base fits inside the floor flange outlet hole to avoid leaks.
The toilet base might not rest evenly against the floor yet. The floor flange seal (FF) will compress as you complete the following steps.
-
Place the new floor mounting washers (DD) and then the new floor mounting nuts (CC) onto the floor mounting T-bolts (EE).
-
Tighten the floor mounting nuts (CC). If a torque wrench is available, tighten them to 30–40 in. Ib (3.4–4.5 N·m). Do not overtighten. Alternate between sides when tightening to prevent distortion. When the floor-mounting nuts (CC) are tight, the base of the toilet (AA) should be securely attached and flat against the floor.
-
Attach the floor mounting caps (BB) onto the floor mounting nuts (CC).
If the toilet (AA) is being installed in a shower stall (or other wet area), apply a bead of caulk around the base of the toilet to prevent water seepage under the base.
- Connect the water supply line and torque the connection to 30–40 in. Ib (3.4–4.5 N·m). Do not overtighten.
If the water supply line comes out of the floor, install a 1/2 in. (13 mm) elbow fitting or adapter.
-
Turn on the water supply.
-
Flush the toilet several times and check for leaks. Refer to "Flushing the Toilet" on page 9.
-
Test for leaks by filling the bowl with water and letting it sit for an hour.
4 Operation
This section provides instructions on the proper use of these gravity-flush toilets.
4.1 Adding Water to the Bowl
Adding water to an empty bowl helps prevent holding tank odors from entering the living space. Adding water is recommended prior to flushing solids and toilet paper.
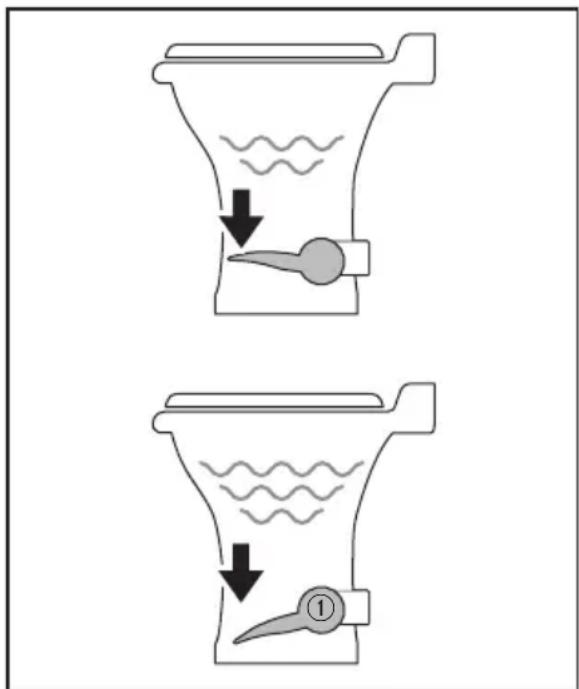
11 Partially Depressing the Flush Pedal
① Flush Pedal
- To add water to the toilet, depress the flush pedal part way. Water flows into the bowl while the flush ball remains closed.
- If the flush ball moves, let up on the pedal slightly.
4.2 Flushing the Toilet
NOTICE: Flush only water, bodily wastes, and rapid-dissolving toilet tissue. Do not flush foreign objects. Do not flush wet wipes, sanitary napkins, diapers, paper cups, cotton swabs, food, hair, or liquids such as oils or solvents. Failure to follow these instructions could cause clogging or damage to the toilet or the toilet system.
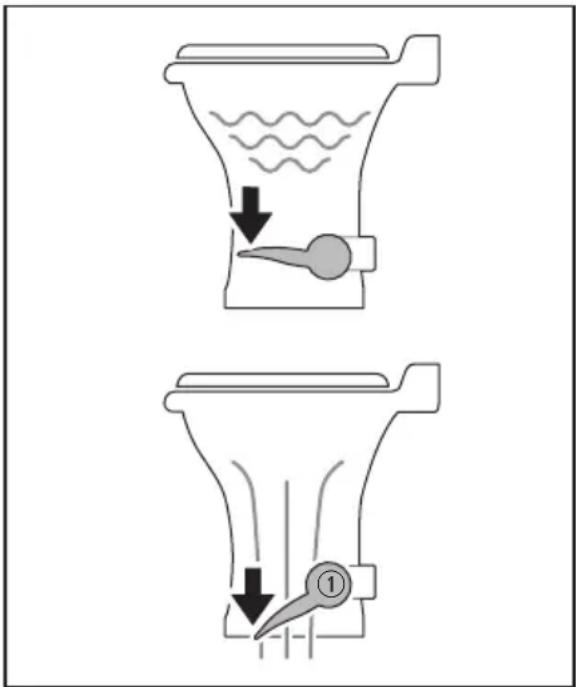
12 Fully Depressing the Flush Pedal
① Flush Pedal
- To flush, depress the pedal until it contacts the floor.
- Release the pedal after a complete flush.
- When flushing liquids, depress the pedal for approximately 1–2 seconds.
- When flushing solids, depress the pedal until the contents of the bowl rinses from the bowl. Flushing longer than necessary will cause the holding tank to fill too quickly.
A small amount of water will collect in the bowl after a flush to create an airtight seal.
Residual water trickle in the ceramic bowls: Due to the integrated rim of the models 310, 311, 320, and 321 toilets, water may continue to trickle into the toilet bowl for up to 20 minutes after flushing. If the water trickle continues after 30 minutes, replace the water valve. Refer to “Replacing the Water Valve” on page 14.
So that holding tank odors do not enter the living space, make sure 1 in. (24 mm) of water remains in the toilet bowl. Depending on the plumbing system and user operation, adding water may be required to achieve this water depth. Refer to "Adding Water to the Bowl" on page 9.
5 Maintenance
Properly cleaning, winterizing, and maintaining your toilet will increase its lifespan.
NOTICE: If this toilet ever requires service, read the following statements before servicing the product. Failure to follow these guidelines can cause product damage and can void your warranty coverage:
- Do not separate the ceramic bowl from the plastic base. Unlike other Dometic foot-pedal toilets, the bowl and base of the 300, 310, and 320 series toilets should not be separated for any reason.
- Do not remove the foot pedal from the base. This toilet has a factory-sealed bowl-to-base assembly.
- Do not disassemble the components.
- Refer to this manual and replacement kit instructions for maintenance and service information.
The toilet does not need to be removed from the vehicle (or unfastened from the floor) for basic repairs, like the flush ball seal replacement and water valve replacement.
If you need to call Dometic for assistance, have the exact model number available. Refer to "Model Identification" on page 4.
5.1 Serviceable Parts
This section shows the replacement parts for the toilet models. Actual available parts may vary. Refer to the complete parts list (available online at www.dometic.com) for additional information. To order parts, contact your local Dometic service partner or dealer.

13 300 Series Serviceable Parts
① Toilet Seat
⑤ Pedal Cover
② Flush Ball Seal
⑥ T-Bolts
③ Vacuum Breaker
⑦ Floor Flange Seal
④ Water Valve
⑧ Supply Hose
5.2 Maintenance Kits and Materials
These kits are available for purchase:
• 300/310/320 Series Toilet Water Valve Replacement Kit
- Flush Ball Seal Replacement Kit
• Vacuum Breaker Kit
Recommended for cleaning:
- SeaLand ^® Toilet Bowl Cleaner
- Soft bristle brush
• Rubbing alcohol (300/301 only)
Recommended for winterization/storage:
• Nontoxic antifreeze (propylene glycol)
Optional for troubleshooting:
• SeaLand Holding Tank Deodorant
- Silicone spray
5.3 Performing Routine Toilet Cleaning
For routine cleaning, use SeaLand toilet bowl cleaner. If this cleaner cannot be found in your area, contact Dometic for your nearest dealer. If the cleaner is not available, use a non-abrasive bathroom and toilet bowl cleaner. Follow label instructions.
For stubborn stains on model 300 and 301 toilet bowls, carefully use rubbing alcohol to wipe and remove the stain.
5.4 Cleaning the Flush Ball and Seal
After a period of time, mineral deposits from hard water may build up on the flush ball or seal, resulting in a slow water leak. To prevent this, periodically clean the flush ball and seal.

14 Cleaning Debris from the Flush Ball Seal
① Flush Ball Seal
② Flush Pedal
- Remove minor debris from the flush ball and seal by slowly depressing and releasing the flush pedal several times. This will loosen and rinse debris from the surfaces. Repeat several times for stubborn buildup.
- If step 1 does not fully clean the ball and seal, clean with a soft bristle brush and SeaLand toilet bowl cleaner.
– Fully clean the top of the flush ball and under the seal where it contacts the flush ball.
- After cleaning the underside of the seal, apply light, downward pressure to the top of the seal while brushing around the full perimeter of the seal.
If the ball pivot arm becomes dislodged while cleaning inside the base beneath the flush ball and seal, re-engage it into the pivot point. Refer to Figure 16 for the location of the pivot point.
If this procedure does not correct a leaking seal, it may require replacement. Detailed replacement instructions are included with the replacement flush ball seal kits.
5.5 Winterizing and Storing the Toilet

WARNING: POISON HAZARD.
Do not use automotive-type antifreeze (ethylene glycol) in freshwater systems. Failure to obey this warning could result in death or serious injury:

CAUTION: BODILY HARM HAZARD.
This toilet is not intended for use when exposed to temperatures below freezing. Failure to obey this caution could result in minor or moderate injury.
NOTICE: The toilet warranty expressly excludes coverage for any damages to the toilet or the vehicle that may occur due to improper winterization of the toilet. Freeze damage that results in leaks to the water valve is an indicator of improper winterization.
5.5.1 Preventing a Frozen Water Valve

15 Identifying a Damaged Water Valve
① Freeze Damage
② Water Valve Damage
These toilet water valves exceed the applicable standards for maximum water pressure as defined by the North American plumbing code agencies. However, if trapped water freezes in the piping that supplies water to the toilet, it expands and creates extremely high pressure that can damage the valve.
If the freeze damage indicator window (1) has white stress marks, it indicates freeze-damage. Water valve damage is due to severe exposure to below-freezing temperatures.
To avoid damage, winterize the toilet as described in this manual. If freeze damage occurs as a result of improper winterization, replace the water valve with a 300/310/320 series toilet water valve kit.
If the water valve is returned for a warranty claim, Dometic reserves the right to deny the claim if the problem is caused by freeze damage.
Use nontoxic antifreeze (propylene glycol) designated for potable water systems (See the vehicle owner's manual).
When a toilet may be exposed to temperatures below freezing, the toilet must be winterized using the "Non-toxic Antifreeze Winterization Method" on page 12 or the "Drain Water from the Toilet Method" on page 13. When a toilet is stored for long periods of time, or the water becomes stagnant, flush the system using the "Drain Water from the Toilet Method" on page 13.
5.5.2 Non-toxic Antifreeze Winterization Method
This is the recommended method.
- Pour non-toxic antifreeze into the potable water tank according to the instructions from the antifreeze manufacturer.
- Flush the toilet (several times) until the antifreeze has flowed completely through the toilet.
For toilets with a hand sprayer, the hand sprayer must be turned on for antifreeze to cycle through the sprayer.
5.5.3 Drain Water from the Toilet Method
- Turn off the water supply to the toilet.
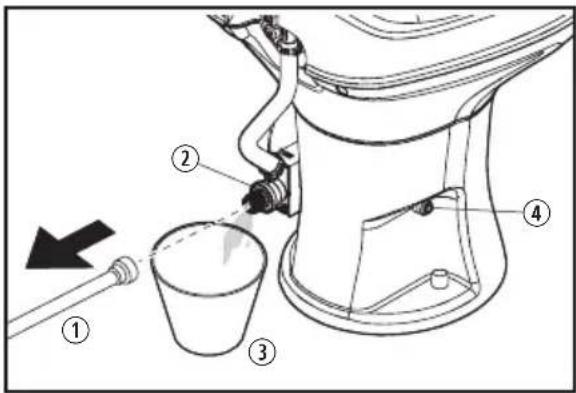
16 Removing the Water Supply
① Water Supply Line
③ Small Bucket
② Water Inlet Valve
④ Pivot Point for the Ball Pivot Arm
- Remove the water supply line from the water valve.
- Place a small bucket under the water valve inlet to catch draining water.
- Depress the flush pedal and allow water to completely drain from the water valve and vacuum breaker.
- Leave the water line disconnected until the threat of freezing temperatures is past.
NOTICE: Do not leave the RV unoccupied for extended periods of time with a municipal water supply connected, or with the onboard water pump turned on, when there is a possibility of freezing temperatures.
5.6 Replacing the Water Valve
Refer to the detailed replacement instructions in the water valve replacement kit before removing or installing a water valve assembly.
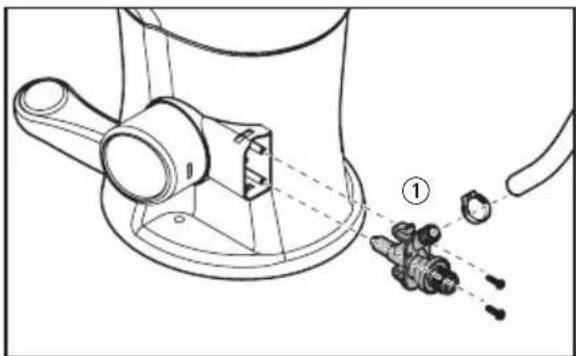
natural_image
Technical line drawing of a mechanical component with bolts and a hand adjusting it (no text or symbols)17 Removing the Water Valve Assembly
① Water Inlet Valve Assembly
In cold climates, be sure to follow the winterizing procedure in this manual to help avoid water valve failure.
5.7 Reconditioning the Flush Ball Seal
Each toilet is factory-tested to assure a watertight seal in the toilet bowl. This quality-assurance testing process requires a device to hold the flush ball open, which may temporarily distort the flush ball seal from its original shape. As a result, it may cause the flush ball seal to leak water into the holding tank during normal use.
If you discover a water leak into the holding tank, recondition the flush ball seal into its original shape.

18 Reconditioning the Flush Ball Seal
① Flush Ball Seal
② Flush Pedal
- Depress the pedal to hold the flush ball open, then lightly press down around the edge of the seal with a finger to conform the seal to the flush ball.
- Release the pedal.
- Keeping the flush ball closed, pour 1 qt (0.9 L) of hot tap water into the toilet bowl.
- Let the water cool completely.
If the toilet does not hold water in the bowl, refer to "Troubleshooting" on page 15 before you replace the flush ball seal.
5.8 Replacing the Flush Ball Seal
Refer to the detailed replacement instructions in the flush ball seal replacement kit before removing or installing the seal.

natural_image
Line drawing of a toilet sink with an open lid and internal components (no text or symbols)19 Removing the Flush Ball Seal
6 Troubleshooting
| Problem Possible Cause Suggested Remedy | ||
| Water will not stay in the bowl. | The flush ball seal is not properly positioned. | Refer to “Reconditioning the Flush Ball Seal” on page 13. |
| The flush ball seal's shape is temporarily distorted. | Refer to “Reconditioning the Flush Ball Seal” on page 13. | |
| The flush ball or flush ball seal is dirty. | Clean and seal the flush ball.Refer to “Cleaning the Flush Ball and Seal” on page 11. | |
| The flush ball seal is worn or defective. | Replace the flush ball seal.To replace the flush ball seal, refer to the detailed instructions included with the flush ball seal replacement kit. | |
| Water flow into the toilet will not stop. | The water valve is worn or defective. | Replace the water valve.Refer to “Replacing the Water Valve” on page 13. |
| Water does not enter the toilet bowl properly. | There is an insufficient water flow rate at the toilet inlet. | Make sure the flow rate at the toilet inlet is 3–5 gpm (11.4–18.9 lpm), which is the recommended rate. |
| The screen at the water valve inlet is clogged. | Clean the screen, on the inlet side, using a cotton swab or an old toothbrush. Do not disassemble the valve. | |
| The water valve is worn or damaged. | Replace the water valve.Refer to “Replacing the Water Valve” on page 13. | |
| There are plugged rim wash holes or a plugged rim jet (300 series only) in the toilet. | Clean the rim wash holes or rim jet. | |
| Odor emits from the toilet when the flush ball is open. | The holding tank vent is plugged. | Clear obstructions from the vent. Refer to the tank owner's manual. |
| The odor is from the holding tank contents. | Add deodorant to the holding tank. | |
| Odor emits from the toilet when the flush ball is closed. | There is no water in the bowl. | Add water to the bowl.Refer to “Adding Water to the Bowl” on page 9. |
| The flush ball seal is damaged. | Replace the flush ball seal.To replace the flush ball seal, refer to the detailed instructions included with the flush ball seal replacement kit. | |
| The floor flange seal is damaged. | Replace the floor flange seal.Refer to “Removing an Existing Toilet” on page 7 and “Installing the New Toilet” on page 8, using the existing toilet and a new seal throughout the procedures. | |
| The flush ball will not close completely. | There is too much friction between the flush ball and the seal. | Clean and lubricate the flush ball and flush ball seal with silicone spray or furniture polish. |
| The flush ball will not operate properly. | The ball pivot arm may have become dislodged when cleaning beneath the flush ball and seal. | Re-engage the ball pivot arm back into the pivot point. Refer to Figure 16 for the location of the pivot point. |
| The hand sprayer leaks. | The hand sprayer is defective. | Replace the hand sprayer.Refer to the hand sprayer owner’s manual. |
| Water is leaking from the water valve. | The water line connection is loose or not seated properly. | Make sure that the threads are not cross-threaded and tighten the connection. |
| The water valve is damaged or defective. | Replace the water valve.Refer to “Replacing the Water Valve” on page 13. | |
| Water is leaking from the toilet base. | The toilet is not secured to the floor. | Tighten the toilet mounting bolts.Follow the steps in “Installing the New Toilet” on page 8. |
| The floor flange seal is worn or defective. | Replace the floor flange seal.Refer to “Removing an Existing Toilet” on page 7 and “Installing the New Toilet” on page 8, using the existing toilet and a new seal throughout the procedures. | |
| Water is leaking from the rear of the toilet. | There is a loose vacuum breaker. | Make sure the vacuum breaker stem is pushed fully into the sealing grommet in the back of the bowl (310 and 320 series), or securely connected to the rim jet (300 series). |
| The vacuum breaker is damaged or defective. | Replace the vacuum breaker.Follow the instructions provided with the new vacuum breaker. | |
| The supply hose is damaged or defective. | Tighten the supply hose clamps.Replace the supply hose. | |
| The toilet bowl is cracked or defective. | Replace the toilet. | |
7 Disposal
Place the packaging material in the appropriate recycling waste bins, whenever possible. Consult a local recycling center or specialist dealer for details about how to dispose of the product in accordance with all applicable national and local regulations.
8 Warranty Information
Refer to the sections below for information about warranty and warranty support in the US, Canada, and all other regions.
8.1 United States and Canada
LIMITED WARRANTY AVAILABLE AT WWW. DOMETIC.COM/WARRANTY.
IF YOU HAVE QUESTIONS, OR TO OBTAIN A COPY OF THE LIMITED WARRANTY FREE OF CHARGE, CONTACT:
DOMETIC CORPORATION CUSTOMER SUPPORT CENTER 5155 VERDANT DRIVE ELKHART, INDIANA 46516 1-800-544-4881 OPT 1
8.2 All Other Regions
The statutory warranty period applies. If the product is defective, please contact the manufacturer's branch in your region (see the back of the instruction manual for the websites) or your retailer.
For repair and guarantee processing, please include the following documents when you send in the device:
• A copy of the receipt with purchasing date
- A reason for the claim or description of the fault
DOMETIC
SANITAIRE
TOILETTES

1 Contenu
natural_image
Simple 3D illustration of a pipe elbow joint (no text or symbols)natural_image
Technical illustration of a mechanical component with a hand and parts, showing assembly steps (no text or symbols)natural_image
Line drawing of a toilet sink with open lid and internal pump (no text or symbols)- CSA C22.1, Parts I & II, Canadian Electrical Code
– CSA Z240 RV Series, Recreational Vehicles
1 Contenido
natural_image
Simple 3D illustration of a pipe elbow joint (no text or symbols)natural_image
Technical line drawing of a mechanical component with bolts and a hand adjusting it (no text or symbols)natural_image
Line drawing of a toilet sink with open lid and internal components (no text or symbols)dometic.com/sales-offices

- Service Center & Dealer Locations
- Contents
- Explanation of Symbols and Safety Instructions
- Recognize Safety Information
- Understand Signal Words
- DANGER!
- WARNING
- CAUTION
- Supplemental Directives
- U.S.A.
- Canada
- Personal and Product Safety
- Pre-Installation
- Intended Use
- Package Contents
- Contents
- Model Identification
- Product Composition
- Toilet Dimensions
- Standard-Height Toilet Dimensions
- Low-Profile Toilet Dimensions
- Installation Requirements
- Minimum Space Requirements
- Tools and Materials
- Installation
- Removing an Existing Toilet
- Installing a New Floor Flange
- Installing the New Toilet
- Operation
- Adding Water to the Bowl
- Flushing the Toilet
- ① Flush Pedal
- Maintenance
- Serviceable Parts
- 300 Series Serviceable Parts
- Maintenance Kits and Materials
- Recommended for cleaning:
- Recommended for winterization/storage:
- Optional for troubleshooting:
- Performing Routine Toilet Cleaning
- Cleaning the Flush Ball and Seal
- Cleaning Debris from the Flush Ball Seal
- Winterizing and Storing the Toilet
- WARNING: POISON HAZARD.
- CAUTION: BODILY HARM HAZARD.
- Preventing a Frozen Water Valve
- Non-toxic Antifreeze Winterization Method
- Drain Water from the Toilet Method
- Replacing the Water Valve
- Reconditioning the Flush Ball Seal
- Replacing the Flush Ball Seal
- Disposal
- Warranty Information
- United States and Canada
- All Other Regions
- DOMETIC
- SANITAIRE
- TOILETTES
- Contenu
- Contenido
Brand : DOMETIC
Model : 321
Category : Toilet