
DS 5000 - Surveillance Camera Trevi - Free user manual and instructions
Find the device manual for free DS 5000 Trevi in PDF.

| Product Type | In-vehicle camera (dashcam) |
| Brand | Trevi |
| Model | DS 5000 |
| Screen Size | 2.2 inches LCD TFT |
| Battery Capacity | 180 mAh |
| Power Supply | USB 5V / 1A (cigarette lighter adapter included) |
| Compatible Memory Card | Micro SD up to 32 GB (class 6 or higher) |
| Maximum Video Resolution | Full HD 1080p (FHD, HD, VGA) |
| Maximum Photo Resolution | 8 megapixels |
| Viewing Angle | Not specified (fixed lens) |
| Main Features | Loop recording, motion detection, sentinel mode (parking), shock sensor (G-sensor), white balance, WDR compensation, time stamp |
| Audio Function | Internal audio recording (adjustable) |
| Mounting Type | Suction cup on windshield |
| Operating Temperature | -10°C to 50°C |
| File Storage | Playback and deletion via screen, PC connection in mass storage or webcam mode |
| Maintenance and Cleaning | Clean the lens with a soft, lint-free cloth. Keep the device away from moisture, dust, and magnetic fields. |
| Safety | Do not obstruct air vents. Keep away from heat sources. Disconnect if liquid enters inside. Respect privacy protection laws. |
| Spare Parts / Repairability | Battery removal reserved for specialized technician. No spare parts provided. |
| General Information | User manual available for free download (48 pages). Automatic on/off with vehicle. |
Frequently Asked Questions - DS 5000 Trevi
User questions about DS 5000 Trevi
0 question about this device. Answer the ones you know or ask your own.
Ask a new question about this device
Download the instructions for your Surveillance Camera in PDF format for free! Find your manual DS 5000 - Trevi and take your electronic device back in hand. On this page are published all the documents necessary for the use of your device. DS 5000 by Trevi.
USER MANUAL DS 5000 Trevi
Thank you for purchasing the product Trevi DV 5000. The information contained in this document is subject to change without notice.
This document may not be reproduced or transferred, even partially, in any way and by any means, electronic, mechanical, photocopied, nor copied or translated into other languages for any purpose without express permission from the manufacturer.
Names, designs and trademarks contained in this manual are the property of their respective owners.
Read carefully this instruction manual and the following information before installing and using the product.

CAUTION
Failure to follow the instructions below may result in serious or fatal overcrowding or accidents.
NOTICE ON THE INSTALLATION OF THE APPLIANCE IN THE VEHICLE
- When installing the device on a vehicle, always choose a safe position that does not obstruct the driver's vision and does not interfere with the vehicle controls; Do not place it near the steering wheel, shift lever, pedals or other controls.
- Do not place the appliance near or above the airbag.
- Do not place the appliance on the dashboard as it may not be optimal with the suction cup. (Spray for polishing dashboards or curved dashboards does not guarantee a good suction cup).
- Do not place the device without inserting the lock on the bracket.
- It is possible that the windshield mount does not remain attached to any condition, so we recommend that you do not place the support in points that can be easily distracted if the media is unplugged. Always keep the windscreen clean to ensure that the support can remain attached and check the windshield mount seal frequently
- Always follow common sense while driving and drive carefully. Do not distract yourself to watch the device and always pay close attention to driving. Reduce the shutter speed of the device while driving.
USAGE NOTES
This device is a precision electronic instrument; do not then use it in the following cases:
Near heat sources such as radiators and heaters.
- In an environment that is too cold or too hot.
- In very damp places, The appliance is not waterproof.
- In very dusty places. Dust contamination in the lens or other components may affect the quality of the video. Please keep the lens clean using a soft, dust-free cloth.
In environments immersed in magnetic fields.
- Please stop power if an abnormal phenomenon is found to avoid short circuits.
- Do not close the ear to the loudspeaker during step setting and volume adjustments, and in particular keep the volume at idle during power-up.
- Place the appliance so that there are enough free space on its sides for free air circulation (at least 5 cm).
- If liquids enter the appliance, disconnect the power plug immediately and bring the appliance to the nearest authorized TREVI service center.
- Always check before recharging the unit, that power and connection cables are properly installed.
- No naked flame sources such as lit candles should be placed on the appliance.
- The appliance must not be exposed to dripping or splashing, and no objects filled with liquid, such as pots, should be placed on the appliance.
- Keep this manual for future reference.
WARNING
- Respect national privacy law strictly. In some countries, taking photos or videos of people or vehicles with these devices may be considered as a breach of privacy. It is your responsibility to know and comply with the laws and the privacy laws of your country.
- Do not use this equipment for illegal purposes.
- Do not obstruct the ventilation slots.
- Do not remove the label on the appliance.
- Do not remove or try to remove the battery inside the appliance.
- The operating temperature of this device is -10^ 50^ . Continuous exposure to direct sunlight for a long period of time can cause malfunction, color distortion, distortion of the housing and image of the device, especially in vehicles parked when the cab temperature exceeds 70^ .
DESCRIPTION
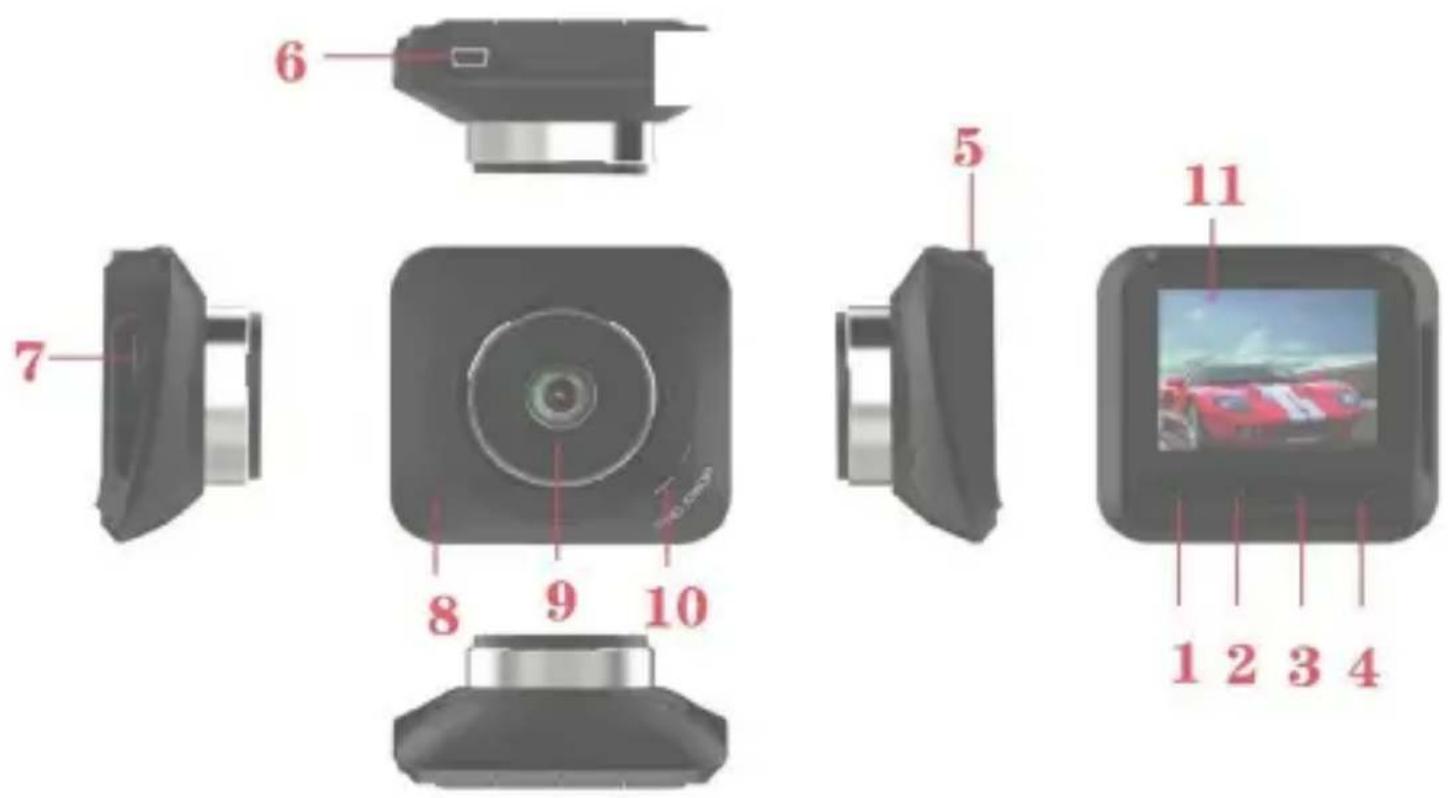
- On / off and confirmation button
- MENU button
3.Left/Upselectionkey - Right / down selection key
- Windscreen suction cup attachment point
- Mini USB socket. PC connection /
Power supply 5V --- IA.
- Micro-SD housing
- Reset button
- Lens
- Speaker
- LCD display
INSTALLATION OF THE DEVICE
Clean the windshield thoroughly before installing the device.
I. With the vehicle turned off, connect the car power cable (supplied) to a vehicle cigarette lighter socket.
2. Connect the other end of the power cable to the Mini USB socket (6) of the device.
3. Insert the support bracket into the slide (5) of the unit.
4. Press the suction cup of the support bracket onto the windscreen and secure it by pressing the lever on the base of the suction cup in the direction of the windscreen.
5. Adjust the correct position of the chamber and lock it by turning the ring nut near the slide support (5) anticlockwise.
Note:
- The device must be mounted on the windshield as indicated above, the upside down or
lateral installation causes the recording of the upside down or lateral videos.
- Switch on the vehicle. When the device is connected to a cigarette lighter socket, the device automatically turns on when the vehicle is turned on. When you unplug the power cord or turn off the car, the appliance will automatically save the current file and turn off with a delay of a few seconds.
INSERTING A MEMORY CARD
Before turning on and using the device, you need to install a memory card.
I. Insert a Micro SD memory card in the slot (7) of the device, paying attention to the correct insertion side (electrical contacts facing the lens).
2. Press it towards the bottom until you hear a "Click" and it is blocked inside.
3. To remove the memory card, press it towards the bottom until you hear a "Click" and it is unlocked.
Note:
- Insert the Micro SD card correctly to avoid damage to the card or device.
- Format the micro SD card (delete all files) before inserting it into the device. We recommend backing up important files before formatting the card.
- We suggest backing up the micro SD card files once a week. This product is not a permanent storage device, so please back up important files to avoid deleting them.
MANUAL SWITCHING ON / OFF
I. POWER ON
Press and hold the ON / OFF button (I) for 3 seconds. The appliance will switch on in pause mode. To start recording, press the button (I). The blue led operating indicator will begin to flash.
2. POWER OFF
Press and hold the ON / OFF button (1) for 3 seconds to switch off the appliance. Note: With low battery, the word "Low battery" will appear on the display, the appliance will automatically save the current file and then turn off.
CHARGING THE BATTERY
It is possible to recharge the battery:
I. Via USB / Mini USB cable connected to external power supply or computer
2. By means of power supply cable for car lighter socket provided
Note: During charging, the red indicator LED will turn on and off automatically when fully charged.
VIDEO RECORDING
When the vehicle is turned on, the camera will automatically turn on and video recording will begin (blue LED flashing). Press the button (I) to stop recording and save the current file, then the appliance will enter standby mode (steady blue LED). In standby mode, press the button (I) to restart recording.
Press it again to stop recording.
During recording, after a certain time, the display will turn off (energy saving mode); to reactivate the display, press any key.
During recording, by long pressing the MENU button (2) you can take a photo.
During recording, the display shows the current time and date while the top shows the active functions and the recording time.
PHOTO
In standby mode, long press the MENU button (2) to enter photo mode. Press the button (1) to take photos.
The display shows the current time and date while the top shows the active functions and the number of photos that can be saved in the available memory.
PLAYING AND DELETING FILES
In photo mode, long press the MENU button (2) to enter the playback mode.
- Press the (3) or (4) button to select the desired file (photo or video).
- Press the button (I) to start playing a video or press it again to pause.
- Various operations are available on recorded photos and videos, press the MENU button (2) to access the file management menu:
- Delete a file (Delete current), deletes the file being played
- Delete all unprotected files (Delete all).
- Protect files (Lock one), activate the delete protection for the file being played.
- Remove file protection (Unlock one), deactivate the delete protection for the
file being played.
-
Remove protection from all files (Unlock all), deactivate the cancellation protection for all files.
-
Use the (3) or (4) keys to select the desired function.
- Press the key (I) to confirm.
- Press the MENU button (2) to exit the menu and return to the play mode.
Note: Deleted videos are not recoverable
MENUDDESCRIPTION
With the camera in standby, press the MENU button (2) to access the settings menu (the menu items are indicated in English as default):
Video resolution: selection of video resolution (FHD, HD, VGA)
Camera resolution: camera resolution selection (1, 2, 3, 5, 8 M)
ISO: selection of the ISO sensitivity (Auto, 100, 200, 400) of the sensor
Loop recording: activation of the loop recording (when the memory space is exhausted, the oldest video files are deleted if not protected) otherwise, when the space is full, it is not possible to make further recordings (Off = function off, 1, 2, 3, 5 minutes = duration of video files).
White balance: adjustment of the white balance. It is possible to select from: Auto, daylight (daylight), cloudy (cloudy sky), tungsten (tungsten lamp lighting), fluorescen (fluorescent lamp lighting).
Exposure: exposure adjustment (-3, -2, -1, 0, +1, +2, +3)
Motion detection: activation of the motion sensor
Recording: activation of the interior audio during recording
Sentry mode (Parking mode): automatic recording in case of impact / vibration with the vehicle off.
WDR (Wide dynamic range): automatic background light compensation
Date stamp: storage of the date / time on photos and videos
Shock sensor: activation of file protection following shock / vibration (Off, High, Medium, Low)
Beep sound: activation of the tone when the keys are pressed
Date / time: adjustment of the date / time
Auto power off: automatic shutdown adjustment after a certain time of inactivity (Off, 10, 20, 30 seconds)
Language: system language selection (English default)
Frequency: frequency of the mains power supply
Auto display off: adjustment of the time after which the display switches off automatically during recording (Off, 30 seconds, 1, 2 minutes)
Format: formatting of the memory card
Reset: resetting all values to the factory values
Version: firmware version
MOTION DETECTION
When the device detects moving objects, it starts recording. If there are no movements for about 10 seconds, the device will stop recording and enter the motion detection mode. The device will start recording again when it detects any other movement.
To activate this function, in standby press the MENU button (2) and tick the Motion Detection function.
SHOCK SENSOR
In video mode, if the machine suddenly brakes or is violently hit, the G-sensor will activate to prevent the current video clip from being overwritten. In the settings it is possible to completely deactivate it or choose the degree of sensitivity of the sensor according to the three levels provided (high, medium, low).
SENTRY MODE
When the vehicle is parked with the engine off, this function allows the video camera to record for 30 seconds following a strong vibration or impact suffered by the vehicle. With this function active, the camera is powered by the internal battery, make sure that it is charged.
CONNECTION TO THE PC
Download Photos and Videos to PC:
- Connect the USB cable to the computer and the other end to the device. The screen will display the categories to choose from: Mass storage, PC Camera, REC mode.
- If you select the Mass Storage option, the device screen will show a pendrive icon. MicroSD memory will be recognized by the computer as mass storage.
- Use your computer to view and manage the files within it.
- If PC Camera is selected, the device can be used as a webcam, the device screen will show a camera icon. Wait a few seconds for the driver installation, after which it is possible to use the device as a webcam on the main video calling software.
- If you select REC mode, the appliance will function normally as a dash cam. Note: Incorrect operations could cause the device to temporarily block. If this should happen, use the small uppuncted object and insert it in the hole (8) to press the reset button. The appliance will automatically restart.
TECHNICAL SPECIFICATIONS
Display Size: 2.2 "TFT LCD
Viewing angle: 120° ultra wide viewing angle
Video resolution: 1920×1080 (interpolated), 1280×720P, 640×480
Video format: AVI / MJEG
Image format:.JPG
Micro-SD card slot: Max. 32GB (class 6 or higher)
USB power supply: 5V IA
Back up battery capacity: 180mAh
Dimension: 66,5x71x33mm
Weight: 77g
INFORMATION ON THE REMOVAL AND DISPOSAL OF BATTERIES
Attention: This operation is reserved exclusively for specialized technical staff!
BATTERY REMOVAL PROCEDURE
Operate only in the absence of connection of the appliance to the power supply!
I. Work with a thin object to release the plastic clips and separate the front and rear furniture.
2. Locate the battery;
3. Disconnect the battery and remove it.
DISCLOSURE OF BATTERY DISPOSAL
Whatever the type of exhausted battery, it must not be thrown into household waste, in fire or in water. Keep the battery away from heat sources. Any type of exhausted battery must be recycled or disposed of at the specific dedicated collection centers.

Precautions for correct disposal of the product.
The symbol shown on the equipment indicates that waste must be disposed of in "separate collection" and so the product must not be disposed of together with urban waste.
The user must take the product to special "separate waste collection centres" provided by local government, or deliver it to the retailer against the purchase of a new product.
Separate collection of waste and subsequent treatment, recycling and disposal operations promotes the production of equipment with recycled materials and limits negative effects on the environment and on health caused by improper handling of waste.
Illegal disposal of the product leads to the enforcement of administrative penalties.
BIENVENUE
Angle de vision: ......ultra large 120°
Résolution video: 1920x1080 (interpolé), 1280x720P, 640x480
Format video: AVI / MJEG
Format d'image:.JPG
Dimension: 66,5x71x33mm
Poids: 77g
INFORMATIONS SUR LE RETRAIT ET L'ELIMINATION DES PILES

- CAUTION
- NOTICE ON THE INSTALLATION OF THE APPLIANCE IN THE VEHICLE
- USAGE NOTES
- WARNING
- DESCRIPTION
- INSTALLATION OF THE DEVICE
- INSERTING A MEMORY CARD
- Note:
- MANUAL SWITCHING ON / OFF
- POWER ON
- POWER OFF
- CHARGING THE BATTERY
- VIDEO RECORDING
- PHOTO
- PLAYING AND DELETING FILES
- MENUDDESCRIPTION
- MOTION DETECTION
- SHOCK SENSOR
- SENTRY MODE
- CONNECTION TO THE PC
- Download Photos and Videos to PC:
- TECHNICAL SPECIFICATIONS
- INFORMATION ON THE REMOVAL AND DISPOSAL OF BATTERIES
- BATTERY REMOVAL PROCEDURE
- DISCLOSURE OF BATTERY DISPOSAL
- Precautions for correct disposal of the product.
- BIENVENUE
- INFORMATIONS SUR LE RETRAIT ET L'ELIMINATION DES PILES
Brand : Trevi
Model : DS 5000
Category : Surveillance Camera