
HI1153T - Washing machine ASKO - Free user manual and instructions
Find the device manual for free HI1153T ASKO in PDF.
| Product type | Washing machine |
| Brand | Asko |
| Model | HI1153T |
| Washing capacity | 7 kg |
| Maximum spin speed | 1400 rpm |
| Energy class | A+++ |
| Height | 85 cm |
| Width | 60 cm |
| Depth | 60 cm |
| Net weight | 75 kg |
| Power supply | 230 V / 50 Hz |
| Rated power | 2200 W |
| Main functions | Programs: Cotton, Synthetics, Delicate, Quick, Eco, Wool, Rinse, Spin, Drain |
| Options | Delayed start, Prewash, Extra rinse, Anti-crease |
| Safety | Child lock, Overflow protection, Foam detection, Door lock |
| Maintenance and cleaning | Cleaning the filter, draining the pump, cleaning the door seal |
| Spare parts and repairability | Available from Asko customer service |
| User manual | Included and available online |
Frequently Asked Questions - HI1153T ASKO
User questions about HI1153T ASKO
0 question about this device. Answer the ones you know or ask your own.
Ask a new question about this device
Download the instructions for your Washing machine in PDF format for free! Find your manual HI1153T - ASKO and take your electronic device back in hand. On this page are published all the documents necessary for the use of your device. HI1153T by ASKO.
USER MANUAL HI1153T ASKO
natural_image
Pure technical line drawing of structural components without any text, numbers, or symbolsInstructions for use of a hidden helper EN
Installing a Hidden Helper between a washing machine and a dryer 5
Installing a Hidden Helper onto the appliance 6
Using a Hidden Helper 7
Adjusting and fixing the ironing board (before first use) 8
SV - SÄKERHETSANVISNINGAR 9
Please read the instruction manual and save it for future reference.
To reduce the risk of fire, electric shock or injury to persons during the use of your appliance, follow the basic precautions, including the following:
- Before using the product for the first time, please read all instructions and save them for future reference.
- Instructions for use are available on our website at www.asko.com.
- The product is intended solely for household use.
- Do not repair and do not attempt to replace any part of the product or to service it in any other way, unless this is expressly recommended in the instructions for use and maintenance or in the instructions for user repairs. Also, do not attempt any repairs or servicing if you do not understand the instructions entirely or if you lack the skills for such repairs.
- Any product repair and maintenance pertaining to safety or performance should be done by trained experts.
- In case of incorrect use or product servicing by an unauthorized person, the user shall be solely responsible for covering any damage or expenses.
- Do not allow children to play with the product or on the product. Watch children closely when you are using the product near them.
- The product is not intended for use by persons (including children) with impaired physical or mental capabilities or lack of experience and knowledge. Such persons should be instructed on safe use of the product by the person responsible for their safety.
- Do not let children younger than three years to come near the appliance, unless they are under constant supervision.
- Do not install or store the product in places where it could be exposed to the elements.
The following symbols are used throughout the manual and they have the following meanings:
| Information, advice, tip, or recommendation | |
| Warning – general danger | |
| Warning – danger of electric shock |
INSTALLING A HIDDEN HELPER BETWEEN A WASHING MACHINE AND A DRYER

The hidden helper may only be used with a washing machine and a dryer by the manufacturer Asko Appliances.
natural_image
Simple line drawing of a bench or bench with no text, numbers, or symbols
natural_image
Diagram showing a mechanical device with a lever and directional arrow, no text or symbols present
natural_image
Diagram showing a car with upward arrows and a ladder extending into a structure (no text or symbols)
natural_image
Diagram showing mechanical assembly with arrows indicating motion, no text or symbols present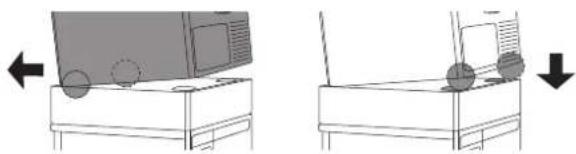
natural_image
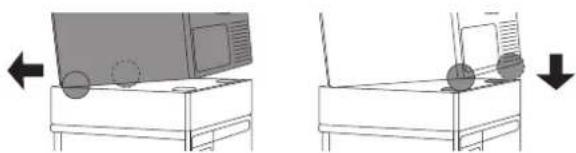
Diagram showing two views of a computer monitor with a mouse, one with an arrow indicating left and the other with a circle (no text or symbols)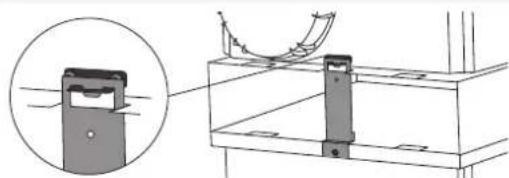
natural_image
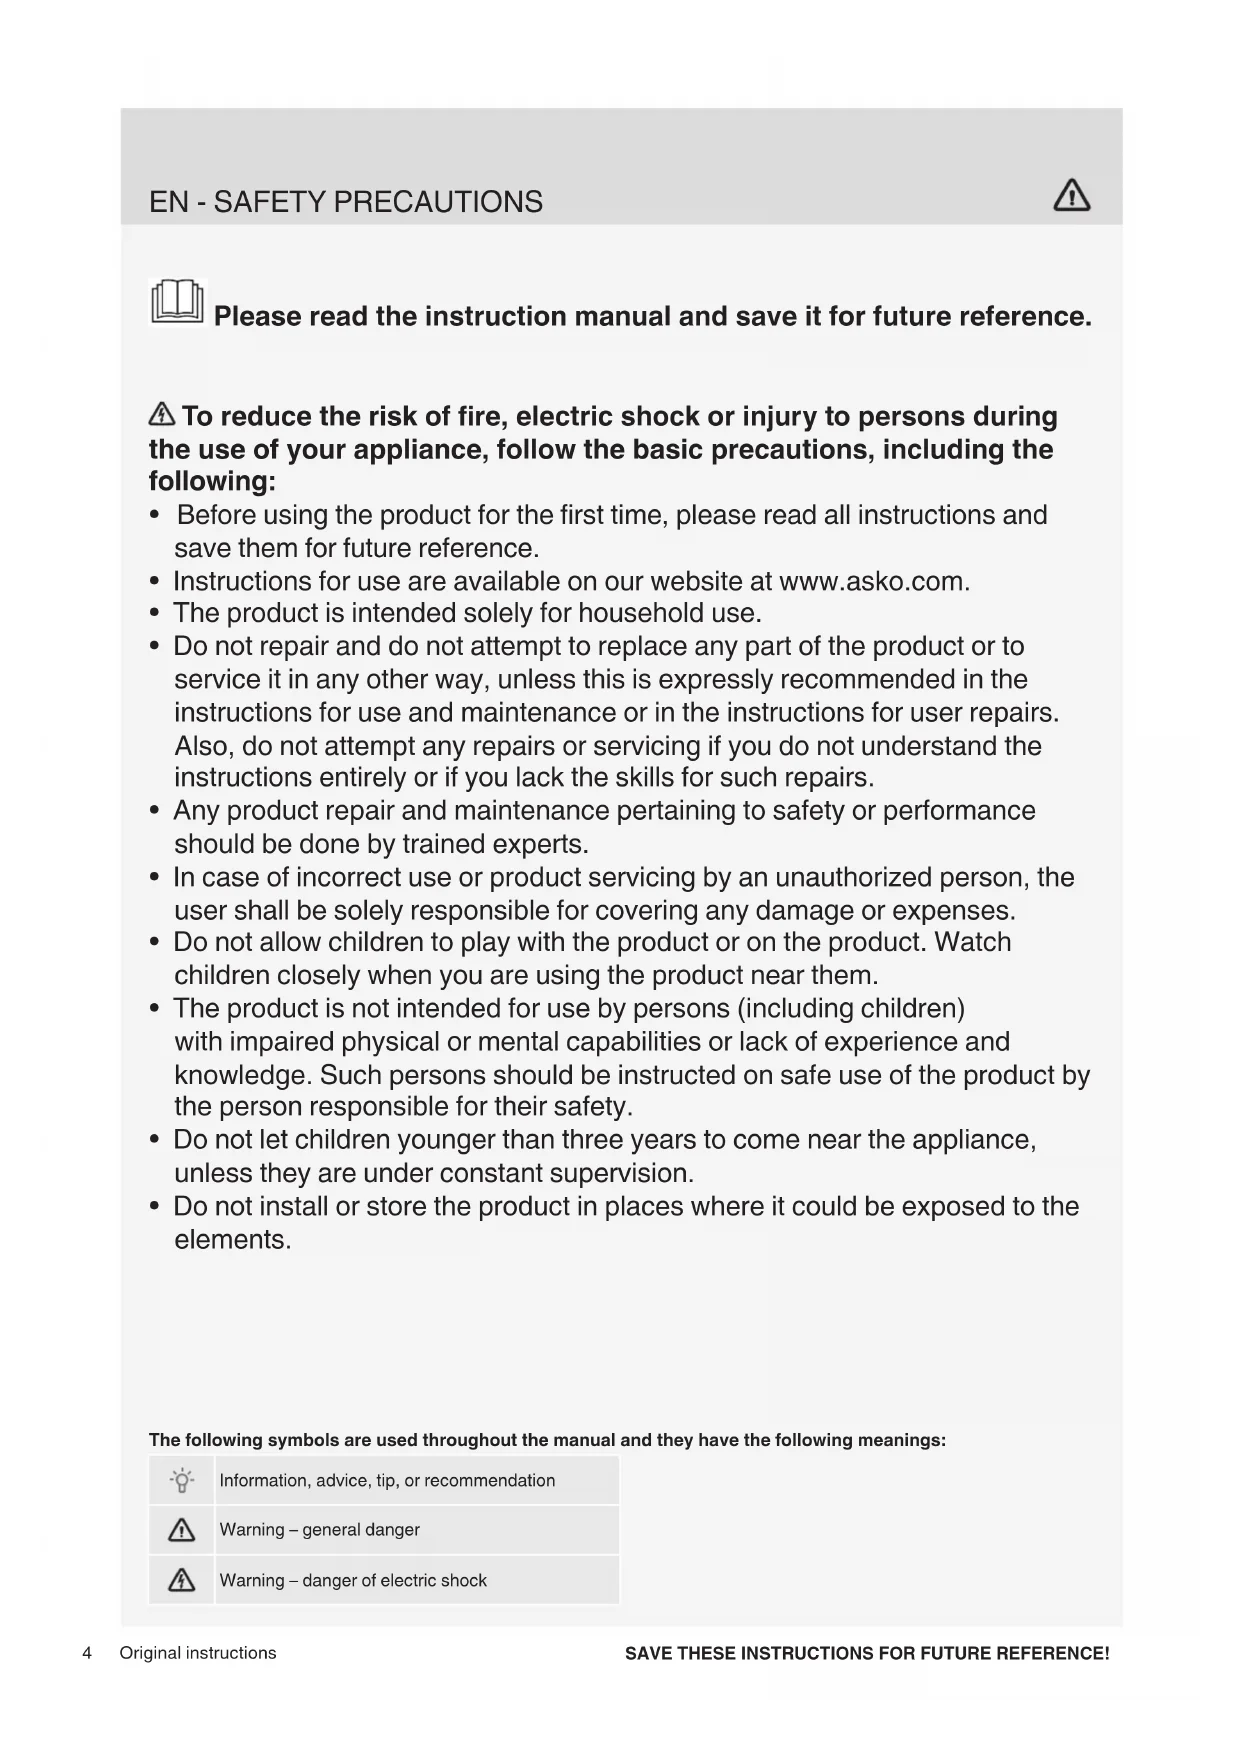
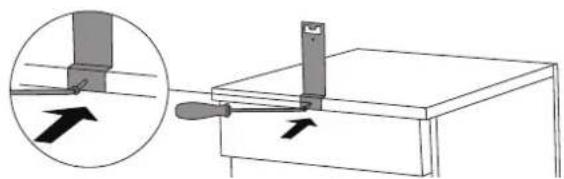
Technical diagram showing a mechanical component with a magnified inset view (no text or symbols)1 Undo the middle screw on the back side of the washing machine.
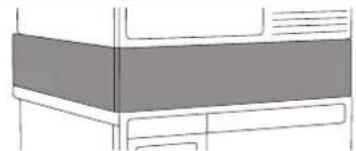
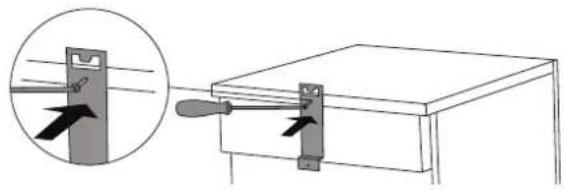
2 Attach the anti-tip bracket (B) to the upper edge of the back of the washing machine.
The anti-tip bracket (B) is supplied in the hidden helper.
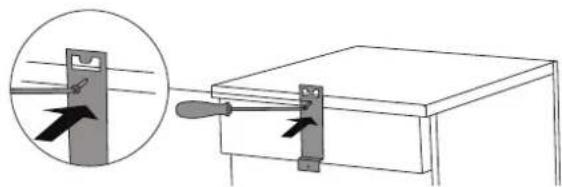
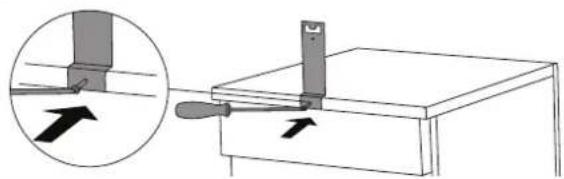
3 Attach the anti-tip bracket (A) to the lower edge of the back of the dryer.
The anti-tip bracket (A) is supplied in the dryer cardboard box.
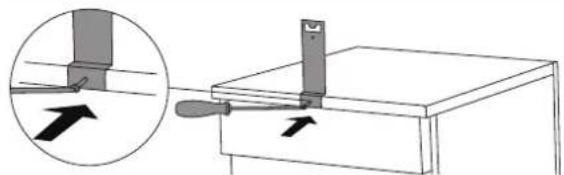
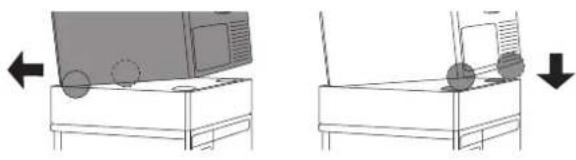
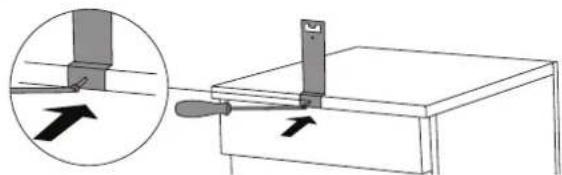
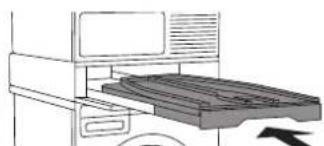
4 Before placing the dryer onto the hidden helper, undo the dryer legs by fi ve turns from the fully retracted position, and tighten the safety nuts all the way.
5 Lift the dryer and tilt it towards the back. Insert the back feet of the dryer into the slots in the hidden helper and push the dryer back towards the back of the hidden helper until the anti-tip bracket (A) locks in with the anti-tip bracket (B). Anti-tip bracket position so that the bracket on the dryer and the bracket on the washing machine are fully aligned.
6 Final installation of the hidden helper between the washing machine and dryer, from the back.

If the hidden helper is installed between a washing machine and a dryer that are already stacked in a tower, first follow instructions for dismounting the tower. This means that the anti-tip bracket has to be removed first.
INSTALLING A HIDDEN HELPER ONTO THE APPLIANCE

The hidden helper may only be used with a washing machine and a dryer by the manufacturer Asko Appliances.
natural_image
Illustration of a rectangular electronic device with a side panel and mounting holes (no text or symbols)

natural_image
Diagram showing a mechanical clamp or bracket being inserted into a box, with an inset magnified view of the clamp (no text or symbols present)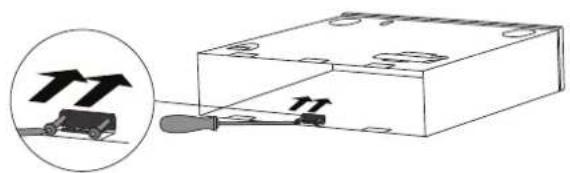
natural_image
Diagram showing a car being inserted into a rectangular box with a screwdriver, accompanied by an inset magnified view of the car (no text or symbols present)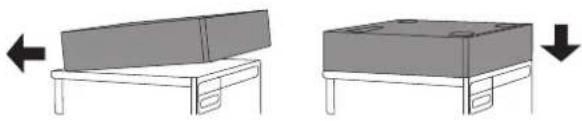
natural_image
Two-step diagram showing a table with a lid and a side panel, both with arrows indicating left and right motion (no text or symbols)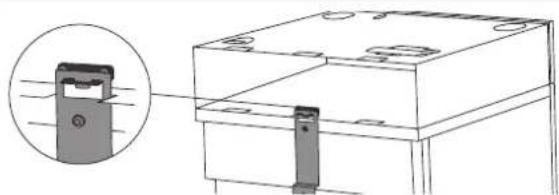
natural_image
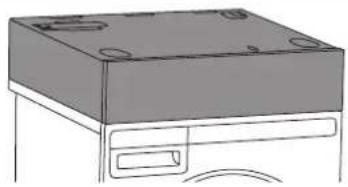
Technical line drawing of a mechanical assembly with a magnified inset showing a component detail (no text or symbols)1 Undo the middle screw on the back side of the washing machine or dryer.
2 Attach the anti-tip bracket (B) to the washing machine or dryer.
The anti-tip bracket (B) is supplied in the hidden helper
3 Using a screw, fasten the anti-tip bracket (A) onto the hidden helper.
The anti-tip bracket (A) is supplied in the dryer cardboard box.
If you are installing the hidden helper onto a washing machine, then the anti-tip bracket (A) has to be purchased from the service unit.
4 Install the hidden helper onto a washing machine or dryer by lifting the front part of the hidden helper and push it towards the back until the anti-tip bracket (A) locks into the anti-tip bracket (B). Then, lower the hidden helper and make sure it is aligned with the washing machine and dryer.
5 Final installation of the hidden helper on a washing machine or dryer, from the back.

Before tightening the anti-tip bracket, make sure the edges of the hidden helper are accurately aligned with the edges of the washing machine or dryer.
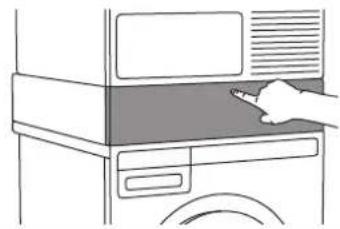
USING A HIDDEN HELPER
natural_image
Line drawing of a hand pressing down on a computer monitor (no text or symbols)

natural_image
Line drawing of a refrigerator interior with a rack and door, showing no text or symbols

natural_image
Line drawing of a desktop computer with keyboard and monitor (no text or symbols)

natural_image
Diagram of a mechanical device with a flat plate and directional arrow indicating rotation (no text or symbols)

natural_image
Line drawing of a computer monitor with a keyboard and mouse (no text or symbols)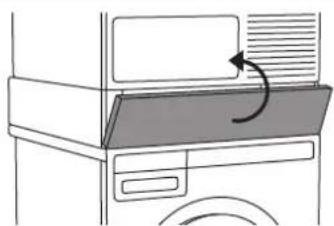
natural_image
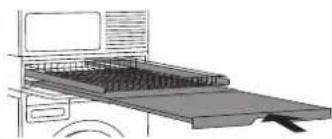
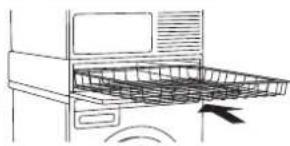
Diagram of a refrigerator with an air vent and airflow direction arrow (no text or symbols)1 Press on the hidden helper door to open it.
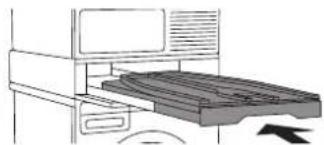
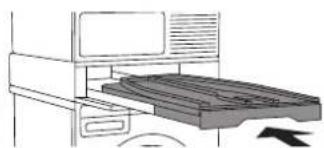
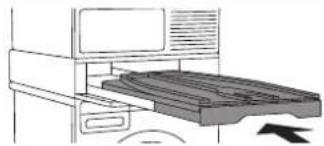
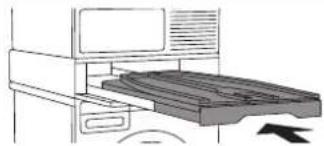
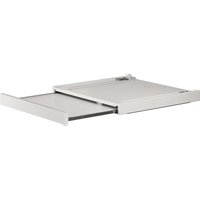
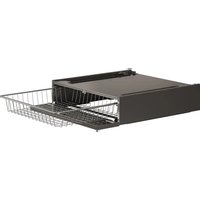
2.1 Pull out the basket towards you as far as it will go. After use, push it back into the hidden helper.
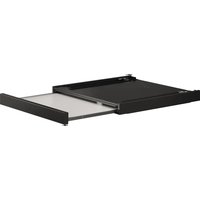
2.2 Pull out the shelf with the basket towards you as far as it will go. After use, push it back into the hidden helper.
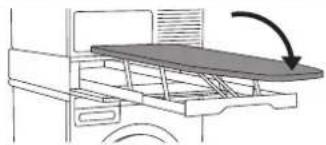
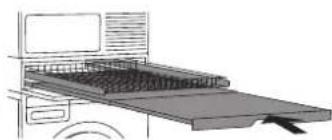
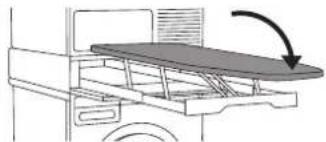
2.3 Hold the ironing board handle, pull it out towards you as far as it will go, and unfold (open) it.
2.3.1 The ironing board is ready for ironing.
After ironing, fold the ironing board and press it back inside the hidden helper.
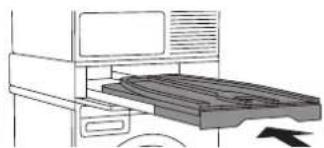
3 Close the hidden helper door.
ADJUSTING AND FIXING THE IRONING BOARD (BEFORE FIRST USE)
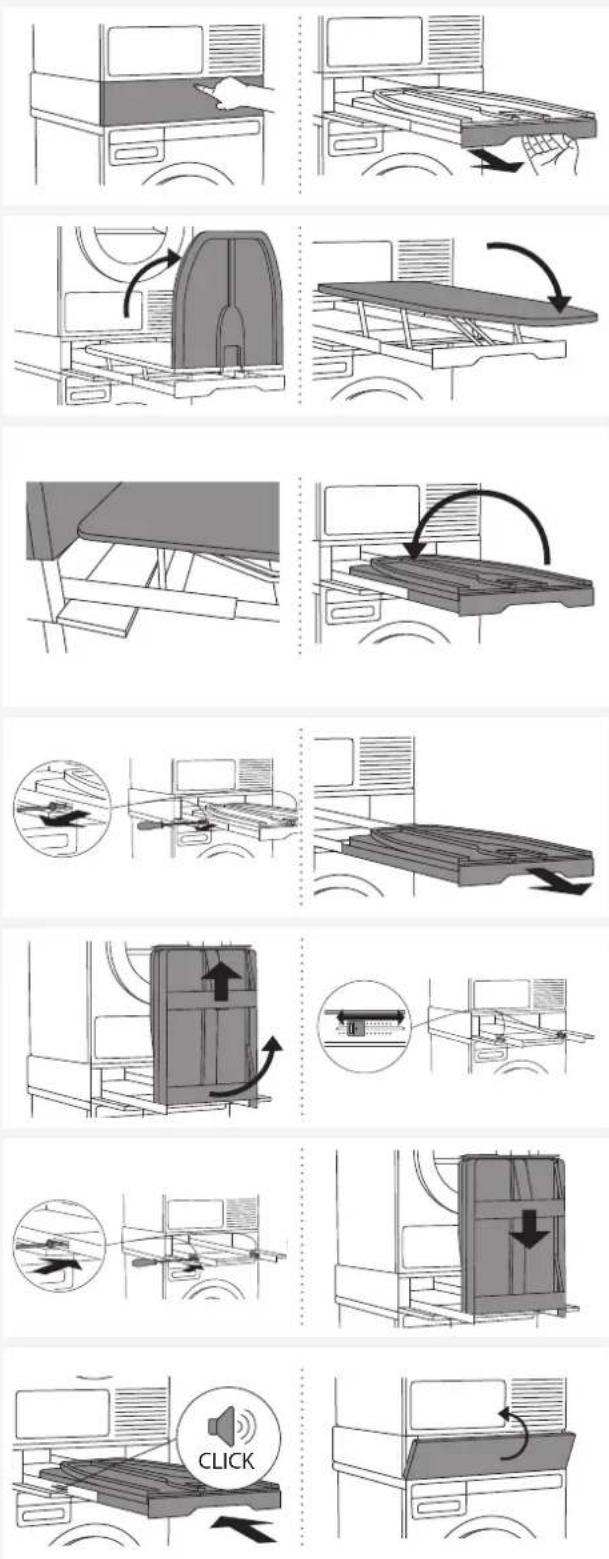
1 Press on the hidden helper door to open it.
Hold the ironing board handle and pull it out towards you as far as it will go.
2 Unfold (open) the ironing board in the direction indicated in the figure.
3 Check for stability before using for the first time. When the ironing board is in the locked position, it is very important that its back part is pressed tightly against the dryer.
If the ironing board does not fit tightly, it can be adjusted as necessary. To do this, fold (close) the ironing board and follow steps 4, 5 and 6.
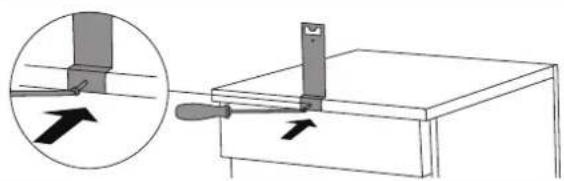
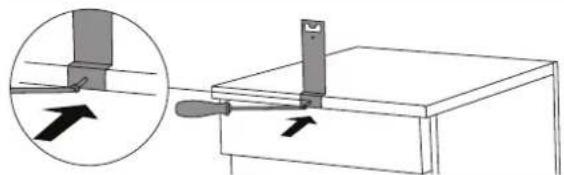
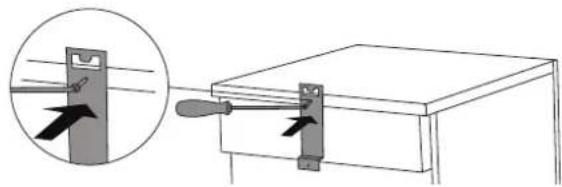
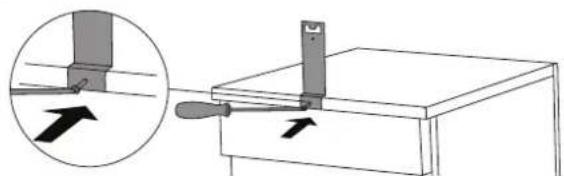
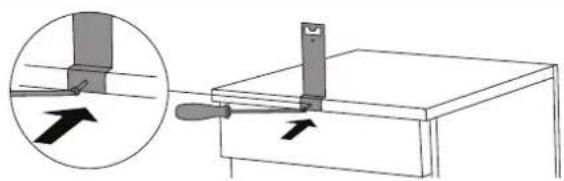
4 Use a screwdriver to carefully undo the screws on the guides on both sides (as shown in the figure) and pull out the ironing board under a right angle (perpendicularly).
5 Detach the ironing board from the guides in the perpendicular direction, and set the length of the plastic plug extension on both sides.
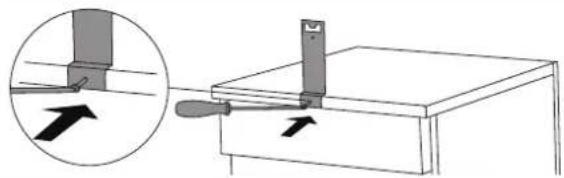
6 Then, replace and tighten the screws removed in step 4.
Replace the ironing board (under a right angle).
7 When replacing the board (under a right angle), it has to audibly "CLICK" into place. Then, push the ironing board towards the inside of the hidden helper.
Close the hidden helper door.

natural_image
Simple line drawing of a bed with no text, numbers, or symbols
natural_image
Diagram showing a mechanical device with a lever and directional arrow, no text or symbols present
natural_image
Diagram showing a car with upward arrows and a rope structure, no text or symbols present
natural_image
Two technical diagrams showing a computer setup with a monitor and two circular components, one with an arrow indicating leftward motion (no text or symbols present)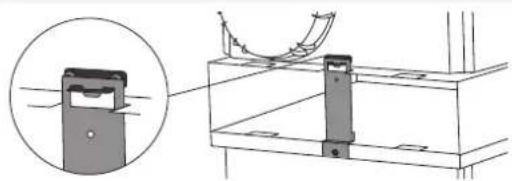
natural_image
Technical diagram showing a mechanical component with a magnified inset view (no text or symbols)
natural_image
Illustration of a rectangular electronic device with a side panel and mounting holes (no text or symbols)

natural_image
Diagram showing a mechanical clamp or bracket being inserted into a box, with an inset magnified view of the clamp (no text or symbols present)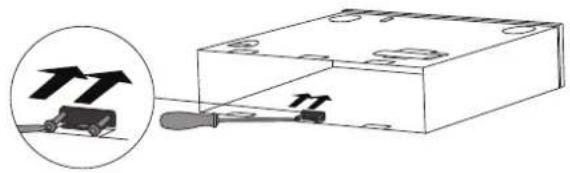
natural_image
Diagram showing a mechanical assembly with a tool and a magnified inset of a component (no text or symbols)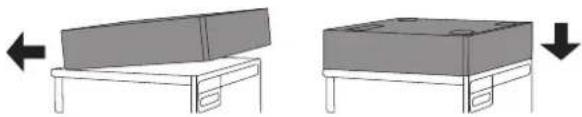
natural_image
Two 3D diagrams showing a table with different sizes and shading, one with an arrow indicating leftward movement (no text or symbols)
natural_image
Technical line drawing of a mechanical assembly with a magnified inset showing a component detail (no text or symbols)natural_image
Line drawing of a hand pressing down on a computer monitor (no text or symbols)

natural_image
Line drawing of a refrigerator interior with a rack and door, showing no text or symbols

natural_image
Line drawing of a desktop computer with keyboard and monitor (no text or symbols)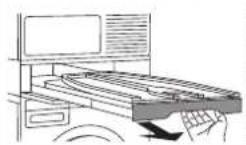

natural_image
Diagram of a mechanical device with a flat plate and directional arrow indicating rotation (no text or symbols)

natural_image
Line drawing of a computer monitor with a keyboard and mouse (no text or symbols)
natural_image
Diagram of a refrigerator with a door handle and airflow arrow indicating direction (no text or symbols)natural_image
Pure technical line drawing of a mechanical component or bracket (no text or symbols)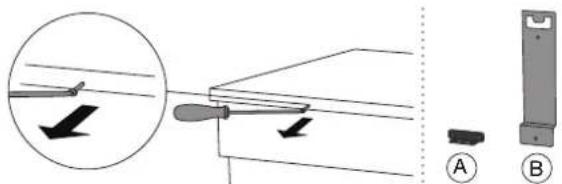

natural_image
Diagram showing a mechanical device with an arrow indicating force or movement, alongside a magnified inset of the component (no text or symbols present)
natural_image
Diagram showing a car with upward arrows and a ladder extending into a structure (no text or symbols)
natural_image
Diagram showing mechanical assembly with arrows indicating motion, no text or symbols present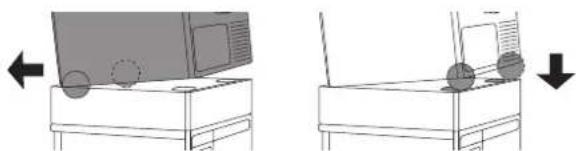
natural_image
Two technical diagrams showing a computer monitor and its side view with circular components, no text or symbols present.
natural_image
Technical diagram showing a mechanical assembly with a magnified inset of a component (no text or symbols)
natural_image
Line drawing of a rectangular electronic device with a side panel and mounting bracket (no text or symbols)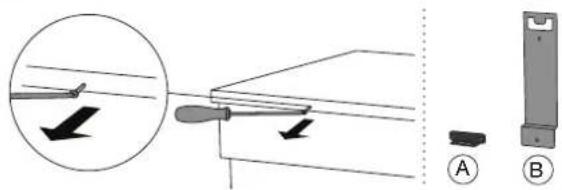
natural_image
Diagram showing a mechanical clamp or bracket being inserted into a box, with an inset magnified view of the clamp (no text or symbols present)
natural_image
Diagram showing a mechanical assembly with a tool and a magnified inset of a vehicle (no text or symbols)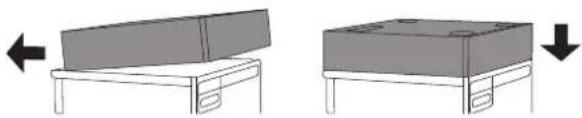
natural_image
Two-step diagram showing a table with a rectangle and a side panel, both with arrows indicating direction (no text or symbols)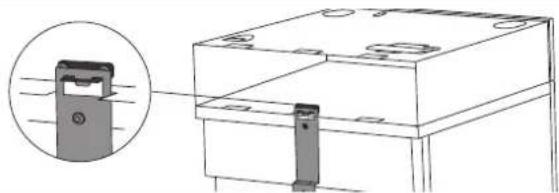
natural_image
Technical line drawing of a mechanical assembly with a magnified inset showing a component detail (no text or symbols)1 Løsne den midterste skruen på baksiden av vaskemaskinen eller tørketrommelen.
2 Fest veltesikringsbeslaget (B) på vaskemaskinen eller tørketrommelen.
- Veltesikringsbeslaget (B) følger med i leveransen av den skjulte hjelperen.
3 Fest veltesikringsbeslaget (A) til den skjulte hjelperen med en skrue.
Veltesikringsbeslaget (A) ligger i boksen som fulgte med tørketrommelen.
natural_image
Line drawing of a hand pressing down on a computer monitor (no text or symbols)

natural_image
Line drawing of a refrigerator interior with a rack and door, showing no text or symbols

natural_image
Line drawing of a desktop computer with keyboard and monitor (no text or symbols)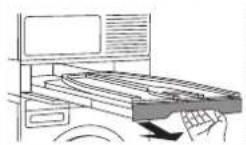

natural_image
Diagram of a mechanical device with a flat plate and directional arrow indicating rotation (no text or symbols)

natural_image
Line drawing of a computer monitor with a keyboard and mouse (no text or symbols)
natural_image
Diagram of a refrigerator with an air vent and airflow direction arrow (no text or symbols)natural_image
Pure technical line drawing of a mechanical component or bracket (no text or symbols)
natural_image
Diagram showing a mechanical device with an arrow indicating force or movement, alongside a magnified inset of the component (no text or symbols present)
natural_image
Diagram showing a car with upward arrows and a ladder extending into a structure (no text or symbols)
natural_image
Diagram showing mechanical assembly with arrows indicating motion, no text or symbols present
natural_image
Diagram showing two views of a computer monitor with a mouse, one left and one right, both with arrows indicating movement (no text or symbols present)
natural_image
Technical diagram showing a mechanical assembly with a magnified inset of a component (no text or symbols)
natural_image
Simple line drawing of a rectangular electronic device with a side panel and mounting holes (no text or symbols)
natural_image
Diagram showing a mechanical clamp or bracket being inserted into a box, with an inset magnified view of the clamp (no text or symbols present)2 Monter antivippebeslaget (B) på vaskemaskinen eller tørretumbleren.
natural_image
Diagram showing a tool interacting with a box, with an inset magnified view of a mechanical component (no text or symbols)natural_image
Two-step diagram showing a table with a lid and a side panel, both with arrows indicating left and right motion (no text or symbols)natural_image
Technical line drawing of a mechanical assembly with a magnified inset showing a component detail (no text or symbols)natural_image
Line drawing of a hand pressing down on a computer monitor (no text or symbols)

natural_image
Line drawing of a refrigerator interior with a rack and door, showing no text or symbols

natural_image
Line drawing of a desktop computer with keyboard and monitor (no text or symbols)

natural_image
Diagram of a mechanical device with a flat plate and directional arrow indicating rotation (no text or symbols)

natural_image
Line drawing of a computer monitor with a keyboard and mouse (no text or symbols)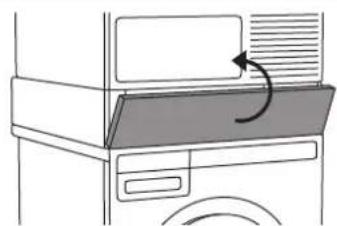
natural_image
Diagram of a refrigerator with a door handle and airflow arrow indicating direction (no text or symbols)1 Tryk på lägen til Hidden Helper for at åbne den.
natural_image
Simple line drawing of a laptop with no text or symbols

natural_image
Diagram showing a mechanical device with a lever mechanism and an inset close-up of the lever (no text or symbols)
natural_image
Diagram showing a car with upward arrows and a ship hull, no text or symbols present
natural_image
Diagram showing mechanical assembly with arrows indicating motion or force direction (no text or symbols)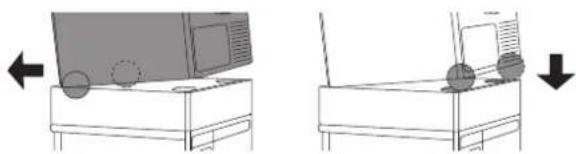
natural_image
Diagram showing two views of a computer monitor with a mouse, one with an arrow indicating left and the other with a circle (no text or symbols)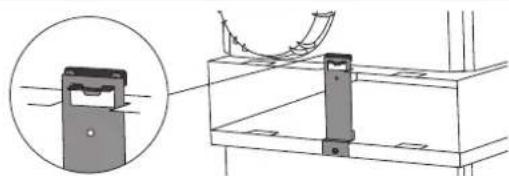
natural_image
Technical diagram showing a mechanical component with a magnified inset view (no text or symbols)natural_image
Illustration of a rectangular electronic device with a side panel and mounting bracket (no text or symbols)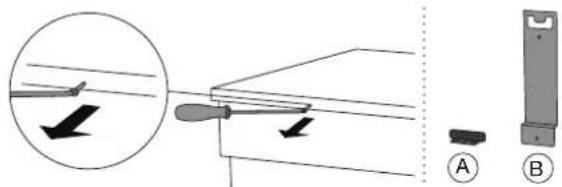

natural_image
Diagram showing a mechanical clamp or bracket being inserted into a box, with an inset magnified view of the clamp (no text or symbols present)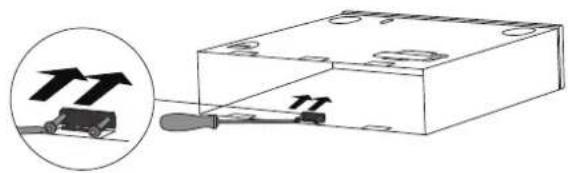
natural_image
Diagram showing a screwdriver inserted into a housing with an arrow indicating direction (no text or symbols present)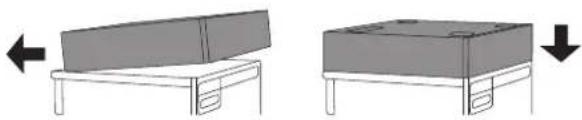
natural_image
Two diagrams showing a table with different sizes and shading, one with an arrow indicating leftward movement (no text or symbols)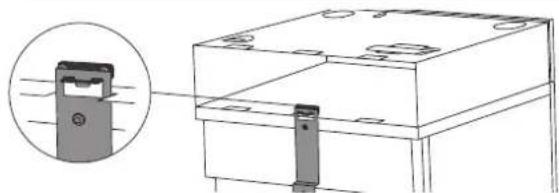
natural_image
Technical line drawing of a mechanical assembly with a magnified inset showing a component detail (no text or symbols)natural_image
Line drawing of a hand pressing down on a computer monitor (no text or symbols)

natural_image
Line drawing of a refrigerator interior with a rack and door, showing no text or symbols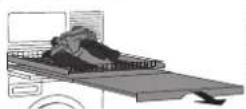

natural_image
Line drawing of a desktop computer with keyboard and monitor (no text or symbols)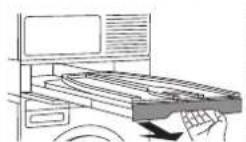

natural_image
Diagram of a mechanical device with a flat plate and directional arrow indicating rotation (no text or symbols)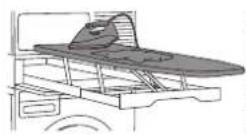
natural_image
Line drawing of a computer monitor with a curved keyboard and scroll (no text or symbols)
natural_image
Diagram of a refrigerator with an arrow indicating rotation or movement (no text or symbols present)natural_image
Simple line drawing of a bed with no text or symbols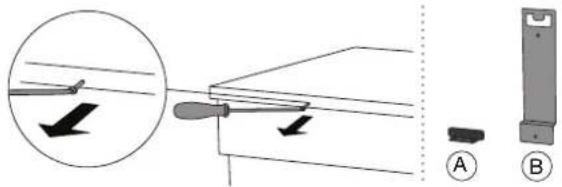
natural_image
Diagram showing a mechanical device with a lever mechanism and an inset view of a lever mechanism (no text or symbols present)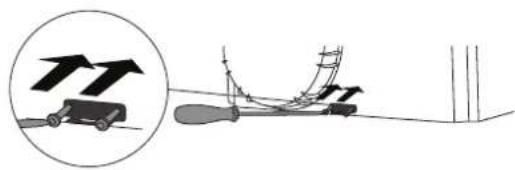
natural_image
Diagram showing a car on a ramp with an arrow indicating upward motion, alongside a mechanical device (no text or symbols present)

natural_image
Diagram showing two views of a computer monitor with circular components, one left and one right, both without any text or symbols.
natural_image
Technical diagram showing a mechanical assembly with a magnified inset of a component (no text or symbols present)natural_image
Line drawing of a rectangular electronic device with mounting holes and a base (no text or symbols)

natural_image
Diagram showing a mechanical clamp or bracket being inserted into a box, with an inset magnified view of the clamp (no text or symbols present)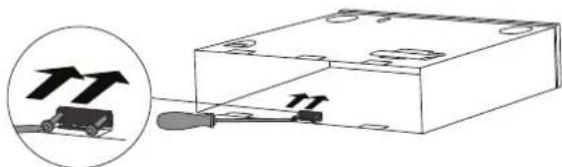
natural_image
Diagram showing a car being inserted into a box with a tool, with an inset magnified view of the car (no text or symbols present)
natural_image
Two-step diagram showing a folding table with a lid and a folded box, both with arrows indicating left and right sides (no text or symbols)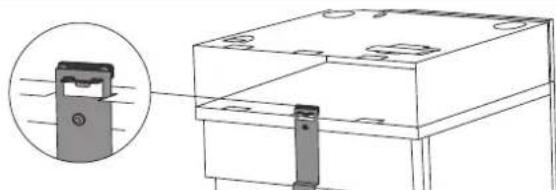
natural_image
Technical line drawing of a mechanical component with a magnified inset showing a close-up view of a handle (no text or symbols)natural_image
Line drawing of a hand pressing down on a computer monitor (no text or symbols)

natural_image
Line drawing of a refrigerator interior with a rack and door, showing no text or symbols
natural_image
Line drawing of a desktop computer with keyboard and monitor (no text or symbols)

natural_image
Diagram of a mechanical device with a flat plate and directional arrow indicating rotation (no text or symbols)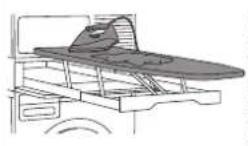
natural_image
Line drawing of a computer monitor with a keyboard and mouse (no text or symbols)
natural_image
Diagram of a refrigerator with an air vent and airflow direction arrow (no text or symbols)natural_image
Simple line drawing of a bench or bench with no text, numbers, or symbols

natural_image
Diagram showing a mechanical device with a lever and directional arrow, no text or symbols present
natural_image
Diagram showing a car with upward arrows and a ladder-like structure, no text or symbols present

natural_image
Two-panel diagram showing a computer monitor and its keyboard with a mouse, both with arrows indicating left and right motion (no text or symbols)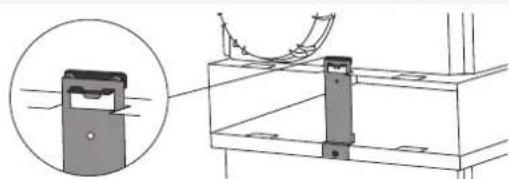
natural_image
Technical diagram showing a mechanical component with a magnified inset view (no text or symbols)
natural_image
Line drawing of a rectangular electronic device with a side panel and mounting holes (no text or symbols)
natural_image
Diagram showing a mechanical assembly with a magnified inset of a component being inserted (no text or symbols present)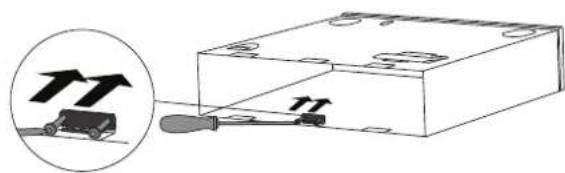
natural_image
Diagram showing a mechanical assembly with a tool and a car, no text or symbols present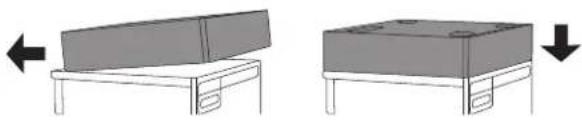
natural_image
Two-step diagram showing a table setup with an open box and a closed box, both with arrows indicating direction (no text or symbols)
natural_image
Technical line drawing of a mechanical assembly with a magnified inset showing a component detail (no text or symbols)natural_image
Line drawing of a hand pressing down on a computer monitor (no text or symbols)

natural_image
Line drawing of a refrigerator interior with a rack and door, showing no text or symbols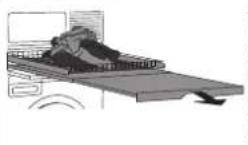

natural_image
Line drawing of a desktop computer with keyboard and monitor (no text or symbols)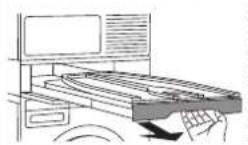
natural_image
Diagram of a mechanical device with a flat plate and directional arrow indicating rotation (no text or symbols)

natural_image
Line drawing of a computer monitor with a keyboard and mouse (no text or symbols)
natural_image
Diagram of a refrigerator with an air vent and airflow direction arrow (no text or symbols)natural_image
Simple line drawing of a bench or bench with no text, numbers, or symbols
natural_image
Diagram showing a mechanical device with a lever and directional arrow, no text or symbols present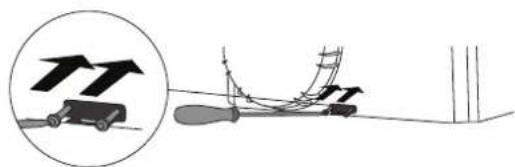
natural_image
Diagram showing a car on the left and a ship on the right, with arrows indicating direction (no text or symbols)
natural_image
Diagram showing a device with a lever mechanism and a close-up view of the lever (no text or symbols present)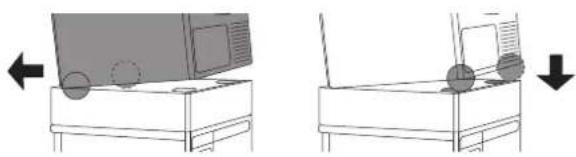
natural_image
Two diagrams showing a computer monitor and its keyboard with a mouse, both with arrows indicating left and right motion (no text or symbols)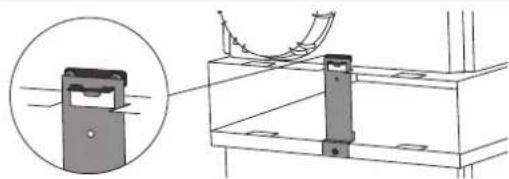
natural_image
Technical diagram showing a mechanical component with a magnified inset view (no text or symbols)natural_image
Illustration of a rectangular electronic device with a base and top panel, no visible text or symbols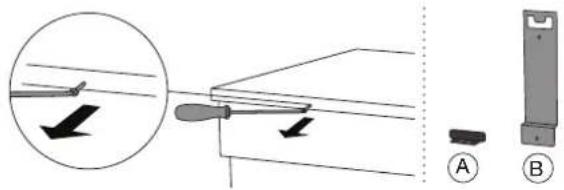

natural_image
Diagram showing a hand operating a lock mechanism with an inset magnified view of the handle (no text or symbols)
natural_image
Diagram showing a mechanical assembly with a tool and a magnified inset of a vehicle (no text or symbols)
natural_image
Two-step diagram showing a table setup with a lid and a side panel, both with arrows indicating direction (no text or symbols)
natural_image
Technical line drawing of a mechanical assembly with a magnified inset showing a component detail (no text or symbols)natural_image
Line drawing of a hand pressing down on a computer monitor (no text or symbols)

natural_image
Line drawing of a refrigerator interior with a rack and door (no text or symbols)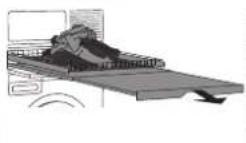
natural_image
Line drawing of a desktop computer with monitor, keyboard, and mouse (no text or symbols)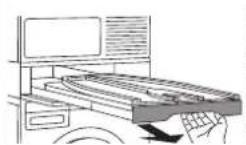
natural_image
Diagram of a vehicle interior showing a flatboard mounted on a lift, with an arrow indicating rotation (no text or symbols present)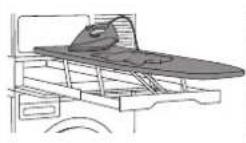

natural_image
Line drawing of a computer monitor with a keyboard and mouse, no text or symbols present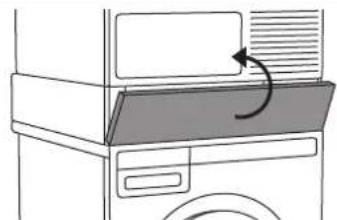
natural_image
Diagram of a refrigerator with a door handle and airflow arrow indicating direction (no text or symbols)natural_image
Simple line drawing of a folded or layered object with no text, numbers, or symbols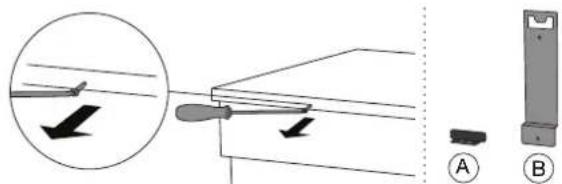
natural_image
Diagram showing a mechanical device with a lever and directional arrow, no text or symbols present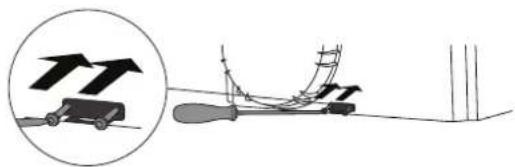
natural_image
Diagram showing a car moving with upward arrows, alongside a mechanical structure with ropes and supports (no text or symbols)
natural_image
Diagram showing mechanical assembly with arrows indicating motion, no text or symbols present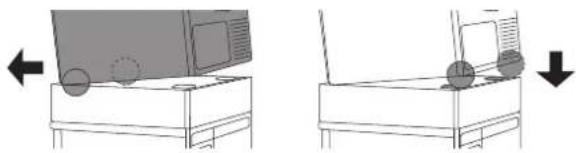
natural_image
Two technical diagrams showing a computer monitor and a printer with a mouse, both with directional arrows indicating movement (no text or symbols present)
natural_image
Technical line drawing of a mechanical assembly with a magnified inset showing a component detail (no text or symbols)
natural_image
Illustration of a rectangular electronic device with a side panel and mounting holes (no text or symbols)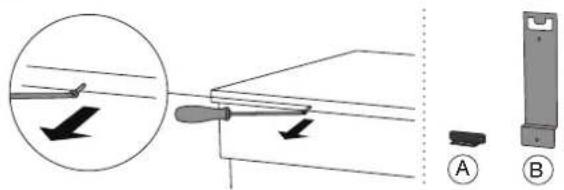
natural_image
Diagram showing a mechanical clamp or bracket being inserted into a box, with an inset magnified view of the clamp (no text or symbols present)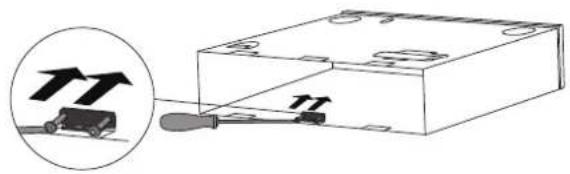
natural_image
Diagram showing a device with a screwdriver inserted into a housing, with an inset magnified view of the component (no text or symbols)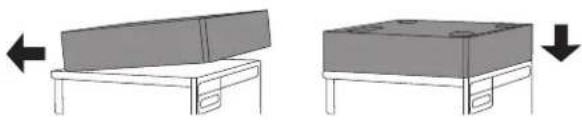
natural_image
Two 3D diagrams showing a table with different internal compartments, one with an arrow indicating leftward movement (no text or symbols)
natural_image
Technical line drawing of a mechanical assembly with a magnified inset showing a component detail (no text or symbols)natural_image
Line drawing of a hand pressing down on a computer monitor (no text or symbols)

natural_image
Line drawing of a refrigerator interior with a rack and door, showing no text or symbols

natural_image
Line drawing of a desktop computer with keyboard and monitor (no text or symbols)

natural_image
Diagram of a mechanical device with a flat plate and directional arrow indicating rotation (no text or symbols)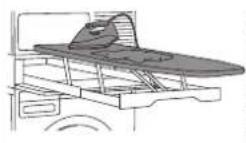

natural_image
Line drawing of a computer monitor with a keyboard and mouse (no text or symbols)
natural_image
Diagram of a refrigerator with a door handle and airflow arrow indicating direction (no text or symbols)natural_image
Simple line drawing of a laptop with no text or symbols
natural_image
Diagram showing a mechanical device with a lever and directional arrow, no text or symbols present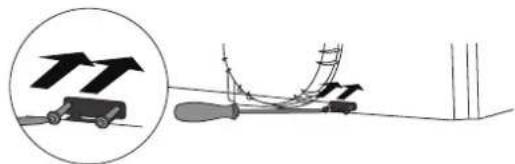
natural_image
Diagram showing a car on a road with directional arrows and a schematic of a boat on a ramp (no text or symbols)
natural_image
Diagram showing mechanical assembly with arrows indicating motion, no text or symbols present
natural_image
Two technical diagrams showing a computer monitor and its side view with a mouse, both without any text or symbols.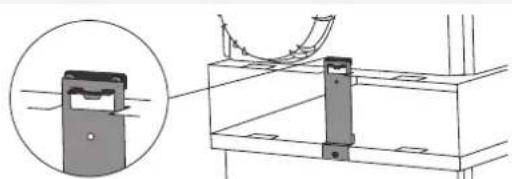
natural_image
Technical diagram showing a mechanical component with a magnified inset view (no text or symbols)1
natural_image
Illustration of a computer monitor with a control panel and display (no text or symbols)

natural_image
Diagram showing a mechanical assembly with a magnified inset of a component being inserted (no text or symbols present)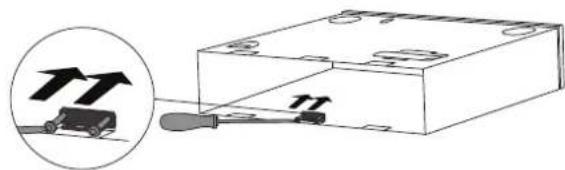
natural_image
Diagram showing a screwdriver inserted into a rectangular housing with a magnified inset illustrating upward force (no text or symbols)
natural_image
Two-step diagram showing a folding table with a lid and drawer, no text or symbols present
natural_image
Technical line drawing of a mechanical component with a magnified inset showing a close-up view of a component (no text or symbols)natural_image
Line drawing of a hand pressing down on a computer monitor (no text or symbols)

natural_image
Line drawing of a refrigerator interior with a rack and door, showing no text or symbols

natural_image
Line drawing of a desktop computer with keyboard and monitor (no text or symbols)

natural_image
Diagram of a mechanical device with a flat plate and directional arrow indicating rotation (no text or symbols)
natural_image
Line drawing of a computer monitor with a keyboard and mouse (no text or symbols)
natural_image
Diagram of a refrigerator with a door handle and airflow arrow indicating direction (no text or symbols)natural_image
Simple line drawing of a bed with a seat and blanket (no text or symbols)
natural_image
Diagram showing a mechanical device with a lever and directional arrow, no text or symbols present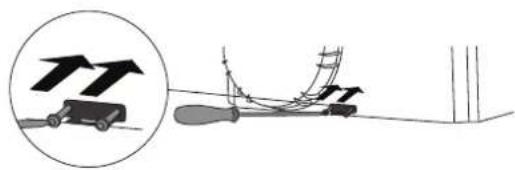
natural_image
Diagram showing a car on tracks with directional arrows indicating motion, alongside a ship's structure (no text or symbols)
natural_image
Two diagrams showing a computer monitor and its keyboard with wheels, both with directional arrows indicating movement (no text or symbols present)
natural_image
Technical diagram showing a mechanical assembly with a magnified inset of a component (no text or symbols present)natural_image
Illustration of a computer monitor with a control panel and display (no text or symbols)

natural_image
Diagram showing a mechanical clamp or bracket being inserted into a box, with an inset magnified view of the clamp (no text or symbols present)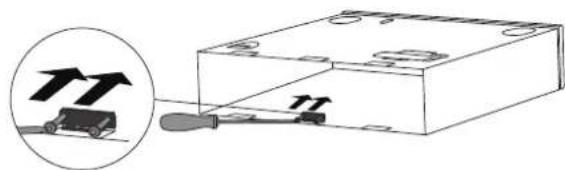
natural_image
Diagram showing a car being inserted into a box with a screwdriver, accompanied by an inset magnified view of the car (no text or symbols present)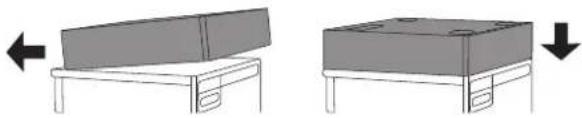
natural_image
Two-step diagram showing a folding table with a lid and a folded box, both with arrows indicating direction (no text or symbols)
natural_image
Technical line drawing of a mechanical component with a magnified inset showing a handle and mounting holes (no text or symbols)natural_image
Line drawing of a hand pressing down on a computer monitor (no text or symbols)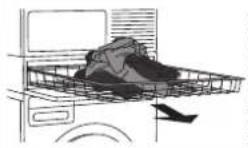
natural_image
Line drawing of a car interior showing a mesh basket and door (no text or symbols)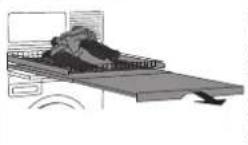

natural_image
Line drawing of a computer setup with monitor, keyboard, and keyboard (no text or symbols)

natural_image
Diagram of a mechanical device with a flat plate and directional arrow indicating rotation (no text or symbols)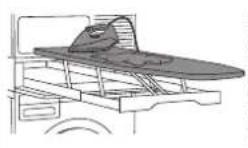
natural_image
Line drawing of a computer monitor with a keyboard and mouse (no text or symbols)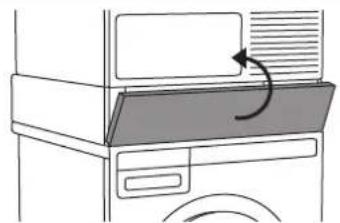
natural_image
Diagram of a refrigerator with a door and fan, showing airflow direction (no text or symbols)natural_image
Simple line drawing of a bench or bench with no text, numbers, or symbols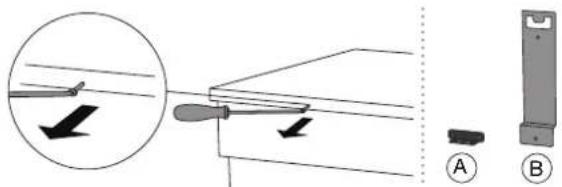

natural_image
Diagram showing a mechanical device with a lever and directional arrow, no text or symbols present
natural_image
Diagram showing a car with upward arrows and a ladder extending into a structure, no text or symbols present

natural_image
Diagram showing two views of a computer monitor with a mouse, one with an arrow indicating left and the other with a circle (no text or symbols)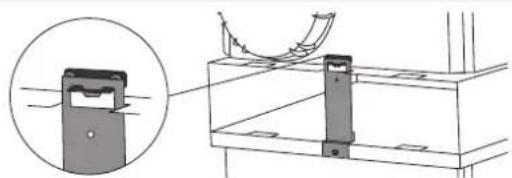
natural_image
Technical line drawing of a mechanical assembly with a magnified inset showing a component detail (no text or symbols)
擰下洗衣機背面中間的螺絲。

natural_image
Simple line drawing of a rectangular electronic device with a side panel and mounting holes (no text or symbols)

natural_image
Diagram showing a mechanical clamp or bracket being inserted into a box, with an inset magnified view of the clamp (no text or symbols present)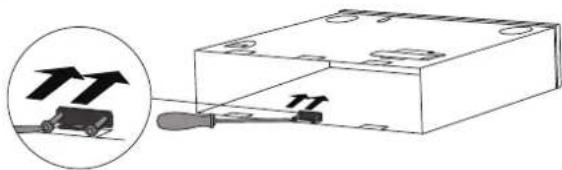
natural_image
Diagram showing a car being inserted into a box with a screwdriver, accompanied by an inset magnified view of the car (no text or symbols present)
natural_image
Two diagrams showing a table with different panel designs, one with an arrow indicating leftward movement and the other with a downward arrow (no text or symbols)
natural_image
Technical line drawing of a mechanical assembly with a magnified inset showing a component detail (no text or symbols)
擰下洗衣機或乾衣機背面中間的螺絲。

natural_image
Line drawing of a hand pressing down on a computer monitor (no text or symbols)

natural_image
Line drawing of a refrigerator interior with a rack and door, showing no text or symbols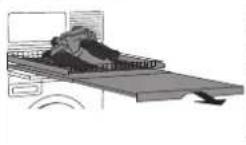

natural_image
Line drawing of a desktop computer with monitor, keyboard, and mouse (no text or symbols)

natural_image
Diagram of a mechanical device with a flat plate and directional arrow indicating rotation (no text or symbols)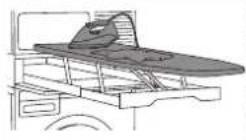
natural_image
Diagram of a computer monitor with a curved keyboard and directional arrow (no text or symbols)
natural_image
Diagram of a refrigerator with an air vent and airflow direction arrow (no text or symbols)1 輕推隱藏幫手門,令其打開。
natural_image
Simple line drawing of a bench or bench with no text, numbers, or symbols
natural_image
Diagram showing a mechanical device with a lever and directional arrow, no text or symbols present
natural_image
Diagram showing a car with upward arrows and a ladder extending into a structure, no text or symbols present.

natural_image
Diagram showing two views of a computer monitor with wheels, one left and one right, both pointing downward (no text or symbols)
natural_image
Technical line drawing of a mechanical assembly with a magnified inset showing a component detail (no text or symbols)
拧下洗衣机背面中间的螺丝。

natural_image
Line drawing of a rectangular electronic device with a side panel and mounting bracket (no text or symbols)

natural_image
Diagram showing a mechanical clamp or bracket being inserted into a box, with an inset magnified view of the clamp (no text or symbols present)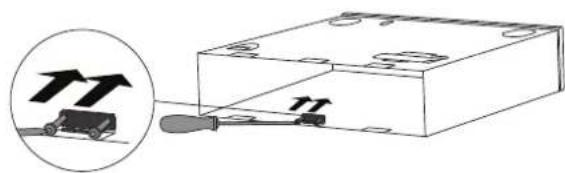
natural_image
Diagram showing a car being inserted into a box with a screwdriver, no text or symbols present
natural_image
Two diagrams showing a table setup with different panel designs, one with an arrow indicating leftward movement and the other with a downward arrow (no text or symbols)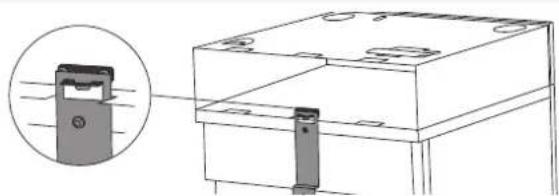
natural_image
Technical line drawing of a mechanical assembly with a magnified inset showing a component detail (no text or symbols)
拧下洗衣机或干衣机背面中间的螺丝。

natural_image
Line drawing of a hand pressing down on a computer monitor (no text or symbols)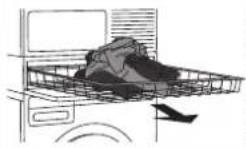

natural_image
Line drawing of a refrigerator interior with a rack and door, showing no text or symbols

natural_image
Line drawing of a desktop computer with monitor, keyboard, and mouse (no text or symbols)

natural_image
Diagram of a mechanical device with a flat plate and directional arrow indicating rotation (no text or symbols)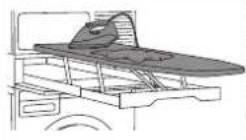
natural_image
Diagram of a computer monitor with a curved screen and directional arrow (no text or symbols)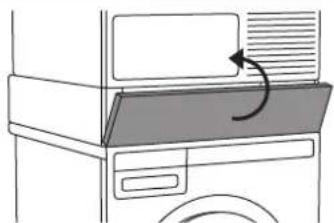
natural_image
Diagram of a refrigerator with a door, showing airflow direction (no text or symbols)1 轻推隐藏帮手门,令其打开。
natural_image
Pure technical line drawing of a mechanical component or bracket (no text or symbols)

natural_image
Diagram showing a mechanical device with a lever and directional arrow, no text or symbols present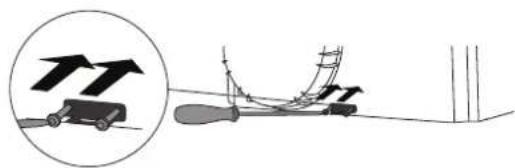
natural_image
Diagram showing a car with upward arrows and a ladder extending into a structure (no text or symbols)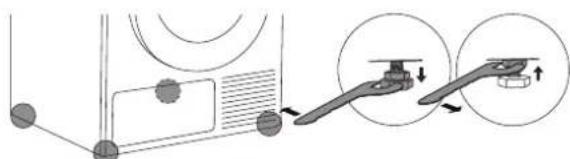
natural_image
Diagram showing mechanical assembly with arrows indicating motion, no text or symbols present
natural_image
Diagram showing two views of a computer monitor with wheels, one left and one right, both pointing downward (no text or symbols)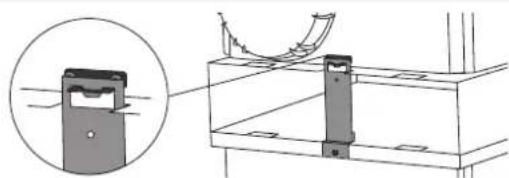
natural_image
Technical diagram showing a mechanical assembly with a magnified inset of a component (no text or symbols)
natural_image
Illustration of a rectangular electronic device with a side panel and mounting holes (no text or symbols)
natural_image
Diagram showing a mechanical clamp or bracket being inserted into a box, with an inset magnified view of the clamp (no text or symbols present)natural_image
Diagram showing a mechanical assembly with a tool and a car, no text or symbols presentnatural_image
Two diagrams showing a table setup with an open panel and a closed panel, both with arrows indicating direction (no text or symbols present)natural_image
Technical line drawing of a mechanical assembly with a magnified inset showing a component detail (no text or symbols)natural_image
Line drawing of a hand pressing down on a computer monitor (no text or symbols)

natural_image
Line drawing of a refrigerator interior with a rack and door, showing no text or symbols

natural_image
Line drawing of a desktop computer with keyboard and monitor (no text or symbols)

natural_image
Diagram of a mechanical device with a flat plate and directional arrow indicating rotation (no text or symbols)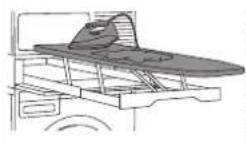

natural_image
Line drawing of a computer monitor with a curved keyboard and mouse (no text or symbols)
natural_image
Diagram of a refrigerator with a door handle and airflow arrow indicating direction (no text or symbols)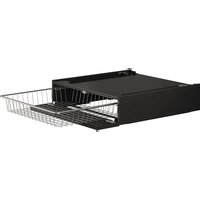

- SV - SÄKERHETSANVISNINGAR 9
- Please read the instruction manual and save it for future reference.
- To reduce the risk of fire, electric shock or injury to persons during the use of your appliance, follow the basic precautions, including the following:
- INSTALLING A HIDDEN HELPER BETWEEN A WASHING MACHINE AND A DRYER
- INSTALLING A HIDDEN HELPER ONTO THE APPLIANCE
- USING A HIDDEN HELPER
- ADJUSTING AND FIXING THE IRONING BOARD (BEFORE FIRST USE)
Brand : ASKO
Model : HI1153T
Category : Washing machine