
AM12BP - Air-conditioner LG - Free user manual and instructions
Find the device manual for free AM12BP LG in PDF.
User questions about AM12BP LG
0 question about this device. Answer the ones you know or ask your own.
Ask a new question about this device
Download the instructions for your Air-conditioner in PDF format for free! Find your manual AM12BP - LG and take your electronic device back in hand. On this page are published all the documents necessary for the use of your device. AM12BP by LG.
USER MANUAL AM12BP LG
Read this owner's manual thoroughly before operating the appliance and keep it handy for reference at all times.
TYPE: WALL MOUNTED
Original instruction
EN ENGLISH
IT ITALIANO
ES ESPANOL
FR FRANÇAIS
DE DEUTSCH
EL EAAHNIKA
PT PORTUGUES
NL NEDERLANDS
PL POLSKI
HU MAGYAR
BGБЛΓAPCKN
HR HRVATSKI
CZ CESTINA
ET EESTI
MT MALTI
RO ROMÁNA
SK SLOVENCINA
SL SLOVENsCINA
LV LATVIEŠU
LT LIETUVI
GA GAEILGE
SR SRPSKI
MKMAKEDOHCKN
SQ SHQIP
BS BOSANSKI
TABLE OF CONTENTS
This manual may contain images or content different from the model you purchased.
This manual is subject to revision by the manufacturer.
SAFETYINSTRUCTIONS 3
IMPORTANT SAFETY INSTRUCTIONS 3
OPERATION 11
Notes for Operation 11
Parts and Functions 11
Wireless Remote Control. 12
Restarting the Air Conditioner Automatically 17
Using the Mode Function 17
Using the Jet Mode Function 19
Using the Fan Speed Function 20
Using the Air Flow Direction Function 20
Setting the On/Off Timer 21
Using the Sleep Function (Optional) 22
Using the Simple Timer Function (Optional) 22
Using the Energy Display Function (Optional) 23
Using the Light Off Function (Optional) 23
Using the Comfort Air Function (Optional) 23
Using the Energy Control Function (Optional) 24
Using Special Functions 24
SMART FUNCTIONS 26
LG ThinQ Application 26
Smart Diagnosis 28
MAINTENANCE 29
Clean the Air Filter 31
TROUBLESHOOTING 32
The following safety guidelines are intended to prevent unforeseen risks or damage from unsafe or incorrect operation of the appliance.
The guidelines are separated into 'WARNING' and 'CAUTION' as described below.

This symbol is displayed to indicate matters and operations that can cause risk. Read the part with this symbol carefully and follow the instructions in order to avoid risk.

WARNING
This indicates that the failure to follow the instructions can cause serious injury or death.

CAUTION
This indicates that the failure to follow the instructions can cause the minor injury or damage to the product.
IMPORTANT SAFETY INSTRUCTIONS

WARNING
To reduce the risk of explosion, fire, death, electric shock, injury or scalding to persons when using this product, follow basic precautions, including the following:
Children in the Household
This appliance is not intended for use by persons (including children) with reduced physical, sensory or mental capabilities, or lack of experience and knowledge, unless they have been given supervision or instruction concerning use of the appliance by a person responsible for their safety. Children should be supervised to ensure that they do not play with the appliance.
For use in Europe:
This appliance can be used by children aged from 8 years and above and persons with reduced physical, sensory or mental capabilities or lack of experience and knowledge if they have been given supervision or instruction concerning use of the appliance in a safe way and understand the hazards involved. Children shall not play with the appliance. Cleaning and user maintenance shall not be made by children without supervision.
Installation
- Do not install the air conditioner on an unstable surface or in a place where there is danger of it falling.
- Contact an authorized service center when installing or relocating the air conditioner.
Install the panel and the cover of the control box safely.
- Do not install the air conditioner in a place where flammable liquids or gases such as gasoline, propane, paint thinner, etc., are stored.
- Make sure that the pipe and the power cable connecting the indoor and outdoor units are not pulled too tight when installing the air conditioner.
- Use standard circuit breaker and fuse that conform to the rating of the air conditioner.
-
Do not input air or gas into the system except with the specific refrigerant.
-
Use non-flammable gas (nitrogen) to check for leak and to purge air; using compressed air or flammable gas may cause fire or explosion.
-
The indoor/outdoor wiring connections must be secured tightly, and the cable should be routed properly so that there is no force pulling the cable from the connection terminals. Improper or loose connections can cause heat generation or fire.
-
Install dedicated electric outlet and circuit breaker before using the air conditioner.
- Do not connect the ground wire to a gas pipe, a lightning rod, or a telephone ground wire.
- Means for disconnection must be incorporated in the fixed wiring in accordance with the wiring rules.
Operation
-
Be sure to use only those parts listed in the service parts list. Never attempt to modify the equipment.
-
Make sure that children do not climb on or hit the outdoor unit.
- Dispose of the batteries in a place where there is no danger of fire.
- Use only the refrigerant specified on the air conditioner label.
- Cut off the power supply if there is any noise, smell, or smoke coming from the air conditioner.
-
Do not leave flammable substances such as gasoline, benzene, or thinner near the air conditioner.
-
Contact an authorized service center when the air conditioner is submerged by flood waters.
-
Do not use the air conditioner for an extended period of time in a small place without proper ventilation.
-
In the event of a gas leak (such as Freon, propane gas, LP gas, etc.) ventilate sufficiently before using the air conditioner again.
- To clean the interior, contact an authorized service center or dealer. Using harsh detergents may cause corrosion or damage to the unit.
-
Be sure to ventilate sufficiently when the air conditioner and a heating appliance such as a heater are used simultaneously.
-
Do not block the inlet or outlet of air flow.
- Do not insert hands or other objects through the air inlet or outlet while the air conditioner is operating.
- Make sure that the power cable is neither dirty, loose, nor broken.
- Never touch, operate, or repair the air conditioner with wet hands.
- Do not place any objects on the power cable.
- Do not place a heater or other heating appliances near the power cable.
- Do not modify or extend the power cable. Scratches or peeling insulation on the power cables may result in fire or electric shock, and should be replaced.
- Cut off the power supply immediately in the event of a blackout or a thunderstorm.
- Take care to ensure that power cable could not be pulled out or damaged during operation.
- Do not touch refrigerant pipe, water pipe and any internal parts while the unit is operating or immediately after operation.
Maintenance
- Do not clean the appliance by spraying water directly onto the product.
- Before cleaning or performing maintenance, disconnect the power supply and wait until the fan stops.
Technical Safety
-
Installation or repairs made by unauthorized persons can pose hazards to you and others.
-
The information contained in the manual is intended for use by a qualified service technician who is familiar with the safety procedures and equipped with the proper tools and test instruments.
- Failure to read and follow all instructions in this manual can result in equipment malfunction, property damage, personal injury and/or death.
-
The appliance shall be installed in accordance with national wiring regulations.
-
When the power cord is to be replaced, the replacement work shall be performed by authorized personnel using only genuine replacement parts.
- This appliance must be properly grounded to minimize risk of electric shock.
-
Do not cut or remove the grounding prong from the power plug.
-
Attaching the earth wire to the power outlet cover screw does not ground the appliance unless the cover screw is metal, uninsulated, and the power outlet is grounded through house wiring.
-
If you have any doubt whether the air conditioner is properly grounded, have the power outlet and circuit checked by a qualified electrician.
-
The refrigerant and insulation blowing gas used in the appliance require special disposal procedures. Consult a service agent or a similarly qualified person before disposing of them.
-
If the supply cord is damaged, it must be replaced by the manufacturer, its service agent or similarly qualified person in order to avoid a hazard.

CAUTION
To reduce the risk of minor injury to persons, malfunction, or damage to the product or property when using this product, follow basic precautions, including the following:
Installation
- Do not install the air conditioner in an area where it is directly exposed to sea wind (salt spray).
- Install the drain hose properly for the smooth drainage of water condensation.
Exercise caution when unpacking or installing the air conditioner. -
Do not touch the leaking refrigerant during installation or repair.
-
Transport the air conditioner with two or more people or use a forklift.
- Install the outdoor unit such that it is protected from direct sunlight. Do not place the indoor unit in a place where it is directly exposed to sunlight via the windows.
- Safely dispose of packing materials such as screws, nails or batteries using proper packaging after installation or repair.
- Install the air conditioner in a place where the noise from the outdoor unit or the exhaust fumes will not inconvenience the neighbors. Failure to do so may result in conflict with the neighbors.
Operation
- Remove the batteries if the remote control is not to be used for an extended period of time.
- Make sure that the filter is installed before operating the air conditioner.
- Be sure to check if there is a refrigerant leak after installing or repairing the air conditioner.
- Do not place any object on the air conditioner.
- Never mix different types of batteries, or old and new batteries for the remote control.
- Do not let the air conditioner run for a long time when humidity is very high or when a door or a window has been left open.
- Stop using the remote control if there is a fluid leak in the battery. If your clothes or skin are exposed to the leaking battery fluid, wash off with clean water.
- Do not expose people, animals, or plants to the cold or hot wind from the air conditioner for extended periods of time.
- If the leaking battery fluid has been swallowed, rinse the inside of the mouth thoroughly and consult a doctor.
- Do not drink the water drained from the air conditioner.
- Do not use the product for special purposes, such as preserving foods, works of art, and etc. It is an air conditioner for consumer purposes, not a precision refrigeration system. There is risk of damage or loss of property.
- Do not recharge or disassemble the batteries.
Maintenance
-
Never touch the metal parts of the air conditioner when removing the air filter.
-
Use a sturdy stool or ladder when cleaning, maintaining, or repairing the air conditioner at a height.
- Never use strong cleaning agents or solvents when cleaning the air conditioner or spray water. Use a smooth cloth.
Notes for Operation
Suggestion for Energy Saving
- Do not over-cool the space. This may be harmful for your health and may consume more electricity.
- Block sunlight with blinds or curtains while you are operating the air conditioner.
- Keep doors or windows closed tightly while you are operating the air conditioner.
- Adjust the direction of the air flow vertically or horizontally to circulate indoor air.
- Speed up the fan to cool or warm indoor air quickly, within a short period of time.
- Open windows regularly for ventilation. The indoor air quality may deteriorate if the air conditioner is used for long durations.
- Clean the air filter once every 2 weeks. Dust and impurities collected in the air filter may block the air flow or reduce the unit performance.
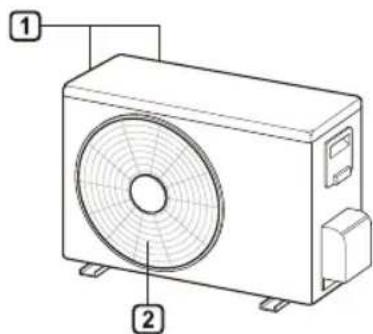
Parts and Functions
Indoor Unit Outdoor Unit
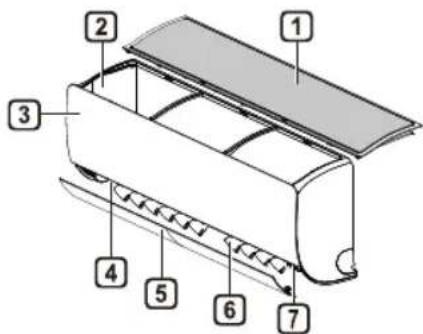
1 Air Filter
Air Intake Vents
2 Air Intake
2 Air Outlet Vents
3 Front Cover
4 Air Outlet
5 Air Deflector (Horizontal Vane)
6 Air Deflector (Vertical Louver)
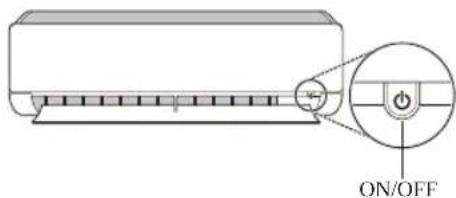
7 On/Off Button
NOTE
- The number and location of operation lamps may vary according to the model of the air conditioner.
The feature may be changed according to the type of model.
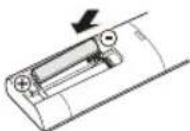
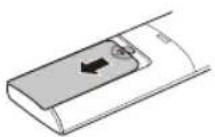
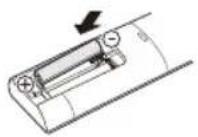
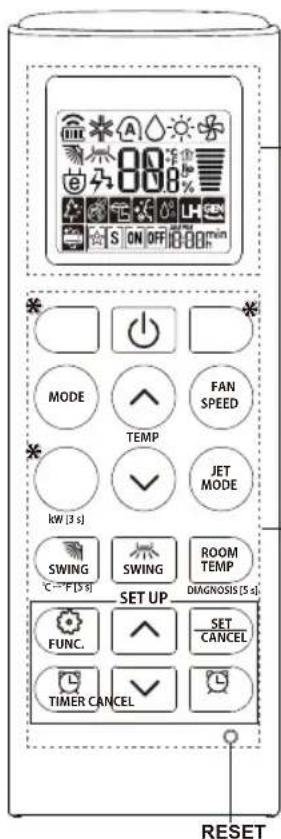
Wireless Remote Control Inserting Batteries
If the display screen of the remote control begins to fade, replace the batteries. Insert AAA (1.5 V) batteries before using the remote control.
1 Remove the battery cover.
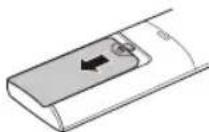
2 Insert the new batteries and make sure that the + and - terminals of the batteries are installed correctly.
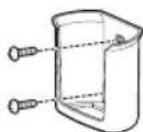
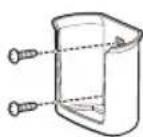
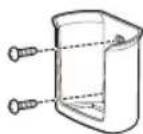
Installing the Remote Control Holder
To protect the remote control, install the holder where there is no direct sunlight.
1 Choose a safe and easily accessible location.
2 Fix the holder by fastening 2 screws firmly with a screwdriver.
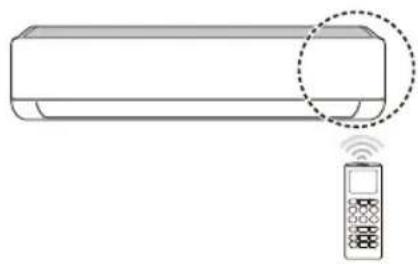
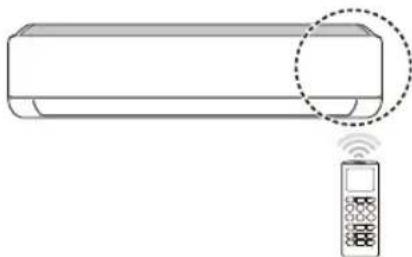
Operating Method
Point the remote control towards the signal receiver at the right side of the air conditioner to operate it.
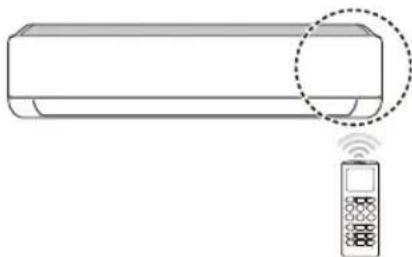
NOTE
The remote control may operate other electronic devices if it is directed towards them. Make sure to point the remote control towards the air conditioner signal receiver.
- For proper operation, use a soft cloth to clean the signal transmitter and receiver.
In case of a function not provided in the product, no buzzer sound occurs from the product when a button for such function on the remote control is pressed except for Air Flow Direction (SWING), Energy Display (Air Purification function).
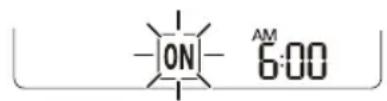
Setting the Current Time
1 Insert batteries.
The icon below blinks at the bottom of the display screen.

2 Press or button to select the minutes.
3 Press SET/CANCEL button to finish.
NOTE
The On/Off Timer is available after setting the current time.
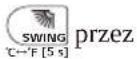
Using the ^ C / ^ F Conversion Function (Optional)
This function changes unit between ^ C and ^ F
- Press and hold SWING button about 5 seconds. C-F [5]
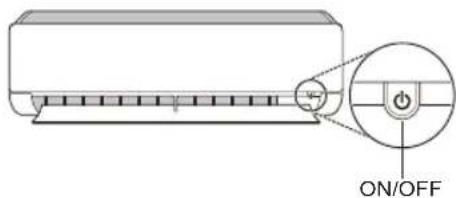
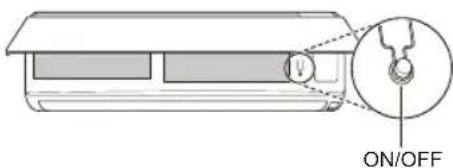
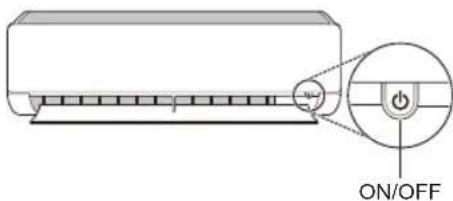
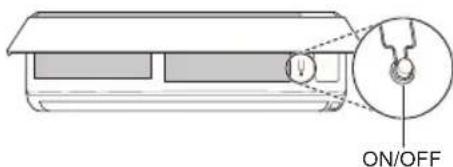
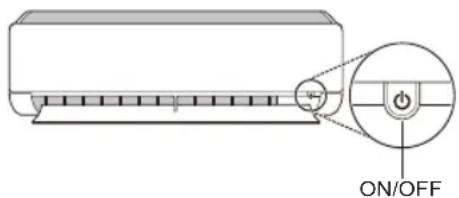
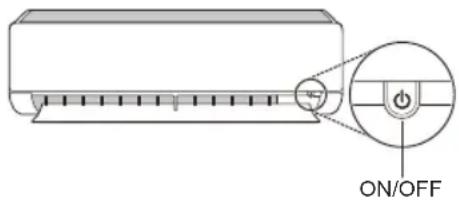
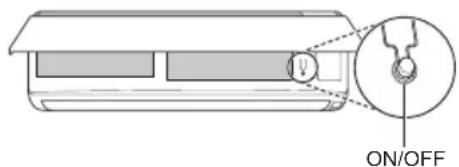
Operating the Air Conditioner without the Remote Control
You can use the ON/OFF button of the indoor unit to operate the air conditioner when the remote control is unavailable.
1 Open the front cover (Type2) or horizontal vane (Type1).
2 Press the ON/OFF button.
Type1
Type2
NOTE
- The stepping motor may be broken, if the horizontal vane opens rapidly.
The fan speed is set to high.
The feature may be changed according to the type of model.
The temperature cannot be altered when using this emergency ON/OFF button. - For cooling-only models, the temperature is set to 22^
For cooling & heating models, the temperature is set from 22^ to 24^
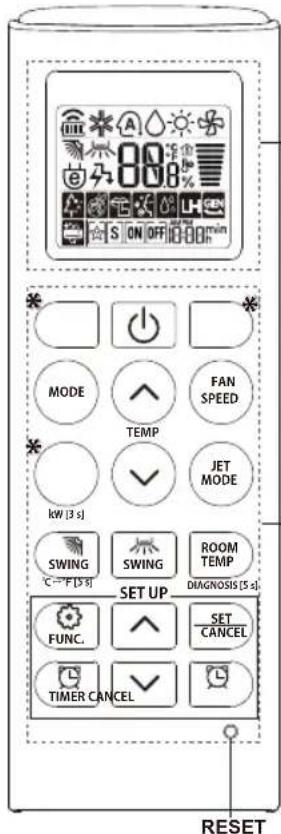
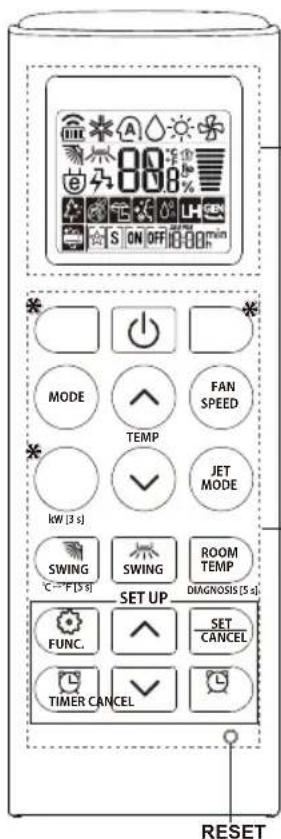
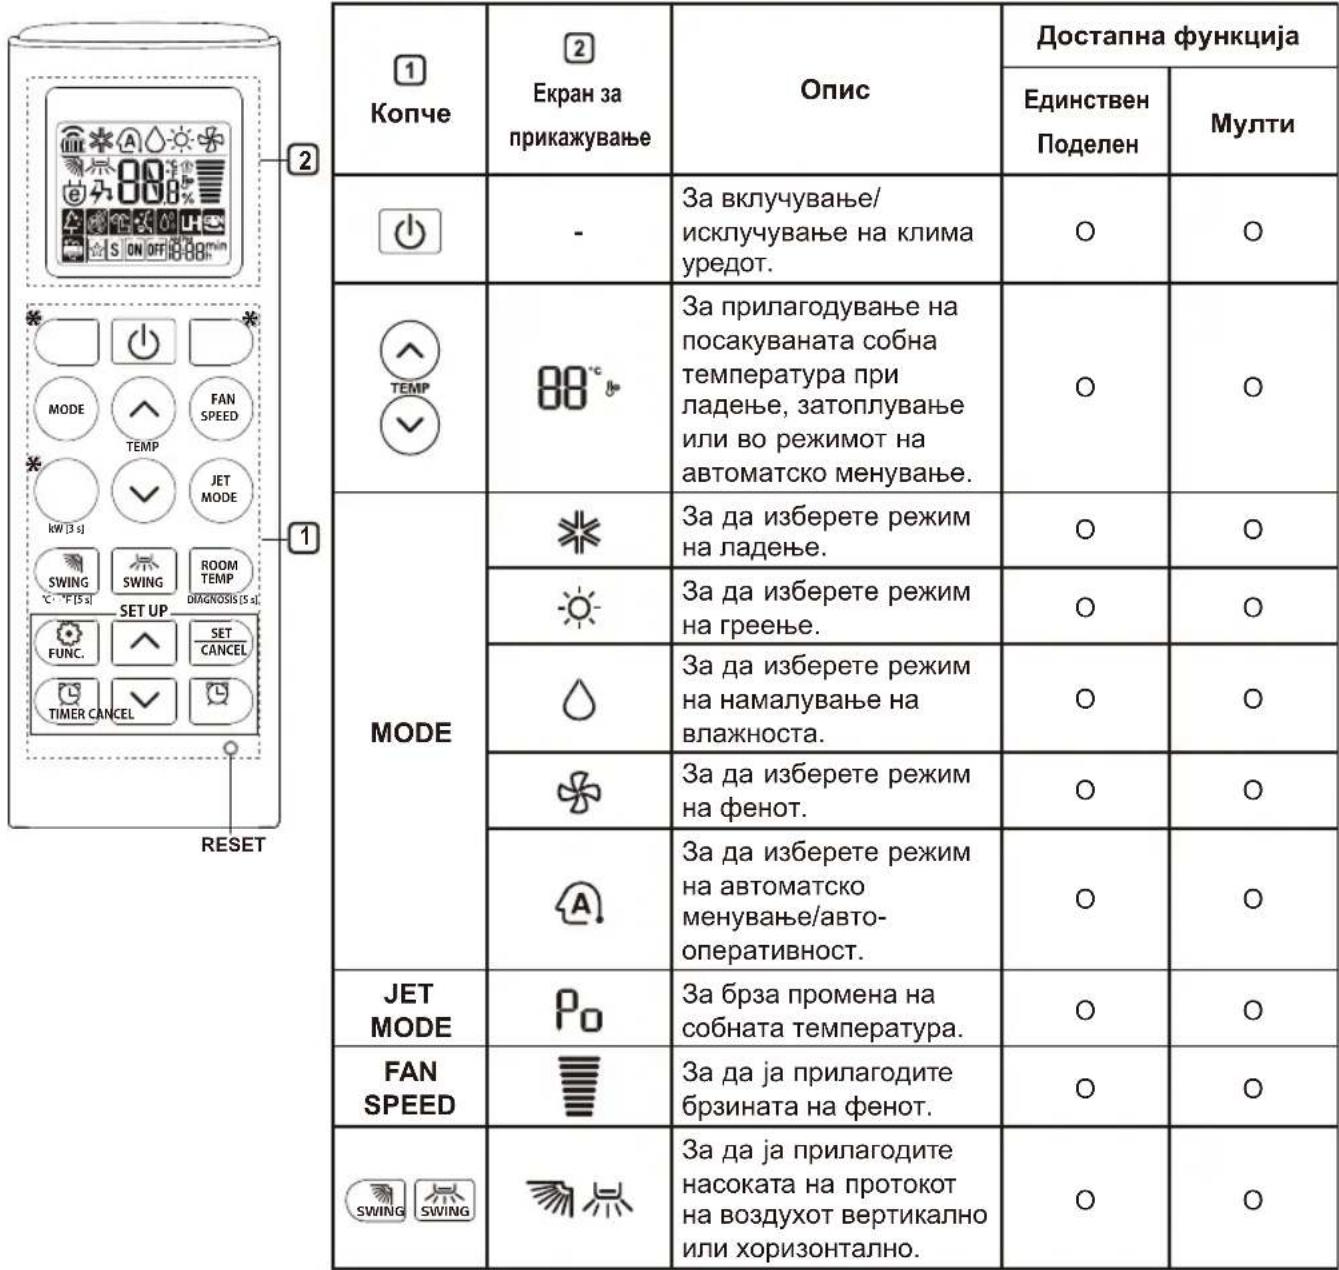
Using Wireless Remote Control
You can operate the air conditioner more conveniently with the remote control.

NOTE
-
- buttons may be changed according to the type of model.
-
When connected to the Multi Outdoor unit, the Energy Display, Energy Control, Silent and Smart Diagnosis function may not be supported.
2
| 1Button | 2DisplayScreen | Description | Available Function | |
| SingleSplit | Multi | |||
| ON OFF | To turn on/off air conditioner automatically at desired time. | ○ | ○ | |
| SET/CANCEL | - | To set/cancel the special functions and timer. | ○ | ○ |
| - | To cancel the timer settings. | ○ | ○ | |
| - To adust time. ○○ | ||||
| *LIGHTOFF | - | To set the brightness of the display on the indoor unit. | ○ | ○ |
| ROOMTEMP | To display the room temperature. | ○ | ○ | |
| °C←°F[5 s] | °C°F | To change unit between °C and °F | ○ | ○ |
| *COMFORTAIR | To adjust the air flow to deflect wind. | ○ | ○ | |
| kW[3 s] | - | To set whether or not to display information regarding energy. | ○ | × |
| *ENERGYCTRL | 88 x | To bring the effect of the power saving. | ○ | × |
| DIAGNOSIS[5 s] | - | To conveniently check maintenance information of a product. | ○ | × |
2
| 1 Button | 2 Display Screen | Description | Available Function | |
| Single Split | Multi | |||
| FUNC. | The Ion generator uses millions of ions to help improve indoor air quality. | O (Optional) | O (Optional) | |
| To reduce noise from outdoor units. | O | X | ||
| To remove moisture generated inside the indoor unit. | O | O | ||
| RESET - | To initialize the remote control settings. | O | O | |
NOTE
- Some functions may not be supported, depending on the model.
^* buttons may be changed according to the type of model. - Press the SET/CANCEL button to operate the selected FUNC.
Restarting the Air Conditioner Automatically
When the air conditioner is turned on again after a power failure, this function restores the previous settings.
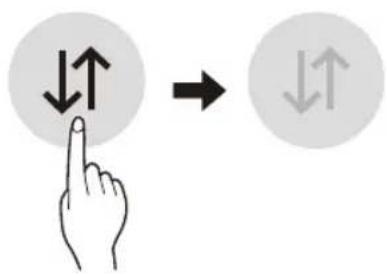
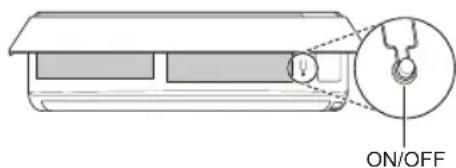
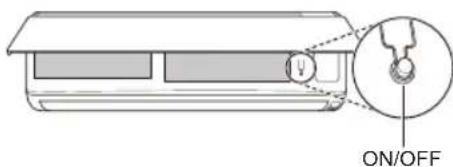
Disabling Auto Restart
1 Open the front cover (Type2) or horizontal vane (Type1).
2 Press the ON/OFF button and hold it for 6 seconds, then the unit will beep twice and the lamp will blink twice 4 times.
To re-enable the function, press the ON/ OFF button and hold it for 6 seconds. The unit will beep twice and the lamp will blink 4 times.
Type1
Type2
NOTE
The feature may be changed according to the type of model.
- If you press and hold the ON/OFF button for 3 - 5 seconds, instead of 6 seconds, the unit will switch to the test operation. In the test operation, the unit blows out strong cooling air for 18 minutes and then returns to factory default settings.
Using the Mode Function
This function allows you to select the desired function.
| ※ | Cooling Mode |
| A | Auto Changeover Mode / Auto Operation(Al) Mode |
| Dehumidification Mode | |
| Heating Mode | |
| Fan Mode |
Cooling Mode
1 Turn the appliance on.
2 Press MODE button repeatedly to select the Cooling Mode.
is displayed on the display screen.
3 Press or button to set the desired temperature.
Auto Operation (Artificial Intelligence)
Multi Model
In this operation mode, the system is automatically operated by the electronic controls.
1 Turn the appliance on.
2 Press MODE button repeatedly to select the Auto Operation.
A is displayed on the display screen.
3 Press or button to set the desired temperature.
4 Press FAN SPEED button to adjust the fan speed.
Auto Changeover Mode
Single Split Model
This mode changes the mode automatically to maintain the set temperature at ± 2^
1 Turn the appliance on.
2 Press MODE button repeatedly to select the Auto Changeover Mode.
A is displayed on the display screen.
3 Press button to set the desired temperature.
4 Press FAN SPEED button to adjust the fan speed.
Dehumidification Mode
This mode removes excess moisture from a highly humid environment or during the rainy season, in order to prevent mildew from setting in. This mode adjusts the room temperature and the fan speed automatically to maintain the optimal level of humidity.
1 Turn the appliance on.
2 Press MODE button repeatedly to select the Dehumidification Mode.
is displayed on the display screen.
NOTE
- In this mode you cannot adjust the room temperature, it is adjusted automatically.
The room temperature is not displayed on the display screen.
In the dehumidification mode, compressor and indoor fan may not operate when the room temperature is below 24^
Heating Mode
1 Turn the appliance on.
2 Press MODE button repeatedly to select the Heating Mode.
is displayed on the display screen.
3 Press or button to set the desired temperature.
NOTE
will be displayed on the indoor unit when defrosting is operating.
- Furthermore, this indication will be displayed on the indoor unit:
-When preheating is operating.
- When the room temperature has been reached to the set temperature.
Fan Mode
This mode only circulates the indoor air without changing the room temperature.
1 Turn the appliance on.
2 Press MODE button repeatedly to select the Fan Mode.
is displayed on the display screen.
3 Press FAN SPEED button to adjust the fan speed.
Using the Jet Mode Function
Changing Room Temperature Quickly
This function allows you to cool indoor air quickly during the summer or warm it quickly during winter.
- The Jet Mode function is available with Cooling, Heating and Dehumidification Mode.
1 Turn the appliance on.
2 Press MODE button repeatedly to select the desired mode.
3 Press JET MODE button.
is displayed on the display screen.
NOTE
- Jet Heating Mode is not available on some models.
In Jet Cooling Mode, strong air blows out for 30 minutes.
After 30 minutes later, setting temperature is maintaining 18^
If you want to change the temperature, Press
or button to set the desired temperature.
In Jet Heating Mode, strong air blows out for 30 minutes.
After 30 minutes later, setting temperature is maintaining 30^
If you want to change the temperature, Press
or button to set the desired temperature.
- This function may operate differently from the remote control display.
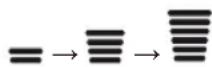
Using the Fan Speed Function
Adjusting the Fan Speed
- Press FAN SPEED button repeatedly to adjust the fan speed.
| Display Screen Speed | |
| High | |
| Medium - High | |
| Medium | |
| Medium - Low | |
| Low | |
| - Natural Wind | |
NOTE
The fan speed of Natural Wind adjusts automatically.
The fan speed icons are displayed on some indoor units.

- Indoor unit display is displayed only 5 seconds and return to the setting temperature on some models.
Using the Air Flow Direction Function
This function adjusts the direction of the air flow vertically (horizontally).
- Press SWING (SWING) button repeatedly and select the desired direction.
-Select adjust the direction of the air flow automatically.
NOTE
- Adjusting the air flow direction horizontally may not be supported, depending on the model.
Adjusting the air deflector arbitrarily may cause product failure. - If you restart the air conditioner, it starts to operate with the previously set direction of air flow, so the air deflector may not match the icon displayed on the remote control. When this occurs, press SWING or SWING button to adjust the direction of the air flow again.
- This function may operate differently from the remote control display.
Setting the On/Off Timer
This function sets the air conditioner to turn on/ off automatically at desired time.
On/Off Timer can be set together.
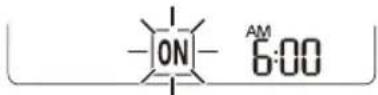
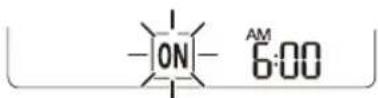
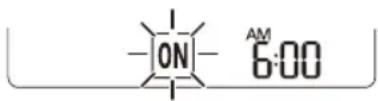
Setting the On Timer
1 Press button repeatedly.
The icon below blinks at the bottom of the display screen.
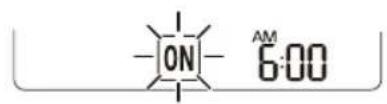
2 Press or button to select the minutes.
3 Press SET/CANCEL button to finish.
After setting the timer, current time and ON icon are displayed on the display screen indicating that the desired time is set.
Canceling the On Timer
1 Press button repeatedly.
The icon below blinks at the bottom of the display screen.
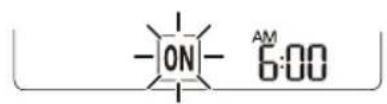
2 Press SET/CANCEL button to cancel the setting.
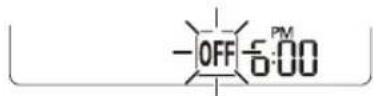
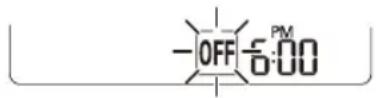
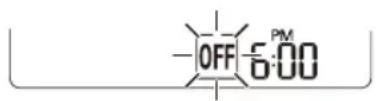
Setting the Off Timer
1 Press button repeatedly.
The icon below blinks at the bottom of the display screen.
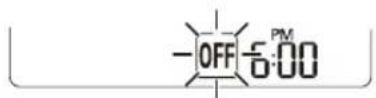
2 Press or button to select the minutes.
3 Press SET/CANCEL button to finish.
After setting the timer, current time and OFF icon are displayed on the display screen indicating that the desired time is set.
NOTE
This function is disabled when you set Simple Timer.
Canceling the Off Timer
1 Press button repeatedly.
The icon below blinks at the bottom of the display screen.
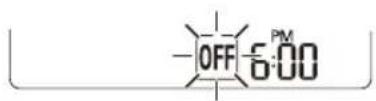
2 Press SET/CANCEL button to cancel the setting.
Canceling the Timer Setting
- Press button to cancel all timer settings.
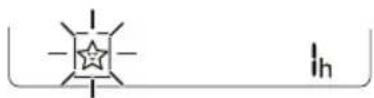
Using the Sleep Function (Optional)
This function turns off the air conditioner automatically when you go to sleep.
1 Turn the appliance on.
2 Press button repeatedly.
The icon below blinks at the bottom of the display screen.
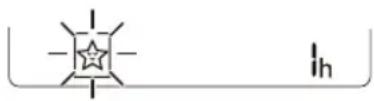
3 Press button to select the hour (up to 7 hours).
4 Press SET/CANCEL button to finish.
is displayed on the display screen.
NOTE
Hs displayed on some indoor units.
- Indoor unit display is displayed from 1H to 7H which is displayed only 5 seconds and then return to the setting temperature.
- In the Cooling and Dehumidification Mode, the temperature increases by 1^ after 30 minutes and additional 1^ after another 30 minutes for a more comfortable sleep.
- The temperature increases up to 2^ from the preset temperature.
- Although the remark for fan speed on the display screen may be changed, the fan speed is adjusted automatically.
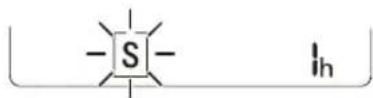
Using the Simple Timer Function (Optional)
This function turns off the air conditioner automatically when you go to sleep.
1 Turn the appliance on.
2 Press button repeatedly.
- The icon below blinks at the bottom of the display screen.

3 Press button to select the hour (up to 7 hours).
4 Press SET/CANCEL button to finish. S is displayed on the display screen.
NOTE
This function is disabled when you set Off Timer.
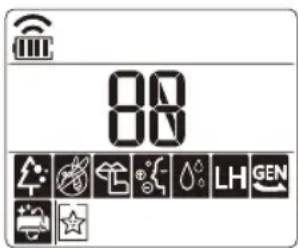
Using the Energy Display Function (Optional)
This function displays the amount of electricity generated on the indoor display as the product operates.
Display the Current Energy Usage
1 Turn the appliance on.
2 Press button and hold it about 3 seconds.
The instantaneous power consumption (88) is displayed for a while on some indoor units.
NOTE
It is not displayed on the wireless remote control.
The unit of the displayed value is kW.
- If it is more than 99kW , which is the range of expression, maintain it as 99kW .
- Display wattage under 10kW with 0.1kW unit, and display one over 10kW with 1kW unit.
The actual power may differ from the power displayed.
- When connected to the Multi Outdoor unit, this function may not be supported.
Using the Light Off Function (Optional)
Display Screen Brightness
You can set the brightness of the indoor unit display screen.
- Press LIGHT OFF button.
NOTE
- Turn on/off the Display screen.
Using the Comfort Air Function (Optional)
Comfort Vane Operation
This function conveniently sets the vane to a preset position to deflect the supply air away from blowing directly onto the occupants in the room.
1 Turn the appliance on.
2 Press COMFORT AIR button repeatedly and select the desired direction.
or is displayed on the display screen.
NOTE
or is displayed on some indoor units.
- This function is disabled when you press MODE or JET MODE button.
This function is disabled and auto swing of vertical direction is set up when you press button. - When this function is off, the horizontal vane operates automatically depending on the set mode.
Using the Energy Control Function (Optional)
1 Turn the appliance on.
2 Press ENERGY CTRL button.
- Press ENERGY CTRL button repeatedly to select each step.
NOTE
-1 step : The power Input is decreased by 20% compared to rated power input.
80 is displayed on the display screen.
-2 step : The power Input is decreased by 40 % compared to rated power input.
60_× is displayed on the display screen.
-3 step (Optional): The power Input is decreased by 60% compared to rated power input.
40_X is displayed on the display screen.
(1 step), (2 step) is displayed on some indoor units.
- This function is available with Cooling Mode.
- Capacity may decrease when Energy Control mode is selected.
- Desired temperature is displayed about 5 seconds if you press FAN SPEED, or button.
- Room temperature is displayed about 5 seconds if you press ROOM TEMP button.
- When connected to the Multi Outdoor unit, this function may not be supported.
Using Special Functions
1 Turn the appliance on.
2 Press FUNC button repeatedly to select the desired function.
3 Press SET/CANCEL button to finish.
| Display Screen | Description |
| The Ion generator uses millions of ions to help improve indoor air quality. | |
| To reduce noise from outdoor units. | |
| To remove moisture generated inside the indoor unit. |
NOTE
Some functions may not be supported, depending on the model.
- Some functions may operate differently from the remote control display.
Canceling Special Functions
1 Press FUNC button repeatedly to select the desired function.
2 Press SET/CANCEL button to cancel the function.
Using the Air Purification Function
These functions supply clean and fresh air by ion particles and the filter.
| Function Display Description | |
| Ionizer | Ion particles from lonizer sterilize the aerial bacteria and other harmful substances. |
| Plasma | It removes microscopic contaminants from the intake air completely to supply clean and fresh air. |
NOTE
- You can use this function without turning the air conditioner on.
- Both the plasma lamp and the cooling lamp light up while Smoke Away/Plasma is in operation on some models.
- Do not touch ionizer during operation.
- This function may operate differently from the remote control display.
Using the Silent Function
This function prevents potential claims by neighbors, reducing noise from outdoor units.

is displayed on the display screen.
NOTE
- This function is disabled when you press MODE or ENERGY CTRL or JET MODE button.
- This function is available with Cooling, Heating, Auto Changeover, Auto Operation Mode.
- When connected to the Multi Outdoor unit, this function may not be supported.
Using the Auto Clean Function
In the Cooling and Dehumidification Mode, moisture is generated inside the indoor unit. This function removes such moisture.

is displayed on the display screen.
NOTE
- Some functions cannot be used while the Auto Clean function is in operation.
- If you turn off the unit, the fan continues to run for 30 minutes and cleans the inside of the indoor unit.
LG ThinQ Application
This feature is only available on models with the or ThinQ logo.
The LG ThinQ application allows you to communicate with the appliance using a smartphone.
LG ThinQ Application Features
Communicate with the appliance from a smartphone using the convenient smart features.
Smart Diagnosis
- If you experience a problem while using the appliance, this smart diagnosis feature will help you diagnose the problem.
Settings
- Allows you to set various options on the appliance and in the application.
NOTE
- If you change your wireless router, internet service provider, or password, delete the registered appliance from the LG ThinQ application and register it again.
The application is subject to change for appliance improvement purposes without notice to users.
- Functions may vary by model.
Before Using LG ThinQ Application
1 Check the distance between the appliance and the wireless router (Wi-Fi network).
- If the distance between the appliance and the wireless router is too far, the signal strength becomes weak. It may take a long time to register or installation may fail.
2 Turn off the Mobile data or Cellular Data on your smartphone.
3 Connect your smartphone to the wireless router.
NOTE
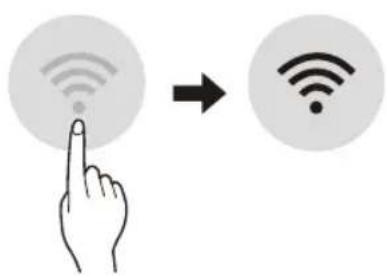
To verify the Wi-Fi connection, check that icon on the control panel is lit.
- The appliance supports 2.4 GHz Wi-Fi networks only. To check your network frequency, contact your Internet service provider or refer to your wireless router manual.
LG ThinQ is not responsible for any network connection problems or any faults, malfunctions, or errors caused by network connection.
-
If the appliance is having trouble connecting to the Wi-Fi network, it may be too far from the router. Purchase a Wi-Fi repeater (range extender) to improve the Wi-Fi signal strength.
-
The Wi-Fi connection may not connect or may be interrupted because of the home network environment.
The network connection may not work properly depending on the Internet service provider.
-
The surrounding wireless environment can make the wireless network service run slowly.
-
The appliance cannot be registered due to problems with the wireless signal transmission. Unplug the appliance and wait about a minute before trying again.
- If the firewall on your wireless router is enabled, disable the firewall or add an exception to it.
- The wireless network name (SSID) should be a combination of English letters and numbers. (Do not use special characters.)
- Smartphone user interface (UI) may vary depending on the mobile operating system (OS) and the manufacturer.
- If the security protocol of the router is set to WEP, you may fail to set up the network. Please change it to other security protocols (WPA2 is recommended) and register the product again.
Installing the LG ThinQ Application
Search for the LG ThinQ application from the Google Play Store or Apple App Store on a smartphone. Follow instructions to download and install the application.
Open Source Software Notice Information
To obtain the source code under GPL, LGPL, MPL, and other open source licenses, that is contained in this product, please visit http:// opensource.lge.com.
In addition to the source code, all referred license terms, warranty disclaimers and copyright notices are available for download.
LG Electronics will also provide open source code to you on CD-ROM for a charge covering the cost of performing such distribution (such as the cost of media, shipping, and handling) upon email request to opensource@lge.com. This offer is valid for a period of three years after our last shipment of this product. This offer is valid to anyone in receipt of this information.
Smart Diagnosis
This feature is only available on models with the or ego.
Use this feature to help you diagnose and solve problems with your appliance.
NOTE
- For reasons not attributable to LGE's negligence, the service may not operate due to external factors such as, but not limited to, Wi-Fi unavailability, Wi-Fi disconnection, local app store policy, or app unavailability.
The feature may be subject to change without prior notice and may have a different form depending on where you are located.
Using LG ThinQ to Diagnose Issues
If you experience a problem with your Wi-Fi equipped appliance, it can transmit troubleshooting data to a smartphone using the LG ThinQ application.
- Launch the LG ThinQ application and select the Smart Diagnosis feature in the menu. Follow the instructions provided in the LG ThinQ application.
Using Audible Diagnosis to Diagnose Issues
Follow the instructions below to use the audible diagnosis method.
- Launch the LG ThinQ application and select the Smart Diagnosis feature in the menu. Follow the instructions for audible diagnosis provided in the LG ThinQ application.
1 Plug the power plug in the outlet properly.
2 Place the mouthpiece of your smartphone close to the or logo.
3 Press and hold the DIAGNOSIS [5 s] button for 5 seconds or longer while holding the smartphone mouthpiece to the logo until the data transfer is complete.
- Keep the smartphone in place until the data transfer has finished. Time remaining for data transfer is displayed.
4 After the data transfer is complete, the diagnosis will be displayed in the application.
NOTE
- For best results, do not move the phone while the tones are being transmitted.
- Be sure to keep ambient noise to a minimum or the phone may not correctly receive the buzzer beeps from the indoor unit.
WARNING
- Before cleaning or performing maintenance, disconnect the power supply and wait until the fan stops.
If the air conditioner will not be used for an extended period of time, dry the air conditioner to maintain it in best condition. Clean the product regularly to maintain optimal performance and to prevent possible breakdown.
- Dry the air conditioner in Fan mode for 3 to 4 hours and disconnect the power. There may be internal damage if moisture is left in its components.
- Before using the air conditioner again, dry the inner components of the air conditioner in Fan mode for 3 to 4 hours. This will help to remove the odor generated from moisture.

The feature may be changed according to the type of model.
| Type Description Interval | ||
| Air filter Clean with a vacuum or hand wash. 2 weeks | ||
| Ionizer (Optional) | Use dry cotton bud to remove any dust. Every 6 months | |
| Indoor unit | Clean the Indoor unit surface by using a soft, dry cloth. Regularly | |
| Have a professional clean the condensate drain pan. Once a year | ||
| Have a professional clean the condensate drain pipe. Every 4 months | ||
| Replace the remote control batteries. Once a year | ||
| Outdoor unit | Have a professional clean the heat exchanger coils and the panel vents. (Consult with technician.) | Once a year |
| Have a professional clean the fan. Once a year | ||
| Have a professional clean the condensate drain pan. Once a year | ||
| Have a professional verify that all the fan assembly is firmly tightened. | Once a year | |
| Clean the electric components with air. Once a year | ||
NOTE
- Never use water that is higher than 40^ when you clean the filters. It may cause deformation or discoloration.
- Never use volatile substances when you clean the filters. They may damage the surface of the product.
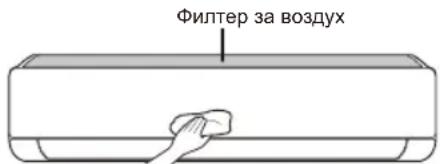
Clean the Air Filter
Clean the air filters once every 2 weeks, or more, if necessary.
NOTE
The air filter can be broken when it is bent.
- When the air filter is not assembled correctly, dust and other substances can enter into the indoor unit.
Type1
If you look at the indoor unit from above it, can assemble the top filter easily.
1 Turn off the power to the unit.
2 Hold the knobs of the air filter, lift it up slightly.
3 Remove it from the indoor unit.
4 Clean the filter with a vacuum cleaner or with lukewarm water with neutral detergent.
5 Dry the filter in the shade.
6 Insert the hooks of the air filter into the front cover.
7 Push down hooks to assemble the air filter.
8 Check the side of the front cover for correct assembly of the air filter.
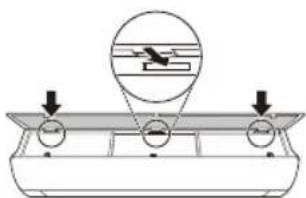
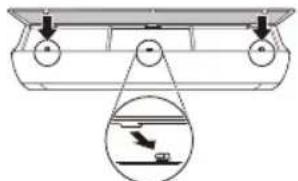
Type2
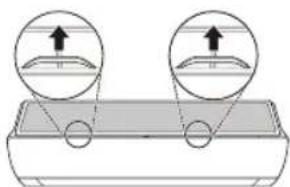
1 Turn off the power to the unit.
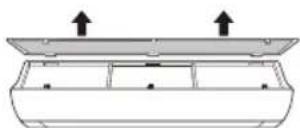
2 Open the front cover.
- Lift up both sides of the cover slightly.
3 Hold the knobs of the air filters, pull them down slightly and remove them from the indoor unit.
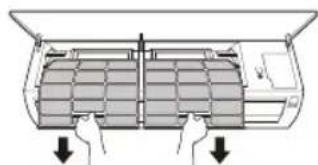
4 Clean the filters with a vacuum cleaner or with lukewarm water with neutral detergent.
5 Dry the filters in the shade.
6 Insert the hooks of the air filters into the front cover.

7 Check the side of the front cover for correct assembly of the air filters.
Self-diagnosis Function
This product has a built-in self-diagnosis function. If an error occurs, the lamp of the indoor unit will blink in 2 second intervals. If this occurs, contact your local dealer or service center.
Before Calling for Service
Please check the following before you contact the service center. If the problem persists, contact your local service center.
| Symptoms Poss | ble Causes & Solution |
| The air conditioner does not work normally. | Burning smell and strange sounds are coming from the unit. ·Turn off the air conditioner, switch OFF, or disconnect the power supply, and contact the service center. |
| Water leaks from the indoor unit even when the humidity level is low. ·Turn off the air conditioner, switch OFF, or disconnect the power supply, and contact the service center. | |
| The power cable is damaged or it is generating excessive heat. ·Turn off the air conditioner, switch OFF, or disconnect the power supply, and contact the service center. | |
| A switch, a circuit breaker (safety, ground), or a fuse is not operated properly. ·Turn off the air conditioner, switch OFF, or disconnect the power supply, and contact the service center. | |
| The unit generates an error code from its self-diagnosis. ·Turn off the air conditioner, switch OFF, or disconnect the power supply, and contact the service center. | |
| The air conditioner does not work. | The air conditioner is unplugged. ·Check whether the power cord is plugged into the outlet or the power isolators are switched on. |
| A fuse exploded, or the power supply is blocked. ·Replace the fuse or check if the circuit breaker has tripped. | |
| A power failure has occurred. ·Turn off the air conditioner when a power failure occurs. ·When the power is restored, wait 3 minutes, and then turn on the air conditioner. | |
| The voltage is too high or too low. ·Check if the circuit breaker has tripped. | |
| The air conditioner was turned off automatically at a preset time. ·Turn the air conditioner on. | |
| The battery setting in the remote controller is incorrect. ·Make sure that the batteries are inserted correctly in your remote controller. ·If the batteries are placed correctly, but the air conditioner still does not operate, replace the batteries and try again. | |
| The air conditioner does not emit cool air. | Air is not circulating properly. ·Make sure that there are no curtains, blinds, or pieces of furniture blocking the front of the air conditioner. |
| The air filter is dirty. ·Clean the air filter once every 2 weeks. ·See “Clean the Air Filter” for more information. | |
| The room temperature is too high. ·In summer, cooling the indoor air fully may take some time. In this case, select the Jet Mode to cool the indoor air quickly. | |
| Cold air is escaping from the room. ·Make sure that no cold air is escaping through the ventilation points in the room. | |
| The desired temperature is higher than the current temperature. ·Set the desired temperature to a level lower than the current temperature. | |
| There is a heating source nearby. ·Avoid using heat generators like electric ovens or gas burners while the air conditioner is in operation. | |
| Fan Mode is selected. ·During Fan Mode, air blows from the air conditioner without cooling or heating the indoor air. ·Switch the operation mode to cooling operation. | |
| Outside temperature is too high. ·The cooling effect may not be sufficient. | |
| The fan speed cannot be adjusted. | The Jet Mode, or Auto Operation Mode is selected. ·In some operation modes, you cannot adjust the fan speed. Select an operation mode in which you can adjust the fan speed. |
| The temperature cannot be adjusted. | The Fan Mode or Jet Mode is selected. ·In some operation modes, you cannot adjust the temperature. Select an operation mode in which you can adjust the temperature. |
| The air conditioner stops during operation. | The air conditioner is suddenly turned off. ·The Timer Function may have timed out, which turns the unit off. Check the timer settings. |
| A power failure has occurred during operation. ·Wait for the power to come back. If you have the Auto Restart function enabled, your unit will resume its last operation several minutes after power is restored. | |
| The indoor unit is still operating even when the unit has been turned off. | The Auto Clean function is being operated. ·Allow the Auto Clean function to continue since it removes any remaining moisture inside the indoor unit. If you do not want this feature, you can turn the unit off. |
| The air outlet on the indoor unit is discharging mist. | The cooled air from the air conditioner makes mist. ·When the room temperature decreases, this phenomenon will disappear. |
| Water leaks from the outdoor unit. | In the heating operations, condensed water drops from the heat exchanger. ·This symptom requires installing a drain hose under the base pan. Contact the installer. |
| There is noise or vibration. | A clicking sound can be heard when the unit starts or stops due to movement of the reversing valve. Creaking sound: The plastic parts of the indoor unit creak when they shrink or expand due to sudden temperature changes. Flowing or Blowing sound: This is the flow of refrigerant through the air conditioner. ·These are normal symptoms. The noise will stop. |
| The indoor unit gives off an odor. | Odors (such as cigarette smoke) may be absorbed into the indoor unit and discharged with airflow. ·If the smell does not disappear, you need to wash the filter. If this does not work, contact the service center to clean your heat exchanger. |
| The air conditioner does not emit warm air. | When Heating Mode starts, the vane is almost closed, and no air comes out, even though the outdoor unit is operating. ·This symptom is normal. Please wait until the unit has generated enough warm air to blow through the indoor unit. |
| The outdoor unit is in Defrosting Mode. ·In Heating Mode, ice/frost is built up on the coils when the outside temperature falls. This function removes a layer of frost on the coil, and it should finish in approximately 15 minutes. | |
| Outside temperature is too low. ·The heating effect may not be sufficient. | |
| Your home appliance and smartphone is not connected to the Wi-Fi network. | The password for the Wi-Fi that you are trying to connect to is incorrect. • Find the Wi-Fi network connected to your smartphone and remove it, then register your appliance on LG ThinQ. |
| Mobile data for your smartphone is turned on. • Turn off the Mobile data of your smartphone and register the appliance using the Wi-Fi network. | |
| The wireless network name (SSID) is set incorrectly. • The wireless network name (SSID) should be a combination of English letters and numbers. (Do not use special characters.) | |
| The router frequency is not 2.4 GHz. • Only a 2.4 GHz router frequency is supported. Set the wireless router to 2.4 GHz and connect the appliance to the wireless router. To check the router frequency, check with your Internet service provider or the router manufacturer. | |
| The distance between the appliance and the router is too far. • If the distance between the appliance and the router is too far, the signal may be weak and the connection may not be configured correctly. Move the location of the router so that it is closer to the appliance. |
NOTE
- Some functions may not be supported, depending on the model.
MANUALE D'USO
CLIMATIZZATORE

m = 311 ;
m = 311
Smart Diagnosis (Diagnostic intelligent) 28
MAINTENANCE 29
Application LG ThinQ
Smart Diagnosis (Diagnostic intelligent)
Smart Diagnosis (Diagnostic intelligent)
H M E I O H
O apiouc kai n theon twv luxviw aeitoupyia c mTpe i va diaepe i avaloya e To movtelo tou kaijatiotko.
H 1i0nta mtoepia aaaaegia vaooya e Tov tTO Tou ovtelou.
m = 311
[?0][] []?a[]?[]?[]?[]?[]?e[i]?i?odwrotnie.
× 日 10000000?0?0000000ae|?0000000?? 100000P?0A]
>IAUU×OUYOEA@OAE:UOIIA@DIYyAEOzdalnegosterowania
&&&?}&&?&&&&}?ON/OFF Jednostki 口 &&**??0?0?0?0?0?0?0?0?0?0?0?0?0?0?0?0?0?0?0?0?0?0?0?0?0?0?0?0?0?0?0?0?0?0?0?0?0?0?0?0?0?0?0?0?0?0?0?0?0?0?
1 000000?00000?000?U?0}?00000?
2 10000?00000?ON/OFF.
Typ1
Typ2

UWAGA
·000?00|0000A?0]0~0A0A?000|000?0000aeA?aeA? 1000J0|0}][00]A0A^?0000|?0000A□? 100|00A
·00]000!0?A0000000?}00000?O^O?O|OooA
× 口^ 000AI 10?A~?ae000?0?0000?0?0[0]!0?0]?ae]A}?00ae|000|A
·AaO□0}?00?a00?00?00A000|00]00|? 100|00?00000°}?0|OOOOON/OFF.
- [0?ae]A[0?0A]00A?0?0]:0000?0~0]:A0000? temperatura ustawiona jest na 22^
:[0?aeJ]AOO?O{OOOO?O\~OO]AOO?O?OOOOo? temperatura ustawiona jest na 22-24°C
He nIeTbOdaTa, n3ToueHa OT KJIIMaTnKa.
- He n3noJ3BaIte npOdykTa 3a CneuHaHn ZeJI N KaTO 3aNa3BaHe Ha XpaHn, Ipon3BeDeHn Ha n3KycTBOTo n DpyrN. KInMaTnKbT e IpeDHa3HaueH 3a Notpe6nteNcKn ZeJI, a He e IpeCu3Ha OxJaXdaUa cNCTema. Ima pNCK OT MaTePnaJIHa UeTa nIIN 3aY6a.
-He npe3apekdaIte n He pa3rno6BaIte 6aTePnIte.
PoaepbXka
- Hnkora He DoKocBaIte MeTaHnTe YacTn Ha KJIIMaTnKa, KOraTO OTCTpaHraBaTe Bb3dUshnA qNITbp.
-Изпольваite стбилна onopa пи CTылба рп поисвае, NOДдрьжka пи ремоHT Ha KЛIMMaTиka, aKO e MOHTиран Ha BUCOKO място. - Hnkora He n3noJ3BaIte cnJIHn NOUcTbaU npenapaTu nn pa3TBOpNTeIN IIN npbCKaHe Ha BOda pRn NOUcTbaHe Ha KInMaTuKa. N3noJ3BaIte MeKO napYe nlaT.
YnpaBHeHne Ha KInMaTnKa 6e3 DnCTaHcNoHHOTO
Moxete da n3noJ3Bate 6yToHa ON/OFF Ha BbTpeHHTO TJIIO 3a ynpabIeHne Ha KImMaTHka, KOrato DnCTaHcNOHHOT He e HAnuHO.
1 OToBopTe npEHHnKanak (Tun2) nnxOpN3oHTaHnHO To KpNIO (Tun1).
2 HaTnCHeTe 6yToHa ON/OFF.
Tun1
Tun2
3AEBJENKKA
-БьрзOTO OТВарЯне Ha XOpn3OHTaHOTo KpInNo MOKe Da NOBpeNi CTbNKOBnA MoTOp.
3aandaehataCKopocTHaBeHTnlaTopa e TBbpDe BnCOka.
-ФункцяТаMOKEДa ce pa3JIuHаBa B 3aBnCmOCTOT TUNa Ha MoDena.
- Temnepaypata He moKe da ce perynipa npn n3no3BaHe Ha To3n 6yToH ON/OFF (6yToH 3a BKNoUbaHe/In3KIOUbaHe) 3a IN3BbHpeHN cNTyaUnn.
3a MoJeH, KOInTo ca npeHa3HaueHcMo 3a oxJaXdAHe, TemnepaTypaTa ce HactpoiBa Ha 22 ^ C
3a MoTeH, KOTo ca npeHa3HaueHn 3a oxJaHaHe n OTOpHeHne, TempePaTypaTa ce HacTpoBa MeJdy 22^ n 24^
I3noI3BaHe Ha 6e3XnHOTO nuctaHcNoHHO
MokTe Da ynpablaBaTe KImaTka C nCTaHcNOHHOTo 3a IIO-TOJMAO ydo6CTBO.

A B T O M A T N U H O p e c T a p T n p a h e h a K J I M A T N K a
PnIOBTOPO BKNIOUBAHe Ha KINMaTnKa CneI npekbcBaHe Ha eNKeTpnuEcTBOTa3nФyHKuBa Bb3CTaHOBRA 3aadaHHTe PpeH NaCTpOKn.
3a6paHЯBaHe Ha ΦyHKcIyTa 3a aBTOMaTNUHO pecTApTupaHe
1 OToBopeTe npedHnKaNak (Tun2) nnn XOpu3oHTaJIHOTo KpINo (Tun1).
2 HaTnCHeTe 6yToHa ON/OFF n fo 3aDpBxTe 3a 6 cekyn, cnei Koeto TAnOTo ue n3dae Dba 3ByKOBn CnHaJa "6Hm" n CBETNHHnT INdikatop 1ue MInHe DBykpaTHo 4 nbTn.
3a da pa3peWITE OTHOBO cyHKUJRA, HATNCHEte 6yToHa ON/OFF n ro 3aApbXTe 3a 6 cekyn. TJIto ue n3dae 3ByKOB CNHAn DBa nTn, a lamnata ue MmHe 4 nbTu.
Tun1

Tun2
3ABEJIENKKA
-Функцята може да ce pa3пчава B 3abcIMOCT OT TUNa Ha MOneJa.
AkoHaTnCHETe 3aIbpxKeTe 6yToHa ON/OFF 3a 3-5ceKynBMeCTo 3a 6ceKyn, TAnOTo ue npemHe B pexmHa TeCTBaHe. B pexmHa TaTeCTBaHe OT TAnOTo Dyxa CnHc CTpyr OxnaJaBv3dyx B npoDbJnxHe He Ha 18 MInHyTu, CneD KoEtO HAcTpOKnTe My Ce BpUaT KbM fapnuHnte nnoPpa3bnpahe.
I3noJ3BaHe Ha yHKnJaTa 3a peKIM
Ta3nФyHKUBA Bn no3BOJRABa da n36epeTe xeJnaHnpeKIM.
| * | Рек imm Ha oxлajdahe |
| ↓ | |
| A | Рек imm Ha abTOMaTNUHOp празвкл�ванe / АВТOMaTNUeH рек imm Ha pa6Ota (иЗкуCTВeH иНтелект) |
| ↓ | |
| Рек imm Ha ИЗсушаванe | |
| ↓ | |
| Рек imm Ha оТОпLEнe | |
| ↓ | |
| Рек imm Ha BeHTINJaTOP | |
PexnHa oxJaXdaHe
1 Bknnoye ypega.
2 HaTnCHeTe 6yToHa MODE HraKoIko nbTu, 3a da n36epete peXmHa Ho oxJaKaDaHe.
Haekpaa ce noka3Ba
3 HaTnCHHeTe 6yToHa Unn, 3a Da HAcTpOnTe XeJNaHata TempepaTypa.
ABTOMaTHueH pexnHa pa6oTa (n3KycTBeH nHTeJIeKT)
MoeJ myItnCnCTema
BTo3n pa6oTeH peKIM CnCTeMaTa ce ynpaBnaBa aBTOMaTHUHOOTeJKeKTPOHHOTOynpaBHeHne.
1 BkIIOUeTe ypeHa.
2 HaTnchete 6yToHa MODE HrKoNk O bTu, 3a da n36epTe aBtOMaTHHna peXm Ha pa6ota.
Ha ducnpe ce noka3Ba A.
3 HaTnchete 6byToHa Unn 3a da Hactponte XeJHaHata TemnepaTypa.
4 Hatachete 6byToHa FAN SPEED,3a da HactponTe cKOpocTtHa BeHTnlaTopa.
Pexm Ha aBTOMaTnHOn npeBKnUoyBaHe
MoJeI eDHHuHcNJIHT
To3npexim npomeHa aBtOMaTNo pexima, 3a da noDbpxa HactpoeHaTa Tempepatypa ± 2^
1 Bknnoye ypeda.
2 HaTnchHeTe 6yToHa MODE HrKoNko nBtN,3a Da n36epTe pexmHa Ha aBTOMaTHUHO npEbkIIOuBaHe.
Ha ducnne er ce noka3Ba A
3 HaTnCHHeTe 6yToHa nnn 3a da HacTpOnTe JeJaHaTa TeMnepaTypa.
4 HaTnchHeTe 6yToHa FAN SPEED, 3a da HacTpOnTe CKOpocTtHa BeHTnlaTopa.
PeximHa n3cuyaBaHe
To3npeXIM npemaxBa n3IINHaTa Bnara npu
ycIOBnC BnCOKO HnBO Ha Bnara nnPpe3
DbXIOBnHcE3OH, 3a da npedOTbpaTu
O6pa3yBaHeTo Ha PnceH. To3n peXIM perynnpa
ABTomaTnUHO CTaHnTa TEMpepTaPy nCKOpocTTa
Ha BeHTnAToPa, 3a Da ce NODbpJka ONTMaHNO
HnBO Ha BnAxAHOCT.
1 Bknoye ypeda.
2 HaTnCHeTe 6yToHa MODE HЯKoNko nbTu, 3a da n36epeTe pexmHa Ha n3cyuBaAhe.
Ha nucnpe ce noka3Ba
3ABeJIeKKA
BTo3npeKIMHeMOKeTe Da npomeHrTe CTaHATA TemnepaTpya, TbN KaTO ce perynnpa ABTOMATNUHO.
- CtaHata TempepaTypa He ce noka3Ba Ha DnCnJe.
BpeKIM Ha 3cyuBaHe, KOMnpecOpbT IN BbTpueHnrt BeHTnIaTOP MoKe Da He pa6oTt, KOrato CtaHata TemnepaTypa e noD 24°C
PexmHaOTOpJIeHne
1 BkIIOUe Te ypeDa.
2 HaTnchTe 6yToHa MODE HraKoNko nBtN, 3a da n36epTe peKIma Ha OTOnnneHne.
HaekpaaCe noka3Ba
3 HaTnchete 6yToHa nnn 3a da HactpOte XeJNaHata TemnepaTypa.
3ABEJIENKKA
- 5e ce nokaxe Ha BbTpeHOTo TnO, KOrato Ce n3BbpuBa pa3Mpa3raBaHe.
- Ta3n INHINKauNJa Ie Ce nOKa3Ba Ha BbTppeuHOT TAnIO N:
-KORATO CE N3BbPbWA npeiBaupTeHNO 3aTOnJIaHe (TOnbl CTapT).
-Korato BbTpewHaTa TemnepaTypa e DoCTurHana 3aJaDeHaTa TemnepaTypa.
Pexim Ha BENTUNaTOP
To3n pexm eHCTBeHO cnpkynpa Bb3dyxa B nomeeHneTo,6e3 da npomeHa cTaNHaTa TEMpepatya.
1 BkIIOUeTe ypeHa.
2 HaTnchete 6yToHa MODE HraKoNko nbTu, 3a da n36epeTe peKIma Ha BeHTuNaTOP.
Ha nncnpe ce noka3Ba
3 HaTnchete 6yToHa FAN SPEED, 3a da HactponTe cKOpocTTa Ha BeHTnlaTopa.
I3noJ3BaHe Ha cyHKnraTa „Pexm Ha ctpy
BkIIOUBaHe n N3KJIIOUBaHe Ha TaMepa
Ta3nФункинHaCTpoIbAKnIMaTnKa da ce 3KJIIOUBa/BKJIIOUBa aBTOMaTnHOBKeJaHOTo BpeMe.
TaimepbT 3a BKn./n3Kn. MoKe Da 6bJe 3aJaAeH 3aEHO C TOBa.
3aandaBaHe Ha TaMep 3a BKNIOUbaHe
1 HaTnuchTe 6yToHa HEKoJIKOkpaTHO.
- IKOHATA NO-DONY MIRA B DOJHATA YACT Ha DnCnJIe.
2 HaTnCHTe 6yToHa V nn A, 3a da n36epTe MNHyTnte.
3 HaTnCHTe 6yToHa SET/CANCEL, 3a da 3aBbPunTe HAcTpoBaNHeTO.
CneHactpoBaHeTo Ha TaMepa TekytoTO BpeMe uKOHaTa ON ce NOKa3BaT Ha ekpaHa, KOeTO NOKa3Ba, Ye JeNaHOTo BpeMe e 3aDaJeHO.
OTMЯHa Ha TaɪMepa 3a BkJIIOUÇBaHe
1 HataHcHete 6yToHa THER HeKoJIKKpaTHO.
- IKOHATA NO-DOJY MURA B DOJHATA YACT Ha DnCnJIe.
2 HaTnCHete 6yToHa SET/CANCEL 3a OTmHa Ha HAcTpOikata.
3aandaBaHe Ha TaMep 3a N3KlIouyBaHe
1 HaTnCHete 6byToHa TImER HeKoJIKKpaTHO.
- IkoHaTa no-dOJy Mira B DoJIHaTa Yact Ha Ducnner.
2 HataHcHete 6yToHa Vnn A,3a Da n36peTe MNHyTInTe.
3 HaTnchTe 6yToHa SET/CANCEL, 3a Da 3aBbPwnte HAcTpOuBaHeTO.
CneHactpoBbHeTo Ha TaMepa TeKyUcOTOBpeMe NIKOHATA OFF ce NOKa3BaT Ha ekpaHa,KOeTO NOKa3Ba, Ye XeJHaHOTOBpeMe e3aJaDeHo.
3A6EJIEXKA
Ta3nФyHKcIe 3a6paHeHa, KOraTo HAcTpOuBaTe,CTaHApTeH TaMep".
OTMЯHa Ha Taïmepa 3a N3KJIQUOYBaHe
1 HaTnCHHe 6yToHa HEKOJIKKpaTHO.
-Иконаю-Dолу Mura BdoJHaTa YacT HaДиспя.
2 HaTnchete 6yToHa SET/CANCEL 3a OTmHa Ha HAcTpOuKaTa.
OTMЯHa HaHacTpOyKaTa Ha TaIMepa
- Hatnche 6yToHa CANCEL,3a da OTMeHInTe BCnKn HacTpoiKn Ha TaMepa.
N3noJ3BaHe Ha yHKnJaTa 3a 3acnBaHe (no n36Op)
Ta3nФyHKUryN3KJIIOUBya KJIIMaTnKa aBTOMaTnUHO, KOrato Cn JIraTe.
1 BkIIOUeTe ypeHa.
2HaTnChHeTe 6yToHa TImER HeKoJIKOkPaTHO.
VAZNE SIGURNOSNE UPUTE 3
RAD 11
Napomene za rad 11
VAŽNE SIGURNOSNE UPUTE

UPOZORENJE
Kako biste smanjili opasnost od eksplozije, požara, smrti, strujnog udara, ozljede ili opekatina osoba prilikom upotrebe ovog proizvoda, slijedite osnovne mjere opreza, uključujuci sljedeće:
Djeca u kućanstvu
Ovim se urežajem ne bi trebale koristiti osobe (uključujuci djecu) smanjenih tjelesnih, osjetilnih ili mentalnih sposobnosti, ili s manjkom iskustva i znanja, osim ako ih osoba koja je odgovorna za njihovu sigurnost ne nadzire ili im daje upute u vezi s upotrebam urežaja. Djecu treba nadgledati kako bi se osiguralo da se ne igrajus urežajem.
Za uporabu u Europa:
Olulised ohutusjuhised 3
KASUTAMINE 11
Olulised ohutusjuhised

OHT
TIP: IMMUNTAT MAL-FAJT
Noti ghat-Thaddim 11
Remote Control Bla Wajar 12
Terga' Tixghel il-Kundizzjonatur tal-Arja Awtomatikament. 17
L-Uzutal-Funzjontal-Modalita 17
L-Uzu tal-Funzjoni tal-Modalita Propulsiva (Jet Mode Function) 19
L-uzu tal-Funzoni tal-Velicita tal-Fann 20
Remote Control Bla Wajer
Meta Ddahhal il-Batteriji
Jekk I-iskrin tal-wiri tar-remote control jibda jiccara, ibdel il-batteriji. Dahhal batteriji AAA (1.5 V) qabel ma tuza r-remote control.
1 Nehhi I-ghatu tal-batteriji.
2 Dahhal il-batteriji I-godda u aghmel cert li t-terminals ^+ u - tal-batteriji huma installati tajbeb.
Installazzjoni tal-Holder tar-Remote Control
Biex tipprotegi r-remote control, installa I-holder fejn ma hemmx dawl tax-xemx dirett.
1 Aghzel post sigur u fejn tilhqu faciliment.
2 Wahhal il-holder permezz ta'zewg viti mwahhlasew b'tornavit.
Metodu ta' hidma
Ipponta r-remote control lejn ir-ricevitur tas-sinjal fuq in-naha leminija tal-kundizzjonatur tal-arja sabiex thaddmu.
NOTA
- Ir-remote control jista' jhaddem apparti elettronici ohrajn jekk ikun IPPuntat lejhom. Aghmel cert li qed tipponta r-remote control lejn ir-ricevitur tas-sinjal tal-kundizzjonatur tal-arja.
Ghal thaddim tajeb, uza carruta ratba biex tnaddaf it-trazmettitur ur r-ricevitur tas-sinjal.
F'kaz li funzjoni ma tkunx provduta fil-prodott, I-ebda sinjal ta' hoss ma johrog mill-prodott meta buttuna ghal funzjoni bhal din fuq ir-remote control tigi maghfusa ghajr ghall-funzjonijiet tad-Direzzjoni tal-Fluss tal-Arja ( SWING), Displej t'Energija ( ) , Purifikazzjoni tal-Arja (
RIESENIE PROBLEMOV 32
"Smart Diagnosis" 28
PRIEZIURA 29
Oro filtro valymas 31
TRIKCIU SALINIMAS 32
LÁMHLEABHAR AN ÚINÉARA
AERCHÓIRITHEOIR

Taispeain Gile Scathlain
Is féidir an gile a shocru don scathlan an aonaid laistigh.
- Bruigh an cnaipe LIGHT OFF.
NOTE
Cas ar/as an scailean Taispeain.
Ag uśáid an fheidhm aer compórdach (roghnach)
Oibriuchán Eite Compórd
Socraionn an fheidhm seo an eite go heasca
go suiomh réamhshocraithe chun an aer
soláthraithe a sraonú ò dul direach go dtí na
daoine sa seomra.
1 Cas an gleas air.
2 Brúigh an cnaipe COMFORT AIR cupla uair chun an treo ata uait a roghnú.
no mar a thaispeanann an scathlan.
NOTE
no L mar a thaispeanann cuple aonaid laistigh.
-Ta an fheidhm seo dichumasaithe nuair a bhruitear MODE no JET MODE.
-Ta an fheidhm seo dichumasaithe agus socraitear an uath-athru treo ingearach nuair a bhruitear SWING
- Nuair ata an fheidhm seo as, oibrionn an eite cothromanach go huathoibrioch de reir an mhodh socraithe.
Ag uśáid an fheidhm smacht fuinnimh (roghnach)
1 Cas an gléas air.
2 Bruigh an cnaipe ENERGY CTRL.
- Bruigh an cnaipe ENERGY CTRL cupla uair chun gach cém a roghnú.
NOTE
- Céim 1: Isliönn an lonchur cumhachta 20% i gcomparáid leis an ionchur cumhachta ann.
80 mar a thaispeanann an scathlan. - Céim 2: Islionn an lonchur cumhachta 40% i gcomparáid leis an ionchur cumhachta ann.
60 mar a thaispeanann an scathlan. - Céim 3 (roghnach): Islionn an lonchur cumhachta 60% i gcomparáid leis an ionchur cumhachta ann.
40 mar a thaispeanann an scathlan.
(1 step), (2 step) mar a thaispeanann
cúpla aonaid laistigh.
-Ta an fheidhm seo ar fail leis an Mhodh Fuarthu.
D'fhéadfadh leis an toilleadh isliu nuair a roghnaïtear an mhodh Smacht Cumhachta.
Taispeanfar an teocht ata uait 5 soic ma bhruitear FAN SPEED, or
-Taispeanfar an teocht ata uait 5 soic ma bhruitear ROOM TEMP
D'fhéadfadh nach ndeanfar tacaiocht don feidhm seo agus rudai ceangailte don aonad Iolrach Lasmaigh.
VAŽNA BEZBEDNOSNA UPUTSTVA

UPOZORENJE
Hnctanipahe Ha dpkaoyHa daJeHHcknot ynpaByBaay.
3apaN 3aHTTa Ha daJeHHCKnOT ynpabyBa, nHCTaIInpajTe ro dpXkaOT Ha MeTo KaDe wTO Hema Da 6nde NOD dIpeKTHa COHcEBA CBETTHa.
1 136epete 6e36eHNO n IecHO DOCTaHNO MeTO.
2 3aucbpcTeTe ro dpkaot co cinnHO npncBpcTyBaHe Ha 2 3aBpTKn, co 3aBpTyBa.
MeToDHa pa6oTa
Hacouete ro daJeHHcknot ynpaByBauchon npneMHKOT Ha cnHaNoT Ha DeChata CtpaHa OKnima ypeDoT, 3a Da ro KOHTpOIpaTe.
HANOMEHA
Далочнскnot упавувач може да контюраз Hekon Друг eльктучни урedi,akо ce hacochn KOH HNB.Ocnypete ce deka cte ro hacouнe Далочнскnot упавувач KOH npneMHNKOT Ha CINHaJOT,Ha KJIIMa ypeDOT.
3a npabnHO cyHKUHnpaHe, KopcTeMeKa Kpna 3a YnCTeHe Ha npedabaTeNoT n npneMHKOT Ha CnHaJNot.
Bo cnyaj yHKnjaTa da He e npedBndeHa 3a npOn3BOoT, Hema Da ce ye 3ByeH cnHaN od npOn3BOoT, Kora KonyeTo 3a Taa cyHKnJa Ha daIeHHCKNt ynpaByBaue Ce npntncHe, OCBeh 3a HAcOKaTa HA BO3DyXOT (SWING), ekpaHot 3a eHeprJa (wW[3s]), cyHKnJaTa 3a npOuNCTyBahe Ha BO3DyXOT (2).
NoctaByBaHe Ha TeKOBHOTo BpeMe
1 CtabeTe 6aTePnN
- IkoHaTa KoJa ce Haora noDony, Ke 3aTppeepn Ha dHOT Ha ekpaHOT 3a npKakyBaHe.

2 PnTncHeTe ro konHeTo 3a da n36epTe MNHyTu.
3 IpnTnCHeTe ro konyeTo SET/CANCEL 3a da 3aBpUInTe.
HANOMEHA
- Bклуваьeto/Nckluyvaьeto Ha МераOT Ha BpeMe Ke cTaHe DoCTaHNo, OTkako Ke ro NOCTaBITE TEKOBHOTO BpeMe.
KopncTeHe Ha ^ / ^ KOHbep3nOHa 4yHKcNja (OnCuNoHaIHo)
ObaФункиja ja MeHyBa edHnuaTaMeу ^ C n
- PnTnCHete n dpxkete ro konyeto OKNY 5 cekyHdN.
PaKyBaHbe co KInMa ypeDoT 6e3 daJeHHcKn ynpaByBauch
Moxete da ro Kopuctte KOnyeto ON/OFF Ha BHaTpeShHaTa eDHHuza, 3a paKyBaHbe co KInMa yPeDoT KOra dAneunHckNt ynpabyBau He e DoCTaIeH.
1 OToBopTe ro npEHNOT kAnak (Tn2) nInxOpN3OHTaJIHata nepka (Tn1).
2 PnntncheTe ro konueTo ON/OFF.
Tun1
Tun2
HANOMEHA
- YekopHnOT MToP MoKe Da ce NckpUn, ako 6pry Ce OTbOpXOpN3OHTaJHaTa nepka.
-БрзинотаHa BeHTnIaTOpOT e NOCTaBeHa Ha BnCOKa.
-Функида може да ce MeHyBa BO 3aBnCHOCT OД TINOT Ha MOneJNot. - TempepaTpaTa He MoXe Da Ce MeHyBa Kora Ce yNtpe6yBa OBA KOnYe 3a NTHOCT ON/OFF.
KajmoJeNITE KOIHTO CE CAMO 3a IaHe, TEMnepaTypata e nocTaBeHa Ha 22^
Kaj moenite 3a naehe & rpehe, Temnepaypata e nocTaBeHa oD 22^ do 24^
KopncTeBe Ha 6e3xuHnot daJeunHcN ynpaByBaay
Mhory nonecHO moKeTe da paKyBaTe co KInMa ypeDoT, npeky KopncTeHbTo Ha daJIeunHcknOt ynpaByBaU.
HANOMEHA
*KoNCHbata MoKaT Da Ce MeHyBaat BO COrNaCHOCT CO TINOT Ha MOJeIOT.
Kora e noBp3aH co MyIHTn HADBopeWHaTa eDHHuA, EHepreTCKNOT npka3, EHepreTckata KOHTpoJa n cyHKunjata Ha HeuyjHata N CMapr DnjarHO3a, MoKe6n Hema da 6nDat noDprXaHN.
2
MoJeI Ha eDInHeuHa noeI6a
Oboj peKIM aBtOMaTcKN ro MeHyBa peKIMOT, 3a da ja oDpKn nocTaBeHaTa TempepaTypa Ha ± 2^
1 NywTeTe ro anapaTOT.
2 Ппншete ro konчeto MODE noBeKeNaTn, 3a da ro n36epeTe peXIMOT Ha aBTOMaTcKO MeHyBaHbe.
A ce npkaKyBa Ha ekpaHOT 3a npkaKyaHe.
3 IpnTnCHeTe ro konyeTo nIa da ja naocTabnTe nocakyBaHaTa TemnepaTypa.
4 PnTCHeTe ro konHeTo FAN SPEED 3a da ja npnaorOnte 6p3HaTa Ha pehOT.
PexnM 3a HaMaJyBaHbe Ha
BnaxHOCTa
Oboj pexim ro otctpaHyBa Bnokot Ha BlaRa oBnCOKo BnaXHaTa CpeHnHa, INI 3a BpeMe Ha DoKIOBHATA Ce3OHa, CO cel Da cnpeuN obNKyBaHeTo Ha NoCTaByBaHbETo. Oboj pexim aBTOMaTcKn rnpilaroDyBa Co6HaTa TemnepaTypa n 6p3InHaTa Ha fehOT, 3a da ro 3aApxN ONTImaJIHOTO HnBO Ha BnAkhHOCT.
1 NywTeTe ro anapaTOr.
2ПиTиСHTe ro konTuTo MODE noBekenatn,3a Da ro n36epTe pexIMOT 3a HaMaIyBaIbe Ha BnaXHocTa.
ce npkaKyBa Ha ekpaHOT 3a npkaKyBaHe.
HANOMEHA
- Bo oboj pexim He moxete da ja npunafoiTe co6hata TemnepaTypa, Taa aBtomatckn ke ce npunafoi.
- Co6HaTa TemnepaTypa He e npKkaKaHa HaekpaHOT 3a npKkaKyAbe.
- Bo pexkIMOT Ha OdBlaJxHyBaHbe, KOMnPecOpOT IN BHaTpeuHnO TcH MoKe Da He pa6oTaT DoIeKa TemnepaTypaHa co6ata e 24 °C
PexnHa rpeeHe
1 NywTeTe ro anapaTOT.
2 IpnTnCHeTe ro konyeTo MODE noBeKeNaTu, 3a Da ro n36epete pexIMOT 3a rpeHbe.
ce npkaKyBa Ha ekpaHOT 3a npkaKyBaHe.
3 PnTnCHeTe ro konyeTo nHn 3a da ja naocTabnTE nocakyBaHaTa TemnepaTypa.
HANOMEHA
ke 6nata npkaaHa Ha BHaTpeHHaTa eHHua, Kora ke pa6OTn Odmp3HyBaHbeto.
- Iohatamy, OoJ noka3aTeI Ke 6nJe npkaXaH Ha BHaTpeuHaTa eDHHua:
-Kora pa6otn nped3arpeBaHeto.
-Kora co6hata TemnepaTpa Ke ja DocnturHe nocTaBeHaTa TemnepaTpa.
PexmHaΦeHOT
Oboj peXIM eINHCTBeHO ro cInpKyInpa BHaTpeShHnOT Bo3dYx, 6e3 da ja n3MeHN co6HaTa TemnepaTypa.
1 NywTeTe ro anapaTOT.
2ПиTINCHeTe ro konChTo MODE noBeKeNaTu,3a Da ro n36epTe peXIMOT Ha cHOT.
ce npkaKyBa Ha ekpaHOT 3a npkaKyBaHe.
3ПиИСсHeTe ro konYeTo FAN SPEED 3a da ja npnilarOДte 6p3nHaTa Ha pheHOT.
KopncTeHe Ha cyHKunjaTa Mna3eH pexm
NoctaByBaHe Ha MepaOT Ha BpeMe
1 PnTnCHeTe ro konyeTo noBeKeNaTu.
- IkoHaTa Koja ce Haora noDoNy, Ke 3aTppeepn Ha dHOT Ho ekpaHOT 3a npKakyBaHe.
2 PnTncHeTe ro KOnHeTo 3a da n36epTe MNHyTu.
3ПиТиСHTeTo KOnTuTeTo SET/CANCEL 3a Da 3abPunTe.
- Ito noctabyaheTo Ha MepaOT Ha BpeMe, TEKOBHOTo BpeMe nIKOHata ce npkaKybaaT Ha ekpaHOT 3a npkaKaKyBaHe, ykaKybajn Ha Toa DeKa e NoctabeHo NocakyBaHOTo BpeMe.
OtkaKyBaHe Ha BkIyueHnot MepaHa BpeMe
1ПиNTIChTe ro konyeTo TIMER noBeKeNaTn.
- IkoHaTa Koja ce Haora noDoNy, Ke 3aTpenepeHa dHOTo Ha ekpaHOT 3a npKakyBaHe.
2 IpnTnCHeTe ro konueTo SET/CANCEL 3a da ja OTkaxte noctabkata.
IocTaByBaHbe Ha nCKJnyBaHbe Ha MepaOT Ha BpeMe
1 PnTncheTe ro konyeTo TIMER NOBekenatn.
- IkoHaTa Koja ce Haofa noDony, Ke 3aTppeepn Ha dHOTo Ha ekpaHot 3a npKaKByBaHe.
2 PnTncHeTe ro konyeTo 3a da n36epTe MNHyTu.
3 IpnTnCHeTe ro konyeTo SET/CANCEL 3a da 3aBpwnTe.
- Ito noctaByBaHTo Ha MepaOT Ha Bpeme, TEKOBHOTO Bpeme n IKoHaTa OFF ce npkaKyBaAT Ha ekpaHOT 3a npkaKyBaHe, yKaKyBajn DeKa e NoctabeHo NocaKyBaHOT Bpeme.
HANOMEHA
- Obaa Функида оеюзможеника Кога КгпoctabNTe eHOCtABHNOt Мерач Ha Врeme.
OTkaJyBaHbe Ha nckIyuYeHnOT MepaHa BpeMe
1 PnTnCHete ro konyeTo TIMER NOBeKeNaTu.
- IkoHaTa Koja ce Haora noDoNy, Ke 3aTppeepn Ha dHOTo Ha ekpaHot 3a npkaKyBaHe.
2Пипснichte ro konчeto SET/CANCEL 3a da ja otkaжete noctabkata.
OTkaxyBaHbe Ha NoctaBKNTe Ha MepaOT Ha BpeMe
-ПиTиСHTeToKoNueTo 3aДa rN OTKaXeTe CNTe NOCTaBKN Ha MepaOT Ha BpeMe.
KopncTeHbe Ha cyHKunjaTa cnnHe be (OncnoHaJHo)
Obaa yHkunja aBtOMaTcKn rNCKJyUyBa KInMaypeoT, kora Ke OTnTe Ha cnneHe.
1 NywTeTe ro anapatot.
2 PnTncheTe ro konyeTo TIMER NOBekenaTn.
- NkoHaTa Koja ce Haora noDony, Ke 3aTpeneepn Ha dHOTo Ha ekpaHOT 3a npKakxBaHe.
3 PnTncheTe ro konyero 3a da ro n36epete yacot (cdo 7 yaca).
4 PnTnCTHeTo KOChTeo SET/CANCEL 3a Da 3aBpWnte.
ce npnkaKyBa Ha ekpaHOT 3a npnKaKyBaHe.
HANOMEHA
Hce npkaxyBa Ha HeKoB BHaTpeuHn eHNHn.
EkpaHot Ha BhatpeuHaTa eHnua ce npKaxyBa od 1u do 7u, camo Bo TeKOT Ha 5 ckyHn, a notoa ce Bpaka Ha noCTaBeHata TemnepaTypa.
Bo pekimot Ha naJeHe n pekimot Ha HamaNyBaHe Ha BnaXHoCTa, Tempepatypata ce 3rolemyBa 3a 1 ^ C no 30 mHyTu, I dnonHnTeJen 1 ^ C noDpyrTe 30 mHyTu, 3apaNn NoydoHo cnnHe.
Temnepatypata ce 3ronemyba do 2 ^ C oMOMeHTaJIHATA Temnepatypa.
- Iako 3a6eilekata 3a 6p3nHaTa Ha feHOT Ha ekpaHOT,3a npKakyBaHe MoKe Da ce npomeHn, 6p3nHaT ha feHOT ABTomatcKn Ce npnilarOdyBa.
KopincteHe Ha cyHkunjaTa eHocTaBeH MepaH Ha BpeMe (OncnoHaJIHo)
Obaa yHKnjia aBtOMaTcKn ro ncknyyBa KInMaypeoT, kora Ke OTnTe Ha cnneHe.
1 NywTeTe ro anapaT.
2 PnTnCHTe ro konyeTo TIMER noBeKeNaTH.
- IkoHaTa Koja ce Haora noDony, Ke 3aTpenepeHa dHOTo Ha ekpaHOT 3a npkaKyaBaHe.
4ПиTUCHeTe ro KOnYeTo SET/CANCEL 3a Da 3aBpWnte.
3 PnTncheTe ro konyero 3a da ro n36epete yacot (cé do 7 yaca).
S ce npkaKyBa Ha ekpaHOT 3a npkaKyBaHe.
HANOMEHA
Obaa cyHKunja ce OHaBO3MOKyBa Kora Ke ro noCTabNTe Ha NcknyeHo MepaOT Ha BpeMe.
KopinCTeHe Ha cyHkCnjaTa PpNKaKyBaHbE Ha eHeprNjata (OnuHaJHo)
ObaaФункиja ja npKakyBa KOnuHaTa Ha npOn3BeDeHaTa eNeKtpnHa eHeprJa Ha BHaTpeuHnot ekpaH, 3a Bpeme Ha pa6oTaTa Ha npOn3BODoT.
Приказа наTekOBнаТаnotpoшуВача НаеileКтprчнаеергиJA
1 NywTeTe ro anapaTOT.
2 PnTncheTe ro konyeTo 0kW[3s] n npKeTe ro OKony 3ceKyHn.
MomeHTaJIHaTApOTPOUyBaUka Ha eHeprJa ( 88) ce npKakUyBa HeKoe OndpeJeHO BpeMe, Ha HeKoB HbATpeuHN eINHnI.
HANOMEHA
He ce npkaKyBa Ha 6e3KuHnO T daJeHHcN ynpabyBa.
- Ednuata Ha npikkaaHaTa BpeHocTe kW.
- Ako e noBeke o9 99 kW, wTo e oncerot Ha n3pa3yBaHbe, oDpxyBajTe ro Ha 99 kW.
-Прикай ja ватажда по 10 kW co 0.1 kW eиница, и рікай сдна koja e haq 10 kW co 1 kW eиница.
-ФakTNKOTO HanojyBaHe MoKe Da ce pa3NkYBa OД ппкжанOTо HanojyBaHe.
Kora e noBp3aH co MyItn HaBopeuHaTa eINHua, OBaa FyHKunja MoKe6n HeMa da 6nde IODprkaHa.
KopncTeHe Ha cyHKnjaTa NcknyeHo OcBeTnyBaHbe (OnCNoHaJIHo)
OcBeTnyBaIbe Ha ekpaHOT 3a npKakyBaIbe
MoKeTe Da ro npNarOndTe OCBeTnyBaHbETo Ha ekpaHot 3a npKakKyBaHbE, Ha BHaTpeWHaTa eDHHUca.
1 NywTe re anapaTOT.
2 PnTnucHeTe To KOnHeTo ENERGY CTRL.
-ПиTNCHeTe ro KOnHeTo ENERGY CTRL NOBeKeNaTn, 3a Da ro N3bepTe ceKoJ YekOp.
HANOMEHA
1 Yekop: Bne3HOTo HanojyBaHe ce HaMaIyBa 3a 20% , cnopeeHO CO HOMHaHHTO Bne3HO HanojyBaHe.
80 ce npkaKyBa Ha ekpaHOT 3a npkaKyBaHe.
2 YeKOp:BnE3HTo HanoJyBaHe ce HaMaIyBa 3a 40% ,CnopeJeHO cO HOMHaJIHOTo BnE3HO HanoJyBaHe.
60 ce npkaKyBa Ha ekpaHOT 3a npkaKyBaHe.
- 3 uekop (onuohno): Bne3HOTo HanojyBaHe ce HamaNyBa 3a 60% , cnopeeHO CO HOMHaHHTO Bne3HO HanojyBaHe.
40 ce npnkaKyBa Ha ekpaHOT 3a npnkaKyBaHe.
(1 step), (2 step) ce npkaKyBa ha ekpaHOT 3a npKaKyBaHe.
Obaa yHKunja e nocTanHa co pexKIMOT Ha naedeHe.
KanaHTOTMOKe Da ce HamaHn, Kora e n36paH peXMMOT 3a KOHTPOnHa Ha eJNKTpuHaTa eHeprnja.
- IocakyBaHata TemnepaTypa ce npkaKyBa OKony 5ceKHyDn, aKO To npNTuCHETe KOnyTe FAN
SPEED, nnn
Cobhata TemnepaTpa ce npkaKyBa OKoly 5 ceKyHdi, aKO rO npuTncHeTe KOnyeTo ROOM TEMP.
Kora e noBp3aH co MyIHTn HAdBopeuHaTa eINHua, OBaa yHKunja MoKe6n Hema da 6nde npdpkaHa.
KopncTeHe Ha cneuJaHn 0yHKcnn
1 NywTeTe ro anapaTOT.
2 IpnTnCHete ro konHceto FUNC noBeKeNaTn, 3a da ja n36peTe nocaKaBaHaTa qyHKuJa.
3 IpnTnCHete ro konyeTo SET/CANCEL 3a da 3aBpwnTe.

| Екран за прикaxesьаны | Опис |
| JOнскnot reнераTop користу MNлнои joи, за да помоге BO поборчыны на Квалитэрот на Воздунот BO 3атворен постор. | |
| За за се hamали бухавата od надворшнаты[eиница. | |
| За hamалуваны на Влиагата Коjaшто се создва BO ВhaТрeshату[eиница. |
HANOMEHA
-
Hekon ΦyHKun He MoKaT da 6nDaT noDpKaH, BO 3aBnCHOCT OJ MOJeNt.
-
HekonФункиIMMOKeДa pa6OTaT pa3NNUHO OД npKkaKaHOTHa ekpaHOT Ha daleuHCKNOT ynpaByBaU.
OTkaxyBaBe Ha cneunjaHnTe cyHKcnn
1ПиТиСHTe ro konHcTo FUNC noBeKeNaTn,3a da ja n36epTe nocakyBaHaTaФункuJa.
2ПиTINCHeTe ro KOnYeTo SET/CANCEL 3a da OTkAKeTe HeKoJa yHKnJa.
KopncTeHe Ha yHKunjaTa 3a npouncTyBaHe Ha BO3dyXOT
Obne yHKnObe36eYBaat NCT n CBEx BO3dyx, npeky johcknte yectnKu n fntepoT.
| Функциja | Ekpan Onис | |
| JOHN3atop | JOHSCNITe ЧecTNUKN OД JOHN3aTOpOT ВршAT СтетПИЗAZUJa Na ВОЗДУSHINTE БаКТери N ДругNTe ШТНИ Матери. | |
| ПлаЗмa | Целесно Г OTСТРANHyBa МИКРССКПСТЕ ЗагдуВачи OД ВUCHUCHNOT ВОЗДУХ, 3a Дa обзбени чИсти СBEЖ BOЗДУХ. |
HANOMEHA
- MoXeTe Da ja KaopnCTnTe Obaa FyHKunja 6e3 Da a ro BkJyHTe BaUNOT KINMa ypeI.
- Iлла3maлam6nukkaTaNlam6nukkata 3aJaedehe ce BKnyeHn,doKePa6oTu OToCTpaHyBaHe yad/ IIla3ma,Ha HeKoN MoJen.
He donnpajte ro john3aTopoT 3a BpeMe Ha pa6oTeHbeto. - Obaa Фуннда може разично да работи од
- ekpaHOT на далецнсnot упавувач.
KopncTeHe Ha yHKunjata TNBko.
ObaaФyHKnja rN cnpeyuBa moxHnTe npoBnEMn co cocednte, npeky hAmaybaheTo Ha 6yuaBata Ond HAnBopeuHnTe eHNn.

ce npkaKyBa Ha ekpaHOT 3a npkaKyBaHe.
HANOMEHA
- Obaa Фуннкида ке биде ооньошможа КORA КЕ Кпчтс悔етКOTЧETO MODE IJN ENERGY CTRL JIIN JET MODE.
- Obaa yHKuJa e DoCTaHa copexIMOT Ha IaHe, rpeeHbe, aBTOMATcKa npomeHa n pexIMOT Ha aBTOMATcKO pa6oTeHe.
Kora e noBp3aH co MyItn HaBOpEwHaTa eINuca, OBaa yHKunja MoKe6n Hema da 6nde npDpKaHa.
KopncTeHe Ha yHKnJaTa aBTOMaTcO YnCTeHe
3a BpeMe Ha pexmnte 3a IaedeHe i HaMaIyBaHBe Ha BnaXHOCTa, ce Co3daBA Bnara BO BHaTpeWHaTa eINHua. Obaa yHKunja ja OTcpanHyBa TaKBata Bnara.

ce npkaKyBa Ha ekpaHOT 3a npkaKyBaHe.
HANOMEHA
- Hekon ΦyHKuH He MoKaT Da ce KOpNCTaT DoNeKa pa60Tu ΦyHKuJata ABtOMaTcK YoCTHe.
Ako ro ncknyuhte HanojyBaHbeto, pehot Ke npoDOnKn da pa60Tu yWTe 30 MmHyTu, uNCTejKn ja BHaTpeuHocTa Ha BHaTpeuHaTa eHNHHua.
Anlncauja LG ThinQ
Obaa yHKunja e eoCTanHa cAmo co MoJeNte Co IoroTO uu ThinQ.
AnikaJaTa LG ThinQ Bn OBO3MOkyBa Da KomyHnupate Co ypeoT co NOMOHa NaMeTeH TelefoH.
KapakTepeNCTnKn Ha anJnKaunjaTa LG ThinQ
Komyuicpaje co ypeoT npeky Baunot Mobnien Tepeoh, KopucTejkn Tn Kopuchnte naMeTHn onu.
Smart Diagnosis
Ako nckycnte npo6nemdoeKa ja Kopncntte annnkaunjaTa, onuJaTa 3a naMeTHa nnjarHocTnKa Ke BN NOMORHe Da ro DnjarHOCTnCnpate npo6nEMOT.
POnecyBaHa
Bn OBO3MOxkyBa Da nocTaBnTe pa3JIuHn OnuN Kaj anapatot N BO anJInKaunjata.
HANOMEHA
Ako ro npomeHnte cbojot 6e3xueh pyTeP, do6abyBaoyt Ha nHTepHET ycnyn nn lo3nKata, n36pnwete ro pernctppahno anapat od annkaunjata LG ThinQ n nobtopho pernctppajte ro.
Annkajata noJnxHa npomeH3apainoobpyBaHe Ha anapaT0,6e3 da m ce daenpeDypeDyBaBe Ha KOpncnUte.
- KapakTePnCTnKtMe MoKe Ia BapnPaat Bo 3aBnCHOCT OJ MOJeIOT.
I P E D U N P E D Y B A H E
- Ppei YnCTe He nIIN N3BpUyBaHBe Ha OdpXyBaHbETo, Ncknyte Ro HanojyBaHbETo I NouekajTe DoKeKa
- pehOT He npectaHe co pa6ota.
Ako KInma ypeoT Hema da ce KopnCTn 3a noDorBpeMeHcN nepnoi, nCyweTe ro 3a da ce OdpKn BO Hajdoopa coctoj6a. PeOBHO YnCTeTe ro npOn3BODoT, 3a da ja oDpXnTe ONTMaJIHaTa n3Be6a n da rncnPeeHTe MoxHnTe deΦeKTn.
- NcyuTe ro KnIma ypeIOT BO feh pexKIMOT, BO TEKOT Ha 3 Do 4 Yaca, n NCKnyeTe ro HanojyBaHBeTO. MoKe da ce noJabN BHaTpeUHO OwTeTyBaHe aKO Blarata OCTaHE BO HEROBNTe COCTABH DeIOBn.
- IcyuTe Tn BHaTpeHHTe COCTaBn DeIOBn Ha KInMa ypeoT, KopucTejKn ro feh peXIMOT BO TEKOT Ha 3 Do 4 Yaca, nped HerOBaTa NOBtOpHa yNtpe6a. Oba Ke NOMORHe BO OTCpaHyBaHbeto Ha Mnpu36bata Co3dAeHa oD BnArata.
-Функида може да ce MeHyBa BO 3aBnCHOCT OД TINOT Ha MOneJIoT.
SIGURNOSNA UPUTSTVA 3
VAZNA SIGURNOSNA UPUTSTVA 3
RAD 11
Napomene prilikom rada 11
VAŽNA SIGURNOSNA UPUTSTVA

UPOZORENJE
Da biste smanjili opasnost od eksplozije, požara, smrti, strujnog udara, povrede ili opekotina za osobe prilikom korištenja ovog proizvoda, pridržavajte se osnovnih mjera predostrožnosti, uključujuci sljedeće:
Djeca u domacinstvu
Ovaj uredaj nods namijenjen za upotrebu od strane osoba (uključujuci djecu) sa smanjenim fizickim, senzornim ili mentalnim sposobnostima, ili s nedostatkom iskustva i znanja, osim u slučaju da su te osobe pod stalnim nadzorom ili su instruirane po pitanju korištenja uredaja od strane osobe koja je odgovorna za njihovu sigurnost. Djeca trebaju biti pod nadzorom kako bi se osiguralo da se ne igraju s uredajem.