SOTG1630B - Cooker SCHOLTES - Free user manual and instructions
Find the device manual for free SOTG1630B SCHOLTES in PDF.

User questions about SOTG1630B SCHOLTES
0 question about this device. Answer the ones you know or ask your own.
Ask a new question about this device
Download the instructions for your Cooker in PDF format for free! Find your manual SOTG1630B - SCHOLTES and take your electronic device back in hand. On this page are published all the documents necessary for the use of your device. SOTG1630B by SCHOLTES.
USER MANUAL SOTG1630B SCHOLTES
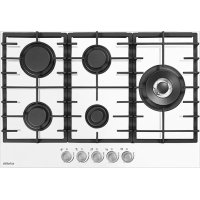
EN Instruction manual/safety instruction - Gas hob
Caracteristiques technique / Technical characteristics


- Brûleur rapide 3000W / Rapid burner
- Brûleur semi-rapide 1750W / Semi-rapid burner
- Brûleur auxiliaire 1000W / Auxiliary burner
- Brûleur triple couronne 3500W / Triple crown burner
- Bandeau de commandes - manettes / Control panel
T
| BRULEUR/ BURNER | CAZ/ CAS mbar L/h Max. | PRESSION DE SERVICE/ NORMAL PRESSURE Min. | DEBIT/ NOMINAL RATE | DIAMETRE INJECTEUR/ INJECTORS DIAMETER 1/100 mm | DIAMETRE BY PASS ROBINET/ TAPE BY PASS DIAMETER 1/100 mm | DEBIT CALORIFIQUE/ NOMINAL HEAT INPUT (KW) | |||
| N° D | Description G/h | ||||||||
| 1 | Rapide/ Rapid | G30 / G31 G20 | 28-30 / 37 20 | 218 - | - 286 | 87 129 | 42 Reg. | 3,0 3,0 | 0,95 0,95 |
| 2 | Semi-rapide/ Semi-rapid | G30 / G31 G20 | 28-30 / 37 20 | 127 - | - 167 | 65 97 | 31 Reg. | 1,75 1,75 | 0,6 0,6 |
| 3 | Auxiliaire/ Auxiliary | G30 / G31 G20 | 28-30 / 37 20 | 73 - | - 95 | 50 72 | 37 Reg. | 1,0 1,0 | 0,45 0,45 |
| 4 | Triple couronne/ Triple crown | G30 / G31 G20 | 28-30 / 37 20 | 255 - | - 334 | 93 135 | 60 Reg. | 3,5 3,5 | 2,1 2,1 |
Measurement and calculation methods used to establish compliance with the above requirements.
The performance of each individual burner is calculated according to standard EN 30-2-1 + A1:2003 + A2:2005; The total efficiency of the hob is calculated according to the EU Regulation 66/2014 Par. 2.2. The efficiency is calculated only for the burners with a nominal capacity exceeding 1,16 KW
Note: Energy Saving Tips: use pots having flat base, with proper size, and with lid whenever it is possible.

FIG 1

FIG 2

FIG 3

FIG 4

FIG 5

FIG 6

FIG 7

FIG 8

FIG 8/A

FIG 9
FIG 10

Cable marron/brown cable L (phase)
Cable bleu/blue cableN (neutre/neutral)
Cable vert-jaune/green-yellow cable (terre/ground)
Cher Client,
2.3 Raccordement gaz

For nearly a century SchoItès has been developing state of the art products to the service of each chef.
Because cooking is a passion, our technology offers you a wide range of options and invites you to explore your culinary creativity.
We hope you will enjoy using your new appliance and we thank you for your trust.
SUMMARY
1. SAFETY AND PRECAUTIONS
1.1 Children and vulnerable people safety
1.2 General safety
2. INSTALLATION
2.1 Fitting
2.2 Electrical connection
2.3 Gas connection
2.4 Changing the type of gas
2.5 Gas properties
- USE
- MAINTENANCE
5.PROBLEMS - CARE FOR THE ENVIRONMENT
Please note that safety information should be read with attention. The manufacturer is not responsible of any injuries or damages that are the result of incorrect installation or usage.
Important safety instructions read carefully and keep for future use.
1. SAFETY AND PRECAUTIONS
BEFORE THE INSTALLATION AND USE OF THE APPLIANCE, PLEASE READ THESE INSTRUCTIONS CAREFULLY.
THE MANUFACTURER IS NOT RESPONSIBLE OF ANY INJURIES OR DAMAGES THAT ARE THE RESULT OF INCORRECT INSTALLATION OR USAGE. ALWAYS KEEP INSTRUCTIONS IN A SAFE AND ACCESSIBLE LOCATION FOR FUTURE REFERENCE.
1.1 Children and vulnerable people safety
This appliance can be used by children aged from 8 years and above and persons with reduced physical, sensory or mental capabilities or lack of experience and knowledge if they have been given supervision or instruction concerning use of the appliance in a safe way and understand the hazards involved.
Children shall not play with the appliance.
Cleaning and user maintenance shall not be made by children without supervision.
Caution : The accessible parts of this appliance may become hot when used with cooking appliances.
1.2 General safety
Check if the appliance gets any damage after unpacking it.
Do not connect the appliance if it has been damaged.
Only a licensed professional may install this appliance and replace the cable.
The electrical plug must remain accessible after installation.
Damages caused by incorrect connection is not covered under warranty.
Before carrying out any maintenance, disconnect the appliance from the power supply.
The appliance can be disconnected by using an accessible power outlet or by incorporating a switch in the fixed lines, in accordance with installation rules.
If the main power supply cable is damaged, it must be replaced by the manufacturer, its authorised service centre or similar qualified persons to avoid an electrical hazard.
Never use steam or high-pressure tools to clean your appliance.
The appliance is not designed to be switched on using an external timer or a separate remote-control system.

WARNING: leaving a hob unattended when cooking with fat or oil can be dangerous and could cause a fire.
Never try to extinguish a fire with water but switch off the appliance, then cover the flame with a lid or a fire blanket.
Fire risk
Do not store any items on the cooking surfaces.
Prior to installation, ensure that the local distribution conditions (type of gas and gas pressure) and the appliance's settings are compatible.
The settings for this appliance are stated on the label inside the wallet or on the information plate.
This appliance is not connected to a system for evacuating combustion products. It must be installed and connected in compliance with current regulations. Particular attention should be given to applicable ventilation requirements.
The use of a gas hob produces both heat and humidity in a room. Ensure that the kitchen is well ventilated: keep mechanical ventilators open.
Prolonged, intensive use of the hob may require additional ventilation, by opening a window, for example, or ventilating the room more efficiently by increasing the setting on mechanical ventilation, where installed.
Do not use cookware that overhangs the edge of the hob.
This appliance is intended to be used in household and similar applications such as: staff kitchen areas in shops, offices and other working environments; by clients in hotels, motels and other residential type environments; farm-houses; bed and breakfast type environments.
Do not use it for commercial or industrial purposes or for any other purpose than that for which it was designed.
This appliance must be installed in compliance with current regulations and only used in a well-ventilated area.
Consult this guide before installing and using your appliance.
You should never leave cooking unattended.

WARNING: Never leave any or products in the cupboard beneath your hob (aerosols or other pressurized cans, papers, recipe books, etc.).
If you have a drawer underneath the hob, we recommend avoiding placing objects in it that are temperature sensitive (plastics, paper, aerosols, etc.).
Disconnect your hob from both electrical and gas supplies before carrying out any maintenance operations.
When connecting electrical appliances to a nearby socket, ensure that the power supply cable is not in contact with any hot surface on the appliance.
For safety reasons, after use, do not forget to close the main gas valve for mains gas lines or the valve on the top of your butane/propane gas cylinder.
This appliance should be installed by a qualified technician /installer.
If a knob is difficult to turn, call your installer immediately.
The walls of the pieces of furniture must resist a temperature of 65^ besides the room one.
The gas hobs are equipped with type X degree protection against overheating. Therefore, the appliance can be installed next to cabinets, provided the height of the cabinet doses not exceed that of the hob.
2. INSTALLATION
2.1 Fitting
This worktop must be at least 3cm thick and heat resistant or else coated with a heat resistant material.
Any possible wall unit over the cook-top must be placed at a distance of at least 760~mm from the top. It is advisable to isolate the appliance from the piece of furniture below with a separator, leaving a depression space of at least 20~mm (Fig. 4).
Make a hole in the worktop according to the dimensions as shown in the figures (Fig.3) with a minimum distance of at least 100mm from the edge of the adjacent walls and of at least 50mm from the appliance border to the back wall.
| MODELE L (mm) D (mm) | ||
| 60-75 560 480 |
If the hob is going to be installed on the top of an oven, precautions must be taken to guarantee an installation in accordance with current accident prevention standards.
If the hob is to be installed above an oven or if other nearby heating appliances could heat and damage the gas hose, then it is essential that a rigid pipe is installed instead. If a flexible hose is used (as is the case of butane gas) then it must not be installed in a place where it may be in contact with a moving part of the kitchen unit or a location likely to get cluttered. If the hob is going to be installed on the top of a built in oven without forced cooling ventilation, proper air vents must be installed to guarantee an adequate ventilation, with the lower air entering with a cross section of at least 200cm^2 and the higher air exiting with a cross section of at least 60cm^2 .
Under no circumstances keep any sprays or pressurized containers in any compartment below the hob (see «Safety guidelines" chapter).
Remove the « pan supports », burner caps and burner heads, noting their original positions. Turn the hob upside down and place it carefully over the top of the base unit, so as not to damage the knobs or igniters.
To ensure a good seal between the body of the hob and the worktop, stick the foam seal S around the edge of the body, before installing the hob (Fig. 5).
Place the hob over the opening in the base unit, taking care to pull the hob towards you. Fit the burner heads, caps and pan supports.
If you wish, you can secure the hob in position, using the four fixing clam C and screws supplied supplied (Fig.6) fixing them to the four corners of the housing. It is essential that
you use the holes provided for the purpose, as per the drawing.
Connect your hob to the gas (see «Gas connection» section) and to the electricity (see « Electrical connection » section).
2.2 Electrical connection
Your hob is supplied with a H05RR-F- T90 3-core (phase, neutral + earth) mains cable, section 0.75mm^2 and must be connected to a 220-240 V'single phase mains supply via a phase, neutral +earth socket meeting standard IEC 60083 or an omnipolar isolator with a contact air gap of at least 3.5mm . The plug must be accessible after the hob is installed.
| CROSS SECTION OF THE CABLE TO BE USED | |
| 220-240 V~ - 50 HZ gas | |
| Cable H05RR-F-T90 Two conductors, one of which is an earth | |
| Cross section of conductors in mm² | 0,75 |

WARNING: The protective conductor (green/yellow) is connected to the earth terminal on the hob and must also be connected to the installation's earth terminal (Fig. 10).
If the supply cable is damaged, it must be replaced by a cable or special set available from the manufacturer or its after-sales department.

WARNING: The electrical connection of the cooking hob and the oven must be carried out separately for security issues and to allow easy removal of the oven from the unit.
2.3 Gas connection

WARNING: No flexible hoses with a limited service life may be longer than 2 meters and must be accessible for inspection along their entire length. They must be replaced before their expiry date (printed on the hose). Whatever means of connection is chosen, make sure that it is gastight when installed, using soapy-water. In France, you must use a hose or pipe stamped NF Gaz.
The gas connection must comply with the regulations in force in the country where it is installed.
Make sure that the appliance is adjusted for the gas type available (see the label under the appliance). If necessary follow the instructions indicated in the chapter "gas transformations and adjustments" for the possible adaptation to different gases.
If the supplied pressure has not the specified value, it is necessary to assemble a proper pressure regulator in compliance with the standard UNI EN 88.For Liquid Gas
(LPG) the use of pressure regulator is allowed only if they are in compliance with UNI EN 12864. The adjustable connection is fixed to the comprehensive ramp by means of a threaded nut G 1/2". Screw the parts without force, adjust the connection in the necessary direction and tighten everything (fig. 7).
The appliance must be connected to the gas system by means of stiff metal pipes or flexible steel pipes having continuous walls, in compliance with the regulations in force.
Rigid connection: Carry out connection by using metal rigid pipes (copper with mechanical end) (UNI-CIG 7129).
Flexible connection: Use a flexible pipe in stainless steel (UNI-CIG 9891) with a maximum length 2m .
When installation is complete, make sure that the seal of each pipe fitting is correct. Use a soapy solution, not a flame.


Some models are equipped with both cylindrical A and conical B connectors for gas supply. Please select the type which is correct for the supply concerned. The connection must not stress the gas ramp. Once the installation is over, check the connection seal with a soapy solution.
2.4 Changing the type of gas
Replacing the nozzles

Note: Your appliance is supplied ready for use with natural gas. The injectors required for adapting it to butane/propane can be found in the plastic bag containing this guide.
Whenever you change the gas type, you must follow these steps in turn:
-
Change the gas connection
-
Change the nozzles
-
Adjust the retarder on the taps
To change the nozzles remove the racks and burners.
By means of a straight spanner L, unscrew the nozzle U (fig. 7) and substitute it with the corresponding one: tighten the nozzle strongly.
Set the retarders on the taps: They are located under the knob.
Adjust each tap in turn. Remove the knobs and sealing washers by pulling them upwards. Insert a flat-tipped screwdriver into the hole (F) in the control panel and turn the bypass screw F (Fig. 8/8-A), and, for correct minimum setting, turn the screw clockwise. As regards G30 gas burners, the by-pass screw must be tightened completely. The setting of the minimum must always be correct, and the flame must always remain on even if the position is changed from maximum to minimum.
2.5 Gas properties
The table (T) shows the installation of the injectors on your appliance depending on the gas used. Each number is marked on the injector.
3. USE
Switching on the gas: ach burner is controlled by a tap fitted with a safety system which, if the flame accidentally goes out (spills, draughts, etc.) the gas inlet is quickly and automatically switched off and gas is prevented from escaping. Each burner is supplied from a tap, which is opened by pressing and turning the knob anti-clockwise. The "O" point corresponds to the tap being off. (Fig. 1)
Choose the desired burner by using the symbols located near the knobs. To light a burner press the knob and turn fully anti-clockwise to the maximum position. Holding the knob pressed will cause a series of sparks until the gas lights. Adjust the setting by turning to flames symbol.
Note: Hold the knob pushed in fully for a few seconds after the flame appears, so as to trigger the safety system. Adjust the ring of flames so that it does not overflow the edge of the pan. Do not use a pan with a concave or convex bottom. Do not use pans that partly cover the knobs. Do not leave the gas on under an empty pan.
Pots
| PAN DIAMETER BURNER USE | |
| 22 to 24 cm Triple crown Frying - Boiling | |
| 20 to 22 cm Rapid Stearing foods | |
| 16 to 20 cm Semi-rapid Sauce - Re-heating | |
| 10 to 14 cm Auxiliary Simmering |
4. MAINTENANCE
It is advisable to clean the appliance when it is cold. Take care to get all the knobs in position 0.
To clean the glass surface, use a sponge with soapy water. Wipe with dry soft cloth.
Do not use abrasive or corrosive products. Do not leave substances, such as lemon or tomato juice, salt water, vinegar, coffee and milk on the enamelled surfaces for a long time...
Stainless steel can be stained if it remains in contact with highly calcareous water or aggressive detergents for an extended period of time.
For persistent stains, use a non-abrasive cream, and then rinse with clean water. Carefully wipe each part of the burner before using your hob again.
The possible lubrication of the taps must be carried out by specialized personnel, exclusively.
Note: After cleaning the burner, make sure that the lid is placed in the housing.
5.PROBLEMS
| LIGHTING BURNERS SOLUTION | |
| Lighting burners: there are no sparks when I push down on the knob | Check that your hob is electrically connected. Check that the ignitors are clean. Check that burners are clean and properly assembled. If the hob is fixed to the worktop, make sure that the fixing clamps have not been twisted. Check that the sealing washers under the knobs have not come out of their locations. |
| When i press a knob, there are sparks on all burners at once | This is normal. The lighting system is centralised and all the burners spark at the same time. |
| There are sparks but the burners do not light. | Check that the gas inlet is open. If you use gas tanks or cylinders check that they are not empty. If you have just installed your hob or changed a gas cylinder, keep the knob fully pressed for a few seconds to allow gas to arrive at the burners. Make sure the lid is properly positioned |
| When lighting, flames ignite but go out when the knob is released | Press the knobs as far as they will go and maintain the pressure for several seconds after flames appear. Check that the burner components are correctly positioned. Check that the sealing washers under the knobs have not come out of their locations. Avoid strong draughts in the room. Light the burner before placing a pan on it. |
| In the low position, the burner goes out or flames remain too high. | Avoid strong draughts in the room. Check that the injectors fitted are the right ones for the gas being used (see the identification on the injectors in the «Changing gas type» section). Reminder: Remember that gas hobs are delivered set up for use with mains gas (natural gas). Check that the retarder screws are properly adjusted (see «Changing gas type» paragraph). |
| The flames have an irregular appearance. | Check that the burners and injectors underneath them, burner assemblies are clean, etc... |
| Knobs become hot during cooking. | Use smaller pans on the burners close to the knobs. |
6. CARE FOR THE ENVIRONMENT
This appliance's packaging can be recycled. Recycle and contribute towards protecting the environment by disposing of packaging in local waste containers designed for this purpose. Your appliance also contains a lot of recyclable material.

This logo indicates that used appliances must not be mixed with other waste. Appliance recycling organised by your manufacturer is carried out under optimum conditions, in accordance with European Directive 2002/96/EC on the disposal of waste electrical and electronic equipment.
Contact your local authority or retailer for information on used appliance collection points close to your home.
Thank you for helping to protect the environment.
Information on the meaning of the conformity marking (C)
The CE marking indicates that the product meets the main requirements of European Directives 2014/35 / CE (Low Voltage), 2014/30 / CE (Electromagnetic Compatibility), 2011/65 / EU (Reduction of the use of certain dangerous substances in EEE).
The warranty does not cover wearing parts of the product, nor problems or damage resulting from:
- Surface deterioration due to normal wear and tear of the product;
- Defects or deterioration due to contact of the product with liquids and due to corrosion caused by rust or the presence of insects;
- Any unauthorized incident, abuse, misuse, modification, disassembly or repair;
- Any improper maintenance operation, use not in accordance with the instructions concerning the product or connection to an incorrect voltage;
- Any use of accessories not supplied or not approved by the manufacturer. The warranty will be void if the product nameplate and / or serial number is removed.