SOTC1410B - Oven SCHOLTES - Free user manual and instructions
Find the device manual for free SOTC1410B SCHOLTES in PDF.
User questions about SOTC1410B SCHOLTES
0 question about this device. Answer the ones you know or ask your own.
Ask a new question about this device
Download the instructions for your Oven in PDF format for free! Find your manual SOTC1410B - SCHOLTES and take your electronic device back in hand. On this page are published all the documents necessary for the use of your device. SOTC1410B by SCHOLTES.
USER MANUAL SOTC1410B SCHOLTES
Warming drawer - Instruction manual / safety instructions
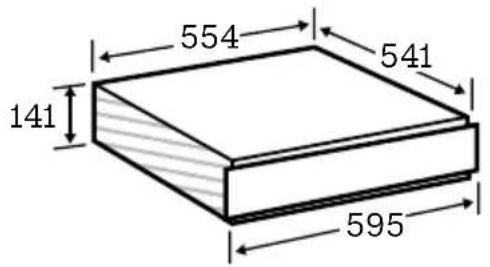
Fig.2
Tiroir chauffant
Specifications techniques
| Marque: SCHOLTES | |
| Référence commerciale: SOTC1410B | |
| Alimentation: | 220-240V~ 50-60Hz |
| Puisance nominale totale : 1000W |
Compact devices H. 454 Classic oven H. 595mm
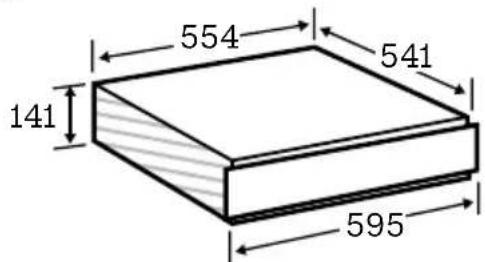
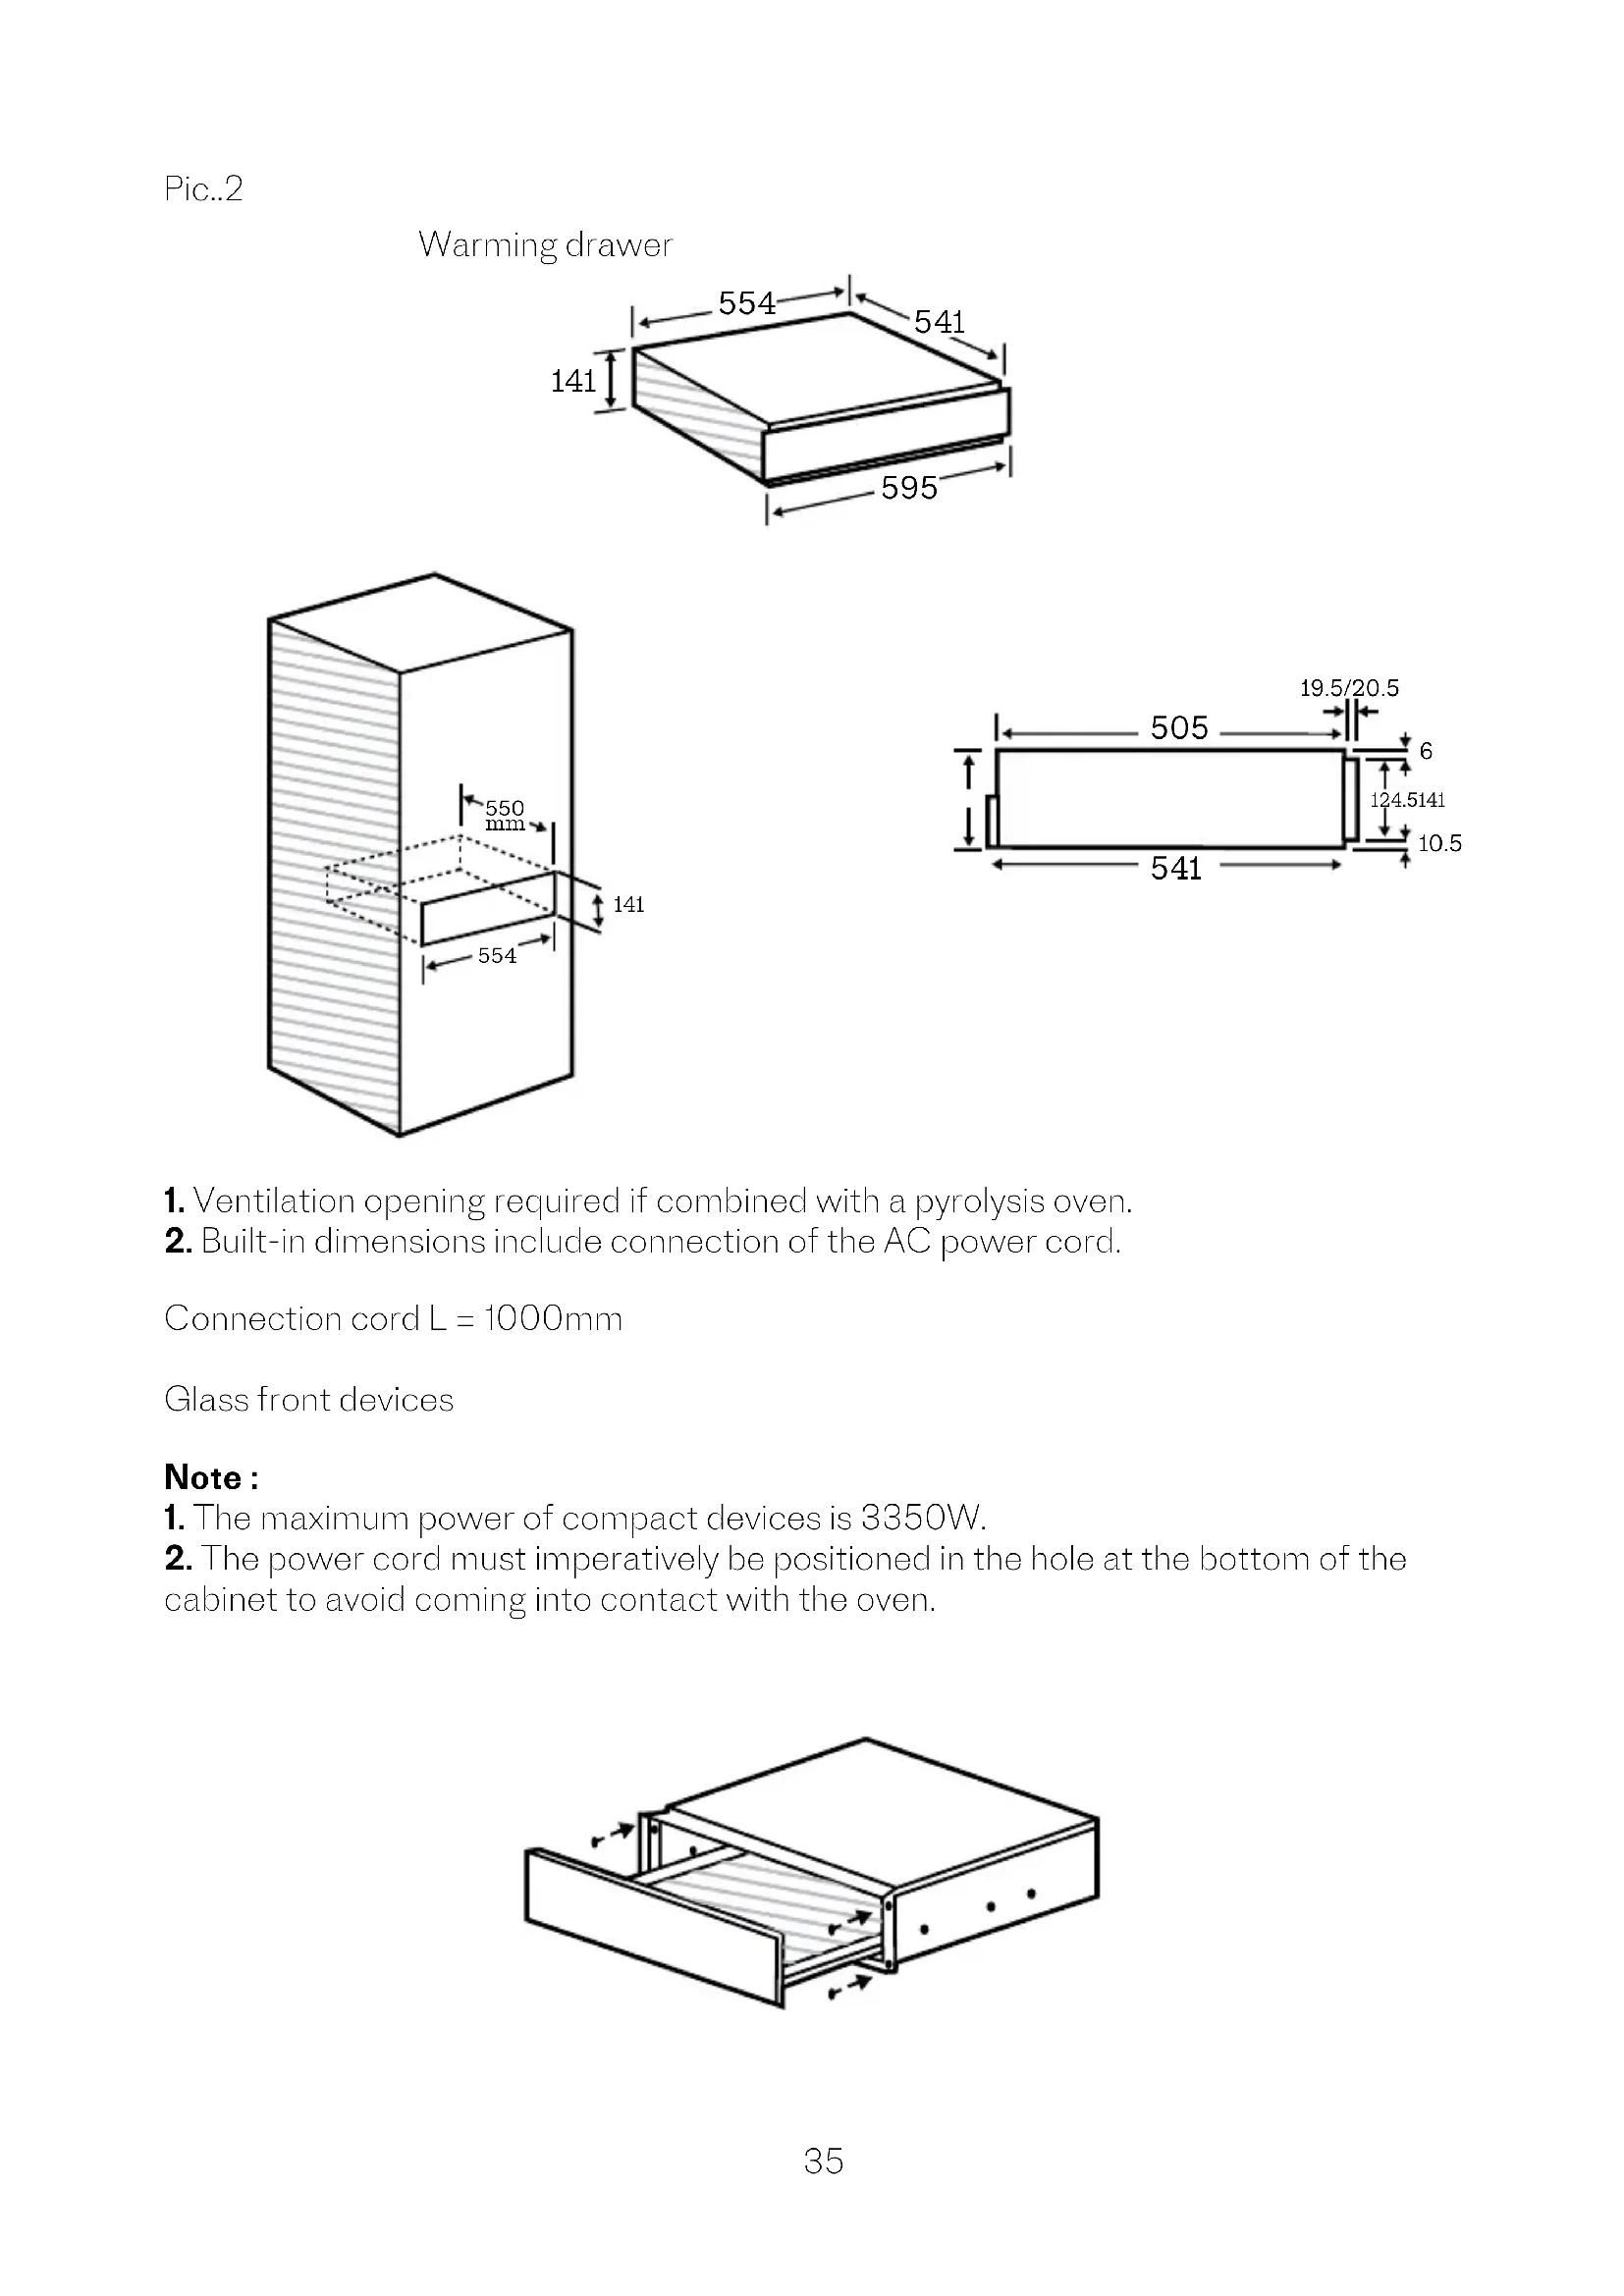
Pic..2
Warming drawer

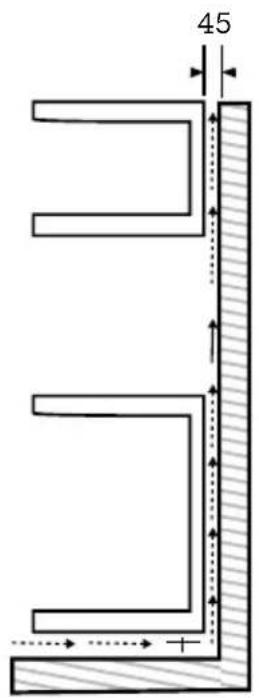
- Ventilation opening required if combined with a pyrolysis oven.
- Built-in dimensions include connection of the AC power cord.
Connection cord L = 1000mm
Glass front devices
Note:
- The maximum power of compact devices is 3350W.
- The power cord must imperatively be positioned in the hole at the bottom of the cabinet to avoid coming into contact with the oven.
Dear Customer,
For nearly a century SchoItès has been developing state of the art products to the service of each chef.
Because cooking is a passion, our technology offers you a wide range of options and invites you to explore your culinary creativity.
We hope you will enjoy using your new appliance and we thank you for your trust.
Summary
1 - Safety and precautions
2 - Installation
3 - Use
4 - Cleaning and maintenance
5 - Anomalies
6 - Respect for the environment
Before using your product, please read the installation and safety instructions. The safety instructions must be read carefully. The manufacturer cannot be held responsible for injury or damage resulting from improper installation or misuse of the device.
Important safety instructions: read carefully and keep for future uses.
1. SAFETY AND PRECAUTIONS
THIS DEVICE COMPLIES WITH ALL APPLICABLE SAFETY REQUIREMENTS. IMPROPER USE CAN, HOWEVER, CAUSE PERSONAL INJURY AND PROPERTY DAMAGE.
THIS DEVICE CAN BE USED BY CHILDREN AGED 8 YEARS AND OVER AND ADULTS, WITH REDUCED PHYSICAL, SENSORY OR MENTAL CAPACITIES OR A LACK OF EXPERIENCE AND KNOWLEDGE, IF THEY HAVE BEEN GIVEN SUPERVISION OR INSTRUCTION REGARDING THE USE THE DEVICE IN A SAFE MANNER AND UNDERSTAND THE DANGERS INVOLVED.
CLEANING AND MAINTENANCE OF
THE USER SHOULD NOT BE CARRIED OUT BY
CHILDREN, UNLESS THEY ARE OVER 8 YEARS OLD
AND ARE SUPERVISED.
Correct use
The device is designed for home use and in residential or work environments.
It is designed exclusively for domestic use as described in these installation and use instructions. Any other use is not authorized by the manufacturer and may be dangerous.
The device is not designed for outdoor use.
This device may be used by persons with reduced physical, sensory or mental capacities, or lacking experience and knowledge, if they are supervised during its use or if they are instructed to use the device safely. been given and whether they understand the inherent risks.
Child safety
Children under the age of 8 should stay away from the device unless they are constantly supervised.
Children 8 years and older can only use the device if they have been shown how to use it safely and if they understand the dangers involved.
Children are not allowed to clean the appliance without supervision.
This device is not a toy!
To prevent the risk of injury, do not allow
children play with the device or its controls.
This device becomes very hot during use and remains very hot for some time after being turned off. Keep
children away from the appliance until it has cooled
down and there is no further danger of burns. Packaging (eg plastic films, polystyrene, and plastic wrap) should be kept out of the reach of babies and children as it presents a choking hazard. Dispose of or recycle all packaging materials in a safe manner as soon as possible.
Technical security
Installation, maintenance and repairs should only be performed by a person with the required skills and qualifications in strict compliance with local and national safety regulations. Installation, maintenance and repairs by unqualified persons can be dangerous.
A damaged device can be dangerous. Before installation, inspect the device for any signs of deterioration. Do not use a damaged device.
The electrical safety of this appliance can only be guaranteed if it is properly earthed. It is extremely important that this basic safety requirement is observed and regularly tested, and if there is any doubt, the home wiring system should be inspected by a qualified electrician.
To prevent the risk of damage to the device, check that the electrical specifications (frequency and voltage) indicated on the nameplate correspond to those of the mains supply before plugging the device into a power outlet. Consult a qualified electrician if in doubt.
Do not plug the device into a power outlet using a power strip or extension cord. This does not guarantee the required safety of the device (eg the risk of overheating).
For safety, this appliance should only be used after it has been built in. This device must not be used in a nomadic place (for example in a boat).
Do not open the casing of the device. Modifying electrical components or connections and mechanical parts is extremely dangerous and may cause the device to fail.
When the device is under warranty, repairs should only be carried out by an authorized repairer, otherwise the warranty is void.
The manufacturer can only guarantee the safety of the device if original spare parts are used. Defective components should only be replaced with original spare parts.
If the plug is removed from the power cord or the appliance is supplied without a plug, it must be connected to the power supply by a qualified electrician.
The device must be disconnected from the mains supply during installation, maintenance and repairs. Make sure that the device is not reconnected to the
power supply until it has been installed or until the repair or maintenance operation is completed.
If the power cord is damaged, it must be replaced by the manufacturer, its repair agent or similarly qualified persons to avoid a hazard.
The power cord must imperatively be positioned in the hole at the bottom of the cabinet to avoid being in contact with the oven.
Safety of use
THE DRAWER IS DESIGNED TO KEEP FOODS HOT, NOT TO HEAT THEM. MAKE SURE THE FOOD IS VERY HOT WHEN YOU PLACE IT IN THE WARMING DRAWER.
Vous pouvez vous brûler avec la vaisselle ou le tiroir. You can burn yourself on the dishes or the hot drawer. Protect your hands with heat resistant oven mitts or gloves when using the appliance. Be careful that they are not wet or damp, as this speeds up heat transfer through the material and puts you at risk of burns.
Do not store any flammable object or plastic container in the warmer drawer. They could melt or ignite when the device is turned on and create a fire hazard.
Due to the high radiated temperatures, objects left near the device during use could ignite. Do not use the appliance to heat the room.
Never replace the non-slip mat supplied with the appliance with paper towels or a similar utensil.
If you overload the drawer or sit or lean on it, it will damage the telescopic rails. The telescopic rails can withstand a maximum load of 25 kg.
If the appliance is installed behind a kitchen cabinet door, it should only be used with the cabinet door open.
Only close the door when the appliance is switched off.
Do not heat unopened jars or cans of food in the drawer, as increasing pressure in the jar or can will cause it to explode. It can cause injury, burns and damage.
The underside of the drawer becomes hot when turned on. Be careful not to touch it when the drawer is open.
Do not use plastic or aluminum containers. High temperatures could melt and ignite. Use only heat-resistant dishes made of glass, porcelain, etc.
When opening or closing the loaded drawer, take care that liquids are not spilled / thrown and do not enter the ventilation openings. This could cause a short circuit in the device.
Bacteria can grow in food if the temperature is too low.
Be sure to set a temperature high enough to keep the food hot.
Cleaning and maintenance
Risk of injury.
Do not use a steam cleaner to clean this device. The steam could reach electrical components and cause a short circuit.
Do not immerse the device in water or any other liquid while cleaning.
Important information
Electrical connection
The appliance is fitted with an electrical plug and must only be plugged into a properly installed earthed socket. Only a qualified electrician complying with the appropriate regulations is authorized to install the plug or replace the power cord. If the plug is no longer accessible after installation, an omnipolar cut-off switch-disconnector must be installed on the side of the installation in accordance with the installation rules in force. Contact protection must be guaranteed by the installation.

Suitable for food
2. INSTALLATION
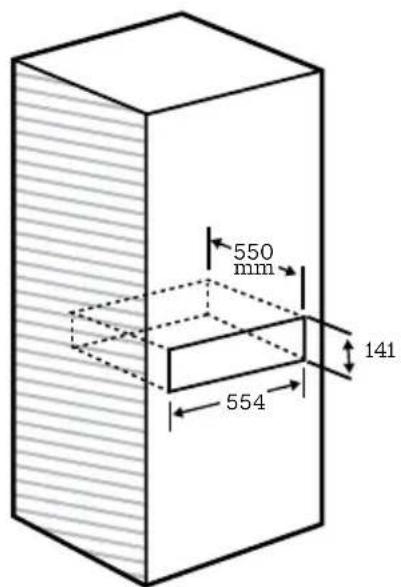
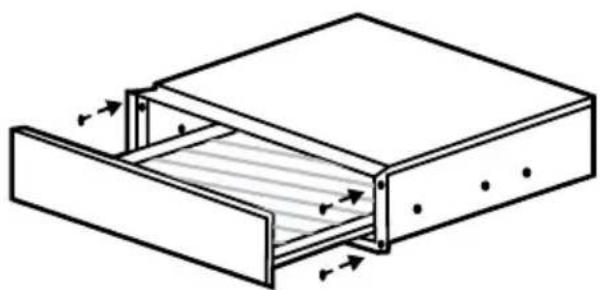
2.1 Installation in the cabinet
Pic.1-Pic.2
The warming drawer may only be installed in combination with the devices indicated as suitable by the manufacturer. The manufacturer does not guarantee trouble-free use if the device is used in combination with devices other than those indicated by the manufacturer as suitable.
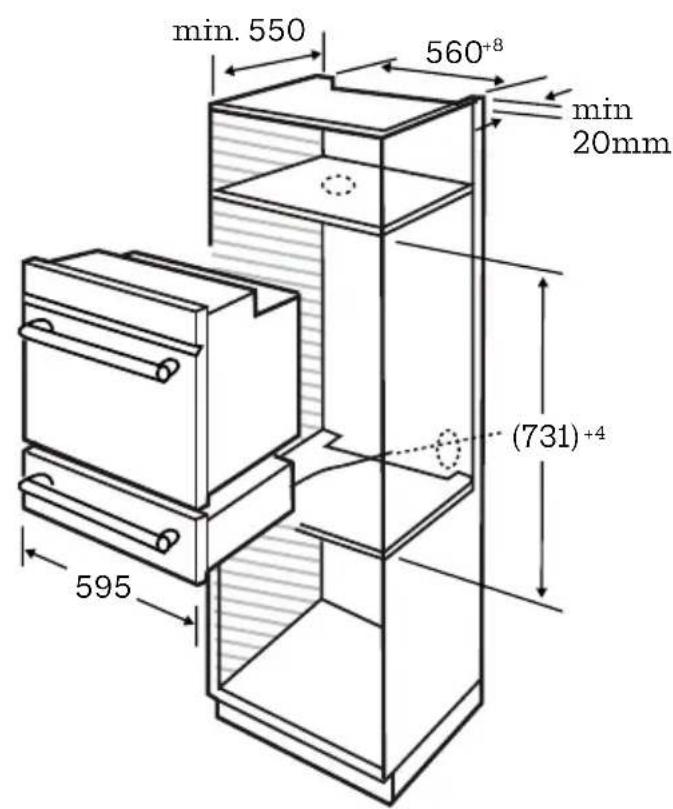
When installing the warming drawer in combination with another suitable appliance, the warming drawer should be installed above a fixed intermediate shelf in the cabinet.
Check that it can support the combined weight of the drawer and the other appliance.
As the combo unit is placed directly above the warming drawer once it is built in, an intermediate shelf is not required between the two units.
The appliance must be fitted so that the contents of the drawer cannot be seen. This helps prevent burns from hot food splashes.
There must be enough space to be able to fully open the drawer.
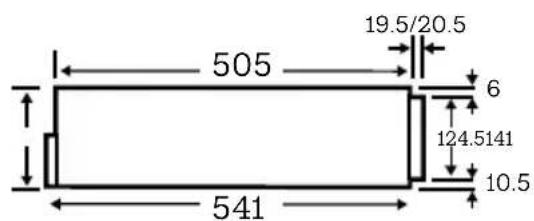
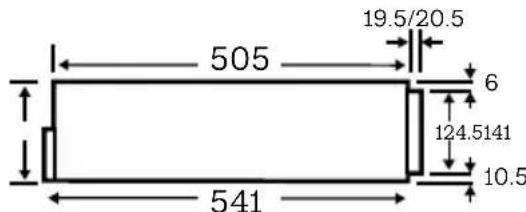
The built-in dimensions for the warming drawer must be added to the built-in dimensions for the combination device in order to establish the required niche size.
All dimensions provided in this manual are indicated in mm.
2.2 Electrical connection
Before plugging the device into a power outlet, check that the electrical connection specifications indicated on the nameplate (voltage and frequency) match those of the mains power supply, otherwise the device will be damaged. Consult a qualified electrician if in doubt.
The socket and the on / off switch must remain easily accessible after installation of the appliance.
3. USE
3.1 Description of the device
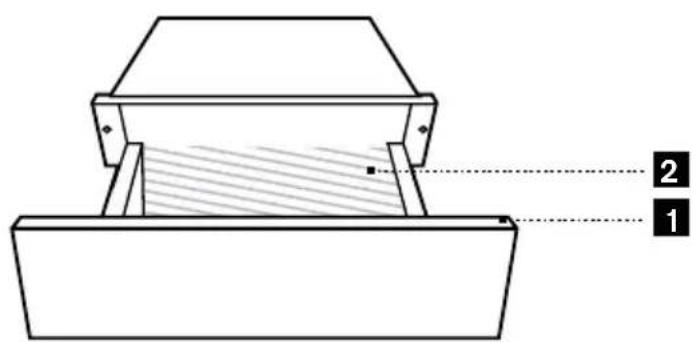
- Control panel
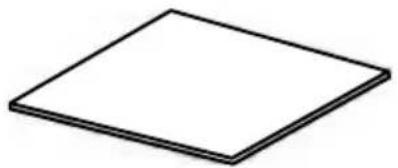
- Non-slip mat: To keep dishes fixed
Press the middle of the drawer to open or close it. When opening, the drawer pops out a little. You can then pull it towards you.
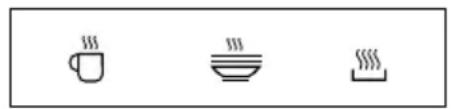
3.2 Control panel


To heat glasses and cups

To heat dishes and plates

To keep food hot

To adjust the temperature

To set the duration

- To set the temperature and time
STOP
Cancel button

Start button
3.3 Cleaning and initialization
Note: Operate the drawer empty.
A display test is carried out for 10 s after installation of the device and after a power failure. The fan turns on at the same time.
The device should not be used during this period.
Remove all stickers and protective films.
Remove the non-slip mat and, if applicable, the drawer grid, and clean them both with a sponge, hot water and a little washing up liquid. Dry with a soft cloth.
Wipe the inside and outside of the device only with a damp cloth, then dry it with a soft cloth.
Put the non-slip mat and the grid (if applicable) back into the drawer. Then heat the empty drawer for at least two hours.
Turn on the device by pressing the touch button.
Press the touch button several times until the LED lights up.
Press the touch button several times until the rightmost LED lights up.
Press the touch button 8 several times until «2 hrs» light up.
Close the drawer.
Note:
The warming drawer has a soft automatic closing mechanism.
It also has a switch to ensure that the heater and the fan of the appliance only work when the drawer is closed.
Metal components have a protective coating that may emit a slight odor when heated for the first time.
The odor and any vapors will dissipate after a short time and do not indicate that the appliance is defective.
Make sure that the kitchen is well ventilated when the appliance is on when the appliance is operating for the first time for the first time.
The appliance can be used to keep food hot while heating plates and dishes.
However the food must be properly covered.
3.4 Function setting
In standby mode, press the « 空 » button to start the cup heating function to 40^ . « 40^ » appears in the display.
Adjust the temperature using the + or - buttons.
To select the heating time press the « 串 » button, then adjust using the «+» or «-» buttons.
Press " ⑥ " to save the temperature and time.
Close the door, the device beeps and then turns on.
Note:
While adjusting the parameters, you can select the other modes
Before closing the door, you can press «STOP » to cancel the settings, the device will return to standby mode.
While the device is in operation you can open the drawer and adjust all parameters.
After making these settings, you can press «STOP » to return to standby mode or close the door to turn on the appliance.
Note:
When the machine is turned on, if you open the drawer the buzzer will sound once and the machine will go into standby mode. «0» is displayed.
During the time setting process, if you do not perform any operation for 3 minutes, the unit will return to standby mode.
When you press a key, a beep informs you that your action has been taken into account.
Once your program is finished, the device will ring three times to inform you.
3.5 Temperature setting
Each function has its own temperature range. The temperature can be changed in ranges of 5^ . The last selected temperature is automatically memorized and is displayed by default the next time you use it.
- Approximate temperature values measured in the middle of the drawer when it is empty.
3.6 Keep food hot
The data may vary depending on the containers used, the food, the quantity and the type of recipe.
| Food Cover the | container? | Temperature for setting |
| Steak (bleeding) | Yes 65 | |
| Gratin | Yes 80 | |
| Roast meat | Yes 75 | |
| Stew | Yes 80 | |
| Fish sticks | no 80 | |
| Meat in sauce | Yes 80 | |
| Vegetables in sauce | Yes 80 | |
| Goulash | Yes 80 | |
| Mashed potatoes | Yes 75 | |
| Baked potatoes / New potatoes | Yes 75 | |
| Breaded cutlet | no 80 | |
| Potato pancakes | no 80 | |
| Pizza | no 80 | |
| Steamed potatoes | Yes 80 | |
| Sauce | Yes 80 | |
| Strudel | no 80 | |
| Heating bread | no 65 |
3.7 Capacity
The amount that can be loaded largely depends on the size and weight of your dishes. Do not overload the drawer. This drawer can support a maximum load of 25kg . When the maximum load is reached, the drawer should be opened or closed slowly.
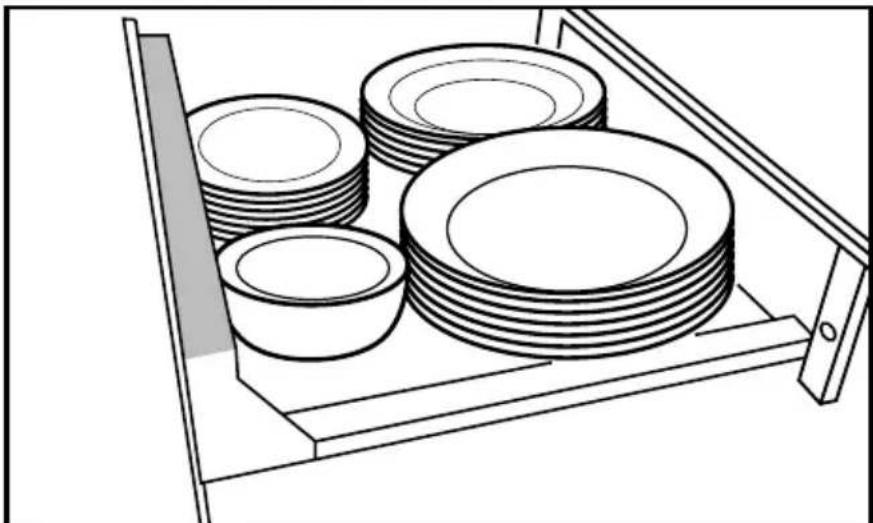
The loading examples indicated are purely indicative. Preheat dinner dishes:
6 dinner plates 26 cm
6 soup plates 23 cm
6 Dessert plates 19 cm
1 oval dish 32 cm
1 medium bowl 16 cm
1 small bowl 13 cm
3.8 Low temperature cooking
Principle
This is a cooking function in which the cooking temperature is at or near the desired final core temperature. In traditional cooking, the cooking temperature always exceeds the desired consumption temperatures. Low temperature cooking allows meat to be cooked at a low temperature for a long time.
With this method, the meat loses less liquid (fewer molecules are broken), retains its organoleptic characteristics (vitamins, proteins, etc.), its freshness, its flavors and its juice.
This cooking method is particularly suitable for large pieces of meat which thus remain tender.
We recommend that you use a food thermometer to monitor core temperature to improve accuracy.
Core temperature
Food can be cooked to a core temperature of up to
70^ in the warming drawer. Meats requiring a core temperature above 70^ should not be cooked in this warming drawer.
The value of the core temperature read indicates the cooking level in the center of a piece of meat. The lower the core temperature, the less the meat is cooked through.
45-50°C = rare
55-60 °C = medium
65^ =well done
Instructions
- Preheat the warmer drawer for 15 minutes at 70^ .
- Cover the meat properly with plastic wrap.
- The cooking time depends on the size of the pieces of meat (consult the indicative table).
- Place the covered meat in a dish and use a stopwatch to monitor the time.
- Sear the meat for flavor (see table).
Indicative cooking table
| Beef and veal | ||||
| Room | Thickness | Degree of cooking | Duration | Indications and duration of input |
| Whole fillet | 50mm | Bleeding Medium rare | 1h 35min 2h 35min | 90 s on the external side at the maximum power of the hob. |
| Well done | 3h 30min 3 | minutes sur le côté externe à la puissance moyenne-haute de la table de cuisson. | ||
| 60mm | Bleeding Medium rare | 1h 45min 2h 50min | 90 s on the external side at the maximum power of the hob. | |
| Well done | 4h 3 minutes | on the external side at medium-high power on the hob. | ||
| 70mm | Bleeding Medium rare | 2h 3h | 90 s on the external side at the maximum power of the hob. | |
| Well done | 4h 40min 3 | minutes on the external side at medium-high power of the stove. | ||
| Sirloin Steak Medallions Rumpsteak | 20mm | Bleeding Medium rare | 50min 1h 30min | 90 s on the external side at the maximum power of the cooker. |
| Well done | 2h 3 minutes | on the outer side at medium-high power of the stove. | ||
| 30mm | Bleeding Medium rare | 1h 5min 1h 50min | 90 s on the external side at the maximum power of the cooker. | |
| Well done | 2h 20min 3 | minutes on the outer side at medium-high power of the stove. | ||
| 40mm | Bleeding Medium rare | 1h 20min 2h 10min | 2 minutes per side at maximum power on the stove. | |
| Well done | 3h 4 minutes | on the medium-high power side of the stove. | ||
| Roast the sirloin Roast beef | 60mm | Bleeding Medium rare | 1h 45min 2h 50min | 4 minutes the outer side at medium-high power of the stove. |
| Well done | 4h 6 minutes | on the outer side at medium stove power. | ||
| 70mm | Bleeding Medium rare | 2h 3h | 4 minutes the outer side at medium-high power of the stove. | |
| Well done | 4h 40min 6 | minutes on the outer side at medium stove power. | ||
| 80mm | Bleeding Medium rare | 2h 20min 3h 30min | 4 minutes the outer side at medium-high power of the stove. | |
| Well done | 5h 40min 6 | minutes on the outer side at medium stove power. | ||
| Pork | ||||
| Room | Thickness | Degree of cooking | Duration l | Indications and duration of input |
| Whole fillet | 40mm | Medium rare | 2h 20min 9 | 90 s on the external side at the maximum power of the cooker. |
| Bien cuit 3 | 10min 3 m | nutes on the outer side at medium-high power of the stove. | ||
| 50mm | Medium rare | 2h 35min | 90 s on the external side at the maximum power of the cooker. | |
| Bien cuit 3 | 3 min 25min | the outer side at medium-high power of the stove. | ||
| 60mm | Medium rare | 3h 90 s on | the external side at the maximum power of the cooker. | |
| Bien cuit 4 | 5min 3 min | nutes on the outer side at medium-high power of the stove. | ||
| Ham on the bone Roulades Roast pork Whole pork loin | 30mm | Medium rare | 1h 50min 2 | minutes on the outer side at high power of the stove. |
| Well done | 2h 40min 3 | minutes on the outer side at medium-high power of the stove. | ||
| 40mm | Medium rare | 2h 20min 2 | minutes on the outer side at high power of the stove. | |
| Well done | 3h 10min 3 | minutes on the outer side at medium-high power of the stove. | ||
| 50mm | Medium rare | 2h 35min 4 | minutes the outer side at medium-high power of the stove. | |
| Well done | 3h 25min 6 | minutes on the outer side at medium stove power. | ||
| 60mm | Medium rare | 3h 4 minu | tes the outer side at medium-high power of the stove. | |
| Well done | 4h 5min 6 m | nutes on the outer side at medium stove power. | ||
| 70mm | Medium rare | 3h 20min | 4 minutes the outer side at medium-high power of the stove. | |
| Well done | 4h 45min | 6 minutes on the outer side at medium stove power. | ||
| 80mm | Medium rare | 3h 40min | 4 minutes the outer side at medium-high power of the stove. | |
| Well done | 5h 30min | 6 minutes on the outer side at medium stove power. | ||
| Tranche de longe | 10mm | Medium rare | 1h 10min | 60 s the side at the maximum power of the cooker. |
| Well done | 5h 30min | 2 minutes per side at maximum power on the stove. | ||
| 20mm | Medium rare 1h 30min | 90 s the side at the maximum power of the cooker. | ||
| Medium rare | 2h 10min | 3 minutes on the high power side of the stove. | ||
| Poultry | ||||
| Room | Thickness | Degree of cooking | Duration | Indications and duration of input |
| Chicken breast | 25mm | Medium rare | 1h 30min | 60 s the side at the maximum power of the cooker. |
| Well done 2h | 90 s the side at the maximum power of the cooker. | |||
| 35mm | Medium rare | 1h 45min | 60 s the side at the maximum power of the cooker. | |
| Bien cuitWell done | 2h 20min | 90 s the side at the maximum power of the cooker. | ||
| Duck breast | 35mm | Bleeding 1h | 4 minutes skin side down on medium-high stovetop power. | |
| Medium rare | 1h 30min | |||
| Well done 2h | ||||
| 40mm | Bleeding 1h 45min | 4 minutes skin side down on medium-high stovetop power. | ||
| Medium rare | 2h 20min | |||
| Well done 3h | ||||
| Turkey breast | 40mm | Medium rare | 3h | 90 s the side at the maximum power of the cooker. |
| Well done 4h | 3 minutes on the high power side of the stove. | |||
| 50mm | Medium rare | 3h 50min | 90 s the side at the maximum power of the cooker. | |
| Well done 5h | 3 minutes on the high power side of the stove. | |||
| Medallion of liver (duck or goose) | 10mm | Medium rare | 30min | 60 s the side at the maximum power of the cooker. |
| 20mm | Medium rare | 40min | ||
| 30mm | Medium rare | 50min | ||
| Whole liver (duck or goose) | 35mm | Medium rare | 48min | 90 s on the external side at the maximum power of the cooker. |
| 45mm | Medium rare | 1h | ||
| 55mm | Medium rare | 1h 15min | ||
| Lamb | ||||
| Room | Thickness | Degree of cooking | Duration | Indications and duration of input |
| Rack of lamb chops | 40mm | RareMedium rareWell done | 1h 20min2h 10min3h | Sear for 90 s over high heat |
| Sear for 3 min over medium-high heat | ||||
| 50mm | RareMedium rareWell done | 1h 35min2h 35min3h 30min | Sear for 90 s over high heat | |
| Sear for 3 min on fire medium - lively | ||||
| 60mm | RareMedium rareWell done | 1h 45min2h 50min4h | Sear for 90 s over high heat | |
| Sear for 3 min over medium-high heat | ||||
| Saddle of lamb | 60mm | RareMedium rareWell done | 1h 45min2h 50min4h | Sear for 3 minutes over high heat |
| Sear for 4 min over medium-high heat | ||||
| 70mm | RareMedium rareWell done | 2h3h4h 40min | Sear for 3 minutes over high heat | |
| Sear for 4 min over medium-high heat | ||||
| 80mm | RareMedium rareWell done | 2h 20min3h 30min5h 40min | Sear for 3 minutes over high heat | |
| Sear for 4 min over medium-high heat | ||||
| Leg of lamb with bone | 60mm | RareMedium rareWell done | 1h 45min2h50min4h | Sear for 2 minutes over high heat |
| Sear for 3 min over medium-high heat | ||||
| 70mm | RareMedium rareWell done | 2h3h4h 40min | Sear for 2 minutes over high heat | |
| Sear for 3 min over medium-high heat | ||||
| 80mm | RareMedium rareWell done | 2h 20min3h 30min5h 40min | Sear for 2 minutes over high heat | |
| Sear for 3 min over medium-high heat | ||||
| Lamb chops | 10mm | RareMedium rareWell done | 35min1h 10min2h | Sear for 60 s over high heat |
| Sear for 90 s over high heat | ||||
| 20mm | RareMedium rareWell done | 50min1h 30min2h 30min | Sear for 60 s over high heat | |
| Sear for 90 s over high heat | ||||
| Eggs | ||||
| Cut Weight | Duration Notes | |||
| Very big 73g or more | 2h 20min2h 30min3h 10min | |||
| Large 63g< 73g | 2h 11min2h 31min3h 1min | |||
| Way 53g< 63g | 2h 5min2h 25min2h 55min | |||
| Small 53g or less | 2h2h 20min2h 50min | |||
3.9 Other uses
| Type of food Container | Cover the container | Temperature for setting | Duration in hours | |
| Defrost berries Dish no 65°C 1 h | ||||
| Defrost frozen vegetables Dish no 65°C 1 h | ||||
| Prove dough | Bowl yes 45°C 1/2 h | |||
| Make yogurt Yoghurt pots with lids | yes 45°C | 6 h | ||
| Melt chocolate Bowl no 50°C | 1 h | |||
| Infusion, oil | Bowl covered with plastic wrap | yes | 75°C | 4 h |
| Infusion, water | Bowl covered with plastic wrap | yes 65°C | 4 h | |
| Dry tomatoes | Dish with baking paper | no 60°C | 20 h | |
| Dry vegetables | Dish no 60°C | 12 h | ||
| Dry sliced fruit | Dish no 60°C | 12 h | ||
| Dry herbs | Dish no 70°C | 4 h | ||
| Dry bread to make bread crumbs | Dish no 80°C | 4 h | ||
| Fish confit in oil | Microwave-compatible plastic box | Cover and open the ventilation hole | 50°C | Depends on size, 1 hr to 2 hrs. |
| Slow cooking stew | Glass container | yes | 80°C | Between 1 a.m. and 12 p.m. |
- According to model
4. CLEANING AND
MAINTENANCE
Risk of injury
Do not use a steam cleaner to clean this appliance. Steam could reach electrical components and cause a short circuit.
Risk of deterioration.
Improper cleaning agents can damage the surfaces of the device. Use only household washing-up liquid to clean the appliance.
Clean and dry the device completely after each use. Always wait until the appliance has cooled down to a safe temperature before cleaning it.
4.1 Front and interior of the device
Immediately remove all dirt.
If this is not done, it may become impossible to remove them and this can cause deterioration or discoloration of the surfaces.
Clean all surfaces with a clean sponge and a solution of hot water and washing up liquid. Then dry with a soft cloth.
A damp, clean microfiber cloth without cleaning agent can also be used.
All surfaces are susceptible to scratches. If the glass surfaces are scratched, it can even cause them to break.
Contact with inappropriate cleaning agents may alter or discolor surfaces.
To avoid damaging the surfaces of your device, do not use:
- Cleaning agents containing soda, ammonia, acids or chlorides.
- Cleaning agents containing descaling agents.
- Abrasive cleaning agents, for example powder or cream cleaners.
- Solvent based cleaning agents.
- Cleaning agents for stainless steel.
- Dishwasher cleaner.
Oven sprays.
Glass cleaning agents. - Abrasive and hard sponges and brushes, for example cookware scouring pads.
Sharp metal scrapers.
4.2 Anti slip carpet
Remove the non-slip mat from the drawer before cleaning it.
Clean the anti-slip pad only by hand with a solution of hot water and a little washing up liquid, then dry it with a cloth.
Do not put the non-slip mat back in the drawer until it is completely dry.
Notes:
Do not wash the non-slip mat in a dishwasher or washing machine.
Never place the non-slip mat in an oven to dry it.
5. ANOMALIES
With the help of the following guide, minor device operation problems, some of which may be due to improper use, can be fixed without having to contact customer service.
CAUTION: Installation work and repairs to electrical devices should only be carried out by a person with the required qualifications and in strict compliance with applicable local and national safety regulations. Repairs and other operations carried out by unqualified persons can be dangerous.
| Problem Possible cause Solution | |
| The device is not properly plugged in and turned on at the power outlet. | Connect the plug to a power outlet and switch on the device. |
| The mains fuse has tripped. | Reactivate the fuse in the electrical network fuse box (to find out the minimum fuse rating, consult the nameplate).If, after reactivating the mains fuse in the fuse box and switching on the appliance again, the appliance still does not heat up, contact a qualified electrician. |
| Food is not hot enough. | The keep food warm function is not selected. | Select the appropriate function. |
| The temperature setting is too low. | Select a higher temperature. | |
| The ventilation openings are covered. | Check that the air can circulate freely. | |
| The food is too hot. | The keep food warm function is not selected. | Select the appropriate function. |
| The function of heating dishes and plates is not selected. | Select a lower temperature. | |
| The dishes are not hot enough. | The function of heating dishes and plates is not selected. | Select the appropriate function. |
| The temperature setting is too low. | Select a higher temperature. | |
| The ventilation openings are covered. | Check that the air can circulate freely. | |
| The heating time of the dishes is not long enough. | Many factors can affect the time it takes to heat the dishes (see «Heating the dishes»). | |
| The dishes are too hot. | The heating function dishes and plates or for heating glasses and cups is not selected. | Select the appropriate function. |
| dishes and plates or for heating glasses | Select a lower temperature. | |
| There is a noise while using the drawer. | The noise may be caused by the fan distributing heat evenly throughout the drawer.The fan operates intermittently while using the keep food warm and low temperature cooking functions. | It is not lacking. |
Technical specifications
| Mark: SCHOLTES | |
| Commercial reference:: SOTC1410B | |
| Electric Supply : | 220-240V~ 50-60Hz |
| Total nominal power: 1000W |
The manufacturer and the retailer cannot be held responsible for any accident or damage caused by improper use of the device, or if the instructions given in this manual have not been followed.
Warranty exclusions:
The warranty does not cover wear parts of the product, nor problems or damage resulting from:
1) surface deterioration due to normal wear and tear of the product;
2) defects or deterioration due to contact of the product with food or liquids and due to corrosion caused by rust or the presence of insects;
3) any unauthorized incident, abuse, misuse, modification, disassembly or repair;
4) any improper maintenance operation, use not in accordance with the instructions concerning the product or connection to an incorrect voltage;
5) any use of accessories not supplied or approved by the manufacturer. The warranty will be void if the nameplate and / or serial number of the product is removed.
6. RESPECT THE ENVIRONMENT

The European Directive 2012/19 / EU on Waste Electrical and Electronic Equipment (WEEE) requires that used household appliances not be thrown into the normal stream of municipal waste. Used devices should be collected separately in order to optimize the recovery rate and recycling of the materials they are made from and reduce the impact on human health and the environment.
The crossed-out bin symbol is affixed to all products to remind you of the obligations of separate collection. Consumers should contact local authorities or their dealer regarding the procedure to follow for the removal of their device.
Information on the meaning of the conformity mark

The CE marking indicates that the product meets the main requirements of European Directives 2014/35 / EU (Low Voltage), 2014/30 / EU (Electromagnetic Compatibility), 2011/65 / EU (Reduction of the use of certain hazardous substances in EEE).
scholtes.com