
F2003 - Oven SCHOLTES - Free user manual and instructions
Find the device manual for free F2003 SCHOLTES in PDF.
| Product type | Built-in oven |
| Brand | Scholtès |
| Model | F2003 |
| Front dimensions (H x W) | 595 x 595 mm |
| Depth behind front | 545 mm |
| Interior dimensions (H x W x D) | 318 x 430 x 396 mm |
| Usable volume | 54 L |
| Net weight (pyrolysis version) | 44 kg |
| Power supply | 230 V or 240 V, 50 Hz, 16 A, cable cross-section 1.5 mm² |
| Total installed power | 2800 W |
| Grill power | 2700 W |
| Cooking modes | Natural convection, fan convection, grill, rotisserie, pyrolysis |
| Cleaning | Pyrolysis (up to 500 °C) and catalysis (on some models) |
| Safety | Automatic door locking during pyrolysis, cool door, multiple glazing |
| Interior lighting | Bulb Philips T22 E14 300°C |
| Supplied accessories | Rack, enamel tray, rotisserie spit (if applicable) |
| Removable door | Yes, for cleaning |
| After-sales service | Indigo 0825 336 666 |
| Consumer relations | Indigo 0825 054 444, www.scholtes.fr |
Frequently Asked Questions - F2003 SCHOLTES
User questions about F2003 SCHOLTES
0 question about this device. Answer the ones you know or ask your own.
Ask a new question about this device
Download the instructions for your Oven in PDF format for free! Find your manual F2003 - SCHOLTES and take your electronic device back in hand. On this page are published all the documents necessary for the use of your device. F2003 by SCHOLTES.
USER MANUAL F2003 SCHOLTES
Table of contents page 22
Inhoud bladzijde 32
Index 42
Table of contents page 22
Inhoud bladzijde 32
#
Norme di sicurezza
From the charcoal stoves of long ago to modern-day digital cooking, Scholtès has preserved that particular "hand-made" spirit which has been its star asset and strength for over 80 years.
Every Scholtes appliance offers the perfect blend of a stylish look and unbeatable innovative performance levels.
The two brochures - User's guide and Technical handbook - are complementary:
- the Technical handbook provides all the information necessary for the smooth installation, electrical connection and maintenance of the appliance, along with any recommendations,
- the User's guide simply illustrates the various features of your new appliance. It contains some cooking advice, which should help you use your oven to its full potential.
Enjoy cooking with SCHOLTES
Table of contents
Safety advice 24
Installation & Fastening 25
Installation 25
Fastening 25
Electrical connection 26
Technical data sheet 27
Appliance care 28-29
General comments 28
Disassembling the oven door 28
Oven door seal 28
Appliance exterior 28
Glass oven light cover 28
Replacing the light bulb 28
The accessories 29
Catalytic cleaning 29
Manual cleaning 29
Pyrolysis 30
Protecting the environment 31
Maintenance 31
Inhoud bladzijde 32
Index 42
Read the instructions in this manual carefully, since they provide vital information to ensure the safe installation, use and maintenance of the appliance, along with some practical advice on how to use it to its full potential.
Keep this manual in a safe place for future reference.
We will not be held responsible in the event of non-observance of the instructions provided herein.
- Allow your appliance to "rest" before installing it. In actual fact, the appliance may have been exposed to very low temperatures in the warehouse. It is vital that all its components, especially the electrical parts, be given time to return to ambient temperature.
- The installation and electrical connection of your appliance should be performed by an authorised fitter or equivalent qualified technical serviceman.
- In the event of damage during transportation, do not commission the appliance.
If the appliance is faulty, unplug it from the mains electricity supply and call your nearest Scholtes authorised after-sales service centre. - This appliance complies with the safety norms applicable to electrical equipment. Repairs must only be carried out by authorised servicemen from the after-sales service centre. Demand the use of original spare parts. Repairs carried out by inexperienced repairmen may cause significant risks for the user.
- Take care when connecting appliances to any electricity sockets close to your oven. No power supply cables should come into contact with hot cooking areas or get lodged in the door of your oven when hot.
- The oven you have just purchased features precise technical characteristics. Under no circumstances are you allowed to modify this appliance in any way.
- Use this appliance to prepare food only.
- Your oven is fitted with a door featuring multiple glazing, to avoid all risk of burning during operation. Nevertheless, we recommend you keep young children away from the oven at all times, especially during the pyrolysis cycle.
- During pyrolysis, do not place inflammable objects over the oven door handle (e.g. tea towels).
- Do not use steam cleaners or high pressure cleaners to clean your oven.
- Do not store inflammable products in your oven, as they could ignite if the oven is accidentally turned on.
- Do not place anything on the bottom of your oven (dripping pan or baking tray, saucepan, dish, ...). The enamel coating could be damaged by the amount of heat that would consequently accumulate.
- Do not line the oven interior with aluminium foil or other protective layer. When the enamel is hot, these could melt and damage the enamel coating irreparably.
- Do not sit on the oven door, and do not use it as a step.
- Use oven gloves to place cookware inside the oven or when removing it.
- The oven door should shut properly. Always make sure the oven door seal is clean.
- Before running a pyrolysis cycle, remove substantial spills or large scraps of food. In fact, large grease spots are liable to ignite in the presence of the intensive heat generated by the pyrolysis.
- When cooking food directly on the oven grid, make sure you place the dripping pan on the 1st rack from the oven bottom to catch any dripping fat or juices.
- Never pour water directly into a hot oven, as this may damage the enamel coating on the interior of the appliance.
- Do not store moist food inside the oven as this could damage the enamel coating.
- When cleaning your oven, try to prevent any liquids from leaking into the door slots.
- When the appliance is in use, it becomes quite hot: do not touch the heating elements inside the oven.
Installation & Fastening
Installation
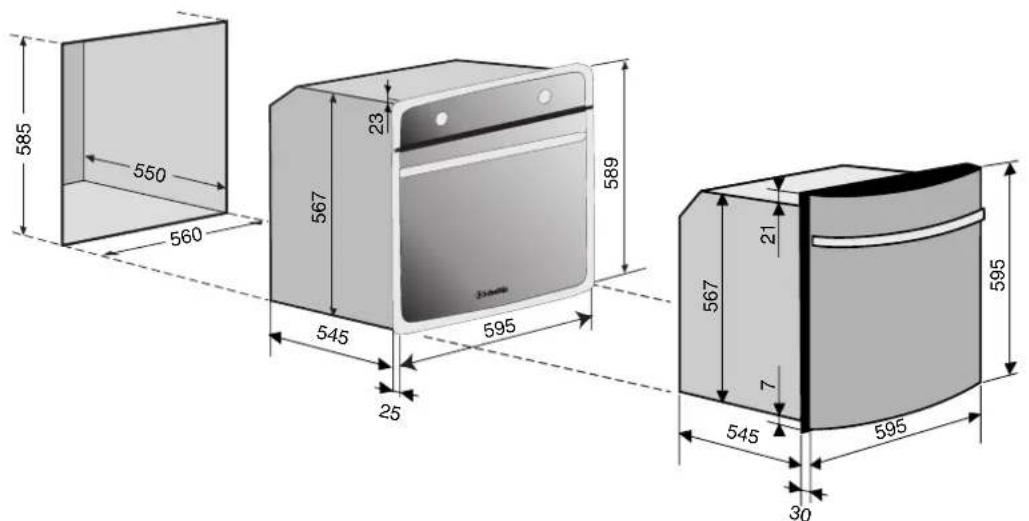
Thanks to a patented fan system, the oven is cooled down completely, while the air outlet is on the front of the appliance. The oven is fully independent and free of all built-in installation constraints, whether it is built into a wall cabinet or under a worktop.
This oven can be built into all standard cabinets featuring dimensions conforming to European standards.
If the appliance is installed in a sealed cabinet, make an opening on the rear of the cabinet measuring 80 millimetres in diameter to allow for the power supply cable and plug to pass through.
Fastening
Your appliance is supplied with an accessory bag, which includes 2 fastening screws. Insert the screws in the holes provided in the side posts of your appliance and screw them into the cabinet side panels.
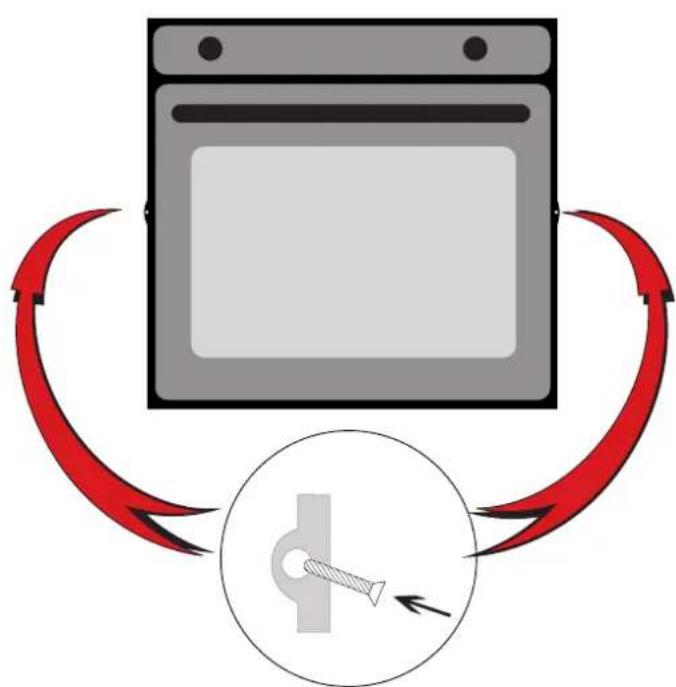
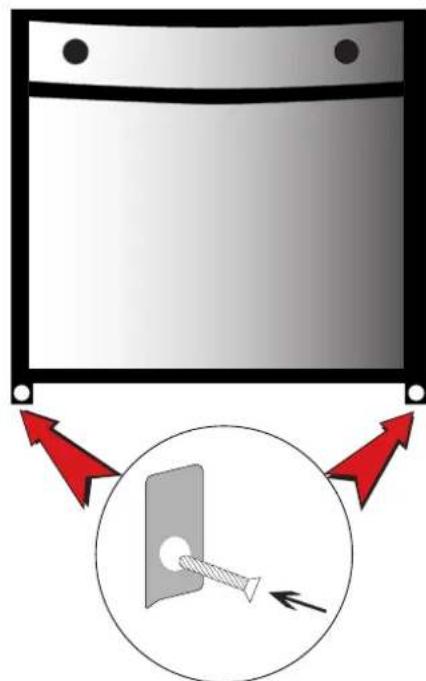
Fixation four classique Fixation four Galbe
Electrical connection
The marking corresponds to the application of the following directives:
- electromagnetic compatibility EC/89/336
marking EC/93/68
low voltage directive EC/73/23
Before making the connection, check the mains electricity supply available:
- single-phase connection,
- voltage: 230 V or 240 V ,
- fuse: 16 A,
- minimum cross-section of wires: 1.5mm^2
Your oven is delivered fitted with a 3-wire power supply cable (each wire has a cross-section of 1.5mm^2 ) and should be connected to the 230V or 240V single-phase connection. The yellow/green wire is connected to the earth connection 1一 of the appliance. The oven neutral (blue wire) should be connected to the mains neutral terminal.
If the appliance installation is achieved by means of a junction box, an omnipolar circuit breaker with a minimum contact opening of 3mm should be installed on the power supply side.
Make sure the electricity socket is accessible for any future maintenance work.

Important:
- Unplug the appliance before all operations, even when replacing the oven lamp.
- Using the appliance without the correct earth connection is highly dangerous.
| Electrical connections Voltage | Frequency | Fuse Section |
| N L | FR-AT-BE-DE-GP-ES-IE-IL-IS-IT-DK LU-RE-FI-GB-GR-PT-SE-MA-NZ-NL 230 V-1+N ~ 50 Hz CY-MT-AU-NZ-KW 240 V-1+N ~ 50 Hz | 16 A 1,5 mm² |
| L2 L1 | FR-BE-NO 230 V-2 ~ 50 Hz | 16 A 1,5 mm² |
Note:
The power supply cable can be changed. This should be done by an authorised fitter or equivalent qualified technical serviceman.
Make sure the power supply cable is long enough to allow for any future maintenance work to be performed easily.
Only use HAR-H05-RRF quality cables fitted with a plug conforming to the regulations in force.
After connecting the appliance to the flexible cable, tighten all the screws on the terminal board.
The point of installation for the appliance must comply with NFC 15100.
Technical data sheet
| Galbe pyrolysis ovens | Galbe non-pyrolysis ovens | Pyrolysis Ovens | Non-pyrolysis Ovens | |
| Total power installed (W) 2800 2800 2800 2800 | ||||
| Grill power (W) 2700 2700 2700 | ||||
| Oven front dimensions in mm (HxW) 595x595 | 595x595 589x595 589x595 | |||
| Oven depth behind front in mm 545 545 | 545 545 | |||
| Oven interior dimensions in mm (HxWxD) | 318x430x396 | 318x430x396 | 318x430x396 | 318x430x396 |
| Approximate weight in kg | 44 | 44 | 42 41 | |
| Volume in I | 54 | 54 | 54 54 | |
| Energy labelling directive 2002/40/EC for electric ovens - Standard EN 50304. (Energy consumption calculated under standard load) | ||||
| Operating in natural convection mode | traditional | traditional | traditional | traditional |
| Operating in forced convection mode used for the energy consumption class declaration | roasting | roasting | Roasting (including FX(44)) | multilevel |
Appliance care
General comments
- Wait for the appliance to have cooled down completely before attempting to clean it manually.
- Never use abrasive products, wire pads or sharp objects to clean the oven, as this could damage the enamel coating irreparably.
- Never use a steam or high pressure cleaner.
- When cleaning, try to prevent any liquids from leaking into the oven door slots.
- Beware of cleaning products: it's best not to overuse these products, as most of them contain caustic soda. Air your kitchen well when using such products to avoid breathing in too much of the mist created.
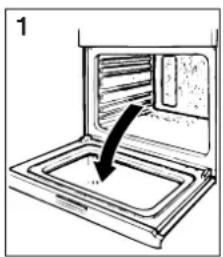
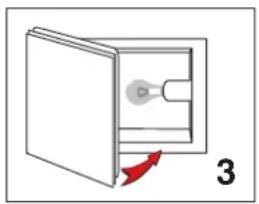
Disassembling the oven door
To clean the oven door, you can dismount it. (To remount the door, follow the same procedure backwards)
- Open the oven door fully,
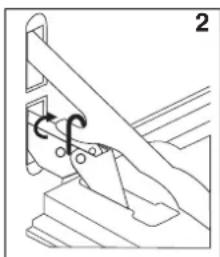
2. Lift up and turn the small levers situated on the two hinges, shut the door, but not completely.
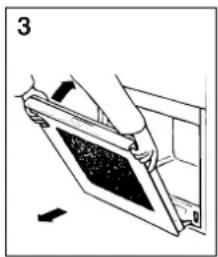
- Grip the door on either side and pull it towards you, easing it out of its seat.
Appliance exterior
Wipe the appliance clean using a damp cloth. If the appliance is particularly dirty, add a few drops of washing-up liquid to the water. Rinse and dry using a soft cloth.
Glass oven light cover
Use a sponge dipped in soapy water, rinse and dry with a soft cloth.
Replacing the light bulb
You can replace the oven light bulb yourself.
Unplug the appliance from the mains or switch off the main switch.
Warning: replacing the light bulb is a very delicate operation, so please take the necessary precautions.
Ask your After-Sales Service Centre or retailer for a specific Philips T22 - E14 - 300°C light bulb.
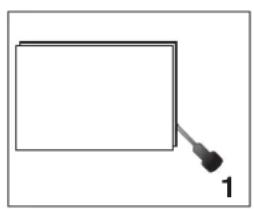
- With the aid of a narrow, flat item (such as a screwdriver, etc.), remove the glass cover,

2. Unscrew the light bulb carefully and replace it,
- Reposition the glass cover, making sure the seal is positioned correctly. 4. Plug your oven back in and set the correct time.
Oven door seal
The oven door seal is made of glass fibre. Make sure it is always in good condition and clean, as any leaks would involve excessive energy consumption levels.
In the event of tough grease spots, use a sponge dipped in soapy water, rinse and dry with a soft cloth.
Appliance care
The accessories
The turnspit can be removed completely thanks to the two wing nuts; clean it like everyday crockery or in your dishwasher. The other accessories (dripping pan or baking tray, oven grid, ...) can be washed in the sink like everyday crockery or even in your dishwasher.

Remove all the accessories from the oven before starting a pyrolysis cycle. The effect of the extremely high temperatures may warp them or change their colour.
Catalytic cleaning
Catalytic cleaning ovens are fitted with vertical enamel-coated oven lining panels perforated with tiny holes (porous enamel) which help evacuate the fat and juices created during cooking. The fat and juices are then automatically burned and decomposed with each subsequent cooking process.
The temperature of the oven lining panels has to be in excess of 170^ for this grease oxidation process to take place.
Catalysis is therefore a cleaning process which requires no external intervention and operates continuously.
However, if tough stains remain at the end of cooking, leave your oven on with nothing in it for 60 to 90 minutes (depending
on the degree of soil) on setting
You may also help in the removal of any large pieces of food residue or splashes of grease using a little hot water and a soft brush.
When your oven has cooled down completely, clean the bottom, door and the glass cover on the oven light using a sponge dipped in soapy water, rinse and dry with a soft cloth.
Important notes:
- Keep young children away from the appliance as the accessible parts of the oven may become hot.
- Avoid scratching the surface of the enamel coating with sharp objects such as knives, ...
- Do not use abrasive detergents or products.
- When cleaning, try to prevent any liquids from leaking into the oven door slots.
- The vertical oven lining panels can be removed; you should replace them approximately every 6 years. Contact your retailer for replacements.
Manual cleaning
The smooth enamel is easy to clean.
We recommend you clean your oven each time you use it, especially after cooking roasts. In fact, it is advisable to prevent food residue from building up during cooking: the residue would be re-cooked each time the oven is used and would char and release smoke and unpleasant odours.
Wait until the oven has cooled down fully before you proceed with cleaning, and unplug the appliance.
To remove food residue or splashes of grease, clean with a sponge dipped in soapy water, rinse and dry with a soft cloth. You can also use common detergents available on the market, in which case you should follow the instructions provided on the pack or bottle.
The grill heating element cleans itself, as all dirt and residue is destroyed by the heat produced each time the grill is used.
Important notes:
- Avoid scratching the surface of the enamel coating with sharp objects such as knives, ...
- Do not use abrasive detergents or products.
- When cleaning, try to prevent any liquids from leaking into the oven door slots.
Pyrolysis
Scholtès has mastered pyrolysis since 1969. The oven structure (enamel coating, insulation, door lock) ensures the operation is carried out in the utmost safety.
This is the most effective cleaning process available: during pyrolysis, the temperature reaches 500^ (the oven door is locked for greater safety). Grease and food particles (juices, sugar, ...) stuck to the interior surface of the oven are literally turned to dust.
Thanks to Scholtes technology, the oven door remains cold during the cleaning phase (pyrolysis) increased safety.
At the end of the chosen cycle and when the appliance has cooled down completely, just wipe the interior panels of the oven clean with a damp cloth.
We recommend you run a pyrolysis after cooking a dish that may have caused large food particles or splashes of grease to build up on the appliance interior (such as roast lamb). However, if you do not cook fatty dishes very often, one pyrolysis per month should suffice to keep your oven clean.
Precautions before pyrolysis
- Remove the toughest grease and food spots and all substantial spills to avoid the risk of fire or smoke.
- Remove all the accessories from the oven before starting a pyrolysis cycle. The effect of the extremely high temperatures may warp them or change their colour.
- Do not place tea towels over the oven handle to dry.
Important notes:
- Keep young children away from the appliance as the accessible parts of the oven may become hot.
- Avoid scratching the surface of the enamel coating with sharp objects such as knives, ...
- Do not use abrasive detergents or products.
- When cleaning, try to prevent any liquids from leaking into the oven door slots.
After pyrolysis, wait for the appliance to have cooled down completely and then remove the dust deposits which formed as the food residue burned.
Clean the seals surrounding the oven door manually, as the self-cleaning cycle does not affect these areas.
To cut down on pre-heating times and therefore save on energy, we recommend:
- you start a pyrolysis cycle straight after cooking,
- or start cooking immediately after the pyrolysis cycle has been completed (the dust deposits that formed during the cycle are completely harmless).
When looking through the oven door, you may notice some particles that light up when they are destroyed by pyrolysis upon contact with the heating elements. This is simply spontaneous combustion: it is perfectly normal and hazard-free.
Protecting the environment

Your appliance was wrapped and packed with fully recyclable and environmentally-friendly materials.
Used appliances are not worthless waste.
The proper disposal which respects the environment allows for some precious raw materials to be recovered from it.
For details on your nearest recycling centre, please contact your retailer or your local authorities.
Maintenance
In the event of a malfunction, call your retailer, who will provide you with details of your nearest After-Sales Service Centre.
For a successful call-out, we recommend you notify the serviceman of the following:
- your appliance's commercial code and serial number (featured on the guarantee certificate),
- as much information as possible on the malfunction itself, so the serviceman can bring all the necessary tools and spare parts on his call.
- Make sure the replacement is an original certified by the manufacturer.


- Table of contents page 22
- Inhoud bladzijde 32
- Index 42
- #
- Norme di sicurezza
- Enjoy cooking with SCHOLTES
- Table of contents
- Safety advice 24
- Installation & Fastening 25
- Electrical connection 26
- Technical data sheet 27
- Appliance care 28-29
- Catalytic cleaning 29
- Manual cleaning 29
- Pyrolysis 30
- Protecting the environment 31
- Maintenance 31
- We will not be held responsible in the event of non-observance of the instructions provided herein.
- Installation & Fastening
- Installation
- Fastening
- Electrical connection
- Important:
- Note:
- Appliance care
- General comments
- Disassembling the oven door
- Appliance exterior
- Glass oven light cover
- Replacing the light bulb
- Oven door seal
- The accessories
- Catalytic cleaning
- Important notes:
- Manual cleaning
- The smooth enamel is easy to clean.
- Pyrolysis
- Precautions before pyrolysis
- Protecting the environment
- Maintenance
Brand : SCHOLTES
Model : F2003
Category : Oven