
FN 34 XA (EU) S - Oven SCHOLTES - Free user manual and instructions
Find the device manual for free FN 34 XA (EU) S SCHOLTES in PDF.


| Product type | Built-in oven |
| Brand | Scholtès |
| Model | FN 34 XA (EU) S |
| Dimensions (W x H x D) | 595 x 595 x 550 mm |
| Weight | 35 kg |
| Electrical supply | 230 V - 50 Hz |
| Total power | 3.0 kW |
| Net capacity | 70 L |
| Number of cooking functions | 8 |
| Main functions | Conventional cooking, fan-forced, grill, pyrolysis, defrost, keep warm, bottom heat, top heat |
| Cleaning | Pyrolysis (self-cleaning) |
| Interior lighting | Halogen |
| Door | Cool glass, removable |
| Installation type | Built-in under counter or in column |
| Energy class | A+ |
| Repairability index | 8.5/10 |
| Spare parts available | Heating element, thermostat, door gasket, bulb, etc. |
| Manufacturer warranty | 2 years |
| Color | Stainless steel |
| Supplied accessories | Drip tray, wire rack, griddle plate (depending on version) |
Frequently Asked Questions - FN 34 XA (EU) S SCHOLTES
User questions about FN 34 XA (EU) S SCHOLTES
0 question about this device. Answer the ones you know or ask your own.
Ask a new question about this device
Download the instructions for your Oven in PDF format for free! Find your manual FN 34 XA (EU) S - SCHOLTES and take your electronic device back in hand. On this page are published all the documents necessary for the use of your device. FN 34 XA (EU) S by SCHOLTES.
USER MANUAL FN 34 XA (EU) S SCHOLTES
Operating Instructions
OVEN
Contents
Operating Instructions, 1
Warnings,3
Assistance,6
Description of the appliance,8
Description of the appliance,10
Installation,20
Start-up and use,22
Modes,22
Precautions and tips,26
Maintenance and care,26
ES
Español
WARNING: The appliance and its accessible parts become hot during use. Care should be taken to avoid touching heating elements. Children less than 8 years of age shall be kept away unless continuously supervised. This appliance can be used by children aged from 8 years and above and persons with reduced physical, sensory or mental capabilities or lack of experience and knowledge if they have been given supervision or instruction concerning use of the appliance in a safe way and understand the hazards involved. Children shall not play with the appliance. Cleaning and user maintenance shall not be made by children without supervision.
Do not use harsh abrasive cleaners or sharp metal scrapers to clean the oven door glass since they can scratch the surface, which may result in shattering of the glass.
Never use steam cleaners or pressure cleaners on the appliance.
WARNING: Ensure that the appliance is switched off before replacing the lamp to avoid the possibility of electric shock.
! When you place the rack inside, make sure that the stop is directed upwards and in the back of the cavity.
FR
Avertissements
The appliance is fitted with an automatic diagnostic system which detects any malfunctions. Malfunctions are signalled through messages of the following type: "F—" followed by numbers.
Call for technical assistance in the event of a malfunction.
Before calling for Assistance:
- Check whether you can fix the problem yourself.
- Restart the programme to check whether the malfunction has disappeared.
- If it has not, contact the Authorised Technical Assistance Service.
! Never use the services of an unauthorised technician.
Please have the following information to hand:
• The type of problem encounter
• The appliance model (Mod.).
• The serial number (S/N).
The latter two pieces of information can be found on the data plate located on the appliance.
FR
Assistance
Attention :
Description of the appliance
Overall view
1 POSITION 1
2 POSITION 2
3 POSITION 3
4 POSITION 4
5 POSITION 5
6 GUIDES for the sliding racks
7 DRIPPING PAN
8 GRILL
9 Control panel
FR
Description of the appliance
Control panel
1 SELECTOR knob
2 DISPLAY
3 THERMOSTAT/SET TIME knob
4 SET TIME button
5 LIGHT button
Display
6 TEMPERATURE and TIME digits
7 CLOCK Icon
8 TIMER Icon
9 END OF COOKING Icon
10 DURATION Icon
11 Preheating indicator
FR
natural_image
Pure technical line drawing of a cabinet or enclosure structure without any text, numbers, or symbols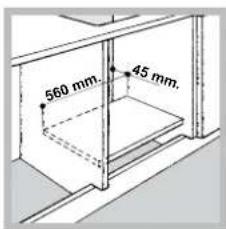
natural_image
3D rendered mechanical part with cutouts and mounting holes (no text or symbols)natural_image
3D rendered mechanical component with no visible text or symbolsnatural_image
3D rendered mechanical component with a rectangular body and mounting holes (no text or symbols)natural_image
Diagram showing a screwdriver inserted into a device component, with an inset view of the component (no text or symbols present)natural_image
Diagram of a microwave oven with an open lid and internal structure, showing airflow direction (no text or symbols)natural_image
Simple line drawing of an oven with a curved arrow indicating a process or operation (no text or symbols)

natural_image
Diagram of a mechanical component with force arrow and labeled section (no readable text or symbols)! Please keep this instruction booklet in a safe place for future reference. If the appliance is sold, given away or moved, please make sure the booklet is also passed on to the new owners so that they may benefit from the advice contained within it.
! Please read this instruction manual carefully: it contains important information concerning the safe operation, installation and maintenance of the appliance.
Positioning
! Do not let children play with the packaging material; it should be disposed of in accordance with local separated waste collection standards (see Precautions and tips).
! The appliance must be installed by a qualified professional in accordance with the instructions provided. Incorrect installation may damage property or cause harm to people or animals.
Built-in appliances
Use an appropriate cabinet to ensure that the appliance operates properly:
- the panels adjacent to the oven must be made of heat-resistant material.
• cabinets with a veneer exterior must be assembled with glues which can withstand temperatures of up to 100^ C. - to install the oven under the counter (see diagram) or in a kitchen unit, the cabinet must have the following dimensions:

! The appliance must not come into contact with electrical parts once it has been installed.
The indications for consumption given on the data plate have been calculated for this type of installation.
Ventilation
To ensure adequate ventilation, the back panel of the cabinet must be removed. It is advisable to install the oven so that it rests on two strips of wood, or on a completely flat surface with an opening of at least 45 x 560 mm (see diagrams).

natural_image
Pure technical line drawing of a structural frame with no text, numbers, or symbols
Centring and fixing
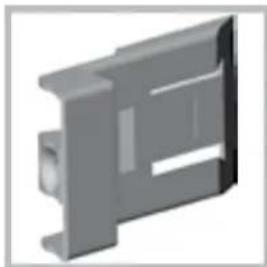
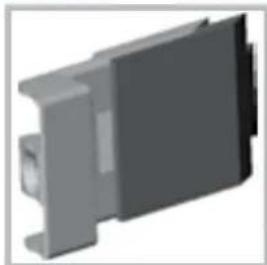
Position the 4 tabs on the side of the oven, in line with the 4 holes on the outer frame. Adjust the tabs according to the thickness of the cabinet side panel, as shown below:
natural_image
3D rendered mechanical part with cutouts and mounting holes (no text or symbols)20 mm thick: take off the removable part of the tab (see diagram);
natural_image
3D rendered mechanical component with no visible text or symbols18 mm thick: use the first groove, which has already been set in the factory (see diagram);

natural_image
3D rendered mechanical component with a rectangular body and mounting flanges (no text or symbols visible)16 mm thick: use the second groove (see diagram).
Secure the appliance to the cabinet by opening the oven door and inserting 4 screws into the 4 holes on the outer frame.
! All parts which ensure the safe operation of the appliance must not be removable without the aid of a tool.
Electrical connection
Ovens equipped with a three-pole power supply cable are designed to operate with alternating current at the voltage and frequency indicated on the data plate located on the appliance (see below).
Fitting the power supply cable

natural_image
Diagram showing a screwdriver inserted into a device component, with arrows indicating direction (no text or symbols present)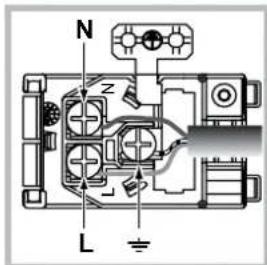
- Open the terminal board by inserting a screwdriver into the side tabs of the cover. Use the screwdriver as a lever by pushing it down to open the cover (see diagram).
- Install the power supply cable by loosening the cable clamp screw and the three wire contact screws L-N-
Connect the wires to the corresponding terminals: the Blue wire to the terminal marked (N), the Brown wire to the terminal marked (L) and the Yellow/Green wire to the terminal marked ± (see diagram). - Secure the cable by fastening the clamp screw.
- Close the cover of the terminal board.
Connecting the supply cable to the mains
Install a standardised plug corresponding to the load indicated on the data plate (see table).
The appliance must be directly connected to the mains using an omnipolar switch with a minimum contact opening of 3 mm installed between the appliance and the mains. The switch must be suitable for the charge indicated and must comply with current electrical regulations (the earthing wire must not be interrupted by the switch). The supply cable must be positioned so that it does not come into contact with temperatures higher than 50°C at any point (the back panel of the oven, for example).
! The installer must ensure that the correct electrical connection has been performed and that it is fully compliant with safety regulations.
Before connecting the appliance to the power supply, make sure that
- the appliance is earthed and the plug is compliant with the law.
- the socket can withstand the maximum power of the appliance, which is indicated on the data plate.
- the voltage is in the range between the values indicated on the data plate.
- the socket is compatible with the plug of the appliance. If the socket is incompatible with the plug, ask an authorised technician to replace it. Do not use extension cords or multiple sockets.
! Once the appliance has been installed, the power supply cable and the electrical socket must be easily accessible.
! The cable must not be bent or compressed.
! The cable must be checked regularly and replaced by authorised technicians only (see Assistance).
! The manufacturer declines any liability should these safety measures not be observed.
| APPLIANCE SPECIFICATIONS | |
| Dimensions* | width 43.5 cmheight 32.4 cmdepth 41.5 cm |
| Volume* | It. 59 |
| Dimensions** | width 45.5 cmheight 32,4 cmdepth 41.5 cm |
| Volume** | It. 62 |
| Electrical connections | voltage: 220-240V~ 50 Hzmaximum power absorbed 2800 W |
| ENERGY LABEL ECODESIGN | EU Directive no 65/2014 supplementing Directive 2010/30/EU.EU Regulation no 66/2014implementing Directive 2009/125/EC.Standard EN 60350-1Standard EN 50564Declared energy consumption for Forced convection Class- heating mode: □ Conventional |
 | This appliance conforms to the following European Economic Community directives:- 2006/95/EC of 12/12/06 (Low Voltage) and subsequent amendments;- 2004/108/EC of 15/12/04 (Electromagnetic Compatibility) and subsequent amendments;- 93/68/EEC of 22/07/93 and subsequent amendments.- 2002/96/EU and subsequent amendments. |
* Only for models with drawn rails.
** Only for models with wire rails.
GB
Start-up and use
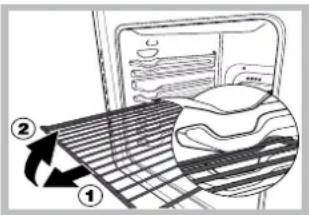
WARNING! The oven is provided with a stop system to extract the racks and prevent them from coming out of the oven (1). As shown in the drawing, to extract them completely, simply lift the racks, holding them on the front part, and pull (2).
! In order to optimise the cooking performance, when starting the selected function, product settings will be applied that could cause a delayed start of the fan and heating elements.
Setting the clock
! The clock may be set when the oven is switched off or when it is switched on, provided that the end time of a cooking cycle has not been programmed previously.
- Press the ⏻ button several times until the ⏻ icon and the first two numerical digits on the display start to flash.
- Turn the SET TIME KNOB towards "and" to adjust the hour value.
- Press the button again so that the other two numerical digits on the DISPLAY begin to flash.
- Turn the SET TIME KNOB towards "and" to adjust the minute value.
- Press the √ button again to confirm.
Setting the minute minder
! This function does not interrupt cooking and does not affect the oven; it is simply used to activate the buzzer when the set amount of time has elapsed.
- Press the ⏻ button several times until the 📂 icon and the three numerical digits on the DISPLAY begin to flash.
- Turn the SET TIME KNOB towards "and" to adjust the minute value.
- Press the √ button again to confirm.
The display will then show the time as it counts down. When this period of time has elapsed the buzzer will be activated.
Using the oven
! The first time you use your appliance, heat the empty oven with its door closed at its maximum temperature for at least half an hour. Make sure that the room is well ventilated before switching the oven off and opening the oven door. The appliance may emit a slightly unpleasant odour caused by protective substances used during the manufacturing process burning away.
! Never put objects directly on the bottom of the oven; this will prevent the enamel coating from being damaged.
! Always place cookware on the racks provided.
! We recommend that you do not open the door when cooking foodstuffs which require proving, so as to not compromise cooking results.
! The oven will begin its preheating phase after 2 seconds from selecting the desired cycle.
- Select the desired cooking mode by turning the SELECTOR knob.
- The oven will begin its preheating phase and the preheating indicators will light up as the temperature rises.
The temperature may be adjusted by turning the THERMOSTAT knob
- When the preheating process is over, a buzzer will sound and all the preheating indicator lights will light up. The food can then be placed in the oven.
- During cooking it is always possible to:
- change the cooking mode by turning the SELECTOR knob;
- adjust the temperature by turning the THERMOSTAT knob;
- set the cooking duration and the cooking end time (see Cooking modes);
- stop cooking by turning the SELECTOR knob to the "0" position.
-
The cooking duration may be modified (see Cooking modes).
-
If a blackout occurs while the oven is already in operation, an automatic system within the appliance will reactivate the cooking mode from the point at which it was interrupted, provided that the temperature has not dropped below a certain level. Programmed cooking modes which have not yet started will not be restored and must be reprogrammed.
Cooling ventilation
In order to cool down the external temperature of the oven, a cooling fan blows a stream of air between the control panel and the oven door.
! Once cooking has been completed, the cooling fan continues to operate until the oven has cooled down sufficiently.
Oven light
When the oven is not in operation, the light may be switched on at any time
by opening the oven door or by pressing the button

Modes
Manual cooking modes
! All cooking modes have a default cooking temperature which may be adjusted manually as desired, between 30 °C and 300 °C (where possible).

MULTILEVEL mode
All heating elements and the fan are activated. Since the heat remains constant throughout the oven, the air cooks and browns food in a uniform manner. A maximum of three racks may be used at the same time.

CONVENTIONAL mode
When using this traditional cooking mode, it is best to use one cooking rack only.

GRILL mode
The top heating element comes on. The high and direct temperature of the grill is recommended for food which requires a high surface temperature. Always cook in this mode with the oven door closed.

ROTISSERIE mode
The top heating element and the rotisserie spit will be activated. The function is ideal for rotisserie spit cooking. Always cook in this mode with the oven door closed.

LOW TEMPERATURE modes
This type of cooking can be used for proving, defrosting, preparing yoghurt, heating dishes at the required speed and slow cooking at low temperatures. The temperature options are: 40, 85 and 120°C.
Rotisserie spit

natural_image
Diagram of a microwave oven with a handle and internal tray, showing no text or symbolsTo operate the rotisserie spit (see diagram) proceed as follows:
- Place the dripping pan in position 1.
- Place the rotisserie support in position 3 and insert the spit in the hole provided on the back panel of the oven.
- Start the spit roast function by selecting the symbols.
! When mode is on, the rotisserie will stop if the door is opened.
Automatic cooking modes
! The temperature and cooking duration are pre-set values, guaranteeing a perfect result every time - automatically. These values are set using the C.O.P.® (Programmed Optimal Cooking) system. The cooking cycle stops automatically and the oven indicates when the dish is cooked. The cooking duration may be modified by a period of several minutes, as specified in the description of the individual functions below.

BREAD mode
Use this function to make bread.
To obtain the best results, we recommend that you carefully observe the instructions below:
- follow the recipe;
• do not exceed the maximum weight of the dripping pan; - remember to pour 100 ml of cold water into the baking tray in position 5.
Place the food inside the oven while it is still cold. If you wish to place the food in the oven after it has been preheated, immediately following a high-temperature cooking programme, the text "Hot" will appear on the display until the temperature of the oven has fallen to 40°. At this point it will be possible to place the bread in the oven.
Recipe for BREAD:
1 Dripping pan of max. 1000 g, lower shelf level
Recipe for 1000 g of dough: 600 g flour, 360 g water, 11g salt, 25 g fresh yeast (or 2 sachets of powder yeast)
Method:
• Mix the flour and salt in a large bowl.
- Dilute the yeast in lukewarm water (approximately 35 degrees).
• Make a small well in the mound of flour.
- Pour in the water and yeast mixture.
- Knead the dough by stretching and folding it over itself with the palm of your hand for 10 minutes until it has a uniform consistency and is not too sticky.
- Form the dough into a ball shape, place it in a large bowl and cover it with transparent plastic wrap to prevent the surface of the dough from drying out. Select the manual LOW TEMPERATURE function on the oven and set the temperature to 40°C. Place the bowl inside and leave the dough to rise for approximately 1 hour (the dough should double in volume).
- Cut the dough into equal sized loaves.
- Place them in the dripping pan, on a sheet of baking paper.
• Dust the loaves with flour.
• Make incisions on the loaves.
- Remember to pour 100 ml of cold water into the baking tray in position 5. For cleaning purposes, we recommend the use of water and vinegar.
- Place the food inside the oven while it is still cold.
- Start the BREAD cooking mode.
- Once baked, leave the loaves on one of the grill racks until they have cooled completely.

PIZZA mode
Use this function to make pizza. Please see the following chapter for further details.
To obtain the best results, we recommend that you carefully observe the instructions below:
- follow the recipe;
- the weight of the dough should be between 500g and 700 g;
• lightly grease the dripping pan and the baking trays.
Place the food inside the oven while it is still cold. If you wish to place the food in the oven after it has been preheated, immediately following a high-temperature cooking programme, the text "Hot" will appear on the display until the temperature of the oven has fallen to 120°. At this point it will be possible to place the pizza in the oven.
Recipe for PIZZA:
1 dripping pan on a low shelf level, hot or cold oven
Recipe for 3 pizzas weighing approximately 550 g: 1000 g flour, 500 ml water, 20 g salt, 20 g sugar, 100 ml olive oil, 20 g fresh yeast (or 2 sachets of powder yeast)
- Proving at room temperature: 1 hour, or manual LOW TEMPERATURE function set to 40^ . Leave to rise for approximately 30-45 minutes.
- Place the food inside the oven while it is still cold.
- Start the 📄 PIZZA cooking mode.

ROAST mode
Use this function to cook beef, veal, pork, chicken and lamb. Place the food inside the oven while it is still cold. The dish may also be placed in a preheated oven.

DESSERTS mode
This function is ideal for baking cakes. Place the food inside the oven while it is still cold. The dish may also be placed in a preheated oven.
Programming cooking
! A cooking mode must be selected before programming can take place.
Programming the duration
- Press the ⏻ button several times until the Xan and the three numerical digits on the DISPLAY begin to flash.
- Turn the SET TIME KNOB towards "and" to adjust the duration.
- Press the √ button again to confirm.
- When the set time has elapsed, the text END appears on the DISPLAY, the oven will stop cooking and a buzzer sounds.
- For example: it is 9:00 a.m. and a duration of 1 hour and 15 minutes is programmed. The cooking programme will stop automatically at 10:15 a.m.
Setting the end time for a cooking mode
! A cooking duration must be set before the cooking end time can be scheduled.
- Follow steps 1 to 3 to set the duration as detailed above.
- Next, press the button until the and the three numerical digits on the DISPLAY begin to flash.
- Turn the SET TIME KNOB towards "and" to adjust the hour value.
- Press the ⬇ button again so that the other two numerical digits on the DISPLAY begin to flash.
GB
-
Turn the SET TIME KNOB towards "and" to adjust the minute value.
-
Press the √ button again to confirm.
-
When the set time has elapsed, the text END appears on the DISPLAY, the oven will stop cooking and a buzzer sounds.
- For example: it is 9:00 a.m. and a duration of 1 hour and 15 minutes is programmed, while the end time is set to 12:30. The programme will start automatically at 11:15 a.m.
Programming has been completed when the Z and VINS light up. The DISPLAY shows the cooking end time and the cooking duration alternately. To cancel programming, turn the SELECTOR knob to the "0" position.
Practical cooking advice
! Do not place racks in position 1 and 5 during fan-assisted cooking. This is because excessive direct heat can burn temperature sensitive foods.
! In the ROTISSERIE cooking mode, place the dripping pan in position 1 to collect cooking residues (fat and/or grease).
MULTILEVEL
- Use positions 2 and 4, placing the food which requires more heat on 2.
- Place the dripping pan on the bottom and the rack on top.
PIZZA
- Use a lightweight aluminium pizza pan. Place it on the rack provided.
For a crispy crust, do not use the dripping pan as this extends the total cooking duration and prevents the crust from forming. - If the pizza has a lot of toppings, we recommend adding the mozzarella cheese on top of the pizza halfway through the cooking process.
Automatic cooking functions
| Mode | Cooking mode recommended for ... | EXAM PLES | SUPPORT | Dripping pan level | Cooking duration (minutes) | Oven at start | |
| Roast veal | Roast meats | Roast veal | dripping pan or tray | 2 | ±10 | Cold | |
| Roast pork | between +10 and +25 | ||||||
| Roast chicken | between +5 and +15 | ||||||
| Leg of lamb | ±10 | ||||||
| Roast beef | between -20 and -5 | ||||||
| Desserts | Sponge cake made with yoghurt and pound cake (with baking powder) | fruit-filled sponge cake made with yoghurt, marble cake, pound cake, etc. | cake tin on rack | 2 45** | Cold | ||
| Fruit tarts (shortcrust pastry or puff pastry, with or without flan filling) | apple tart, mirabelle plum tart, pear tart, etc. | cake tin on rack | 2 | ||||
| Puff pastry | apple puffs, country-style tarts, pastries, etc. | on dripping pan | 2 | ||||
| Desserts without yeast (clafoutis, almond pithivier, torta rustica, etc.) | on dripping pan | 2 | |||||
| Pizza | Deep-pan pizza, focaccia (bread dough) | 2 | 28** | Hot or cold | |||
| Bread | *** | 2 | 55 | Cold |
* The cooking times listed above are intended as guidelines only and may be modified in accordance with personal tastes. Oven preheating times are set as standard and may not be modified manually.
** The duration of the automatic cooking functions are set by default. The values in the table refer to the minimum and maximum duration, which may be modified by the user, taking the default value as a starting point.
*** As stated in the recipe, pour 100 g water into the dripping pan.
Oven cooking advice table
| CANAPES AND STARTERS | DISHES | EXAMPLES | FUNCTION | TEMPERATURE | SUPPORT |
| Savoury sponge cake made with yoghurt | savoury sponge cake with olives, tuna, etc. | Baked cakes or Multilevel | 160 °C | cake tin on dripping pan | |
| Country-style pie | cheese country-style pie, salmon pastry, ... | Baked cakes or Multilevel | 200 °C | on dripping pan | |
| Terrines | fish, meat, vegetable, foie gras terrines, etc. | Traditional oven | 160 °C | terrine mould on dripping pan (bain-marie filled with hot water) | |
| “En cocotte” dishes | poultry liver pie, salmon mousse, eggs en cocotte, etc. | Traditional oven | 160 °C | baking dish on dripping pan (bain-marie filled with hot water) | |
| Soufflé | cheese soufflé, vegetable soufflé, fish soufflé, etc. | Multilevel | 200 °C | cake tin on dripping pan | |
| I LEGUMI | Stuffed vegetables | potatoes, tomatoes, courgettes, cabbages, etc. | Multilevel | 200 °C | on dripping pan or cake tin on dripping pan |
| Braised vegetables en cocotte | lettuce, saffron carrots, salsify, etc. | Traditional oven | 200 °C | baking dish on dripping pan | |
| Flan | mushroom flan, vegetable pancake, etc. | Traditional oven | 160 °C | baking dish or cake tin on dripping pan (bain-marie filled with hot water) | |
| Terrines | vegetable terrines | Traditional oven | 160 °C | cake tin on dripping pan (bain-marie filled with hot water) | |
| Soufflé | asparagus soufflé , tomato soufflé, etc. | Multilevel | 200 °C | cake tin on dripping pan | |
| Dishes with a crust | vegetable pie, etc. | Multilevel | 200 °C | on dripping pan | |
| Baking in foil (“en papillote”) | truffles, etc. | Multilevel | 200 °C | foil pouch on dripping pan | |
| Rice | Pilaff | Traditional oven | 180 °C | tray on plate |
| MEAT | DISHES | EXAMPLES | FUNCTION | TEMPERATURE | SUPPORT |
| Spit-roast poultry | chicken, young cockerel | Rotisserie | 270 °C | rotisserie spit support | |
| Large braised cuts | whole braised leg, large capon or turkey, etc. | Multilevel | 180°C (a third of the way through cooking, lower to 160°C) | meat on dripping pan (baste with cooking juices at regular intervals) | |
| Sautéed meat en cocotte, traditional dishes | beef bourguignon, rabbit cacciatora, veal Marengo, lamb stew, Basque chicken, etc. Hotpot, terrine, etc. | Conventional oven | 190 °C | casserole dish on dripping pan | |
| Grilled meat | grilled steak, chops, sausages, kebabs, chicken drumsticks, etc. | Grill | 200 °C | on grill (shelf level depends on thickness of fish) | |
| Meat with a crust | beef Wellington, leg with a crust, etc. | Multilevel | 200 °C | on dripping pan (for large cuts, lower to 160 °C after the pastry has cooked) | |
| Salt-crusted dishes | salt-crusted poultry, etc. | Multilevel | 240 °C | meat on dripping pan or tray on dripping pan | |
| FISH | Grilled fish and kebabs | sea bass, mackerel, sardines, mullet, tuna, etc. | Grill | 180 °C | on grill (shelf level depends on thickness of fish) |
| Whole (stuffed) fish | bream, carp, etc. | Multilevel | 200 °C | on dripping pan | |
| Fish fillet (with wine or other liquid) | salmon, rock-fish, cod, sea bass, etc. | Conventional oven | 200 °C | on dripping pan | |
| Baking in foil (“en papillote”) | sole, dab, scallops, etc. | Multilevel | 200 °C | on dripping pan | |
| Fish with a crust (puff pastry or shortcrust pastry) | salmon, kebabs, etc. | Multilevel | 200 °C | on dripping pan | |
| Souffle | scallops, etc. | Multilevel | 200 °C | cake tin on dripping pan | |
| Salt-crusted fish | sea bass, carp, etc. | Multilevel | 240 °C | fish on dripping pan or tray on dripping pan |
Oven cooking advice table
| BAKED DESSERTS | DISHES | EXAMPLES | FUNCTION | TEMPERATURE | SUPPORT |
| Biscuit cakes (without yeast) | sponge cake, sponge fingers, swirled biscuits, brownies, etc. | Baked cakes or Multilevel | 200 °C | cake tin on dripping pan | |
| White cheese tart | 200 °C | cake tin on dripping pan | |||
| Tarts made using leavened dough | sugar pie, fruit brioche loaf, etc. | 180 °C | cake tin on dripping pan | ||
| Tart cases (crumbly sweet pastry) | fresh fruit tarts (strawberry, raspberry, etc.) | 180 °C | cake tin on dripping pan (with baking beans weighing the pastry down ) | ||
| Pies (shortcrust or puff pastry) | pear pie, etc. | 220 °C | cake tin on dripping pan | ||
| Cream puffs | profiteroles, mini cream puffs, cream puffs, Paris-Brest pastry dessert, Saint Honoré cake, etc. | 190 °C | on dripping pan | ||
| Mini sweet pastries (natural yeast) | croissants, sugar pie, plain brioche (no filling), mini savarin cakes, etc. | 180 °C | on dripping pan | ||
| Large sweet pastries (natural yeast) | Kugelhopf, brioche, panettone, sweet bread, etc. | 160 °C | on dripping pan or cake tin on dripping pan | ||
| PASTRIES | Biscuit dough | biscuits in paper trays, scooping biscuits, etc. | Baked cakes or Multilevel | 180 °C | on dripping pan |
| Crumbly sweet pastry | shortbread, spritz cookies, plain biscuits, etc. | 200 °C | on dripping pan | ||
| Puff pastry | various types of puff pastry dessert, etc. | 200 °C | on dripping pan | ||
| Amaretti, coconut balls | coconut or almond amaretti | 180 °C | on dripping pan | ||
| Leavened dough | mini-brloches, mini-croissants, etc. | 180 °C | on dripping pan | ||
| White meringues | 70 °C | on dripping pan | |||
| Golden meringues | 110 °C | on dripping pan | |||
| DESSERTS | Pudding | pudding made with bread or brioche, rice pudding | Baked cakes or Multilevel | 190 °C | cake tin on dripping pan |
| Cream desserts and flans, semolina | crème caramel, crème brûlée, chocolate flan, etc. | 160 °C | moulds or baking dish on dripping pan (bain-marie on dripping pan) | ||
| Rice desserts | riz condé rice pudding, Imperial rice pudding, etc. | 180 °C | cake tin on dripping pan | ||
| Soufflé | liqueur soufflé, fruit soufflé, etc. | 200 °C | cake tin on dripping pan | ||
| FRUIT | Stuffed or foil-baked fruit | baked apples, etc. | Multilevel | 200 °C | cake tin or foil pouch on dripping pan |
| VARIOUS | DISHES | EXAMPLES | FUNCTION | TEMPERATURE | SUPPORT |
| Yoghurt | Low temperature | 40 °C | baking dish on dripping pan | ||
| Dried foods | mushrooms, herbs, sliced fruit or vegetables, etc. | Low temperature | 80 °C | on grill |
GB
Precautions and tips
! This appliance has been designed and manufactured in compliance with international safety standards. The following warnings are provided for safety reasons and must be read carefully.
General safety
- The appliance was designed for domestic use inside the home and is not intended for commercial or industrial use.
- The appliance must not be installed outdoors, even in covered areas. It is extremely dangerous to leave the appliance exposed to rain and storms.
- When moving or positioning the appliance, always use the handles provided on the sides of the oven.
- Do not touch the appliance while barefoot or with wet or damp hands and feet.
- The appliance must be used by adults only for the preparation of food, in accordance with the instructions provided in this booklet. Any other use of the appliance (e.g. for heating the room) constitutes improper use and is dangerous. The manufacturer may not be held responsible for any damage caused as a result of improper, incorrect and unreasonable use of the appliance.
- Do not touch the heating elements or certain parts of the oven door when the appliance is in use; these parts become extremely hot. Keep children well away from the appliance.
- Make sure that the power supply cables of other electrical appliances do not come into contact with the hot parts of the oven.
- The ventilation and heat dispersal openings must never be obstructed.
• Always grip the oven door handle in the centre: the ends may be hot. - Always use oven gloves when placing cookware in the oven or when removing it.
- Do not use aluminium foil to line the bottom of the oven.
- Do not place flammable materials in the oven: if the appliance is switched on accidentally, the materials could catch fire.
- Always make sure the knobs are in the “●”/“○” position when the appliance is not in use.
- When unplugging the appliance, always pull the plug from the mains socket; do not pull on the cable.
- Do not perform any cleaning or maintenance work without having disconnected the appliance from the electricity mains.
- If the event of malfunctions, under no circumstances should you attempt to perform the repairs yourself. Contact an authorised Service Centre (see Assistance).
- Do not rest objects on the open oven door.
- Do not let children play with the appliance.
- The appliance should not be operated by people (including children) with reduced physical, sensory or mental capacities, by inexperienced individuals or by anyone who is not familiar with the product. These individuals should, at the very least, be supervised by someone who assumes responsibility for their safety or receive preliminary instructions relating to the operation of the appliance.
- The appliance is not intended to be operated by means of an external timer or separate remote-control system.
Disposal
- When disposing of packaging material: observe local legislation so that the packaging may be reused.
- The European Directive 2012/19/EU on Waste Electrical and Electronic Equipment (WEEE), requires that old household electrical appliances must not be disposed of in the normal unsorted municipal waste stream. Old appliances must be collected separately in order
to optimise the recovery and recycling of the materials they contain and reduce the impact on human health and the environment. The crossed out "wheeled bin" symbol on the product reminds you of your obligation, that when you dispose of the appliance it must be separately collected.
Consumers should contact their local authority or retailer for information concerning the correct disposal of their old appliance.
Respecting and conserving the environment
- Whenever possible, avoid pre-heating the oven and always try to fill it. Open the oven door as little as possible because heat is lost every time it is opened. To save a substantial amount of energy, simply switch off the oven 5 to 10 minutes before the end of your planned cooking time and use the heat the oven continues to generate.
• Automatic programmes are based on standard food product. - Keep gaskets clean and tidy to prevent any door energy losses
- If you have a timed tariff electricity contract, the "delay cooking" option will make it easier to save money by moving operation to cheaper time periods.
! This product complies with the requirements of the latest European Directive on the limitation of power consumption of the standby mode.
If no operations are carried out for a period of 2 minutes, the appliance automatically switches to the standby mode.
The standby mode is visualised by the high luminosity "Watch Icon".
As soon as interaction with the machine resumes, the system's operating mode is restored.
Maintenance and care
Switching the appliance off
Disconnect your appliance from the electricity supply before carrying out any work on it.
Cleaning the appliance
- The stainless steel or enamel-coated external parts and the rubber seals may be cleaned using a sponge that has been soaked in lukewarm water and neutral soap. Use specialised products for the removal of stubborn stains. After cleaning, rinse and dry thoroughly. Do not use abrasive powders or corrosive substances.
- The inside of the oven should ideally be cleaned after each use, while it is still lukewarm. Use hot water and detergent, then rinse well and dry with a soft cloth. Do not use abrasive products.
- All accessories - with the exception of the sliding racks - can be washed like everyday crockery, and are even dishwasher safe.
! Never use steam cleaners or pressure cleaners on the appliance.
Cleaning the oven door
Clean the glass part of the oven door using a sponge and a non-abrasive cleaning product, then dry thoroughly with a soft cloth. Do not use rough abrasive material or sharp metal scrapers as these could scratch the surface and cause the glass to crack. For more thorough cleaning purposes, the oven door may be removed:
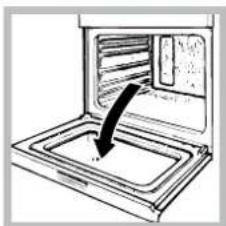
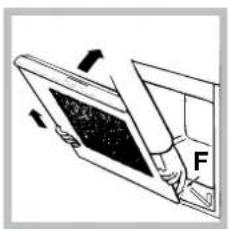
- Open the oven door fully (see diagram).
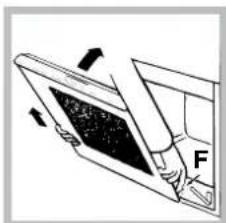
- Lift up and turn the small levers located on the two hinges (see diagram).
natural_image
Simple line drawing of an oven with a curved arrow indicating a process or movement (no text or symbols)
natural_image
Diagram of a mechanical component with force arrow and labeled part 'F' (no text or symbols beyond label)- (With glass panel fitted to the inside of the door) Grip the door on the two outer sides and close it approximately half way. Unlock the door by pressing on the clamps F, then pull the door towards you, lifting it out of its slot (see diagram).
To replace the door, reverse this sequence.
Inspecting the seals
Check the door seals around the oven regularly. If the seals are damaged, please contact your nearest Service Centre (see Assistance). We recommend that the oven is not used until the seals have been replaced.
Replacing the light bulb
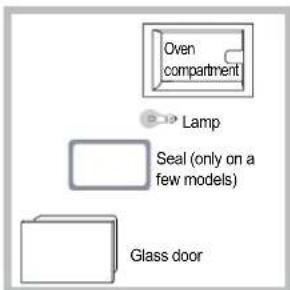
To replace the oven light bulb:
-
Remove the glass cover using a screwdriver.
-
Unscrew the light bulb and replace it with a similar one: Wattage 15 W, cap E 14.
Replace the glass cover, making sure the seal is positioned correctly (see diagram).
! Do not use the oven lamp as/for ambient lighting.
FR
Installation
natural_image
Pure technical line drawing of a cabinet or enclosure structure without any text, numbers, or symbols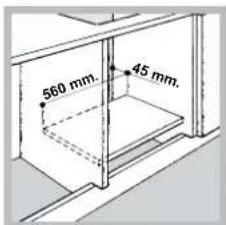
natural_image
3D rendered mechanical part with cutouts and mounting holes (no text or symbols)natural_image
3D rendered mechanical component with no visible text or symbolsnatural_image
3D rendered mechanical component with a rectangular body and flange (no text or symbols visible)natural_image
Diagram showing a screwdriver inserted into a device component, with an inset circular view highlighting the mechanical assembly (no text or symbols present)natural_image
Diagram of a microwave oven with an open lid and internal structure, showing airflow direction (no text or symbols)natural_image
Simple line drawing of a microwave oven with a downward arrow indicating cooling or ventilation (no text or symbols)
natural_image
Diagram of a mechanical component with labeled force F, showing internal structure without any text or symbols.natural_image
Pure technical line drawing of a cabinet or enclosure structure without any text, numbers, or symbols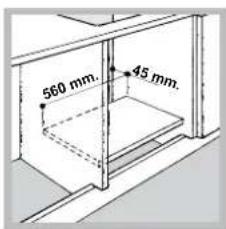
Centrado y fijación
natural_image
3D rendered mechanical part with cutouts and mounting holes (no text or symbols)natural_image
3D rendered mechanical component with no visible text or symbolsnatural_image
3D rendered mechanical component with no visible text or symbolsnatural_image
Diagram showing a screwdriver inserted into a device component, with an arrow indicating the insertion direction (no text or symbols present)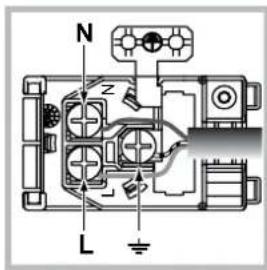
natural_image
Diagram of a microwave oven with an open lid and internal structure, showing airflow direction (no text or symbols)natural_image
Simple line drawing of an oven with a curved arrow indicating a process or movement (no text or symbols)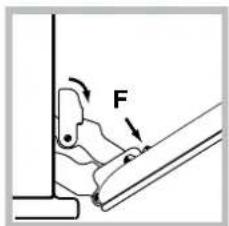

natural_image
Diagram of a mechanical component with force arrow and labeled part 'F' (no text or symbols beyond label)natural_image
Pure technical line drawing of a cabinet or enclosure structure without any text, numbers, or symbols
Colocar no centro e prender
natural_image
3D rendered mechanical part with cutouts and mounting holes (no text or symbols)natural_image
3D rendered mechanical component with no visible text or symbolsnatural_image
3D rendering of a gray mechanical component with a side protrusion (no text or symbols visible)natural_image
Diagram showing a screwdriver inserted into a device housing, with an inset magnified view of the component (no text or symbols present)natural_image
Diagram of a laptop interior with a rectangular tray and directional arrows indicating movement (no text or symbols)natural_image
Simple line drawing of a microwave oven with a curved arrow indicating airflow or cooling (no text or symbols)

natural_image
Diagram of a mechanical component with force arrow and labeled part 'F' (no text or symbols beyond label)natural_image
Pure technical line drawing of a structural frame with no text or symbols
natural_image
3D rendered mechanical part with cutouts and mounting holes (no text or symbols)natural_image
3D rendered mechanical component with no visible text or symbolsnatural_image
3D rendered mechanical component with a rectangular body and mounting flanges (no text or symbols visible)natural_image
Diagram showing a screwdriver inserted into a device component, with an inset magnified view of the component (no text or symbols present)natural_image
Diagram of a microwave oven with an open tray and internal compartments, showing airflow direction (no text or labels)natural_image
Simple line drawing of a microwave oven with a curved arrow indicating airflow or cooling (no text or symbols)

natural_image
Diagram of a mechanical component with labeled force F, showing internal structure without any text or symbols.natural_image
Pure technical line drawing of a mechanical assembly without any text, numbers, or symbols
Centreren en bevestigen
natural_image
3D rendered mechanical part with cutouts and mounting holes (no text or symbols)natural_image
3D rendered mechanical component with no visible text or symbolsnatural_image
3D rendered mechanical component with a rectangular body and flange (no text or symbols visible)natural_image
Diagram showing a screwdriver inserted into a device component, with an inset magnified view of the component (no text or symbols present)natural_image
Diagram of a kitchen interior with a hand pointing to a horizontal line and arrows indicating direction (no text or symbols)natural_image
Simple line drawing of a microwave oven with a downward arrow indicating cooling process (no text or symbols)

natural_image
Diagram of a mechanical component with labeled force F, showing internal structure and directional arrows (no text or symbols beyond label)


- Operating Instructions
- FR
- Avertissements
- Assistance
- Attention :
- Description of the appliance
- Overall view
- Control panel
- Display
- Positioning
- Built-in appliances
- Ventilation
- Centring and fixing
- Electrical connection
- Fitting the power supply cable
- Connecting the supply cable to the mains
- GB
- Start-up and use
- Setting the clock
- Setting the minute minder
- Using the oven
- Cooling ventilation
- Oven light
- Modes
- Manual cooking modes
- MULTILEVEL mode
- CONVENTIONAL mode
- GRILL mode
- ROTISSERIE mode
- LOW TEMPERATURE modes
- Rotisserie spit
- Automatic cooking modes
- BREAD mode
- Recipe for BREAD:
- PIZZA mode
- Recipe for PIZZA:
- ROAST mode
- DESSERTS mode
- Programming cooking
- Programming the duration
- Setting the end time for a cooking mode
- Practical cooking advice
- MULTILEVEL
- PIZZA
- Precautions and tips
- General safety
- Disposal
- Respecting and conserving the environment
- Maintenance and care
- Switching the appliance off
- Cleaning the appliance
- Cleaning the oven door
- Inspecting the seals
- Replacing the light bulb
- Installation
- Centrado y fijación
- Colocar no centro e prender
- Centreren en bevestigen
Brand : SCHOLTES
Model : FN 34 XA (EU) S
Category : Oven