
CERM1000B - Food Processor CONTINENTAL EDISON - Free user manual and instructions
Find the device manual for free CERM1000B CONTINENTAL EDISON in PDF.

| Brand | Continental Edison |
| Model | CERM1000B |
| Product type | Food processor |
| Reference | CERM1000B / CY-329 |
| Rated voltage | 220-240 V ~ 50/60 Hz |
| Power | 1000 W |
| Protection class | II |
| Bowl material | Plastic |
| Bowl capacity | Max capacity line (not specified, ~1 L) |
| Included blades | Stainless steel blade, plastic blade, 2-in-1 disc (julienne/fries), 2-in-1 disc (thin/thick slices), emulsifying disc |
| Main functions | Chopping, kneading, mixing, slicing, grating, emulsifying, Pulse mode, 3 automatic modes (Chopper, Kneader, Mode) |
| Controls | Rotary knob with manual settings (slow/fast speed) and Mode function |
| Operating conditions | Do not operate for more than 3 minutes continuously, cool down for 5 minutes after use, 30 minutes after 3 cycles |
| Cleaning | Food-contact parts washable with soapy water; wipe housing with a damp cloth; do not immerse motor unit |
| Safety | Safety switch on bowl; bowl and lid locking; sharp blades; unplug before cleaning |
| Spare parts | Use only original parts; power cable replaced by a qualified professional |
| Usage | Household use only; keep out of reach of children |
| Weight | Not provided |
| Dimensions | Not provided |
Frequently Asked Questions - CERM1000B CONTINENTAL EDISON
User questions about CERM1000B CONTINENTAL EDISON
0 question about this device. Answer the ones you know or ask your own.
Ask a new question about this device
Download the instructions for your Food Processor in PDF format for free! Find your manual CERM1000B - CONTINENTAL EDISON and take your electronic device back in hand. On this page are published all the documents necessary for the use of your device. CERM1000B by CONTINENTAL EDISON.
USER MANUAL CERM1000B CONTINENTAL EDISON
natural_image
Product photo of a kitchen blender with green leafy contents and various kitchen utensils (no text or symbols visible)CERM1000B Robot de cuisine - Food Processor Manuel d'instructions - Instruction Manual
■ INSTRUCTIONS DE SÉCURITÉ
Nettoyez les raccords.
■ FONCTIONNEMENT GENERAL
1 OFF (Arrêt)
flowchart
graph TD
    A["1: Round cooker with brush"] --> B["2: Round cooker with brush"]
    B --> C["3: Stirrer with brush"]
    C --> D["4: Stirer with brush"]
    D --> E["5: Cooker with brush"]
    E --> F["OK/OR actions shown in legend"]
    style A fill:#f9f,stroke:#333
    style B fill:#ccf,stroke:#333
    style C fill:#cfc,stroke:#333
    style D fill:#fcc,stroke:#333
    style E fill:#cff,stroke:#333
    style F fill:#ffc,stroke:#333
■ UTILISATION DU DISQUE EMULSIFIANT

■ MISE AU REBUT APPROPRIÉE

natural_image
Product photo of a kitchen blender with kitchen utensils and kitchen tools (no visible text or labels)CERM1000B
Robot de cuisine - Food Processor
Manuel d'instructions - Instruction Manual
■ SAFETY INSTRUCTIONS
Read the operating instructions carefully before putting the appliance into operation and keep the instructions for future reference.
• This appliance is for household use only.
- Never dip machine into any liquid and sharp edges. Do not use the appliance with wet hands. If the appliance is humid or wet, unplug it immediately.
- Avoid children or other people who do not know the operation of this machine to use it, unless they are under proper instruction. This appliance is not intended for use by persons (including children) with reduced physical, sensory or mental capabilities, or lack of experience and knowledge, unless they have been given supervision or instruction concerning use of the appliance by a person responsible for their safety.
- Always disconnect the machine from the supply if it is left unattended and before assembling, disassembling or cleaning.
- If the supply cord is damaged, it must be replaced by the manufacture of its service agent or a similar qualified person in order to avoid a hazard.
- Keep your finger away from moving parts and fitted tools. Never put your fingers etc in hinge mechanism.
- Use only original spare parts.
- In order to ensure your children's safety, please keep all packaging (plastic bags, boxes, polystyrene etc.) out of their reach.
- Do not interfere with any safety switches.
- Place the machine on a smooth, flat and stable working surface.
- Be very careful when you handle the blades or inserts. Be especially careful when you remove them from machine, their cutting edges are very sharp.
- Be very careful when you handle the blades or inserts. Be especially careful when you remove them from machine, their cutting edges are very sharp.
- Wait until moving parts stop running before you remove the lid of machine.
- Do not exceed the maximum content indicated on the accessories.
- Always disconnect the appliance from the supply if it is left unattended and before assembling, disassembling or cleaning.
- This appliance shall not be used by children. Keep the appliance and its cord out of reach of children.
- Appliances can be used by persons with reduced physical, sensory or mental capabilities or lack of experience and knowledge if they have been given supervision or instruction concerning use of the appliance in a safe way and if they understand the hazards involved.
- Children shall not play with the appliance.
- Switch off the appliance and disconnect from supply before changing accessories or approaching parts that move in use.
BEFORE CONNECTING TO POWER
- Before connecting to the power, recheck the type of supply and the mains voltage match with the details given on the rating label on the appliance.
- Using for the first time, rip off all wrapping paper and plastic bags. Clean the fittings.
■ SAVE THESE INSTRUCTIONS
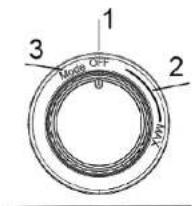
INTELLIGENT SWITCH
This machine has "Mode", "OFF", "Speed" controls.
1 (0 level): On / Off
2 (Speed level): from Min Speed to Max speed
3 (Mode level): Shift into "Mode" control
4 (Pulse mode button): PULSE function
5 (Crush mode button): MIX/CHOP function
6 (Smoothies mode button) : DOUGH function
● "OFF" LEVEL SWITCH CONTROL
This level control is to stop the machine or reset the machine speed.
● VARIABLE SPEED SWITCH CONTROLS
Slow speed, turn the control knob into the beginning Fast speed, turn the control knob till to the end
● "MODE" LEVEL SWITCH CONTROL
Turn to this switch control into "OFF" position firstly And then turn into the "Mode", all 3 buttons into light flashing.
Once change into "Mode", 3 MODE buttons will be in light flashing, it means the machine ready now. If the light is not flashing, please recheck whether the accessories are pressed down well onto the machine body nor not.


● "PULSE" Mode button
Press for Pulse blending, remove to stop.

- "MIX/CHOP" Mode button Machine under this mode will automatically work: high speed for Chopper. Working 15 seconds will stop by itself.
- "DOUGH" Mode button - Dough maker function Machine under this mode will automatically work: speed will increase till to the best speed for dough mixing. Working 1.5 minutes will itself.
■ USING THE KNIFE BLADE

The 2 knife blades could be the most versatile of all the attachments.
For Stainless Steel Knife Blade:
▲ Before processing, cut the food into pusher size pieces.
▲ Each operation cannot longer than 3 minutes every time. Please rest the machine 5 minutes before next operation. It's better to rest the machine 30 minutes after 3 times' operations, this will cool down the motor and better to protect the machine life.
▲ For coarser foods use the pulse control.
| Food | Processing size | Quantity | Processing time | Speed |
| Onion | Into 4 pcs Without skin | 250g | approx. 30-60 sec. | Pulse |
| Garlic | Without skin | 250g | approx. 30-60 sec. | Pulse |
| Carrot | < 2x2 cm | 250g | approx. 30-60 sec. | Maximum |
| Meat | < 2x2 cm without bone | 250g | approx. 30-60 sec. | Maximum |
For Plastic Knife Blade:
▲ Each operation cannot longer than 2 minutes every time. Please rest the machine 5 minutes before next operation. It's better to rest the machine 30 minutes after 3 times' operations, this will cool down the motor and better to protect the machine life.
| Food Suggest quantity | Processing time | Speed | ||
| Flour / water | Flour 100g water 65g | approx. 90 sec. | Minimum | |
| Mixing of cake batter | Eggs 1 pcs Margarine 50g Sugar 50g Flour 50g Baking powder 1g | approx. 2 min. | Minimum | |
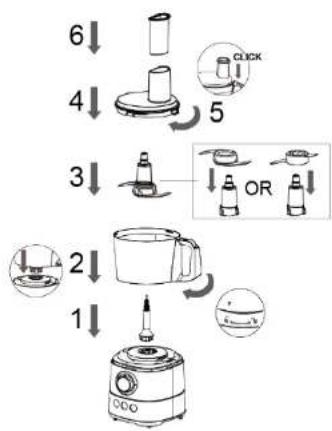
● Follow below flow pictured step by step to assemble machine.
- Ensure the bowl in step 2 and the lid in step 4 are locked well, or the machine will not work.
- In step 3, Stainless Steel knife blade or Plastic blade could be settled, sure either blade is fixed well on shaft.
● After operation, you can disassemble machine by opposite flow and direction.
● Only open the lid when blades completely stopped
flowchart
graph TD
    A["1: Cooker with brush"] --> B["2: Blender with brush"]
    B --> C["3: Stender with brush"]
    C --> D["4: Stender with brush"]
    D --> E["5: Quickener with brush"]
    E --> F["6: Quickener with brush"]
    style A fill:#f9f,stroke:#333
    style B fill:#ccf,stroke:#333
    style C fill:#cfc,stroke:#333
    style D fill:#fcc,stroke:#333
    style E fill:#cff,stroke:#333
    style F fill:#ffc,stroke:#333
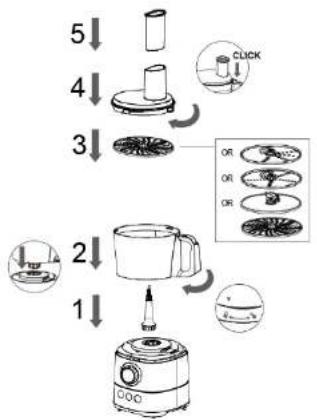
■ USING SLICER / JULIENNE / FRENCH FRIED POTATO / SHRED BLADE

▲ Please pay attention to the capacity line of container. Once the food approaches the max line on the container, please stop operation and pour out food.
▲ Switch on and push down evenly with the Pushers - never put your fingers in the feed tube.
▲ Each operation cannot longer than 3 minutes every time. Please rest the machine 5 minutes before next operation. It's better to rest the machine 30 minutes after 3 times' operations, this will cool down the motor and better to protect the machine life.
▲ To get the best performance, suggestion on the 1/2 max speeds.

French Fried Potato Julienne Disc

2 in 1 blade:
Rough Slicer & Julienne Disc

2 in 1 blade:
Fine Slicer & Julienne Disc

Shredder Disc
- Follow the flow pictured step by step to assemble machine.
- Ensure the bowl in step 2 and the lid in step 4 are locked well, or the machine will not work.
- In step 3, 4 type blade could be settled
- After operation, you can disassemble machine by opposite flow and direction.
- Always be careful when handling the blade as they are very sharp.
- Only open the lid when the blades are completely stopped
flowchart
graph TD
    A["1: Induction"] --> B["2: Rotation"]
    B --> C["3: Rotation"]
    C --> D["4: Rotation"]
    D --> E["5: Induction"]
    style A fill:#f9f,stroke:#333
    style B fill:#ccf,stroke:#333
    style C fill:#cfc,stroke:#333
    style D fill:#fcc,stroke:#333
    style E fill:#ffc,stroke:#333
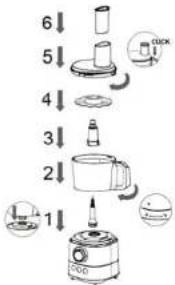
■ USING THE EMULSIFYING DISC

▲ Each operation cannot longer than 2 minutes every time. Please rest the machine 5 minutes before next operation. It's better to rest the machine 30 minutes after 3 times' operations, this will cool down the motor and better to protect the machine life.
▲ Use for aioli, instant pudding, mayonnaise, whipping cream, whisking eggs, egg whites, and sponge cake mixtures.
▲ For egg white whisking, please use room temperature eggs. Please ensure the bowl and emulsifying disc is dry and free from grease.
▲ Clean the emulsifying disc after each use.
▲ To keep the best processing result: use the Max. speed.
| IngredientsWhisking cream 200 ml approx. 1 min. Maximum | Quantity | Processing time | Speed |
| Egg white | 4 eggs | approx. 2 - 5 min. | Maximum |
- Follow the flow pictured step by step to assemble machine.
- Ensure the bowl in step 2 and the lid in step 5 are locked well, or the machine will not work.
- After operation, you can disassemble machine by opposite flow and direction.
- Only take the disc from the machine when the disc is completely Stopped
flowchart
graph TD
    A["1"] --> B["2"]
    B --> C["3"]
    C --> D["4"]
    D --> E["5"]
    E --> F["6"]
    F --> G["COOK"]
    style A fill:#f9f,stroke:#333
    style G fill:#bbf,stroke:#333
CLEANING
● Before cleaning please remove the power cord from the socket.
● Do not immerse the housing with motor in water.
- Do not use any abrasive detergents.
- Please only use a damp to clean the outside of the housing.
- Components that have come into contact with food can be cleaned in soapy water.
- Allow the parts to dry thoroughly before reassembling the device.
TECHNICAL DATA
Item reference: CERM1000B
Model: CY-329
Rated voltage: 220-240V, 50/60Hz
Power consumption: 1000W
Protection class: II
Lot #: amc102019
■ PROPER DISPOSAL

This product contains recyclable materials. Do not dispose this product as unsorted municipal waste. Please contact your local municipality for the nearest collection point.
TROUBLESHOOTING
| PROBLEM | EASY SOLUTION |
| Machine does not work | * There is a safety interlock switch on processing bowl / blender. Please sure bowl and lock are securely locked into position.* If the motor still will not start, check the power cord and power outlet. |
| French Fried Potato Julienne Disk | * Always clear any blocked potato from the chipper disc before processing more potatoes. |
| Some food remains on the disc after processing | * It is normal for small pieces to remain after processing. |
| Motor slows down when mixing dough | * Amount of dough may exceed maximum capacity. Remove half and process in two batches.* Do not add more than 200g dough. |
| Dough is too dry * Running machine and add water through feed cube, 1 tablespoon at a time until dough cleans the inside of the processing bowl. | |
| Dough is too wet * Running machine and add flour through feed cube, 1 tablespoon at a time until dough cleans the inside of the processing bowl. | |
| Motor slow down when chopping blade | * Amount of meat may be too much. Remove half and process in two batches.* For the best result, trim the meat of fat before processing. |
| Vibrates/moves during processing | * Clean and dry the rubber feet at the bottom of the unit.* Also make sure that the maximum load capacity is not being exceeded. |
Continental Edison
120-126 Quai de Bacalan
CS 11584
33000 Bordeaux
IMPORT BY :
A.M.C.
123, QUAI JULES GUESDE
94400 VITRY SUR SEINE
France
www.continentaledison.fr


- ■ INSTRUCTIONS DE SÉCURITÉ
- ■ FONCTIONNEMENT GENERAL
- OFF (Arrêt)
- ■ UTILISATION DU DISQUE EMULSIFIANT
- ■ MISE AU REBUT APPROPRIÉE
- ■ SAFETY INSTRUCTIONS
- BEFORE CONNECTING TO POWER
- ■ SAVE THESE INSTRUCTIONS
- INTELLIGENT SWITCH
- ■ USING THE KNIFE BLADE
- For Stainless Steel Knife Blade:
- For Plastic Knife Blade:
- ■ USING SLICER / JULIENNE / FRENCH FRIED POTATO / SHRED BLADE
- ■ USING THE EMULSIFYING DISC
- CLEANING
- TECHNICAL DATA
- ■ PROPER DISPOSAL
Brand : CONTINENTAL EDISON
Model : CERM1000B
Category : Food Processor