
CEFM118R - Food Processor CONTINENTAL EDISON - Free user manual and instructions
Find the device manual for free CEFM118R CONTINENTAL EDISON in PDF.
| Brand | Continental Edison |
| Model | CEFM118R |
| Product type | Multifunction food processor |
| Power supply | 220-240 V~, 50/60 Hz |
| Power | 1000 W |
| Weight (without accessories) | 6.2 kg |
| Stainless steel bowl capacity | 5 L |
| Glass blender capacity | 1.5 L |
| Number of speeds | 6 |
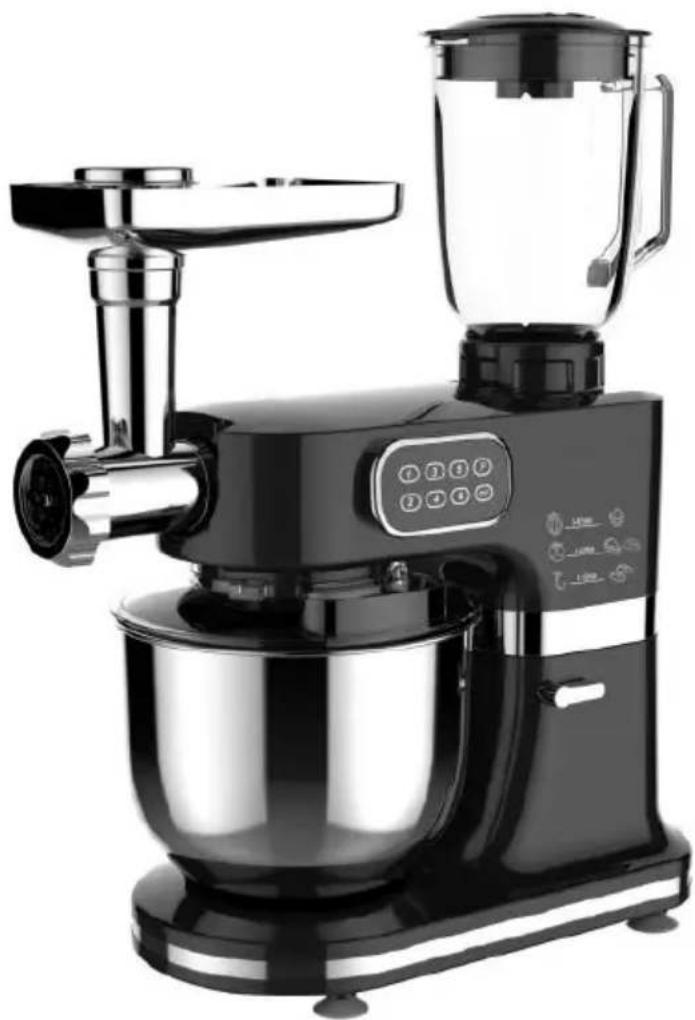
| Main functions | Blender, meat grinder, stand mixer (dough hook, flat beater, whisk), pasta and sausage preparation |
| Included accessories | 5L stainless steel bowl, 1.5L glass blender, splash-proof lid, dough hook, flat beater, wire whisk, meat grinder with 3 discs, 6 pasta dies, sausage funnel, meatball accessory, pusher, measuring cup |
| Maximum continuous operation time | 10 minutes (with 30-minute pause before reuse) |
| Main materials | Stainless steel bowl, glass blender bowl, plastic, stainless steel blades |
| Care and cleaning | Stainless steel bowl, whisk, blender: dishwasher safe (except grinder and beater). Clean exterior with a damp cloth and mild detergent. Never immerse the appliance. |
| Safety | Blender safety lock; splash-proof lid; automatic stop if mispositioned; sharp blades (caution); keep out of reach of children; do not use unattended. |
| Warranty | Legal warranty of conformity (does not cover wear, damage due to misuse, unauthorized repairs) |
| Repairability | Contact an authorized technician; do not repair yourself; power cord must be replaced by the manufacturer |
| Compliance | CE (Directives 2014/35/EU, 2014/30/EU, 2011/65/EU) |
| Use | Household use only, do not use outdoors |
Frequently Asked Questions - CEFM118R CONTINENTAL EDISON
User questions about CEFM118R CONTINENTAL EDISON
0 question about this device. Answer the ones you know or ask your own.
Ask a new question about this device
Download the instructions for your Food Processor in PDF format for free! Find your manual CEFM118R - CONTINENTAL EDISON and take your electronic device back in hand. On this page are published all the documents necessary for the use of your device. CEFM118R by CONTINENTAL EDISON.
USER MANUAL CEFM118R CONTINENTAL EDISON
natural_image
Abstract geometric shapes with no text or symbolsContinental Edison
natural_image
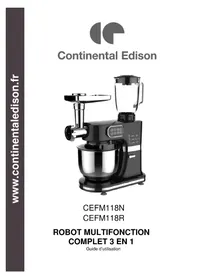
Black and white photo of a modern kitchen mixer with a blender and control panel (no visible text or symbols)CEFM118N
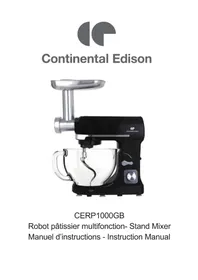
CEFM118R
ROBOT MULTIFONCTION
COMPLET 3 EN 1
Guide d'utilisation
natural_image
Symbolic icon of a person walking inside a circular arrow, with no text or numbers present.natural_image
Line drawing of a kitchen mixer with labeled parts (no text or symbols on the device itself)natural_image
Line drawing of a kitchen stand mixer with exploded view and component details (no text or symbols)natural_image
Line drawing of a kitchen feeder with exploded view and component details (no text or symbols)Accessoires à pâtes
natural_image
Line drawing of a kitchen mixer with a blue arrow indicating rotation (no text or symbols)
natural_image
Line drawing of a kitchen mixer with a bowl, showing the mixing bowl and control panel (no text or symbols)natural_image
Line drawing of a kitchen mixer with a bowl and stand (no text or symbols)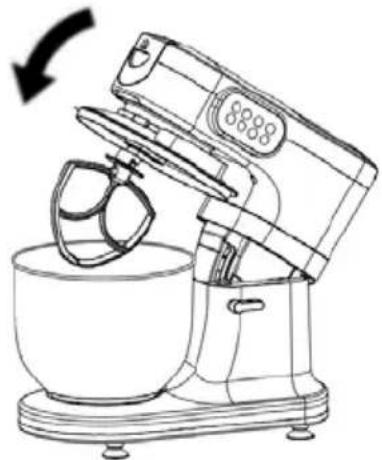
natural_image
Line drawing of a kitchen mixer with a rotating head and mixing bowl (no text or symbols)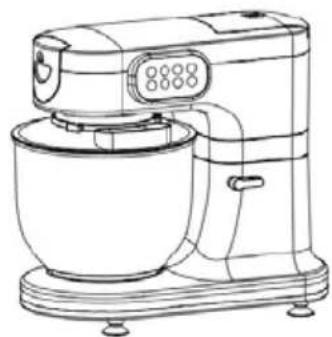
natural_image
Line drawing of a kitchen mixer with control panel and side-mounted dish (no text or symbols)natural_image
Symbol of a trash bin with crossed lines indicating no waste, and a solid black rectangle below (no text or labels)natural_image
Abstract geometric shapes in gray, no text or symbols presentContinental Edison
natural_image
Black and white photo of a modern kitchen mixer with a blender and control panel (no visible text or symbols)CEFM118N
CEFM118R
MULTI-FUNCTION STAND MIXER 3 IN 1
USER MANUAL
Read the user guide carefully before turning on the device. Keep this document, the warranty and the receipt as well as the box and the inner packaging. If you give this device to another person, please also give them the instructions for use. Please keep these instructions for future reference.

Important information about your personal safety and how to avoid damage to the device
GENERAL SECURITY
- Make sure the voltage of your electrical installation matches that indicated on the product nameplate.
- This appliance is intended for home use only and for the purpose
for which it was designed. This device is not intended for commercial use. Do not use outdoors. Keep it away from heat sources, direct sunlight, moisture (never put it in any liquid) and sharp edges. Do not use the device with wet hands. If the unit has moisture or is wet, unplug it immediately.
- When cleaning or storing the unit, always turn off and unplug the unit by removing the plug from the outlet, if the unit is not in use, and then remove any accessories that have been installed.
- Do not leave the device running unattended. If you must be away, always switch off the device or unplug it.
- Regularly check that the unit and the power cord are not damaged.
Do not use the appliance if it is damaged.
- Regular checking of the cord is recommended to detect any signs of deterioration. The device should not be used if the cord is damaged.
- Do not try to repair the unit yourself. Always call an authorized technician.
- To avoid any danger, if the power cord is damaged, have it replaced by the manufacturer, an authorized agent, or a qualified person.
- Only use original spare parts.
- This unit is not designed to work with an external timer or separate external control system.
CHILD SAFETY
- For the safety of your children, do not leave any items of the packaging (plastic bags, boxes, polystyrene, etc.) within reach.
- Warning! Do not let young children play with the items in the package to avoid choking!
- To protect children and frail persons from hazards from electrical equipment, make sure that this device is never used unattended. This device is not a toy. Do not let children play with the device.
- If the power cable is damaged, it must be replaced by the manufacturer, its service department or similarly qualified persons in order to avoid danger.
- This appliance should not be used by children. Keep the device and
its cable out of the reach of children.
- Children should not use the device as a toy.
USE OF INSTRUCTIONS
- The use of accessories not sold or recommended by the manufacturer may cause fire, injury or electric shock. Do not use outdoors.
- Beware of the risk of injury if misused. Care should be taken when handling sharp blades, when emptying the bowl and when cleaning.
- Turn the unit off and disconnect from the power supply before changing accessories or approaching moving parts during operation.

DANGER : RISK OF CUT!
- Always disconnect the appliance from the power supply if it is left unattended and before assembly, disassembly or cleaning.
-
This unit is for home use but not for use in the following cases:
-
kitchen areas reserved for employees in companies, shops and other work environments;
- farms;
- by customers in hotels, motels and other residential environments;
- guest house.
- This device may be used by persons whose physical, sensory or mental capabilities are impaired or whose experience or knowledge is not sufficient, provided they are supervised or
instructed the use of the device safely and to the extent that they understand the potential dangers.
- For installation, handling, cleaning, and disposal of the device, refer to the following chapters of the User's Guide.

Suitable for food
Information on the meaning of the conformity marking CE
The marking CE indicates that the product meets the main requirements of the European Directives) 2014/35/EU (Low Voltage), 2014/30/EU (Electromagnetic Compatibility), 2011/65/EU (Limitation of use of certain substances in electronic equipment).
SUMMARY
IMPORTANT WARNINGS AND SAFETY ADVICE 26
I- D ESCRIPTION OF THE DEVICE 34
II- TECHNICAL CHARACTERISTICS 36
III- BEFORE FIRST USE 37
a. Unpacking the device and scrapping the packing elements 37
b. Before first use 37
IV- USE OF THE DEVICE 38
A. Using the blender 38
B. Using the chopper function 39
C. Operation in robotic mixer mode 41
D. Recommended speeds according to the accessory 43
V- EXAMPLES OF USE 44
To mix or knead dough 44
To whip egg whites or cream 44
VI- CLEANING THE DEVICE 45
VII- GUARANTEE 46
VIII- DISPOSAL 47
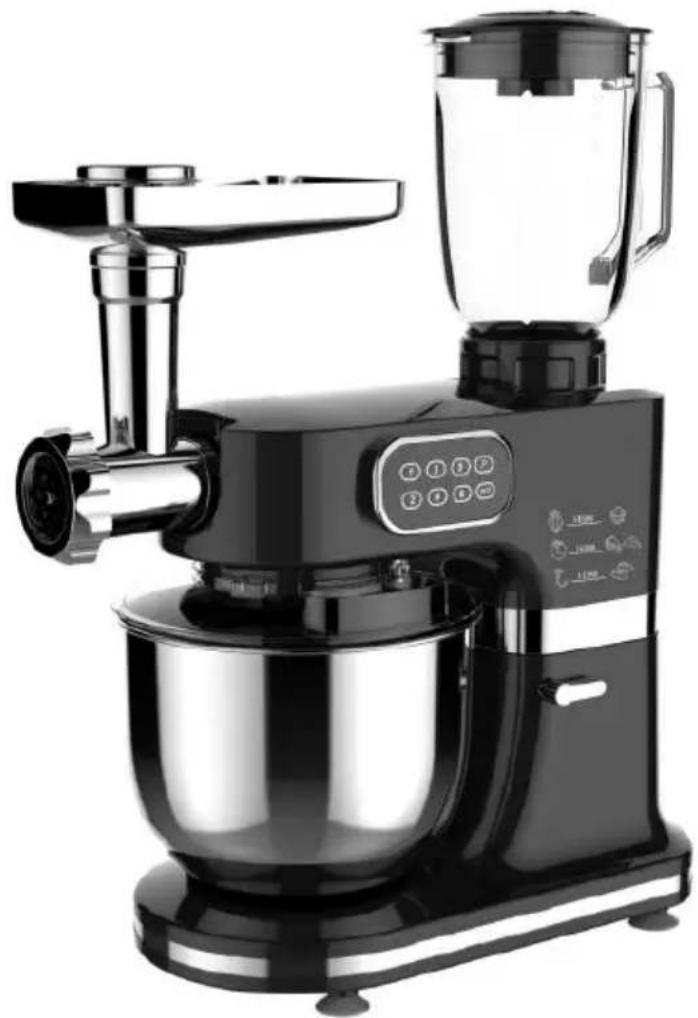
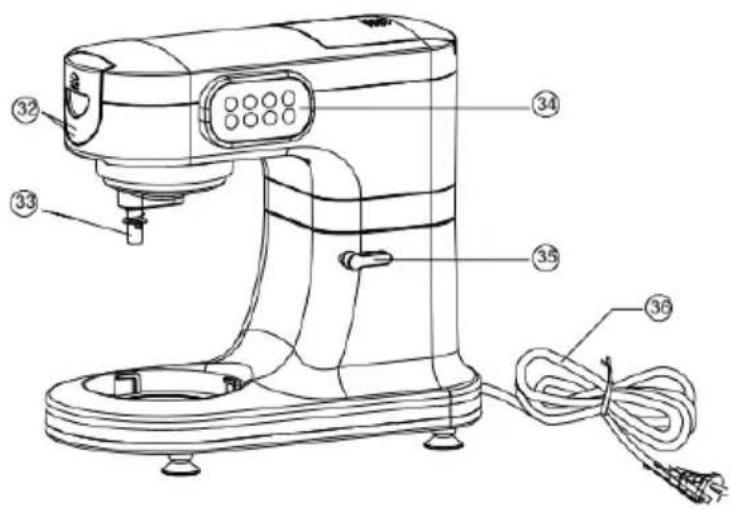
I - DESCRIPTION OF THE DEVICE
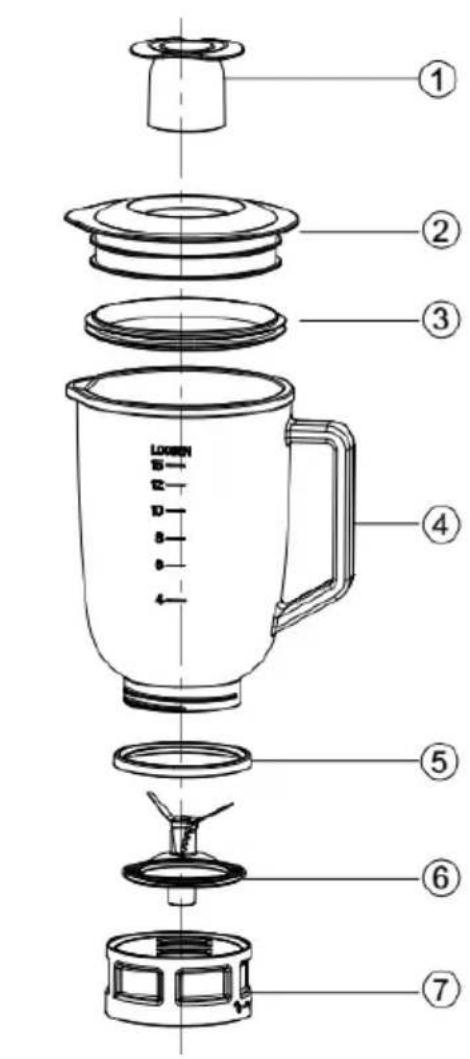
Blender accessories
- Small measuring cup
- Cover
- Lid seal
- Glass bowl (1.5L)
- Bowl seal
- Set of blades
- Blender base
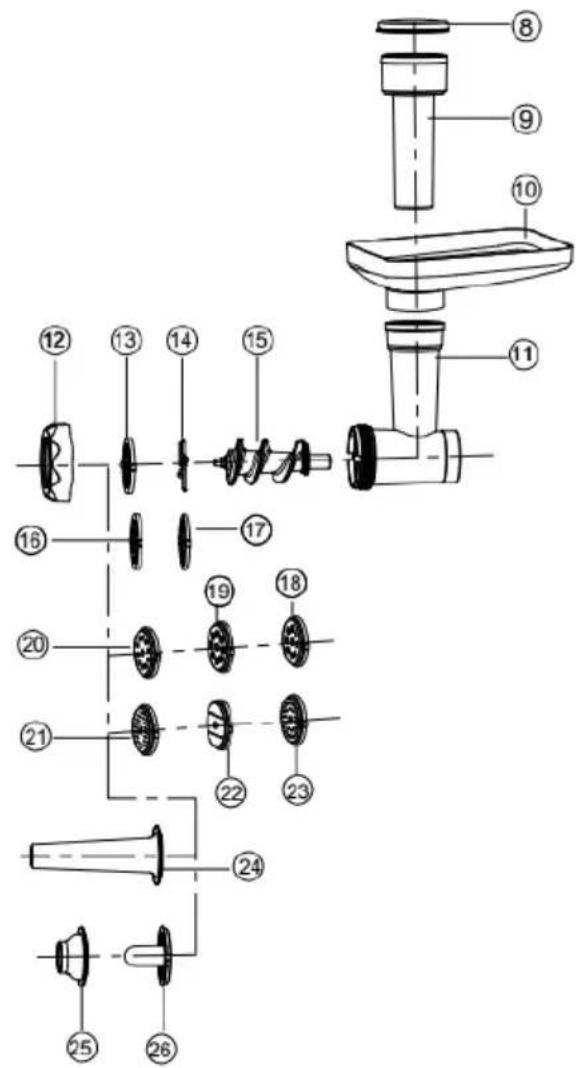
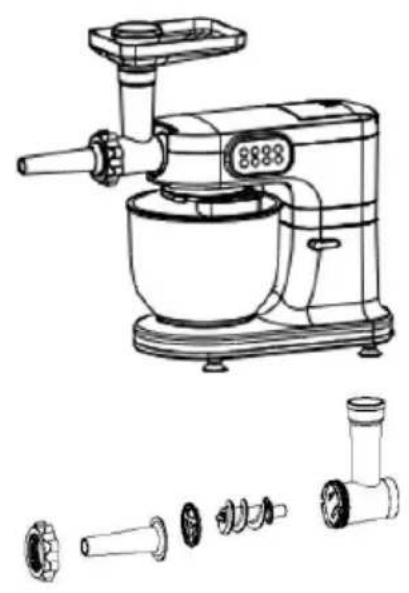
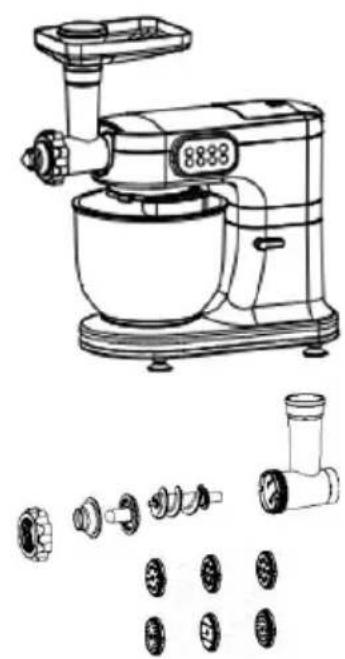
Meat grinder accessories
- Pusher cover
- Meat grinder push
- Filling tray
- Chopper head
- Closing ring
- Grinding disk - 1
- Blade to grind
- Worm
- Grinding disk - 2
- Grinding disc - 3
18-23. Pasta disc (x6) - Sausage funnel
- Meatball accessory
- Cone
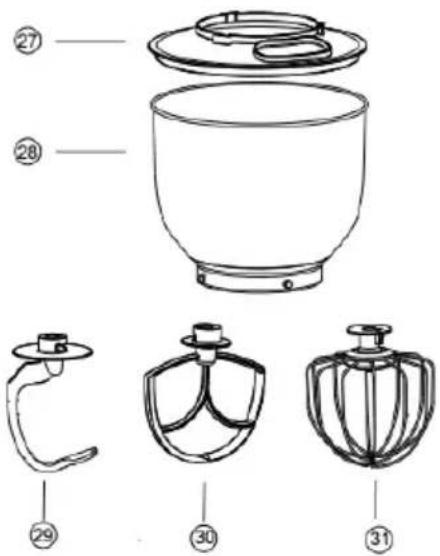
Pastry accessories and Appliance body
- Anti-projection transparent lid
- Large stainless-steel bowl (5L)
- Dough hook
- Flat beater
- Balloon whip
- Front protective cover
- Rotating axis
- Control Panel
- Arm opening button
- Cord and power plug
II - TECHNICAL CHARACTERISTICS
| Product reference | CEFM118NCEFM118R |
| Model (s) FM118 | |
| Power supply 220-240 V~ | |
| Frequency 50/60 Hz | |
| Power 1000 W | |
| Product weight without accessories | 6.2 Kg |
| Number of speeds 6 | |
| Stainless steel bowl capacity 5 L | |
| Maximum operating time | 10 minutes |
a. Unpacking the device and scrapping the packing elements:

natural_image
Abstract icon of a person walking inside a circular arrow system (no text or symbols)i. Remove all packing material around the appliance and the protective elements inside the appliance compartments.
ii. Carton board and sheets of paper are recyclable. They must be thrown in the collection bins provided for this purpose.
• The materials bearing the symbol △ are recyclable:
PE <= polyethylene; > PS <= polystyrene; > PP <= polypropylene
This means that they can be recycled by depositing them into appropriate collection containers.
- Other packaging materials (adhesive, fasteners, etc.) must be disposed of with household waste.
b. Before first use
- The appliance must be used and placed on a flat, stable, and dry surface.
- Wash all accessories with a sponge soaked in liquid and rinse with warm water before drying with a clean cloth. (See the section: Cleaning the device).
- Take the power cord out of its storage box on the bottom of the unit and connect it to the AC outlet.
IV - USE OF THE DEVICE
The 4 functions of this device are: blender, pastry, chopper and blender.
A. U sing the blender
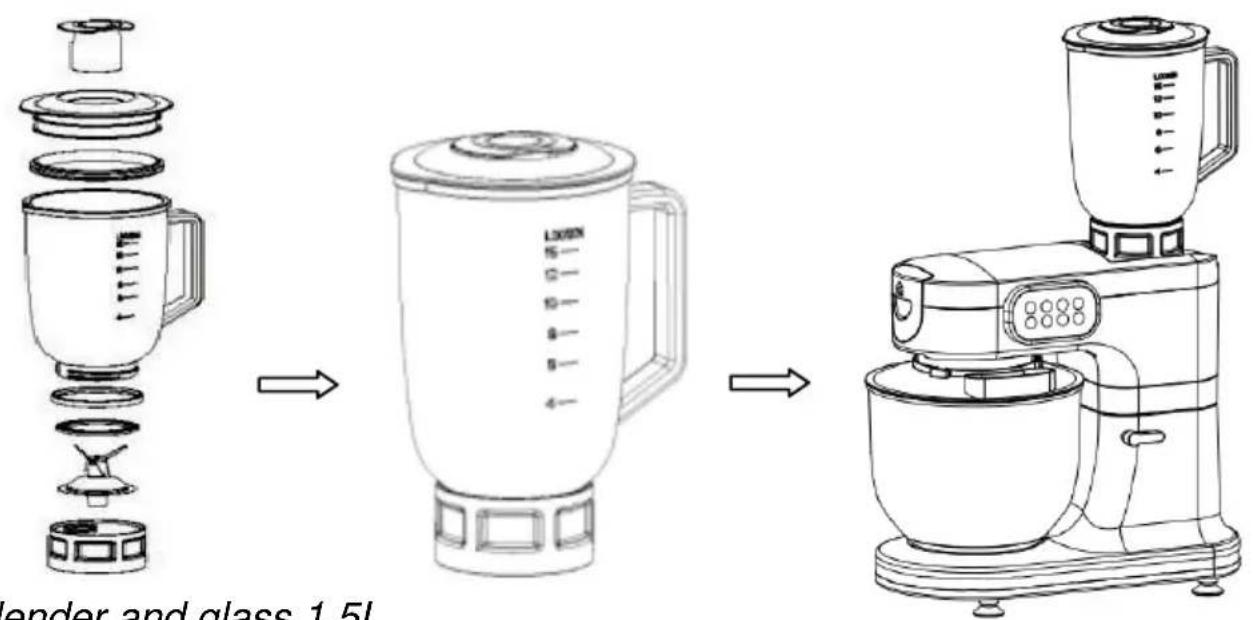
Blender and glass 1.5L
Make sure the robot is turned off before setting up the blender.
1) Assemble the accessories in the order shown in the picture.
2) Put your preparation inside the blender and put in the lid.
3) Attach the blender to the robot making sure to position it correctly until the safety interlock engages. Make sure the lid is closed before switching on the appliance.

IMPORTANT: The robot will not work if the Blender is not correctly positioned.

DANGER: Risk of cutting! The blades delivered with your device are very sharp! Be careful when you have to handle them.
4) Make sure that the small transparent measuring cup is inserted (above the lid). When the robot is running, you can remove the measuring cup to add ingredients.
5) Plug the power cable into an AC outlet.
6) Select speed 6 to mix.
7) When you put ice cubes into the blender, first use the pulse function to crush them and then use speed 6 to mix.

IMPORTANT : The continuous mixing time should not exceed 1 minute.
Caution: The maximum capacity of ingredients to be mixed must be less than 1.5L.
Do not operate the Blender empty for more than 10 seconds.
B. Using the chopper function

natural_image
Line drawing of a kitchen mixer with labeled parts and exploded view (no text or symbols)Chopper accessories
natural_image
Line drawing of a kitchen stand mixer with exploded view and component details (no text or symbols)Sausage accessories
natural_image
Line drawing of a kitchen mixer with exploded view and component assembly (no text or labels)Meat pasta accessories
Using the meat grinder accessories (complete set):
a. Preparation of meatballs:
The accessories of the meat grinder are composed of three round disks. Select the disc according to the desired fineness for mincing meat or making pasta.
1) Insert the auger (15) into the chopper head.
2) Adjust the cone and then the meatball attachment on the end of the auger.
3) Screw in the locking ring by turning it clockwise.
WARNING!
- Make sure there is no bone or skin in the meat before chopping.
- Do not forget to disassemble the chopper's head before changing accessories.
b. Preparation of sausages:
Note: The use of sausage accessories and the meat grinder is the same. Just replace the round disc with the sausage funnel.
1) Insert the auger (15) into the chopper head.
2) Adjust the sausage adapter and sausage tip on the auger exit.
3) Screw in the locking ring by turning it clockwise.
c. Preparation of pasta:
The pasta accessories consist of six round discs. Use the appropriate accessory according to the desired fineness of the pasta.
1) Insert the auger into the chopper head.
2) Place the pasta accessory of your choice on the end of the auger.
3) Screw in the locking ring by turning it clockwise.

IMPORTANT : Maximum duration of continuous operation: do not exceed 10 minutes
Note: The use of speed 4 or 5 is recommended when using the meat grinder functions.
C. Operation in Robotic Mixer Mode: Locking the mixing bowl
natural_image
Line drawing of a kitchen stand mixer with a blue rotation arrow indicating rotation (no text or symbols)
natural_image
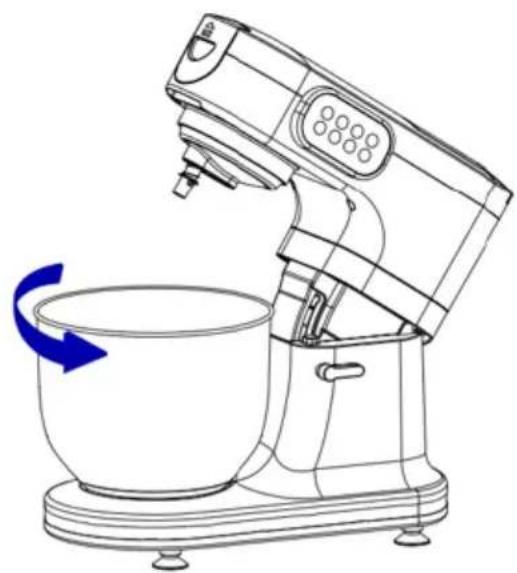
Line drawing of a kitchen mixer with a bowl, showing the mixing bowl being turned by a hand (no text or symbols present)Place the filled bowl on the base and secure the bowl by turning it counterclockwise. (Fig.1a)
Remove the bowl with the mixture by turning it clockwise. (Fig.1b)
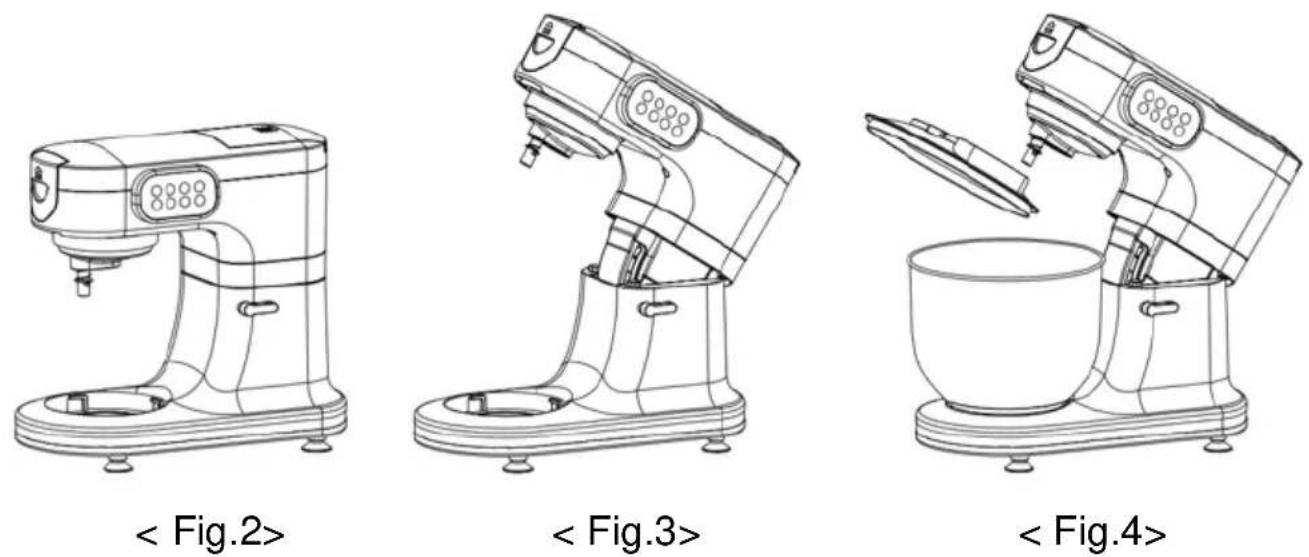
- Mix the ingredients carefully following the recipe, then raise the head of the unit using the arm opening button (35). Fig. 2 and Fig. 3.
-
Place the blender jar on the base of the unit, and then turn it clockwise as shown on your unit until it clicks into place. Fig. 4.
-
Insert the dough hook, flat beater or balloon whisk into the rotating shaft on the head of the food processor, then turn the shaft clockwise until it is firmly closed. engaged. Fig. 5 and 6. Finally, put the anti-projection lid on the bowl.
-
Adjust the position of the cover and lower the head of your device. Fig.7.

natural_image
Line drawing of a kitchen mixer with a bowl and stand (no text or symbols)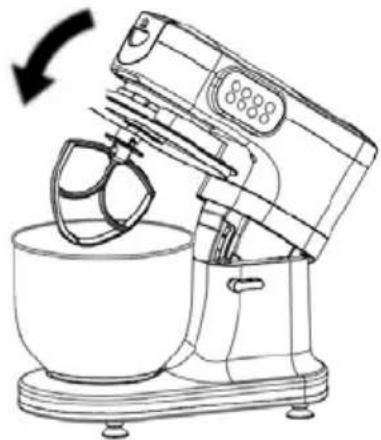
natural_image
Line drawing of a kitchen mixer with a rotating head and mixing bowl (no text or symbols)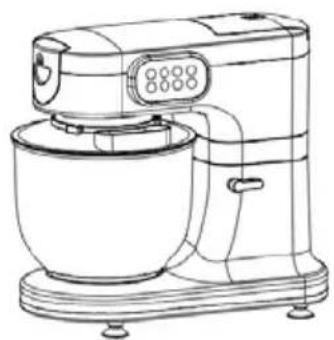
natural_image
Line drawing of a kitchen mixer with control panel and side-mounted dish (no text or symbols)- Insert the power plug into the AC outlet and set the speed adjustment knob to the desired position, 1 to 6, for extended use.
- When finished, turn the switch to "OFF".
- Raise the head of the device using the arm release button.
- You can now remove the mixing bowl from the base of the unit by turning it counterclockwise.
D. Recommended speeds according to the accessory:
| Accessories Buttons | Time | ||
| Dough hook |  | Speed 1 and 2 | Max. 5 minutes. |
| - Ideal for all "heavy" pasta, to easily prepare bread, brioches, pizzas, broken pasta or shortbread. | |||
| Flat Beater | 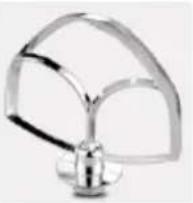 | Speed 1-6 Max. 5 minutes | |
| - Ideal for incorporating ingredients in preparation, making cake or cake machines, or preparing tasty mashed potatoes. | |||
| Balloon whip | 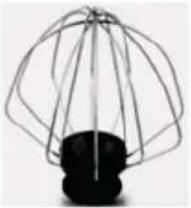 | Speed 5-6 | Max. 5 minutes |
| - Ideal for mixing fluid pasta (such as pancakes or omelets), emulsifying, whipping up whites, making very smooth whipped cream very easily. | |||
| Meat grinder | 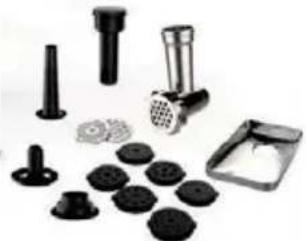 | Speed 4-5 | Max. 7 minutes |
| Blender | 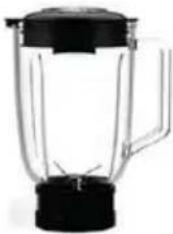 | Speed 6 | Max. 1 minute |

Caution: This device must not be operated continuously for more
than 10 minutes.
After each use, allow the unit to cool for at least 30 minutes.
To mix or knead dough
Suggested Proportions of Flour and Water: 5: 3. Maximum quantity of dry flour: 900 g Maximum kneader: 1.5 kg
The dough hook must be used.
• Use speed 1 for 5 minutes.
- When filling the mixing bowl, please ensure that the maximum quantity is not exceeded.
To whip egg whites or cream Maximum quantity: 12 eggs The balloon whip must be used.
- Use whisk at speed 6 to whip the egg whites without stopping for about 2 to 5 minutes, depending on the size of the eggs, to a firm consistency.
- For the whipped cream, whip 250ml of cream at speed 6 for about 5 minutes.
- When filling the mixing bowl with fresh milk, cream or other ingredients, please ensure that the maximum amount is not exceeded.

WARNING: USE ONLY ONE FUNCTION AT A TIME WHEN
YOU PREPARE FOOD. DO NOT USE FUNCTIONS (Mix and chop) AT THE SAME TIME!
Before cleaning, please make sure that the power button is in the "OFF" position and that the power cable has been unplugged from the power outlet.
√ Accessories should only be washed in hot water with dishwashing liquid.
√ The plastic accessories, the mixing bowl, the whisk, the blade blender can be washed in the dishwasher.
√ The mixer, blender and blender should not be washed in a dishwasher.
√ To clean the exterior of the unit, use a mild detergent and a damp cloth.
Do not use abrasive detergents or alcohol.
√ To clean the unit, never immerse in water.
√ After use, allow the unit to cool before cleaning.
Warning: The accessories of the meat grinder must in no way case be put in the dishwasher.

DANGER: Risk of cutting! The blades delivered with your device are very sharp! Be careful when you need to handle or clean them. Do not use sharp, toxic and aggressive products such as burnt alcohol, industrial strippers, solvents to clean your appliance as these may damage it.
VII - GUARANTEE
The warranty does not cover the wear parts of the product, nor the problems or damage resulting from:
(1) surface deterioration due to normal wear and tear of the product;
(2) defects or deterioration due to contact with liquids and corrosion caused by rust or the presence of insects;
(3) any incident, abuse, misuse, alteration, disassembly or unauthorized repair;
(4) improper maintenance, improper use concerning the product or connection to an incorrect voltage;
(5) any use of accessories not supplied or not approved by the manufacturer.

The guarantee will be cancelled if the nameplate and / or serial number of the product are removed.
VIII - DISPOSAL
natural_image
Symbol of a trash bin crossed out by two crossed lines, with a solid black rectangle below (no text or labels)This logo affixed to the product means that it is a device whose treatment as waste falls within the framework of the directive 2012/19 / EU of July 4th, 2012, relative to the waste of electrical and electronic equipment (WEEE). This means that this product must be supported by a collection system selective in accordance with the European directive mentioned above in order to be either recycled or dismantled in order to reduce any impact on the environment.
Hazardous substances in electrical and electronic equipment can have potentially harmful effects on the environment and human health.
Thus, at the end of the life of this appliance, it must not be disposed of with unsorted municipal waste. Recovery and collection systems are made available to you by local authorities (waste disposal centers) and distributors.
This device must not be thrown on public roads. You have the obligation to use the selective collection systems available to you.

natural_image
Abstract geometric shapes with no text or symbolsContinental Edison
www.continentaledison.fr

- Continental Edison
- ROBOT MULTIFONCTION
- COMPLET 3 EN 1
- MULTI-FUNCTION STAND MIXER 3 IN 1
- GENERAL SECURITY
- CHILD SAFETY
- USE OF INSTRUCTIONS
- DANGER : RISK OF CUT!
- Suitable for food
- Information on the meaning of the conformity marking CE
- SUMMARY
- IMPORTANT WARNINGS AND SAFETY ADVICE 26
- I- D ESCRIPTION OF THE DEVICE 34
- II- TECHNICAL CHARACTERISTICS 36
- III- BEFORE FIRST USE 37
- IV- USE OF THE DEVICE 38
- V- EXAMPLES OF USE 44
- VI- CLEANING THE DEVICE 45
- VII- GUARANTEE 46
- VIII- DISPOSAL 47
- I - DESCRIPTION OF THE DEVICE
- Blender accessories
- Meat grinder accessories
- Pastry accessories and Appliance body
- II - TECHNICAL CHARACTERISTICS
- a. Unpacking the device and scrapping the packing elements:
- b. Before first use
- IV - USE OF THE DEVICE
- U sing the blender
- Make sure the robot is turned off before setting up the blender.
- Using the chopper function
- Using the meat grinder accessories (complete set):
- a. Preparation of meatballs:
- WARNING!
- b. Preparation of sausages:
- c. Preparation of pasta:
- Operation in Robotic Mixer Mode: Locking the mixing bowl
- To mix or knead dough
- VII - GUARANTEE
- VIII - DISPOSAL
Brand : CONTINENTAL EDISON
Model : CEFM118R
Category : Food Processor