WG811Y5U - Range hood Atag - Free user manual and instructions
Find the device manual for free WG811Y5U Atag in PDF.

| Product type | Extractor hood |
| Brand | Atag |
| Model | WG811Y5U |
| Power supply | 230 V ~ 50 Hz |
| Connection power | See rating plate |
| Number of speeds | 4 (1, 2, 3, 4) |
| High intensity position (4) | Automatic return to speed 3 after 3 minutes |
| Delayed automatic shut-off | Yes, 15 minutes |
| Lighting | Halogen 20 W |
| Grease filter saturation indicator | Yes (red indicator) |
| Grease filters | Dishwasher safe, clean every 15 days |
| Charcoal filter | Replace once a year (for recirculation model) |
| Type of exhaust | External exhaust or recirculation |
| Minimum distance (gas hob) | 75 cm |
| Minimum distance (electric hob) | 65 cm |
| Noise level | Depends on the exhaust duct |
| Material | Stainless steel (for some models) |
| Installation | Wall-mounted or island |
| Dimensions | Refer to page 15 of the manual |
Frequently Asked Questions - WG811Y5U Atag
User questions about WG811Y5U Atag
0 question about this device. Answer the ones you know or ask your own.
Ask a new question about this device
Download the instructions for your Range hood in PDF format for free! Find your manual WG811Y5U - Atag and take your electronic device back in hand. On this page are published all the documents necessary for the use of your device. WG811Y5U by Atag.
USER MANUAL WG811Y5U Atag
instructions for use
mode d'emploi
Gebrauchsanausung
afzulgkap
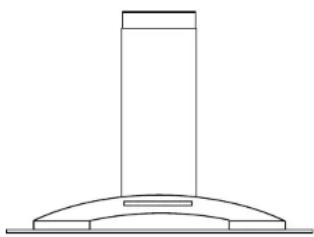
cooker hood
hotte d'aspiration
Dunstabzugshaube
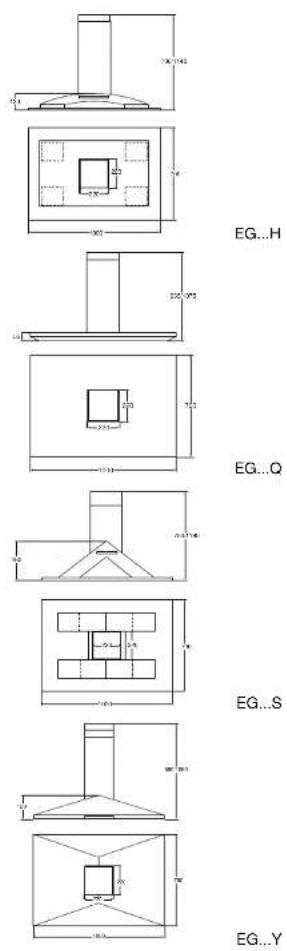
WG3/4/8H -EG3/4/8H
WG3/4/8S - EG3/4/8S
WG3/4/8Q - EG3/4/8Q
WG3/4/8Y - EG3/4/8Y
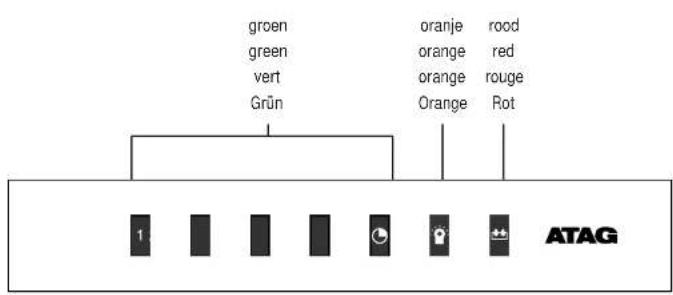
symbolen

Halogeneilamp defect.
remedie
automatic continued operation

lighting

grease filter indicator
1,2,3,4 speed switches
introduction
When you have read these instructions for use, you will quickly be aware of all the facilities the appliance can offer you. You can read about safety and how you should look after the appliance. In addition you will find environmental tips and instructions that can help to save energy.
Keep the instructions for use and the installation instructions. Any later user of this appliance could benefit from them.
Enjoy your cooking!
table of contents
introduction 1
for your safety 2
lighting 2
use 3
maintenance 4
dealing with faults yourself 5
removing packaging and appliance 5
for your safety
flambée and frying
When deep-frying, always keep a close watch.
Never flambe under an extractor hood. The high flames can cause fire. Even if the ventilator is switched off.
air supply
If you are using the appliance for the first time then check that the air supply is sufficient.
Dangerous situations can arise if there is a combination of insufficient air supply and the use of naked flames.
cleaning
Clean the appliance regularly, as shown in 'maintenance'. This minimizes the chance of a fire starting.
lighting
switch the lighting on
Press the light key
The halogen lighting will light up.
The orange light above the lighting key will light up.
switch the lighting off
Press the light key again.
The orange light above the lighting key goes out.
use
switch the fan on
Press key 1, 2 or 3.
The extractor hood will switch on at the level selected. The green light above the key will light up.
control the extraction capacity
Press a higher or lower key.
The green light above the key will light up.
intensive setting
Press key 4.
The green light above the key will light up.
After 5 minutes the extractor hood will automatically go back to setting 3.
automatic continued operation
Press the key once.
The extractor hood will automatically switch off after 12 minutes.
The extractor hood will automatically switch from setting 3 to setting 1.
switch the fan off
Press key 1, 2 or 3.
The light above the key will go out.
clean the grease filter
Clean the grease filter every two weeks. Clean the grease filter immediately if the red grease filter indicator hits up after a shorter period.
Put the cleaned filter back in the appliance. Press the key to the operating panel for about five seconds. The indicator will go out.
maintenance
extractor hood
Clean the extractor hood two to four times a year. Clean both the grease filter as well as the rest of the appliance. Use a liquid detergent to clean the cooker hood.
Never use abrasive cleaning agents, (such as Vim, steel wool, green scouring pads or other abrasive pads) or cleaning agents (such as liquid scouring powder and Jif). With stainless steel hoods in particular, you risk damage to the structure so that the result is a smudgy surface.
Never use aggressive chemical cleaning agents. These may cause discolouration, both on varnish and stainless steel.
remove Pyra/Quadro filters
Remove the filters as follows: switch off the fan and the halogen lamp. Press the filter both slightly upwards and outwards at the same time. You can now lift it out. Slowly remove the filter. Un-click the safety-chain hook.
Re-hook the safety chain. Place the filter in the holder. Fix the filter in the holder by pushing it gently upwards and, at the same time, inwards. Erase the electronic memory as instructed under "instructions for use".
remove Casa/Mega filters
Switch off the fan and the halogen lamp. Pull the filters downwards to free them. They have a magnetic catch.
Fix the filter in the holder by pressing it gently upwards.
clean filters
You can clean the filter in the dishwasher.
replace carbon filter
Replace the carbon filter once each year. This is only applicable for recirculation hoods.
Place the carbon filter on top of the filter unit before replacing it.
trouble shooting
If your appliance does not operate as required, check first if you can solve the problem yourself by using the table below. The cause of the problem is often a simple one.
| problem | cause | remedy |
| Lightning not operational. | Lamp defective. | Pull the chromium-plated ornamental ring down. Remove the small halogen lamp from the fitting and replace it by a new small 20 W halogen lamp. Hold the new lamp with a clean piece of cloth or something like that. |
Cooker hood is noisy. Outlet duct too long or with too Change the outlet duct many bends.
Defective motor. Call Service Department.
disposal of packaging and appliance
The packaging of the appliance is recyclable. It can be made up of:
-cardboard
polyethylene
CFC free polystyrene (PS rigid foam)
polypropylene straps around the box
- CFC free foam (soft)
Please dispose of these materials in a responsible way in accordance with the regulations of your local authority.
Your local authority will also be able to give you information about disposing disused household appliances in a responsible way.
symboles

arrêt automatique

éclairage

installation instructions
An extractor hood should be installed in accordance with national and local regulations.
These state, for example, that the distance between the bottom of the extractor hood and a gas cooking appliance should be at least 75~cm . For electric cooking appliances, this distance should be at least 65~cm .
please note:
When an extractor hood and a heat source (e.g. gas, oil, coal stoves, etc.) requiring air are used together in the same room, attention is required since the hood may exhaust the necessary combustion air creating a depression in the room. Maximum depression allowed in the room is 4Pa in order not to pipe into the room exhaust gas from the heat source. To ensure this condition, an air source is necessary in the room to feed the room constantly with fresh air.
electrical connection
When making the electrical connections, make sure the current socket has an earth wire connection and check if the voltage corresponds with the rating plate inside the hood.
After the extractor hood is installed, the socket should be easily accessible so that the power can be switched off. When connecting the appliance to the mains supply, national regulations must always be observed.
outlet
The outlet should, under no circumstances, be connected to a duct which is also being used for other purposes.
The air can be discharged directly outside through the wall opening, provided this is protected by a grid to shield against rain and leaves, etc.
The grid should not restrict the outlet hole by more than 20% .
We advise the fitting of the widest possible outlet duct. A smaller diameter will result in a lower extraction capacity and a higher noise level.
Ensure that the connections fit well. Aluminium or plastic tape can be used to connect the pipes.
Bends in the duct will have a negative influence on the extracting capacity and should therefore be avoided as much as possible.
ATAG provides accessories for extractor ducts of extractor hoods. A list of the product assortment and the relevant type numbers can be found in the model/price list.
building-in dimensions
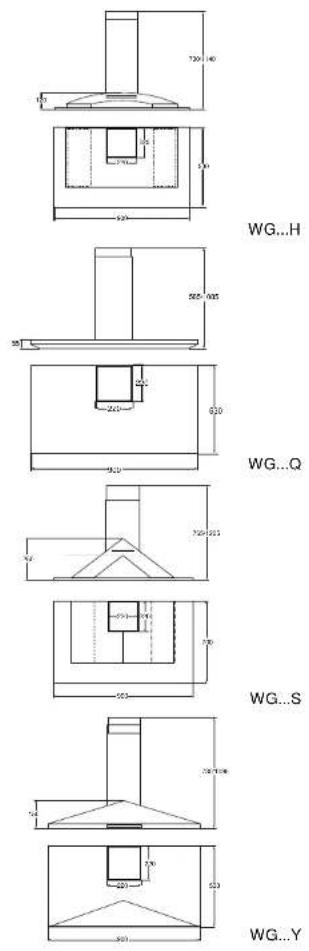
installation wall hood
The key dimensions are indicated on page 9. Set the height of the telescopic pipe within the allowable range.
Position the discharge and the electrical connection in such a way that it will be easy to hook up the hood.
marking and mounting attachment frame
- Draw a centre line on the wall (middle of the hood).
- Place the fastening clip against the wall so that it rests against the ceiling. The arrow on the flanged rim indicates the middle of the cooker hood. Mark the attachment holes to be drilled.
- Drill the holes (8 mm).
- Insert the plugs and fasten the mounting plate to the wall.
marking and assembling the hood
-
Mark the holes to be drilled on the wall by means of the stencil and drill the holes.
-
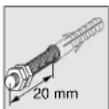
Insert plugs. Twist two nuts in the opposite direction on the ends of the studs and twist the studs about 20mm into the wall. Remove the nuts.
- Position the hood on the bolts. Fasten washers and nuts and adjust the hood.
- Attach the connecting cable and discharge hose from the inside (does not apply to recirculation hoods). Make sure the connecting cable is not pinched or folded.
- Make the necessary plug and socket connections.
hanging the telescopic pipe
- Push the flanged rim of the upper telescopic pipe from the bottom in between the fastening clip and push the telescopic pipe up against the ceiling (the telescopic pipe fixes itself).
- Bend the sides of the lower telescopic pipe a little bit towards the outside and clasp it over the upper telescopic pipe. Push the lower telescopic pipe downwards until it connects up the hood.
installation island hood
The key dimensions are indicated on page 9. Set the height of the telescopic pipe within the allowable range.
It is advisable to suspend the hood with the help of an assembly lift. If there is no lift present, it is advisable to carry out the mounting with more than one person.
Position the discharge and the electrical connection in such a way that it will be easy to hook up the hood.
marking
- Mark the holes to be drilled on the ceiling by means of the stencil.
- Drill the holes (4× 10mm)
placing the upper telescopic pipe
Fix the plugs and the studs to the ceiling. Screw the studs 20mm into the plugs in the ceiling.
- Put the top telescopic pipe over the studs. Screw down the washers and the nuts.
determining the length
- Slide the lower telescopic pipe over the motor frame of the hood and slide both pipe and frame over the already-fitted upper telescopic pipe.
- Determine the length of the telescopic pipe. Remember the minimum height above the hob.
- Mark the drill holes and slide the two sections apart again.
- Drill the fixing holes (6.0mm) at the side of the upper telescopic pipe using the drill bit supplied. Debrr the holes.
assembling the extractor hood
- Attach the connecting cable and discharge hose from the inside (does not apply to recirculation hoods). Make sure the connecting cable is not pinched or folded.
- Make the necessary plug-and socket connections (to feed the external motor).
- Slide the hood over the upper telescopic pipe. Secure it with the 4 screws.
technical data
type number see the
identification plate
power supply 230V50Hz
power consumption see the
identification plate
dimensions (h x w x d) see page 9
This appliance complies with the
CE directives.
information général
generalités
electrique descriptive