CM4492ACUU - Coffee machine Atag - Free user manual and instructions
Find the device manual for free CM4492ACUU Atag in PDF.
User questions about CM4492ACUU Atag
0 question about this device. Answer the ones you know or ask your own.
Ask a new question about this device
Download the instructions for your Coffee machine in PDF format for free! Find your manual CM4492ACUU - Atag and take your electronic device back in hand. On this page are published all the documents necessary for the use of your device. CM4492ACUU by Atag.
USER MANUAL CM4492ACUU Atag
The appliance identification card is located on the side of the appliance.
Apparatets ID-kort er plassert på siden av apparatet.
When contacting the service department, have the production code (PCODE) and complete item number (ITEMNR) to hand.
You will find the addresses and phone numbers of the service organisation on the guarantee card.
Du finner adesser og telefonnumre til serviceorganisasjonen på garantikortet.
natural_image
Exterior view of a modern stainless steel microwave oven with control panel and digital display (no visible text or symbols)CM4411
CM4492
NL
text_image
paar) J K S T R U M A I O W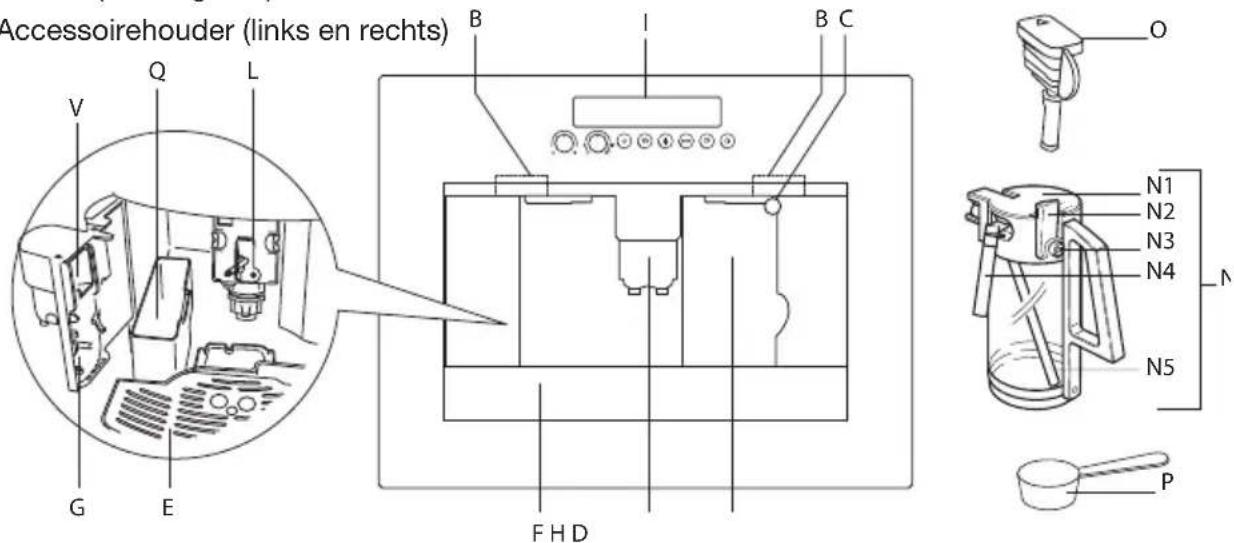
text_image
Accessoirehouder (links en rechts) V Q L B B C O N1 N2 N3 N4 N5 P G E F H D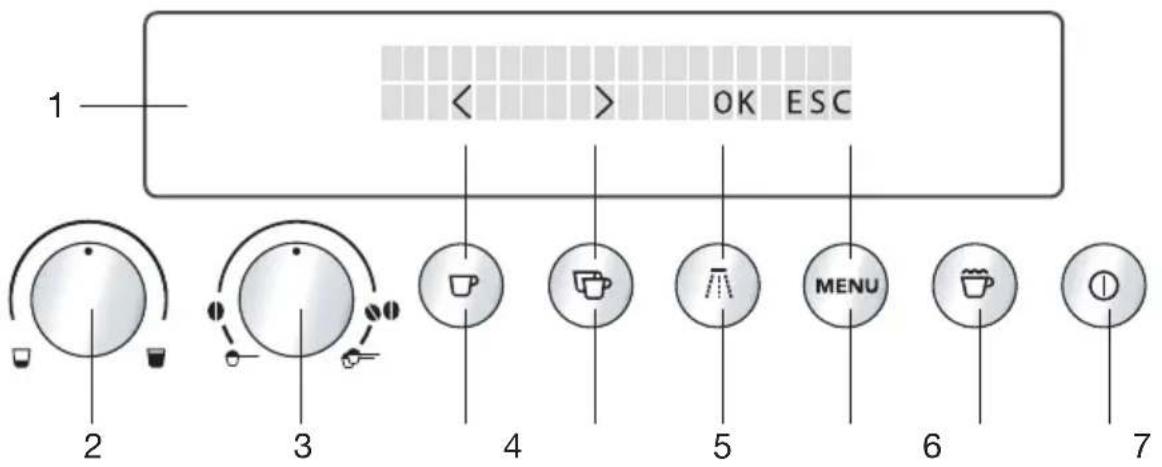
text_image
1 2 3 4 5 MENU 6 7 OK ESC8
natural_image
Diagram of a mechanical device with a component and directional arrow, no visible text or symbolsnatural_image
Two warning symbols: a triangle with an exclamation mark and a light bulb with rays (no text or labels)natural_image
Illustration of a hand using a coffee maker to press a cup into a machine (no text or symbols visible)natural_image
Diagram of a refrigerator interior with a door handle and a hanging circular component (no text or symbols)
natural_image
Diagram of a circular dial with three curved arrows indicating rotation or direction (no text or symbols)natural_image
Simple line drawing of a coffee machine with a cup and side table (no text or symbols)natural_image
Simple line drawing of a mechanical device with two circular components and a top panel (no text or symbols)natural_image
Hand placing a component into a container with a downward arrow (no text or symbols)
natural_image
Simple diagram of a circular object with arrows indicating direction, no text or symbols presentnatural_image
Illustration of a printer with a hand inserting a spring into the cover, showing mechanical components (no text or symbols)
text_image
Three-step diagram illustrating a hand using a computer to interact with a device, labeled 8, 9, and 10.natural_image
Illustration of a printer with a hand inserting a card into a slot, showing the process (no text or symbols)natural_image
Pure diagram of a circular component with arrows indicating direction, no text or symbols presentnatural_image
Technical line drawing of a mechanical device with two clamps and a base plate (no text or symbols)natural_image
Illustration of a hand using a tool to press or install a machine component, with no visible text or symbols.natural_image
Illustration of a printer with a magnified view of the paper being inserted (no text or symbols present)natural_image
Illustration of a hand pouring liquid into a coffee mug inside a machine (no text or symbols)natural_image
Illustration of a hand using a pipette to press a small object into a container (no text or symbols)natural_image
Line drawing of a hand inserting a component into a storage cabinet (no text or symbols)natural_image
Line drawing of a kitchen appliance with a water dispenser and control panel (no text or symbols)natural_image
Diagram of a mechanical device with a lever and handle, labeled '19' (no text or symbols on the diagram itself)natural_image
Line drawing of a coffee maker with a mug and handle, no text or symbols presentCappuccino maken
natural_image
Line drawing of a coffee maker with a mug and tray, no text or symbols presentnatural_image
Line drawing of a hand cleaning a window with a cloth, labeled '22' (no text or symbols on the diagram itself)natural_image
Line drawing of a hand inserting a small component into a device (no text or symbols)natural_image
Line drawing of a hand inserting into a device into a container (no text or symbols)De koffi emachine reinigen
natural_image
Line drawing of a hand pressing down on a door panel, with no visible text or symbolsnatural_image
Line drawing of a hand using a tool to adjust or install a component inside a kitchen appliance (no text or symbols)natural_image
Line drawing of a hand holding a tool inside a kitchen appliance (no text or symbols)natural_image
Technical diagram of a mechanical device with directional arrows indicating movement or force (no text or symbols present)natural_image
Technical diagram of a mechanical device with directional arrows indicating movement or force (no text or symbols present)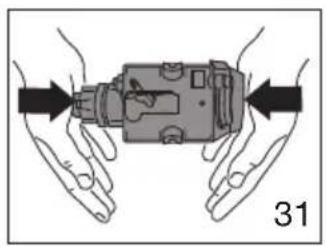
natural_image
Illustration of hands holding a mechanical device with directional arrows indicating movement (no text or symbols)Aanwijzingen
natural_image
Illustration of a hand using a tool to press a cylindrical component into a pot (no text or symbols)natural_image
Technical line drawing of a mechanical device with lever and handle (no text or symbols)natural_image
Line drawing of a hand inserting a small component into a device (no text or symbols)
text_image
Technical diagram of a mechanical device with numbered components and labeled parts, including screw, spring, and pin assembly.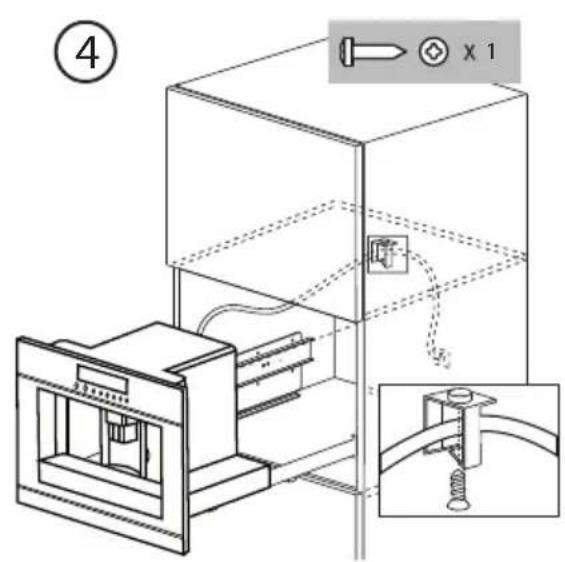
text_image
④ x 1
text_image
⑤natural_image
Symbol of a trash bin with crossed lines indicating no waste or restriction, no text presentCE
text_image
O N1 N2 N3 N4 N N5 P
text_image
1 2 3 4 5 MENU 6 7 OK ESC8
natural_image
Diagram of a mechanical device with a component labeled '4' and an arrow indicating direction (no text or symbols beyond labels)
natural_image
Two gray warning symbols: a triangle with an exclamation mark and a light bulb with radiating lines (no text or labels)natural_image
Illustration of a hand using a coffee maker to press a cup into a machine (no text or symbols visible)natural_image
Diagram of a refrigerator interior with a door and hanging door, showing internal compartments and a circular component (no text or symbols)natural_image
Pure diagram of a circular arrow with concentric rings and arrows, no text or symbols presentnatural_image
Simple line drawing of a coffee machine with a cup and side table, no text or symbols presentnatural_image
Simple line drawing of a 3D printer or printer with two holders and a base, no text or symbols present.natural_image
Illustration of a hand pressing down on a device inside a cabinet (no text or symbols)
natural_image
Simple diagram showing a circular object with two small objects below, enclosed by curved arrows (no text or symbols)natural_image
Illustration of a printer with a hand inserting a spring into the cover, showing mechanical components (no text or symbols)Remarques
natural_image
Simple line drawing of a person inside a rectangular frame, no text or symbols present
natural_image
Illustration of a hand operating a 3D printer in a control panel (no text or symbols visible)
natural_image
Diagram of a mechanical device with rotating components and labeled parts (no readable text or symbols)natural_image
Illustration of a printer with a hand inserting a spring into the cover, showing mechanical components (no text or symbols)text_image
Warning symbol and rotary dial with arrows indicating clockwise rotation around a circular dialnatural_image
Pure diagram of a circular dial with arrows indicating direction, no text or symbols presentnatural_image
Technical line drawing of a mechanical device with two clamps and a base plate (no text or symbols)natural_image
Line drawing of a printer with a hand inserting a tool into the cover (no text or symbols)natural_image
Illustration of a printer with a hand inserting a component into the paper (no text or symbols present)natural_image
Line drawing of a hand pouring liquid into a coffee mug inside a machine (no text or symbols)natural_image
Illustration of a hand using a tool to press or inspect a small object into a container (no text or symbols present)natural_image
Line drawing of a hand inserting a small component into a cabinet (no text or symbols)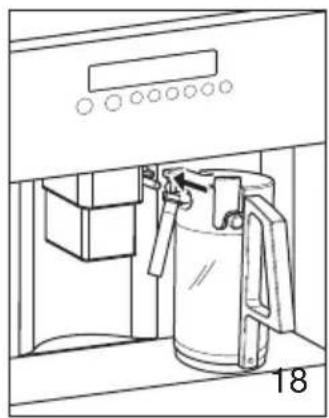
natural_image
Line drawing of a kitchen appliance with a water dispenser and control panel (no text or symbols)natural_image
Diagram of a kitchen appliance with a handle and lid, showing a lever mechanism (no text or symbols)natural_image
Line drawing of a kitchen appliance with a mug and fan, no text or symbols presentnatural_image
Line drawing of a coffee maker with a mug and tray, no text or symbols presentNettoyage des buses
natural_image
Illustration of a hand cleaning a window with a cloth, labeled '22' (no text or symbols on the diagram itself)natural_image
Line drawing of a hand inserting a small component into a device (no text or symbols)natural_image
Line drawing of a hand inserting into a device into a container (no text or symbols)natural_image
Line drawing of a hand pressing down on a door panel, no text or symbols presentnatural_image
Line drawing of a hand using a tool to press or install a device inside a machine (no text or symbols visible)natural_image
Line drawing of a hand using a handheld device to clean or install a door panel (no text or symbols visible)natural_image
Technical diagram of a mechanical device with directional arrows indicating movement or force (no text or symbols present)natural_image
Technical diagram of a mechanical device with directional arrows indicating movement or force (no text or symbols present)
natural_image
Illustration of hands holding a mechanical device with directional arrows indicating movement (no text or symbols)Remarques
natural_image
Illustration of a hand using a tool to press or install a cylindrical component into a pot (no text or symbols present)natural_image
Diagram of a mechanical device with lever and handle, showing directional arrows indicating movement (no text or symbols)natural_image
Line drawing of a hand inserting a small component into a device (no text or symbols)text_image
Technical diagram showing a mechanical assembly with numbered components and labeled parts, including a screw and pin indicator X 4.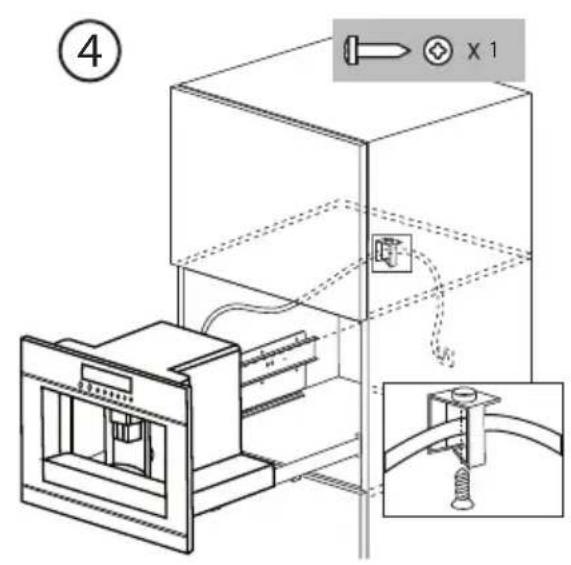
text_image
④ x 1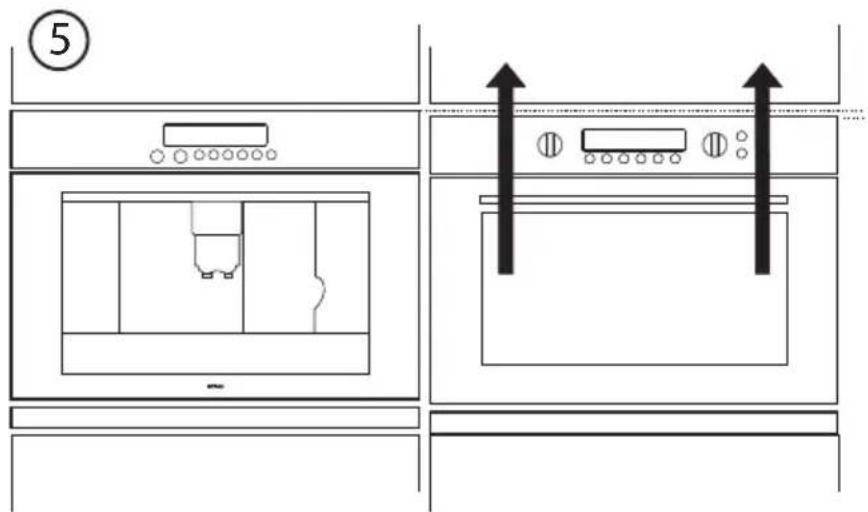
text_image
⑤natural_image
Symbol of a trash bin with crossed lines indicating no waste or restriction (no text present)text_image
Technical diagram of a microwave oven with labeled components and internal parts, including a control panel and component layout.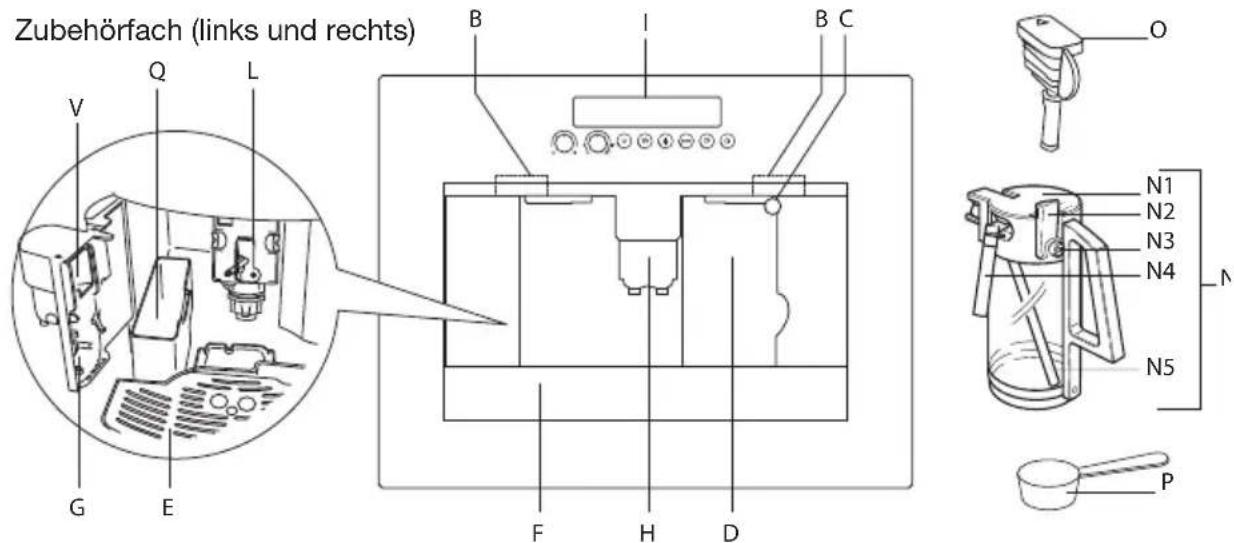
natural_image
Diagram of a mechanical device with two internal components and an arrow indicating direction (no text or symbols)natural_image
Illustration of a hand using a coffee maker to press a cup into a machine (no text or symbols visible)natural_image
Diagram of a refrigerator interior with a door handle and a hanging circular component (no text or symbols)
natural_image
Diagram of a circular dial with three concentric rings and directional arrows, no text or symbols present.natural_image
Simple line drawing of a coffee machine with a cup and side table (no text or symbols)natural_image
Simple line drawing of a 3D printer or printer with two cups, no text or symbols present.natural_image
Hand placing a component into a storage cabinet with a downward arrow (no text or symbols)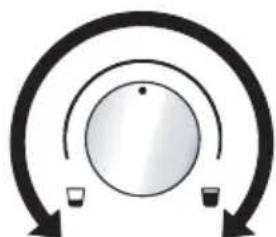
natural_image
Simple diagram of a circular dial with two small cups below, enclosed by curved arrows (no text or symbols)natural_image
Illustration of a printer with a hand inserting a device into the paper, showing a circular diagram and no text or symbols.

natural_image
Simple line drawing of a person inside a rectangular frame, no text or symbols present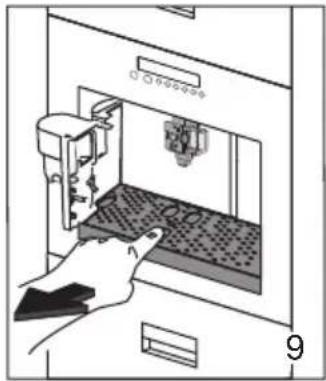
natural_image
Illustration of a hand inserting a device into a machine (no text or symbols visible)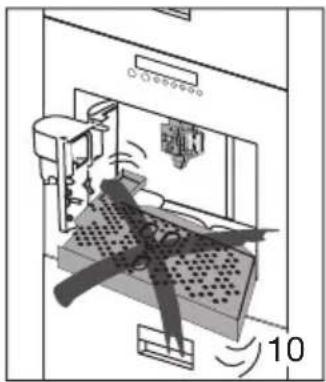
natural_image
Diagram of a mechanical device with rotating arms and labeled component '10' (no text or symbols beyond label)natural_image
Illustration of a printer with a hand inserting a spring into the cover, showing mechanical components (no text or symbols)Mahlgrad einstellen
text_image
Warning symbol and circular dial with arrows indicating clockwise rotation around a central dialnatural_image
Pure diagram of concentric circular arrows with a central circle, no text or symbols presentnatural_image
Technical line drawing of a mechanical device with two clamps and a base plate (no text or symbols)natural_image
Illustration of a printer with a hand inserting a component into it, showing the process (no text or symbols present)natural_image
Illustration of a printer with a hand inserting a paper into the cover, showing mechanical components (no text or symbols)natural_image
Illustration of a hand pouring liquid into a coffee mug inside a machine (no text or symbols)natural_image
Illustration of a hand using a tool to press or inspect a cylindrical object into a pot (no text or symbols present)natural_image
Line drawing of a hand inserting a small component into a device (no text or symbols)natural_image
Line drawing of a kitchen appliance with a hand mixer and control panel (no text or symbols)natural_image
Diagram of a mechanical device with a lever and handle, showing a component inside a cabinet (no text or symbols)natural_image
Line drawing of a coffee maker machine with a mug and handle, no text or symbols present
natural_image
Diagram of a coffee maker with a mug and tray, no text or symbols presentDüsen reinigen
natural_image
Line drawing of a hand cleaning a window with a cloth, labeled '22' (no text or symbols on the diagram itself)natural_image
Line drawing of a hand inserting a small component into a device (no text or symbols)natural_image
Line drawing of a hand inserting into a device into a container (no text or symbols)natural_image
Line drawing of a hand pressing down on a door panel, with no visible text or symbolsnatural_image
Line drawing of a hand using a tool to press or install a device inside a machine (no text or symbols visible)natural_image
Line drawing of a hand holding a tool inside a kitchen appliance (no text or symbols)natural_image
Technical diagram of a mechanical device with directional arrows indicating movement or force (no text or symbols present)natural_image
Technical diagram of a mechanical device with directional arrows indicating movement or force (no text or symbols present)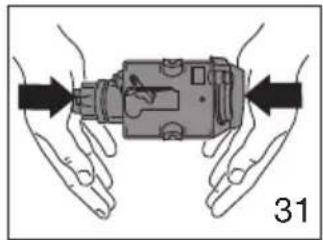
natural_image
Illustration of hands holding a mechanical device with directional arrows indicating movement (no text or symbols)Hinweise
natural_image
Illustration of a hand using a tool to press a cylindrical component into a pot (no text or symbols)natural_image
Diagram of a mechanical device with lever and handle, no visible text or symbolsnatural_image
Line drawing of a hand inserting a small component into a device (no text or symbols)text_image
Technical diagram of a mechanical device with numbered components and labeled parts, including screw, spring, and pin assembly.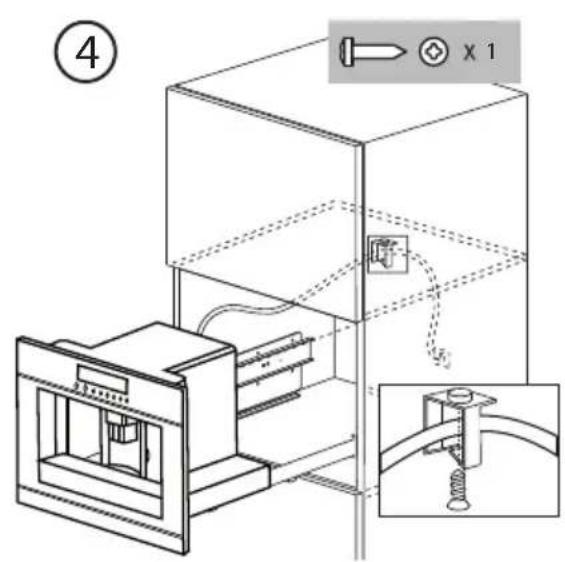
text_image
④ x 1
text_image
⑤natural_image
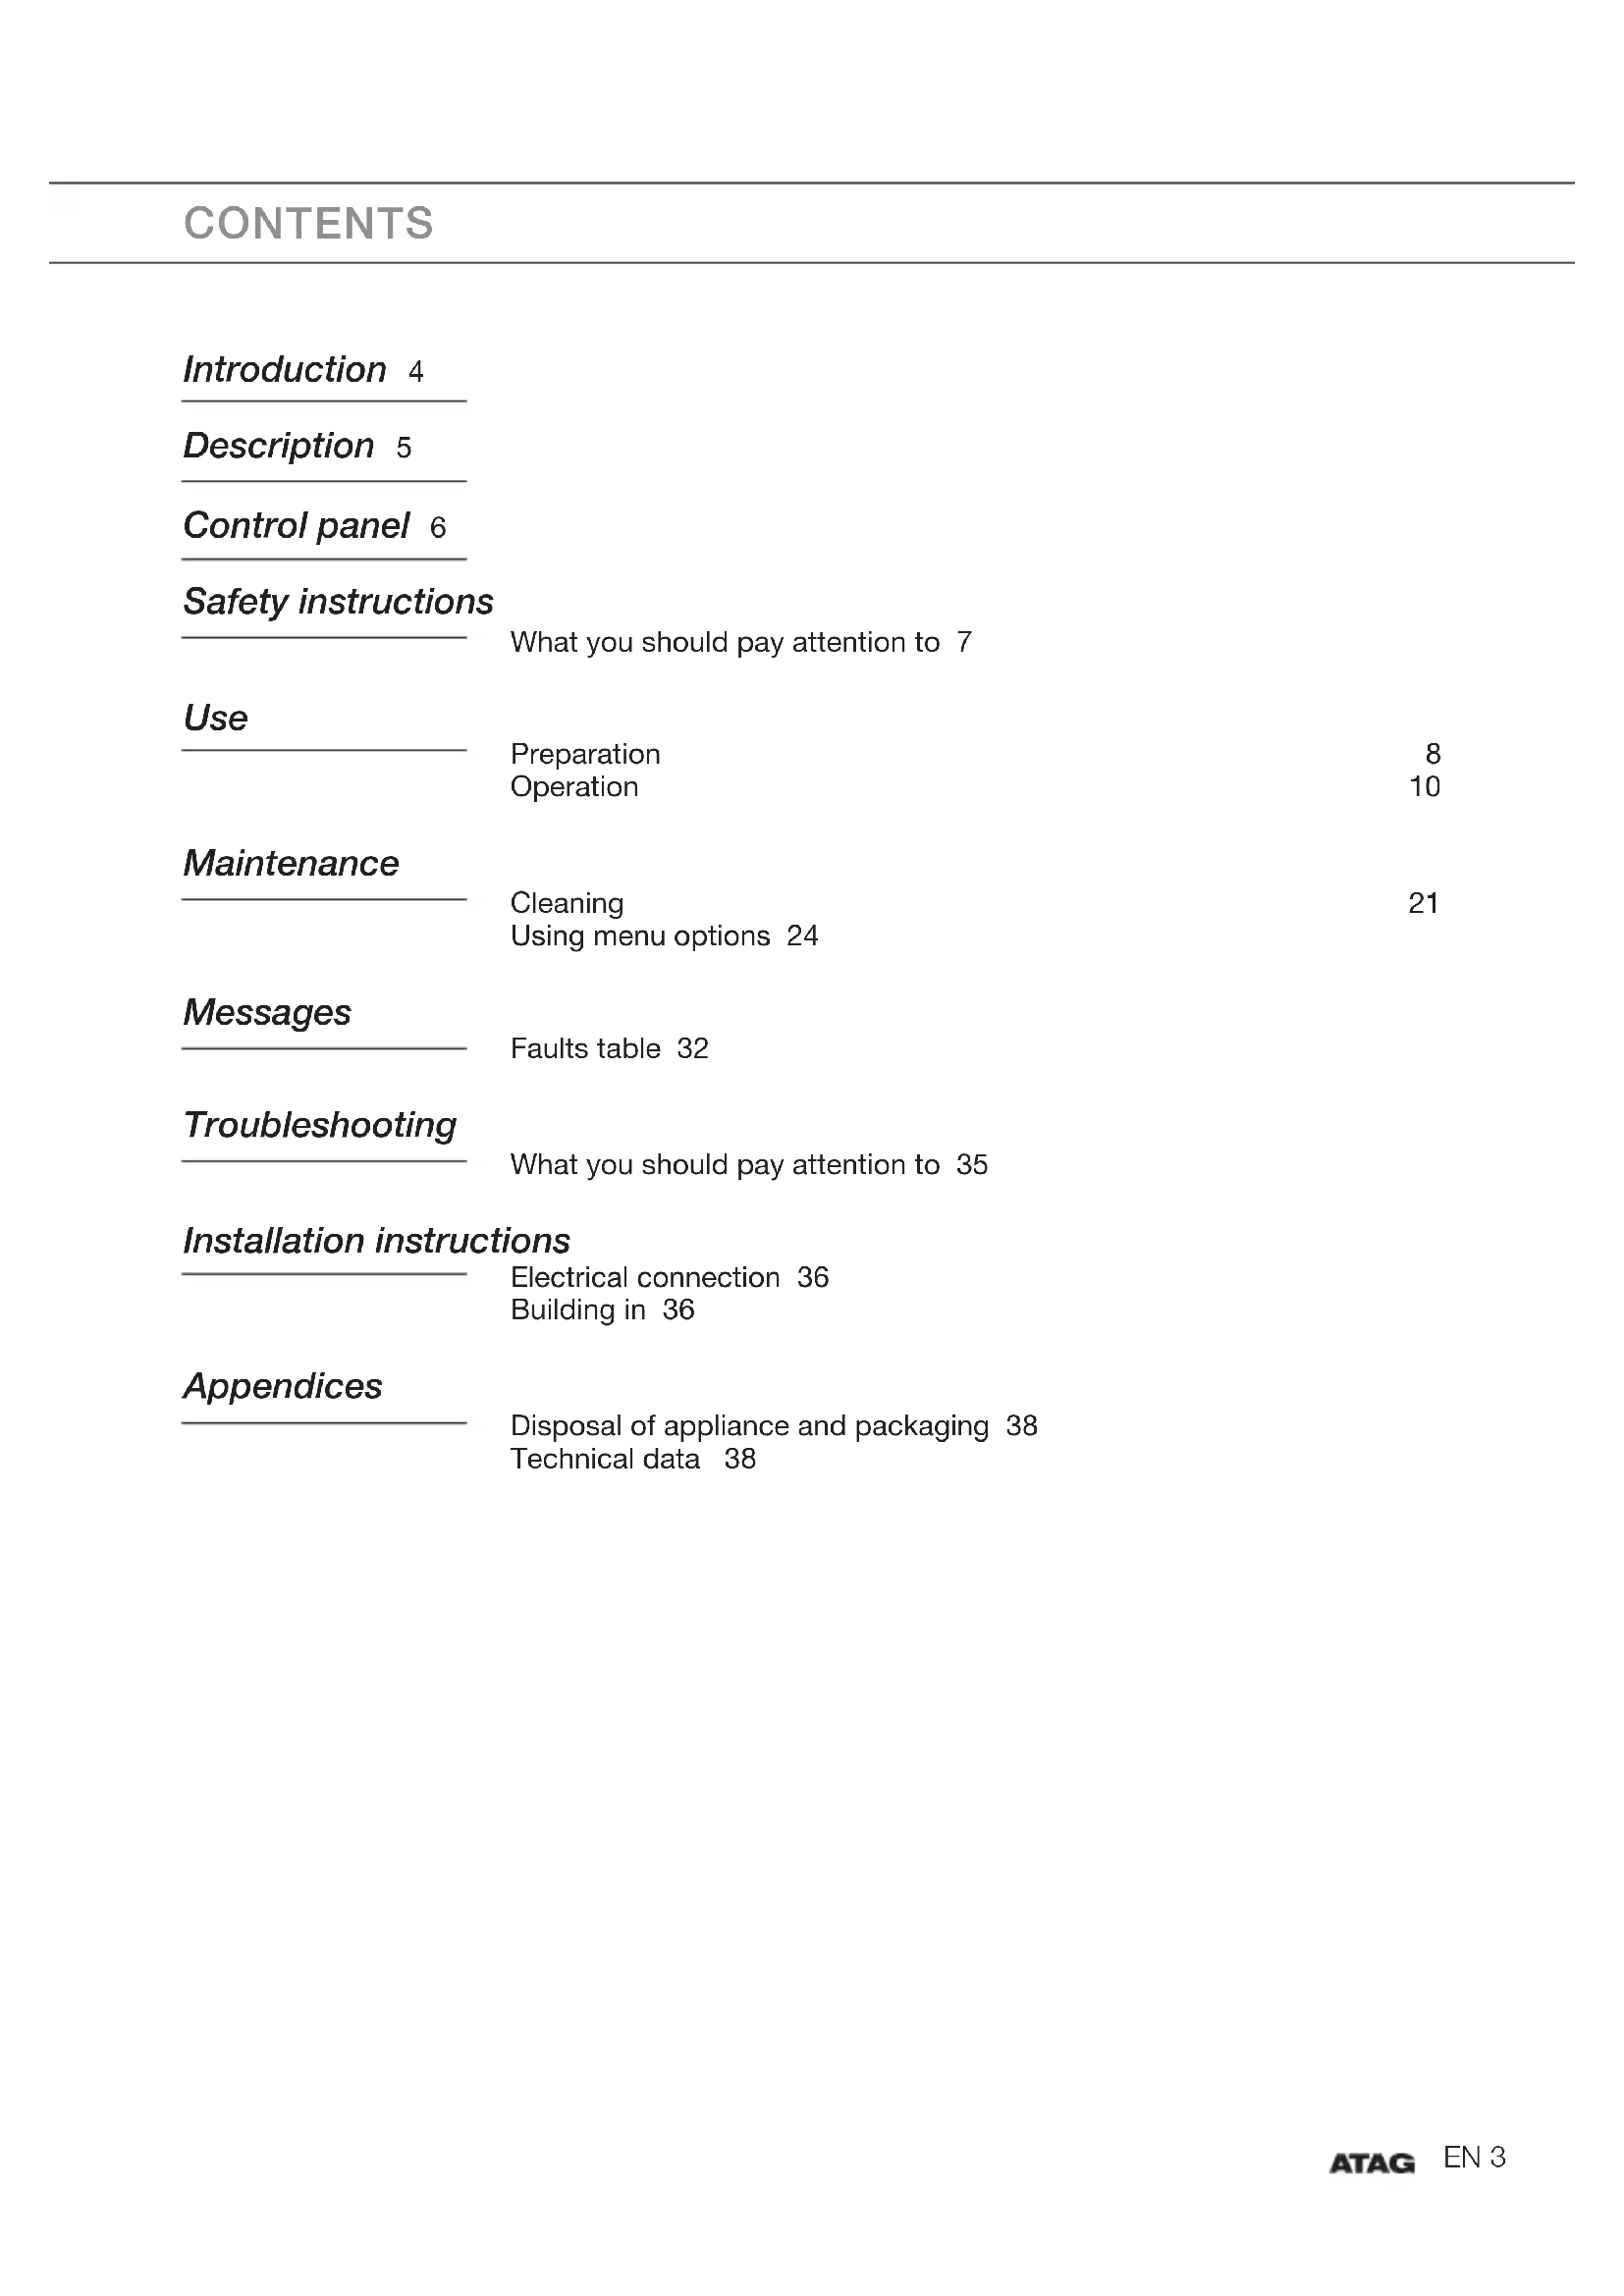
Symbol of a trash bin with crossed lines indicating no waste or restriction (no text present)What you should pay attention to 7
Use
Preparation 8
Operation 10
Maintenance
Cleaning 21
Using menu options 24
Messages
Faults table 32
Troubleshooting
What you should pay attention to 35
Installation instructions
Electrical connection 36
Building in 36
Appendices
Disposal of appliance and packaging 38
Technical data 38
This coffee machine will make delicious cups of coffee, espresso and cappuccino. You can customise the settings of the machine to suit your personal preferences and tastes.
Coffee has been used in the factory to test the appliance and it is therefore completely normal that there are traces of coffee in the mill. This appliance is however guaranteed to be new.

First read the user instructions carefully and completely before starting to use the appliance, and keep them carefully for future reference.
Pictograms used

Important information

Danger! Elektrical appliance

Danger of burns

Tip
The parts which could come into contact with coffee or milk conform to the provisions of the EEC directive 1935/2004 relating to materials suitable for contact with foodstuffs.
This appliance is marked according to the European directive 2004/108/EC on Waste Electrical and Electronic Equipment (WEEE).
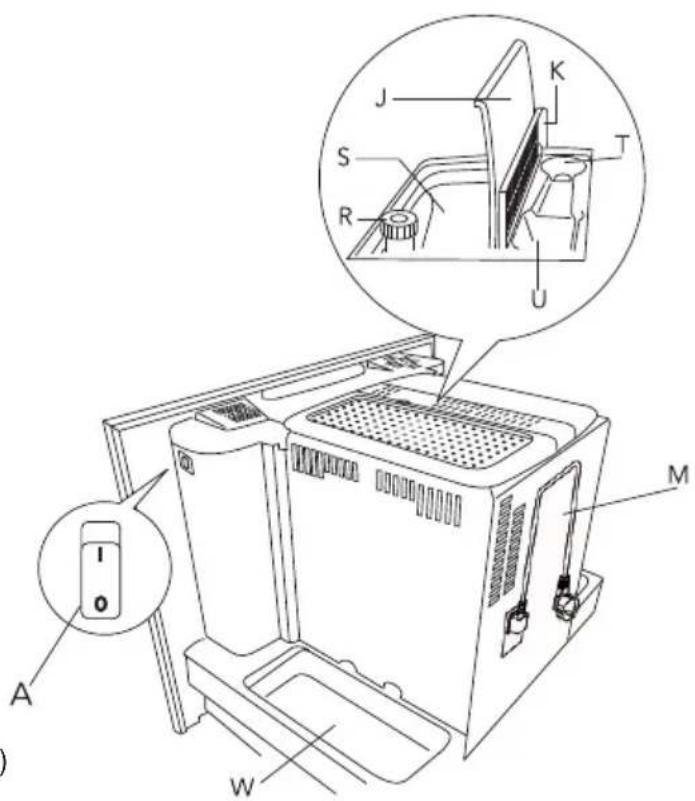
A. Main switch
B. Handles
C. Nozzle
D. Water tank (removable)
E. Cup tray
F. Drip tray grill (removable)
G. Service door
H. Height adjustable coffee dispenser
I. Control panel
J. Coffee bean holder cover
K. Ground coffee chute cover
L. Brewing unit
M. Power cable
N. Milk container:
N1. Cover (removable)
N2. Slider CAFFELATTE/CAPPUCCINO (removable)
N3. CLEAN button
N4. Milk dispenser pipe (removable)
N5. Suction pipe (removable)
O. Hot water nozzle (removable)
P. Measuring spoon for preground coffee
Q. Waste coffee container (can be taken out)
R. Button for setting the grind level
S. Coffee bean container
T. Place for the measuring spoon
U. Filling chute for preground coffee
V. Swing drawer
W. Place for accessories (left and right)
text_image
A I O W M R S J K T U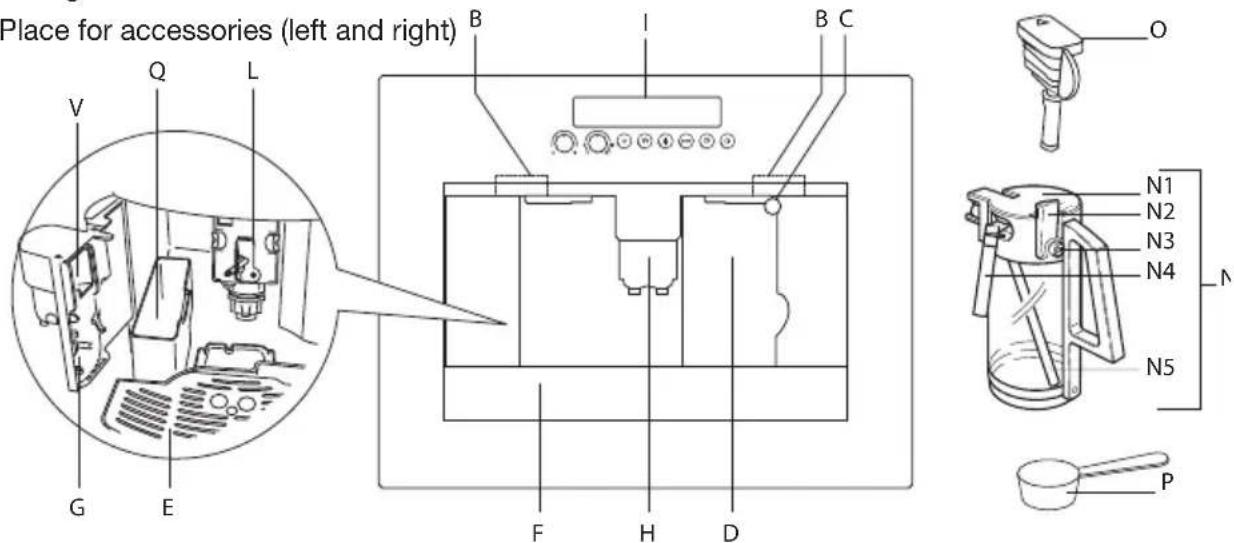
text_image
Place for accessories (left and right) V Q L B B C O N1 N2 N3 N4 N5 P G E F H D
text_image
1 2 3 4 5 MENU 6 7 OK ESC8
- Display
- Cup size knob
- Coffee strength / preground coffee knob
- 1 cup of coffee / scrolling (<) button
- 2 cups of coffee / scrolling (>) button
- Hot water / confi rm menu option (OK) button
- MENU / return without making changes (ESC) button
- Cappuccino button
- On/Off button
What you should pay attention to


- WARNING: The appliance and its accessible parts become hot during use. Care should be taken to avoid touching heating elements. Children less than 8 years of age shall be kept away unless continuously supervised.
- This appliance can be used by children aged from 8 years and above and persons with reduced physical, sensory or mental capabilities or lack of experience and knowledge if they have been given supervision or instruction concerning use of the appliance in a safe way and understand the hazards involved.
- This appliance is intended for domestic use only (around 3000 cups a year). Any other use is considered improper and in that case no guarantee will be given.
- This appliance is designed to “make espresso coffee” and “heat drinks”. Use it with care to avoid scalds from the water and steam jets or through incorrect use.
- Do not lean or hang on the machine when it has come out of the cabinet and do not place heavy or unstable objects on the machine.
- The manufacturer is not liable for damage caused by improper, incorrect or unreasonable use of the appliance.
- When using the appliance, do not touch the hot surfaces. Use the knobs or handles.
• Never let children play with the appliance. - In case of failures, make sure the appliance is not connected to the mains power supply. Turn the main power switch on the right side (behind the front panel) to 0. Refer to our service department for repairs.
- Only ask for original spare parts to be used. Failure to respect the above could reduce the safety of the appliance.
- Do not put objects containing liquids, infl ammable or corrosive materials on the machine.
- Use the accessories holder to contain coffee accessories (for example coffee beans).
- Never touch the appliance with damp hands.
Preparation

The first time you switch on the appliance and every time that it is plugged in, the appliance executes a SELF-DIAGNOSIS action. Then the appliance switches off.
To turn it on, press the on/off button on the control panel.

-
The first time you use the appliance, select the language. Press the main ON/OFF switch on the right side of the appliance (see "A" on page 5); the lights on the front side and the display go on. Wait for the appliance to display PRESS MENU FOR ENGLISH. Press the menu button for at least 3 seconds until the appliance displays ENGLISH. The appliance then displays the setting message in English.
-
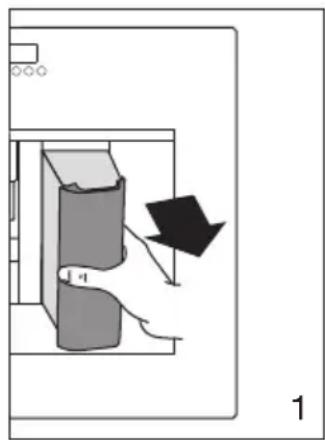
After a few seconds, the appliance displays FILL TANK! To fill it, remove the tank (fi g. 1), rinse and fi ll with fresh water. Never exceed the MAX line. Put the tank back and push it as far as it will go.
natural_image
Diagram of a mechanical device with a component and directional arrow, no visible text or symbols
natural_image
Two warning symbols: a triangular warning triangle with an exclamation mark and a light bulb with radiating lines (no text or labels)Only fi ll the water tank with cold water. Never use other liquids such as mineral water or milk.
To ensure good, aromatic coffee at all times, you should:
- change the water in the water tank every day;
- clean the water tank with normal water for rinsing (not in the dishwasher) at least once a week. Then rinse off with fresh water.
natural_image
Illustration of a hand inserting a small object into a coffee mug inside a container (no text or symbols)-
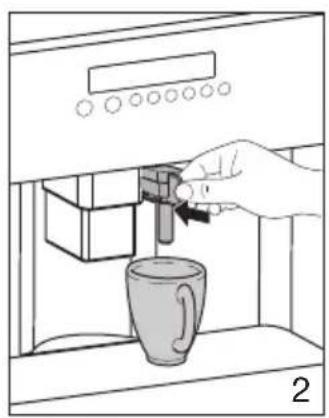
The display shows INSERT WATER SPOUT! Insert the hot water spout and place a cup underneath. (fi g. 2).
-
The display shows PRESS MENU. Press the MENU button. After a few seconds some water comes out of the hot water spout. When the cup is filled with about 30 ml of water, the progress bar is completed.
-
The display shows TURNING OFF... PLEASE WAIT... The appliance switches off.
-
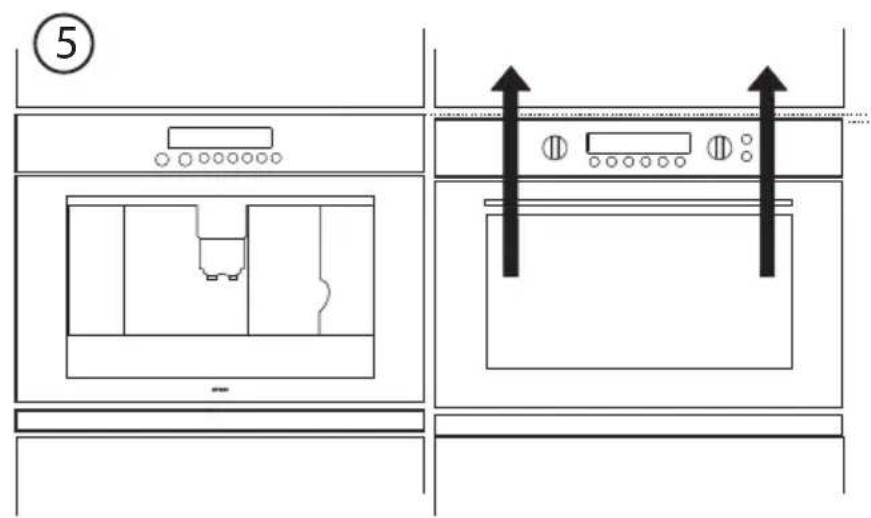
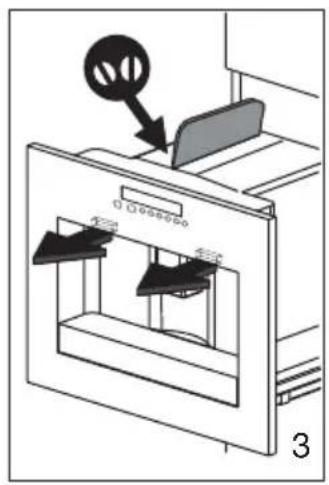
Extract the appliance by pulling it outwards with the special handles. Open the lid and fi ll the container with coffee beans (fi g. 3). Then close the lid and push the appliance inwards.
text_image
Diagram of a refrigerator with labeled parts and a magnifying glass indicating a device, showing internal compartments and a button.
To prevent malfunctions, never fi ll with ground coffee, frozen or caramelised coffee beans or anything else that could damage the appliance.

- Press the on/off button on the control panel. The display shows HEATING UP... PLEASE WAIT... The appliance is heating up. When the appliance has finished heating up it displays: RINSING. The appliance performs an automatic rinse cycle (a little hot water comes out of the coffee dispenser and is caught in the drip tray).

-
If you want to make a short coffee (less than 60 cc), to make it hotter, fi ll the cup with this hot rinsing water fi rst. You can also use the menu setting RINSING (see "Resetting the appliance to factory settings" on page 28).
-
The appliance displays the basic settings (cup size and coffee strength).

When you use the appliance for the first time, you will get satisfying results after 4-5 cups of coffee.
Operation
natural_image
Pure diagram of a circular component with arrows indicating direction, no text or symbols presentPreparing coffee (using coffeebeans)
The appliance is preset to make coffee with a normal taste. You can also choose coffee with an extra-mild, mild, strong or extra-strong taste. With the “coffee strength” knob you can choose the required taste.
natural_image
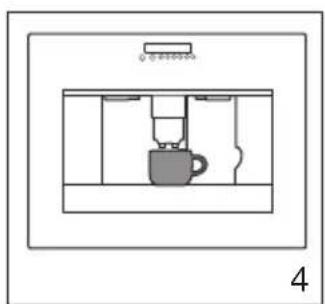
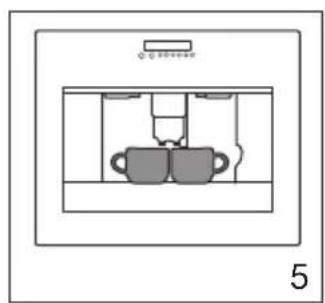
Simple line drawing of a coffee machine with a cup and tray, no text or symbols present- Put one or two cups under the coffee dispenser (fi g. 4 and 5).
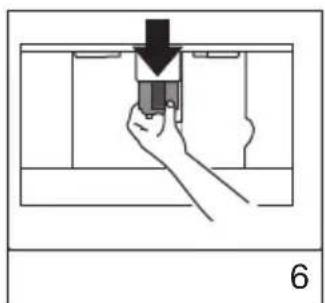
Move the dispenser up or down (fi g. 6) to adjust the height of the dispenser to the height of your cup.
natural_image
Simple line drawing of a 3D printer or printer with two cups placed inside a frame, no text or symbols present.- For a creamier coffee, lower the spouts to bring them as close to the cups as possible (fi g. 6).
natural_image
Hand inserting a component into a device (no text or symbols visible)
natural_image
Simple diagram showing a circular object with arrows pointing inward, flanked by two small objects below (no text or symbols)- Select the desired cup size with the "cup size" knob. The selected cup size is displayed. Then press the "1 cup of coffee" button or the "2 cup of coffee" button to make one or two cups of coffee.
To change the quantity of coffee automatically, follow the instructions in (see “Changing the quantity of coffee” on page 13).

The appliance now grinds the beans and starts dispensing the coffee into the cup. Once the desired quantity is reached, the appliance automatically stops dispensing coffee and ejects the grounds into the special container.
-
After a few seconds the appliance is ready for use again. The display shows the last selected coffee setting.
-
To turn the appliance off, press the on/off button ^① .
Before switching off, the appliance performs an automatic rinse cycle (a little hot water comes out of the coffee dispenser and is caught in the drip tray). Take care to avoid scalds.

The lights don't shut off immediately and the cooling span motor continues to operate as to avoid condensation into the housing. After about 10 minutes, the appliance switches off completely.

Notes
natural_image
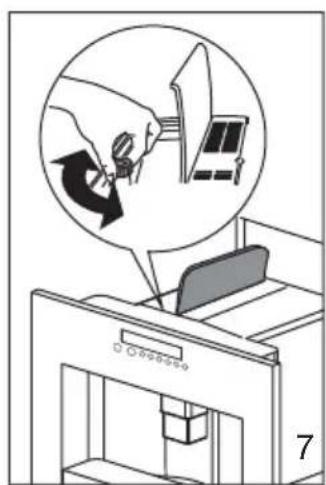
Illustration of a printer with a hand inserting a device into the paper, showing a circular arrow indicating rotation (no text or symbols present)- If the coffee only comes out in drips or not at all, the knob for setting the grind level (fi g. 7) must be turned by one position clockwise (see "Setting the grind level" on page 14). Turn one click at a time until the coffee is delivered satisfactorily.
- If the coffee comes out too fast and the cream does not meet your taste, turn the knob by one position anti-clockwise). Make sure that you do not turn the knob for setting the grind level too far, as coffee may come out in drips when dispensing 2 cups.
- Tips to make hotter coffee
- After 3 minutes since you last made coffee, you can preheat the brewing unit by using the menu setting RINSING (see Rinsing on page 28). Run off the water into the underlying drip tray or alternatively use this water to fi ll (and then empty) the cup to be used for the coffee.
- Do not use cups that are too thick, as they will absorb too much heat.
- You can stop the coffee from dispensing by pressing the "1 cup" button or "2 cups" button again, or by turning the "cup size" knob anti-clockwise towards "espresso cup".

- After the coffee has fi nished dispensing (the progress bar reaches 100%), you can increase the amount of coffee by pressing and holding the “1 cup” button until the desired amount of coffee is reached.
- When the display shows the message FILL TANK!, you must fill the tank, otherwise the appliance cannot make any coffee. It is normal that there is some water left in the water tank when the message is displayed.
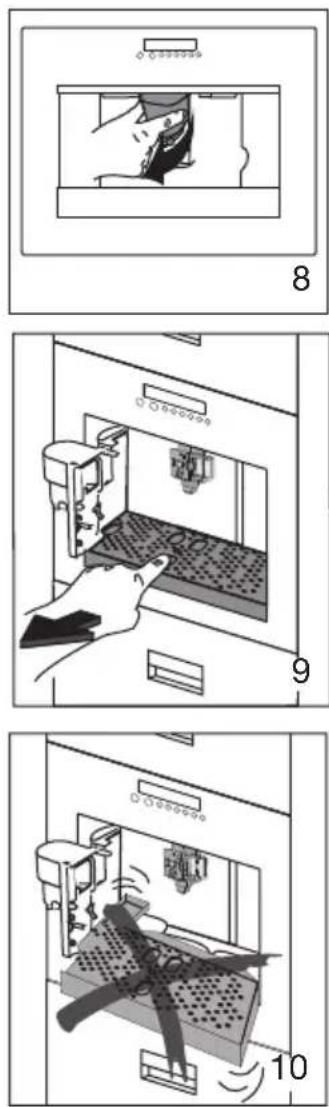
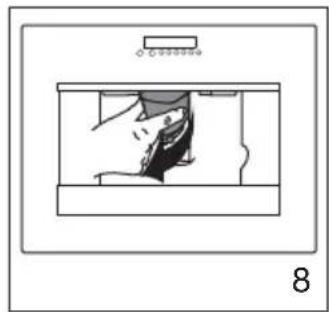
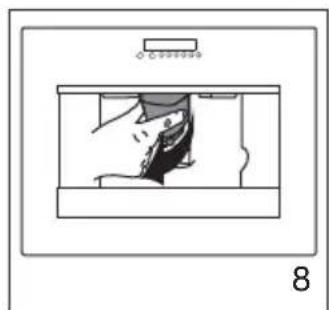
- The appliance counts the number of coffees made. Every 14 single coffees (or 7 doubles) the appliance displays EMPTY WASTE COFFEE CONTAINER. This means that the waste coffee container is full and must be emptied and cleaned. As long as the waste coffee container is not cleaned, this message remains in place and the coffee machine cannot make any coffee. To clean, open the service door at the front by pulling the coffee spout (fi g. 8), remove the drip tray (fi g. 9), empty it and clean it.
natural_image
Simple line drawing of a person inside a rectangular frame, no text or symbols present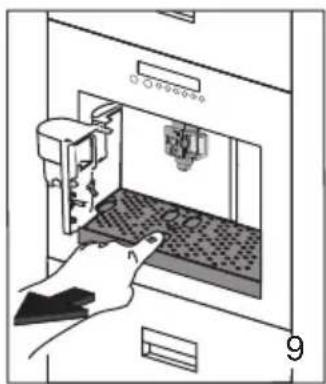
natural_image
Illustration of a hand inserting a device into a machine (no text or symbols visible)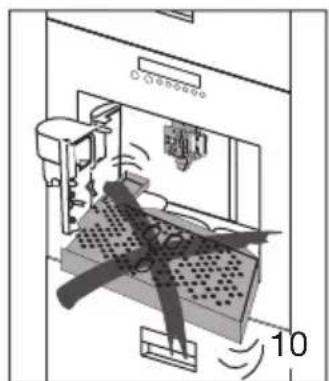
natural_image
Diagram of a mechanical device with rotating components and labeled parts (no readable text or symbols)Important!
Always completely extract the drip tray, to avoid that it falls when removing the grounds container (fi g. 10). Empty the grounds container and clean thoroughly, making sure all residues deposited on the bottom are removed.
Every time you pull the drip tray out, the waste coffee container must also be emptied, even if it is not completely full. If this process is not carried out, the waste coffee container may overfi ll when coffee is made and the machine may get blocked.

Never remove the water tank when the appliance is dispensing coffee. Otherwise, the appliance will not be able to make the coffee. If the appliance malfunctions, do not contact the service centre straight away, but first look at the instructions on pages 30 until 33. If this does not help, contact the customer service.
Changing the quantity of coffee
The appliance is factory preset to automatically deliver the following quantities of coffee:
- espresso cup;
- small cup;
- medium cup;
- large cup;
- mug.


To change these quantities, proceed as follows:
- Press the MENU button and press the scrolling buttons < or > until the menu option COFFEE PROGRAM appears. Confi rm the menu option with the OK button.
- Select the cup size you want to change with the scrolling buttons < or >. When the desired cup size is displayed, confirm it with the OK button.
- A bar appears on the display, which can be made bigger or smaller; this represents the cup fi lling quantity. A different quantity can be selected using the scrolling buttons < or > in 10 steps. A full bar indicates that the maximum cup fi lling quantity of 220 ml is selected.
- Select the desired cup filling quantity and confirm it with the OK button to program this setting. (If you don't press the OK button, the appliance automatically returns to the coffee mode after 120 seconds without saving.)

After programming the display automatically jumps back to the menu option for setting the filling quantity. To go back to the coffee mode immediately, press the MENU button twice or wait about 120 seconds until the appliance automatically returns to the coffee mode.
natural_image
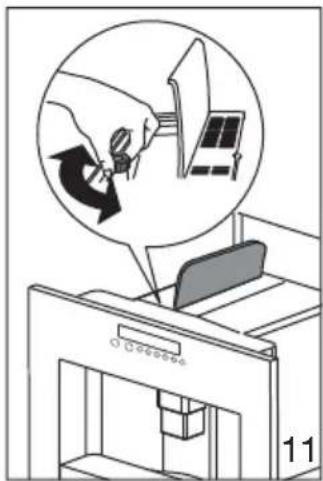
Illustration of a printer with a hand inserting a spring into a paper airplane, showing the process (no text or symbols)Setting the grind level
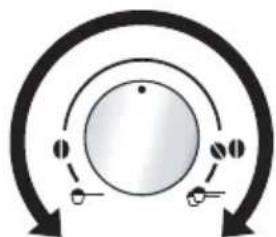
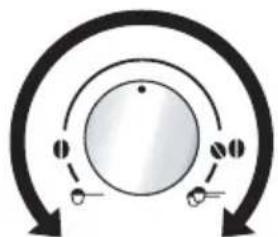
If coffee is dispensed too quickly or too slowly (in drips), you can change the grind level. (fi g. 11).

text_image
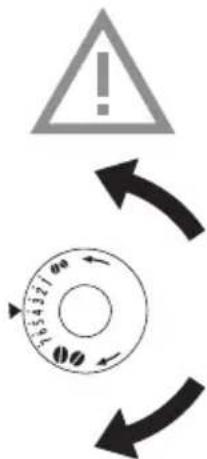
Warning symbol and rotary dial with arrows indicating clockwise rotation around a circular dialOnly change the grind level during the milling process. Otherwise, the coffee machine may be damaged.
- Turn anti-clockwise to obtain fi ner ground coffee, slower delivery and a creamier appearance.
- Turn clockwise for coarser ground coffee and faster delivery (not a drop at a time).
The adjustment will be evident after at least 2 cups of coffee are made.
natural_image
Pure diagram of a circular component with arrows indicating direction, no text or symbols presentPreparing espresso coffee using ground coffee
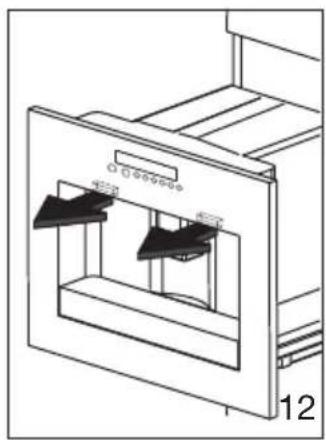
- Turn the “coffee strength/ preground coffee” knob completely to the left (for 1 cup) or completely to the right (for 2 cups). This disables the coffee grinding mill. The appliance shows ESPRESSO CUP PRE-GROUND 1 CUP/2 CUPS.
natural_image
Technical line drawing of a mechanical device with two clamps and a base plate (no text or symbols)- Extract the appliance by pulling the special handles (fi g. 12).
natural_image
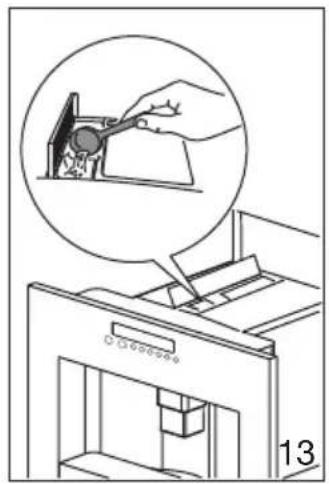
Line drawing of a printer with a hand inserting a tool into the cover (no text or symbols)- Lift the central lid and place one or two level measures of ground coffee in the funnel (see fi g. 13). Close the lid, push the appliance back and proceed as described in (see "Preparing coffee" on page 10).
text_image
X ✓
text_image
! MAX 2Notes
- Never add ground coffee when the appliance is off, to avoid it being dispersed inside the appliance.
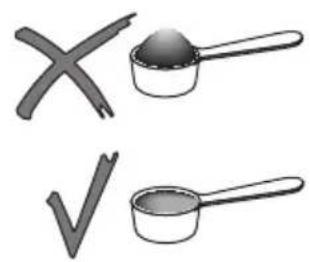
- Never put in more than 2 level measuring spoonfuls. Otherwise the appliance either makes no coffee, the ground coffee is spilled all over the appliance, or the coffee comes out in drips and the message GROUND TOO FINE ADJUST MILL + PRESS HOT WATER KEY is displayed.
- When dosing the quantity of coffee to be added, only use the measuring spoon supplied.
- Only use ground coffee for espresso coffee makers. Do not use coffee beans, freeze-dried coffee or other materials that could damage the appliance.
natural_image
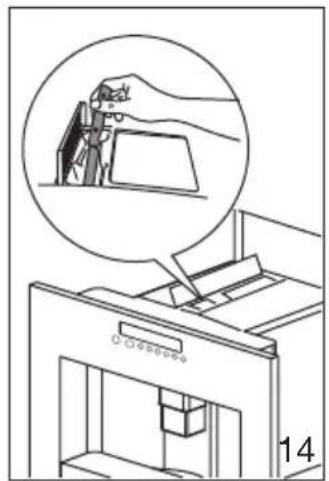
Illustration of a printer being inserted into a paper airplane, with a magnified inset showing the printer's handle (no text or symbols present)- If the fllling chute is blocked (due to damp in the appliance or because more than 2 measuring spoons have been inserted), use a knife or spoon handle to push the ground coffee down (fi g. 14). Next remove the brewing unit and clean it together with the coffee machine as described in (see “Cleaning the coffee machine” on page 21) and (see “Cleaning the brewing unit” on page 21).
- To return to the mode for coffee beans after making the coffee, turn the “coffee strength/preground coffee” knob to any coffee strength setting (this re-enables the coffee grinding mill).
Preparing hot water
Hot water can be used to warm up cups and to make hot drinks, such as tea or packet soups.

Warning! Escaping hot water can lead to scalds! Only activate the hot water nozzle when there is a receptacle underneath it.
natural_image
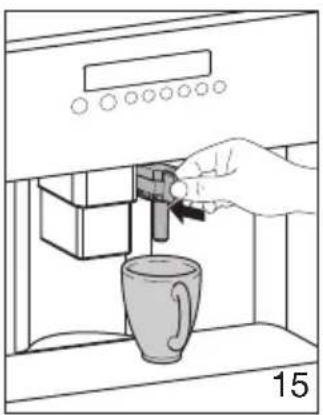
Line drawing of a hand pouring liquid into a coffee mug inside a washing machine (no text or symbols)- Put the hot water nozzle in place (fi g. 15).
- Place a container underneath the hot water nozzle (fi g. 15).
- Press the "hot water" button. Hot water is dispensed; the display shows HOT WATER. Once the programmed amount of hot water is dispensed, dispensing stops automatically.
For a few seconds the display shows PLEASE WAIT.... After that the appliance is ready to make coffee again and the last selected coffee setting appears on the display.
Making cappuccino or hot milk
Rinse the special milk container under the tap when you are about to use it for the first time.
- Unfasten the lid of the milk container with a slight clockwise turn and remove it.
- Fill the container with sufficient milk (preferably skimmed or semi-skimmed milk at fridge temperature (about 5 °C) should be used). Do not go over the MAX line engraved on the container handle (comes to about 1000 ml).
natural_image
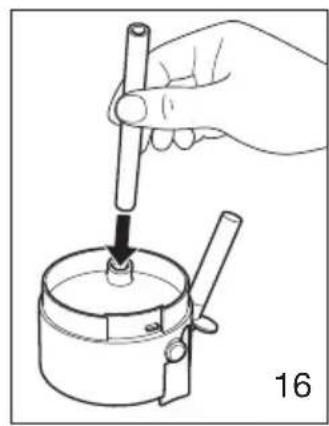
Illustration of a hand using a tool to press or inspect a cylindrical object into a pot (no text or symbols present)- Make sure that the suction pipe is correctly inserted (fi g. 16). Place the lid back on the milk container and fasten it with a slight turn anti-clockwise.
natural_image
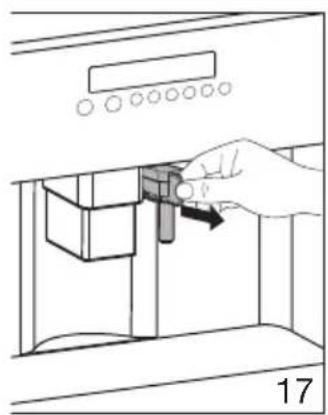
Line drawing of a hand inserting a component into a device inside a cabinet (no text or symbols)- Pull the hot water nozzle off (fi g. 17).
natural_image
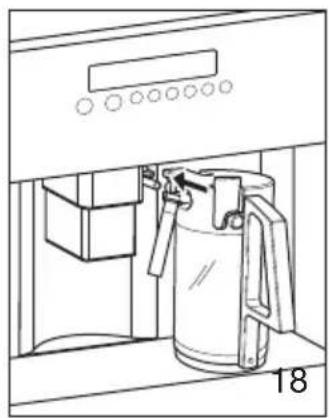
Line drawing of a kitchen appliance with a water dispenser and control panel (no text or symbols)- Bring the milk container up to the nozzle (fi g. 18).
natural_image
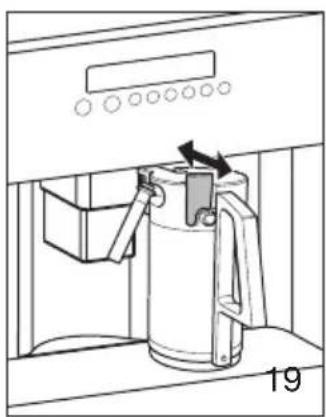
Diagram of a hand-operated kitchen machine with a handle and control panel, no text or symbols present- Use the slider on the lid to set the amount of froth on the milk to any level (fi g. 19):
• CAPPUCCINO: very frothy milk.
• CAFFELATTE: not so frothy milk.
- Once the milk container is put in place, the appliance suggests the next step on the display: PRESS KEY X1 FOR CAPPUCCINO, X2 FOR MILK ONLY.
natural_image
Line drawing of a kitchen appliance with a mug and fan, no text or symbols presentMaking cappuccino
- Follow the steps described in (see "Making cappuccino or hot milk" on page 16 and 17)!
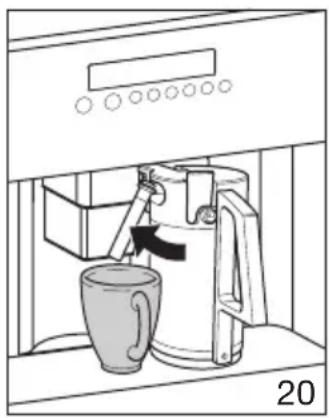
- Swing the milk dispenser pipe out and place a suffi ciently big cup underneath the coffee dispenser and the milk dispenser pipe (fi g. 20).
- Select the desired coffee strength for the cappuccino with the "coffee strength" knob (see "Preparing coffee" on page 10). The cup size on the top line (e.g. ESPRESSO CUP) has no meaning here, as the amount of coffee made is fixed in the CAPPUCCINO PROGRAM menu.

- Press the “cappuccino” button once. Hot and frothy milk, then coffee, are dispensed into the cup. The top line of the display shows CAPPUCCINO and the bottom line shows a progress bar and percentage.

The amount of milk and coffee is preset to normal quantities. You can change and save these to suit your taste, see “Setting the cappuccino program” on page 20. The display shows the last selected coffee setting.
Frothing/heating up milk
- Follow the steps described in see “Making cappuccino or hot milk” on page 16 and 17!
- Swing the milk dispenser pipe out and place a suffi ciently big cup underneath the coffee dispenser and the milk dispenser pipe (fi g. 20).
- Press the “cappuccino” button twice (within 2 seconds of each other). Hot and frothy milk is dispensed into the cup. The top line of the display shows MILK FROTHING and the bottom line shows a progress bar and percentage.


The amount of milk is preset to normal quantities. You can change and save these to suit your taste, see “Setting the cappuccino program” on page 20. The display shows the last selected coffee setting.
natural_image
Line drawing of a coffee maker with a mug and tray, no text or symbols presentCleaning the nozzles
Clean the nozzles on the milk container every time after heating milk or making cappuccino. Otherwise, remains of milk may set hard.
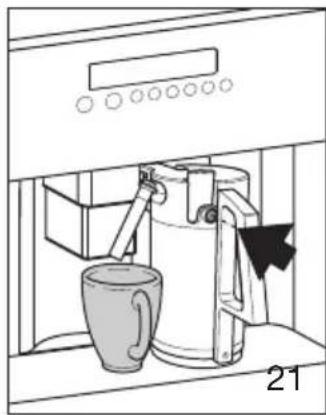
- Place a container under the milk dispenser pipe and press on the CLEAN button on the milk container for at least 5 seconds (fi g. 21). The display shows CLEANING!

Warning! Risk of scalding from steam and hot water escaping from the milk dispenser pipe.
natural_image
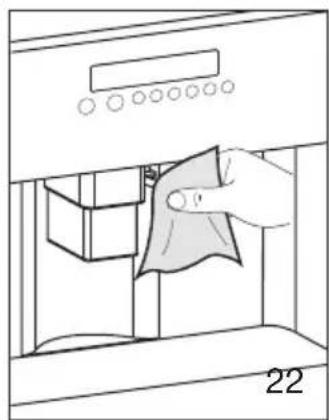
Line drawing of a hand cleaning a kitchen appliance with a cloth (no text or symbols)- Remove the milk container and clean the nozzles on the appliance with a damp cloth (fi g. 22).
natural_image
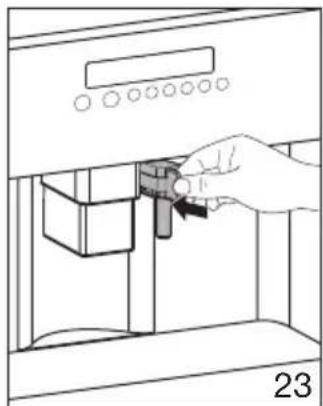
Line drawing of a hand inserting a small component into a device (no text or symbols)- Put the hot water nozzle back in (fi g. 23).

After you finished cleaning, remove the milk container and place it in the fridge, as the milk should not stay out of the fridge for longer than 15 minutes. See “Cleaning the nozzles and the milk container” on page 23 for information on cleaning the milk container.
text_image
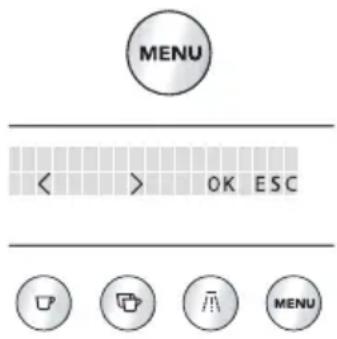
MENU < > OK ESCSetting the cappuccino program
The quantities of milk and coffee required to make a cappuccino are preset to normal levels at the factory. You can adjust and change these to suit your taste.
- Press the MENU button and press the scrolling buttons < or > until the menu option CAPPUCCINO PROGRAM appears. Confirm the menu option with the OK button.
- The display shows MILK VOLUME. If you want to change and save the milk quantity used to make a cappuccino, confi rm the menu option with the OK button.
- A bar appears on the display, representing the milk quantity used to make a cappuccino. You can select a different filling quantity using the scrolling buttons < or > in 10 steps. A full bar indicates that the maximum milk quantity for the cappuccino program of 120-180 ml (depending on the set amount of froth) is selected.
- When the desired filling quantity is displayed, confirm it with the OK button. (Otherwise, the appliance automatically returns to the coffee mode after 120 seconds without saving the entries). The display automatically returns to the menu option MILK VOLUME after programming.
- If you want to change and save the coffee quantity used to make a cappuccino, press the scrolling buttons < or > until the menu option COFFEE FOR CAPPUCC. appears. Confi rm the menu option with the OK button.
- A bar appears on the display, representing the coffee quantity used to make a cappuccino. You can select a different fi lling quantity using the scrolling buttons < or > in 10 steps. A full bar indicates that the maximum coffee quantity for the cappuccino program of 220 ml is selected.
- When the desired filling quantity is displayed, confirm it with the OK button. (Otherwise, the appliance automatically returns to the coffee mode after 120 seconds without saving the entries). The display automatically returns to the menu option COFFEE FOR CAPPUCC. after programming.

To return to the coffee mode, press the MENU button twice, or wait about 120 seconds until the appliance automatically returns to coffee mode.
Cleaning

Before performing any cleaning operations, turn the appliance off by pressing the on/off button and let the appliance cool down.
Never immerse the espresso maker in water. It is an electrical appliance. Do not use solvents or abrasive cleaning products to clean the appliance. A soft damp cloth will suffi ce. Never wash any of the components of the appliance in a dishwasher.
natural_image
Line drawing of a hand inserting into a device into a container (no text or symbols)Cleaning the coffee machine
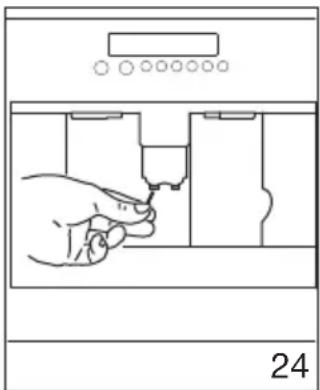
Clean the waste coffee container (as described on page 12) whenever it requires emptying. The water tank should also be cleaned regularly. The drip tray is fitted with a level indicator (red) showing the level of water it contains. When the indicator starts to become visible (a few millimetres under the drip tray), the drip tray must be emptied and cleaned. Check that the holes in the coffee spout are not blocked. To unblock them, scrape the dry coffee residues away with a needle (fi g. 24).

Cleaning the brewing unit
The brewing unit must be cleaned regularly to avoid the build-up of coffee encrustations which could cause malfunction. Proceed as follows:
- Turn the appliance off by pressing the on/off button on the (do not switch off the main switch or unplug) and wait for the display to go off.
- Open the service door (see fi g. 8 on page 12).
- Remove the drip tray and the waste coffee container (see fig. 9 on page 12) and clean.
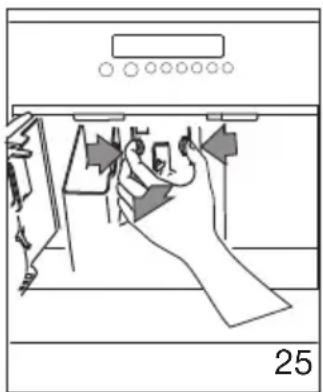
- Press the two red release buttons on the brewing unit sideways and towards the centre (fi g. 25) and pull the unit out.
natural_image
Line drawing of a hand pressing down on a door panel, with no visible text or symbolsThe brewing unit can only be taken out when the appliance is switched off (by pressing the on/off button on the control panel). Otherwise, the coffee machine may be seriously damaged.
Clean the brewing unit under running tap water without using detergent. Never clean the brewing unit in the dishwasher.
natural_image
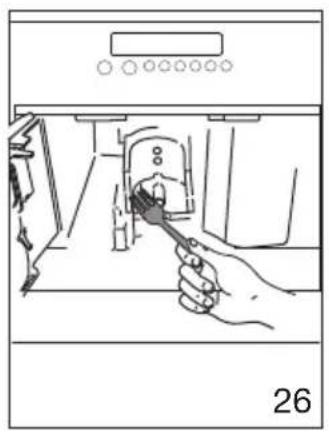
Line drawing of a hand using a tool to clean or install a device inside a kitchen appliance (no text or symbols)- Carefully clean the inside of the machine. Scrape off the encrusted coffee in the coffee machine using a wooden or plastic fork or something similar that will not scratch the fi nish (fi g. 26).
natural_image
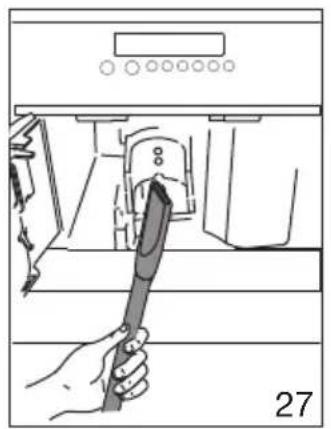
Line drawing of a hand holding a tool inside a kitchen appliance (no text or symbols)- Remove all the remains with a vacuum cleaner (fi g. 27).
text_image
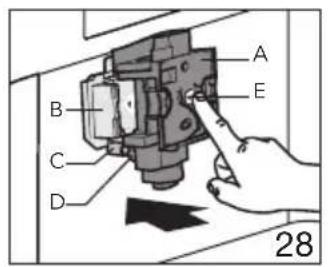
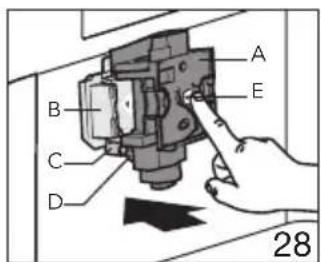
A B C D E 28- Replace the brewing unit (A) by pushing it into the holder (B) and the pin (C). The pin must be introduced into the tube (D) at the bottom of the brewing unit. Now push firmly where it says PUSH (E) until the brewing unit is heard fastening into place (fi g. 28).
natural_image
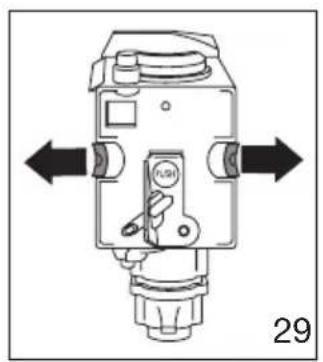
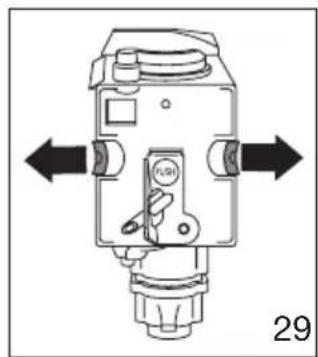
Technical diagram of a mechanical device with directional arrows indicating movement or force (no text or symbols present)- Once you have heard the unit clicking into position, make sure that the red buttons have snapped back out, otherwise the service door cannot be closed.
• The two red buttons are correctly snapped out (fig. 29).
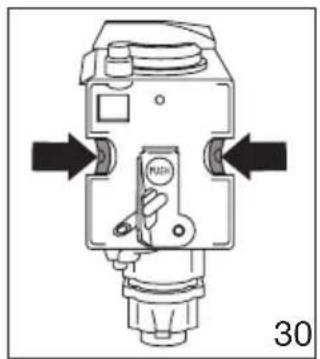
• The two red buttons are not snapped out (fig. 30).
natural_image
Technical diagram of a mechanical device with directional arrows indicating movement or force (no text or symbols present)
natural_image
Illustration of hands holding a mechanical device with directional arrows indicating movement (no text or symbols)Notes
- If the brewing unit is not put in place correctly, the service door cannot be closed.
- If it is diffi cult to insert the brewing unit, it must be made into the right height (before inserting) by pressing the brewing unit fi rmly together from top and bottom (fi g. 31).
• If it is still diffi cult to insert the brewing unit: - Leave it out of the appliance, place the drip tray, close the service door, switch the main switch on the back of the appliance to 0 and then to I again.
- Wait for all the lights to go off, then open the door, remove the drip tray and replace the brewing unit.
- Replace the drip tray, together with the grounds container.
- Close the service door.
Cleaning the nozzles and the milk container
natural_image
Illustration of a hand using a tool to press a cylindrical component into a pot (no text or symbols)Clean the nozzles on the milk container every time after you heat milk or make cappuccino (see "Cleaning the nozzles" on page 19). The milk container must be cleaned regularly.
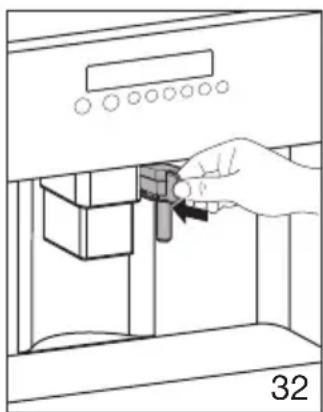
- Unfasten the lid of the milk container with a slight turn clockwise and remove it.
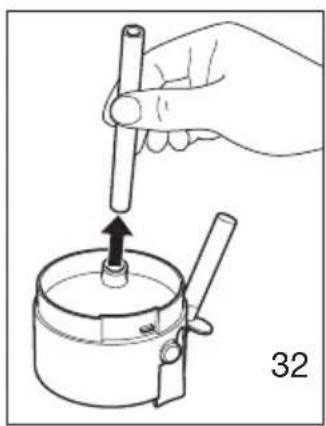
- Pull off the suction pipe (fi g. 32).
natural_image
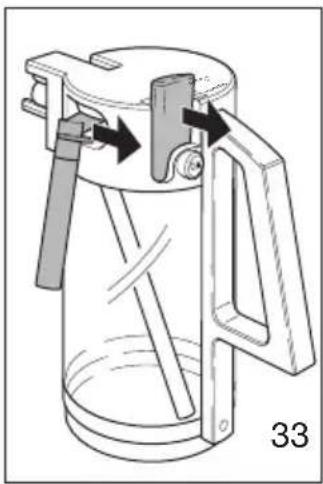
Technical line drawing of a mechanical device with lever and handle (no text or symbols)- Pull off the milk dispenser pipe and the slider on the lid (fig. 33).
- Carefully clean all the parts with hot water and detergent.
Do not clean the parts of the milk container in the dishwasher!
Another way of easily cleaning the milk jug:
Fill the milk jug with water and place it in the device. Press the 'Automatic Cappuccino' button twice. Repeat three times.
Using menu options
The menu options are used to change and save the appliance's factory settings, start programs and look up information.
They are:
- Language (see "Setting the language" on page 24)
• Water hardness (see "Water hardness" on page 24) - Temperature (see "Setting the coffee temperature" on page 25)
- Auto shut off time (see "Setting the switch-off time" on page 26)
- Coffee program (see “Changing the quantity of coffee” on page 13)
- Cappuccino program (see “Setting the cappuccino program” on page 20)
- Hot water (see "Preparing hot water" on page 16)
- Descale (see “Carrying out the descaling program” on page 26)
- Rinsing (see "Rinsing" on page 28)
• Statistics (see "Statistics" on page 28) - Reset to default (see “Resetting the appliance to factory settings” on page 28)

If you don't press OK after you change a setting, the appliance automatically returns to the coffee mode after 120 seconds without saving the entries.

To go back to the coffee mode, press the MENU button twice.
Setting the language
You can choose between several languages. A different language can be selected as follows:
- Press the MENU button and press the scrolling buttons < or > until the menu option CHOOSE LANGUAGE appears. Confi rm the menu option with the OK button.
- The language set appears on the display. Press the scrolling buttons < or > until the desired language appears. When the desired language is displayed, confi rm with the OK button.


Water hardness
A PLEASE DESCALE! message is displayed after the appliance has been operated for a factory set period of time, calculated on the basis of the maximum quantity of lime scale which may be contained in the water used. If necessary, this period of operation can be extended,
making descaling less frequent, by programming the appliance based on the actual lime content in the water used. Proceed as follows:
- Remove the "Total Hardness Test" strip (in front of your manual). Dip it fully in the water for a few seconds. Remove it and wait 30 seconds until its colour changes and a number of red dots are formed. For example, if there are 3 red dots on the test strip, you must set the water hardness level to 3.

If you no longer have a water hardness test, you can find the data in the table below.
- Press the MENU button and press the scrolling buttons < or > until the menu option WATER HARDNESS appears. Confi rm the menu option with the OK button.
- The display shows the current setting. Press the scrolling buttons < or > until the established hardness level is displayed. Confirm the selection with the OK button. The appliance is now programmed to provide the descaling warning when necessary, based on the actual hardness of the water.

Information on the hardness of the water in your area can be obtained from the local water board. The table below shows the water hardness setting your machine requires.
| German hardness | French hardness Water hardness machine |
| 0 - 6 dH 0 - 11 fH 1 | |
| 7 - 13 dH 12 - 17 fH 2 | |
| 14 - 20 dH 18 - 36 fH 3 | |
| >21 dH >37 fH 4 |
Setting the coffee temperature
You can choose between three temperature levels. The coffee temperature levels are defined as follows:
• TEMPERATURE LOW
• TEMPERATURE MEDIUM
• TEMPERATURE HIGH
The factory setting is TEMPERATURE HIGH. You can change this as follows:
- Press the MENU button and press the scrolling buttons < or > until the menu option TEMPERATURE appears. Confi rm the menu option with the OK button.
- The display shows the current setting. Select another temperature with the scrolling buttons < or >. When the desired temperature is displayed, confirm it with the OK button.
Setting the switch-off time
If the appliance is not used for a while, it switches itself off automatically for safety and energy saving reasons. You can choose between 3 switch-off times:
• AUTO SHUTOFF TIME 1 H
• AUTO SHUTOFF TIME 2 H
• AUTO SHUTOFF TIME 3 H
You can change this as follows:
- Press the MENU button and press the scrolling buttons < or > until the menu option AUTO SHUTOFF TIME appears. Confirm the menu option with the OK button.
- Select another switch-off time with the scrolling buttons < or >. When the desired switch-off time is displayed, confirm it with the OK button.
Carrying out the descaling program
When the display shows PLEASE DESCALE!, the appliance must be descaled.
- Insert the hot water nozzle (fi g. 32).
- Press the MENU button and press the scrolling buttons < or > until the menu option DESCALE appears. Confirm the menu option with the OK button.
-
The display shows DESCALE NO. Press the scrolling button <, and the display shows DESCALE YES. Confirm with the OK button. The descaling program starts.
The top line of the display alternates between ADD DESCALER and PRESS MENU KEY. -
Empty the water tank and pour in the contents of the bottle of descaler supplied with the machine and fi ll with fresh water up to the MAX level. For subsequent descaling operations, descaling solution can be purchased from authorised technical service centres.
natural_image
Line drawing of a hand inserting a small component into a storage cabinet (no text or symbols)
Make sure that any splashes from the descaling product do not come into contact with surfaces that are sensitive to acids, such as marble, limestone and ceramic.
- Put a container with a capacity of at least 1.5 litres underneath the hot water nozzle (see fig. 2 on page 9).
- Press the MENU button. The display shows DESCALING. The descaling liquid runs out of the hot water nozzle.
The descaling program automatically goes through a serie of rinses and pauses to remove limescale deposits from the inside of the coffee machine.
After about 30 minutes the water tank is empty and the top line of the display alternates between DESCALE COMPLETE and PRESS MENU KEY.
- Press the MENU button. The display shows RINSING, FILL TANK. The appliance is now ready for a rinsing process with clean water.
- Empty the container under the hot water nozzle and put it back under the hot water nozzle.
- Take out the water tank and fill it with clean water.
- Put the water tank back in place. The display shows: RINSING, PRESS MENU KEY.
- Press the MENU button. A rinsing process takes place with clean water and the rinsing water runs out of the hot water nozzle. After a few minutes the water tank is empty and the display shows RINSING COMPLETE, PRESS MENU KEY.
- Press the MENU button. The display shows FILL TANK!
- Take out the water tank, fill it with clean water and put it back in place.
The appliance is now ready for use again and is back to the last coffee mode selected.
If the descaling cycle is interrupted before completion, the appliance continues to display the descale message and the program must be started again from the beginning.

Failure to descale the appliance invalidates the guarantee.
Rinsing
If 2/3 minutes have passed, since you last made coffee, you should first rinse the system to preheat the brewing unit. Select the rinsing function from the appropriate menu. Let the water run into the drip tray underneath. You can also use this water to warm up the cup that you are using for the coffee. In this case simply let the hot water run into the cup (and then empty it).
- Press the MENU button and press the scrolling buttons < or > until the menu option RINSING appears. Confi rm the menu option with the OK button.
- The appliance performs an automatic rinse cycle (a little hot water runs out of the spouts and is collected in the drip tray beneath).
Statistics
You can look up the following information values:
- total number of coffees made with the appliance up to that point;
• number of descaling procedures carried out;
• number of cappuccinos made.
2 cups of coffee dispensed at the same time are counted as 2 cups.
Proceed as follows to look up the values:
- Press the MENU button and press the scrolling buttons < or > until the menu option STATISTICS appears. Confirm the menu option with the OK button.
- The number of cups dispensed so far appears on the display, e.g. TOT. COFFEES 135.
- Repeatedly press the scrolling button > to show the number of descaling procedures carried out, e.g. TOT. DESCALES 5 and the number of cappuccino's, e.g. TOT. CAPPUCCINO 135.
Resetting the appliance to factory settings
This function resets previously changed values to the factory settings.
The following settings or saved data are affected:
- water hardness;
- cup filling quantities;
- coffee temperature;
- switch-off time.

The factory default values can be reset as follows:
-
Press the MENU button and press the scrolling buttons < or > until the menu option RESET TO DEFAULT appears. Confirm the menu option with the OK button.
-
The display shows RESET TO DEFAULT NO.
-
Press the scrolling button < until RESET TO DEFAULT YES appears on the display. Confirm the menu option with the OK button.
| MESSAGE MEANING WHAT TO DO | ||
| FILL TANK! The water tank is empty or not properly in place.The water tank is dirty or limescale deposits have built up inside it. | Fill the water tank and insert it according to instructions, page 8 (fi g. 1).Rinse out or descale the water tank. | |
| GROUND TOO FINE ADJUST MILL + PRESS HOT WATER KEY | Coffee comes out too slowly.The coffee machine cannot make any coffee. | Turn the knob for the grind level setting clockwise by one position (see “Setting the grind level” on page 14).Place a container underneath the hot water nozzle and press the “hot water” button . |
| EMPTY WASTE COFFEE CONTAINER | The waste coffee container is full. | Empty, clean and replace the waste coffee container as described on page 12. |
| INSERT WASTE COFFEE CONTAINER | The waste coffee container was not replaced after cleaning. | Open the service door and insert the waste coffee container. |
| ADD PRE-GROUND COFFEE | No ground coffee was put into the filling chute after selecting the preground coffee function. | Add ground coffee as described in (see “Preparing espresso coffee using ground coffee” on page 14 and 15). |
| FILL BEAN CONTAINER There | are no more coffee beans in the coffee bean container.If the mill mechanism starts sounding very loud, this can mean that a small stone from the coffee beans has blocked the mill mechanism. | Fill the coffee bean container,.Consult customer services. |
| PLEASE DESCALE! Shows that | the coffee machine is encrusted with limescale. | The descaling program must be carried out as soon as possible (see “Carrying out the descaling program” on page 26 and 27). |
| CLOSE DOOR The service door | is open. Close the service door. | If the service door cannot be closed, make sure that the brewing unit is correctly inserted (see “Cleaning the brewing unit” on page 21, 22 and 23). |
| INSERT BREWING UNIT! Some | one probably forgot to put the brewing unit back in the coffee machine after cleaning it. | Insert the brewing unit, (see “Cleaning the brewing unit” on page 21, 22 and 23). |
| GENERAL ALARM! The inside of | of the machine is very dirty. | Carefully clean the inside of the machine (see “Cleaning the coffee machine” on page 21). If the coffee machine still shows this message once it has been cleaned, please consult customer services. |
Faults table
If the appliance does not work properly, this does not always mean that it is defective. If the coffee machine does not work and a message is displayed, refer to the problem solving information of chapter 7. If no message is displayed, try to find a solution first by checking the points mentioned in the table below, or contact the service department. (See the guarantee certifi cate for details.)
| FAULT CAUSE SOLUTION | ||
| Coffee is not hot. The cups were not preheated.The brewing unit is too cold. | Preheat the cups by rinsing them out with warm water (see “Tips to make hotter coffee” on page 11 and 12).Warm up the brewing unit with the rinsing program before making coffee (see “Rinsing” on page 28). | |
| The coffee does not have enough crema. | The coffee is too coarsely ground.The coffee blend is not suitable. | Turn the knob for the grind level setting one position anti-clockwise (see “Setting the grind level” on page 14).Use a coffee blend suited to fully automated coffee machines. |
| Coffee comes out too slowly. | The coffee is ground too fine. Turn | the knob for the grind level setting one position clockwise (see “Setting the grind level” on page 14). |
| Coffee comes out too quickly. | The coffee is too coarsely ground. | Turn the knob for the grind level setting one position anti-clockwise (see “Setting the grind level” on page 14). |
| Coffee only comes out of one of the spouts on the coffee dispenser. | The holes on the spouts are blocked. | Remove the dry coffee residues with a needle (see “Cleaning the coffee machine” on page 21, fi g. 24). |
| When the “coffee strength/ preground coffee” knob is turned completely to the left or right, water comes out of the machine instead of coffee. | The ground coffee could have got stuck in the fi lling chute. | Remove the ground coffee with the help of a knife (see page 16, fi g 14). Then clean the brewing unit and the inside of the machine (see “Cleaning the brewing unit” on page 21, 22 and 23). |
| The machine does not swithen the on/off button is pressed. | The main switch on the right side of the appliance is not switched on or the mains plug is not plugged in. | Check that the main switch is in the I position and that the power lead is plugged in the socket properly. |
| The brewing unit cannot be taken out for cleaning. | The coffee machine is switched on. The brewing unit can only be removed when the machine is switched off. | Switch the appliance off and remove the brewing unit (see “Cleaning the brewing unit” on page 21, fi g. 25). IMPORTANT: The brewing unit can only be taken out when the appliance is switched off. If you try to take out the brewing unit whilst the coffee machine is switched on, this could be seriously damaged. |
| Too much preground coffee was inserted. | Remove the brewing unit and carefully clean the insided of the machine (see “Cleaning the coffee machine” and “Cleaning the brewing unit” on page 21, 22 and 23). Repeat the process using a maximum of 2 level measuring spoons of ground coffee. | |
| Ground coffee was used (instead of coffee beans) and the machine will not dispense any coffee. | The “coffee strength/ preground coffee” knob is not turned completely to the left or right and the appliance used both preground coffee and coffee ground by the mill mechanism.Preground coffee was inserted whilst the machine was switched off. | Carefully clean the inside of the machine (see page 12). Repeat the process, but fi rst turn the “coffee strength/ preground coffee” knob completely to the left or right (see “Preparing espresso coffee using ground coffee” on page 14).Remove the brewing unit and carefully clean the insided of the machine (see “Cleaning the coffee machine” and “Cleaning the brewing unit” on page 21, 22 and 23). Repeat the process with the machine switched on. |
| Coffee does not come out of the spouts on the coffee dispenser but out of the service door at the side. | The holes on the coffee dispenser are blocked with dried on coffee.The swing drawer on the inside of the service hatch is blocked and will not move. | Remove the dried on coffee with a needle (see “Cleaning the coffee machine” on page 21, fi g. 24).Carefully clean the swing drawer, particularly in the area around the hinges so that these continue to move. |
| Milk is frothed up too much or too little. | Wrong setting of the slider on the lid of the milk container.If the milk is not frothy enough, the milk container may not be correctly in place. | You can set the amount of froth on the milk to any level using the slider on the lid (fi g. 19 on page 17): ‘CAPPUCCINO’ (very frothy milk) or ‘CAFFELATTE’ (not so frothy milk).Put the milk container correctly in place. (fi g. 18 on page 17). |
What you should pay attention to

- After removing the packaging, make sure the product is complete and undamaged. If in doubt, do not use the appliance and contact a qualified professional.
- Installation must be carried out by a qualified technician and in compliance with current regulations.
- Packing elements (plastic bags, polystyrene etc.) must not be left within reach of children as they may represent a hazard.
- Never install the appliance in environments where the temperature may reach 0 °C or lower (the appliance may be damaged if the water freezes).
- Make sure the mains voltage corresponds to the voltage indicated on the appliance rating plate. Connect the appliance to an efficiently earthed socket with a minimum current rating of 10A only. The manufacturer may not be considered liable for possible incidents caused by the failure to adequately earth the mains.
• The power socket has to remain visible after installation. - Never touch the plug with damp hands.
- Never pull the power cable as you could damage it.
- This appliance can be installed over a built-in oven it he latter is fitted with a cooling fan at the rear (maximum power: 3KW).
- Do not use multiple plug adapters or extension leads.
- The power cable on this appliance must not be replaced by the user as this operation requires the use of special tools. If the cable is damaged or requires replacing, contact an authorised service centre only to avoid all risks.
- For the electrical connection use a HO5 VV-F type cable as indicated in the table below:
| Conductors Amount x size | |
| 230 V ~+ ↓ 3 x | 1.0 mm ^2 |
- You should personalise water hardness as soon as possible following the instructions in 6.2.2 on page 24 and 25.
Electrical connection
Only an authorised service technician may connect the appliance. The connection must comply with national and local regulations.
This appliance must be earthed.
The appliance comes with a supply cable which must be supplied with a connector. Refer to the table below:
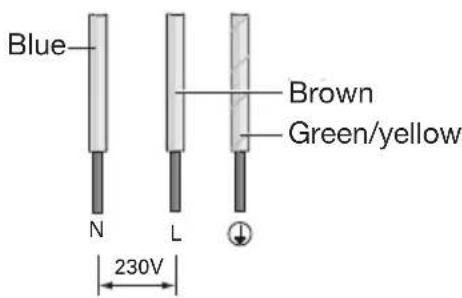
text_image
Blue Brown Green/yellow N L 230VIf you want to make a permanent connection, ensure that an omnipolar switch with a contact gap of at least 3 mm is fitted in the supply cable.
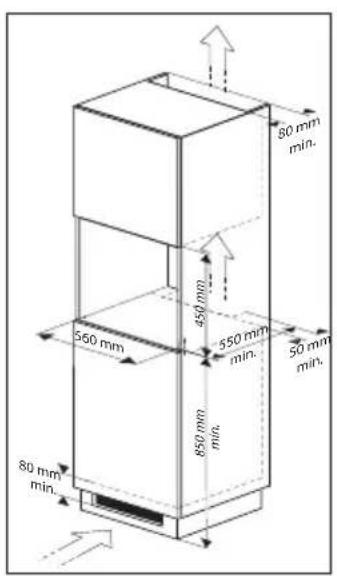
Building in
Please check the minimum measures necessary to the proper installation of the appliance. The coffee maker must be installed in a column unit, which must in turn be fixed to the wall.
text_image
Technical diagram of a mechanical device with numbered components and labeled parts, including screw, spring, and pin assembly.
text_image
④ x 1
text_image
⑤Disposal of appliance and packaging
The packaging of this appliance is recyclable and may have been made of:
- cardboard
- paper
- polythene foil (PE)
• CFC-free polystyrene (PS hard foam)
• polypropylene tape (PP).
Dispose of these materials in a responsible manner and in accordance with government regulations.
natural_image
Symbol of a trash bin with crossed lines indicating no waste or restriction, no text presentThe appliance carries the symbol of a crossed-out dustbin to state that segregated processing is compulsory to avoid any negative effects on the environment and public health. This means that at the end of its working life, you must hand it in at a special refuse collection centre run by your local authority or dealer.
Segregated processing enables the recovery of the materials used in the production of this appliance, thus saving considerably in terms of raw materials and energy.
CE
Declaration of conformity
We declare that our products meet the applicable European Directives, Decisions and Regulations and the requirements listed in the standards referenced.
Technical data
The data plate on the side of the appliance states the total load when connected, the required voltage and frequency.
Introduksjon 4
Beskrivelse 5
Betjeningspanel 6
text_image
A I O W M R S J K T U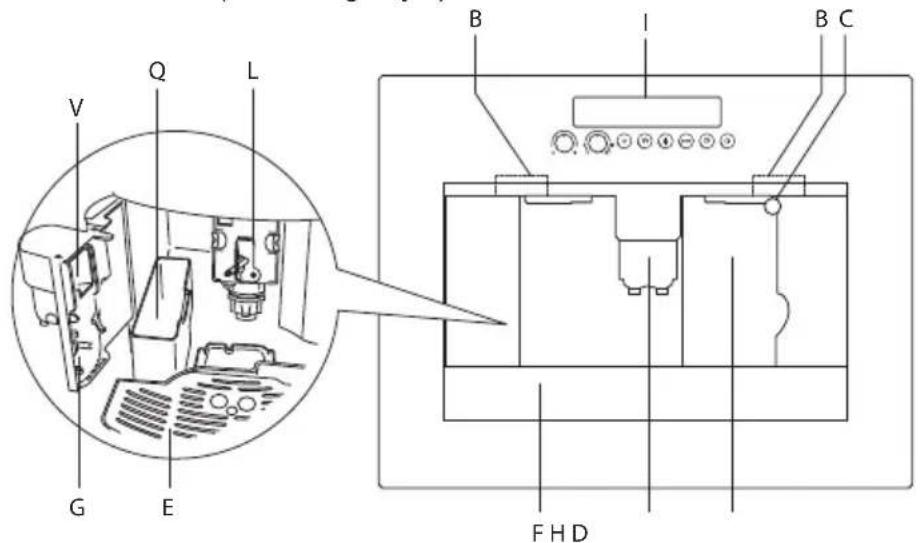
text_image
V Q L B I B C G E F H D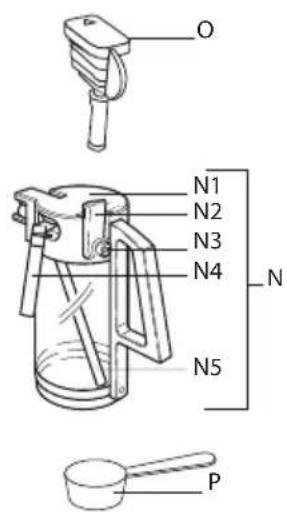
text_image
O N1 N2 N3 N4 N N5 P
text_image
1 2 3 4 5 MENU 6 78
natural_image
Diagram of a mechanical device with a component and directional arrow, no visible text or symbols
natural_image
Two gray warning symbols: a triangle with an exclamation mark and a light bulb with radiating lines (no text or labels)Bare fyll vannbeholderen med kaldt vann. Bruk aldri andre væsker som mineralvann eller melk.
natural_image
Illustration of a hand using a manual tool to press or adjust a coffee mug inside a machine (no text or symbols visible)text_image
Diagram of a refrigerator with labeled parts and a magnifying glass indicating a device's position.natural_image
Pure diagram of a circular arrow with concentric rings and a central circle, no text or symbols present.Tilberede kaffe (bruk kaffebønner)
natural_image
Simple line drawing of a coffee machine with a cup and side table (no text or symbols)- Sett én eller to kopper under kaffedispenseren (fi g. 4 og 5).
natural_image
Simple line drawing of a 3D printer or printer with two cups placed inside a frame, no text or symbols present.natural_image
Illustration of a hand pressing down on a mechanical component (no text or symbols)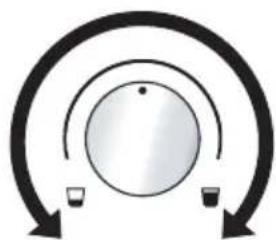
natural_image
Simple diagram showing a circular object with two small objects below, enclosed by curved arrows (no text or symbols)- Velg ønsket koppstørrelse med "koppstørrelse"-knotten. Den valgte koppstørrelse vises. Deretter trykker du på "1 kopp kaffe"-knappen eller "2 kopper kaffe"-knappen for å lage en eller to kopper kaffe.
natural_image
Illustration of a printer with a hand inserting a device into the paper, showing mechanical components and a circular inset view (no text or symbols)

natural_image
Simple line drawing of a person inside a rectangular frame, no text or symbols present
natural_image
Illustration of a hand inserting a device into a machine (no text or symbols visible)
natural_image
Diagram of a mechanical device with rotating components and labeled parts (no readable text or symbols)Viktig!
natural_image
Illustration of a printer with a hand inserting a spring into the cover, showing mechanical components (no text or symbols)Stille inn kvernnivået
Hvis kaffen dispenseres for fort eller for sakte (i dråper), kan du endre malenivået. (fi g. 11).
text_image
!Bare endre malenivået under kverneprosessen. Ellers kan kaffemaskinen bli skadet.
natural_image
Pure diagram of a circular dial with arrows indicating direction, no text or symbols presentnatural_image
Technical line drawing of a mechanical device with two clamps and a base plate (no text or symbols)natural_image
Line drawing of a printer with a hand inserting a tool into the cover (no text or symbols)natural_image
Illustration of a printer being inserted into a paper airplane, with a magnified inset showing the printer's handle (no text or symbols present)natural_image
Illustration of a hand using a water dispenser to lift a mug into a container (no text or symbols)- Sett varmtvannsdysen på plass (fi g. 15).
- Sett en beholder under varmtvannsdysen (fi g. 15).
- Trykk på "varmt vann"-knappen. Varmt vann dispenserer, displayet viser HOT WATER (VARMT VANN). Når den programmerte mengden varmt vann er dispensert, stopper dispenseringen automatisk.
natural_image
Illustration of a hand using a tool to press or inspect a cylindrical object into a pot (no text or symbols)natural_image
Line drawing of a hand inserting a small component into a cabinet (no text or symbols)- Dra varmtvannsdysen av (fi g. 17).

natural_image
Line drawing of a kitchen appliance with a water dispenser and control panel (no text or symbols)- Før melkebeholderen opp til dysen (fi g. 18).

natural_image
Diagram of a mechanical device with a lever and handle, no text or symbols presentnatural_image
Line drawing of a kitchen appliance with a mug and handle, no text or symbols presentLage cappuccino
- Følg fremgangsmåten som er beskrevet i (se "Lage cappuccino eller varm melk" på side 16 og 17)!
- Sving melkedispenserrøret ut og sett en tilstrekkelig stor kopp under kaffedispenseren og melkedispenserrøret (fi g. 20).
- Velg ønsket kaffestyrke for cappuccino med "kaffestyrke"-knappen (se "Tilberede kaffe" på side 10). Koppstørrelsen på den øverste linjen (f.eks. ESPRESSO CUP (ESPRESSOKOPP)) har ingen betydning her, da mengden kaffe som lages er fast i CAPPUCCINO PROGRAM-menyen.

natural_image
Diagram of a coffee maker machine with a mug and tray, no text or symbols presentnatural_image
Line drawing of a hand cleaning a window with a cloth, labeled '22' (no text or symbols on the diagram itself)natural_image
Line drawing of a hand inserting a small component into a device (no text or symbols)- Sett varmtvannsdysen tilbake i (fi g. 23).

Stille inn cappuccino-programmet
natural_image
Line drawing of a hand inserting into a device into a container (no text or symbols)natural_image
Line drawing of a hand pressing down on a door panel with control buttons (no text or symbols)natural_image
Line drawing of a hand using a tool to press or install a device inside a machine (no text or symbols visible)natural_image
Line drawing of a hand holding a tool inside a kitchen appliance (no text or symbols)- Fjern alle restene med en støvsuger (fi g. 27).
text_image
A B C D E 28- Skift bryggeenheten (A) ved å skyve den inn i holderen (B) og pinnen (C). Pinnen må innføres i røret (D) på bunnen av bryggeenheten. Skyv den fast der det står PUSH (SKYV) (E) til bryggeenheten festes på plass (fi g. 28).
natural_image
Technical diagram of a mechanical device with directional arrows indicating movement or force (no text or symbols present)natural_image
Technical diagram of a mechanical device with directional arrows indicating movement or force (no text or symbols present)
natural_image
Illustration of hands holding a mechanical device with directional arrows indicating movement (no text or symbols)Merknader
natural_image
Illustration of a hand using a tool to press or install a cylindrical component into a pot (no text or symbols present)natural_image
Mechanical device diagram showing a lever mechanism with arrows indicating motion (no text or symbols)natural_image
Line drawing of a hand inserting a small component into a device (no text or symbols)
text_image
Technical diagram of a mechanical device with numbered components and labeled parts, including screw, spring, and pin assembly.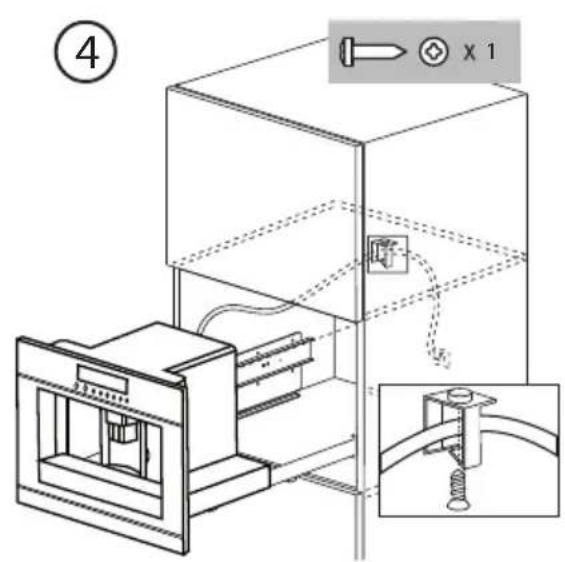
text_image
④ x 1
text_image
⑤natural_image
Symbol of a trash bin crossed with no visible text or labelstext_image
Technical diagram of a microwave oven with labeled components and internal wiring, including a close-up view of the internal structure.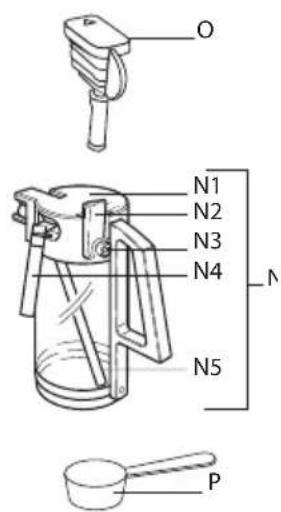
text_image
O N1 N2 N3 N4 N N5 P
text_image
1 < > OK ESC 2 3 4 5 MENU 6 78
natural_image
Diagram of a mechanical device with a component and directional arrow, no readable text or symbols present
natural_image
Two gray warning symbols: a triangle with an exclamation mark and a light bulb with rays (no text or labels)natural_image
Illustration of a hand inserting a small object into a coffee cup inside a machine (no text or symbols)text_image
Diagram of a refrigerator interior with labeled compartments and a hanging circular component, showing part number 3.natural_image
Pure diagram of a circular arrow with concentric rings and directional arrows, no text or symbols present.Lav kaffe (med kaffebønner)
natural_image
Simple line drawing of a coffee machine with a cup and side table, no text or symbols presentnatural_image
Simple line drawing of a 3D printer or printer with two holders and a top panel, no text or symbols present.natural_image
Illustration of a hand inserting a component into a device (no text or symbols)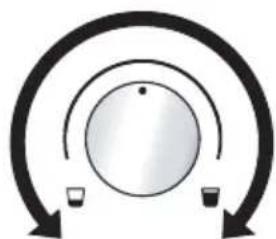
natural_image
Simple diagram showing a circular arrow with a central dot and two small objects below, no text or symbols present.natural_image
Illustration of a printer with a hand inserting a clip into the cover, showing mechanical components and a magnified view (no text or symbols)natural_image
Simple line drawing of a person inside a rectangular frame, no text or symbols present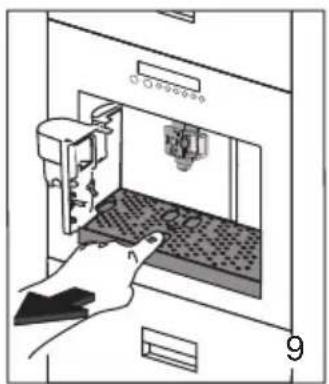
natural_image
Illustration of a hand operating a 3D printer in a control panel (no text or symbols visible)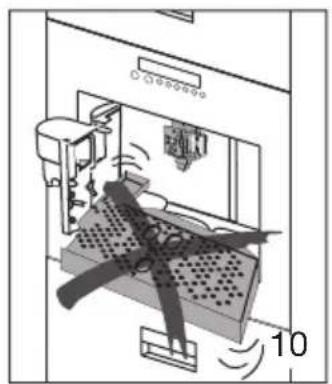
natural_image
Diagram of a mechanical device with rotating components and labeled parts (no readable text or symbols)natural_image
Illustration of a printer with a hand inserting a spring into the cover, showing mechanical components (no text or symbols)text_image
Warning symbol and rotary dial with arrows indicating clockwise rotation around a circular dialnatural_image
Pure diagram of a circular dial with arrows indicating direction, no text or symbols presentnatural_image
Technical line drawing of a mechanical device with two clamps and a base plate (no text or symbols)natural_image
Line drawing of a printer with a hand inserting a paper into the cover, showing internal components (no text or symbols)natural_image
Illustration of a printer being inserted into a paper airplane, with an inset showing the hand inserting a clip (no text or symbols present)natural_image
Line drawing of a hand pouring liquid into a coffee mug inside a machine (no text or symbols)natural_image
Illustration of a hand using a tool to press or inspect a small object into a container (no text or symbols)natural_image
Line drawing of a hand inserting a component into a storage unit (no text or symbols)natural_image
Line drawing of a kitchen appliance with a hand mixer and control panel (no text or symbols)natural_image
Diagram of a hand-operated machine with a handle and control panel, no text or symbols presentnatural_image
Line drawing of a kitchen appliance with a mug and handle, no text or symbols presentSådan laves cappuccino
natural_image
Line drawing of a coffee maker with a mug and tray, no text or symbols presentnatural_image
Line drawing of a hand cleaning a window with a cloth (no text or symbols)natural_image
Line drawing of a hand inserting a small component into a device (no text or symbols)- Sæt derefter vandstudsen på mundstykket igen (fi g. 23).

natural_image
Line drawing of a hand inserting into a device into a container (no text or symbols)natural_image
Line drawing of a hand cleaning a kitchen appliance with arrows indicating cleaning steps (no text or symbols)natural_image
Line drawing of a hand using a tool to press or install a device inside a machine (no text or symbols visible)natural_image
Illustration of a hand using a tool to clean or install a device inside a washing machine (no text or symbols visible)natural_image
Technical diagram of a mechanical device with directional arrows indicating movement or force (no text or symbols present)natural_image
Technical diagram of a mechanical device with directional arrows and label '30' (no readable text or symbols beyond basic components)
natural_image
Illustration of hands holding a mechanical device with directional arrows indicating movement (no text or symbols)Anvisninger
natural_image
Illustration of a hand using a tool to press or install a cylindrical component into a pot (no text or symbols present)natural_image
Diagram of a mechanical device with lever and handle, showing directional arrows (no text or symbols)natural_image
Line drawing of a hand inserting a small component into a device (no text or symbols)
text_image
Technical diagram of a mechanical device with numbered components and labeled parts, including screw, spring, and pin assembly.
text_image
④ x 1
text_image
⑤natural_image
Symbol of a trash bin with crossed lines indicating no waste or restriction (no text or numbers present)CE
text_image
J K S T R U agbar) M A I O W
text_image
V Q L B I B C G E F H D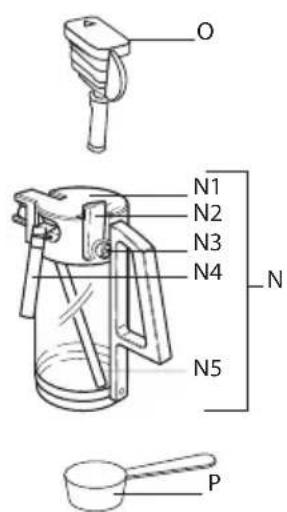
text_image
O N1 N2 N3 N4 N N5 P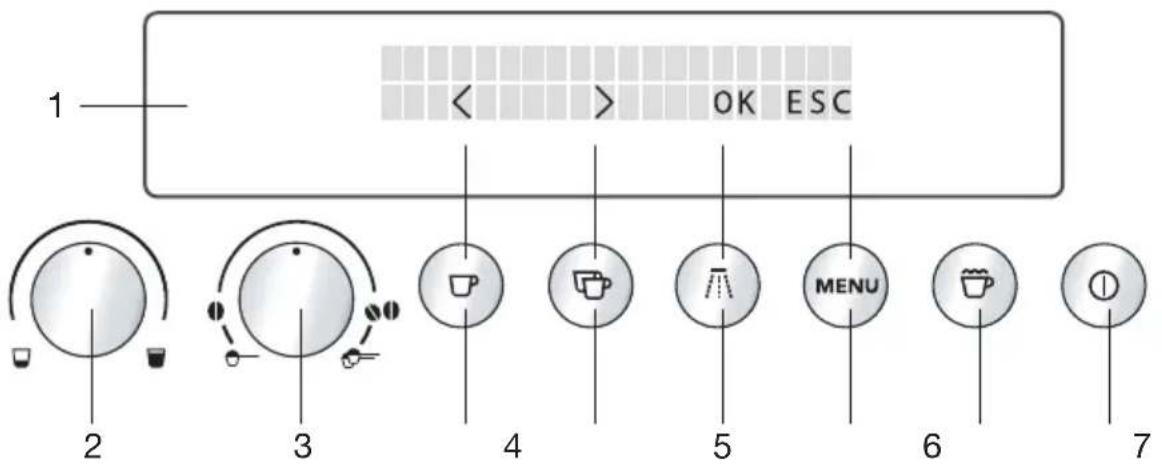
text_image
1 2 3 4 5 MENU 6 7 OK ESC8
natural_image
Diagram of a mechanical device with a component labeled '4' and an arrow indicating direction (no text or symbols beyond labels)
natural_image
Two gray warning symbols: a triangular warning triangle and a light bulb with rays (no text or labels)natural_image
Illustration of a hand pouring liquid into a coffee mug inside a storage unit (no text or symbols)natural_image
Diagram of a refrigerator interior with a door handle and a hanging circular component (no text or symbols)
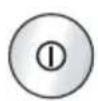
natural_image
Pure diagram of concentric circular arrows with a central circle, no text or symbols presentnatural_image
Simple line drawing of a coffee machine with a cup and tray, no text or symbols presentnatural_image
Simple line drawing of a 3D printer with two cups and a top cover, no text or symbols present.natural_image
Hand placing a component into a storage cabinet with a downward arrow (no text or symbols)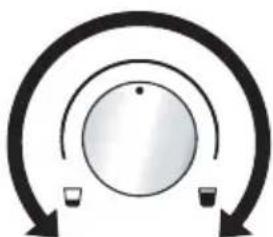
natural_image
Simple diagram of a circular object with two small cups at the bottom, surrounded by curved arrows (no text or symbols)natural_image
Illustration of a printer with a hand inserting a device into the paper, showing a circular arrow indicating rotation (no text or symbols present)

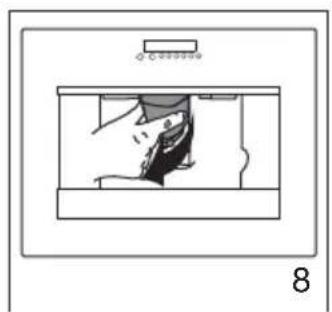
natural_image
Simple line drawing of a person inside a rectangular frame, no text or symbols present
natural_image
Illustration of a hand inserting a device into a machine (no text or symbols visible)
natural_image
Diagram of a mechanical device with rotating components and labeled parts (no readable text or symbols)• espresso cup (espressokopp);
- small cup (liten kopp);
• medium cup (medelstor kopp);
- large cup (stor kopp);
- mug (mugg).

natural_image
Illustration of a hand inserting a device into a printer, showing the process with a magnified inset (no text or symbols)natural_image
Simple diagram of a circular dial with arrows indicating direction (no text or symbols)natural_image
Technical line drawing of a mechanical device with two clamps and a base plate (no text or symbols)natural_image
Line drawing of a printer with a hand inserting a paper into the cover, showing internal components (no text or symbols)natural_image
Line drawing of a printer with a magnified inset showing the printer's handle (no text or symbols)natural_image
Illustration of a hand pouring liquid into a coffee cup inside a storage unit (no text or symbols)natural_image
Illustration of a hand using a tool to press or inspect a small object into a container (no text or symbols)natural_image
Line drawing of a hand inserting a small component into a device (no text or symbols)natural_image
Line drawing of a kitchen appliance with a water dispenser and control panel (no text or symbols)natural_image
Diagram of a kitchen appliance with a handle and lid, showing a lever mechanism (no text or symbols)natural_image
Line drawing of a coffee maker with a mug and handle, no text or symbols presentLaga cappuccino
natural_image
Line drawing of a coffee maker with a mug and tray, no text or symbols presentRengöra munstycken
natural_image
Line drawing of a hand cleaning a window with a cloth (no text or symbols)natural_image
Line drawing of a hand inserting a small component into a device (no text or symbols)natural_image
Line drawing of a hand inserting into a device into a container (no text or symbols)natural_image
Line drawing of a kitchen appliance with a hand holding a tool, no text or symbols presentnatural_image
Line drawing of a hand using a tool to press or install a device inside a machine (no text or symbols visible)natural_image
Line drawing of a hand holding a tool inside a kitchen appliance (no text or symbols)natural_image
Technical diagram of a mechanical device with directional arrows indicating movement or force (no text or symbols)natural_image
Technical diagram of a mechanical device with directional arrows indicating movement or force (no text or symbols present)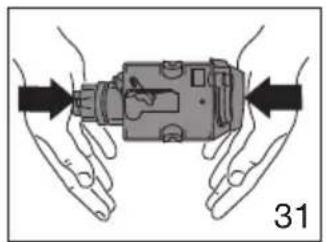
natural_image
Illustration of hands holding a mechanical component with directional arrows indicating movement (no text or symbols)Anmärkningar
natural_image
Illustration of a hand using a tool to press or install a cylindrical component into a pot (no text or symbols present)natural_image
Technical line drawing of a mechanical device with lever and handle (no text or symbols)natural_image
Line drawing of a hand inserting a small component into a device (no text or symbols)
text_image
Technical diagram of a mechanical device with numbered components and labeled parts, including screw, spring, and pin assembly.
text_image
④ x 1
text_image
⑤natural_image
Symbol of a trash bin crossed with no visible text or labelstext_image
J K S T R U NO A M I O W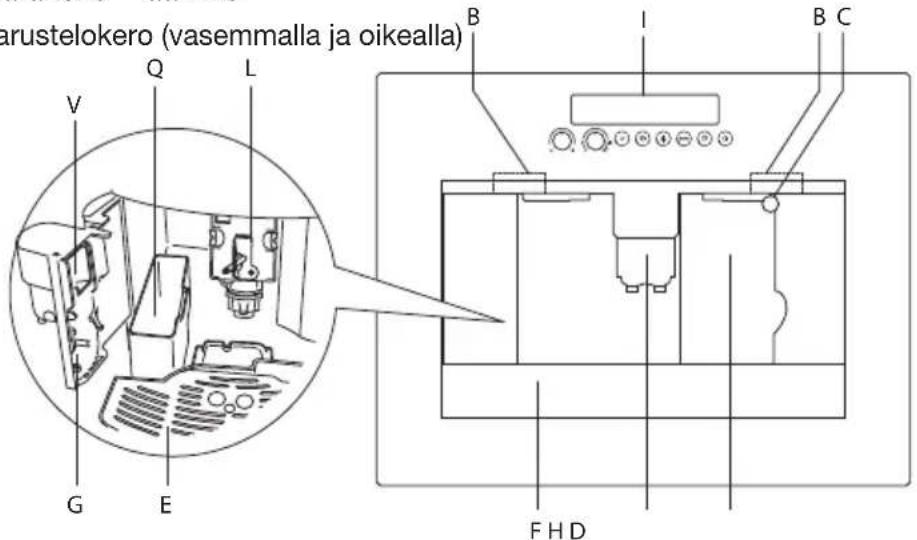
text_image
O N1 N2 N3 N4 N N5 P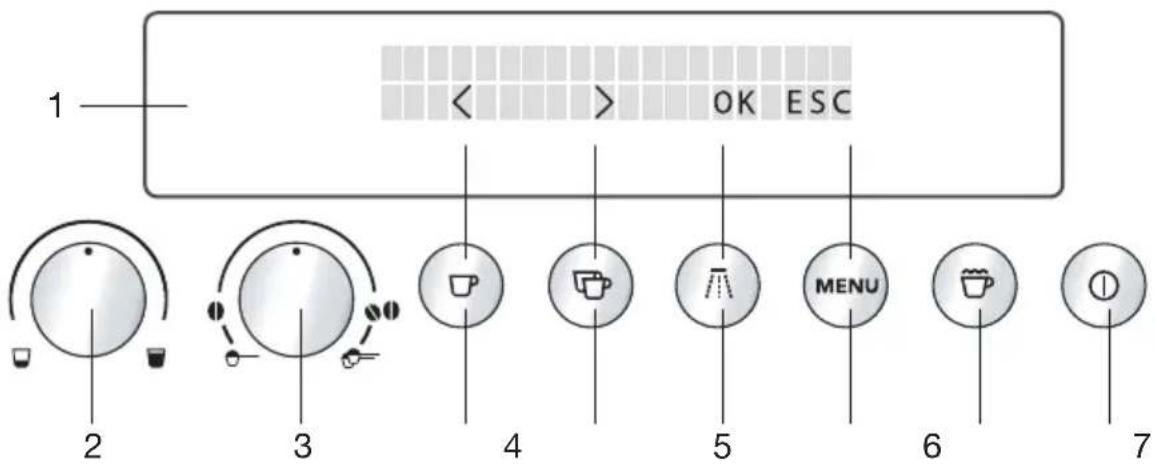
text_image
1 < > OK ESC 2 3 4 5 MENU 6 78
natural_image
Diagram of a mechanical device with internal components and directional arrow (no text or symbols)natural_image
Illustration of a hand pouring liquid into a coffee mug inside a container (no text or symbols)natural_image
Diagram of a refrigerator interior with a door handle and a hanging circular component (no text or symbols)natural_image
Pure diagram of concentric circular arrows with a central circle, no text or symbols presentnatural_image
Simple line drawing of a coffee machine with a cup and stand (no text or symbols)natural_image
Simple line drawing of a mechanical device with two circular components and a top component (no text or symbols)natural_image
Hand holding a small object in a storage cabinet with a downward arrow indicating motion (no text or symbols)
natural_image
Simple diagram showing concentric circles with arrows pointing inward, no text or symbols presentnatural_image
Illustration of a printer with a hand inserting a spring into the cover, showing mechanical components (no text or symbols)
natural_image
Simple line drawing of a person inside a device frame, no text or symbols present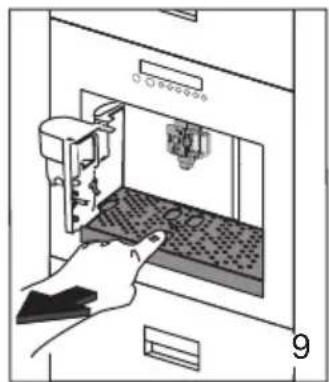
natural_image
Illustration of a hand operating a 3D printer in a machine (no text or symbols visible)
natural_image
Diagram of a mechanical device with rotating components and a numbered label '10' (no readable text or symbols)Tärkeää!
natural_image
Illustration of a hand inserting a device into a printer, showing the process with a magnified inset (no text or symbols)Jauhatusasteen asetus
natural_image
Pure diagram of a circular dial with pointer and arrow, no text or symbols presentnatural_image
Technical line drawing of a mechanical device with two clamps and a base plate (no text or symbols)natural_image
Line drawing of a printer with a hand inserting a paper into the cover, showing internal components (no text or symbols)natural_image
Illustration of a hand inserting a component into a printer (no text or symbols present)natural_image
Illustration of a hand using a manual lever to lift a mug into a container (no text or symbols)natural_image
Illustration of a hand using a tool to press or inspect a cylindrical object into a pot (no text or symbols present)natural_image
Line drawing of a hand inserting a component into a device (no text or symbols)natural_image
Line drawing of a kitchen appliance with a kettle and handle, no text or symbols presentnatural_image
Diagram of a kitchen appliance with a handle and control panel, showing a lever mechanism (no text or symbols)natural_image
Line drawing of a kitchen appliance with a mug and handle, no text or symbols presentnatural_image
Line drawing of a coffee maker with a mug and tray, no text or symbols presentnatural_image
Line drawing of a hand cleaning a window with a cloth, labeled '22' (no text or symbols on the diagram itself)natural_image
Line drawing of a hand inserting a small component into a device (no text or symbols)natural_image
Line drawing of a hand inserting into a device into a container (no text or symbols)natural_image
Line drawing of a kitchen appliance interior with a hand holding a tray and a door, no text or symbols presentnatural_image
Line drawing of a hand using a tool to clean or install a device inside a kitchen appliance (no text or symbols)natural_image
Line drawing of a hand holding a tool inside a kitchen appliance (no text or symbols)natural_image
Technical diagram of a mechanical device with directional arrows indicating movement or force (no text or symbols)natural_image
Technical diagram of a mechanical device with directional arrows indicating movement or force (no text or symbols present)
natural_image
Illustration of hands holding a mechanical device with directional arrows indicating movement (no text or symbols)Huomautukset
natural_image
Illustration of a hand using a tool to press or install a cylindrical component into a pot (no text or symbols present)natural_image
Mechanical device diagram showing a lever mechanism with arrows indicating motion (no text or symbols)natural_image
Line drawing of a hand inserting a small component into a device (no text or symbols)
text_image
Technical diagram of a mechanical device with numbered components and labeled parts, including screw, spring, and pin assembly.
text_image
④ x 1
text_image
⑤natural_image
Symbol of a trash bin crossed with no visible text or labelsA. Interruptor principal
B. Asas
C. Boquilla
text_image
V Q L G E F H D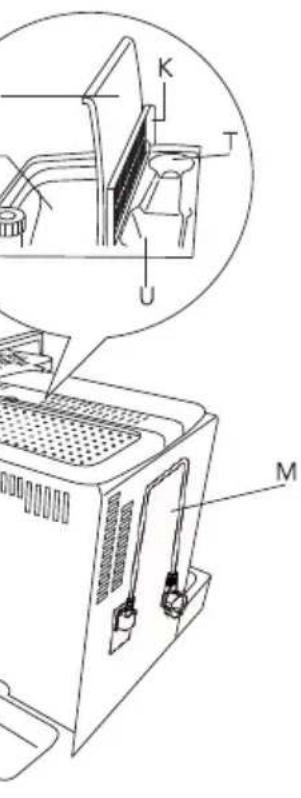
text_image
Technical diagram of a device with labeled parts K, T, U, and M, showing internal components and assembly.
text_image
O N1 N2 N3 N4 N N5 P
text_image
1 2 3 4 5 MENU 6 7 OK ESC8
natural_image
Diagram of a mechanical device with a component and directional arrow, no visible text or symbols

natural_image
Illustration of a hand pouring liquid into a coffee mug inside a storage unit (no text or symbols)natural_image
Diagram of a refrigerator interior with a door handle and a hanging circular component (no text or symbols)text_image
Warning symbol with exclamation mark inside triangle and circular icon containing '①'natural_image
Diagram of a circular dial with three concentric rings and directional arrows, no text or symbols present.natural_image
Simple line drawing of a coffee machine with a cup and side table, no text or symbols presentnatural_image
Simple line drawing of a mechanical device with two circular components and a top component, labeled '5' at bottom (no text or symbols on diagram itself)natural_image
Illustration of a hand pressing down on a mechanical component (no text or symbols)
natural_image
Simple diagram showing a circular object with two small cups at the bottom, surrounded by curved arrows (no text or symbols)text_image
Diagram showing a hand using a device to rotate a component, with an arrow indicating the rotation direction.
natural_image
Simple line drawing of a person inside a rectangular frame, no text or symbols presentnatural_image
Illustration of a hand operating a 3D printer in a control panel (no text or symbols visible)
natural_image
Diagram of a mechanical device with rotating arms and a central component, no visible text or symbolsImportante
text_image
Diagram illustrating a hand using a device to rotate a component, with an inset showing the process and label '11'natural_image
Pure diagram of a circular dial with arrows indicating direction, no text or symbols presentnatural_image
Technical line drawing of a mechanical device with two clamps and a base plate (no text or symbols)natural_image
Line drawing of a printer with a hand inserting a paper into the cover (no text or symbols)natural_image
Illustration of a hand inserting a component into a printer (no text or symbols present)natural_image
Illustration of a hand pouring liquid into a coffee mug inside a container (no text or symbols)natural_image
Illustration of a hand using a tool to press or inspect a cylindrical object into a pot (no text or symbols)natural_image
Line drawing of a hand inserting a component into a storage unit (no text or symbols)natural_image
Line drawing of a kitchen appliance with a water dispenser and control panel (no text or symbols)natural_image
Diagram of a hand-operated kitchen appliance with a handle and control panel, showing no text or symbolsnatural_image
Line drawing of a kitchen appliance with a mug and fan, no text or symbols presentnatural_image
Line drawing of a coffee maker with a mug and tray, no text or symbols presentnatural_image
Line drawing of a hand cleaning a window with a cloth (no text or symbols)natural_image
Line drawing of a hand inserting a small component into a device (no text or symbols)natural_image
Line drawing of a hand inserting into a device into a container (no text or symbols)natural_image
Line drawing of a hand pressing down on a door panel, no text or symbols presentnatural_image
Line drawing of a hand using a tool to press or install a device inside a machine (no text or symbols visible)natural_image
Illustration of a hand using a tool to clean or install a device inside a washing machine (no text or symbols visible)natural_image
Technical diagram of a mechanical device with directional arrows indicating movement or force (no text or symbols present)natural_image
Technical diagram of a mechanical device with directional arrows indicating movement or force (no text or symbols present)
natural_image
Illustration of hands holding a mechanical device with directional arrows indicating movement (no text or symbols)Notas
natural_image
Illustration of a hand using a tool to press a cylindrical component into a pot (no text or symbols)natural_image
Mechanical device diagram showing a lever mechanism with arrows indicating motion (no text or symbols)natural_image
Line drawing of a hand inserting a small component into a device (no text or symbols)
text_image
Technical diagram of a mechanical device with numbered components and labeled parts, including screw, spring, and pin assembly.
text_image
④ x 1