HG6011PA20GB - Hob Atag - Free user manual and instructions
Find the device manual for free HG6011PA20GB Atag in PDF.
User questions about HG6011PA20GB Atag
0 question about this device. Answer the ones you know or ask your own.
Ask a new question about this device
Download the instructions for your Hob in PDF format for free! Find your manual HG6011PA20GB - Atag and take your electronic device back in hand. On this page are published all the documents necessary for the use of your device. HG6011PA20GB by Atag.
USER MANUAL HG6011PA20GB Atag
natural_image
Illustration of a gas stove with two vent grilles and control buttons (no text or symbols)gebruiksaanwijzing
gaskookplaat
HG40..P
mode d'emploi
instructions for use
gas hob
7000013709

natural_image
Three people preparing food in a kitchen, one holding a spoon and another writing (no visible text or symbols)ATAG
ATAG
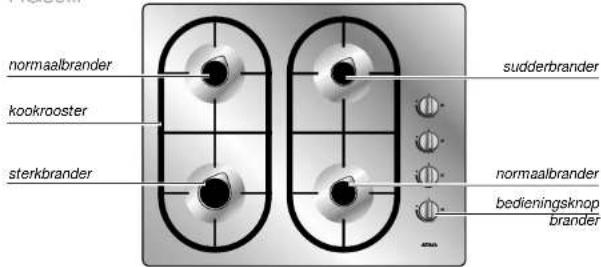
uw gaskookplaat
beschrijving
HG60..Q
text_image
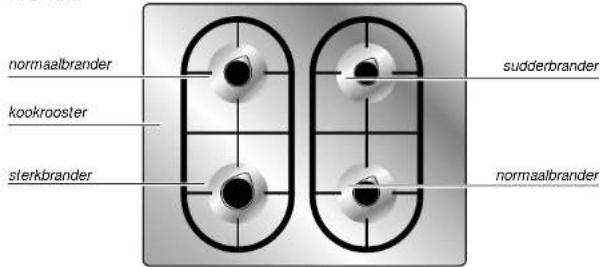
normaalbrander kookrooster sterkbrander kinderslot indicatielamp sudderbrander normaalbrander bedieningsknop branderHG60..P
text_image
normaalbrander kookrooster sterkbrander sudderbrander normaalbrander bedieningsknop branderHG40..P
text_image
normaalbrander kookrooster sterkbrander sudderbrander normaalbrander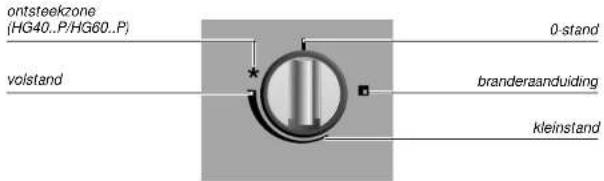
vlambeveiliging HG60..Q
extra beveiliging HG60..Q
natural_image
Two identical illustrations of a cooking pot on a gas stove, showing heating and cooling steps (no text or symbols)fout goed
positie
natural_image
Two identical illustrations of a cooking pot on a gas stove, showing heating and cooling process (no text or symbols)faute correct
position
natural_image
Two identical illustrations of a cooking pot on a gas stove, showing heating and cooling stages (no text or symbols)falsch nichtig
Position
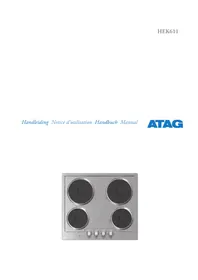
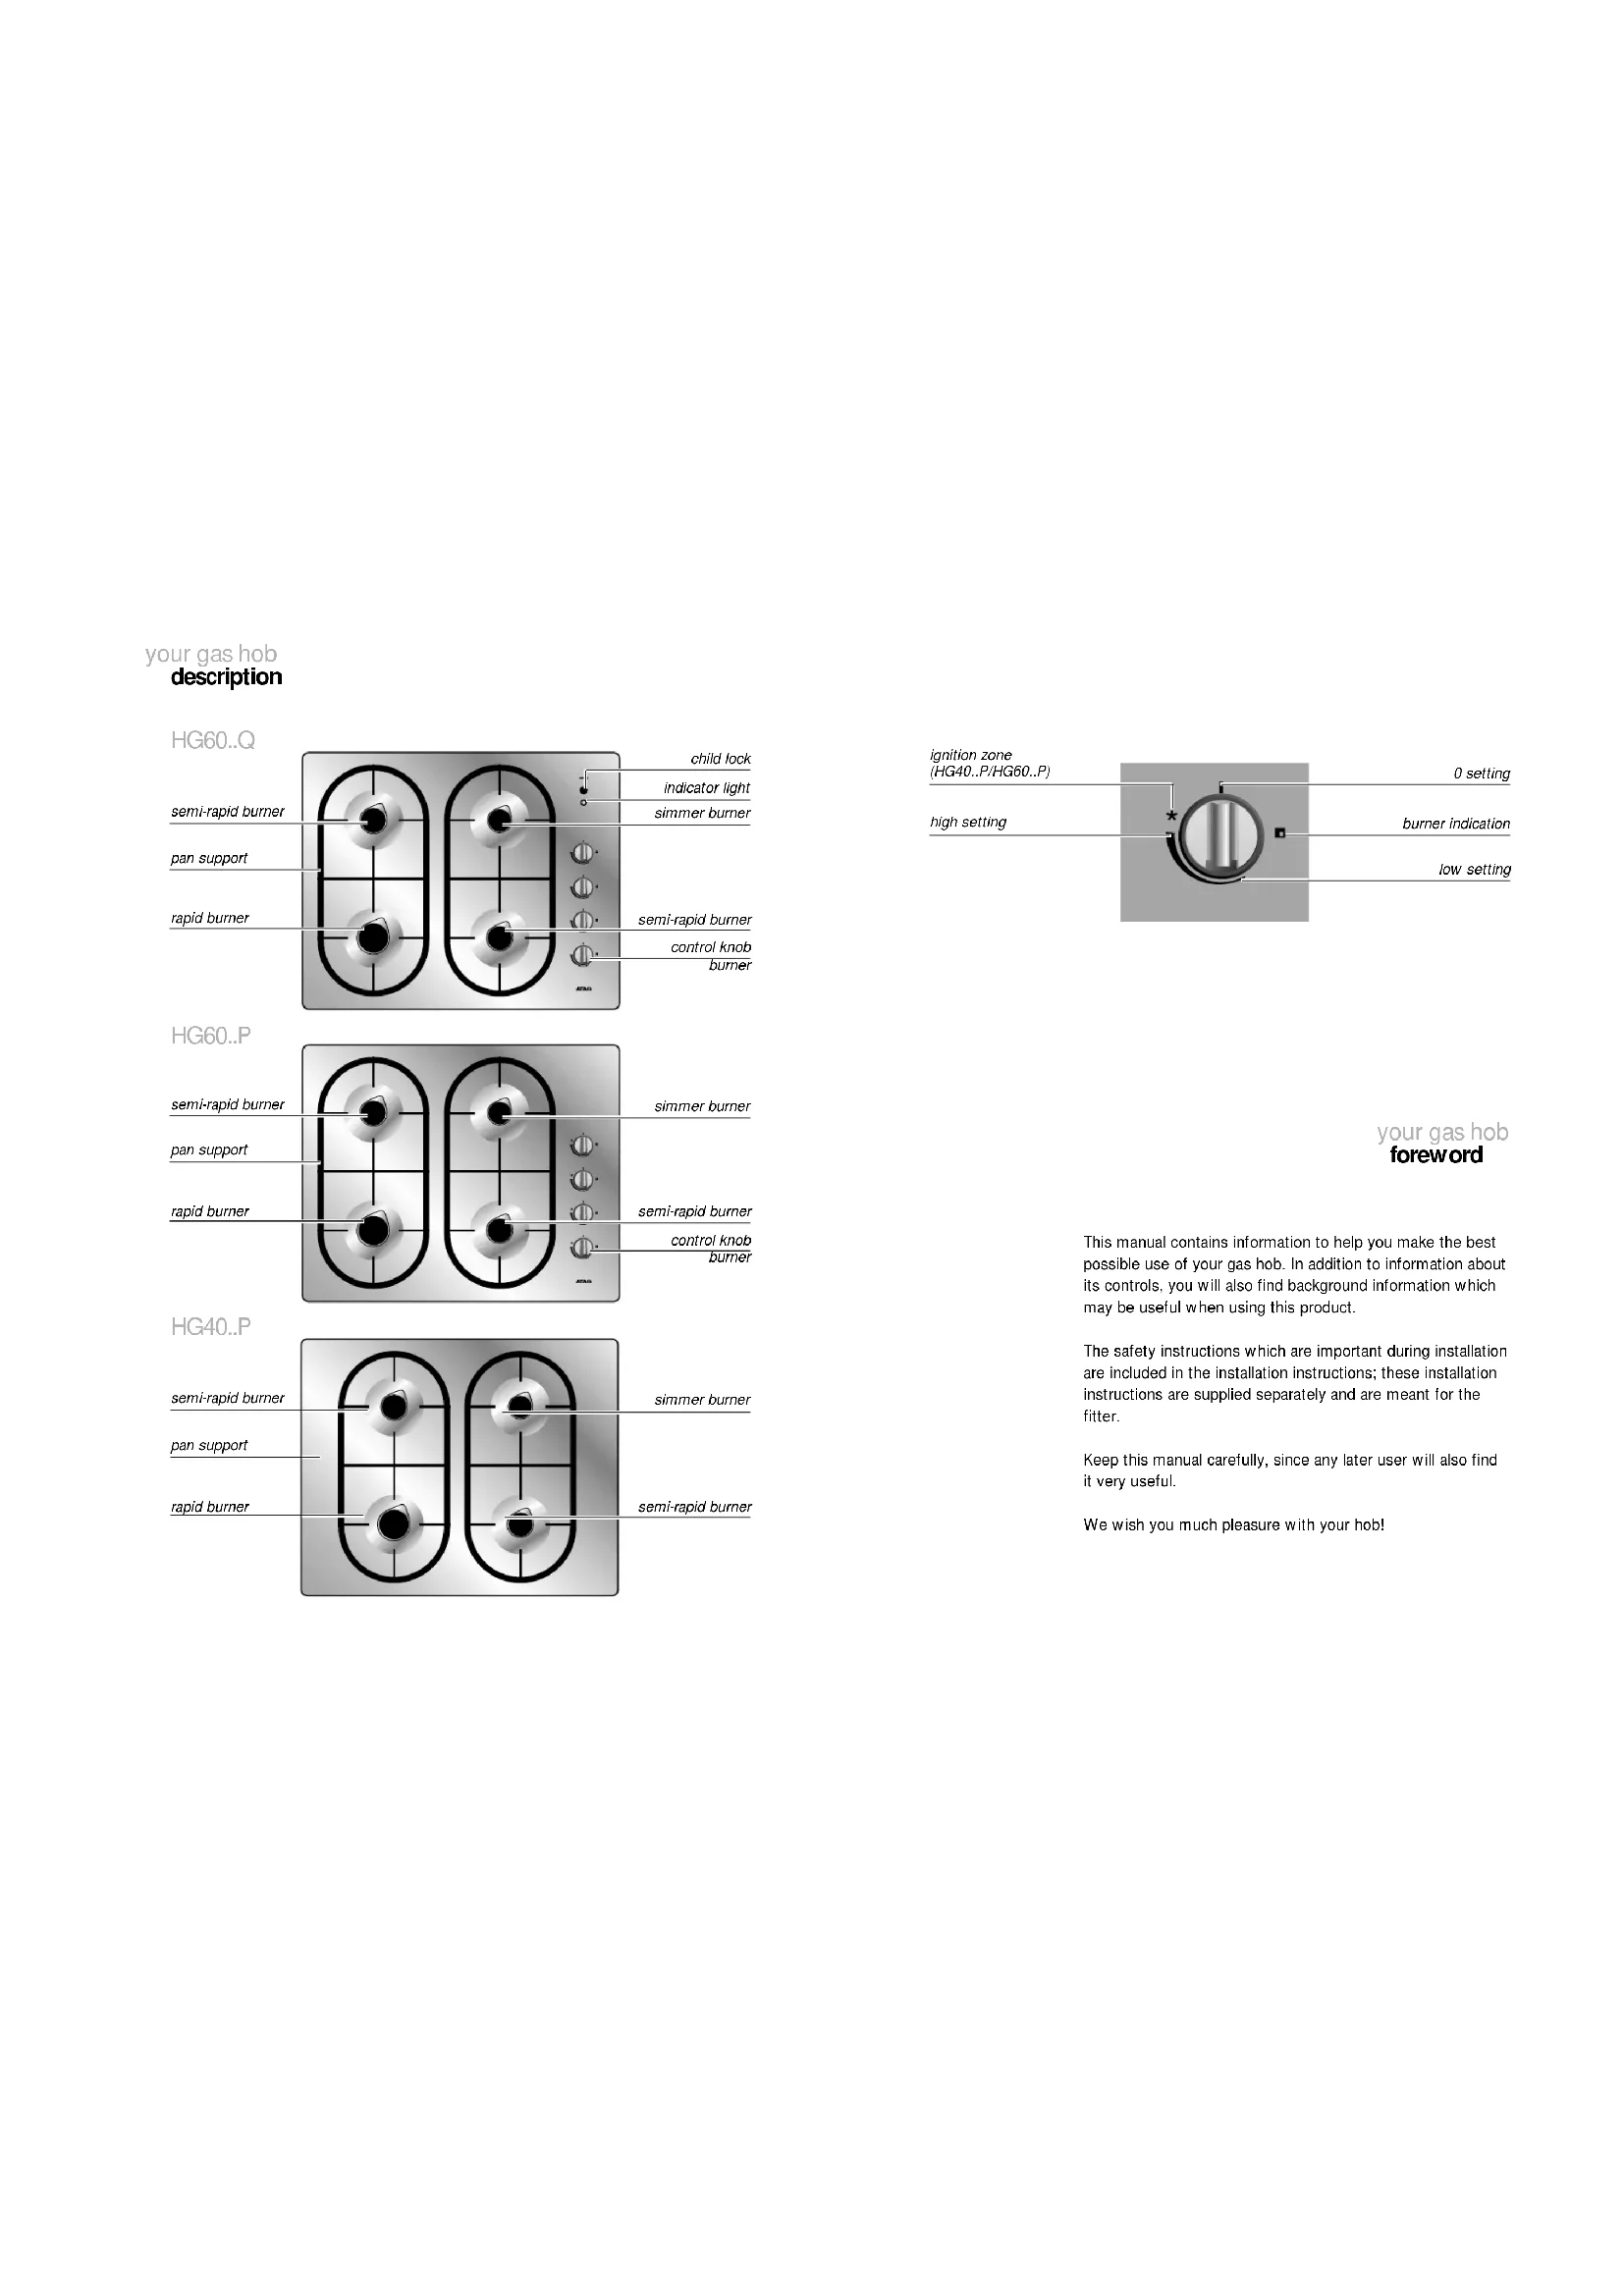
your gas hob description
text_image
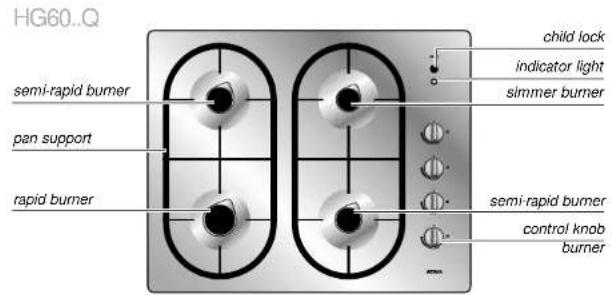
HG60..Q semi-rapid burner pan support rapid burner child lock indicator light simmer burner semi-rapid burner control knob burner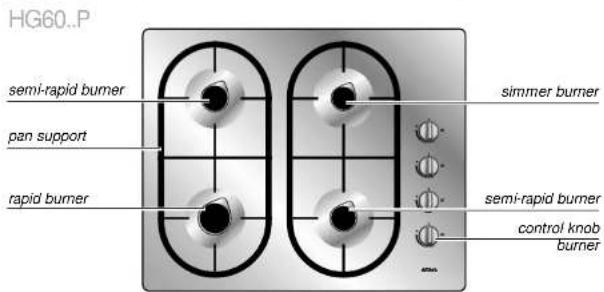
text_image
HG60..P semi-rapid burner pan support rapid burner simmer burner semi-rapid burner control knob burner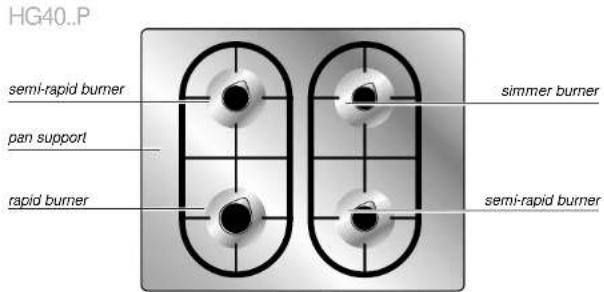
text_image
HG40..P semi-rapid burner pan support rapid burner simmer burner semi-rapid burner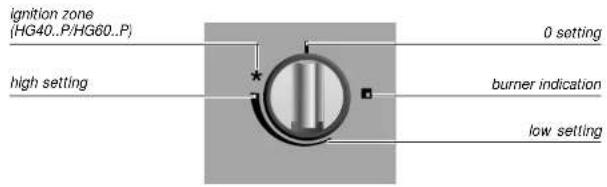
text_image
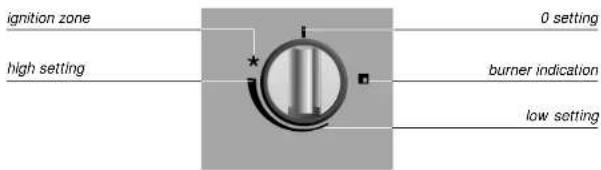
ignition zone (HG40..P/HG60..P) high setting 0 setting burner indication low settingyour gas hob foreword
This manual contains information to help you make the best possible use of your gas hob. In addition to information about its controls, you will also find background information which may be useful when using this product.
The safety instructions which are important during installation are included in the installation instructions; these installation instructions are supplied separately and are meant for the fitter.
Keep this manual carefully, since any later user will also find it very useful.
We wish you much pleasure with your hob!
your gas hob
introduction
This Atag gas hob has been designed for the real lover of cooking. The generous separation of the burners makes for comfortable working.
The hob is fitted with ionisation protection. This protective device ensures that the burner automatically reignites if the flame goes out. Thanks to the integral spark ignition in the knobs, you can ignite and control the burners with just one hand.
your gas hob
contents
safety
what you should pay attention to 4 - 5
controls
igniting and adjusting 6 – 7
comfortable cooking
burners 8
pans 9
maintenance
cleaning 10
faults
what should I do if ... 11
environmental aspects
disposing of packaging and appliance 12
appendix
gas information 13
safety
what you should pay attention to
safety
what you should pay attention to
general
Before installing the appliance, check that the type of gas and the gas pressure are in accordance with the appliance's specifications.
When using a metal connecting pipe, make sure that it cannot get damaged or pinched.
The use of gas cooking appliances releases heat and moisture into the room in which the appliance is fitted. Take care that the room is sufficiently ventilated; keep natural ventilation openings open or install a mechanical ventilator (extractor hood).
If the hob is in use for a long time, extra ventilation may be necessary - for example, an open window, or a higher setting for the ventilator (extractor hood).
during use
This cooking appliance has been designed for domestic use. Only use it for preparing foods.
Do not use the appliance to heat the kitchen. This will cause the atmosphere to become damp.
Flambéing under an extractor hood is not permitted. The high flames can cause a fire, even when the extractor hood is switched off.
The appliance is hot during and after use. Bear this in mind if young children come anywhere near the appliance. Do not leave young children alone near a hot cooking appliance.
flame protection of HG60..Q
The flame protection (ionisation protection) ensures that the gas supply is shut off if the flame goes out.
If the flame threatens to go out, the appliance ignites automatically.
extra safety device HG60..Q
If you forget to turn off one or more of the burners when you finish cooking and leave them burning for more than 4 hours, the gas supply will shut off automatically. The red indicator light will flash.
To release this safety lock, turn all burner controls to the 'off' position.
child lock HG60..Q
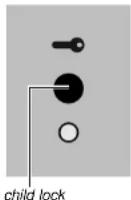
The childproof lock shuts off the gas supply. This protective device prevents 'undesired' use of the gas cooking appliance.
locking
Press the child lock button.
The red indicator light will come on, the gas supply is cut off and the appliance will not respond to the controls.
unlocking
To switch off this safety device, press the child lock button and hold it in for about 4 seconds. The red light will go out and the gas supply will be restored.
attention!
The distance between a pan and a wall that is not heat-resistant should be greater than 2 cm. If the pan is any closer, it may cause the wall to discolour or deform.
controls
igniting and adjusting
controls
igniting and adjusting
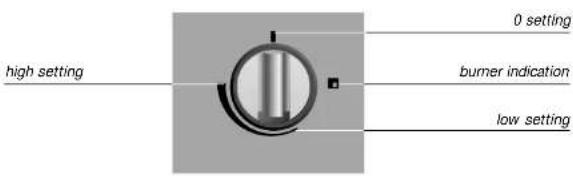
igniting HG60..Q
text_image
high setting 0 setting burner indication low setting- Push the control in and turn it to the full on position. The burner lights automatically.
If the burner does not ignite within ± 10 seconds, the gas supply is shut off and all the burners go out. The red indicator light starts to blink. Turn all the control knobs to their 'off' setting and wait until the indicator light goes out. Then try again. Now try to light the burner again.
If the burner blows out, it will automatically relight. If the burner does not relight within approximately 10 seconds, the gas supply is cut off and all the burners will go out.
If a burner refuses to light, always check:
—that the cover is properly aligned on the burner;
- that the burner is clean and dry.
adjusting
You may set the knob at any position between full-on and simmer.
igniting HG60..P/HG40..P
text_image
ignition zone high setting 0 setting burner indication low settingadjusting
attention!
- Press the control knob in.
- Turn the control knob carefully to the ignition zone. The burner ignites.
- Turn the control to the desired setting once the burner is alight.
If the burner fails to ignite, check if:
- The burner cap is positioned correctly.
- The burner is clean and dry.
You may set the knob at any position between full-on and simmer.
You can only ignite the burner in the ignition zone.
comfortable cooking
burners
comfortable cooking
pans
rapid burner
Sautéing and frying, deep-frying and blanching, boiling large quantities and stir-frying are best done on the rapid burner. This has the highest output.
Pay attention to the diameter of the pan, however.
A diameter of between 16 and 28 cm is best, although a pan of 12 cm also fits on this burner.
semi-rapid burner
The semi-rapid burner is highly suitable for stewing and steaming, boiling average-size portions (about four people) and making a roux.
Pay attention to the diameter of the pan, however.
A diameter of between 16 and 28 cm is best, although a pan of 12 cm also fits on the burner.
simmer burner
Preparing sauces, simmering and boiling can be done best on the simmer burner. On its high setting this burner is large enough for cooking food right through.
diameter
Use pans of the correct size.
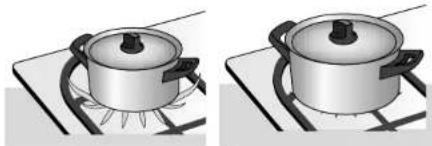
Use pans with a maximum size of 28 cm for the simmer, rapid and semi-rapid burners. Do not use pans with a base diameter of less than 12 cm. Smaller pans are not very stable; larger pans can result in walls becoming too hot.
The tips of the flames are the hottest. If the flames play around the pan, a lot of heat is wasted.
To make the most efficient use of gas, you should use a pan with a large diameter.
natural_image
Two identical illustrations of a cooking pot on a gas stove, showing heating and cooling process (no text or symbols)wrong right
attention!
The distance from a knob or a non heat resistant wall is always greater than 2 cm. If the pan is nearer, the knobs or the wall may become discoloured or deformed.
lid
Cook with a lid on the pan. You will make energy savings of up to 50%.
Regular cleaning immediately after use prevents food that has boiled over from affecting the hob over a period of time and causing stubborn stains that are hard to remove.
First clean the control knobs, burners and pan supports and only then the glass top. This prevents the top from becoming dirty again while you are cleaning.
daily
For daily cleaning of your gas hob, it is best to use a mild cleaning agent. Do not use too much liquid, since this could get into the burner or ventilation openings.
stubborn stains on enamel
Remove with a non-abrasive cream or a soft sponge. Never use scouring powders, aggressive cleaning agents, green scours.
stubborn stains on stainless steel
Remove with a special stainless-steel cleaning agent. Always polish in the direction of the surface structure of the stainless steel. In this way, you will prevent shiny patches occurring. This damage is excluded from the guarantee. If stains cannot be removed, clean the hob with the proprietary HG barbecue grill & oven cleaner. Always treat the whole drip-tray, to prevent "colour differences". Always treat with a stainless-steel polish/care product afterwards.
attention!
Remove food remains that have boiled over immediately, particularly red cabbage, apple sauce and rhubarb. If these remains are allowed to affect the hob over a period of time, they can cause discoloration.
Never immerse hot burner caps in cold water. The rapid cooling can damage the enamel.
If the appliance does not work properly, it does not always mean that it is defective. Try to deal with the problem yourself first. Phone the service department if the advice given below does not help.
If the light next to the childproof lock starts blinking, this indicates a malfunction. Count the number of long and short pulses. Error codes lower than ten are indicated by a number of short pulses. Error codes higher than ten are indicated by a long pulse followed by a number of short pulses. Error codes higher than twenty are indicated by two long pulses followed by a number of short pulses. For example, two long pulses and three short pulses indicates error code 23. Write down the number of pulses on a piece of paper, so that you can inform the engineer of the indicated error code when he comes.
| fault | cause | solution |
| Burner does not burn or ignite properly. | Burner is dirty or damp. | Clean and/or dry the burner. |
| Burner cap not fitted on the burner correctly. | Fit the burner cap on the burner correctly. | |
| The ventilation slots at the rear of the appliance are blocked. | Unblock the ventilation slots. | |
| Appliance is not suitable for the type of gas used. | Check the data plate and contact service if necessary. | |
| The flame protection has shut off the gas supply. | Turn all the control knobs to the 0 setting and ignite the burner again. If this malfunction happens again, check whether the burner caps have been put on the burners correctly and whether the burners, ignition pin and/or ionisation pin are clean and dry. | |
| The spark ignition sparks, but does not ignite. | Sparking plug dirty. | Clean the sparking plug. |
| Burner is dirty or damp. | Clean and/or dry the burner. | |
| Burner cap not fitted on the burner correctly. | Fit the burner cap on the burner correctly. | |
| The gas taps were not turned off during switching on. | Turn off all gas taps and relight the appliance. | |
| The burners suddenly go out. | After a cooking time of four hours, the burners go out automatically. | Turn off al gas taps and relight the appliance. |
The appliance's packaging is recyclable. The following can be used:
- cardboard;
• polyethylene film (PE);
• CFC-free polystyrene (PS rigid foam).
Dispose of these materials in a responsible way and in accordance with government regulations.
The authorities can provide you with information about how to dispose of discarded domestic appliances in a responsible way.
| front controls appliance variant I, natural gas | appliance variant II, liquid gas low pressure | appliance variant III, liquid gas high pressure | |||||||
| burner | rating G25 25 mbar ^1 2L kW | rating G20 20 mbar ^2 H ^1 2E ^1 2E* kW | rating G25 20 mbar ^1 2LL kW | rating G30 29 mbar ^1 3B:P kW | rating G31 29 mbar ^1 * kW | rating G31 37 mbar ^1 3P kW | rating G30 50 mbar ^1 3B:P kW | rating G31 50 mbar ^1 * kW | rating G31 67 mbar ^1 3P kW |
| simmer: high setting | 0.90 | 0.95 | 0.75 | 0.65 | 0.70 | 0.83 | 0.90 | 0.80 | 0.90 |
| semi rapid: high setting | 2.50 | 2.75 | 2.25 | 1.75 | 1.50 | 1.70 | 1.90 | 1.65 | 1.90 |
| rapid: high setting | 2.90 | 3.10 | 2.60 | 2.80 | 2.40 | 2.75 | 3.10 | 2.70 | 3.10 |
| top controls appliance variant I, natural gas | appliance variant II, liquid gas low pressure | appliance variant III, liquid gas high pressure | |||||||
| burner | rating G25 25 mbar ^1 2L kW | rating G20 20 mbar ^1 2H ^1 2E ^2 2E* kW | rating G25 20 mbar ^1 2LL kW | rating G30 28 mbar ^1 3B/P kW | rating G31 29 mbar ^1 * kW | rating G31 37 mbar ^1 3P kW | rating G30 50 mbar ^1 3B/P kW | rating G31 50 mbar ^1 * kW | rating G31 67 mbar ^1 3P kW |
| simmer: high setting | 0.75 | 0.83 | 0.68 | 0.85 | 0.70 | 0.83 | 0.90 | 0.75 | 0.90 |
| semi rapid: high setting | 2.50 | 2.75 | 2.25 | 1.75 | 1.50 | 1.70 | 2.00 | 1.70 | 2.00 |
| rapid: high setting | 2.90 | 3.20 | 2.60 | 2.80 | 2.40 | 2.75 | 3.20 | 2.75 | 3.20 |
The stated ratings are nominal power ratings.