
Code 25 - Keyboard M-AUDIO - Free user manual and instructions
Find the device manual for free Code 25 M-AUDIO in PDF.
| Product Type | MIDI controller keyboard |
| Number of keys | 25 velocity-sensitive keys with Aftertouch |
| Dimensions (approx.) | 45 x 20 x 5 cm |
| Weight (approx.) | 2 kg |
| Power supply | USB bus or 9V DC power adapter (sold separately) |
| Connectivity | USB, MIDI In/Out (5-pin), Sustain Input, Volume/Expression Input |
| Main features | Pitch Bend wheel, Modulation wheel, 9 potentiometers, 9 buttons, 8 rotary encoders, 8 pads, X/Y touchpad, display screen, transport controls, Zone mode, presets |
| Control modes | MIDI, Mackie Control/HUI, HID |
| Included software | Pro Tools | First M-Audio Edition, Ableton Live Lite |
| Care and cleaning | Soft, dry cloth. Avoid liquids and abrasive cleaners. |
| Safety | Do not expose to humidity, extreme temperatures. Disconnect before cleaning. |
| Spare parts and repairability | Contact M-Audio support or authorized dealers for spare parts. |
| General information | Brand: M-Audio, Model: Code 25, Category: 25-key MIDI controller keyboard |
Frequently Asked Questions - Code 25 M-AUDIO
User questions about Code 25 M-AUDIO
0 question about this device. Answer the ones you know or ask your own.
Ask a new question about this device
Download the instructions for your Keyboard in PDF format for free! Find your manual Code 25 - M-AUDIO and take your electronic device back in hand. On this page are published all the documents necessary for the use of your device. Code 25 by M-AUDIO.
USER MANUAL Code 25 M-AUDIO
USB Cable Safety & Warranty Manual
Software Download Cards
Important: Visit m-audio.com to download the complete User Guide and Code Preset Editor. The Preset Editor gives you a visual and intuitive way to edit the various messages that Code's controls send to your computer without having to use the hardware interface.
Support
For the latest information about this product (system requirements, compatibility information, etc.) and product registration, visit m-audio.com.
For additional product support, visit m-audio.com/support.
Quick Start
Software: We've included Pro Tools | First M-Audio Edition and Ableton Live Lite with your Code 25 so you can get started making music with professional software right out of the box. For Pro Tools | First M-Audio Edition, register your Code 25 on m-audio.com, and follow the install instructions in your User Account. For installing Ableton Live Lite, follow the instructions on the included Ableton Live Lite software download card. Also, visit ableton.com to check for any available software updates.
Virtual Instruments: Follow the instructions on the software download card for installing the included virtual instrument plugins. After installation, most DAWs will not load virtual instrument plugins automatically. In order to access the virtual instrument plugins with Pro Tools | First M-Audio Edition and Ableton Live Lite, you will need to choose the plugin folder for the software to scan:
Pro Tools | First M-Audio Edition (AAX) plugin folders:
Windows (32-bit): C:\Program Files (x86)\Common Files\Avid\Audio\Plug-Ins
Windows (64-bit): C:\Program Files\Common Files\Avid\Audio\Plug-Ins
macOS: Macintosh HD/Library/Application Support/Avid/Audio/Plug-Ins
Ableton (VST) Plugins:
Windows (32-bit): C:\Program Files (x86)\VSTplugins
Windows (64-bit): C:\Program Files\VSTplugins
macOS: Macintosh HD\Library Audio\Plugins\VST
To set your plugin folder in Ableton Live Lite:
- Go to the Preferences menu.
- Select the File Folder tab. Under Plug-In Sources click Browse and select the appropriate plugin folder.
- After making your selection, the Use VST Custom Plug-In Folder button should be ON. If it is not, click the button to turn it on.
- Exit the Preferences menu.
Pro Tools | First M-Audio Edition Setup
- Connect Code 25 to an available USB port on your computer using the supplied USB cable, and launch Pro Tools | First M-Audio Edition.
- Open or Create a Project.
- Select the Setup pulldown menu and open MIDI Input Devices. Enable MIDI Input from the Code 25 by clicking the box next to Code 25.
- Select the Setup pulldown menu and open Playback Engine. Choose your audio device from the Playback Engine pulldown menu.
- To create a new Instrument track, select the Track pulldown menu and select New.
- In the New pulldown menu, select Stereo, and then Instrument Track.
- In the newly created track, add an Insert to your track by clicking in your track's Inserts A-E and selecting Multichannel Plugin > Instrument and select the instrument you would like to use, such as Xpand!2 (Stereo). The plugin can now be triggered with your Code 25.
Note: Windows users will need either an external soundcard (such as the M-Track 2X2) or a low-latency ASIO driver.
Ableton Live Lite Setup
- Connect Code 25 to an available USB port on your computer using the supplied USB cable, and launch Ableton Live Lite.
- Next, open the Ableton Live Lite Preferences window. Choose your Audio Device in the Audio tab. This will be dependent upon the audio interface that you are using.
Windows: Select Options > Preferences
macOS: Select Live > Preferences
- Select the MIDI / Sync tab. Within the MIDI Ports section, adjust the settings as seen below:
Next to Input: Code 25, toggle the On button in the Track and Remote columns.
Next to Output: Code 25, toggle the On button in the Track and Remote columns.
-
Close the Preferences window.
-
To add an instrument or plugin to Ableton Live Lite in order to generate sound, in the Categories column, choose Instruments or Plug-Ins.
-
In the Name column, just to the right of the Categories column, locate the Instrument or Plug-in of your choice. Click-and-drag the instrument to a MIDI track in Ableton Live Lite to load the instrument. The Instrument can now be triggered with your Code 25.
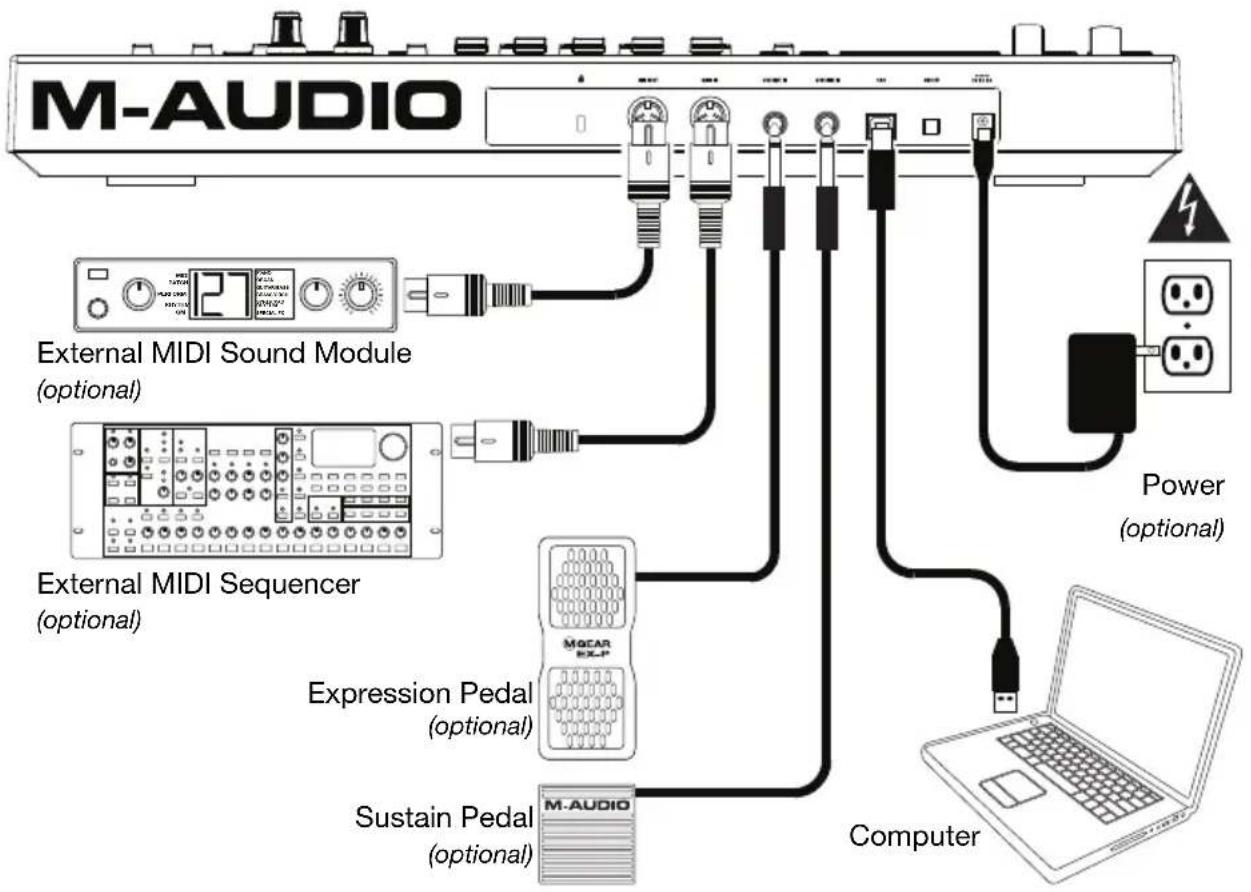
Connection Diagram
Remember to select Code 25 as the controller in the Preferences, Device Setup, or Options of your digital audio workstation (DAW).
Items not listed in Introduction > Box Contents are sold separately.
flowchart
graph TD
    A["M-AUDIO"] --> B["External MIDI Sound Module (optional)"]
    A --> C["External MIDI Sequencer (optional)"]
    A --> D["Expression Pedal (optional)"]
    A --> E["Sustain Pedal (optional)"]
    A --> F["Computer"]
    B --> G["Power (optional)"]
    C --> H["Computer"]
    D --> I["Computer"]
    E --> J["Computer"]
Features
Top Panel
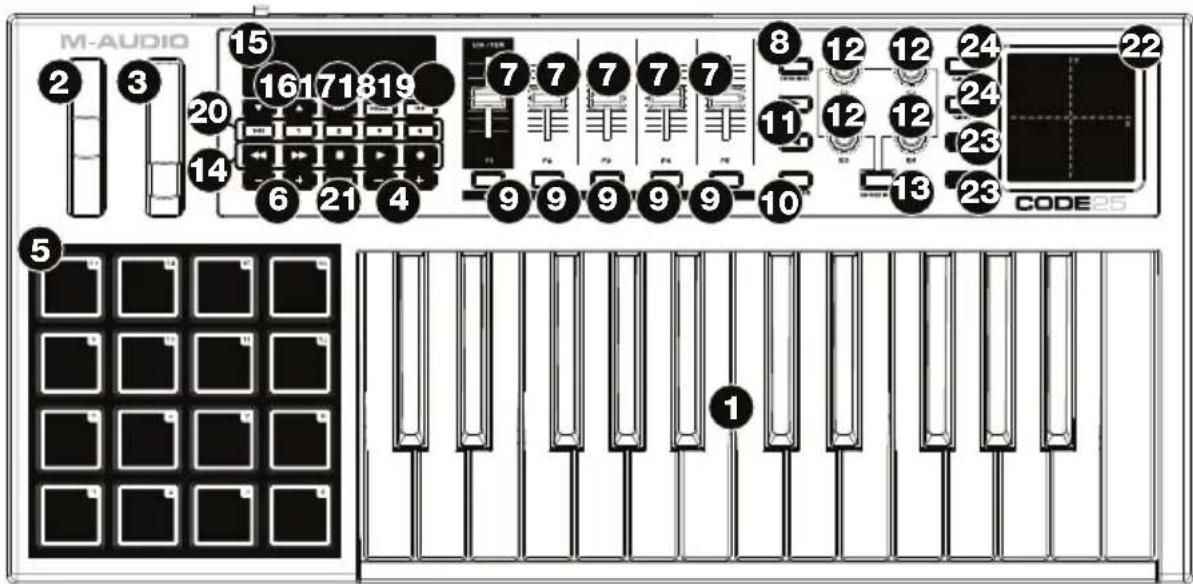
Important: For a more complete explanation of these controls and how to use them, download the Code 25 User Guide at m-audio.com.
- Keyboard: This 25-note keyboard is velocity-sensitive with aftertouch and, in conjunction with the Key Octave -/+ buttons, can access the full range of 127 available MIDI notes (10 octaves).
- Pitch-Bend Wheel: Move this wheel to send MIDI pitch bend information.
You can also change this wheel's MIDI assignment. See the User Guide to learn how to do this.
- Modulation Wheel: Move this wheel to send continuous controller data—MIDI CC #01 (modulation), by default.
You can also change this wheel's MIDI assignment. See the User Guide to learn how to do this.
- Key Octave -/+ : Press one of these buttons to move the keyboard up or down an octave.
Press and hold Transpose and press one of the buttons to move the keyboard down or up a semitone.
- Pads: Use these pads to trigger drum hits or other samples in your software or external MIDI sound module. The pads are velocity-sensitive, which makes them very responsive and intuitive to play.
You can also change these pads' MIDI and Color assignments. See the User Guide to learn how to do this.
- Pad Octave -/+ : Press one of these buttons to move the pads up or down an octave.
Press and hold Transpose and press one of the buttons to move the pads down or up a semitone.
- Faders (F1–F5): Use these faders to send MIDI CC messages to your software or external MIDI device. Use the Fader Mode button to change their current mode.
You can also change these faders' MIDI assignments. See the User Guide to learn how to do this.
- Fader Mode: Press this button to switch the Faders (F1–F5) between their two modes, distinguishable by this button's color:
Red: MIDI Mode (the default)
Green: Mackie Control®/HUI® Mode.
Learn more about these modes in the User Guide.
- Buttons (B1-B5): Use these buttons to send MIDI CC messages to your software or external MIDI device. They can function as momentary or toggle (latching) buttons. Use the Button Mode button to change their current mode.
You can also change these buttons' MIDI, HID, and Color assignments. See the User Guide to learn how to do this.
- Button Mode: Press this button to cycle the Buttons (B1–B5) through their three modes, distinguishable by this button's color:
Red: MIDI Mode (the default)
Green: Mackie Control/HUI Mode
Yellow: HID Mode
Learn more about these modes in the User Guide.
- Bank Right/Left: Press one of these buttons to move to the next or previous bank of assignable controls (Faders, Buttons, and Encoders). This will affect only the assignable controls that are in the same mode as the Bank Right/Left buttons, distinguishable by this button's color:
Red: MIDI Mode
Green: Mackie Control/HUI Mode
Yellow: HID Mode
White: Global (the default; this affects all assignable controls regardless of their current modes)
Learn more about these modes in the User Guide.
-
Encoders (E1–E4): Use these 360° knobs to send MIDI CC messages to your software or external MIDI device. You can also change these encoders' MIDI assignments. Please see the User Guide to learn how to do this.
-
Encoder Mode: Press this button to switch the Encoders (E1–E4) between their two modes, distinguishable by this button's color:
Red: MIDI Mode (the default)
Green: Mackie Control/HUI Mode
Learn more about these modes in the User Guide.
-
Transport Controls: These six buttons are dedicated buttons for sending conventional Mackie Control/HUI transport control commands: Rewind (◀), Fast-Forward (▶), Stop (■), Play (▶), and Record (●).
-
Display: Use this screen to view parameter values, settings, and messages relevant to Code 25's current operation. The various messages shown here are described throughout the User Guide.
-
Preset Down/Up (▼▲): Use these buttons to move to the previous or next preset.
You can also use these buttons to cycle through the editable parameters shown in the display, set the global MIDI channel, or set the MIDI channel of a zone of the keyboard. See the User Guide to learn how to do this.
Press and hold Shift and press these buttons to move to the previous or next program.
-
Shift: Press and hold this button to access the secondary functions of certain buttons and keys. Press this button in Zone Edit Mode to access additional zone editing functions.
-
Channel: Press this button to enter or exit Channel Mode. In Channel Mode, use the Preset Down/Up (▼▲) buttons to change Code 25's global MIDI channel. See the User Guide to learn more about this mode.
Press and hold Shift and press this button to send a MIDI Snap Shot. This sends the assigned MIDI message and current position/value of all controls.
- Edit: Press this button to enter or exit Edit Mode. In Edit Mode:
- Use the Preset Down/Up (▼▲) buttons to change the value or setting of the parameter shown in the display.
- Use the keyboard's keys to access additional functions or commands.
Learn more about this mode in the User Guide.
- Zone, 1-4: Press the Zone button to enter Zone Mode, which lets you use 4 different overlapping or non-overlapping ranges of keys on different MIDI channels. This is useful for sending notes to 4 external synthesizers from the same keyboard, for example.
Press any of the 1-4 buttons (when the Zone Button is active/lit) to activate or deactivate those zones of the keyboard. When a zone is active, its corresponding button will be lit.
Press and hold the Zone Button for 1 second to enter or exit Zone Edit Mode. You can press any of the flashing 1-4 buttons to edit that zone.
- Transpose: Press and hold this button and press one of the Pad Octave -/+ or Key Octave -/+ buttons to move the pads or keys (respectively) down or up a semitone.
Press and hold Shift and press this button to send a "MIDI Panic" message. This means all MIDI notes will stop and all controls will stop sending their messages.
-
X/Y Pad: This touch-sensitive pad lets you control two parameters simultaneously in a two-dimensional way (rather than a traditional one-dimensional modulation wheel). You can assign the parameter and range of each axis, X (horizontal) and Y (vertical). This pad can be in one of three modes as determined by the X-Mode and Y-Mode buttons.
-
X/Y Buttons: Press one of these buttons to send the minimum value for the parameter assigned to that axis.
Press and hold Shift and press one of these buttons to send the middle value for the parameter assigned to that axis (e.g., a MIDI value of 64—halfway between 0 and 127).
In Edit Mode, press one of these buttons when assigning a parameter to assign it to that axis: X (horizontal) or Y (vertical).
In HID Mode, use the X or Y button as a left-click or right-click mouse command (respectively).
- X-Mode / Y-Mode: Press one of these buttons to cycle through the available modes for that axis of the X/Y Pad, distinguishable by the button's color:
Red: MIDI CC Mode (the axis is assigned to a MIDI CC number)
Pink: In MIDI Note Mode (the axis is assigned a range, scale, or group of MIDI notes)
Yellow: HID Mode (the axis lets you use the X/Y Pad as a mouse/track pad)
Learn more about these modes in the User Guide.
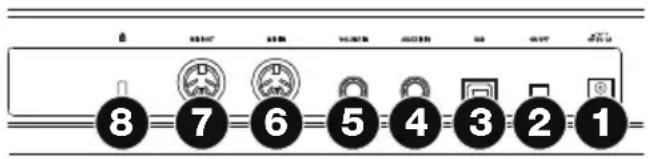
Rear Panel
- Power Input: If you do not want to use a computer in your setup (i.e., if you are using Code 25 to control an external MIDI module), connect Code 25's power input to a power outlet using an optional power adapter (9 VDC, 1 A, center-positive, sold separately). Alternatively, you can connect Code 25's USB Port to a power outlet using a standard USB charger (sold separately).
-
Power Switch: Press this button to power the Code 25 on or off.
-
USB Port: Use a standard USB cable to connect this USB port to your computer. The computer's USB port provides ample power to Code 25. This connection is also used to send and receive MIDI data to and from your computer.
This connection is also relevant to Code 25's MIDI Out and MIDI In:
- If an external device is connected to the MIDI Out, your computer can send MIDI messages out along this path: computer Code 25 external device.
-
If an external device is connected to the MIDI In, the external device sends MIDI messages in along this path: external device Code 25 computer. MIDI messages can then be sent to an external device via the MIDI Out, but it must pass through the computer first.
-
Sustain In: Connect an optional 1/4" (6.35 mm) TS sustain pedal to this input.
You can also change this input's MIDI assignment. See the User Guide to learn how to do this. - Volume In: Connect an optional 1/4" (6.35 mm) TRS expression pedal to this input.
You can also change this input's MIDI assignment. See the User Guide to learn how to do this. - MIDI In: Use a standard five-pin MIDI cable to connect this MIDI In to the MIDI Out of an external MIDI device (e.g., another MIDI controller). The MIDI messages sent to this MIDI In will be sent to your computer via the USB port.
- MIDI Out: Use a standard five-pin MIDI cable to connect this MIDI Out to the MIDI In of an external MIDI device (e.g., a synthesizer, sequencer, drum machine, etc.).
- Kensington ^® Lock Slot: You can use this slot to secure your Code 25 to a table or other surface.
Basic Operations
This chapter covers just some basic features of your Code 25. To get the most out of your Code 25, remember to download the full User Guide at m-audio.com for more in-depth explanations of the available controls and features.
Presets
A preset is a saved collection of MIDI assignments for Code 25's controls, channel settings, keyboard zone settings, etc. You can store up to 12 presets in Code 25's internal memory, enabling you to use a dedicated preset for each digital audio workstation (DAW), virtual instrument, or project/session, for example.
We recommend visiting m-audio.com and downloading the Code Preset Editor, which gives you a visual and intuitive way to edit the various messages that Code's controls send to your computer without having to use the hardware interface.
To select a preset, use the Preset Down/Up (▼▲) buttons. The current preset number will appear in the display.
To store a preset:
- Press Edit to enter Edit Mode. The button will light up.
- Press the keyboard's Store key.
- Press the keyboard's Enter key. The current settings will be stored as a preset.
Control Modes
Fader Modes: The Faders (F1–F5) are always in one of two modes. Press Fader Mode to switch between them, distinguishable by the Fader Mode button's color:
MIDI Mode (red): Moving the faders will send MIDI CC messages.
Mackie Control/HUI Mode (green): Moving the faders will send messages using the Mackie Control/HUI protocol.
Button Modes: The Buttons (B1–B5) are always in one of three modes. Press Button Mode button to cycle through them, distinguishable by the Button Mode button's color:
MIDI Mode (red): Pressing the buttons will send MIDI CC messages.
Mackie Control/HUI Mode (green): Pressing the buttons will send messages using the Mackie Control/HUI protocol.
HID Mode (yellow): Pressing the buttons will send ASCII character messages.
Encoder Modes: The Encoders (E1–E4) are always in one of two modes. Press Encoder Mode to switch between them, distinguishable by the Encoder Mode button's color:
MIDI Mode (red): Moving the encoders will send MIDI CC messages.
Mackie Control/HUI Mode (green): Moving the encoders will send messages using the Mackie Control/HUI protocol.
X-Modes / Y-Modes: The X/Y Pad is always in one of three modes. Press X-Mode or Y-Mode to cycle through them, distinguishable by the X-Mode or Y-Mode button's color (respectively):
MIDI Mode (red): The axis is assigned to a MIDI CC number.
MIDI Note Mode (pink): The axis is assigned to a range, scale, or group of MIDI notes.
HID Mode (yellow): The axis lets you use the X/Y Pad as a mouse/track pad.
Edit Mode
Edit Mode lets you set various functions on Code 25. For instance, you can assign MIDI parameters, set MIDI value ranges, change the colors of buttons, or assign MIDI channels.
To enter or exit Edit Mode, press Edit. The button will light up while in Edit Mode.
Basic Control Assignments
When you select a control to edit, you can set any of the following:
- MIDI assignment (Ctrl Assign): This number determines what type of MIDI message the control sends (a MIDI CC number, for example).
- Data 1 (if applicable): This number determines how the control functions (whether a button acts as a momentary or toggle button, for example). This applies only to a button, a pad, or the sustain pedal when its MIDI message (described above) is a non-registered parameter number (NRPN, a parameter number higher than 127).
- Data 2: This number determines the control's minimum value, its "released" message, etc.
- Data 3: This number determines the control's maximum value, its "pressed" message, etc.
All of these numbers and their corresponding parameters are listed in the User Guide. Some numbers correspond to their conventional MIDI parameters, but others may be less familiar to you, particularly NRPNs.
Editing Controls
This section is a brief overview of how to edit the basic control assignments described above. Please note, though, that different controls have different available parameters, settings, values, etc., so refer to the User Guide for a more in-depth explanation of how you can edit each control. You can use Edit Mode for a lot more than changing just the settings described here, as well.
Important:
- In Edit Mode, moving or pressing any control will cause it to send its MIDI message. In other words, Edit Mode does not prevent/disable controls from sending their normal data. Keep this in mind while selecting controls to edit them. The exceptions are the keyboard's 25 keys, which you can use to access additional functions or commands (see the diagram on the next page).
- After making your changes in Edit Mode, you must press the keyboard's Enter key to save them. To cancel your changes at any time, press Edit to exit Edit Mode.

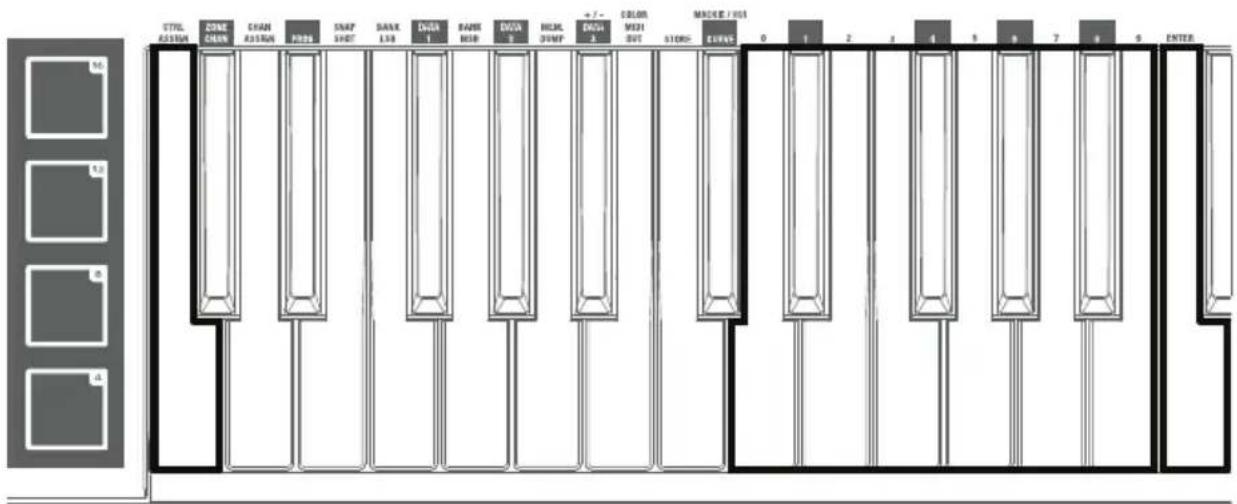
Ctrl Assign Numeric Keys 0
-9 Enter
To assign or edit a control:
- Press Edit to enter Edit Mode. The button will light up.
- Select the control you want to assign or edit by moving or pressing it. Its name (and number, if available) will appear in the display.
- Set any of the four control settings below. You can do more than one and in any order:
Control Assign:
i. Press the keyboard's Ctrl Assign key.
ii. Use the keyboard's numeric keys (0–9) to enter the number that corresponds to the desired MIDI message as specified in the User Guide.
Data 1 (if applicable): This applies only to a button, a pad, or the sustain pedal when its MIDI message is a non-registered parameter number (NRPN, a parameter number higher than 127).
i. Press the keyboard's Data 1 key.
ii. Use the keyboard's numeric keys (0–9) to enter the Data 1 value, which will appear in the display. This number corresponds to a specific MIDI parameter specified in the User Guide.
Data 2:
i. Press the keyboard's Data 2 key.
ii. Use the keyboard's numeric keys (0–9) to enter the Data 2 value, which will appear in the display. This number corresponds to, usually, the minimum value set on a control.
Data 3:
i. Press the keyboard's Data 3 key.
ii. Use the keyboard's numeric keys (0–9) to enter the Data 3 value, which will appear in the display. This number corresponds to, usually, the minimum value set on a control.
- To save your changes, press the keyboard's Enter key. Your changes will be saved and you will automatically exit Edit Mode.
To cancel your changes, press Edit. You will exit Edit Mode without saving anything.
macOS: Macintosh HD/Library/Application Support/Avid/Audio/Plug-Ins
Plugins de Ableton (VST):
Windows (32-bit): C:\Program Files (x86)\VSTplugins
Windows (64-bit): C:\Program Files\VSTplugins
macOS: Macintosh HD\Library Audio\Plugins\VST
macOS : Macintosh HD/Bibliothèque/Application Support/Avid/Audio/Plug-ins
Plug-ins Ableton (VST) :
Installation Pro Tools | First M-Audio Edition
Pro Tools | First M-Audio Edition (AAX) cartelle plugin:
Windows (32-bit): C:\Program Files (x86)\Common Files\Avid\Audio\Plug-Ins
Windows (64-bit): C:\Program Files\Common Files\Avid\Audio\Plug-Ins
macOS: Macintosh HD/Library/Application Support/Avid/Audio/Plug-Ins
Plugin Ableton (VST):
Windows (32-bit): C:\Program Files (x86)\VSTplugins
Windows (64-bit): C:\Program Files\VSTplugins
macOS: Macintosh HD\Library Audio\Plugins\VST
Per configurare la cartella plugin in Ableton Live Lite:
macOS: Macintosh HD/Library/Application Support/Avid/Audio/Plug-Ins
Ableton (VST) Plugins:
Windows (32-bit): C:\Programme (x86)\VSTplugins
Windows (64-bit): C:\Programme\VSTplugins
macOS: Macintosh HD\Library Audio\Plugins\VST
Ableton Live Lite Setup
Technical Specifications
Specifications are subject to change without notice.
| Keyboard | 25 velocity- and pressure-sensitive keys (with aftertouch)10-octave range available with Key Octave -/+ buttons4 assignable zonesAll 25 keys send secondary commands in Edit Mode |
| Pads | 16 assignable velocity-sensitive pads, multicolor-backlit |
| Faders | 5 30mm assignable fadersAdditional banks available with Bank ▶/◀ buttons |
| Buttons | 5 assignable buttons, multicolor-backlitAdditional banks available with Bank ▶/◀ buttons |
| Encoders | 4 assignable 360° knobsAdditional banks available with Bank ▶/◀ buttons |
| X/Y Pad | 55mm x 55mm touch-sensitive pad2 independently assignable axes: X (horizontal), Y (vertical) |
| Display | 85mm x 25mm LCD |
| Connections | 1 USB port1 1/4" (6.35mm) TS sustain pedal/footswitch input1 1/4" (6.35mm) TRS volume/expression pedal input1 5-pin MIDI input1 5-pin MIDI output1 power adapter input (power adapter not included)1 Kensington lock slot |
| Power | via USB bus powerorvia power adapter (9 VDC, 1A, center-positive, not included) |
| Dimensions(width x depth x height) | 20.9" x 10.0" x 2.8"53.0 cm x 25.5 cm x 7.1 cm |
| Weight | 6.2 lbs.2.8 kg |
Presets
Code 25 includes 12 presets with pre-assigned controls for various plugins and digital audio workstations (DAWs).
When using each of these presets:
• The faders, buttons, encoders, and X/Y pad in MIDI Mode will control the plugin/plugins.
• The buttons and X/Y pad in HID Mode will control the DAW.
Note: To use Code 25's transport controls with your DAW, make sure your DAW is set to receive Mackie Control or HUI commands.
| Preset Plugin DAW | ||
| 1 | VIP | General |
| 2 | AIR Music Technology ^ Hybrid Ableton ^TM Live | |
| 3 | AIR Music Technology ^ Loom Ableton ^TM Live | |
| 4 | AIR Music Technology ^ Hybrid Avid | ^ Pro Tools ^ |
| 5 | AIR Music Technology ^ Loom Avid | ^ Pro Tools ^ |
| 6 | AIR Music Technology ^ Hybrid Steinberg ^TM Cubase ^TM | |
| 7 | AIR Music Technology ^ Loom Steinberg ^TM Cubase ^TM | |
| 8 | AIR Music Technology ^ Hybrid Apple | ^ Logic ^ Pro |
| 9 | AIR Music Technology ^ Loom Apple | ^ Logic ^ Pro |
| 10 | AIR Music Technology ^ Hybrid Bitwig Studio | ^ |
| 11 | AIR Music Technology ^ Loom Bitwig Studio | ^ |
| 12 | AIR Music Technology ^ Hybrid & Loom Ableton ^TM Live | |
Trademarks and Licenses
M-Audio and AIR Music Technology are trademarks of inMusic Brands, Inc., registered in the U.S. and other countries.
Windows is a registered trademark of Microsoft Corporation in the United States and other countries.
Macintosh and macOS are trademarks or registered trademarks or service marks of Apple Inc., registered in the U.S. and other countries.
Mackie Control and HUI are trademarks or registered trademarks of LOUD Technologies Inc.
Kensington and the K & Lock logo are registered trademarks of ACCO Brands.
Ableton is a trademark of Ableton AG.
AAX, Avid and Pro Tools are trademarks or registered trademarks of Avid Technology, Inc. in the U.S. and other countries.
Cubase, Steinberg, ASIO, and VST are trademarks of Steinberg Media Technologies GmbH.
Logic is a trademark of Apple Inc., registered in the U.S. and other countries.
Bitwig Studio is a registered trademark of Bitwig GmbH, registered in the U.S. and other countries.
All other product or company names are trademarks or registered trademarks of their respective owners.
m-audio.com

- Support
- Quick Start
- Pro Tools | First M-Audio Edition (AAX) plugin folders:
- Ableton (VST) Plugins:
- Pro Tools | First M-Audio Edition Setup
- Ableton Live Lite Setup
- Connection Diagram
- Features
- Top Panel
- Rear Panel
- Basic Operations
- Presets
- To store a preset:
- Control Modes
- Edit Mode
- Basic Control Assignments
- Editing Controls
- Important:
- To assign or edit a control:
- Control Assign:
- Data 2:
- Data 3:
- Installation Pro Tools | First M-Audio Edition
- Technical Specifications
- Trademarks and Licenses
- m-audio.com
Brand : M-AUDIO
Model : Code 25
Category : Keyboard