
BX Subwoofer - Earphones M-AUDIO - Free user manual and instructions
Find the device manual for free BX Subwoofer M-AUDIO in PDF.
| Product type | Active subwoofer |
| Brand | M-Audio |
| Model | BX Subwoofer |
| Speaker | 25.4 cm (10 inch) composite cone, rubber surround, high-temperature voice coil |
| Amplifier | 240 watts, discrete transistor architecture |
| Frequency response | Extension down to 20 Hz |
| Power | 240 W |
| Audio inputs | Balanced/unbalanced XLR, balanced/unbalanced 6.35 mm TRS, unbalanced RCA |
| Audio outputs | Balanced/unbalanced XLR, balanced/unbalanced 6.35 mm TRS |
| Controls | Volume, Crossover (50–200 Hz), Phase (0°/180°), Bypass (via footswitch) |
| Crossover | 4th order Linkwitz-Riley low-pass filter, adjustable from 50 Hz to 200 Hz |
| Phase | Phase inversion 0°/180° |
| Power supply | Mains, voltage selector 115 V / 230 V |
| Included accessories | IEC power cable, footswitch, 4 removable feet, user guide |
| Dimensions (estimated) | 450 x 400 x 450 mm (W x D x H) |
| Weight (estimated) | 20 kg |
| Safety | Thermal protection with automatic shutoff; voltage selector must be set correctly |
| Maintenance and cleaning | Clean with a dry, soft cloth; do not use abrasive products |
| Spare parts and repairability | Contact M-Audio support for parts and repairs |
| General information | Manual available free in PDF format at notice-facile.com |
Frequently Asked Questions - BX Subwoofer M-AUDIO
User questions about BX Subwoofer M-AUDIO
0 question about this device. Answer the ones you know or ask your own.
Ask a new question about this device
Download the instructions for your Earphones in PDF format for free! Find your manual BX Subwoofer - M-AUDIO and take your electronic device back in hand. On this page are published all the documents necessary for the use of your device. BX Subwoofer by M-AUDIO.
USER MANUAL BX Subwoofer M-AUDIO
User Guide (English)
Introduction
About the BX Subwoofer
Thank you for choosing the M-Audio BX Subwoofer. The BX Subwoofer has been designed to integrate seamlessly with M-Audio's M3 series, BX series, or other lines of active studio monitors, extending the low-frequency response of the total monitoring system down to 20 Hz. Moreover, the versatile design of BX Subwoofer allows it to work well with any combination of active studio monitors in a two-channel stereo or multichannel surround environment.
Box Contents
BX Subwoofer
Power Cable
Momentary Footswitch (for Subwoofer Bypass)
(4) Removable Feet
User Guide
Safety & Warranty Manual
Support
For the latest information about this product (system requirements, compatibility information, etc.) and product registration, visit m-audio.com/bxsubwoofer.
For additional product support, visit m-audio.com/support.
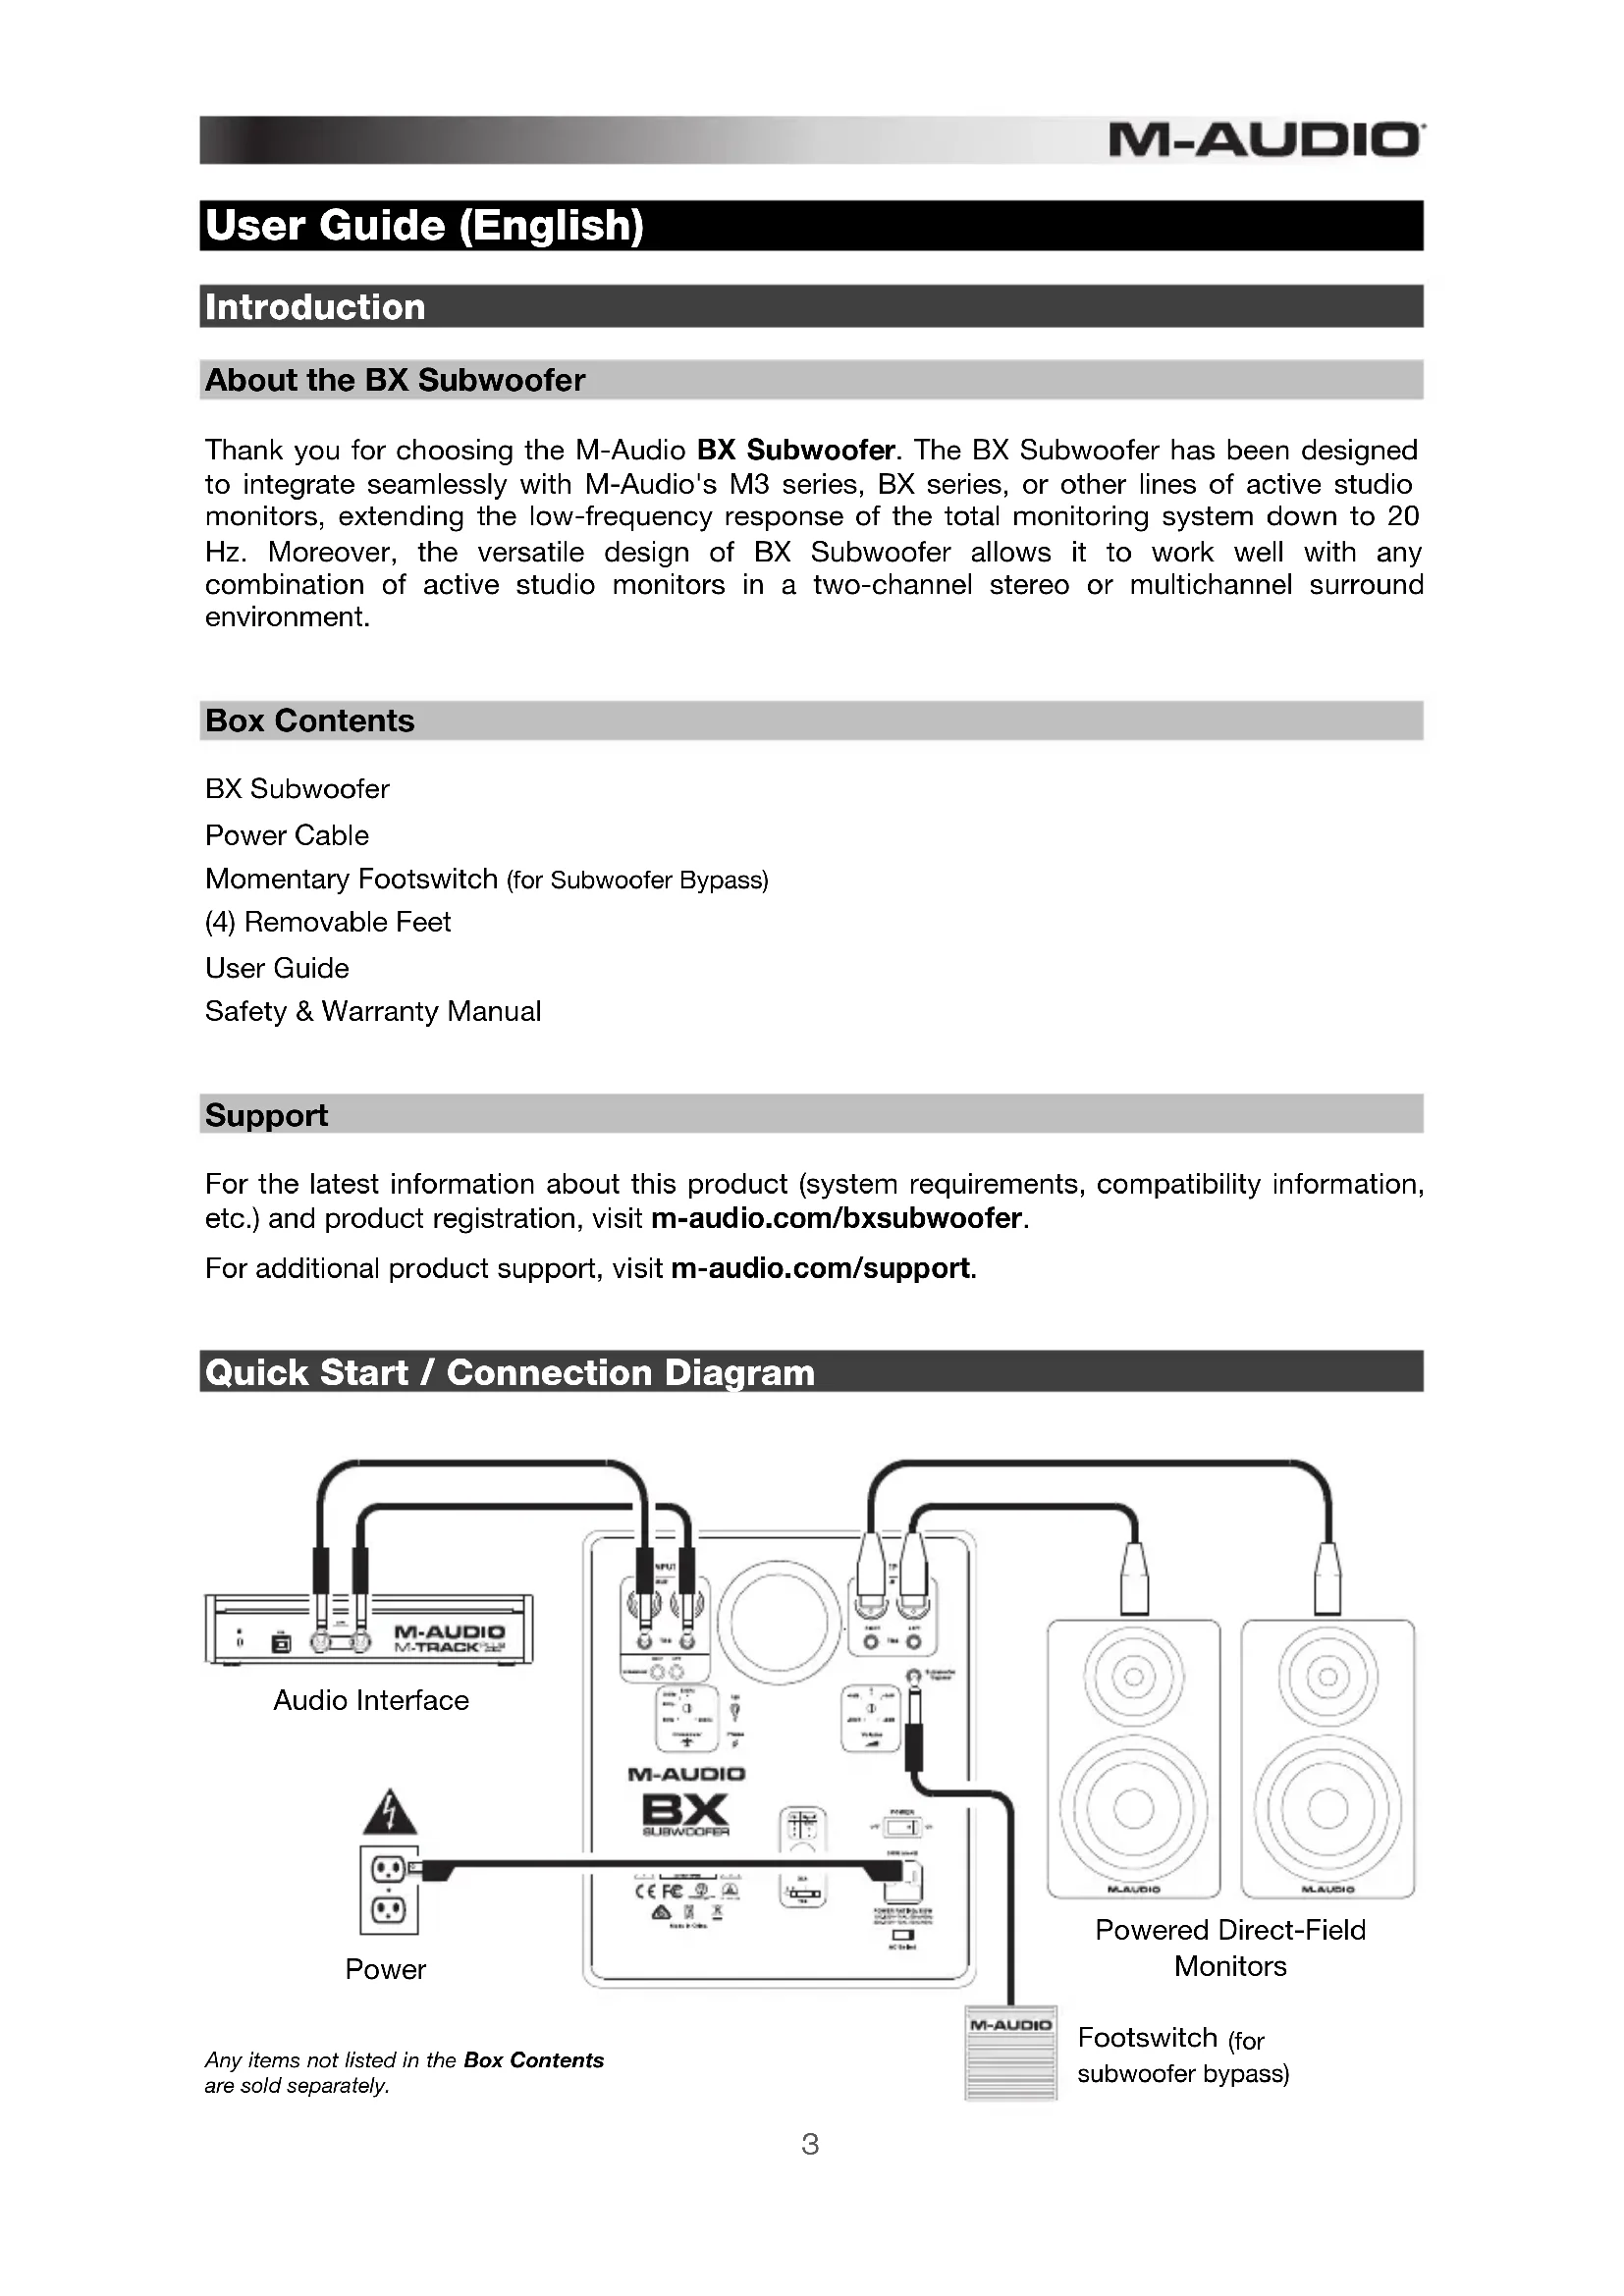
Quick Start / Connection Diagram

flowchart
graph TD
    A["Audio Interface"] --> B["M-AUDIO M-TRACK"]
    B --> C["Power"]
    C --> D["M-AUDIO BX SUBWOOFER"]
    D --> E["Powered Direct-Field Monitors"]
    E --> F["M-AUDIO"]
    F --> G["Footswitch (for subwoofer bypass)"]
    style A fill:#f9f,stroke:#333
    style B fill:#ccf,stroke:#333
    style C fill:#cfc,stroke:#333
    style D fill:#fcc,stroke:#333
    style E fill:#cff,stroke:#333
    style F fill:#ffc,stroke:#333
    note bottom of C Any items not listed in the Box Contents are sold separately.
Features
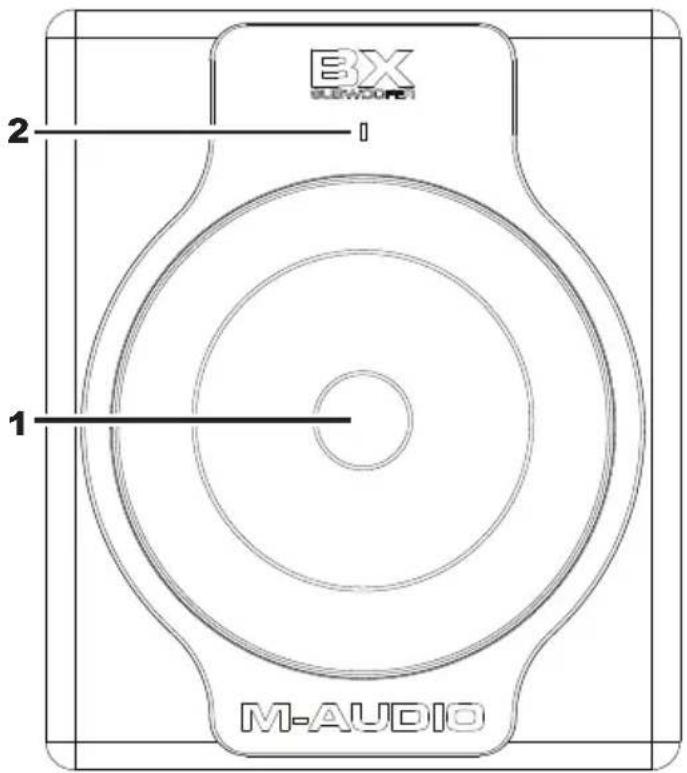
Front Panel
-
Subwoofer Driver: Redesigned and upgraded for the BX Subwoofer, the transducer driver utilizes a 10" (25.4 cm) composite diaphragm and well damped rubber surround, all driven by a high-temperature voice coil. It is designed to deliver a tight and punchy low-frequency response (in contrast to the "boomy" or "hyped" response that is often characteristic of underdamped subwoofers). The driver's high BI factor (electromagnet force factor) creates a powerful motor that allows the cone to follow the input signal very accurately, resulting in excellent low-frequency extension and transient response.
-
LED Indicator: The LED Indicator lights up blue when the subwoofer is powered on. When the Subwoofer Bypass feature is engaged, the LED Indicator will flash red to indicate that no sound is coming out of the subwoofer and that the full-bandwidth signal is being routed to the direct-field monitors. While in Thermal Protection mode, the LED Indicator will illuminate solid red, and no audio will be heard from the subwoofer.
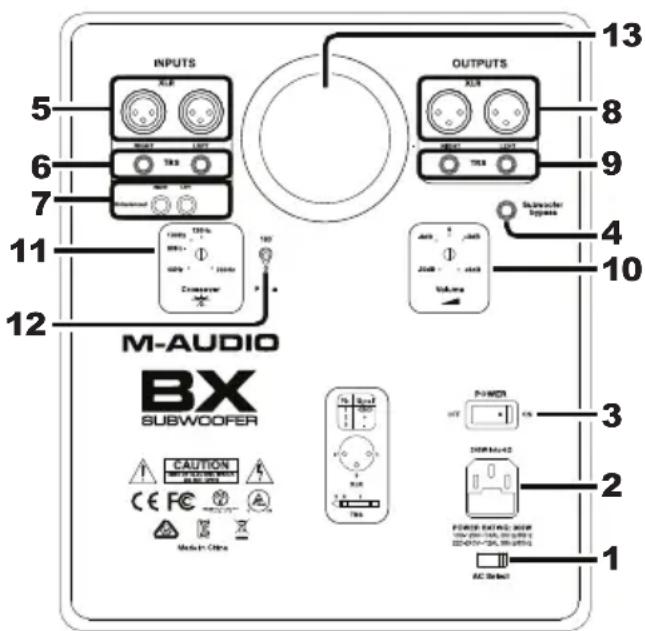
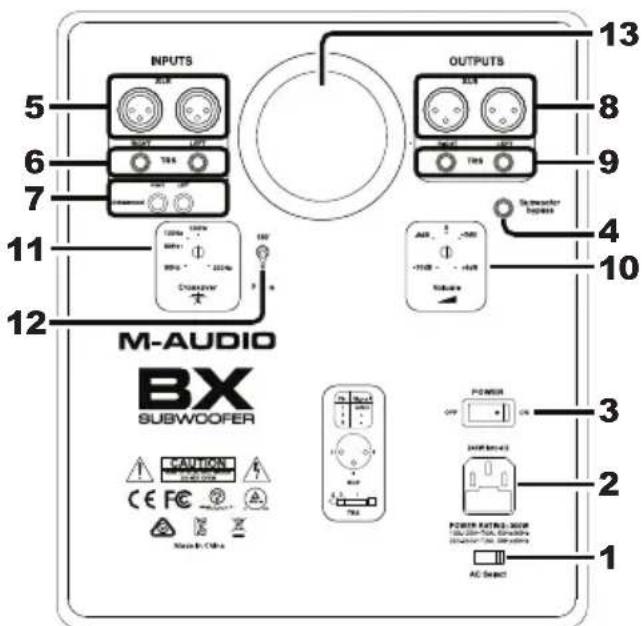
Rear Panel
-
AC Voltage Selector: Set this switch to the correct setting for your location: 115 V and 230 V. Use the 115 V setting for the USA and Japan, or use the 230 V setting for most of the UK and Europe. Make sure this switch is in the proper position for your area before attaching the power cable.
-
Power Input: Use a standard IEC power cable (included) to connect this input to a power outlet.
-
Power Switch: Use this switch to turn the subwoofer on and off.
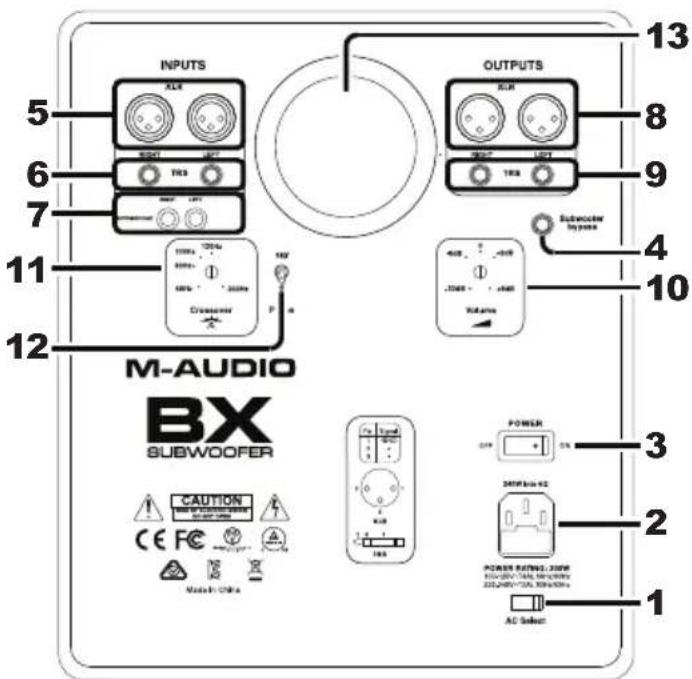
- Subwoofer Bypass: Connect the included footswitch to this input, and then use the footswitch to momentarily bypass the low frequencies generated by the subwoofer (including the amp, driver, and crossover), sending the full-bandwidth signal directly to your main monitors. This lets you conveniently audition mixes with and without the low-frequency extension of the subwoofer. The LED Indicator on the front of the subwoofer flashes red when in Bypass Mode.
Note: You can use any two-position footswitch, such as an electronic keyboard sustain pedal.
- XLR Inputs: Use these inputs for XLR connections with either balanced or unbalanced wiring.
Use XLR connectors with this wiring configuration:
• XLR Pin 1: signal ground (shield)
• XLR Pin 2: signal positive (+)
• XLR Pin 3: signal negative (−)
- TRS Inputs: Use these inputs for 1/4" (6.35 mm) connections with either balanced or unbalanced wiring.
For balanced wiring, use a three-conductor TRS connector with this wiring configuration:
• TRS tip: signal positive (+)
• TRS ring: signal negative (−)
• TRS sleeve: signal ground (shield)
For unbalanced wiring, use a 1/4" (6.35 mm) connector—either with two conductors (TS) or three conductors (TRS). A two-conductor (TS) connector automatically grounds the signal negative input, whereas a three-conductor (TRS) connector, wired unbalanced, provides the option of leaving the negative input open or grounded. We recommend grounding the unused negative input, which you can do by wiring the ring and sleeve of the TRS plug together.
Note: If the TRS Inputs and XLR Inputs are connected at the same time, the TRS Inputs will take priority, and the XLR Inputs will be muted. If the RCA Inputs are used at the same time as either of the TRS Inputs or XLR Inputs, audio will be heard from both. However, we recommend not playing audio through both connectors simultaneously, which can overload the inputs, resulting in clipping (distortion) at the inputs.
-
RCA Inputs: Use these inputs for unbalanced RCA connections.
-
XLR Outputs: Use these outputs for XLR connections, with either balanced or unbalanced wiring, to send the audio signal to your stereo direct-field monitors.
Use XLR connectors with this wiring configuration:
• XLR Pin 1: signal ground (shield)
• XLR Pin 2: signal positive (+)
• XLR Pin 3: signal negative (−)
- TRS Outputs: Use these outputs for 1/4" (6.35 mm) connections, with either balanced or unbalanced wiring, to send the audio signal to your stereo direct-field monitors.
For balanced wiring, use a three-conductor TRS connector with this wiring configuration:
• TRS tip: signal positive (+)
• TRS ring: signal negative (−)
• TRS sleeve: signal ground (shield)
-
Volume Control: Use this control to set the output gain from the subwoofer.
-
Variable Crossover: You can use this subwoofer in a variety of monitoring contexts, from two-channel to multichannel (e.g., 5.1, 7.1) systems, and as an accompaniment to practically any direct-field monitors. To this end, we have provided a versatile yet efficient way to tailor the subwoofer's response to work well in any typical monitoring system.
For a two-channel system, there is an in-line low-pass filter control that lets you adjust the crossover frequency. You can set it anywhere from 50 Hz to 200 Hz. It splits the signal by routing everything below that frequency to the subwoofer and everything above it to your main monitors. By using a fourth-order Linkwitz-Riley topology, the circuit enables you to achieve the flattest net response through the crossover point.
For multichannel systems, this subwoofer can reproduce just the output of the LFE (low-frequency effects) channel, or it can reproduce the bass from some or all of the main channels using conventional multichannel bass management schemes. In this application, you can simply "open up" the subwoofer fully by setting it to 200 Hz (for use with external bass managers), or you can set it to 120 Hz (to comply with the Dolby® Digital standard for the LFE band limit).
- Phase Selector: Because low-frequency signals have long wavelengths compared to the dimensions of most rooms, subwoofers can cause phasing or cancellations that can be quite dramatic. For this reason, we have included a phase inversion switch, which causes a 180^ phase shift in the subwoofer's output. This gives you more freedom in choosing where to locate the subwoofer (and consequently, the crossover frequency phase alignment) in your monitoring environment. Note that this function affects only the signal going to the subwoofer amplifier, not the signal going to your direct-field monitors.
- Bass Reflex Port: This subwoofer has a vented enclosure containing a custom bass-reflex port tube with a circular cross section on the rear of the enclosure. The port effectively gives the subwoofer a smooth response down to 20 Hz, and since its low-frequency contribution complements that of the front-firing woofer driver, the woofer stays linear and distortion-free throughout the passband. The port has also been designed using Failure Mode and Effects Analysis (FMEA) software in order to maximize output and minimize audible port air turbulence noise.
- Power Amplifier (not pictured): To generate a powerful, tight bass response, this subwoofer uses a 240-watt amplifier with customized discrete transistor architecture. The amplifier has a carefully designed damping factor which, in conjunction with the mechanical and electromechanical systems built into the driver, helps eliminate the natural tendency of the driver to "ring" after input signal has ceased. This results in an extremely accurate and controlled bass response. You will notice that kick drums and staccato bass notes reproduced by the subwoofer are tight and solid, as though coming from a large acoustic suspension system.
- Enclosure (not pictured): Like the other components, the subwoofer's enclosure has an important role in shaping the overall sonic response. To provide more stable performance, this subwoofer employs a special high-acoustic-efficiency medium-density fiberboard (MDF) and unique interior reinforcement designed to reduce sonic coloration and absorb vibration generated by the subwoofer's high-SPL signals and transients. Additionally, the cabinet uses carefully placed acoustic foam to absorb internal reflections and dampen standing waves. This effectively makes the enclosure behave as though it were larger, resulting in a system more capable of reproducing very low-frequency signals naturally and evenly.
- Thermal Protection (not pictured): The subwoofer's thermal protection protects it from overheating. If a critical internal temperature is reached, the subwoofer's amplifier will temporarily shut off until the temperature returns to a lower level. While in this protection mode, the LED Indicator will illuminate solid red, and no audio will be heard from the subwoofer. Once its internal temperature has dropped sufficiently, audio output will resume automatically, and the LED Indicator will illuminate blue again.
Setup
Connecting the Power
AC Voltage Select: Since this subwoofer contains its own amplifier, it must be connected to a power outlet using a standard IEC cable (included). Before connecting the subwoofer to a power outlet, set the AC Voltage Selector to the proper setting for your location: 115 V (for the USA and Japan) or 230 V (for most of the UK and Europe).
Warning: Setting an improper voltage selector setting may result in hazardous conditions and/or damage to speaker components not covered by speaker warranty.
Connecting Audio
Two-Channel Stereo Operation
Connect the main left and right outputs of your mixing console, audio interface, or sound card to the subwoofer's XLR Inputs, TRS Inputs, or RCA Inputs, and then connect the subwoofer's left and right XLR Outputs or TRS Outputs to your direct-field, full-range monitors.
While the TRS Inputs and TRS Outputs will work with unbalanced cables, we strongly recommend using balanced cables, which provides better immunity to inductively coupled noise from power cables, etc. For balanced wiring, use this wiring configuration:
• XLR Pin 1 or TRS sleeve: signal ground (shield)
• XLR Pin 2 or TRS tip: signal positive (+)
• XLR Pin 3 or TRS ring: signal negative (−)

flowchart
graph TD
    A["Audio Interface"] --> B["Power"]
    B --> C["M-AUDIO"]
    C --> D["M-AUDIO"]
    D --> E["M-AUDIO"]
    E --> F["M-AUDIO"]
    F --> G["M-AUDIO"]
    G --> H["M-AUDIO"]
    H --> I["M-AUDIO"]
    I --> J["M-AUDIO"]
    J --> K["M-AUDIO"]
    K --> L["M-AUDIO"]
    L --> M["M-AUDIO"]
    M --> N["M-AUDIO"]
    N --> O["M-AUDIO"]
    O --> P["M-AUDIO"]
    P --> Q["M-AUDIO"]
    Q --> R["M-AUDIO"]
    R --> S["M-AUDIO"]
    S --> T["M-AUDIO"]
    T --> U["M-AUDIO"]
    U --> V["M-AUDIO"]
    V --> W["M-AUDIO"]
    W --> X["M-AUDIO"]
    X --> Y["M-AUDIO"]
    Y --> Z["M-AUDIO"]
    Z --> AA["M-AUDIO"]
    AA --> AB["M-AUDIO"]
    AB --> AC["M-AUDIO"]
    AC --> AD["M-AUDIO"]
    AD --> AE["M-AUDIO"]
    AE --> AF["M-AUDIO"]
    AF --> AG["M-AUDIO"]
    AG --> AH["M-AUDIO"]
    AH --> AI["M-AUDIO"]
    AI --> AJ["M-AUDIO"]
    AJ --> AK["M-AUDIO"]
    AK --> AL["M-AUDIO"]
    AL --> AM["M-AUDIO"]
    AM --> AN["M-AUDIO"]
    AN --> AO["M-AUDIO"]
    AO --> AP["M-AUDIO"]
    AP --> AQ["M-AUDIO"]
    AQ --> AR["M-AUDIO"]
    AR --> AS["M-AUDIO"]
    AS --> AT["M-AUDIO"]
    AT --> AU["M-AUDIO"]
    AU --> AV["M-AUDIO"]
    AV --> AW["M-AUDIO"]
    AW --> AX["M-AUDIO"]
    AX --> AY["M-AUDIO"]
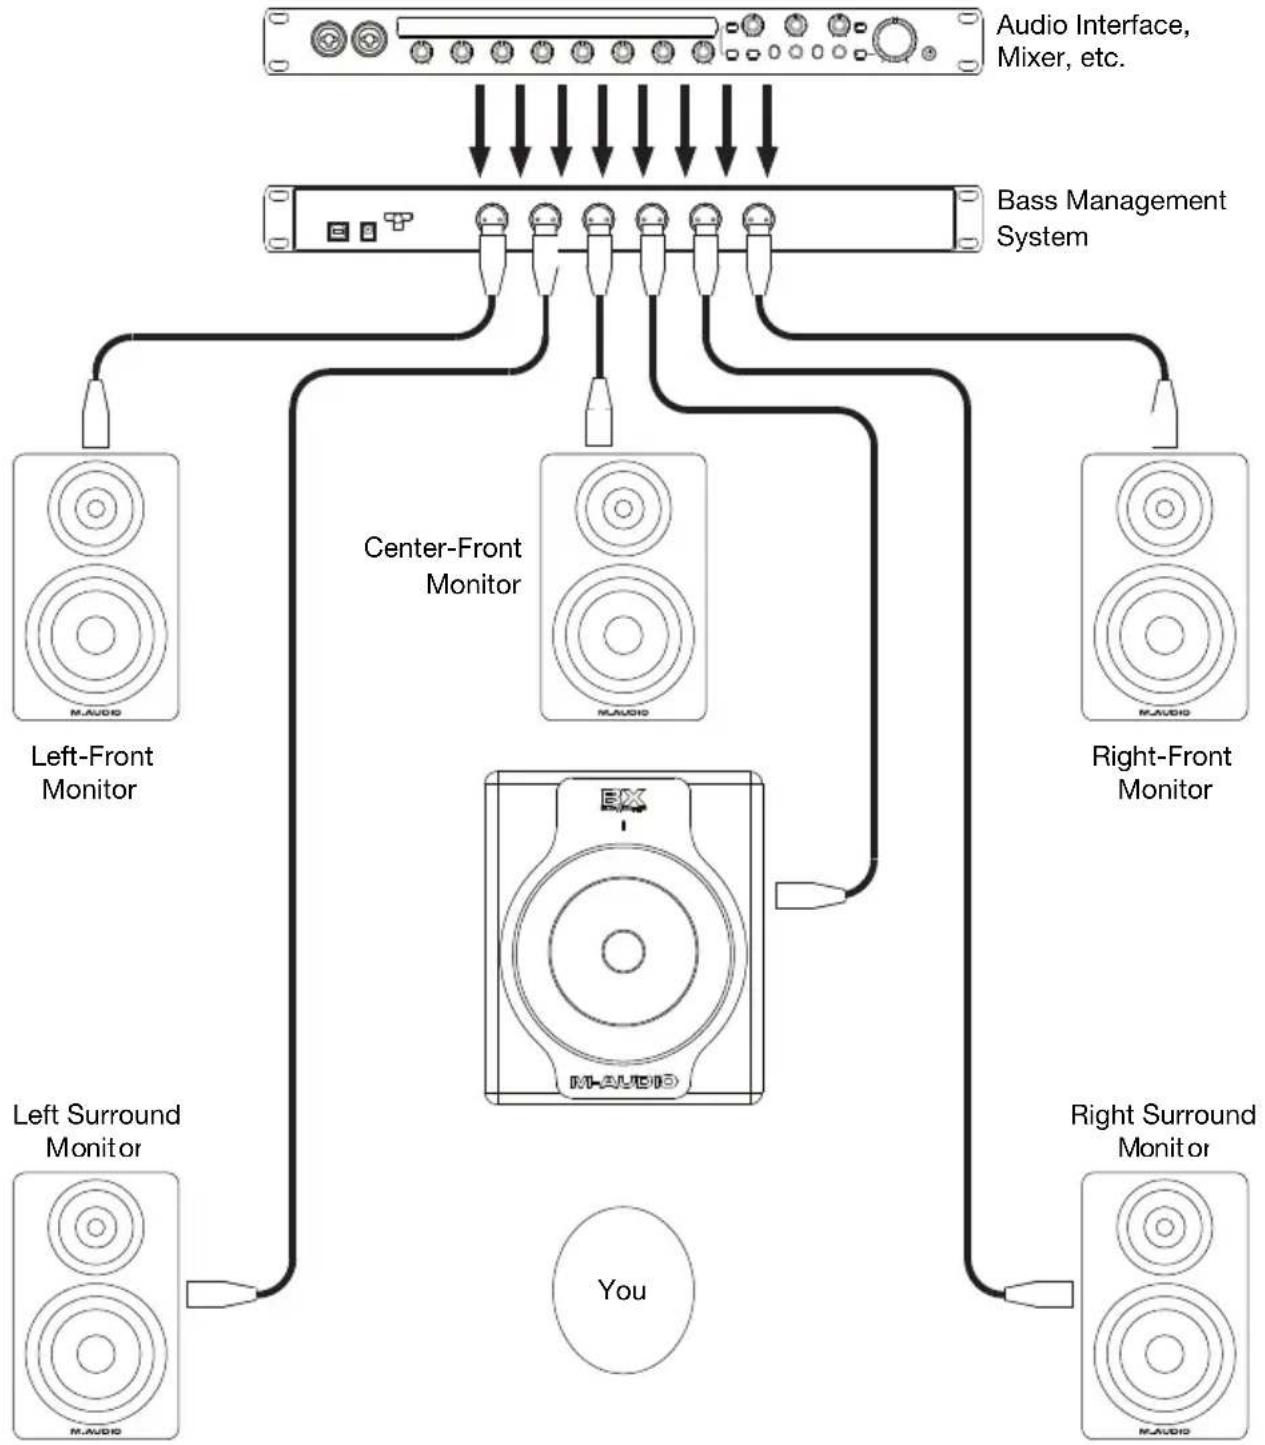
Multichannel Operation (e.g., 5.1 channel surround)
For mixing or monitoring a multichannel source, you undoubtedly have an external bass management system and/or you may be sending the LFE (low-frequency effects) channel directly to the subwoofer with no additional signal redirection. In this scenario, route your subwoofer's audio signal to either the left or right input on the BX Subwoofer. Also, bypass the BX Subwoofer's internal crossover by setting its Variable Crossover control to 200 Hz (fully open).
Note: More information on using a subwoofer for multichannel applications may be found at dolby.com, dts.com, or thx.com. These websites are examples only and are in no way associated or affiliated with M-Audio or inMusic Brands, Inc. M-Audio does not guarantee the performance or availability of these services. The BX Subwoofer is not endorsed, sponsored, or approved by these companies.
flowchart
graph TD
    A["Audio Interface, Mixer, etc."] --> B["Bass Management System"]
    B --> C["Center-Front Monitor"]
    B --> D["Right-Front Monitor"]
    C --> E["Left-Front Monitor"]
    C --> F["Right-Front Monitor"]
    D --> G["Right Surround Monitor"]
    D --> H["Left Surround Monitor"]
    E --> I["You"]
    F --> I
    G --> I
    H --> I
Adjusting the Back Panel Controls
Variable Crossover Control: We have touched on this topic already, but here are a few more points to keep in mind:
- The crossovers of most audio/video home theater systems are set to 80 Hz (assuming they are being used with a subwoofer). So if you are mixing multichannel material using the BX Subwoofer, we recommend starting with the 80 Hz setting as a reference to approximate a typical end-user listening environment.
- For easy compliance with Dolby ^ Digital, DTS ^ , and THX ^ recommendations, we have provided calibrated markings on the crossover dial for 80 Hz, 100 Hz, and 120 Hz positions (in addition to 50 Hz and 200 Hz).
-
If you are using the BX Subwoofer with direct-field monitors in a two-channel setup, we recommend starting with the crossover frequencies listed below (depending on your monitor's driver size) and adjusting it to suit your particular environment:
-
5" (127 mm) drivers (such as the M-Audio BX5 Carbon or BX5 D2): 80 Hz.
- 6" (152 mm) drivers (such as the M-Audio M3-6 or BX6 Carbon): 65 Hz.
- 8" (203 mm) drivers (such as the M-Audio M3-8, BX8 Carbon, or BX8 D2): 50 Hz.
- Check the documentation of your direct-field monitors to see if it recommends a specific subwoofer crossover frequency.
Phase Selector: As we mentioned before, this switch inverts the signal (the phase angle from 0^ to 180^ ) that goes to the subwoofer amplifier. This function does not affect the signal going to your direct-field monitors. Set the appropriate position of this switch by listening to how the sound from the BX Subwoofer blends with the rest of your system. There is no "right" or "wrong" position, but the subwoofer should be "phase-coherent" with your direct-field monitors at the crossover frequency and have no audible energy cancellation. You can determine this by playing a sine wave signal at the crossover frequency and putting the Phase Selector in the position that gives you the strongest output.
Volume Control: You should always send a line-level signal to the subwoofer's inputs. When the Volume Control is all the way up, 85 mV of pink noise at the input will produce a 100 dBA output SPL at one meter from the front baffle. The Volume Control affects the level going to the subwoofer amplifier, not the level of the subwoofer outputs send to your direct-field monitors.
Generally, we recommend trying to get the flattest, most even system response between your subwoofer and your direct-field monitors. Depending on the acoustics of your environment and the setup of your signal path and levels, spend a few minutes calibrating the respective levels of the subwoofer and each of your main monitors. If you have access to pink noise signals and/or swept sine waves (linear and logarithmic), they can help ensure your system has the smoothest tonal balance from top to bottom.
Subwoofer Bypass: This 1/4" (6.35 mm) mono input is for connecting a non-latching footswitch like the M-Audio SP-1 (or any similar sustain pedal for a keyboard controller). In two-channel scenarios, toggling the footswitch triggers a relay circuit that mutes the subwoofer's output and re-routes the full-bandwidth audio signal to your direct-field monitors. In essence, this removes the subwoofer (with its crossover) from the signal path so you can easily audition your mixes both with and without the subwoofer's low-frequency extension. This can also be useful in multichannel operation.
When the subwoofer is in Bypass Mode, the LED Indicator on the front panel flashes red.
Note: More information on using a subwoofer for multichannel applications may be found at dolby.com, dts.com, or thx.com. These websites are examples only and are in no way associated or affiliated with M-Audio or inMusic Brands, Inc. M-Audio does not guarantee the performance or availability of these services. The BX Subwoofer is not endorsed, sponsored, or approved by these companies.
Placing the BX Subwoofer
The "location, location, location" cliché applies to more than just the real estate market. It is equally (if not more) applicable to loudspeakers and room acoustics. Where you place the BX Subwoofer in your room can have a huge impact on how it will sound. In fact, any well-designed, powerful subwoofer can sound like a complete dud in your monitoring setup if you have placed it poorly. (This applies for any loudspeaker, but it is especially true for low-frequency reproducers like subwoofers.)
There are many opinions on the best method to determine the optimal location for your subwoofer (if you ask three different studio engineers, they will probably give you six different answers), but we cannot emphasize enough how important this issue is.
Things to Remember
Always place the subwoofer on the floor when you are using it, never on a table or speaker stand.
Take time to consider your subwoofer's placement, keeping in mind that the shape of your room, its dimensions (including ceiling height), the wall construction, any acoustic treatment, and other obstacles like furniture can affect the subwoofer's apparent performance.
Remember that the frequency of any given signal is inversely proportional to its wavelength (e.g., at 40 Hz, one wavelength is approximately 28 feet [8.5 meters]; at 80 Hz, one wavelength is a little over 14 feet [four meters]).
Different Methods
One theory suggests that the best position for a subwoofer in a two-channel system is on the floor halfway between your left and right direct-field monitors, with its front facing forward and in the same plane as the direct-field speakers. From there, you can adjust the subwoofer's position until it is most "correct."
Another theory dictates that you should start with the subwoofer in a corner of the room's floor, where the adjacent walls can help the subwoofer maximize the amount of sound it radiates; and then you can adjust the position to suit your specific monitoring setup.
Another method that many mix engineers have employed with great success uses the law of bilateral symmetry. Place the subwoofer in the chair in your listening position (presumably, this is at the apex of an isosceles triangle between your left and right direct-field monitors). Play some music with substantial bass frequencies (pink noise works well, too) into the subwoofer at a comfortable listening level. Get down on the floor of the room and listen for a place where the sound is "fullest" but also "tight"-sounding, and place your subwoofer there. To be more precise, use a 1/12th-octave real-time spectrum analyzer instead of your ears and perform the same exercise using pink noise as the test signal and observing where the spectral response is smoothest and has the greatest low-frequency extension.
Further Adjustments
Because low-frequency signals radiate omnidirectionally, you may find that the best location sonically for the subwoofer is inconvenient (like in an area of your studio with a lot of foot traffic). If this is the case, try flipping the Phase Selector on the rear panel and repeat the exercise to see if you can find a more convenient place.
Finally, once you have placed the subwoofer where you believe it will sound best, play some material along with direct-field monitors, listening from your standard mix position. Make sure the subwoofer's Volume Control, Phase Selector, and Variable Crossover are set appropriately. If something sounds "wrong" to you, experiment with other locations and different directions for facing the driver. You may inadvertently find a better placement, even if you think its current location already sounds good.
Assistance technique
Technical Specifications
| Type | Bass-reflex active powered subwoofer |
| Woofer Driver | 10" (71 cm) composite (treated paper/fiberglass) cone with high-temperature voice coil and damped rubber surround |
| Frequency Response | 20 Hz – 200 Hz |
| Crossover | High-pass/low-pass linked filter sweepable from 50 Hz – 200 Hz; 24 dB/octave 4th-order Linkwitz-Riley alignment |
| Input Sensitivity | 85 mV pink noise input produces 100 dBA output SPL at one meter with Volume Control at maximum |
| Amplifier | 240 W average power into 4 Ω, discrete transistor design |
| Signal-to-Noise Ratio | 86 dB (A-weighted) |
| THD (at rated power) | 0.019% |
| Inputs | 2 XLR inputs, balanced or unbalanced2 TRS inputs, balanced or unbalanced2 RCA inputs, unbalanced |
| Outputs | 2 XLR outputs for satellites, balanced or unbalanced2 TRS outputs for satellites, balanced or unbalanced |
| Controls | Volume/Gain control, phase inverse switch, variable crossover control, subwoofer bypass footswitch input |
| Input Impedance | 20 kΩ balanced, 10 kΩ unbalanced |
| Maximum Input Level | +20 dBu |
| Protections | Over-temperature (thermal), turn-on/off transient, subsonic filter, external mains fuse, DC protection, over-current protection |
| Indicators | Power On (blue) or Bypass Mode (red) |
| Cabinet | Vinyl-laminated medium-density fiberboard |
| Power | Detachable grounded IEC cable with voltage selector for 100-120 V (~50/60 Hz) or 220-240 V (~50/60 Hz) |
| Dimensions(width x depth x height) | 13.0" 17.3" x 15.5"33 cm x 43.9 cm x 39.4 cm |
| Weight | 54.6 lbs.24.8 kg |
Specifications are subject to change without notice.
Trademarks and Licenses
M-Audio is a trademark of inMusic Brands, Inc., registered in the U.S. and other countries. Dolby is a registered trademark of Dolby Laboratories. DTS is a registered trademark of DTS, Inc. THX is a trademark of THX Ltd. which is registered in some jurisdictions. All other product or company names are trademarks or registered trademarks of their respective owners.
m-audio.com
- User Guide (English)
- Introduction
- About the BX Subwoofer
- Box Contents
- Support
- Quick Start / Connection Diagram
- Features
- Front Panel
- Rear Panel
- Setup
- Connecting the Power
- Connecting Audio
- Two-Channel Stereo Operation
- Multichannel Operation (e.g., 5.1 channel surround)
- Adjusting the Back Panel Controls
- Placing the BX Subwoofer
- Things to Remember
- Different Methods
- Further Adjustments
- Assistance technique
- Trademarks and Licenses
- m-audio.com
Brand : M-AUDIO
Model : BX Subwoofer
Category : Earphones