IS5V8CHXE - Cooker INDESIT - Free user manual and instructions
Find the device manual for free IS5V8CHXE INDESIT in PDF.
User questions about IS5V8CHXE INDESIT
0 question about this device. Answer the ones you know or ask your own.
Ask a new question about this device
Download the instructions for your Cooker in PDF format for free! Find your manual IS5V8CHXE - INDESIT and take your electronic device back in hand. On this page are published all the documents necessary for the use of your device. IS5V8CHXE by INDESIT.
USER MANUAL IS5V8CHXE INDESIT
natural_image
Simple line drawing of a kitchen oven icon (no text or symbols)FR
GUIDEGUIDEGUIDEGUIDEGUIDE
D'UTILISATION QUOTIDIENNE 11
Installation 47
EN
Operating Instructions
COOKER AND OVEN
Contents
Safety Instructions 9
DAILY REFERENCE
GUIDEGUIDE 38
Installation 47
DE
DÉCLARATIONS DE CONFORMITÉ
IMPORTANT TO BE READ AND
Before using the appliance, read these safety instructions. Keep them nearby for future reference.
These instructions and the appliance itself provide important safety warnings, to be observed at all times. The manufacturer declines any liability for failure to observe these safety instructions, for inappropriate use of the appliance or incorrect setting of controls.
⚠ WARNING: The appliance and its accessible parts become hot during use. Care should be taken to avoid touching heating elements. Children less than 8 years of age must be kept away unless continuously supervised.
⚠ WARNING : If the hob surface is cracked, do not use the appliance – risk of electric shock.
⚠ WARNING : Danger of fire : Do not store items on the cooking surfaces.
⚠️ CAUTION: The cooking process has to be supervised. A short cooking process has to be supervised continuously.
⚠ WARNING: Leaving the hob unattended when cooking with fat or oil can be dangerous – risk of fire. NEVER try to extinguish a fire with water, but switch off the appliance and then cover the flames e.g. with a lid or a fire blanket.
⚠ Do not use the hob as a work surface or support. Keep clothes or other flammable materials away from the appliance, unit all the components have cooled down completely – risk of fire.
⚠️ Very young children (0-3 years) should be kept away from the appliance. Young children (3-8 years) should be kept away from the appliance unless continuously supervised. Children from 8 years old and above and persons with reduced physical, sensory or mental capabilities or lack of experience and knowledge can use this appliance only if they are supervised or have been given instructions on safe use and understand the hazards involved. Children must not play with the appliance. Cleaning and user maintenance must not be carried out by children without supervision.
⚠ WARNING: The appliance and its accessible parts become hot during use. Care should be taken to avoid touching heating elements. Children less than 8 years of age must be kept away unless continuously supervised
⚠️ Never leave the appliance unattended during food drying. If the appliance is suitable for probe usage, only use a temperature probe recommended for this oven - risk of fire.
⚠️ Keep clothes or other flammable materials away from the appliance, until all the components have cooled down completely - risk of fire. Always
be vigilant when cooking foods rich in fat, oil or when adding alcoholic beverages - risk of fire. Use oven gloves to remove pans and accessories. At the end of cooking, open the door with caution, allowing hot air or steam to escape gradually before accessing the cavity - risk of burns. Do not obstruct hot air vents at the front of the oven - risk of fire.
Exercise caution when the oven door is in the open or down position, to avoid hitting the door.
PERMITTED USE
⚠️ CAUTION: The appliance is not intended to be operated by means of an external switching device, such as a timer, or separate remote controlled system.
This appliance is intended to be used in household and similar applications such as: staff kitchen areas in shops, offices and other working environments; farm houses; by clients in hotels, motels, bed & breakfast and other residential environments.
⚠️ No other use is permitted (e.g. heating rooms).
This appliance is not for professional use. Do not use the appliance outdoors.
Do not store explosive or flammable substances (e.g. gasoline or aerosol cans) inside or near the appliance - risk of fire.
INSTALLATION
⚠ The appliance must be handled and installed by two or more persons - risk of injury. Use protective gloves to unpack and install - risk of cuts.
⚠️ Installation, including water supply (if any), electrical connections and repairs must be carried out by a qualified technician. Do not repair or replace any part of the appliance unless specifically stated in the user manual. Keep children away from the installation site. After unpacking the appliance, make sure that it has not been damaged during transport. In the event of problems, contact the dealer or your nearest Aftersales Service. Once installed, packaging waste (plastic, styrofoam parts etc.) must be stored out of reach of children - risk of suffocation. The appliance must be disconnected from the power supply before any installation operation - risk of electric shock. During installation, make sure the appliance does not damage the power cable - risk of fire or electric shock. Only activate the appliance when the installation has been completed.
Do not remove the appliance from its polystyrene foam base until the time of installation.
⚠️ Do not install the appliance behind a decorative door - risk of fire.

if the range is placed on a base, it must be leveled and fixed to the wall by the retention chain provided, to prevent the appliance slipping from the base.

WARNING: In order to prevent the appliance from tipping, the retention chain provided must be installed. Refer to the instructions for installation.
ELECTRICAL WARNINGS
⚠️ The rating plate is on the front edge of the oven (visible when the door is open).
⚠ It must be possible to disconnect the appliance from the power supply by unplugging it if plug is accessible, or by a multi-pole switch installed upstream of the socket in accordance with the wiring rules and the appliance must be earthed in conformity with national electrical safety standards.
Do not use extension leads, multiple sockets or adapters. The electrical components must not be accessible to the user after installation. Do not use the appliance when you are wet or barefoot. Do not operate this appliance if it has a damaged power cable or plug, if it is not working properly, or if it has been damaged or dropped.
⚠️ If the supply cord is damaged, it must be replaced with an identical one by the manufacturer, its service agent or similarly qualified persons in order to avoid a hazard - risk of electric shock.
⚠️ If the power cable needs to be replaced, contact an authorized service center.
⚠ WARNING: Ensure that the appliance is switched off before replacing the lamp to avoid the possibility of electric shock.
CLEANING AND MAINTENANCE
⚠ WARNING: Ensure that the appliance is switched off and disconnected from the power supply before performing any maintenance operation; never use steam cleaning equipment - risk of electric shock.
Do not use harsh abrasive cleaners or metal scrapers to clean the door glass since they can scratch the surface, which may result in shattering of the glass.
Do not use abrasive or corrosive products, chlorine-based cleaners or pan scourers.
⚠️ Make sure the appliance has cooled down before cleaning or performing maintenance. - risk of burns.
⚠ WARNING: Switch off the appliance before replacing the lamp - risk of electric shock.
DISPOSAL OF PACKAGING MATERIALS
The packaging material is 100% recyclable and is marked with the recycle symbol 🚗. The various parts of the packaging must therefore be disposed of responsibly and in full compliance with local authority regulations governing waste disposal.
DISPOSAL OF HOUSEHOLD APPLIANCES
This appliance is manufactured with recyclable or reusable materials. Dispose of it in accordance with local waste disposal regulations.
For further information on the treatment, recovery and recycling of household electrical appliances, contact your local authority, the collection service for household waste or the store where you purchased the appliance. This appliance is marked in compliance with European Directive 2012/19/EU, Waste Electrical and Electronic Equipment (WEEE). By ensuring this product is disposed of correctly, you will help prevent negative consequences for the environment and human health. The symbol 📄 on the product or on the accompanying documentation indicates that it should not be treated as domestic waste but must be taken to an appropriate collection centre for the recycling of electrical and electronic equipment.
ENERGY SAVING TIPS
Only preheat the oven if specified in the cooking table or your recipe. Use dark lacquered or enamelled baking trays as they absorb heat better.
DECLARATIONS OF CONFORMITY
This appliance meets Ecodesign requirements of European Regulation 66/2014 in compliance with the European standard EN 60350-1.
This appliance meets Ecodesign requirements of European Regulation 66/2014 in compliance with the European standard EN 60350-2.
GUIDE GUITELISATHGNI QUCOTDIENNE

natural_image
Close-up of a metallic electronic component with red arrows pointing to features (no visible text or symbols)text_image
Diagram showing a room interior with numbered steps and directional arrows indicating flow or movement.natural_image
Simple line drawing of a mechanical or architectural component with a curved arrow indicating rotation (no text or symbols)text_image
A. Foyers A A A Bradiants
natural_image
Three diagrams showing crossed-out electrical symbols on a surface, no text or labels presentnatural_image
Pure mechanical diagram showing two circular components with directional arrows, no text or symbols presentnatural_image
Technical line drawing of a mechanical component with an arrow indicating direction (no text or symbols)natural_image
Two-step diagram showing hands using a tool to adjust or install a mechanical component, with no visible text or symbols.natural_image
Close-up of a metallic mechanical component with red arrows pointing to features (no visible text or symbols)text_image
Diagram showing a kitchen interior with labeled parts and directional arrows indicating movement or flow.natural_image
Three schematic diagrams showing cross-shaped symbols on a baseline, with no readable text or labels.natural_image
Diagram of a mechanical assembly with a black arrow indicating direction (no text or symbols present)natural_image
Illustration of a hand using a tool to adjust or install a mechanical component (no text or symbols visible)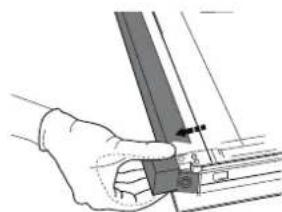
natural_image
Hand holding a mechanical component with a ruler and bracket (no text or symbols visible)text_image
Diagram illustrating a hand holding a folded document with an inset showing the same object and directional arrows indicating movement or force.natural_image
Close-up of a metallic electronic component with red arrows pointing to features (no visible text or symbols)natural_image
Simple line drawing of a mechanical or architectural component with no text or symbolstext_image
Diagram showing a refrigerator interior with labeled parts and a magnified view of the interior area.natural_image
Three schematic symbols showing crossed-out electrical or mechanical components on a line, with no text or labels present.natural_image
Pure technical diagram showing two circular components mounted on a horizontal line, no text or symbols presentnatural_image
Diagram of a car interior with a directional arrow indicating movement (no text or symbols present)natural_image
Two-step diagram showing hand positioning of a mechanical component with arrows indicating movement (no text or symbols present)text_image
Illustration showing a hand holding a folded document with magnified views of the object being held, including a close-up of the body.Read the safety instructions carefully before using the product
PRODUCT DESCRIPTION
text_image
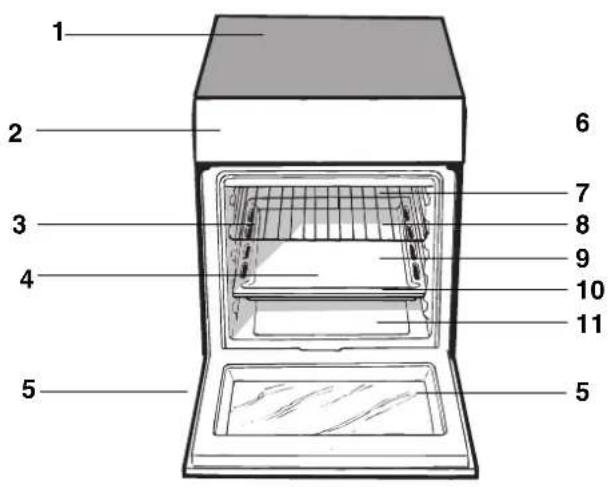
1 2 3 4 5 6 7 8 9 10 11 5- Glass ceramic hob
- Control panel
3.Sliding grill rack
4.DRIPPING pan - Adjustable foot
- GUIDE RAILS for the sliding racks
7.position 5
8.position 4
9.position 3
10.position 2
11.position 1
CONTROL PANEL
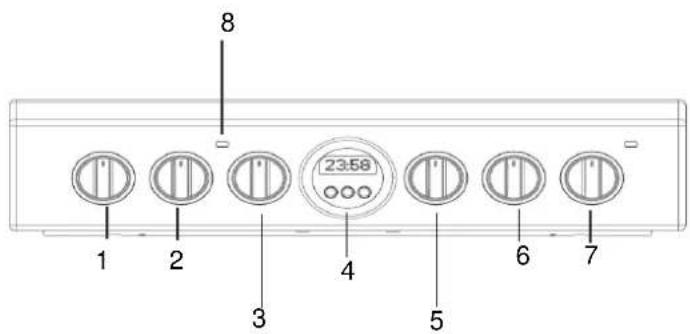
text_image
1 2 3 4 5 6 7 8 23:58- Electric HOTPLATE control knob
- Electric HOTPLATE control knob
-
THERMOSTAT knob
-
TIMER knob
- SELECTOR knob
-
Electric HOTPLATE control knob
-
Electric HOTPLATE control knob
- THERMOSTAT indicator light
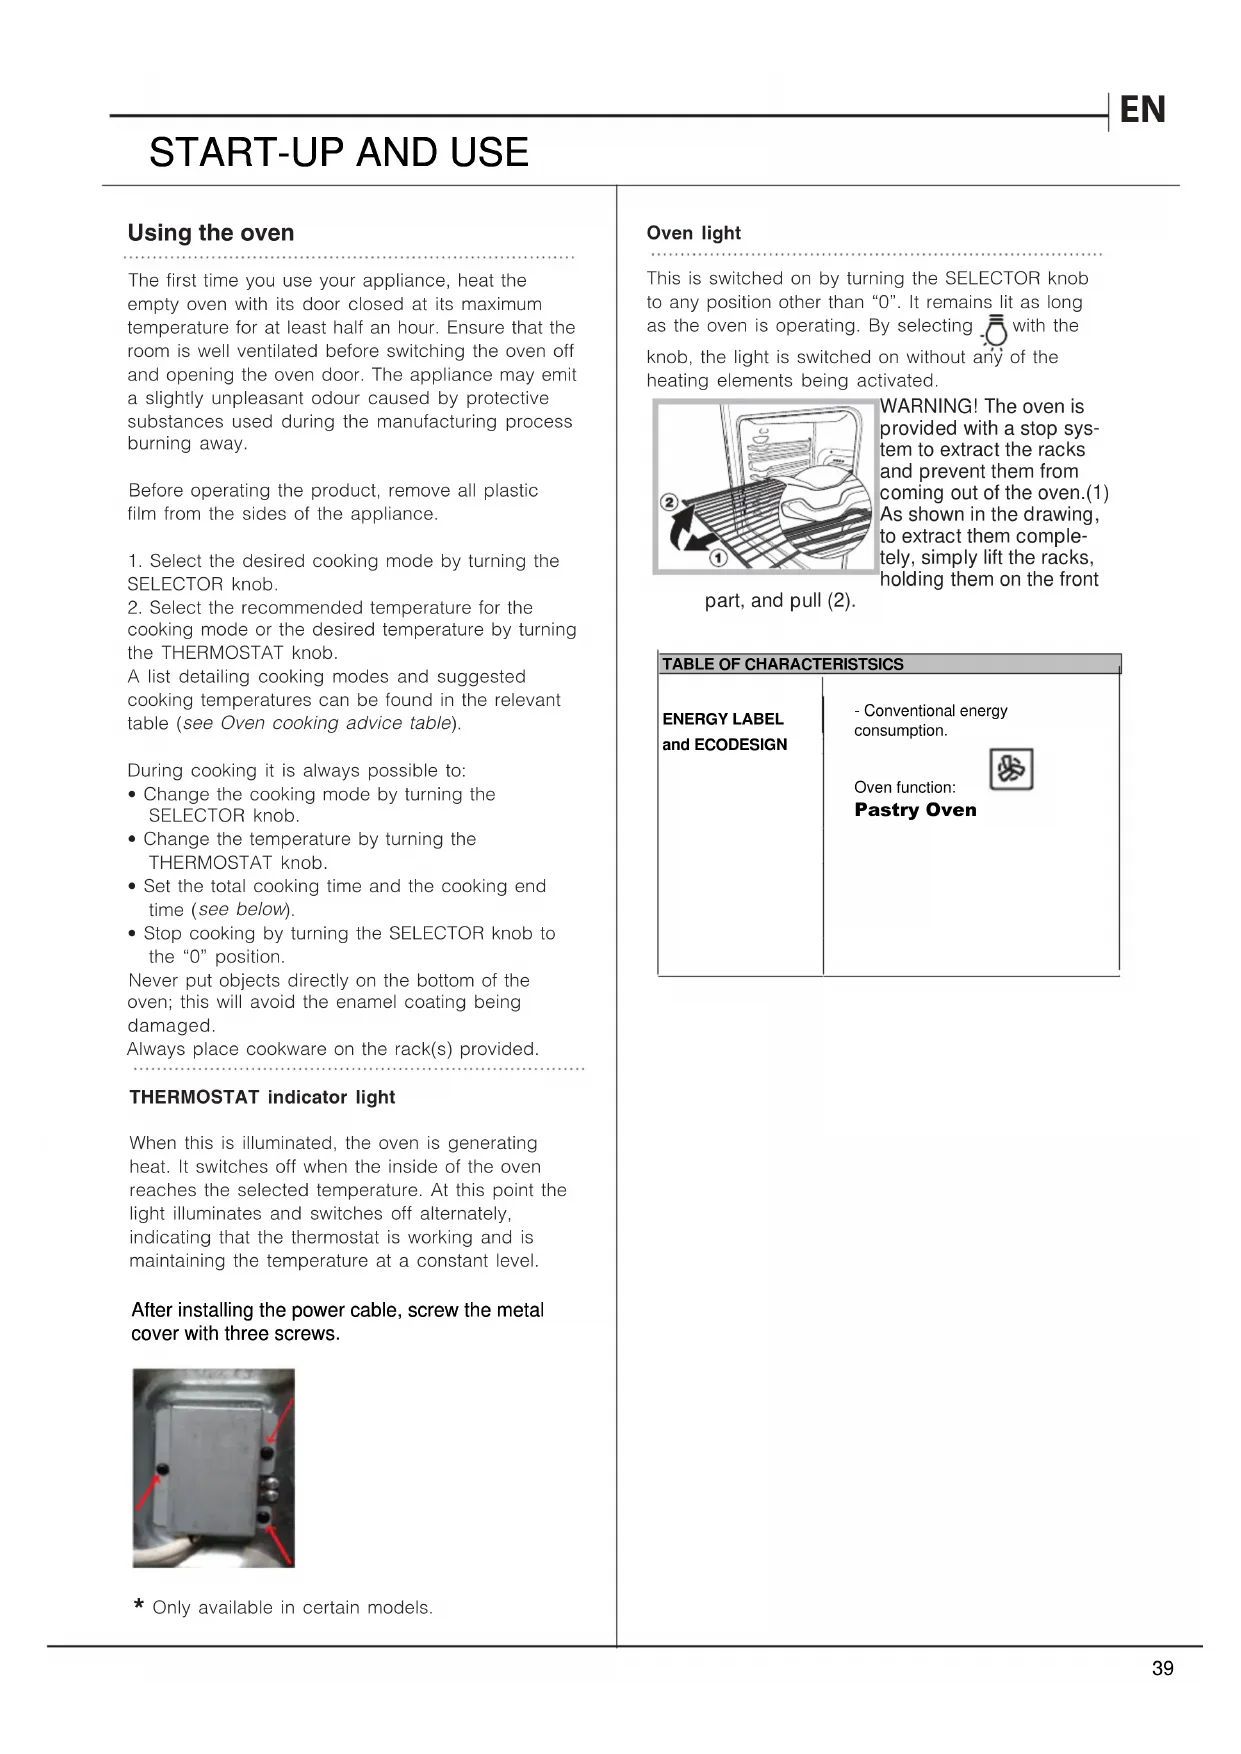
START-UP AND USE
Using the oven
The first time you use your appliance, heat the empty oven with its door closed at its maximum temperature for at least half an hour. Ensure that the room is well ventilated before switching the oven off and opening the oven door. The appliance may emit a slightly unpleasant odour caused by protective substances used during the manufacturing process burning away.
Before operating the product, remove all plastic film from the sides of the appliance.
- Select the desired cooking mode by turning the SELECTOR knob.
- Select the recommended temperature for the cooking mode or the desired temperature by turning the THERMOSTAT knob.
A list detailing cooking modes and suggested cooking temperatures can be found in the relevant table (see Oven cooking advice table).
During cooking it is always possible to:
- Change the cooking mode by turning the SELECTOR knob.
- Change the temperature by turning the THERMOSTAT knob.
- Set the total cooking time and the cooking end time (see below).
- Stop cooking by turning the SELECTOR knob to the "0" position.
Never put objects directly on the bottom of the oven; this will avoid the enamel coating being damaged.
Always place cookware on the rack(s) provided.
THERMOSTAT indicator light
When this is illuminated, the oven is generating heat. It switches off when the inside of the oven reaches the selected temperature. At this point the light illuminates and switches off alternately, indicating that the thermostat is working and is maintaining the temperature at a constant level.
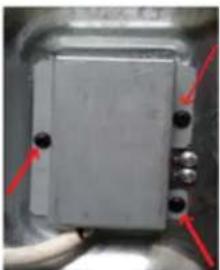
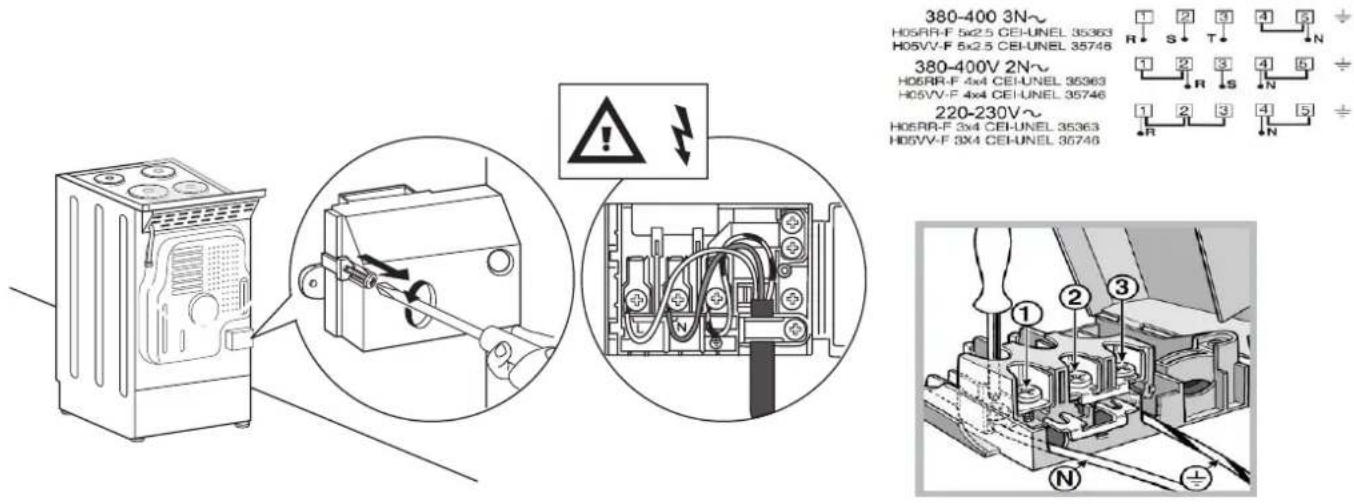
After installing the power cable, screw the metal cover with three screws.
natural_image
Close-up of a metallic mechanical component with red arrows pointing to features (no visible text or symbols)* Only available in certain models.
Oven light
This is switched on by turning the SELECTOR knob to any position other than "0". It remains lit as long as the oven is operating. By selecting 📄 with the knob, the light is switched on without any of the heating elements being activated.
text_image
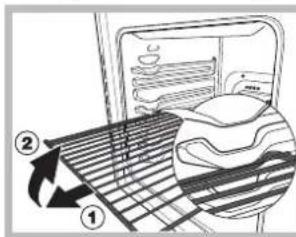
Diagram showing a kitchen appliance with labeled parts and a magnified view of the interior area.part, and pull (2).
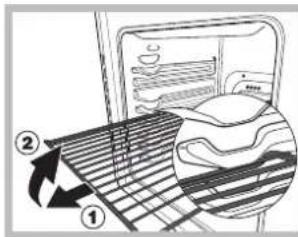
WARNING! The oven is provided with a stop system to extract the racks and prevent them from coming out of the oven.(1) As shown in the drawing, to extract them completely, simply lift the racks, holding them on the front
TABLE OF CHARACTERISTSICS
ENERGY LABEL and ECODESIGN
- Conventional energy consumption.
Oven function:
Pastry Oven

Cooking modes
A temperature value can be set for all cooking modes between 50^ C and Max, except for the following modes
- GRILL and DOUBLE GRILL (recommended: set only to MAX power level).
- FAN-ASSISTED DOUBLE GRILL (recommended: do not exceed 200°C).

DEFROSTING mode
The fan located on the bottom of the oven makes the air circulate at room temperature around the food. This is recommended for the defrosting of all types of food, but in particular for delicate types of food which do not require heat, such as for example: ice cream cakes, cream or custard desserts, fruit cakes. By using the fan, the defrosting time is approximately halved. In the case of meat, fish and bread, it is possible to accelerate the process using the "multi-cooking" mode and setting the temperature to 80° - 100°C.

STATIC OVEN mode
Both the top and bottom heating elements will be activated. When using this traditional cooking mode, it is best to use only one rack at a time, otherwise the heat will not be distributed evenly.

FAN OVEN mode
The top and bottom heating elements will switch on and the fan will begin to operate. Since the heat remains constant throughout the oven, the air cooks and browns food in a uniform manner. A maximum of two racks may be used at the same time.

GRILL mode
The central part of the top heating element is switched on. The high and direct temperature of the grill is recommended for food that requires a high surface temperature (veal and beef steaks, fillet steak and entrecôte). This cooking mode uses a limited amount of energy and is ideal for grilling small dishes. Place the food in the centre of the rack, as it will not be cooked properly if it is placed in the corners.

FAST PREHEAT mode
For preheating the oven quickly. Wait for preheating to finish before placing food in the oven, then select the preferred cooking function.

FAN ASSISTED DOUBLE GRILL mode
The top heating element and the turnspit are activated and the fan begins to operate. This combination of features increases the effectiveness of the unidirectional thermal radiation of the heating elements through forced circulation of the air throughout the oven. This prevents the food from burning on top by enabling heat to penetrate into the food more effectively; it is therefore an ideal way of cooking food quickly under the grill or for grilling large pieces of meat without having to use the turnspit.
The GRILL, DOUBLE GRILL and FAN-ASSISTED DOUBLE GRILL cooking modes must be performed with the oven door shut.
When using the GRILL and DOUBLE GRILL cooking modes, place the rack in position 5 and the dripping pan in position 1 to collect cooking residues (fat and/or grease). When using the FAN-ASSISTED DOUBLE GRILL cooking mode, place the rack in position 2 or 3 and the dripping pan in position 1 to collect cooking residues.

Pizza Oven
temp: between 50°C and Max.
Activation of the oven floor and circular heating elements, as well as the turbine. Selecting this combination enables accelerated preheating of the oven, courtesy of the high level of power it delivers (2700 W). In this instance, the heat is distributed by the air being pumped out and by the floor of the oven. The pizza oven function is particularly suitable for dishes that require a lot of heat, such as pizza and large joints of meat. Only use one dripping pan or shelf at a time. Cooking on more than one shelf at a time is only possible if these are switched over halfway through cooking.

Pastry Oven
temp: between 50°C and Max.
Activation of the fan and all the heating elements. This enables a "gentle" heat to be obtained, mainly from the floor of the oven. This function is particularly suitable for cooking more delicate dishes, particularly cakes, which rise better thanks to the heat coming from below. A few tips:
• Preheat the oven before placing the dish inside
• Only cook one dish at a time
- Use the shelf (unless cooking directly in the dripping pan); this will enable improved heat distribution. Do not leave any dripping pans that you are not using in the oven.
- Place the shelf on the third or second rack from the bottom; this will enable the heat from the floor of the oven to reach your dishes better. Place your cake tin or mould in the middle of the shelf.
- Never open the door while cooking, as drops in temperature may interrupt cooking and your cakes may collapse.

Top heating element
temp: between 50°C and Max.
The direct high temperature provided by the grill enables you to sear the surface of the food you are cooking, preventing it from losing moisture and keeping it tender. Grill cooking is particularly recommended for dishes that require a high temperature on the surface: veal and beef ribs, rib-eye and fillet steaks, hamburgers, etc.

Lower Fan Oven
The lower heating element (fan) is activated.
This position is recommended for cooking food (in roasting dishes) which are already well cooked on the surface but still soft inside, or for cakes filled with fruit or jam that need to be browned on the surface.
Cooking on several shelves simultaneously
If it is necessary to use two racks, use the FAN OVEN cooking mode ☐, as this is the only cooking mode suited to this type of cooking. We also recommend that:
- Positions 1 and 5 are not used. This is because excessive direct heat can burn temperature sensitive foods.
- Positions 2 and 4 are used and that food that requires more heat is placed on the rack in position 2.
- When cooking foods that require different cooking times and temperatures, set a temperature that is halfway between the two recommended temperatures (see Oven cooking advice table) and place the more delicate food on the rack in position 4. Remove the food that requires a shorter cooking time first.
- When cooking pizzas on several racks with the temperature set to 220°C, the oven is preheated for 15 minutes. Generally speaking, cooking on the rack in position 4 takes longer: we recommend that the pizza cooked on the lowest rack position is removed first, followed by the pizza cooked in position 4 a few minutes later.
- Place the dripping pan on the bottom and the rack on top.
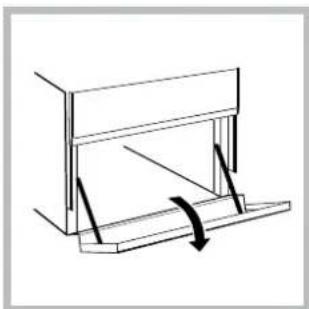
Lower compartment\*
natural_image
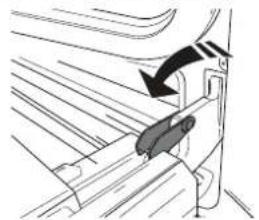
Simple line drawing of a mechanical or architectural component with no text or symbolsThere is a compartment underneath the oven that may be used to store oven accessories or deep dishes. To open the door pull it downwards (see figure).
Do not place flammable
materials in the lower oven compartment.
The internal surfaces of the compartment (where present) may become hot.
text_image
Diagram showing airflow or ventilation process with numbered steps and a magnified view of the interior wall.WARNING! The oven is provided with a stop system to extract the racks and prevent them from coming out of the oven.(1) As shown in the drawing, to extract them completely, simply lift the racks, holding them on the front
part, and pull (2).
text_image
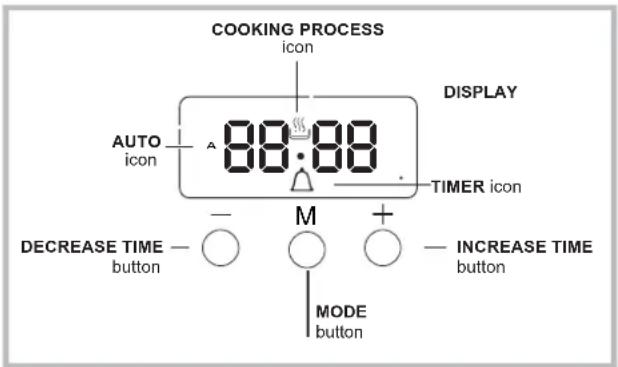
COOKING PROCESS icon DISPLAY AUTO icon 88:88 TIMER icon - M + DECREASE TIME - button MODE button INCREASE TIME buttonSetting the clock
The clock may be set when the oven is switched off or when it is switched on, provided that the end time of a cooking cycle has not been programmed previously. After the appliance has been connected to the mains,
or after a blackout, the 00:00
digits on the DISPLAY will begin to flash.
- Press the "+" and "-" button simultaneously
Than the colon between hours and minutes is flashing. - Use the “+” and “-” buttons to adjust the time; if you press and hold either button, the display will scroll through the values more quickly, making it quicker and easier to set the desired value.
Changing the buzzer frequency
The buzzer signal frequency can be changed by touching the "-" repeatedly.
Setting the minute minder
This function does not interrupt cooking and does not affect the oven; it is simply used to activate the buzzer when the set amount of time has elapsed.
- Press the ⏻ button several times until the 🔊 icon and the three digits on the display begin to flash.
- Use the “+” and “-” buttons to set the desired time; if you press and hold either button, the display will scroll through the values more quickly, making it quicker and easier to set the value.
- Wait for 5 seconds, If you press the bottom one more time the display will then show the time as it counts down. When this period of time has elapsed the buzzer will be activated.
Programming cooking
A cooking mode must be selected before programming can take place.
Programming the cooking duration
- Press the ⏻ button several times until icon T0 and the DUR digits on the DISPLAY begin to flash.
- Use the "+" and "-" buttons to set the desired duration; if you press and hold either button, the display will scroll through the values more quickly, making it quicker and easier to set the value.
- Wait for 5 seconds, after that the icon will be visible on the display.
- When the set time has elapsed and the oven will stop cooking you will hear a buzzer sounds. Press any button to stop the buzzer.
- For example: it is 9:00 a.m. and a time of 1 hour and 15 minutes is programmed. The programme will stop automatically at 10:15 a.m.
Setting the end time for a cooking mode
- Follow steps 1 to 3 to set the duration as detailed above.
- Next, press the ⏻ button until the text END on the display begin to flash.
- use the "+" and "-" buttons to adjust the cooking end time; if you press and hold either button, the display will scroll through the values more quickly, making it quicker and easier to set the desired value.
- Wait for 5 seconds or press the 📄 button again, When the cooking process start, the symbol 🔊 is visible on the display.
- When the set time has elapsed, the oven will stop cooking and a buzzer sounds. Press any button to stop it. Programming has been set when the icon is illuminated.
- For example: It is 9:00 a.m. and a duration of 1 hour has been programmed. 12:30 is scheduled as the end time. The programme will start automatically at 11:30 a.m.
Cancelling a programme
To cancel a programme:
- press the 🔊 button until the icon corresponding to the setting you wish to cancel and the digits on the display are flashing. Press the “-” button until the digits 00:00 appear on the display.
- Press and hold the “+” and “-” buttons; this will cancel all the settings selected previously, including timer settings.
Using the glass ceramic hob
The glue applied on the gaskets leaves traces of grease on the glass. Before using the appliance, we recommend you remove these with a special non-abrasive cleaning product. During the first few hours of use there may be a smell of rubber which will disappear very quickly.
Switching the cooking zones on and off
To switch on a cooking zone, turn the corresponding knob in a clockwise direction.
To switch it off again, turn the knob in an anticlockwise direction until it is in the "0" position.
If the ELECTRIC HOTPLATE ON indicator light is lit, this shows that at least one hotplate on the hob is switched on.
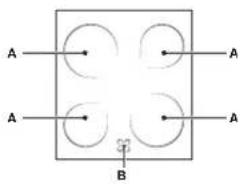
Cooking zones
The hob is equipped with electric radiant heating elements. When they are in use the following items on the hob become red.
text_image
A A A BA. The cooking zone.
B. The residual heat indicator light: this indicates that the temperature of the corresponding cooking zone is greater than 60^ C, even when the heating element has been
switched off but is still hot.
Cooking zones with radiant heating elements
They have similar properties to gas burners: they are easy to control and reach set temperatures quickly, allowing you to actually see the power they are providing.
Turn the corresponding knob in a clockwise direction, to a position between 1 and 6.
| Setting | Normal or Fast Plate |
| 0 | Off |
| 1 | Cooking vegetables, fish |
| 2 | Cooking potatoes (using steam) soups, chickpeas, beans. |
| 3 | Continuing the cooking of large quantities of food, minestrone |
| 4 | For roasting (average) |
| 5 | For roasting (above average) |
| 6 | For browning and reaching a boil in a short time. |
Practical advice on using the hob
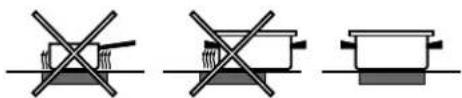
- Use pans with a thick, flat base to ensure that they adhere perfectly to the cooking zone.
- Always use pans with a diameter that is large enough to cover the hotplate fully, in order to use all the heat produced.
natural_image
Three diagrams showing crossed-out electrical symbols on a surface, no text or labels present- Always make sure that the base of the pan is completely clean and dry: this ensures that the pans adhere perfectly to the cooking zones and that both the pans and the hob last for a longer period of time.
- Avoid using the same cookware that is used on gas burners: the heat concentration on gas burners may have warped the base of the pan, causing it not to adhere to the surface correctly.
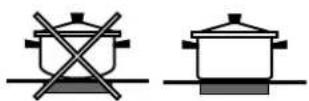
- Never leave a cooking zone switched on without a pan on top of it, as doing so may cause the zone to become damaged.
| RECIPE | COOKING FUNCTION | COOKING LEVEL (from bottom) | TEMPERATURE (°C) | TIME (min) |
| Sponge cake | Thermal | 2 | 160 - 190 | 35 - 60 |
| Convect | 2 - 4 | 160 - 180 | 30 - 55 | |
| Filled cakes (cheese cake, strudel, fruit cake) | Thermal | 3 | 180 - 200 | 50 - 100 |
| Convect | 2 - 4 | 160 - 190 | 40 - 90 | |
| Cookies | Thermal | 3 | 160 - 180 | 20 - 45 |
| Convect | 1 - 3 - 5 | 140 - 150 | 30 - 45 | |
| Small cakes | Thermal | 3 | 160 - 180 | 20 - 45 |
| Convect | 1 - 3 - 5 | 150 - 160 | 30 - 45 | |
| Pizza | Thermal | 3 | 230 - 250 | 10 - 25 |
| Convect | 2 - 4 | 190 - 210 | 15 - 30 | |
| Sausages / Pork ribs / Hamburger | Broil | 4 | MAX | 15 - 30 |
| Quiche Lorraine | Thermal | 3 | 180 - 200 | 50 - 70 |
| Quiche Lorraine | Convect | 2 - 4 | 170 - 190 | 60 - 80 |
| Toast | Broil | 5 | MAX | Preheat 5' Cooking 2.5' |
| Lasagna | Thermal | 2 | 170 - 190 | 40 - 60 |
| Chicken | Thermal | 2 | 200 - 230 | 50 - 90 |
| Turbobroil | 3 | 200 - 220 | 55 - 70 | |
| Beef | Thermal | 2 | 190 - 200 | 70 - 110 |
| Convect | 2 | 180 - 190 | 80 - 120 | |
| Veal | Thermal | 2 | 190 - 200 | 70 - 110 |
| Convect | 2 | 180 - 190 | 80 - 120 | |
| Fish | Thermal | 2 | 170 - 190 | 30 - 50 |
| Broil | 4 | 200 | 20 - 30 | |
| Stuffed vegetable | Convect | 2 | 180 - 200 | 50 - 70 |
Care and maintenance
Respecting and conserving the environment
- Whenever possible, avoid pre-heating the oven and always try to fill it. Open the oven door as little as possible because heat is lost every time it is opened. To save a substantial amount of energy, simply switch off the oven 5 to 10 minutes before the end of your planned cooking time and use the heat the oven continues to generate.
- Automatic programmes are based on standard food product.
- Keep gaskets clean and tidy to prevent any door energy losses
- If you have a timed tariff electricity contract, the "delay cooking" option will make it easier to save money by moving operation to cheaper time periods.
- Make the most of your hot plate's residual heat by switching off cast iron hot plates 10 minutes before the end of your cooking time and glass ceramic hot plates 5 minutes before the end of cooking time.
- The base of your pot or pan should cover the hot plate. If it is smaller, precious energy will be wasted and pots that boil over leave encrusted remains that can be difficult to remove.
- Cook your food in closed pots or pans with well-fitting lids and use as little water as possible. Cooking with the lid off will greatly increase energy consumption
- Use purely flat pots and pans
- If you are cooking something that takes a long time, it's worth using a pressure cooker, which is twice as fast and saves a third of the energy.
Switching the appliance off
Disconnect your appliance from the electricity supply before carrying out any work on it.
Never use steam cleaners or pressure cleaners on the appliance.
Replacing the oven light bulb
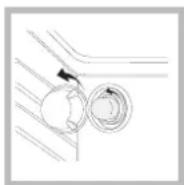
- After disconnecting the oven from the electricity mains, remove the glass lid covering the lamp socket (see figure).
- Remove the light bulb and replace it with a similar one: voltage 230 V, wattage 25 W, cap E 14.
- Replace the lid and reconnect the oven to the electricity supply.
Do not use the oven lamp as/for ambient lighting.
Cleaning the glass ceramic hob
Do not use abrasive or corrosive detergents (for example, products in spray cans for cleaning barbecues and ovens), stain removers, anti-rust products, powder detergents or sponges with abrasive surfaces: these may scratch the surface beyond repair.
- It is usually sufficient simply to wash the hob using a damp sponge and dry it with absorbent kitchen roll.
- If the hob is particularly dirty, rub it with a special glass ceramic cleaning product, then rinse well and dry thoroughly.
- To remove more stubborn dirt, use a suitable scraper (this is not supplied with the appliance). Remove spills as soon as possible, without waiting for the appliance to cool, to avoid residues forming crusty
deposits. You can obtain excellent results by using a rustproof steel wire sponge - specifically designed for glass ceramic surfaces - soaked in soapy water.
- If plastic or sugary substances have accidentally been melted on the hob, remove them immediately with the scraper, while the surface is still hot.
- Once it is clean, the hob may be treated with a special protective maintenance product: the invisible film left by this product protects the surface from drips during cooking. This maintenance should be carried out while the appliance is warm (not hot) or cold.
• Always remember to rinse the appliance well with clean water and dry it thoroughly: residues can become encrusted during subsequent cooking processes.
| Glass ceramic hob cleaners | Available from |
| Window scraper Razor blade scrapers | DIY Stores |
| Replacement blades DIY Stores, supermarkets, chemists | |
| COLLO lunetaHOB BRITEHob CleanSWISSCLEANER | Boots, Co-op stores, department stores, Regional Electricity Company shops, supermarkets |
Cleaning stainless steel
Stainless steel can be marked by hard water that has been left on the surface for a long time, or by aggressive detergents that contain phosphorus. We recommend that the steel surfaces are rinsed well then dried thoroughly.
AFTER-SALES SERVICE
To receive assistance, call the number given on the warranty leaflet enclosed with the product or follow the instructions on our website. Be prepared to provide:
a brief description of the problem;
• the exact model type of your product;
- the assistance code (the number following the word SERVICE on the identification plate attached to the product, which can be seen on the inside edge when the oven door is open);
- your full address;
. a contact telephone number.
Please note: If repairs are required, contact an authorised service centre that is guaranteed to use original spare parts and perform repairs correctly.
Please refer to the enclosed warranty leaflet for more information on the warranty.

A complete product specification, including the energy efficiency ratings for this oven, can be read and
downloaded from our website www.indesit.comwww.indesit.comwww.indesit.comwww.indesit.comwww.indesit.com
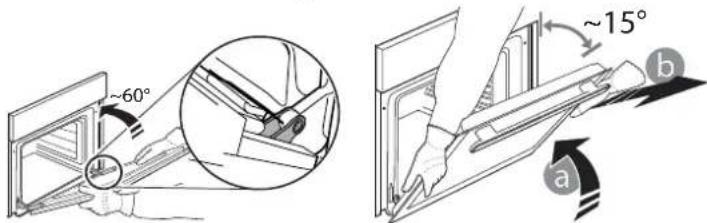
REMOVING AND REFITTING THE DOOR
- To remove the door, open it fully and lower the catches until they are in the unlock position.
natural_image
Diagram of a car seatbelt mechanism with a black arrow indicating direction (no text or symbols present)- Close the door as much as you can.
Take a firm hold of the door with both hands – do not hold it by the handle.
Simply remove the door by continuing to close it while pulling it upwards (a) at the same time until it is released from its seating (b).
text_image
~60° ~15° a bPut the door to one side, resting it on a soft surface.
-
Refit the door by moving it towards the oven, aligning the hooks of the hinges with their seating and securing the upper part onto its seating.
-
Lower the door and then open it fully. Lower the catches into their original position: Make sure that you lower them down completely.
-
Try closing the door and check to make sure that it lines up with the control panel. If it does not, repeat the steps above.
Steam-Assisted Oven Cleaning
This method of cleaning is recommended especially after cooking very fatty (roasted)meats.
This cleaning process allows to facilitate the removal of dirt of the walls of the oven by the generation of steam that is created inside the oven cavity for easier cleaning.
! Important! Before you start steam -cleaning:
-Remove any food residue and grease from the bottom of the oven.
- Remove any oven accessories (grids and drip pans).
Perform the above operations according to the following procedure:
- pour 300ml of drinking water into the baking tray in the oven, placing it in the bottom shelf. In the models where the drip pan is not present, use a baking sheet and place it
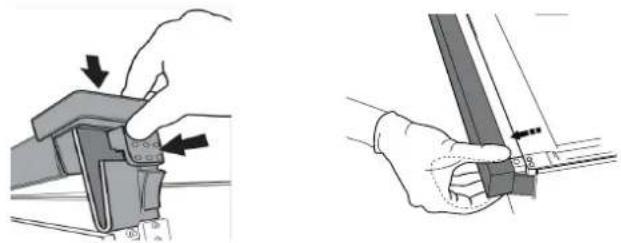
CLICK TO CLEAN - CLEANING THE GLASS
- After removing the door and resting it on a soft surface with the handle downwards, simultaneously press the two retaining clips and remove the upper edge of the door by pulling it towards you.
natural_image
Two-step diagram showing hand positioning of a mechanical component with arrows indicating movement (no text or symbols present)-
Lift and firmly hold the inner glass with both hands, remove it and place it on a soft surface before cleaning it.
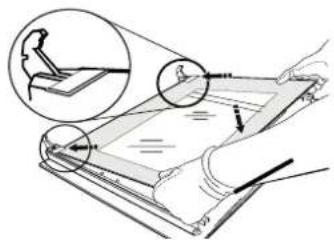
-
When reassembling the inner door glass insert the glass panel correctly so that the text written on the panel is not reversed and can be easily legible.
text_image
Diagram illustrating a hand holding a document with magnified views showing the process and detail of the image.- Refit the upper edge: a click will indicate correct positioning. Make sure the seal is secure before refitting the door
Assistance
Please have the following information to hand:
• The appliance model (Mod.).
• The serial number (S/N).
This information can be found on the data plate located on the appliance and/or on the packaging.
on the grill at the bottom shelf;
- select the function of the oven BOTTOM and set the temperature to 90 °C;
- keep it in the oven for 35min;
- turn off the oven;
- Once cooled the oven, you can open the door to complete the cleaning with water and a damp cloth;
- eliminate any residual water from the cavity after finishing cleaning

When the steam -cleaning is done, after cooking especially fatty foods, or when grease is difficult to remove, you may need to complete the cleaning with the traditional method, described in the previous paragraph. ! Perform cleaning only in the cold oven!

text_image
0000 Min. 600 mm Min. 650 mm Min. 420 mm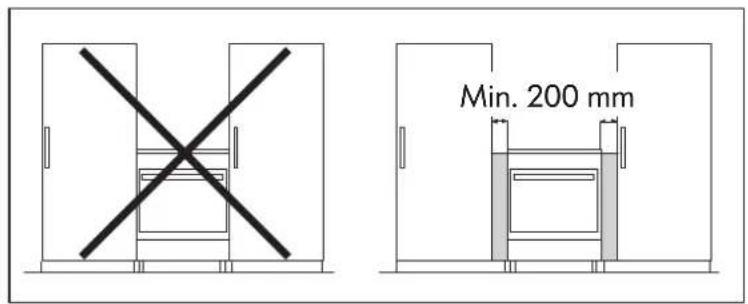
text_image
Min. 200 mm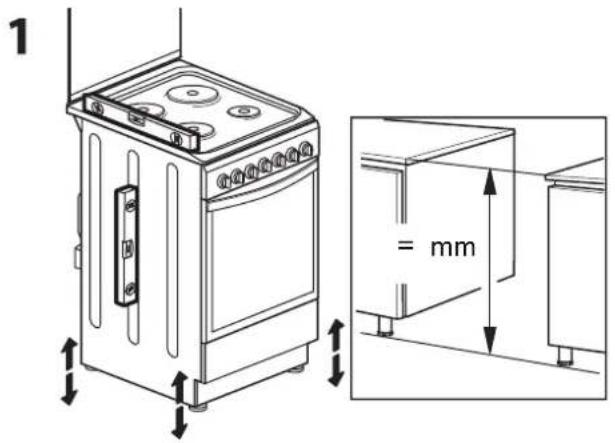
text_image
1 = mm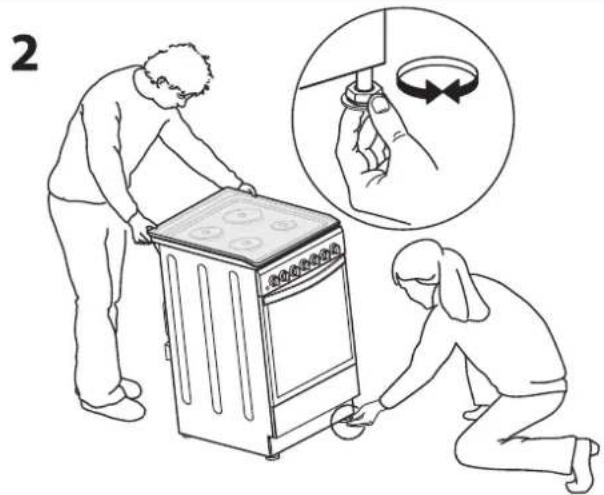
natural_image
Illustration of two people cleaning a kitchen appliance, one using a fan switch and the other kneeling with hands (no text or symbols)
text_image
34
text_image
380-400 3N~ H05RR-F 5x2.5 CEI-UNEL 35363 H05VV-F 5x2.5 CEI-UNEL 35748 380-400V 2N~ H05RR-F 4x4 CEI-UNEL 35363 H05VV-F 4x4 CEI-UNEL 35748 220-230V~ H05RR-F 3x4 CEI-UNEL 35363 H05VV-F 3x4 CEI-UNEL 357485