
LI8 S1E S AQUA - Fridge INDESIT - Free user manual and instructions
Find the device manual for free LI8 S1E S AQUA INDESIT in PDF.
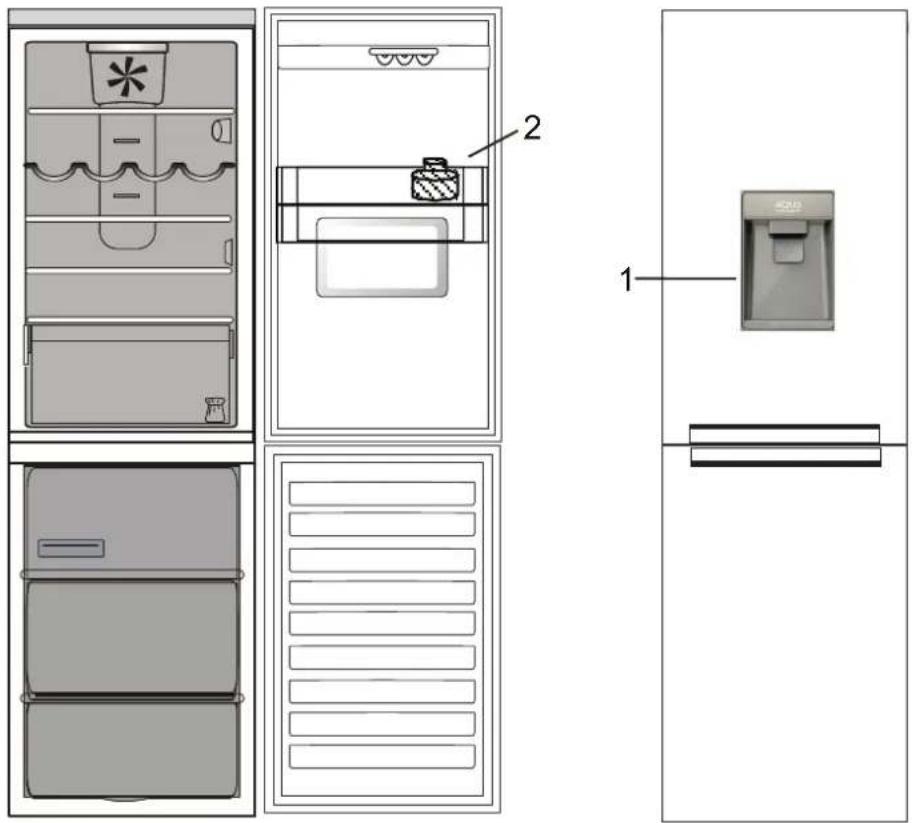
| Product Type | Refrigerator |
| Brand | Indesit |
| Model | LI8 S1E S AQUA |
| Filtration System | Activated carbon cartridge |
| Water Tank Capacity | 3 liters |
| Filter Lifespan | 2 months (up to 225 liters) |
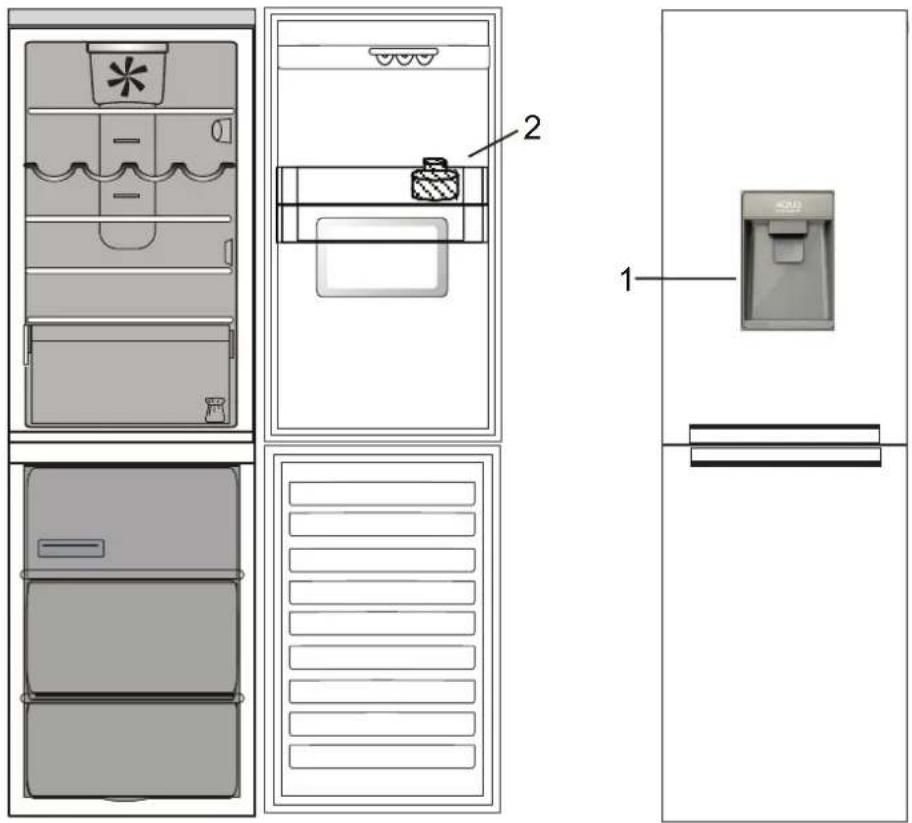
| Water Dispenser | Paddle with child lock |
| Suspended Bottle Holder | Yes, removable |
| Spare Parts | Replaceable charcoal filter cartridge |
| Maintenance | Clean tank and seal with water only |
| Safety | Child lock on dispenser |
| General Information | Manual available in multiple languages |
Frequently Asked Questions - LI8 S1E S AQUA INDESIT
User questions about LI8 S1E S AQUA INDESIT
0 question about this device. Answer the ones you know or ask your own.
Ask a new question about this device
Download the instructions for your Fridge in PDF format for free! Find your manual LI8 S1E S AQUA - INDESIT and take your electronic device back in hand. On this page are published all the documents necessary for the use of your device. LI8 S1E S AQUA by INDESIT.
USER MANUAL LI8 S1E S AQUA INDESIT
-
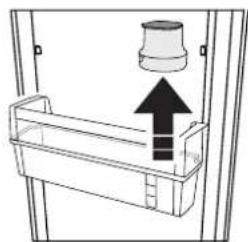
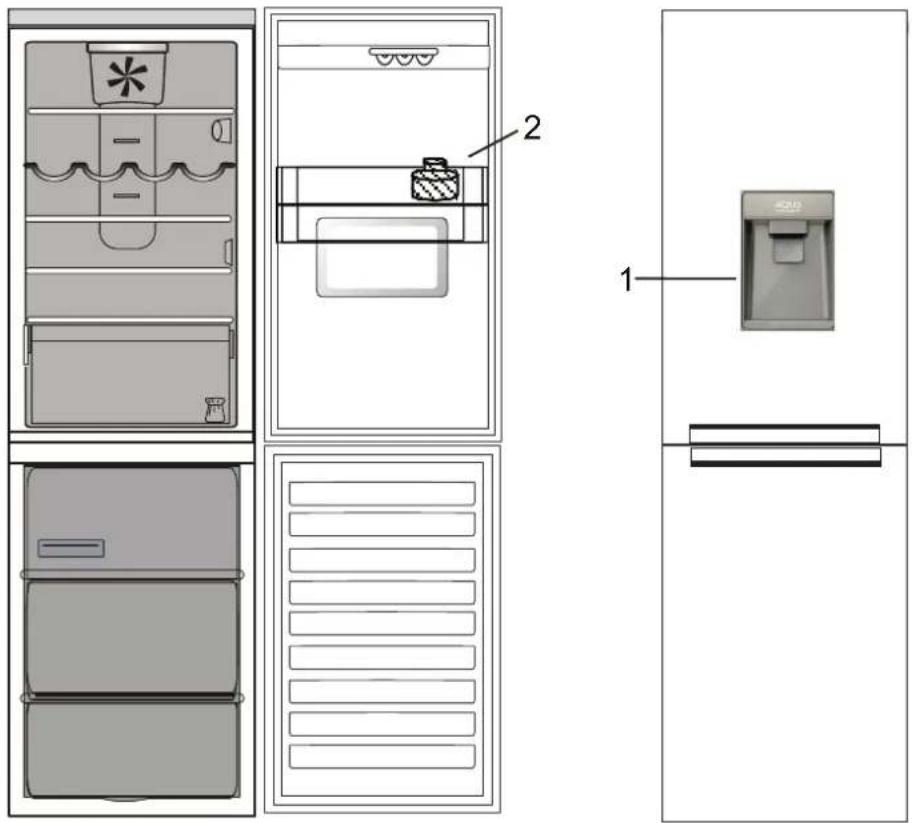
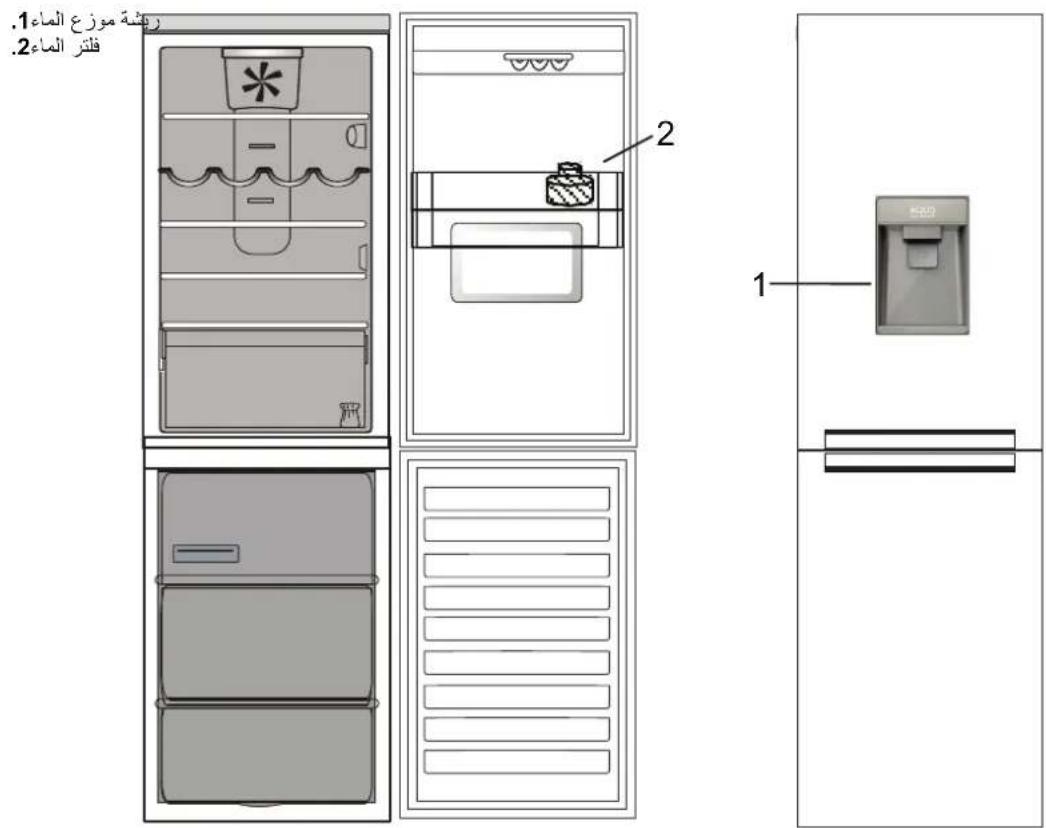
Dispenser's paddle
-
Water filter
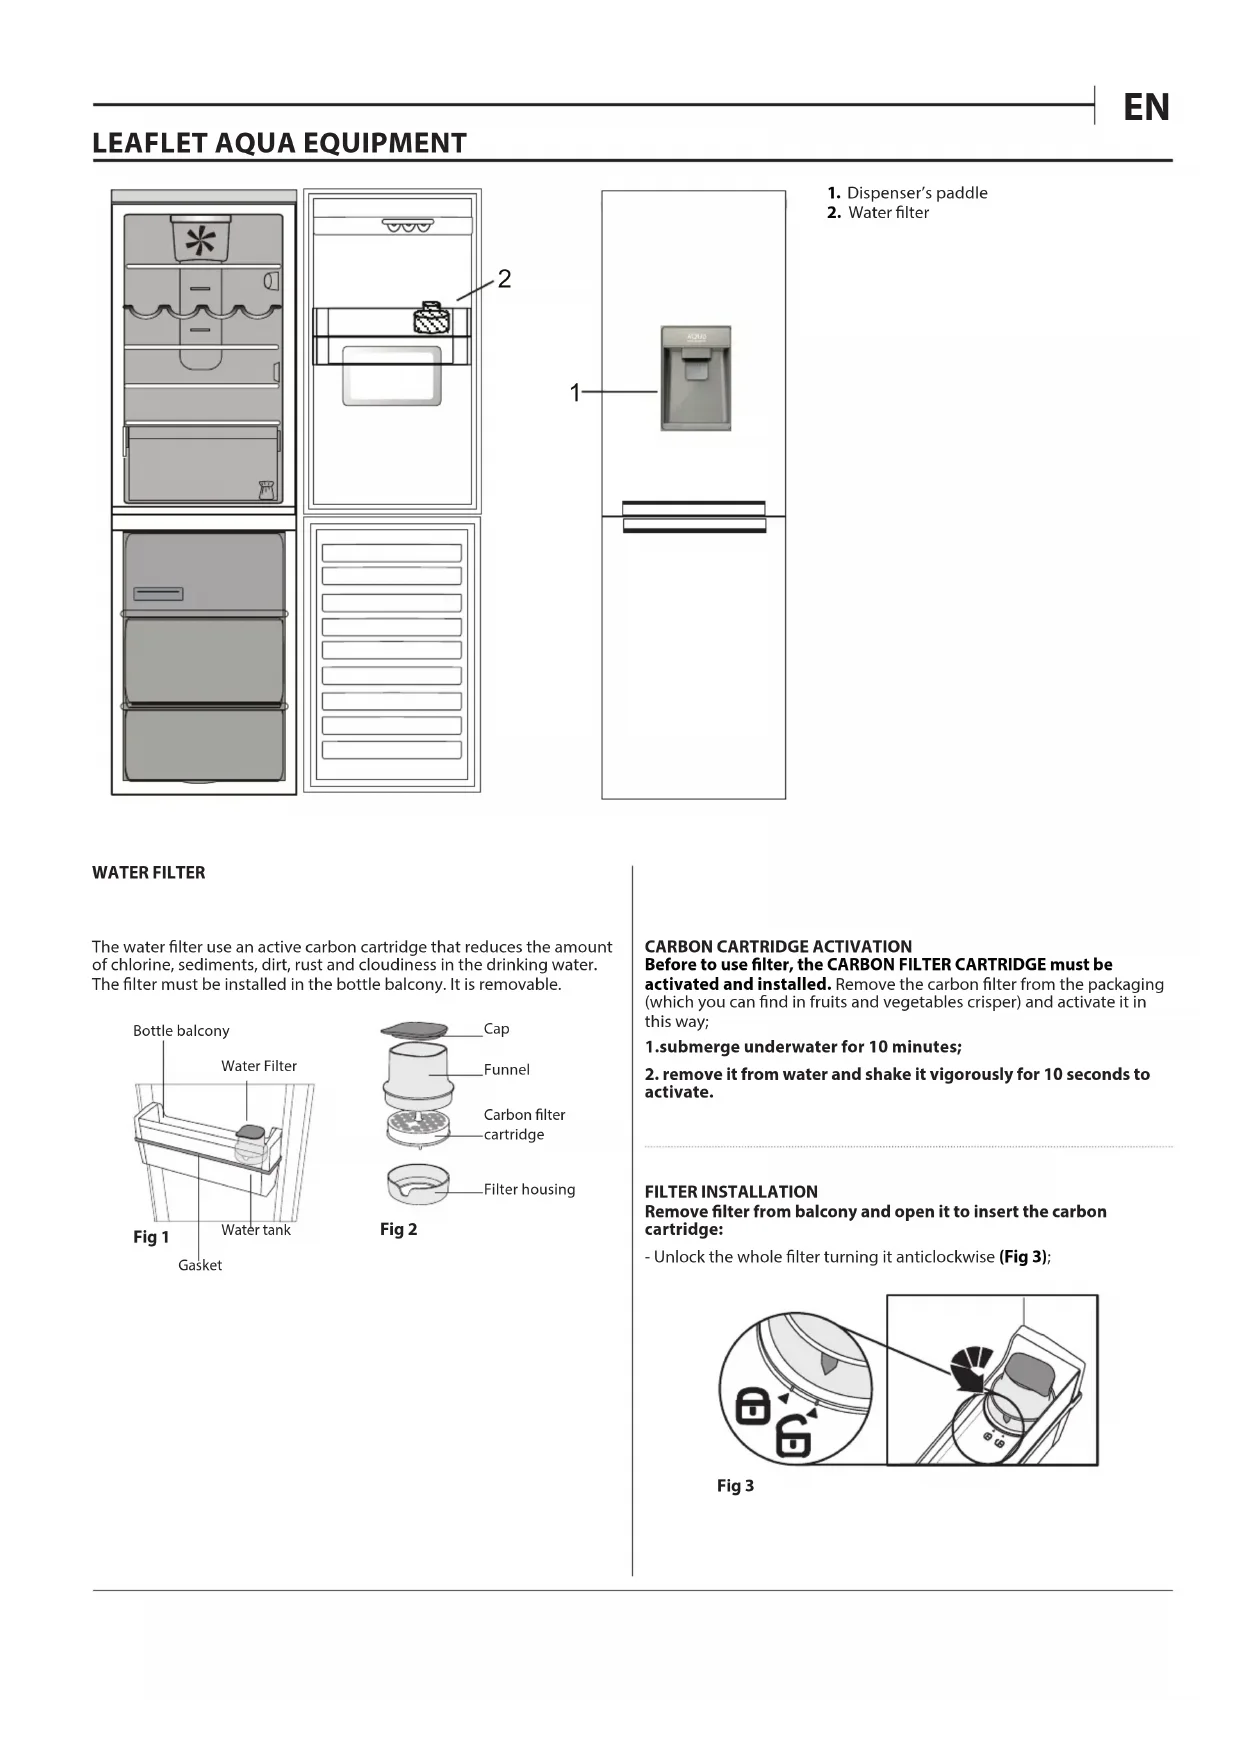
WATER FILTER
The water filter use an active carbon cartridge that reduces the amount of chlorine, sediments, dirt, rust and cloudiness in the drinking water. The filter must be installed in the bottle balcony. It is removable.
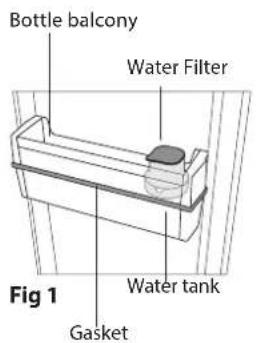
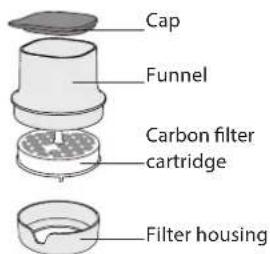
Fig 2
CARBON CARTRIDGE ACTIVATION Before to use filter, the CARBON FILTER CARTRIDGE must be activated and installed. Remove the carbon filter from the packaging (which you can find in fruits and vegetables crisper) and activate it in this way;
- submerge underwater for 10 minutes;
- remove it from water and shake it vigorously for 10 seconds to activate.
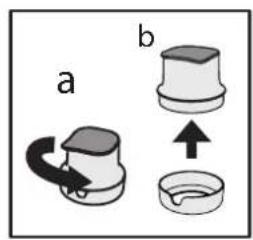
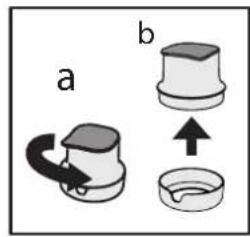
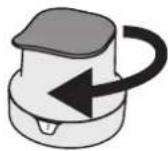
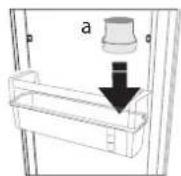
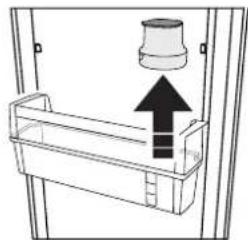
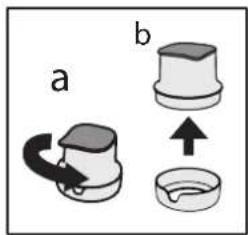
FILTER INSTALLATION Remove filter from balcony and open it to insert the carbon cartridge:
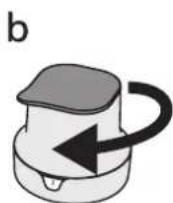
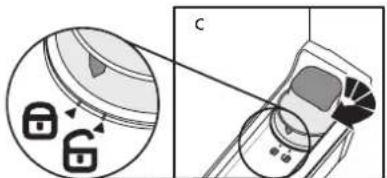
- Unlock the whole filter turning it anticlockwise (Fig 3);
Fig 3
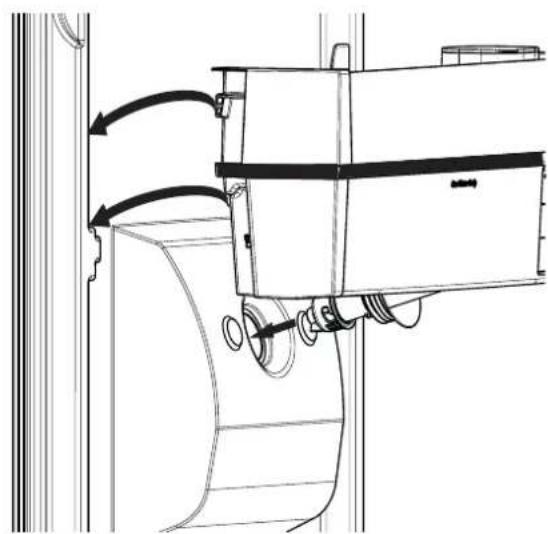
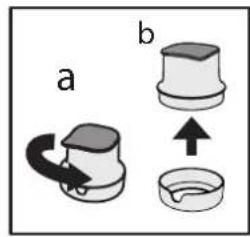
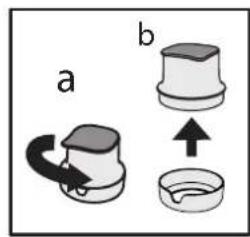
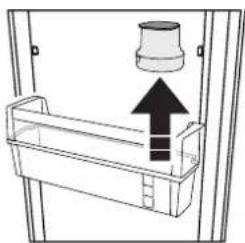
- Remove the filter from the balcony (Fig. 4); - Remove the funnel from the filter housing rotating it anticlockwise (Fig 5. a - b).
natural_image
Diagram of a mechanical device with a cylindrical component and an upward arrow, no text or symbols presentFig 4
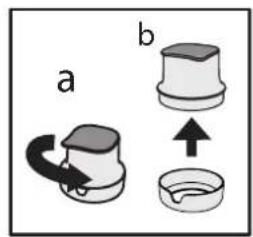
Fig 5
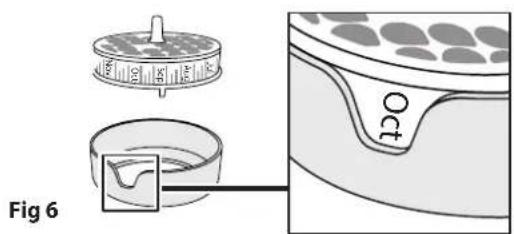
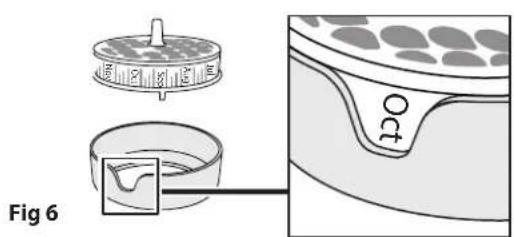
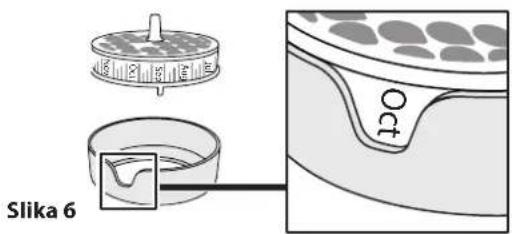
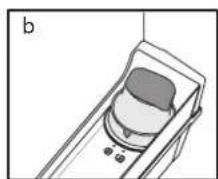
After activated, insert the carbon cartridge in the filter housing with the current month facing through the window (eg. If you are in october, face Oct month in the window) - See Fig. 6.
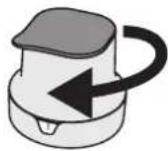
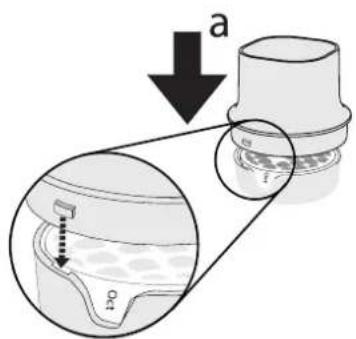
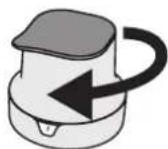
Close the filter (Fig. 7): a) insert the funnel on filter housing (with carbon filter in), as shown in Fig. 7a; b) rotate the funnel clockwise to fix it, as shown in Fig. 7b.
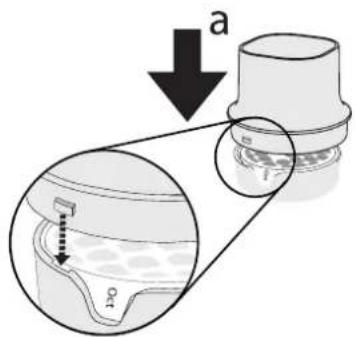
Fig 7
Then place the whole filter in the bottle balcony and lock it following the sequence in Fig 8.
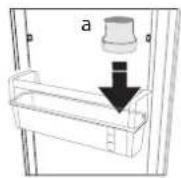
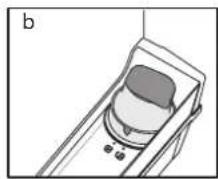
Fig 8
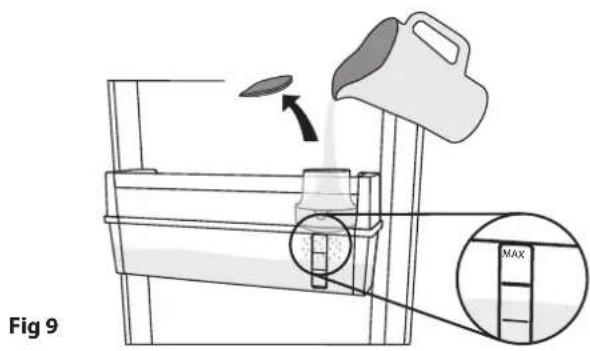
FILLING AND FILTERING WATER Remove the cap and pour water into the funnel (Fig. 9): the water fill will be filtered and will fill the water tank. You can fill up to 3 litres. Don't overfill water (the max water level is indicated on the tank).
Note: fill water only in the tank. Do not insert juice, coke or other drink because they can damage the filter and the dispenser functionality.
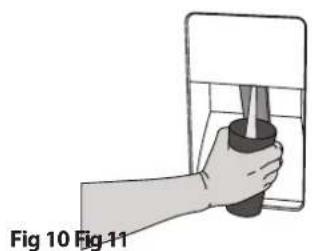
DISPENSING WATER To dispense water press the paddle with a glass (Fig. 10) and release the paddle to stop dispensing.
natural_image
Hand holding a tool inside a container, labeled Fig 10 and Fig 11 (no text on the diagram itself)
natural_image
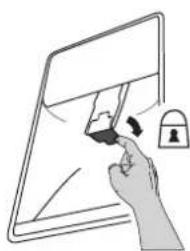
Illustration of a hand holding a tablet with a lock icon (no text or symbols)Note: possible black dots in the filtered water or in filter area are normal and not dangerous, they are due the normal carbon filter functionality.
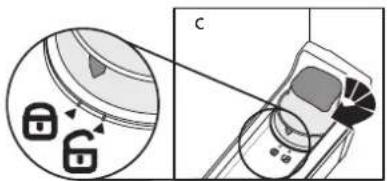
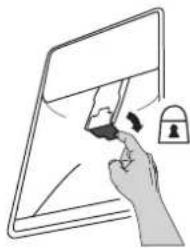
DISPENSER CHILD LOCK: You can lock the dispenser's paddle to avoid children dispensing water (flip the small lever behind the paddle as shown in (Fig. 11).
REPLACING THE CARBON CARTRIDGE The carbon filter lasts max 2 months for continuous use (up to 225 lt).
To replace the carbon cartridge: - unlock the filter and remove it from the balcony; - remove the funnel from filter housing rotating it anticlockwise; - remove the old carbon cartridge and insert the new one after activated, with current month faced in the window). (You can follow the procedure described in Carbon filter activation and Filter installation - Fig. 3, 4, 5, 6, 7, 8).
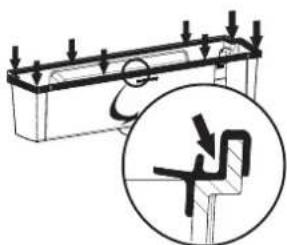
CLEAN THE TANK
It is suggested to periodically remove the tank to clean it (see Fig 12 and description below):
- unlock the filter (a) and remove it (b);
- remove the bottle balcony (c) then remove the tank (d) and the gasket.
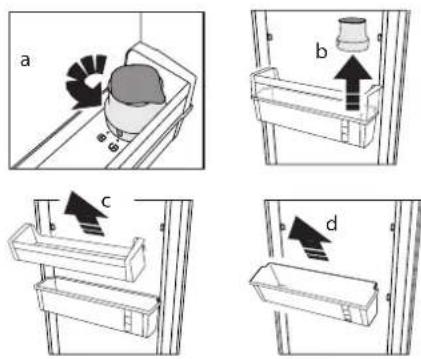
Fig 12
In case you decide to remove completely the water filter and tank from your fridge, you can remove the whole filter and the tank, using the balcony to normally store water bottles. In this case please use the filter cap to cover the hole on the balcony (see Fig. 13).
natural_image
Diagram of a mechanical component with a downward arrow and circular base (no text or symbols)Fig 13
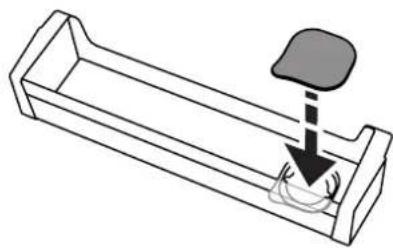
Wash the tank and the gasket with water only. At the end of cleaning, mount the gasket on the water tank. Make sure to correctly assembly the gasket on the tank (see Fig. 14).
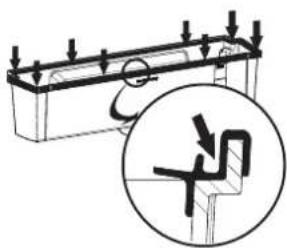
Fig 14
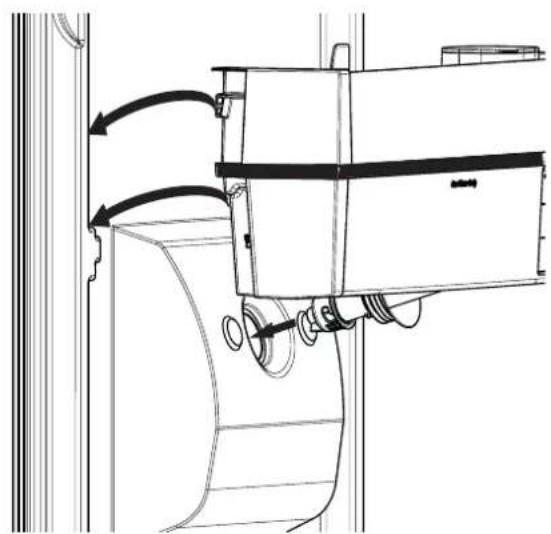
Then mount the bottle balcony on the water tank and assembly them on the door as suggested in Fig 15. Once assembled, mount the filter with the carbon cartridge (as described in Fig 5, 6, 7, 8).
natural_image
Technical line drawing of a mechanical assembly with directional arrows indicating motion (no text or symbols)Fig 15
Abb. 3
natural_image
Diagram of a door handle with a container and upward arrow indicating direction (no text or symbols)Abb. 4

Abb. 5
natural_image
Hand holding a small object inside a container, labeled 'Abb. 10' (no other text or symbols visible)Abb.
11

natural_image
Illustration of a hand interacting with a tablet screen and lock (no text or symbols)natural_image
Line drawing of a mechanical component with a downward arrow and circular base (no text or symbols)Abb. 13
Abb. 14
natural_image
Technical line drawing of a mechanical device with directional arrows indicating motion (no text or symbols)Abb. 15
BROCHURE ÉQUIPEMENT AQUA

natural_image
Diagram showing a device with lock icons and a close-up of its internal components (no text or symbols)Fig. 3
natural_image
Diagram of a door handle with a container and upward arrow indicating direction (no text or symbols)Fig. 4
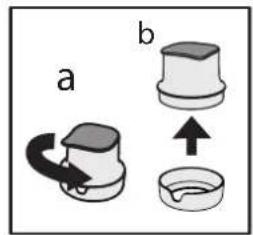
Fig. 5
natural_image
Illustration of a hand holding a tool inside a container, labeled Fig. 10 (no text or symbols on the diagram itself)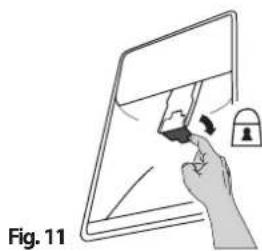
natural_image
Illustration of a hand holding a tablet with a lock and pen, labeled as Fig. 11 (no text or symbols on the diagram itself)REPLACEMENT DE LA CARTOUCHE AU CHARBON
natural_image
Line drawing of a mechanical component with a downward arrow and circular base (no text or symbols)Fig. 13
Fig. 14
natural_image
Technical line drawing of a mechanical assembly with directional arrows indicating motion (no text or symbols)Fig. 15
BROCHURE AQUA-UITRUSTING

-
Dispenserklepje
-
Waterfilter
WATERFILTER
Afb. 3
natural_image
Diagram of a door handle with a container and upward arrow indicating direction (no text or symbols)Afb. 4

Afb. 5
WATER VULLEN EN FILTEREN
natural_image
Hand holding a small object inside a container, labeled 'Afb. 10' (no other text or symbols visible)Afb.
11

natural_image
Illustration of a hand interacting with a tablet screen and lock (no text or symbols)natural_image
Line drawing of a mechanical component with a downward arrow and circular base (no text or symbols)Afb. 13
Afb. 14
natural_image
Technical line drawing of a mechanical assembly with directional arrows indicating motion (no text or symbols)Afb. 15
NOTE SUGLI APPARECCHI AQUA

Fig. 3
natural_image
Diagram of a door handle with a container and upward arrow indicating direction (no text or symbols)Fig. 4

Fig. 5
natural_image
Illustration of a hand holding a container with a tool, labeled 'Fig. 10' (no text or symbols on the diagram itself)
natural_image
Illustration of a hand holding a tablet with a lock and lock icon, labeled as Fig. 11 (no text or symbols on the diagram itself)natural_image
Diagram of a mechanical component with a downward arrow and circular base (no text or symbols)Fig. 13
Fig. 14
natural_image
Technical line drawing of a mechanical assembly with directional arrows indicating motion (no text or symbols)Fig. 15
FOLLETO DE EQUIPO AQUA

Fig. 3
natural_image
Diagram of a door handle with a container and an upward arrow indicating direction (no text or symbols)Fig. 4
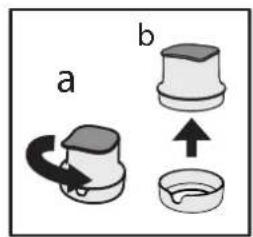
Fig. 5
natural_image
Illustration of a hand holding a container with a tool, labeled 'Fig. 10' (no text or symbols on the diagram itself)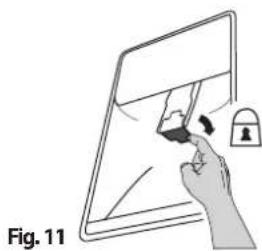
natural_image
Illustration of a hand holding a tablet with a lock and pen, labeled as Fig. 11 (no text or symbols on the diagram itself)natural_image
Diagram of a mechanical component with a downward arrow and circular base (no text or symbols)Fig. 13
Fig. 14
natural_image
Technical line drawing of a mechanical device with directional arrows indicating motion (no text or symbols)Fig. 15
Fig. 3
natural_image
Diagram of a refrigerator with an upward arrow indicating direction (no text or symbols)Fig. 4

Fig. 5
natural_image
Illustration of a hand holding a container with a tool, labeled 'Fig. 10' (no text or symbols on the diagram itself)
natural_image
Illustration of a hand holding a tablet with a lock and eraser, labeled as Fig. 11 (no text or symbols on the diagram itself)natural_image
Diagram of a mechanical component with a downward arrow and circular base (no text or symbols)Fig. 13
Fig. 14
natural_image
Technical line drawing of a mechanical assembly with directional arrows indicating motion (no text or symbols)Fig. 15
Фиг. 3
natural_image
Diagram of a refrigerator with an upward arrow indicating direction (no text or symbols)Фиг. 4
Фиг.5
Фиг.7
b
natural_image
Illustration of a hand holding a small object inside a transparent container (no text or symbols)Фиг.
11
natural_image
Illustration of a hand interacting with a tablet screen and lock (no text or symbols)natural_image
Diagram of a mechanical component with a downward arrow and circular base (no text or symbols)Фиг. 13
Фиг. 14
natural_image
Technical line drawing of a mechanical assembly with directional arrows indicating motion (no text or symbols)Фиг. 15
LETAK OPREMA ZA VODU
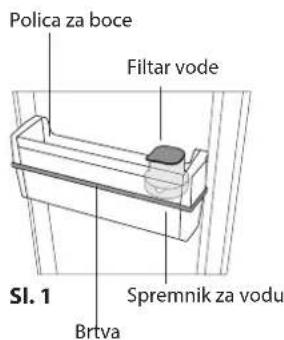
- Lopatica spremnika
- Filtar vode
FILTAR VODE
Filtar vode upotrebljava uložak s aktivnim ugljenom koji smanjuje količinu klora, taloga, prljavštine, hrđe i zamućenosti u pitkoj vodi. Filtar se mora postaviti u ladicu za boce. Može se ukloniti.
natural_image
Diagram showing a device with lock icons and a magnified view of its internal components (no text or symbols)Sl. 3
natural_image
Diagram of a refrigerator with an upward arrow indicating direction (no text or symbols)Sl. 4

Sl. 5
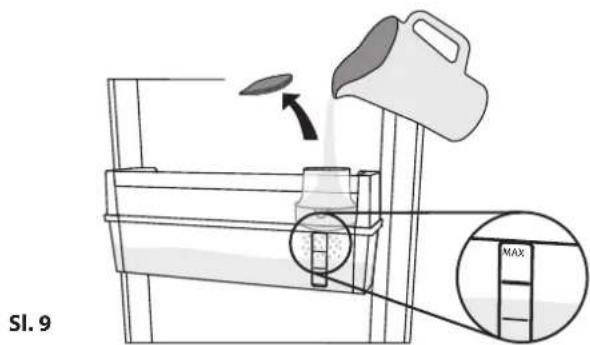
PUNJENJE I FILTRIRANJE VODE
Skinite čep i ulijte vodu u lijevak (sl. 9): voda će se filtrirati i napuniti spremnik vode.
Možete naliti najviše 3 litre. Ne ulijevajte preveliku količinu vode (maksimalna razina vode označena je na spremniku).
Napomena: spremnik punite isključivo vodom. Ne ulijevajte sok, colu ili neki drugi napitak jer bi oni mogli oštetiti funkcionalnost filtra i spremnika.
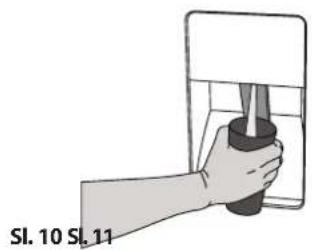
ISPUŠTANJE VODE
Za ispušanje vode lopaticu pritisnite čašom (sl. 10) i otpustite lopaticu za prestanak ispuštanja.
natural_image
Hand holding a tool inside a container, no text or symbols visible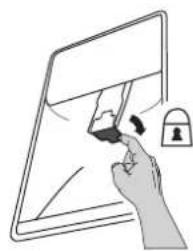
natural_image
Illustration of a hand holding a tablet with a lock and eraser (no text or symbols)Napomena: pojava crnih točaka u filtriranoj vodi ili području filtra uobičajena je i bezopasna, do nje dolazi uslijed normalnog rada ugljenog filtra.
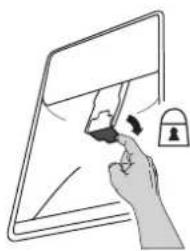
RODITELJSKA BLOKADA SPREMNIKA: Lopaticu spremnika možete blokirati kako biste spriječili da djeca ispuštaju vodu (okrenite malu ručicu iza lopatice kao što je prikazano na (sl. 11).
natural_image
Line drawing of a mechanical component with a downward arrow and circular base (no text or symbols)Sl. 13
Spremnik i brtvu perite samo vodom. Po završetku čišćenja brtvu postavite na spremnik vode. Pazite da ispravno postavite brtvu na spremnik (pogledajte sl. 14).
Sl. 14
Zatim postavite ladicu za bocu na spremnik vode i spojite ih na vrata kao što je predloženo na sl. 15. Nakon sastavljanja postavite filtar s ugljenim filtrom (kao što je opisano na sl. 5, 6, 7, 8).

natural_image
Technical line drawing of a mechanical assembly with directional arrows indicating motion (no text or symbols)Sl. 15
NÁVOD PRO PŘÍSLUŠENSTVÍ NA VODU (AQUA EQUIPMENT)

Obr. 3
natural_image
Diagram of a door handle with a container and an upward arrow indicating direction (no text or symbols)Obr. 4

Obr. 5
NAPLNĚNÍ VODOU A FILTRACE VODY
DÁVKOVÁNÍ VODY
natural_image
Illustration of a hand holding a small object inside a container, labeled 'Obr. 10' (no other text or symbols)Obr.
11

natural_image
Illustration of a hand holding a tablet with a lock and padlock (no text or symbols)natural_image
Line drawing of a mechanical component with a downward arrow and circular base (no text or symbols)Obr. 13
Obr. 14
natural_image
Technical line drawing of a mechanical assembly with directional arrows indicating motion (no text or symbols)Obr. 15
BROCHURE FOR AQUA UDSTYR

- Dispenserens pagaj
- Vandfilter
VANDFILTER
natural_image
Diagram showing a device with lock icons and a close-up of its interior panel (no text or symbols)Fig. 3
natural_image
Diagram of a container with an upward arrow indicating flow or movement (no text or symbols present)Fig. 4

Fig. 5
PÄFYLDNING OG FILTRERING AF VAND
natural_image
Illustration of a hand holding a container with a tool, labeled 'Fig. 10' (no text or symbols on the diagram itself)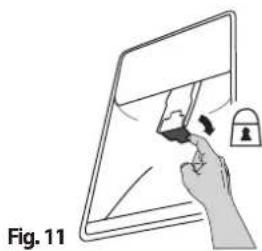
natural_image
Illustration of a hand interacting with a tablet screen and lock (no text or symbols)natural_image
Line drawing of a mechanical component with a downward arrow indicating force or motion (no text or symbols)Fig. 13
Fig. 14
natural_image
Technical line drawing of a mechanical assembly with directional arrows indicating motion (no text or symbols)Fig. 15
VEESEADME INFOLEHT

- Veeautomaadi laba
- Veefilter
VEEFILTER
Joonis 3
natural_image
Diagram of a mechanical device with an upward arrow and a cylindrical component (no text or symbols)Joonis 4
Joonis 5
VEE LISAMINE JA FILTRIMINE
natural_image
Illustration of a hand holding a tool inside a container, labeled 'Joonis 10' (no other text or symbols)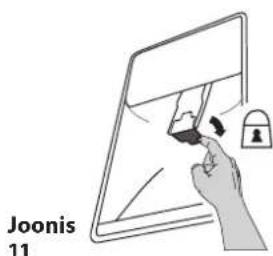
Kuva 3
natural_image
Diagram of a mechanical assembly with a cylindrical component and an upward arrow, no text or symbols presentKuva 4
Kuva 5
VEDEN TÄYTTÄMINEN JA SUODATTAMINEN
natural_image
Illustration of a hand holding a container with a tool, labeled 'Kuva 10' (no other text or symbols)Kuva
11

natural_image
Illustration of a hand interacting with a tablet screen and lock (no text or symbols)natural_image
Line drawing of a mechanical component with a downward arrow and circular base (no text or symbols)Kuva 13
Kuva 14
natural_image
Technical line drawing of a mechanical assembly with directional arrows indicating motion (no text or symbols)Kuva 15
natural_image
Diagram showing a device with lock icons and a magnified view of its internal components (no text or symbols)Eik. 3
natural_image
Diagram of a refrigerator with an upward arrow indicating direction (no text or symbols)Eik. 4
Eik. 5
natural_image
Illustration of a hand holding a container with a tool, labeled 'Eik. 10' (no other text or symbols)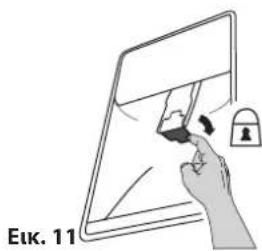
natural_image
Illustration of a hand holding a tablet with a lock and pen, no text or symbols presentnatural_image
Diagram of a mechanical component with a downward arrow indicating force or movement (no text or symbols)Eik. 13
Eik. 14
natural_image
Technical line drawing of a mechanical device with directional arrows indicating motion (no text or symbols)Eik. 15
VÍZADAGOLÓ BERENDEZÉS FÜZET
- ábra
natural_image
Diagram of a door handle with a container and upward arrow indicating direction (no text or symbols)- ábra

- ábra
natural_image
Line drawing of a mechanical component with a downward arrow and circular base (no text or symbols)- ábra
- ábra
natural_image
Technical line drawing of a mechanical assembly with directional arrows indicating motion (no text or symbols)- ábra
ÜDENS IEKÄRTAS BROŠÜRA

- att
natural_image
Diagram of a refrigerator with an upward arrow indicating direction (no text or symbols)- att.

- att.
- att.
b
ÜDENS UZPILDİŠANA UN FILTRĖŠANA
natural_image
Hand holding a cup and bottle inside a container (no text or symbols visible)- att.

natural_image
Illustration of a hand holding a tablet with a lock and eraser (no text or symbols)natural_image
Line drawing of a mechanical component with a downward arrow and circular base (no text or symbols)- att.
- att.
natural_image
Technical line drawing of a mechanical assembly with directional arrows indicating motion (no text or symbols)- att.
„AQUA“ IRANGOS LANKSTINUKAS

-
Vandens tiektuvo svirtelė
-
Vandens filtras
VANDENS FILTRAS
natural_image
Diagram showing a device with lock icons and a magnified view of its internal components (no text or symbols)3 pav.
natural_image
Diagram of a mechanical assembly with a cylindrical component and an upward arrow, no text or symbols present4 pav.

5 pav.
VANDENS IPYLIMAS IR FILTRAVIMAS
natural_image
Hand holding a spray bottle inside a container, labeled '10 pav.' (no other text or symbols)11
pav.
natural_image
Illustration of a hand holding a tablet with a lock and padlock (no text or symbols)natural_image
Line drawing of a mechanical component with a downward arrow and circular base (no text or symbols)13 pav.
14 pav.
natural_image
Technical line drawing of a mechanical assembly with directional arrows indicating motion (no text or symbols)15 pav.
HEFTET AQUA-UTSTYR

-
Dispenserens skovl
-
Dispenserarm
DISPENSERARM
Vannfilteret benytter en aktiv karbonpatron som reduserer mengden klor, avsetninger, skitt, rust og uklarheter i drikkevannet. Filteret må installeres i flaskehyllen. Det kan fjernes.
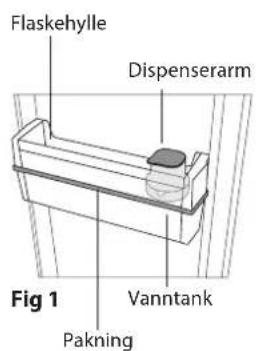
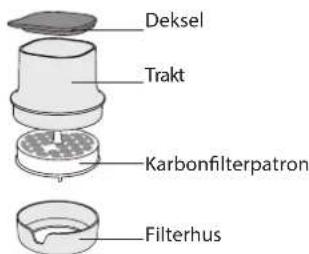
Fig 2
Fig 3
natural_image
Diagram of a container with an upward arrow indicating flow or movement (no text or symbols present)Fig 4
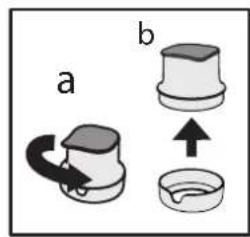
Fig 5
Etter aktivering, sett karbonpatronen inn i filterhuset slik at den aktuelle måneden kan ses igjennom vinduet (f.eks. dersom du er i oktober, kan du lese av oktober i vinduet) - Se Fig. 6.
Lukk filteret (Fig. 7):
FYLLING OG FILTRERING AV VANN
VANNDISPENSER
natural_image
Hand holding a tool with a cap, partially enclosed in a container (no text or symbols visible)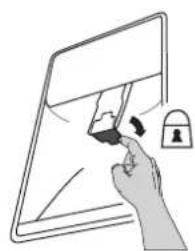
natural_image
Illustration of a hand holding a tablet with a lock icon (no text or symbols)natural_image
Diagram of a mechanical component with a downward arrow and circular base (no text or symbols)Fig 13
Bruk kun vann for å vaske tanken og pakningen. Når du har avsluttet vaskingen, monter pakningen på vanntanken. Påse at pakningen er riktig montert på tanken (se Fig. 14).

Fig 14
Monter deretter flaskehyllen på vanntanken og monter de på døren slik det anbefales i Fig 15. Når det hele er satt sammen, monter filteret med karbonpatronen (slik det beskrives i Fig 5, 6, 7, 8).

natural_image
Technical line drawing of a mechanical assembly with directional arrows indicating motion (no text or symbols)Fig 15

Rys. 3
natural_image
Diagram of a refrigerator with an upward arrow indicating direction (no text or symbols)Rys.4

Rys. 5
NAPEŁNIANIE I FILTROWANIE WODY
natural_image
Hand holding a small object inside a container, labeled 'Rys. 10' (no other text or symbols visible)Rys.
11
natural_image
Illustration of a hand holding a tablet with a lock icon (no text or symbols)natural_image
Line drawing of a mechanical component with a downward arrow and circular base (no text or symbols)Rys. 13
Rys. 14
natural_image
Technical line drawing of a mechanical assembly with directional arrows indicating motion (no text or symbols)Rys. 15
BROŞURĂ ECHIPAMENT AQUA

natural_image
Diagram showing a device with lock mechanism and magnified view of the screen (no text or symbols)Fig. 3
natural_image
Diagram of a refrigerator interior with a door handle and an upward arrow indicating direction (no text or symbols)Fig. 4
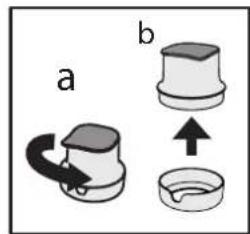
Fig. 5
UMPLEREA CU APĂ ȘI FILTRAREA ACESTEIA
natural_image
Hand holding a tool inside a container, labeled Fig. 10 (no text or symbols on the diagram itself)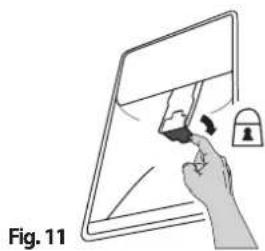
natural_image
Illustration of a hand holding a tablet with a lock and eraser, labeled as Fig. 11 (no text or symbols on the diagram itself)natural_image
Diagram of a mechanical component with a downward arrow indicating force or motion (no text or symbols)Fig. 13
Fig. 14
natural_image
Technical line drawing of a mechanical assembly with directional arrows indicating motion (no text or symbols)Fig. 15
Рис. 3
natural_image
Diagram of a door handle with a container and upward arrow indicating direction (no text or symbols)Рис. 4

Рис. 5
natural_image
Line drawing of a mechanical component with a downward arrow and circular base (no text or symbols)Рис. 13
Рис. 14
natural_image
Technical line drawing of a mechanical assembly with directional arrows indicating motion (no text or symbols)Рис. 15
LETAK ZA AQUA OPREMU

-
Ručica dispensera
-
Filter za vodu
FILTER ZA VODU
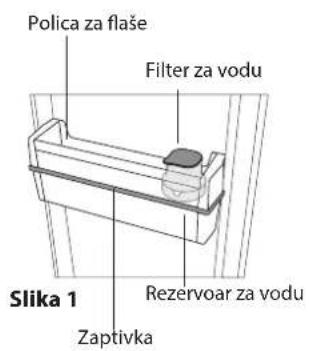
Filter za vodu koristi uložak sa aktivnim ugljem koji smanjuje količinu hlora, taloga, prljavštine, rđe i zamućenosti u vodi za piće. Filter se mora postaviti na policu za flaše. Može da se ukloni.
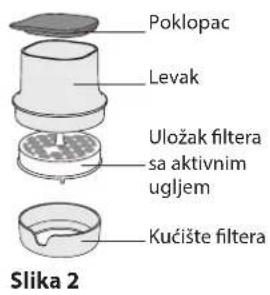
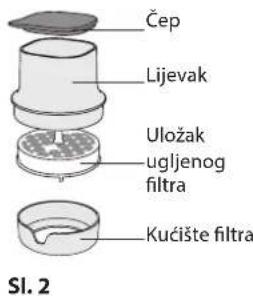
AKTIVIRANJE ULOŠKA SA AKTIVNIM UGLJEM Pre prve upotrebe, ULOŽAK FILTERA SA AKTIVNIM UGLJEM se mora aktivirati i namestiti. Izvadite filter sa aktivnim ugljem iz pakovanja (koje možete naći u pregradi za voće i povrće) i aktivirajte ga na sledeći način;
- potopite ga na 10 minuta u vodu
- izvadite ga iz vode i snažno ga protresite 10 sekundi da biste ga aktivirali.
POSTAVLJANJE FILTERA Skinite filter sa police i otvorite ga da biste ubacili uložak sa ugljenikom:
- Odblokirajte ceo filter okrećući ga u smeru suprotnom od smera kretanja kazaljki na satu (slika 3)
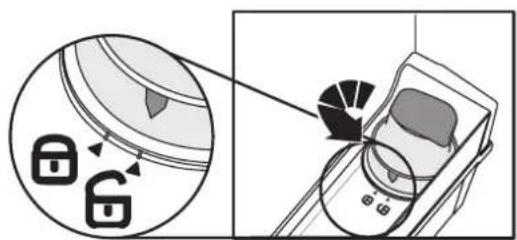
Slika 3
- Skinite filter sa police (slika 4)
- Skinite levak sa kućišta filtera rotirajući ga u smeru suprotnom od smera kretanja kazaljki na satu (Slika 5. a - b).
natural_image
Diagram of a refrigerator with an upward arrow indicating direction (no text or symbols)Slika 4

Slika 5
Nakon aktiviranja, ubacite uložak sa ugljenikom u kućište filtera tako da trenutni mesec u godini bude namešten na malom prozoru (npr. ako je sad oktobar mesec, namestite tako da na malom prozoru bude oktobar) - pogledajte sliku 6.
Zatvorite filter (Slika. 7):
a) stavite levak na kućište filtera (sa postavljenim aktivnim ugljem), kao što je prikazano na slici 7a;
b) rotirajte levak u smeru kretanja kazaljki na satu kako biste ga učvrstili, kao što je prikazano na slici 7b.
Slika 7
b
Zatim stavite ceo filter na policu za flaše i zaključajte ga prateći postupak sa Slike 8.
Slika 8
PUNJENJE VODOM I FILTRIRANJE
natural_image
Illustration of a hand holding a tablet with a lock and padlock (no text or symbols)Napomena: mogući crni tragovi u filtriranoj vodi ili u zoni filtera su normalni i nisu opasni, oni nastaju kao rezultat normalnog funkcionisanja filtera sa aktivnim ugljem.
RODITELJSKA BLOKADA DISPENSERA: Možete zaključati ručicu dispensera kako biste izbegli da deca toče vodu (povucite malu polugu koja se nalazi iza ručice kao što je prikazano na (slici 11).
ZAMENA ULOŠKA SA AKTIVNIM UGLJEM
natural_image
Line drawing of a mechanical component with a downward arrow and circular base (no text or symbols)Slika 13
Za pranje rezervoara i zaptivke koristite isključivo vodu. Po obavljenom čišćenju, postavite zaptivke na rezervoar za vodu. Zaptivci moraju biti ispravno postavljeni na rezervoar (vidite sliku 14).

Slika 14
Potom montirajte policu za flaše na rezervoar za vodu i postavite sve zajedno na vrata kao što je prikazano na slici 15. Kada je sve na mestu, postavite filter sa aktivnim (kao što je prikazano na slikama 5, 6, 7, 8).
natural_image
Technical line drawing of a mechanical assembly with directional arrows indicating motion (no text or symbols)Slika 15
LETÁK K ZARIADENIU AQUA

natural_image
Diagram showing a device with lock icons and a close-up of its internal components (no text or symbols)Obr. 3
- Vyberte filter z poličky (obr. 4);
natural_image
Diagram of a mechanical device with an upward arrow and a cylindrical component inserted into a housing (no text or symbols)Obr. 4

Obr. 5
NALIATIE A FILTROVANIE VODY
VÝDAJ VODY
natural_image
Hand holding a bottle with a container, labeled 'Obr. 10' (no other text or symbols)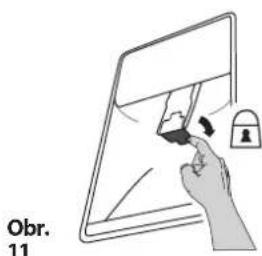
natural_image
Illustration of a hand interacting with a tablet screen and lock (no text or symbols)natural_image
Line drawing of a mechanical component with a downward arrow and circular base (no text or symbols)Obr. 13
Obr. 14
Potom pripevnite poličku na fláše na nádrž na vodu a primontujte ich na dvere, ako vidíte na obr. 15. Po zmontovaní nasadte filter s uhlíkovou vložkou (ako je opísané na obr. 5, 6, 7, 8).

natural_image
Technical line drawing of a mechanical assembly with directional arrows indicating motion (no text or symbols)Obr. 15
NAVODILA ZA UPORABO VODOMATA AQUA
- Vzvod vodomata
- Vodni filter
VODNI FILTER
Slika 3
- Filter odstranite s police na vratih (slika 4); - Tulec odstranite z ohišja filtra, tako da ga zavrtite v nasprotni smeri urnega kazalca (sliki 5a in b).
natural_image
Diagram of a mechanical assembly with a cylindrical component and an upward arrow, no text or symbols presentSlika 4

Slika 5
POLNJENJE IN FILTRIRANJE VODE Odstranite pokrov in v tulec nalijte vodo (slika 9): voda se bo pri tem prefiltrirala in napolnila rezervoar za vodo. Napolnite lahko do 3 litre vode. V rezervoar ne nalijte prevelike količine vode (maksimalna količina vode je prikazana na predalu).
natural_image
Illustration of a hand holding a bottle with a container, labeled 'Slika 10' (no other text or symbols)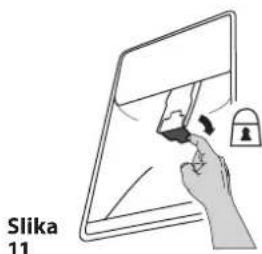
natural_image
Illustration of a hand interacting with a tablet screen and lock (no text or symbols)natural_image
Line drawing of a mechanical component with a downward arrow and circular base (no text or symbols)Slika 13
Slika 14
Nato pritrdite polico za steklenice na rezervoar za vodo ter ju namestite na vrata, kot je prikazano na sliki 15. Ko ste oboje namestili, pritrdite filter z ogljikovim vložkom (kot opisano na slikah 5, 6, 7, 8).

natural_image
Technical line drawing of a mechanical assembly with directional arrows indicating motion (no text or symbols)Slika 15
BROSCHYR OM VATTENUTRUSTNING

- Automatens slusslucka
- Vattenfilter
VATTENFILTER
Fig 3
natural_image
Diagram of a container with an upward arrow indicating flow or movement (no text or symbols present)Fig 4

Fig 5
PÄFYLLNING OCH FILTRERING AV VATTEN
VATTENDISPENSER
natural_image
Hand holding a tool inside a container, labeled Fig 10 and Fig 11 (no text on the diagram itself)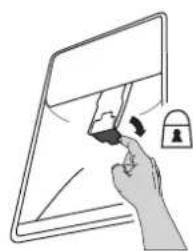
natural_image
Illustration of a hand holding a pen and lock on a tablet screen (no text or symbols)natural_image
Diagram of a mechanical component with a downward arrow and circular base (no text or symbols)Fig 13
Fig 14
natural_image
Technical line drawing of a mechanical assembly with directional arrows indicating motion (no text or symbols)Fig 15
Мал. 3
natural_image
Diagram of a door handle with a container and upward arrow indicating direction (no text or symbols)Мал. 4

Мал. 5
natural_image
Illustration of a hand holding a tablet with a lock icon, no text or symbols presentnatural_image
Diagram of a mechanical component with a downward arrow and circular base, no text or symbols presentМал. 13
Мал. 14
natural_image
Technical line drawing of a mechanical assembly with directional arrows indicating motion (no text or symbols)Мал. 15
natural_image
Diagram of a mechanical assembly with a cylindrical component and an upward arrow, no text or symbols present4 صورة
5 صورة
14 صورة
natural_image
Technical line drawing of a mechanical assembly with directional arrows indicating motion (no text or symbols)15 صورة
تنظيف الخزان
natural_image
Diagram of a mechanical component with a downward arrow and circular base (no text or symbols)13 صورة