
MD350 - Audio recorder TASCAM - Free user manual and instructions
Find the device manual for free MD350 TASCAM in PDF.
| Brand | TASCAM |
| Model | MD350 |
| Product type | MiniDisc audio recorder |
| Format | MiniDisc digital audio system |
| Sampling frequency | 44.1 kHz |
| Compression system | ATRAC (Adaptive TRansform Acoustic Coding) |
| Number of channels | 2 (stereo), 1 (mono) |
| Recording modes | SP (80 min), LP2 (160 min), LP4 (320 min), Mono (160 min) |
| Dynamic range | Greater than 94 dB (playback, 1 kHz, A-weighting) |
| Total harmonic distortion | Less than 0.013% |
| Frequency response | 20 Hz to 20 kHz ±0.5 dB (playback) |
| Signal-to-noise ratio | Greater than 94 dB (playback, A-weighting) |
| Analog inputs | XLR balanced (+4 dBu, 10 kΩ), RCA unbalanced (-10 dBV, 50 kΩ) |
| Analog outputs | XLR balanced (+4 dBu, 150 Ω), RCA unbalanced (-10 dBV, 600 Ω) |
| Digital inputs/outputs | 2 TOS inputs (S/PDIF), 1 TOS output (S/PDIF) |
| Headphone output | 25 mW + 25 mW max. into 32 Ω |
| Power supply | 120 V~ 60 Hz (US/Canada), 230 V~ 50 Hz (Europe), 240 V~ 50 Hz (Australia) |
| Power consumption | 13 W |
| Dimensions (W x H x D) | 482.6 x 94 x 313 mm |
| Weight | 5.5 kg |
| Included accessories | Remote control RC-32, 2 AA batteries, keyboard template, rack mount screw kit |
| Editing functions | Erase, divide, combine, move tracks, titling, UNDO |
| Playback modes | Continuous, random, programmed, repeat (all, one, A-B) |
| Maintenance | Clean with a dry, clean cloth. Do not use solvents. |
| Safety instructions | Do not open the casing. Avoid direct exposure to sunlight, heat, moisture, and vibration. |
Frequently Asked Questions - MD350 TASCAM
User questions about MD350 TASCAM
0 question about this device. Answer the ones you know or ask your own.
Ask a new question about this device
Download the instructions for your Audio recorder in PDF format for free! Find your manual MD350 - TASCAM and take your electronic device back in hand. On this page are published all the documents necessary for the use of your device. MD350 by TASCAM.
USER MANUAL MD350 TASCAM
TEAC Professional Division
MD-350
Minidisc Deck
D00602210A
OWNER'S MANUAL / MANUEL DU PROPRIETAIRE
BEDIENUNG SANLEITUNG / MANUALE DI ISTRUZIONI
MANUAL DEL USUARIO / GEBRUIKSAANWIJZING

CAUTION
RISK OF ELECTRIC SHOCK DO NOT OPEN

CAUTION: TO REDUCE THE RISK OF ELECTRIC SHOCK, DO NOT REMOVE COVER (OR BACK). NO USER-SERVICEABLE PARTS INSIDE. REFER SERVICING TO QUALIFIED SERVICE PERSONNEL.

The lightning flash with arrowhead symbol, within an equilateral triangle, is intended to alert the user to the presence of uninsulated "dangerous voltage" within the product's enclosure that may be of sufficient magnitude to constitute a risk of electric shock to persons.

The exclamation point within an equilateral triangle is intended to alert the user to the presence of important operating and maintenance (servicing) instructions in the literature accompanying the appliance.
This appliance has a serial number located on the rear panel. Please record the model number and serial number and retain them for your records.
Model number
Serial number
WARNING: TO PREVENT FIRE OR SHOCK HAZARD, DO NOT EXPOSE THIS APPLIANCE TO RAIN OR MOISTURE.
CAUTION:
-Read all of these Instructions.
Save these Instructions for later use.
- Follow allWarnings and Instructions marked on the audio equipment.
1) Read Instructions — All the safety and operating instructions should be read before the product is operated.
2) Retain Instructions - The safety and operating instructions should be retained for future reference.
3) HeedWarnings All warnings on the product and in the operating instructions should be adhered to.
4) Follow Instructions — All operating and use instructions should be followed.
5) Cleaning — Unplug this product from the wall outlet before cleaning. Do not use liquid cleaners or aerosol cleaners. Use a damp cloth for cleaning.
6) Attachments - Do not use attachments not recommended by the product manufacturer as they may cause hazards.
7) Water and Moisture — Do not use this product near water — for example, near a bath tub, wash bowl, kitchen sink, or laundry tub; in a wet basement; or near a swimming pool; and the like.
8) Accessories - Do not place this product on an unstable cart, stand, tripod, bracket, or table. The product may fall, causing serious injury to a child or adult, and serious damage to the product. Use only with a cart, stand, tripod, bracket, or table recommended by the manufacturer, or sold with the product. Any mounting of the product should follow the manufacturer's instructions, and should use a mounting accessory recommended by the manufacturer.
9) A product and cart combination should be moved with care. Quick stops, excessive force, and uneven surfaces may cause the product and cart combination to overturn.

10) Ventilation — Slots and openings in the cabinet are provided for ventilation and to ensure reliable operation of the product and to protect it from overheating, and these openings must not be blocked or covered. The openings should never be blocked by placing the product on a bed, sofa, rug, or other similar surface. This product should not be placed in a built-in installation such as a bookcase or rack unless proper ventilation is provided or the manufacturer's instructions have been adhered to.
11) Power Sources — This product should be operated only from the type of power source indicated on the marking label. If you are not sure of the type of power supply to your home, consult your product dealer or local power company. For products intended to operate from battery power, or other sources, refer to the operating instructions.
12) Grounding or Polarization — This product may be equipped with a polarized alternating-current line plug (a plug having one blade wider than the other). This plug will fit into the power outlet only one way. This is a safety feature. If you are unable to insert the plug fully into the outlet, try reversing the plug. If the plug should still fail to fit, contact your electrician to replace your obsolete outlet. Do not defeat the safety purpose of the polarized plug.
13) Power-Cord Protection — Power-supply cords should be routed so that they are not likely to be walked on or pinched by items placed upon or against them, paying particular attention to cords at plugs, convey-ience receptacles, and the point where they exit from the product.
14) Outdoor Antenna Grounding - If an outside antenna or cable system is connected to the product, be sure the antenna or cable system is grounded so as to provide some protection against voltage surges and built-up static charges. Article 810 of the National Electrical Code, ANSI/NFPA 70, provides information with regard to proper grounding of the mast and supporting structure, grounding of the lead-in wire to an antenna discharge unit, size of grounding conductors, location of antenna-discharge unit, connection to grounding electrodes, and re-requirements for the grounding electrode.
Note to CATV system installer:
This reminder is provided to call the CATV system installer's attention to Section 820-40 of the NEC which provides guidelines for proper grounding and, in particular, specifies that the cable ground shall be connected to the grounding system of the building, as close to the point of cable entry as practical.
grounding and, in particular, specifies that the cable ground shall be connected to the grounding system of the building, as close to the point of cable entry as practical.
Example of Antenna Grounding as per
National Electrical Code, ANSI/NFPA 70
15) Lightning — For added protection for this product during a lightning storm, or when it is left unattended and unused for long periods of time, unplug it from the wall outlet and disconnect the antenna or cable system. This will prevent damage to the product due to lightning and power-line surges.
16) Power Lines — An outside antenna system should not be located in the vicinity of overhead power lines or other electric light or power circuits, or where it can fall into such power lines or circuits. When installing an outside antenna system, extreme care should be taken to keep from touching such power lines or circuits as contact with them might be fatal.
17) Overloading — Do not overload wall outlets, extension cords, or integral convenience receptacles as this can result in risk of fire or electric shock.
18) Object and Liquid Entry — Never push objects of any kind into this product through openings as they may touch dangerous voltage points or short-out parts that could result in a fire or electric shock. Never spill liquid of any kind on the product.
19) Servicing — Do not attempt to service this product yourself as opening or removing covers may expose you to dangerous voltage or other hazards. Refer all servicing to qualified service personnel.
20) Damage Requiring Service — Unplug this product from the wall outlet and refer servicing to qualified service personnel under the following conditions:
a) when the power-supply cord or plug is damaged.
b) if liquid has been spilled, or objects have fallen into the product.
c) if the product has been exposed to rain or water.
d) if the product does not operate normally by following the operating instructions. Adjust only those controls that are covered by the operating instructions as an improper adjustment of other controls may result in damage and will often require extensive work by a qualified technician to restore the product to its normal operation.
e) if the product has been dropped or damaged in any way.
f) when the product exhibits a distinct change in performance - this indicates a need for service.
21) Replacement Parts — When replacement parts are required, be sure the service technician has used replacement parts specified by the manufacturer or have the same characteristics as the original part. Unauthorized substitutions may result in fire, electric shock, or other hazards.
22) Safety Check - Upon completion of any service or repairs to this product, ask the service technician to perform safety checks to determine that the product is in proper operating condition.
23) Wall or Ceiling Mounting — The product should be mounted to a wall or ceiling only as recommended by the manufacturer.
24) Heat The product should be situated away from heat sources such as radiators, heat registers, stoves, or other products (including amplifiers) that produce heat.
SAFETY INFORMATION
This product has been designed and manufactured according to FDA regulations "title 21, CFR, chapter 1, subchapter J, based on the Radiation Control for Health and Safety Act of 1968", and is classified as class 1 laser product. There is no hazardous invisible laser radiation during operation because invisible laser radiation emitted inside of this product is completely confined in the protective housings.
The label required in this regulation is shown ①.
- CAUTION
-DO NOT REMOVE THE PROTECTIVE HOUSING USING SCREWDRIVER.
- USE OF CONTROLS OR ADJUSTMENTS OR PERFORMANCE OF PROCEDURES OTHER THAN THOSE SPECIFIED HEREIN MAY RESULT IN HAZARDOUS RADIATION EXPOSURE.
- IF THIS PRODUCT DEVELOPS TROUBLE, MAKE A CONTACT WITH OUR SERVICEMAN, AND DO NOT USE THE PRODUCT IN A TROUBLED STATE.

For U.S.A
TO THE USER
This equipment has been tested and found to comply with the limits for a Class B digital device, pursuant to Part 15 of the FCC Rules. These limits are designed to provide reasonable protection against harmful interference in a residential installation. This equipment generates, uses, and can radiate radio frequency energy and, if not installed and used in accordance with the instruction manual, may cause harmful interference to radio communications. However, there is no guarantee that interference will not occur in a particular installation. If this equipment does cause harmful interference to radio or television reception, which can be determined by turning the equipment off and on, the user
is encouraged to try to correct the interference by one or more of the following measures.
a) Reorient or relocate the receiving antenna.
b) Increase the separation between the equipment and receiver.
c) Connect the equipment into an outlet on a circuit different from that to which the receiver is connected.
d) Consult the dealer or an experienced radio/TV technician for help.
CAUTION
Changes or modifications to this equipment not expressly approved by TEAC CORPORATION for compliance could void the user's authority to operate this equipment.
IMPORTANT SAFETY INSTRUCTIONS 2-3
Before Use 4
Read This Before Operating 4
Handling MDs 5
Memory back-up function 5
When "Protected !!" is displayed. 5
While "UTOC Writing" is blinking 5
When "D-IN UNLOCK!" blinks 5
Remote Control Unit 5
k Mounting. 6
Voltage Conversion (For general export models) 6
Connections 6
Connection 6
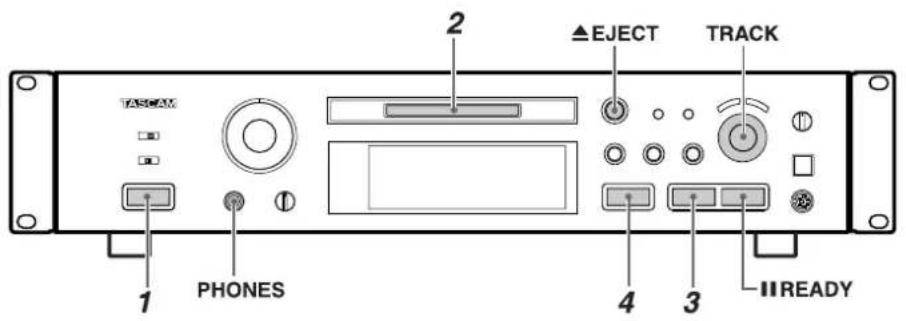
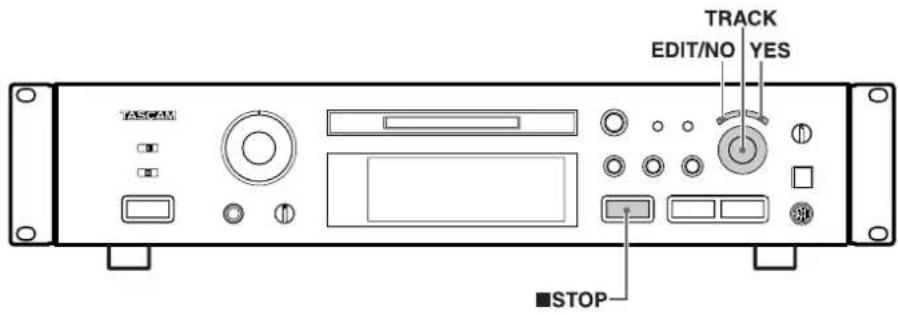
Name of Each Control 7
Recording 8
Recording an MD 8
Notes on Recording 9
Playback 10
NormalPlayback 10
Useful Tips for Recording 11
Monitoring the Input Signal 11
Adjusting the Recording Level 11
Assigning Track Numbers During Recording 11
Recording Over Existing Tracks (Over Write) 11
Sync Recording 12
Checking the Remaining MD Recording Time 12
Checking the Recorded Tracks 12
Timer Recording 12
Useful Tips forPlayback 13
Using the Display Window 13
Selecting the Desired Track 13
Playing Tracks in Random Order (Shuffle Playback) 13
When Recording to Analog Tape 13-14
Playing Tracks in the Desired Order (Program Playback) 14-15
Repeating Track(s) (Repeat Playback) 15
TimerPlayback 15
Pitch control 15
Play modes 15
Editing Recorded MDs 16
Notes on Editing 16
Erasing Track(s) (ERASE Function) 16
Dividing a Track (DIVIDE Function) 17
Combining Tracks (COMBINE Function) 17
Moving a Track (MOVE Function) 17
Assigning Titles (TITLE Function) 18
Assigning Titles to the Disc and All Tracks Successively
(TITLE AUTO INC Function) 18-19
Changing entered characters 19
Copying a Title (TITLE COPY Function) 19
Canceling the Last Operation (UNDO Function) 19
Optional Functions 20
Correspondence between deck buttons and keyboard keys. 20
Editing keys 20
Title entry keys 20
System Restrictions 20-21
Display Messages 21
Guide to the Serial Copy Management System 22
Serial Copy Management System 22
Troubleshooting 23
Specifications 23
Read This Before Operating
- Place the unit on a hard flat surface.
- Avoid placing it in direct sunlight or close to a source of heat. Also avoid locations subject to vibrations and excessive dust, heat, cold or moisture.
- Do not open the cabinet, as this might result in circuitry damage or electrical shock.
- Do not attempt to clean the unit with chemical solvents, as this might damage the finish. Use a clean, dry cloth.
- When removing the power plug from the wall outlet, always pull directly on the plug, never yank the cord.
- Keep this manual in a safe place for future reference.
IMPORTANT (for U.K. Customers)
DO NOT cut off the mains plug from this equipment. If the plug fitted is not suitable for the power points in your home or the cable is too short to reach a power point, then obtain an appropriate safety approved extension lead or consult your dealer.
If nonetheless the mains plug is cut off, remove the fuse and dispose of the plug immediately, to avoid a possible shock hazard by inadvertent connection to the mains supply.
If this product is not provided with a mains plug, or one has to be fitted, then follow the instructions given below:
IMPORTANT. DO NOT make any connection to the larger terminal which is marked with the letter E or by the safety earth symbol 12 or coloured GREEN or GREEN-and-YELLOW.
The wires in the mains lead on this product are coloured in accordance with the following code:
BLUE: NEUTRAL
BROWN: LIVE
As these colours may not correspond with the coloured markings identifying the terminals in your plug proceed as follows:
The wire which is coloured BLUE must be connected to the terminal which is marked with the letter N or coloured BLACK.
The wire which is coloured BROWN must be connected to the terminal which is marked with the letter L or coloured RED.
When replacing the fuse only a correctly rated approved type should be used and be sure to re-fit the fuse cover.
IF IN DOUBT CONSULT A COMPETENT ELECTRICIAN.
■ Handling MDs
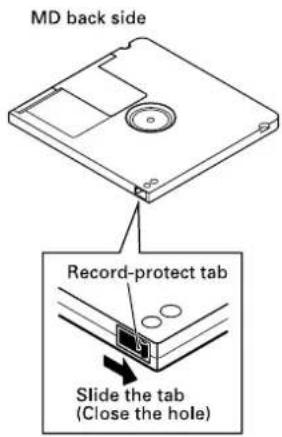
The MiniDisc (MD) measures 64mm in diameter. Although the MD is housed in a protective cartridge (68mm × 72mm × 5mm) and can be handled easily, deck malfunctions may result if the cartridge gets dust on it or is damaged. To protect the disc, always take the following precautions:
- Be sure that the MD is taken out of the deck and put back in its MD case after using it.
- Do not touch the disc inside the cartridge. Do not open the shutter to expose the MD.
- Do not place MDs in direct sunlight, high temperatures, or high levels of humidity.
- Use a dry, soft cloth to clean the cartridge.
- When attaching a label to the MD cartridge, be sure to apply it correctly to the specified position. If the label is rolled up or partially detached, the MD cartridge may get stuck inside the deck.
- Do not place one label on top of another.
Memory back-up function
This unit is provided with a memory backup function. When you use the deck for the first time, leave it on for about 5 minutes to allow the back-up circuit to be charged and become operational. When not using the deck for a while, try to turn the power on every 3 or 4 days.
Serial Copy Management System
This deck complies with the SCMS (Serial Copy Management System). As a result, it is not possible to digitally record from a source MD which has been recorded digitally.
When "Protected !!" is displayed
- A playback-only MD is loaded.
The MD is record-protected against accidental erasure. To make recording (or editing) possible, slide the record-protect tab to close the hole.
While "UTOC Writing" is blinking:
"UTOC Writing" blinks while the MD is being ejected after recording (or editing). While it is blinking, the recorded data is being written on the MD. Do not pull out the power cord or vibrate the deck. Otherwise the recorded data may not be written correctly on the MD. If the power is turned off with the MD left in the deck ("thoughts up")
after recording, the UTOC cannot be recorded. Turn the power back on within 3 or 4 days and eject the MD. The recorded data might be lost if the MD is left in the deck for a long time.
When "D-IN UNLOCK!" blinks
The program source is not connected to the [DIGITAL INPUT 1] or [DIGITAL IN 2] terminal even though you have selected [DIGITAL 1] or [DIGITAL 2] with the [INPUT SELECTOR]. Either make the digital connection or select [ANALOG] with the [INPUT SELECTOR] and perform analog recording.
- This message also appears when the digital signal input is interrupted during digital recording. To continue recording, restart the digital program source.
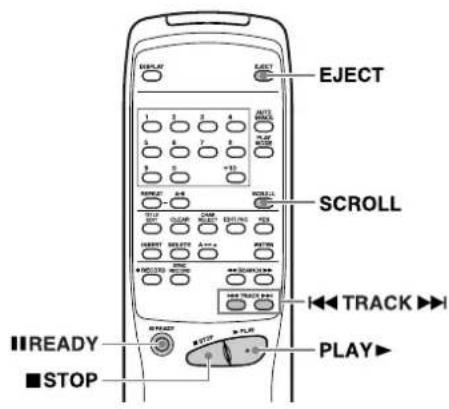
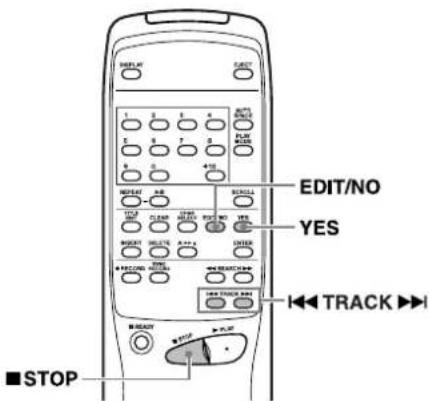
Remote Control Unit
When operating the remote control unit, point it towards the remote sensor on the front panel of the unit.

Battery installation
1. Remove the battery compartment cover.
2. Insert two "AA" (R6, SUM-3) dry batteries.
Make sure that the batteries are inserted with their positive and negative poles positioned correctly.
3. Close the cover until it clicks.
Battery replacement
If you notice that the distance between the remote control unit and the player for correct operation becomes shorter, it indicates that the batteries are exhausted. In this case replace the batteries with new ones.
Precautions concerning batteries
- Be sure to insert the batteries with correct positive and negative polarities.
- Use batteries of the same type. Never use different types of batteries together.
- Rechargeable and non-rechargeable batteries can be used. Refer to the precautions on their labels.
- When the remote control unit is not to be used for a long time (more than a month), remove the batteries from the remote control unit to prevent them from leaking. If they leak, wipe away the liquid inside the battery compartment and replace the batteries with new ones.
- Do not heat or disassemble batteries and never dispose of old batteries by throwing them in fire.
Rack Mounting
Install this deck with the provided mounting screw kit as illustrated.
Voltage Conversion
(For general export models)
Be sure to remove the power cord from the AC outlet before repositioning the voltage converter switch.
- Locate the voltage selector on the rear panel.
- Using a flat-bladed screwdriver, set to the appropriate 230V or 120V position according to your area.
IN NORTH AMERICA DANSL AMERIQUE USE ONLY ON 120 V DU NORD:
SUPPLY. UTILISABLE SUR 120 V
D'ALIMENTATION
UNIQUEMENT.
Connections
- Turn off power for all equipment before making connections.
- Read instructions of each component you intend to use with the MD deck.
Connection
ANALOG INPUT/OUTPUT
(BALANCED/UNBALANCED) terminals
Use these terminals to connect the deck to a mixer, cassette tape recorder or other components.
- Be sure to insert each plug securely. To prevent hum and noise, do not bundle the connection cords with the power cord or speaker cord.
DIGITAL INPUT 1/OUTPUT terminals
Use these terminals to connect the deck to a digital component (such as a CD player, DAT deck, digital amplifier, or another MD deck).
- Use a digital optical (TOS) cable (optional) for digital recording. Connect the [DIGITAL IN 2] terminal located on the front panel to a digital component such as a DAT/MD deck.
- When making a digital connection, remove the caps from the terminals. When the terminals are not in use, leave the caps in place.
Power cord
Be sure to connect the power cord to an AC outlet which supplies the correct voltage.
- Hold the power plug when plugging or unplugging the power cord.
[POWER] button
2 [TIMER PLAY/OFF/REC] switch
PITCH CONTROL ON/OFF switch
4 [INPUT] control
Remote sensor
⑥ Disc insertion slot
7[ EJECT] button
[ RECORD] button
9[DISPLAY] button
10[SEARCH]buttons
1[PLAY MODE] button
12[TRACK▶] dial / [PUSH ENTER]
[EDIT/NO] button
[YES] button
[INPUT SELECTOR] switch
[PHONES] jack
PHONES level control
Display window
[STOP] button
20[▶PLAY]button
4[ READY] button
2[DIGITAL IN 2] terminal
KEYBOARD]terminal
24 Numeric buttons (1 to 9, 0, +10)
[REPEAT/A-B] buttons
26 [TITLE EDIT] button
[CLEAR] button
[INSERT] button
[DELETE] button
[SYNC RECORD] button
Upper/Lower case button [A a]
[AUTO SPACE] button
[SCROLL] button
Character select button [CHAR SELECT]
[ENTER] button
46[TRACK] buttons
Buttons used on this page
Recording an MD
- Press the [POWER] button.
- "NO DISC" appears on the display.
-
Turn on the source component and the amplifier. Set the input selector to the source component.
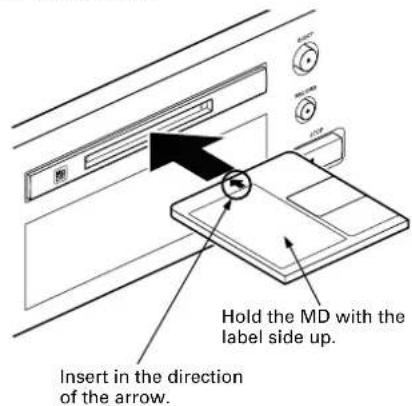
-
Insert a recordable MD.
Insert in the direction of the arrow.
- When a blank MD is inserted, the display shows "Disc Loading", "TOC Reading", "No Track!!" and "Blank Disc" in sequence.
-
When a partially recorded MD is inserted, the deck will automatically start recording from the end of the last recorded track.
-
Select the input with the [INPUT SELECTOR].
Display Selected Input
| ANALOG ANALOG INPUT |
| DIGITAL 1 DIGITAL INPUT 1 (OPTICAL) |
| DIGITAL 2 DIGITAL IN 2 (OPTICAL) (front panel) |
- Select the recording mode following the steps below:
The MD-350 is capable of recording and playing back in standard stereo mode (SP), monaural standard speed (MON), double long-play (LP2) and quadruple long-play (LP4) modes.
As the name suggests, LP2 provides long-play facilities giving twice the usual recording/playback time, and LP4 provides four times the usual recording/playback time.
All modes are stereo, except for MONO, when recording will be performed using only the left (L) channel. "L" appears on the level meter, but the output is sent to both channels.
To select a mode (SP, MON, LP2 or LP4) for recording:
a) With the unit in stop mode, press the [EDIT/NO] button repeatedly until "REC MODE?" is displayed.
b) Press the [YES] button. ("RecMode>XXX" is displayed.)
c) Use the [TRACK] dial to select the recording mode shown on the display.
d) Press the [YES] button to confirm the setting.
Note:that when the time remaining on a disc for further recording is shown, this refers to the remaining time using the current mode.
It is possible to include tracks recorded in different modes (SP,MONO, LP2 and LP4) on one disc.
- Also note that while the LP4 (quadruple long-play) mode provides exceptional recording time thanks to advanced compression technology, very occasionally you may hear some slight noise, depending on the material being recorded. We therefore recommend that if sound quality is more important for your recording project than recording time, you use either the SP (stereo) or LP2 (double long-play) mode.
The maximum amount of time available with monaural recording is twice that of stereo recording.
■ Indication of recording mode
When the recording mode is shown, the last three characters of the display are used, and it is displayed as SP, MON, LP2 or LP4.
- In stop mode, the recording mode is shown when the remaining time display is selected.
In record or record-ready mode, the recording mode is always shown -
In play or in play-pause mode, the recording mode is shown when the remaining time is selected. In this case, the display shows the recording mode of the current material, not the currently-selected recording mode.
-
Press the [● RECORD] button.
The deck enters the Record-Ready mode ("REG lights up).
- "Disc Full !!" or "Track Full !!" is displayed when no room is available on the MD for recording.
6. Adjust the recording level.
- If [ANALOG] was selected above, adjust the recording level with the [INPUT] control.
- When adjusting the recording level, adjust so that the "OVER" segments of the peak level meter do not light up.
7. Start recording.
Press the [PLAY] button or the [READY] button ("REC lights up). Start playing the source program.
- To stop recording, press the [STOP] button.
To stop recording temporarily (ready)
Press the [READY] button.
- Press the [▶PLAY] or [■ READY] button to resume recording.
- Whenever you pause recording, the track number increases by one.
To eject the MD
Press the [EJECT] button in stop mode.
If the power is turned off with the MD left in the deck ("thight up) after
recording, the UTOC cannot be recorded. Turn the power back on within 3 or 4 days and eject the MD. The recorded data might be lost if the MD is left in the deck for a long time.
Notes on Recording
To protect an MD against accidental erasure
After recording an MD, slide the record-protect tab to open the hole.
- To record on the MD again, slide the tab to close the hole.
When "Disc Full !!" or "Track Full !!" is displayed
The MD has no more available space for recording or the MD has used up all its track numbers. Erase unnecessary tracks or record music on another MD.
The way track numbers are assigned varies depending on the source
When a CD or MD is played and recorded digitally by selecting [DIGITAL 1/2] with the [INPUT SELECTOR]:
- Track numbers on the recorded MD are assigned to match those on the source CD or MD. However, in the circumstances listed below only one track number may be assigned to a recorded section.
A section composed of the repeated playback of a single track on a disc (e.g. using single track repeat playback).
A section composed of the successive recording of tracks with the same track number from more than one disc. Also, if the source is an MD, track numbers may not be marked for tracks shorter than 3 seconds.
When the source is recorded with [ANALOG] or when a digital source other than a CD or MD is recorded with [DIGITAL 1] or [DIGITAL 2] while the Auto Track function is OFF:
The entire recording may be counted as a single track with only one track number assigned to it.
- Track numbers can be assigned manually at the desired points by pressing the [●RECORD] button during recording.
- Track numbers can be assigned automatically by switching the Auto Track function to "ATRACK > ON" before starting recording.
Buttons used on this page
NormalPlayback
- Press the [POWER] button.
- "NO DISC" appears on the display.
-
Turn on the amplifier and set the input selector to MD.
-
Insert an MD.
After the TOC (Table Of Contents) data has been read, the disc title (when the disc has a title assigned to it), the total number of tracks and the total playing time of the disc are displayed.
Total number of tracks Disc title
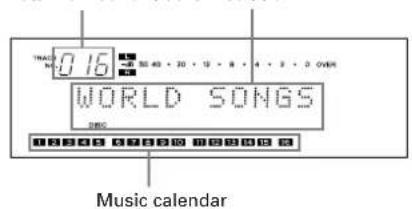
The disc or track title can be scrolled on the display with the [SCROLL] button on the remote control unit. After scrolling, the title returns to its original display.
3. Start playback.
Press the [▶PLAY] button ("▶" lights up). Playback starts from the first track and "001" appears on the "TRACK NO." display.
- When the disc finishes playback, the track numbers disappear from the music calendar.
If the total number of tracks exceeds 20 ("Oights up), the track number should be confirmed on the TRACK NO. display. - Press the [▶PLAY] button immediately after recording is stopped (within 10 seconds) to play back a track which has just been recorded from the beginning.
- If ten seconds or more have passed after recording is stopped, or if the [▶PLAY] button is pressed after pressing the [■STOP] button, playback starts from the first track of the disc.
- To stop playback, press the [STOP] button.
To stop playback temporarily (ready) Press the [READY] button ("") lights up
- Press the [▶PLAY] or [■ READY] button to resume playback.
To play a track located before or after the current track
Turn the [TRACK] dial.
If you are operating the remote control unit, select the desired track by pressing the [i<TRACK] buttons or entering the track number with the numeric buttons.
The selected track number starts playing.
To eject the MD
Press the [EJECT] button.
Headphones
When using headphones, connect the headphone plug into the PHONES jack.
- Adjust the level of the signals output from the phones jack.
Condensation
When the deck is moved directly from a cold to a warm location or when the temperature is raised suddenly in the room where the deck is installed, moisture may condense inside the mechanism. This will prevent the deck from operating normally and may result in damage to the MD or to precision parts. If condensation occurs, turn on the deck and leave it for an hour or two until the moisture evaporates.
Buttons used on this page
Monitoring the Input Signal
You can monitor the input signal of the component connected to each input terminal before recording.
- Press the [▲ EJECT] button to eject the disc.
- Select the input source with the [INPUT SELECTOR].
- Press the [●RECORD] button. ("Monitor Mode" appears.)
Even when the [REC MODE] is set to [MONO], the output is sent to both channels. - Insert an MD or press the [STOP] button to cancel the Monitor mode.
Adjusting the Recording Level
Recording an analog signal
- Insert a recordable MD and press the [RECORD] button to enter the RecordReady mode (■up).
- Play the highest-level section of the program source and turn the [INPUT] control so that the "OVER" segments of the peak level meters do not light.
- Play the program source again.
- Press the [▶PLAY] or [■ READY] button to start recording.
Recording a digital signal
- In Record-Ready mode, press the [EDIT/NO] button until "D-LEV 0.0dB" appears.
- Turn the [TRACK] dial to adjust the recording level. The recording level can be set in 0.5 dB steps within a range between -6.0 dB and +6.0 dB.
- Press the [YES] button after making the adjustment.
Assigning Track Numbers During Recording
Assigning track numbers at specific points will make it easy to quickly locate those points later using the playback or editing functions.
To assign track numbers automatically (Auto Track function)
Track numbers can be assigned automatically during recording by setting the Auto Track function to ON.
- In the Record or Record-Ready mode, press the [EDIT/NO] button until "ATRACK > XXX" appears.
- Turn the [TRACK] dial to select "ATRACK > ON".
- Press the [YES] button to end the setting function.
- While the Auto Track function is "ON", the signal level must remain low for 4 or more seconds before a new track number is advanced.
- During digital recording from a CD or MD, the track numbers are advanced automatically according to the CD or MD data.
- Once the Auto Track function is "ON", this mode will not be released even after the power is turned off. Press the [YES] button after selecting "ATRACK > OFF" to release it.
To assign track numbers manually
Press the [RECORD] button at every point where you want to assign a track number during recording. Each press of the button advances the track number.
To assign track numbers after recording
A track number is added when a track is divided in editing. (See "Dividing a track" on page 16.)
Note:
Changing the input with the [INPUT SELECTOR] switch during recording activates the Record-Ready mode.
Recording Over Existing Tracks (Over Write)
The Over Write function allows you to record music by erasing a previously recorded track.
- Perform steps 1 to 4 of "Recording an MD" on page 8.
- Turn the [TRACK] dial (or press the [TRACK] buttons on the remote control unit) until the track number to be recorded over appears.
- Press the [RECORD] button ("REC lights up).
After "Over Write" appears, the remaining recording time is displayed.
The track numbers which come after the track being recorded over blink on the music calendar. - Adjust the recording level.
- If [ANALOG] was selected above, adjust the recording level with the [INPUT] control.
- Press the [▶PLAY] button or [■ READY] button to start recording.
The deck records over the existing track. The track number is updated.
Recording over an existing track from the middle
- Select the track number to be erased then press the [▶PLAY] button to start playback.
- Press the [READY] button where you want to start recording.
- Press the [●RECORD] button.
The track number is updated and blinks on the music calender. - Press the [▶PLAY] or [■ READY] button to start recording.
The deck records over the existing track.
[CAUTION]
It is not possible to record from the middle of an existing track when "SHURFLIE PROGRAM
Buttons used on this page
![TASCAM MD350 - [CAUTION] - 1](/content/2026/03/544577/images/bcee62a182af22b796f388e107056162487dfe5a5f2108dffba038601d2df827.jpg)
![TASCAM MD350 - [CAUTION] - 2](/content/2026/03/544577/images/56c4cfe55509c692a473165be399039166a07ab9134c75d7f0ece023e20ee372.jpg)
Sync Recording
The deck starts recording when the input audio exceeds a certain level and pauses when the input audio has dropped below a certain level continuously for 4 seconds or more.
- Perform steps 1-4 of "Recording an MD" on page 8.
- Press the [SYNC RECORD] button on the remote control unit. The deck enters the Sync Record-Ready mode.
"light upsync
The remaining recording time appears after "S_SYNC ON" is displayed.
3. Start playing the source component.
The deck starts sync recording upon detection of the input audio signal. It pauses when the input audio level drops below a certain level.
- You cannot start recording manually by pressing the [▶ PLAY] button on [■ READY] button in the Sync Record-Ready mode.
- Press the [SYNC RECORD] button again to cancel sync recording.
Notes:
- Pressing the [I] READY] button during sync recording aborts the Sync Record operation.
- Changing the input with the [INPUT SELECTOR] switch during sync recording aborts the Sync Record operation.
Checking the Remaining MD Recording Time
With each press of the [DISPLAY] button, the display changes as follows:
In the Stop/Record mode:
The remaining recording time (REMAIN) is only displayed in the Record-Ready mode.
The disc title can be displayed only when it has been recorded onto the MD.
Checking the Recorded Tracks
Press the [▶PLAY] button immediately after stopping recording.
The track which has just been recorded will be played from the beginning.
$$ \boxed {\text {R e c o r d i n g}} \rightarrow \boxed {\square} \text {S T O P} \rightarrow \boxed {\triangleright} \text {P L A Y} $$
To play from the first track of the MD after recording:
Press the [STOP] button again immediately after stopping recording then press the [PLAY] button.
$$ \text {R e c o r d i n g} \rightarrow \boxed {\text {S T O P}} \rightarrow \boxed {\text {S T O P}} \rightarrow \boxed {\text {P L A Y}} $$
Timer Recording
By connecting this deck with a timer (commercially available), you can start and stop recording operations at a preset time.
- Perform steps 1 to 6 of "Recording an MD" on page 8.
- Set the [TIMER] switch to [REC].
- Set the [TIMER] so that it starts and stops power supply at the desired start time and end time.
- As the actual recording starts after the "TOC Reading" operation, set the timer recording start time to slightly before the time when you want to start recording.
Each component power is turned off. - When the start time comes, power is supplied to the components and recording starts.
[CAUTION]
- When timer recording is performed in the "SHUFFLE" mode or "PROGRAM" mode, the deck automatically enters the "CONTINUE" mode.
- Be sure to turn the deck on again and eject the MD within 3 or 4 days of timer recording. When the MD is ejected, the recorded contents will be written on the MD. If the deck is left off for a long time after the timer recording has finished, the contents may disappear.
- During timer recording, recording starts from the end of the previously-recorded portion on the MD.
- Set the [TIMER] switch to [OFF] after timer recording. If the timer is left in [REC], the deck will automatically start recording the next time the power is turned on.
Buttons used on this page
![TASCAM MD350 - [CAUTION] - 1](/content/2026/03/544577/images/4fe09934bde9233dd9327875baa4db94254e84278fbfc9f38413b1cd7926dfbf.jpg)
![TASCAM MD350 - [CAUTION] - 2](/content/2026/03/544577/images/052d606bb4af77c430c005383a5e8f759d2a88e93de697d88d360d1d13bdea38.jpg)
Using the Display Window
The information shown on the display allows you to check the disc title, track title, the total track number in an MD, total playing time, remaining recordable time of the MD.
Each press of the [DISPLAY] button changes the display as shown below.
In the Stop mode:
In the Play mode:
The total number of tracks appears on the TRACK NO. display.
The disc title and track titles are displayed only when they have been recorded onto the MD.
- When a track has been selected in the Stop mode ("TRACK" is lit), pressing the [DISPLAY] button displays the track title.
- When a track title is composed of more than 100 characters, the 100th character and beyond cannot be displayed.
The disc or track title can be scrolled on the display with the [SCROLL] button on the remote control unit. After scrolling, the title returns to its original display.
Selecting the Desired Track
Playing a track by direct search
Specify the desired track by pressing the numeric buttons (1 to 9, 0, +10) on the remote control unit. The specified track starts to play.
Examples of operation for direct search of track number 10 or more: To search track number 10:
Press +10 once then 0. To search track number 25: Press +10 twice then 5.
- Press the [CLEAR] button while "TRACK NO." is blinking to cancel it.
To skip to the previous or next track
Turn the [TRACK] dial clockwise or counterclockwise (or press the [TRACK] buttons on the remote control unit) during playback to skip to a track located after or before the current track.
To search a desired section
During playback, press and hold the [
- In the Play-Ready mode, the desired section can be searched by observing the elapsed playing time or remaining playing time on the display.
Normal search may not be possible if there are several successive short tracks of only a few seconds in length.
Playing Tracks in Random Order (Shuffle Playback)
Each track on the disc is played once in random order.

- In the Stop mode, press the [PLAY MODE] button repeatedly until "SHUFFLE MODE" is displayed ("Slightly up).
- Press the [▶PLAY] button.
To play the next track, turn the [TRACK] dial clockwise (or press the [ ] button on the remote control unit) during shuffle playback.
To play from the beginning of the current track, turn the [TRACK] dial counterclockwise (or press the [ ] button on the remote control unit) during shuffle playback.
The Shuffle mode will not be canceled even when the power is turned off.
- To cancel the Shuffle mode, press the [PLAY MODE] button repeatedly until "CONTINUE MODE" is displayed.
When Recording to Analog Tape
To play tracks with spaces inserted after every track (Auto Space playback)
The Auto Space playback function inserts a 3-second blank space between each track. This makes possible music scan operations when recording from MDs to analog tape.
- Press the [AUTO SPACE] button on the remote control unit once so that "A_SPACE ON" is displayed. ("A-SPACE lights up.)
- Press the [▶PLAY] button.
To release Auto Space Playback, press the [AUTO SPACE] button repeatedly until "disappears.
To pause after each track (Auto Ready playback)
The deck can enter the Ready mode after playing each track. This feature is convenient when copying a single MD track onto tape or when the tracks to be copied are not continuous.
1. Press the [AUTO SPACE] button on the remote control unit twice so that "A_READY ON" is displayed. ("Algresdpr.)
Buttons used on this page

- Press the [▶PLAY] button.
- When playback is finished, the deck pauses at the beginning of the next track.
- Press the [▶PLAY] or [■ READY] button to start playing the next track.
To release Auto Ready playback, press the [AUTO SPACE] button repeatedly until "Ad disappears.
A·SPACE and A·READY playback cannot be used together.
Auto cue mode
(tracks recorded in SP mode only)
The auto cue function lets the unit automatically start playback at the audio start of each track. The trigger level which determines the point at which playback starts is set as follows:
1 In stop, play or pause mode, press the [EDIT/NO] button until "AUTO CUE?" appears.
2 Press [YES].
3 Turn the [TRACK] dial to cycle the threshold level between the following values: "-54dB", "-60dB", "-66dB", "-72dB" and "OFF".
4 Press the [YES] button after making the adjustment.
- When the Auto Cue mode is on (the value is anything except "OFF"), and the unit is in STOP, moving to the next or previous track will automatically cue the playback point to the first point in the track where the sound level rises above the trigger level as set above and the unit will pause.
- When Auto Cue is on, and Auto Ready is also on, moving to the next or previous track will automatically cue the playback point to the first point in the track where the sound level rises above the trigger level as set above and the unit will pause at this point. If the desired start of the track is cut off using this function, the trigger level should be adjusted to a lower level.
Note that if Auto Cue and Auto Ready are both off, moving to the next track will enter stop mode as usual.
If the Auto Cue mode is on, the Auto Space function is unavailable.
- If the Auto Space function is on when Auto Cue is turned on, the Auto Space function and the Auto Ready function (if this is on) will be turned off.
- If the Auto Cue function is on, and the [AUTO SPACE] button is pressed, the only effect is to turn the Auto Ready function on or off.
The function does not work with tracks recorded in any mode other than SP mode. With any non-SP tracks, the cue point is the top of the track, not the cue point.
This cue is made to ± 1 frame accuracy (in SP mode, this is ± 64 ms).
Playing Tracks in the Desired Order (Program Playback)
Up to 25 tracks can be programmed in the desired order and played.
■ To program tracks
- In the Stop mode, press the [PLAY MODE] button repeatedly until "PGM MODE" appears in the display. After "PGM MODE", the display shows "0m 00s 00p" ("FRONTSRAM
- Turn the [TRACK] dial so that the desired track number indicator lights on the music calendar, and press [PUSH ENTER] on the dial.
The track number blinks. - Repeat this operation to program other tracks.
- Tracks can be programmed automatic-ly by simply pressing the numeric buttons (1 to 9, 0, +10) on the remote control unit to display their numbers sequentially.
- When a track number of 21 or more is selected, the "indicator blinks. However, the track number can still be checked on the TRACK NO. display.
The same track can be programmed repeatedly.
If you make a mistake in the track number entry, press the [CLEAR] button.
Each press clears the current last track in the program.
- Press the [PLAY] button to start Program playback.
The program is held in memory after Program playback has been stopped by pressing the [STOP] button or it has stopped automatically at the end. - Pressing the [STOP] button in the Stop mode clears the program memory.
- When the total program playback time is longer than 159 minutes and 59 seconds, "---m--s" appears on the time counter.
- When the 25th track has been programmed, "PGM Full !!" is displayed and no more tracks can be programmed.
- Pressing the [PLAY MODE] button in the Stop mode cancels the Program Play mode and clears the program memory.
The Program mode will not be canceled even when the power is turned off, and the programmed data will remain in the deck. - If you attempt program playback when no programmed data is entered, normal playback will start after "PGM Empty !!" is displayed.
To check the program contents
In the Play or Play-Ready mode, turn the [TRACK] dial or press the [ ] or [ ] button on the remote control unit to display the program contents.
To delete a programmed track
In the Stop mode, press the [CLEAR] button. Each press clears the current last track in the program.
Buttons used on this page
To add a track to the program
In the Stop mode, turn the [TRACK] dial to select the desired track number and press [PUSH ENTER] on the dial.
A track can also be added from the remote control unit by simply entering the track number with the numeric buttons (1 to 9, 0, +10).
The new track is appended to the end of the existing program.
Repeating Track(s) (Repeat Playback)
All or one of the tracks, or a specified portion (A-B) of an MD can be played repeatedly. Program playback and Shuffle playback can also be repeated.
To repeat all MD tracks (All-track repeat)
- In the Stop mode, press the [PLAY MODE] button to select one of the following repeat play modes.
Play Mode Repeat
CONTINUE Normal repeat
SHUFFLE MODE Shuffle repeat
PGM MODE Program repeat
- Press the [REPEAT] button on the remote control unit once to display "REPEAT ALL".
"FlightRepeat
- Press the [▶PLAY] button. The tracks will be played repeatedly in the specified mode.
To release REPEAT playback and resume normal playback, press the [REPEAT] button repeatedly until "REPEAT OFF" appears.
The Repeat Playback mode will not be canceled even when the power is turned off.
To repeat a single track (Single-track repeat)
- During playback in the "CONTINUE MODE", press the [REPEAT] button on the remote control unit twice.
"REPEAT 1" appears ("REPEAT "sInHsuL
2. Press the [▶PLAY] button. The current track will be repeated.
3. The track to be repeated can be changed by turning the [TRACK] dial or by pressing the [TRACK] buttons or numeric buttons (1 to 9, 0, +10) on the remote control unit.
- Single-track repeat is unavailable in the "SHUFFLE MODE" or "PGM MODE".
To repeat a section within a track (A-B repeat)
A specified portion (between A and B) of a track can be played repeatedly.
- During playback, press the [A-B] button on the remote control ("REPEAT A-" is displayed, and "RigbaS up, "Abinks) at the starting point (A) of the portion you want to repeat.
- Press the [A-B] button again ("REPEAT A-B" is displayed, and "REPEAT "Alight steadily) at the ending point (B). The portion (A-B) will be played repeatedly.
A-B repeat playback of portions extending over more than one track is not possible during programmed playback or shuffle playback.
To cancel Repeat playback and resume normal playback, press the [A-B] button or [REPEAT] button again. ("REPEAT OFF" is displayed.) - Press the [STOP] button to erase the specified portion (between A-B).
TimerPlayback
By connecting this deck with a timer (commercially available), playback can be started at a specified time.
- Insert a pre-recorded MD and set the [TIMER] switch to [PLAY].
- Select the amplifier's input which allows this deck to play back.
- Timer playback is available when "SHUFFLE MODE", "PGM MODE", "ALL REPEAT" or "REPEAT SINGLE" playback is selected.

- Set the timer to the desired start time and turn off the power.
When the set time comes, each component will be turned on and playback will start.
- Set the [TIMER] switch back to [OFF] after timer playback.
Pitch control
You can use the pitch control feature to play back material at ± 12.0% relative to the normal playback pitch. This feature is not available in LP2 mode.
To set the pitch change which will be operative when the PITCH ON/OFF switch is on:
1 In stop, play or pause mode, press the [EDIT/NO] button until "Pitch?" appears.
2 Press the [YES] button.
3 Turn the [TRACK] dial to adjust the pitch in 0.1% steps.
4 Press the [YES] button after making the adjustment.
The value set in this way does not take effect until the PITCH ON/OFF switch is set to ON.
Note that when the position of the PITCH ON/OFF switch is changed, the sound is momentarily muted.
Play modes
Tracks recorded in different modes (SP, MONO, LP2 and LP4) can be combined on one disc. When playing back a disc, the appropriate mode is automatically selected as each track is played back, and this is shown on the display.
Buttons used on this page
Notes on Editing
Available editing operations include erasing, moving, dividing and combining tracks. It is also possible to assign disc and track titles.
■ When "Protected !!" is displayed
The MD is record-protected against accidental erasure. To make recording or editing possible, slide the record-protect tab to close the hole.
While "UTOC Writing" is blinking
This message indicates that the recorded data is being written on the MD. Do not pull out the power cord or vibrate the deck. Otherwise the recorded data may not be written correctly on the MD.
Erasing Track(s) (ERASE Function)
The data written on an MD can be erased in the following ways.
Erasing all tracks simultaneously
Erasing a single track
Erasing parts of a track
To erase all tracks at once (DISC ERASE)
- In the Stop mode, press the [EDIT/NO] button repeatedly until "ERASE DISC ?" is displayed.

- Press the [YES] button. ("Sure ?" is displayed.)
- Pressing the [EDIT/NO] button or the [■STOP] button while "Sure ?" is displayed aborts the operation.
- Press the [YES] button again. "COMPLETE" is displayed and then Blank Disc is displayed to indicate that all recorded data on the MD has been erased.
If "ERASE DISC ?" is selected with the [EDIT/NO] button while "Blank Disc" is displayed, and then the [YES] button is pressed, UNDO (which cancels the most recent operation) cannot be performed.
To erase a single track (TRACK ERASE)
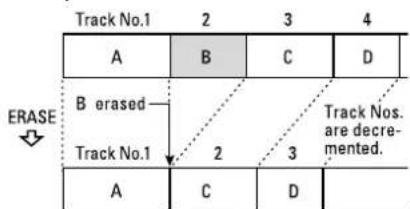
(Example): To erase B in track number 2
- Specify the track to be erased with the [TRACK] dial.
- Press the [EDIT/NO] button repeatedly until "ERASE TRK?" is displayed.
- Press the [YES] button. ("Track OK ?" is displayed.)
- Pressing the [EDIT/NO] button or the [■STOP] button while "Track OK?" is displayed aborts the operation.
- Press the [YES] button again.
- "COMPLETE" is displayed. Once the specified track has been erased, the subsequent track is decreased by one and all tracks following are renumbered.
- Repeat this procedure to erase additional tracks.
To erase a part of a track
This operation consists of dividing the track, erasing one of the tracks obtained by division and combining the remaining tracks. A part of a track can be erased using these three functions.
(Example): To erase a part of A with track number 1
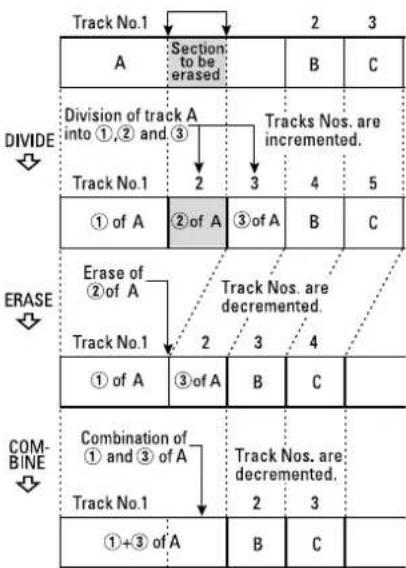
Dividing a Track (DIVIDE Function)
A recorded track can be divided into two tracks and a track number can be assigned to the second track. This function is designed for use when a single track contains several musical pieces (for example with an analog-recorded MD), or when you want to mark a point for use in track location.
(Example): To divide C and D contained in track number 3 into two tracks
- During playback, press the [I READY] button at the point where you want to divide the current track into two.
- Press the [EDIT/NO] button repeatedly until "DIVIDE?" is displayed.
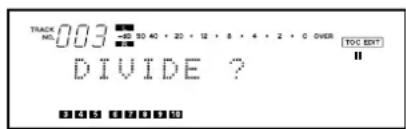
3. Press the [YES] button.
- "Rehearsal" and "Point OK?" are displayed alternately while the first 4 seconds of the portion which becomes the second track after division are played repeatedly.
- If the original track is not divided as precisely as desired, you can fine-adjust the division point by turning the [TRACK] dial while monitoring the sound.
The division point can be adjusted within an offset range of -128 +127 (± 1 corresponds to approx.0.06 sec.). - Press the [STOP] button or [EDIT/NO] button to abort the operation.
- When the track is divided at the desired point, press the [YES] button again.
- The track numbers of the new track (second track after division) and subsequent tracks are increased by one but these new numbers are still continuous.
- "COMPLETE" is displayed and the track is divided. The deck will pause at the beginning of new track obtained after division.
tracks which have been recorded in
- Tracks obtained after division do not have track titles, regardless of whether the original track had one or not.
The beginnings of tracks cannot be divided.
Combining Tracks (COMBINE Function)
Two consecutive tracks can be combined into a single track. This function is designed for use when you want to play several songs continuously or you want to make a single track from many separately recorded parts of music.
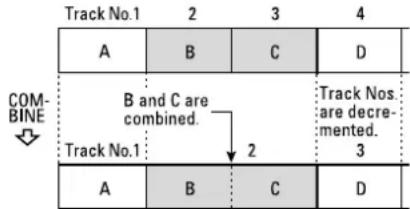
(Example): Combining B and C
- Select a track number by turning the [TRACK] dial.
- The selected track number will be combined with the track before it. For example, to combine track numbers 2 and 3, select track number 3 in this step.
- If you select track 1, it will not be combined into a single track.
- Press the [EDIT/NO] button until "COMBINE?" is displayed.
3. Press the [YES] button.
- "Rehearsal" is displayed. The beginning of the selected track is played back repeatedly.
- If the combination point between the two tracks is not played properly, press the [EDIT/NO] button to stop playback and restart the operation from the beginning.
- Press the [STOP] or [EDIT/NO] button to abort the operation.
- If the combination point is correct, press the [YES] button again.
- "COMPLETE" is displayed for a few seconds and the tracks are combined.
- When both tracks have titles assigned, the title of the track before the selected track is assigned to the combined track. Subsequent track numbers are decreased by one.
Note that it is impossible to combine tracks which have been recorded in different modes (SP, MONO, LP2 and LP4).
Moving a Track (MOVE Function)
The order of tracks can be changed by moving a track to another position. After the track has been moved, track numbers are automatically renumbered.
(Example): To move D from track number 4 to track number 2
- During playback or pause, select the track to be moved by turning the [TRACK] dial.
- Press the [EDIT/NO] button until "MOVE?" is displayed.
- Press the [YES] button.
"Move to 001?" is displayed. ("001" blinks.)
Track number Destination track to be moved number
- Select the destination track number with the [I
- When you specify the destination track number with the numeric buttons, "COMPLETE" is displayed, then the track is moved and the track numbers are automatically changed. Playback resumes from the track's new location.
- Press the [STOP] button or [EDIT/NO] button to abort the operation.
5. Press the [YES] button again.
- "COMPLETE" is displayed, then the track is moved and the track numbers are automatically changed. Playback resumes from the track's new location.
Buttons used on this page
![TASCAM MD350 - Press the [YES] button again. - 1](/content/2026/03/544577/images/cd294834f3b0cbeaecf4efee11d940563cf57163b7e9223cebf2fb7a49e51b13.jpg)
Assigning Titles (TITLE Function)
Titles can be assigned to each disc or each track using uppercase and lowercase letters, numbers, "为夕力(Katakana) and symbols.
- Press the [EDIT/NO] button so that "TITLE?" is displayed.
- Press the [YES] button.
- Press the [TITLE EDIT] button if you are using the remote control unit.
- Select "DSC" or a track number using the [TRACK] dial.
To assign a disc title, select "TITLE > DSC" ("DSC" blinks).
To assign a track title, select "TITLE > XXX (track number)" (Track number blinks).
- Press the [YES] button.
"DSC > _ " or "XXX > " is displayed.
The character entry mode is engaged and the cursor blinks on the display.
5. Press the [DISPLAY] button to select the character type.
- When "为该行:Katakana (square Japanese syllabary) can be entered.
- When " capital alphabet letters, numerals and symbols can be entered.
- When no indicator is lit: Small alphabet letters, numerals and symbols can be entered.
6. Select each character by turning the [TRACK] dial and pressing [PUSH ENTER] on the dial.
-
Repeat steps 5-6.
-
Press the[STOP] button to abort the operation.
- Press the [EDIT/NO] button for more than 3 seconds (or press the [TITLE EDIT] button on the remote control unit) to cancel the title function and resume playback
- Press the [YES] button again.
The disc or track title is displayed again. - Repeat steps 1-8 to assign titles to other track numbers.
Assigning Titles to the Disc and All Tracks Successively (TITLE AUTO INC Function)
Select the "CONTINUE" mode with the [PLAY MODE] button. Titles can be assigned to the disc and all tracks successively.
- Press the [EDIT/NO] button so that "TITLE?" is displayed.
- Press the [YES] button.
- Press the [TITLE EDIT] button if you are using the remote control unit.
- Select "TITLE > AINC" with the [TRACK] dial ("AINC" blinks).
- Press the [YES] button.
The disc title entry mode is engaged ("DSC >_ " is displayed) and the cursor blinks on the display.
- The cursor blinks at the first character position even if a title has already been assigned.
-
Press the [DISPLAY] button to select the character type.
-
Select each character by turning the [TRACK] dial and pressing [PUSH ENTER] on the dial.
- If you are using the remote control unit, select each character with the [TRACK] buttons and press the [ENTER] button to enter it.
- Repeat steps 5-6.
- Press the [YES] button after assigning the disc title.
The title entry mode for track 1 is automatically engaged ("001 > _" is displayed) and the cursor blinks on the display.
-
Repeat steps 5-6.
-
Press the [YES] button again.
-
When the title entry mode for track 2 is engaged ("002 > _" is displayed), repeat steps 5-8.
- Repeat the character entry procedure until all titles have been entered. The disc title is then displayed if the deck is in the Stop mode, or if the deck is in the Play mode, the current track title is displayed.
- Confirm titles by turning the [TRACK] dial.
- Press the [STOP] button to abort the operation.
Press the [EDIT/NO] button for more than 3 seconds (or press the [TITLE EDIT] button on the remote control unit) to cancel the title function and resume playback.
Notes:
- Up to 100 characters can be entered per track title. However, when the total number of characters of all track titles exceeds 1700, no more track titles can be written onto the MD.
- If the TITLE AUTO INC function is canceled before all titles have been assigned, the track title currently being entered will be erased. Only track titles which have already been assigned will be kept.
- If UNDO is performed after TITLE AUTO INC is completed, the last edited track title will be canceled.
Disc and track titles can be assigned during recording. - If a track title is assigned while in the Record-Ready mode during the overwriting of a track, the track title will be erased when you resume recording.
- "DISC" lights while a disc title is being entered, and "TRACK" lights while a track title is being entered.
-Assigning titles is unavailable in the "SHUFFLE MODE" or "PGM MODE".
Buttons used on this page
Character types selectable
- When "为压力计: Katakana (square Japanese syllabary) can be entered.
When " csharp: Capital alphabet letters, numerals and symbols can be entered: ABCDEFGHIJKLMNOP QRSTUVWXYZ0123456789; < =>? @! "#\$% &'( ) +, -./_(space)
When no indicator is lit: Small alphabet letters, numerals and symbols can be entered: abcdefghijklmnpQRS tvwxzy0123456789;;<=>? @ !"#$%&'()+,-./_(space)
Changing entered characters
Move the cursor to the character to be corrected in the character entry mode.
- Select a new character to change the character at the cursor position.
To move the cursor
Deck Press the [SEARCH] buttons.
Remote Control Unit Press the [SEARCH] buttons.
To select a character at the cursor position
Deck Turn the [TRACK] dial. Remote Control Unit Press the [TRACK] buttons.
To change the character type at the cursor position
Deck Press the [DISPLAY] button. Remote Control Unit Press either the [DISPLAY] button or [CHAR SELECT] button.
To change the character at the cursor position to an upper/ lower case letter
Deck Press the [DISPLAY] button. Remote Control Unit Press the [A a] button.
To insert a space at the cursor position
Deck Press [PUSH ENTER] on the dial for 3 seconds or more.
Remote Control Unit Press the [INSERT] or [ENTER] button for more than 3 seconds.
To enter a number
Deck Turn the [I<TRACK▶] dial. Remote Control Unit Press the numeric buttons.
To erase a character at the cursor position
Deck Press the [EDIT/NO] button. Remote Control Unit Press either the [DELETE] button or [EDIT/NO] button.
To move the cursor to the right after selecting a character
Deck Press [PUSH ENTER] on the dial. Remote Control Unit Press the [ENTER] button.
To erase all the characters at once
Deck Unavailable. Remote Control Unit Press the [CLEAR] button.
Copying a Title (TITLE COPY Function)
- In the Stop mode, display the disc title or track title (number) that you want to copy with the [I<TRACK▶] dial.
(Example): To copy the track 4 title
- Press the [EDIT/NO] button repeatedly until "TITLE COPY?" appears.
- Press the [YES] button. "Copy to 001 ?" is displayed. ("001" blinks)
(Example): To copy the track 4 title to track 6
- Select the track to copy the title to with the [I<TRACK▶] dial. "Copy to 006 ?" is displayed ("006" blinks).

- Press the [STOP] button or [EDIT/NO] button to cancel the TITLE COPY mode.
- Press the [YES] button.
The title is copied to track number 006. - Pressing the [▶PLAY] button or [■ READY] button releases the title copy operation.
Canceling the Last Operation (UNDO Function)
- In the Stop mode, press the [EDIT/NO] button repeatedly until "UNDO ?" appears.

- Press the [YES] button. "Undo OK?" is displaye
To cancel this function, press the STOP button or [EDIT/NO] button.
3. Press the [YES] button.
The last operation is undone and "COMPLETE" is displayed.
- Pressing the [▶PLAY] button or [■ READY] button releases the UNDO mode.
Notes:
"UNDO ?" will not be displayed in the cases below, even if you press the [EDIT/NO] button (cannot undo).
- When the operation has already been undone (cannot undo an undo), or no operation has been performed to undo.
- When the editing mode is released by pressing the [YES] button.
- During recording or when the Recording-Ready mode is engaged.
- When "DISC ERASE" is performed on a blank disc.
- When the power is cut off.
If you connect an IBM-compatible personal computer keyboard (101 or 106 keys) to the KEYBOARD terminal of this deck, you can operate the deck control, track selection, editing and title entry directly from the keyboard.
- Place the provided lettering guide around the keyboard function keys for your reference.
Correspondence between deck buttons and keyboard keys
| Deck Buttons Keyboard Keys | |
| [I←] F1 key | |
| [►←] F2 key | |
| STOP button F4 key | |
| PLAY button F5 key | |
| READY button F6 key | |
| RECORD button F8 key | |
| AUTO SPACE button F9 key | |
| REPEAT button F10 key | |
| PLAY MODE button F11 key | |
| DISPLAY button F12 key | |
| YES button Enter key | |
| +10 button | +key |
| Numeric buttons | Numeric keys |
| CLEAR button | Shift + F10 keys |
| EJECT button | Shift + F12 keys |
| ← | ←key |
| → | →key |
■ Editing keys
| Function | Key Operation |
| ERASE TRACK | Shift + F1 keys |
| ERASE DISC | Shift + F2 keys |
| MOVE | Shift + F4 keys |
| DIVIDE | Shift + F5 keys |
| COMBINE | Shift + F6 keys |
| TITLE COPY | Shift + F7 keys |
| TITLE | Shift + F8 keys |
| UNDO | Shift + F9 keys |
| Mode cancellation | Esc key |
Title entry keys
| Operation | Key Operation |
| Move cursor | ← key, → key |
| Change track number to be edited | ↑ key, ↓ key |
| Switch uppercase/ lowercase | Caps key |
| Erase character before cursor key | BS (Back Space) |
| Erase character on cursor | DEL (Delete) key |
| Insert character | INS (Insert) key |
| End title entry | Esc key |
- Characters can be entered directly from the keyboard.
- When the track number to be edited is changed using [ ] or [ ] , the track title will remain the same.
CAPS"and" 力力" cannot be used at the same time. - When using a keyboard, do not turn the power on and off rapidly, as this may sometimes cause the keyboard to become unoperational.
System Restrictions
Because of the different recording systems used by Compact Cassette, DAT, etc., the MD (Mini Disc) is subjected to some system restrictions. These restrictions may result in the following problems. These are normal and are not malfunctions.
- "Track Full" is displayed before the available recording time expires.
"Track Full" is displayed whenever the number of allowable tracks is reached, regardless of the recording time still available. With the MD system, it is not possible to record more than 254 tracks. If you want to record more tracks, erase unnecessary tracks, record them on another MD, or use the editing procedure to combine existing tracks.
- "Track Full" is displayed even though both the number of tracks and the recording time have not been filled.
Whenever emphasis data or other signal enhancements are switched on-off in the middle of tracks, the track is separated at that point and "Track Full" may be displayed regardless of the recording time and number of tracks.
- The remaining recording time of an MD does not increase although you have erased several tracks.
The remaining recording time display ignores tracks shorter than 12 seconds. Therefore, the time may not increase if you have erased several short tracks.
- The total elapsed recording time and remaining recording time does not coincide with the available recording time as calculated from the stated time on the disc, and the recording mode.
The minimum unit for recording data is usually 6 clusters (approx. 12 seconds). Data of less than 12 seconds still uses the 12-second space, so actual available recording time becomes shorter than rated. Also, if the MD is scratched, the scratched sections are automatically deleted and the time available is decreased accordingly.
Display Messages
- Track combination may not be possible.
Tracks created by other editing operations sometimes cannot be combined.
- Audio is interrupted during search.
When a track created by an editing operation is searched, audio is sometimes interrupted.
- Track numbers are not assigned correctly.
When a CD is recorded through a digital connection, short tracks may be recorded depending on the contents of the CD. Also, when auto track marking is performed, the track numbers may not be assigned correctly in some cases.
The "TOC Reading" display will not disappear.
"TOC Reading" is displayed for a longer time than usual when a brand-new recordable MD is inserted.
Note the following when you attempt to perform recording while erasing (overwriting) the previous recording:
The remaining recording time of the MD may not be displayed correctly.
After repeated overwrite operations, it may no longer be possible to overwrite recording. In this case, first edit the previous recording (by erasing tracks, etc.) then proceed to the overwrite operation.
- The remaining recording time is shorter after recording than it was before recording.
- The overwrite operation is not recommended if the track to be overwritten contains noise. Since recording is performed on a 6-cluster basis (approx. 12 seconds), over-writing a noisy track may erase a part of the track.
It is not possible to assign a track title during overwrite recording.
Sometimes the maximum recording time will not be available even after performing "ERASE DISC". In this case, try performing "ERASE DISC" again. However, you will not be able to UNDO it afterwards.
- While the LP4 (quadruple long-play) mode provides exceptional recording time thanks to advanced compression technology, very occasionally you may hear some slight noise, depending on the material being recorded. We therefore recommend that if sound quality is more important for your recording project than recording time, you use either the SP (stereo) or LP2 (double long-play) mode.
The following messages are displayed depending on the operation conditions.
| Message Description | |
| Blank Disc The recordable MD contains no recorded data. | |
| Cannot Copy! Copying is not possible. | |
| Cannot EDIT! Editing is not possible. | |
| Disc Error! The data in the MD is abnormal. | |
| Disc Full!! No more recording is possible. | |
| D-IN UNLOCK! Digital input connection is not made. | |
| ERASE DISC? Is it OK to erase the recorded data on the MD? | |
| ERASE TRK? Is it OK to erase this track? | |
| Name Full!! The title memory is full. | |
| NO DISC!! No MD is inserted. | |
| No Track!! No track has been recorded. | |
| PGM Empty!! Tracks have not been programmed. | |
| PGM Full!! No more tracks can be programmed. | |
| Play Mode!! The selected play mode is inappropriate. | |
| Protected!! The MD is protected against accidental erasure. A playback-only MD is loaded. | |
| Rec Error!! | A recording error occurred. |
| Track Full!! | The MD has used up all its track numbers. |
| UNDO? | Is it OK to cancel the last operation? |
| UTOC Writing The recorded data is being written on the MD. | |
Serial Copy Management System
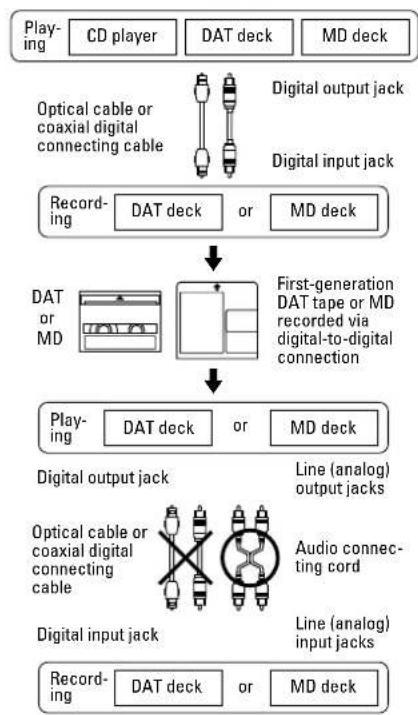
This MD deck is in compliance with the Serial Copy Management System standard. This standard has been elaborated to restrict digital-to-digital copying to only the first generation. The basic rules governing this system are as described in the following.
Rule 1
A digital recording is possible from a digital source such as a CD, DAT or pre-mastered MD onto a DAT or recordable MD through a digital input connection. However, further digital-to-digital recording is prohibited for the second generation and later.
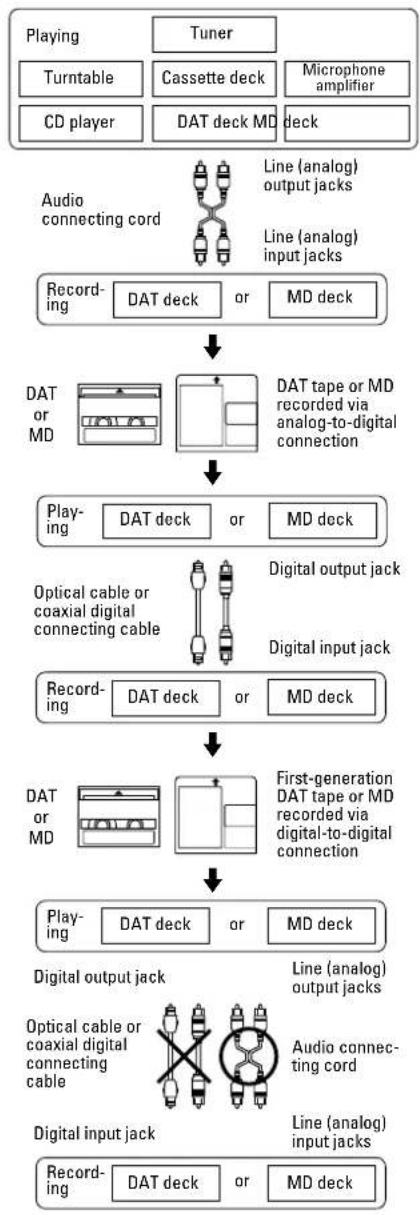
Rule 2
When an analog source such as an analog disc or FM broadcast is digitally recorded by using a DAT or MD, this recorded source can be digitally recorded on another DAT or MD. However, further digital copying is prohibited.
Rule 3
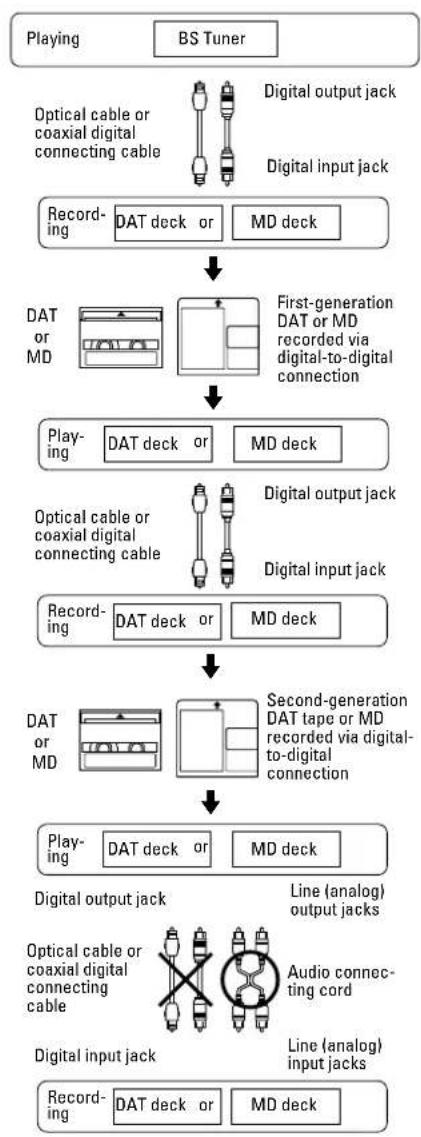
A DAT deck or an MD deck which is compatible with 32kHz and 48kHz sampling frequencies can record the digital audio of satellite broadcasting digitally (digital-to-digital). A first-generation DAT or MD recorded in this way can be recorded again on another DAT or MD digitally (digital-to-digital). However, the second-generation DAT or MD may not be recordable with certain BS tuner models.
If you have any problems with the deck, please check the following before calling for service. If the trouble persists, please consult your dealer or nearest TASCAM service agent.
| Problem Remedy | |
| No operations are possible. The | MD is dirty or damaged. If "Disc Error!" is display-ed in this case, replace the MD with another disc. |
| Playback will not start. Check if | power is supplied. |
| "Blank Disc" is displayed if the MD contains no record-ed data. "No Track!!" is displayed if no tracks have been recorded on the disc. Replace the MD with a pre-recorded MD. | |
| When "UTOC Error!" is displayed, replace the MD with another disc. | |
| There may be condensation inside the deck. In this case, eject the MD and leave the deck on for a few hours. | |
| Recording will not start. When " | Protected !!" is displayed, the MD is protected against accidental erasure. Slide the accidental erasure protection tab to close the hole. A playback-only MD is loaded. Replace the MD with a recordable one. |
| When "D-IN UNLOCK !!" is displayed and the source audio is not input, connect the source through digital connection or record the audio using the analog input. | |
| Timer recording is unavailable. After timer recording, turn the power back on within 3 or 4 days and eject the MD. If the deck is left off for a long time, the recorded contents may disappear. | |
| When "Disc Full !!" is displayed, the disc has no remain-ing time available for recording. Erase unnecessary tracks or use another MD. | |
| When "Rec Error !!" is displayed, there is an error in recording. Restart recording from the beginning. | |
| Too much noise. Do not operate | this deck near a TV. |
- If normal operation cannot be recovered, unplug the power cord from the outlet and plug it again.
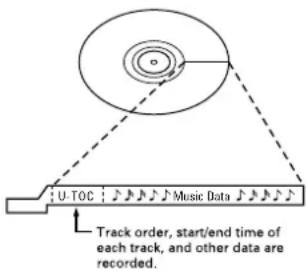
U-TOC
Editing recorded tracks is easy with recordable MiniDiscs. Information about the recorded tracks (start address, end address, title, etc.) is recorded in the UTOC (User Table Of Contents) area. You can edit tracks simply by rewriting this data.

Format: MiniDisc digital audio system
Recording system:
Magnetic field modulation overwrite system
Recording/playback time:
SP, 80 minutes max.
LP2, 160 minutes max.
LP4, 320 minutes max.
Mono: 160 minutes max.
Sampling frequency: 44.1 kHz
Compression system: ATRAC (Adaptive)
TRansform Acoustic Coding)
Dynamic range:
More than 94 dB (playback, 1 kHz, A filter)
Total harmonic distortion:
Less than 0.013%
Number of channels: 2 (stereo), 1 (mono)
Frequency response:
20 Hz - 20 kHz ± 0.5 dB (playback)
Signal-to-noise ratio:
More than 94 dB (playback, A filter)
Analog input/output connectors:
Input:
Balanced: XLR, +4 dBu (ref.),
10 kohms
Unbalanced: RCA, -10 dBV (ref.),
`50 kohms
Output:
Balanced: XLR, +4 dBu (ref.),
150 ohms
Unbalanced: RCA, -10 dBV (ref.),
600 ohms
Power supply:
120VAC,60Hz
(U.S.A./Canada model),
230 V AC, 50 Hz
(Europe/General export model),
240 V AC, 50 Hz
(Australia model)
Headphones output: Max. 25mW + 25mW 32 ohms
Digital input/output connectors:
Input 1, 2:
TOS (EIAJ RC-5720), IEC60958
Type II (S/PDIF)
Output:
TOS (EIAJ RC-5720), IEC60958
Type II (S/PDIF)
Remote connector:
KEYBOARD connector: Mini DIN 6pin
Power consumption: 13 W
Dimensions W× H× D
482.6 × 94 × 313 (mm)
Weight: 5.5kg
Accessories
Remote control unit (RC-32) x 1
Battery (SUM-3, "AA", "R6" type) x 2
Lettering guide x 1
Rack mounting screw kit x 1
- Improvements may result in specifications or feature changes without notice.
- Photos and illustrations may differ slightly from production models.
- US and foreign patents licensed from Dolby Laboratories Licensing Corporation.
Prises DIGITAL INPUT 1/OUTPUT
| ANALOG ANALOG INPUT |
| DIGITAL 1 DIGITAL INPUT 1 (OPTICAL) |
| DIGITAL 2 DIGITAL IN 2 (OPTICAL) (panneau avant) |
| ANALOG ANALOG INPUT |
| DIGITAL 1 DIGITAL INPUT 1 (OPTICAL) |
| DIGITAL 2 DIGITAL IN 2 (OPTICAL) (Vorderseite) |
Serial Copy Management System
Samplingrate: 44.1 kHz
Datumkompression:ATRAC(Adaptive TRansform Acoustic Coding)
IMPORTANT SAFETY INSTRUCTIONS 2-3
Prima dell'uso 66
IMPORTANT SAFETY INSTRUCTIONS 2-3
Antes de usar 90
Lea esto antede usability 90
DIGITAL 1 DIGITAL INPUT 1 (OPTICAL)
DIGITAL 2 DIGITAL IN 2 (OPTICAL) (panel frontal)
Superior a 94 dB (reproduccion,
filtro A)
Conectores analógicos de entrada/salida:
Entrada:
Equilibrada: XLR, +4 dBu (ref.),
10 kohms
Desequilibrada: RCA, -10 dBV (ref.)
50 koh
Salida:
Equilibrada: XLR, +4 dBu (ref.),
150 ohms
Desequilibrada: RCA, -10 dBV (ref.),
600 ohms
Alimentación:
120VCA,60Hz
- TEAC Professional Division
- MD-350
- CAUTION
- CAUTION:
- Note to CATV system installer:
- SAFETY INFORMATION
- - CAUTION
- For U.S.A
- TO THE USER
- Read This Before Operating
- IMPORTANT (for U.K. Customers)
- ■ Handling MDs
- Memory back-up function
- Serial Copy Management System
- When "Protected !!" is displayed
- While "UTOC Writing" is blinking:
- When "D-IN UNLOCK!" blinks
- Remote Control Unit
- Remove the battery compartment cover.
- Insert two "AA" (R6, SUM-3) dry batteries.
- Close the cover until it clicks.
- Battery replacement
- Precautions concerning batteries
- Rack Mounting
- Voltage Conversion
- (For general export models)
- Connections
- Connection
- ANALOG INPUT/OUTPUT
- (BALANCED/UNBALANCED) terminals
- DIGITAL INPUT 1/OUTPUT terminals
- Power cord
- Recording an MD
- To stop recording temporarily (ready)
- To eject the MD
- Notes on Recording
- To protect an MD against accidental erasure
- When "Disc Full !!" or "Track Full !!" is displayed
- The way track numbers are assigned varies depending on the source
- NormalPlayback
- To stop playback temporarily (ready) Press the [READY] button ("") lights up
- To play a track located before or after the current track
- Headphones
- Condensation
- Buttons used on this page
- Monitoring the Input Signal
- Adjusting the Recording Level
- Recording an analog signal
- Recording a digital signal
- Assigning Track Numbers During Recording
- To assign track numbers automatically (Auto Track function)
- To assign track numbers manually
- To assign track numbers after recording
- Note:
- Recording Over Existing Tracks (Over Write)
- Recording over an existing track from the middle
- [CAUTION]
- Sync Recording
- Notes:
- Checking the Remaining MD Recording Time
- In the Stop/Record mode:
- Checking the Recorded Tracks
- Timer Recording
- Using the Display Window
- Selecting the Desired Track
- Playing a track by direct search
- To skip to the previous or next track
- To search a desired section
- Playing Tracks in Random Order (Shuffle Playback)
- When Recording to Analog Tape
- To play tracks with spaces inserted after every track (Auto Space playback)
- To pause after each track (Auto Ready playback)
- Auto cue mode
- (tracks recorded in SP mode only)
- Playing Tracks in the Desired Order (Program Playback)
- ■ To program tracks
- To check the program contents
- To delete a programmed track
- To add a track to the program
- Repeating Track(s) (Repeat Playback)
- To repeat all MD tracks (All-track repeat)
- Play Mode Repeat
- To repeat a single track (Single-track repeat)
- To repeat a section within a track (A-B repeat)
- TimerPlayback
- Pitch control
- Play modes
- Notes on Editing
- ■ When "Protected !!" is displayed
- While "UTOC Writing" is blinking
- Erasing Track(s) (ERASE Function)
- To erase all tracks at once (DISC ERASE)
- To erase a single track (TRACK ERASE)
- To erase a part of a track
- (Example): To erase a part of A with track number 1
- Dividing a Track (DIVIDE Function)
- Press the [YES] button.
- tracks which have been recorded in
- Combining Tracks (COMBINE Function)
- Moving a Track (MOVE Function)
- (Example): To move D from track number 4 to track number 2
- Press the [YES] button again.
- Assigning Titles (TITLE Function)
- Assigning Titles to the Disc and All Tracks Successively (TITLE AUTO INC Function)
- Character types selectable
- Changing entered characters
- To move the cursor
- To select a character at the cursor position
- To change the character type at the cursor position
- To change the character at the cursor position to an upper/ lower case letter
- To insert a space at the cursor position
- To enter a number
- To erase a character at the cursor position
- To move the cursor to the right after selecting a character
- To erase all the characters at once
- Copying a Title (TITLE COPY Function)
- (Example): To copy the track 4 title
- Canceling the Last Operation (UNDO Function)
- System Restrictions
- Display Messages
- Rule 1
- Rule 2
- Rule 3
- U-TOC
- Prises DIGITAL INPUT 1/OUTPUT
- IMPORTANT SAFETY INSTRUCTIONS 2-3
- Prima dell'uso 66
- Antes de usar 90
Brand : TASCAM
Model : MD350
Category : Audio recorder