MF 214 - Freezer VESTFROST - Free user manual and instructions
Find the device manual for free MF 214 VESTFROST in PDF.
| Product Type | Freezer for vaccines and ice packs |
| Brand | Vestfrost |
| Model | MF 214 |
| Dimensions (W x D x H) | 800 mm x (not specified) x (not specified) |
| Required clearance | Back and left: 50 mm, right: 100 mm, floor: 30 mm |
| Power supply | 220-240 V ~ 50 Hz, fuse/circuit breaker protection 10-13 A |
| Refrigerant | R600a (isobutane), quantity indicated on rating plate |
| Temperature range | Vaccine compartment: -15 °C to -25 °C (thermostat setting 1-8) |
| Thermostat | Mechanical, adjustment from 1 (least cold) to 8 (coldest) |
| Voltage stabilizer | Recommended; must be individual and grounded |
| Maintenance and cleaning | Defrost every 3 months; clean with mild unscented detergent |
| Defrosting | Manual; use hot water (not boiling) and plastic scraper |
| Capacity | Not specified in the manual |
| Climate class | Not specified |
| Noise level | Not specified |
| Energy consumption | Not specified |
| Main functions | Vaccine storage, freezing of cold packs |
| Safety | Flammable hydrocarbon (R600a); do not obstruct ventilation |
| Spare parts and repairability | Parts list available; repair by authorized service |
| Warranty | Not specified in detail; covers manufacturing defects |
| General information | 88-page manual available in several languages |
Frequently Asked Questions - MF 214 VESTFROST
User questions about MF 214 VESTFROST
0 question about this device. Answer the ones you know or ask your own.
Ask a new question about this device
Download the instructions for your Freezer in PDF format for free! Find your manual MF 214 - VESTFROST and take your electronic device back in hand. On this page are published all the documents necessary for the use of your device. MF 214 by VESTFROST.
USER MANUAL MF 214 VESTFROST
natural_image
Exterior view of a white laboratory refrigerator with open lid and ventilation slots (no visible text or symbols)
12
RESPONSIBLE CONSUMPTION AND PRODUCTION

Vestfrost Solutions is working towards reaching the UN - Global Sustainable Development Goals by 2030.
The Sustainable Development Goals are the blueprint to achieve a better and more sustainable future for all.
In order to implement Goal no 12 "Responsible Consumption and Production", this manual has been printed on recycled paper.

Vaccine and Icepack Freezer MF 214
GB Instructions for use
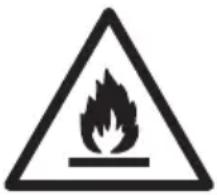
As this appliance contains hydrocarbon refrigerant please refer to guidelines listed below.
The quantity and type of the refrigerant used in your appliance is indicated on the rating plate.
Standard EN378 specifies that the room in which you install your appliance must have a volume of 1 m^3 per 8 g of hydrocarbon refrigerant used in the appliances. This is to avoid the formation of flammable gas/air mixtures in the room where the appliance is located in the event of a leak in the refrigerant circuit.
WARNING:
Ventilation openings in the appliance or in built-in structures must be kept clear.
WARNING:
Do not use other mechanical devices or means to accelerate the defrosting process or to remove rime other than those recommended by the manufacturer.
WARNING:
Do not damage the refrigerant system.
WARNING:
The appliance may not be exposed to rain.
WARNING:
This appliance is not intended for use by persons (including children) with reduced physical, sensory or mental capabilities, or lack experience and knowledge, unless they have been given supervision or instructions concerning use of the appliance by a person responsible for their safety. Children should be supervised to ensure that they do not play with the appliance.
WARNING:
Children must not play with, on, or around the appliance.
WARNING:
Children must not clean the appliance or carry out general maintenance unless they are at least 8 years old and are being supervised.
WARNING:
Do not store explosives, such as aerosol cans with flammable propellants in the unit.
WARNING:
Always, keep the keys in a separate place and out of reach of children.
WARNING:
Danger risk of fire or explosion if flammable refrigerant are used. To be repaired only by trained personnel.
natural_image
Warning symbol of a flame inside a triangle (no text or numbers)WARNING:
Before servicing or cleaning the appliance, switch off circuit breaker.
WARNING:
Cleaning and user maintenance shall not be made by children without supervision.
WARNING:
Do not store explosive substances such as aerosol cans with a flammable propellant in this appliance.
WARNING:
When positioning the appliance, ensure the power cord is not trapped or damaged.
WARNING:
Do not locate multiple portable socket-outlets or portable power supplies at the rear of the appliance.
WARNING:
Appliance use flammable insulation blowing gas.
For information about safe disposal, please contact your local disposal service.
See section for Disposal.
Contents
WARNING 2
Get to know your Freezer....4
General information....5
Unpacking and installation....5
Voltage stabilizers....6
Electrical connection....6
Cool down of the appliance ....7
Temperature adjustment....7
Loading the appliance ....8
Defrosting and cleaning....8
Trouble shooting....10
Warranty, spare parts and service......11
Wire-diagram....12
Spare parts list....13
Disposal....15
Get to know your Freezer
Handle
Sealing strip
Ice freezing tray
Compressor compartment
with ventilation grille
Temperature display
Fig. 1
PQS Code Model PQS Performance
specifications
Specification reference:
PQS Independent
type-testing protocol
Product verification protocol:
E003/025 MF 214 E003/FZ01.2 E003/FZ01-VP.2
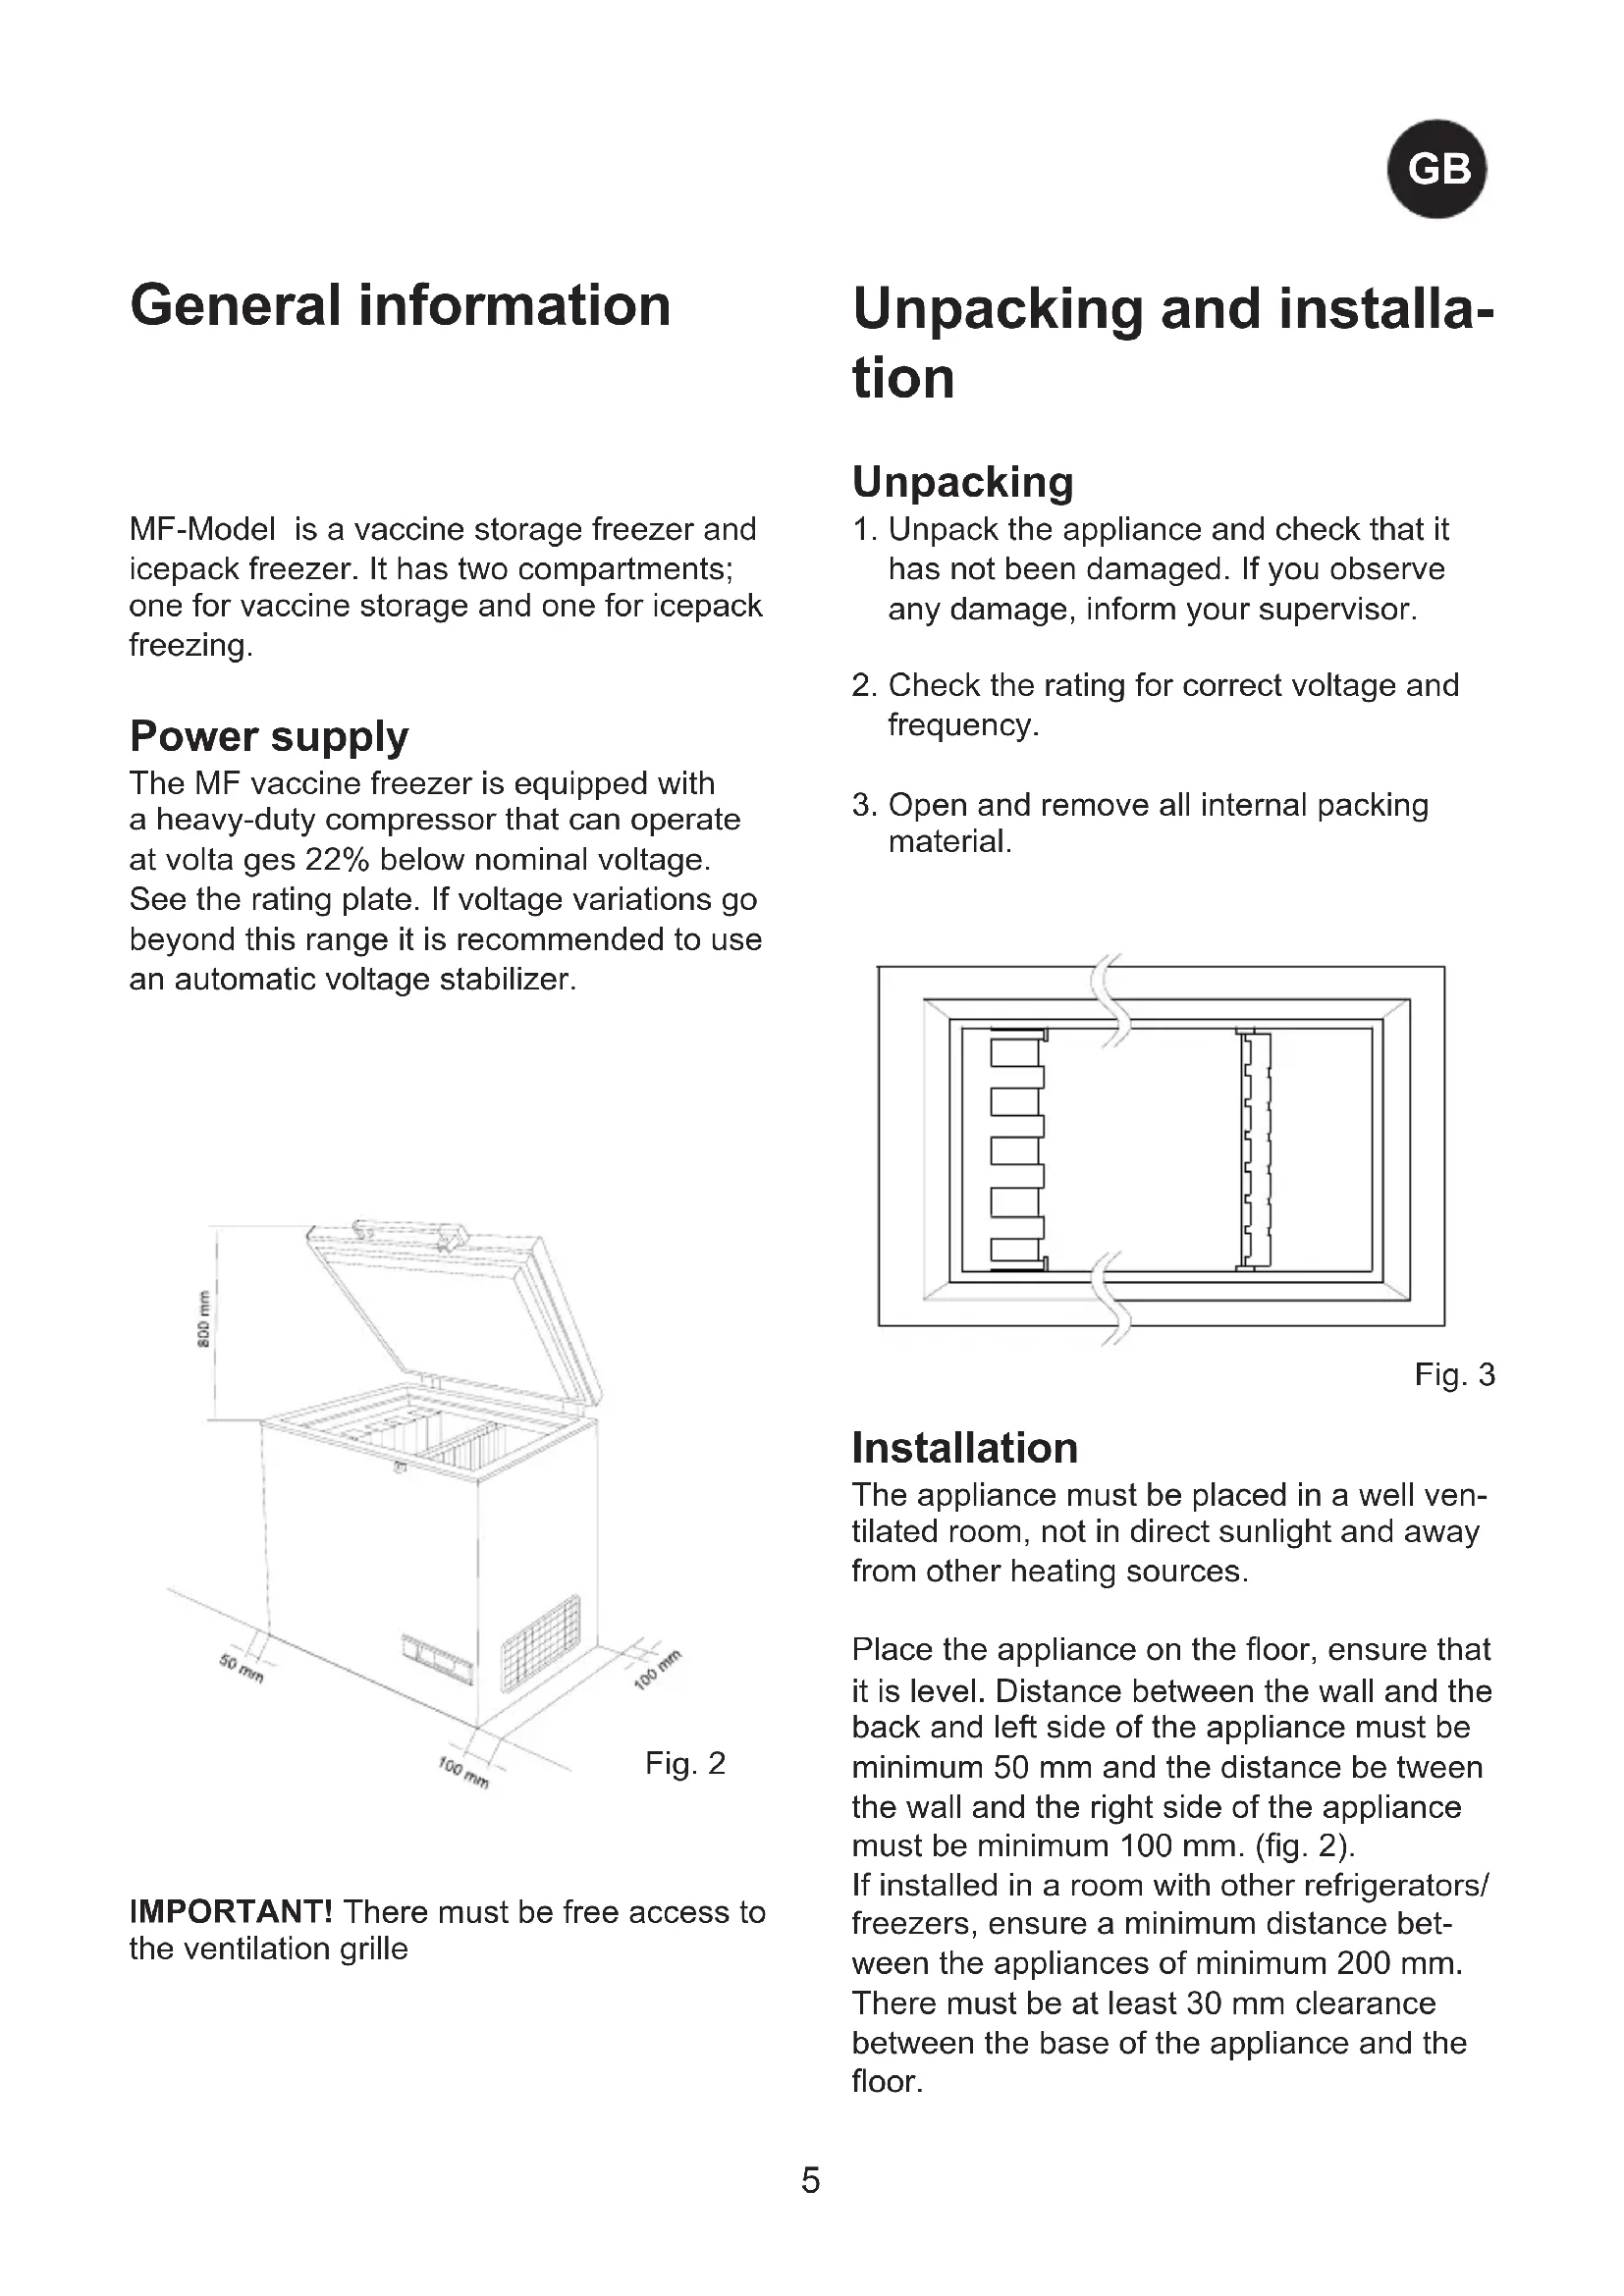
General information
MF-Model is a vaccine storage freezer and icepack freezer. It has two compartments; one for vaccine storage and one for icepack freezing.
Power supply
The MF vaccine freezer is equipped with a heavy-duty compressor that can operate at volta ges 22% below nominal voltage. See the rating plate. If voltage variations go beyond this range it is recommended to use an automatic voltage stabilizer.
IMPORTANT! There must be free access to the ventilation grille
Unpacking and installation
Unpacking
-
Unpack the appliance and check that it has not been damaged. If you observe any damage, inform your supervisor.
-
Check the rating for correct voltage and frequency.
-
Open and remove all internal packing material.
natural_image
Pure architectural floor plan lines without any text, numbers, or symbolsFig. 3
Installation
The appliance must be placed in a well ventilated room, not in direct sunlight and away from other heating sources.
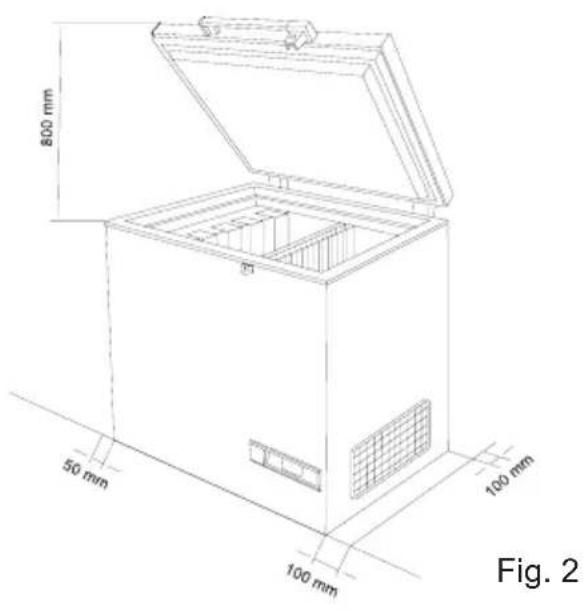
Place the appliance on the floor, ensure that it is level. Distance between the wall and the back and left side of the appliance must be minimum 50 mm and the distance be tween the wall and the right side of the appliance must be minimum 100 mm. (fig. 2). If installed in a room with other refrigerators/freezers, ensure a minimum distance between the appliances of minimum 200 mm. There must be at least 30 mm clearance between the base of the appliance and the floor.
Voltage stabilizers
It is highly recommended that all cold chain equipment running on AC current is installed with a voltage stabilizer, in order to safeguard the equipment against voltage fluctuations.
Stabilizers should be selected & installed as per the input voltage available.
Instructions to User:
- Every refrigeration unit must be connected to an individual stabilizer.
- Bypassing of Stabilizer is not recommended, as such practice may lead to damage of the CCE & in turn safety of vaccines & hence must be avoided.
- Proper earthing should be available and connected.
- Emphasize on repairing stabilizers immediately. Identify authorized Vestfrost service provider in case of technical assistance is required.
The voltage stabilizer is also provided with arrangement to cut off its output voltage to the Vaccine/waterpacks freezer in case the mains voltage goes below or above as per designed input voltage range. The output is restored automatically after the factory set delay 3 to 6 minutes (WHO/PQS E007/VS01.4 specifications) when the mains voltage is within the recommended range and remains within.
natural_image
Line drawing of a hand inserting a component into a device housing (no text or symbols)Fig. 4
Electrical connection
Wiring and connections in power supply systems must be all applicable (local and national) electrical codes. Consult these codes lengths and sizes prior to cabinet installation.
This device complies with relevant EU directives including Low Voltage Directive 2014/35/EU and Electromagnetic Compatibility Directive 2014/30/EU
The socket should be freely accessible.
Connect the appliance only to 220/240 V 50Hz alternating current via a correctly installed earthed socket.
The socket must be fused with a 10-13 A fuse.
If the appliance is to be operated in a non-European country, check on the rating plate whether the indicated voltage and current type correspond to the values of your mains supply.
Information regarding voltage, current or power are given on the rating plate
The power cord may be replaced by a technician only.
Check that the plug fits your type of socket. If it does not fit, have a qualified electrician to fit the plug. This appliance must be earthed.
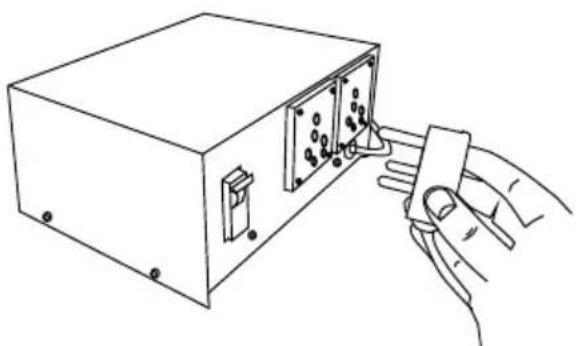
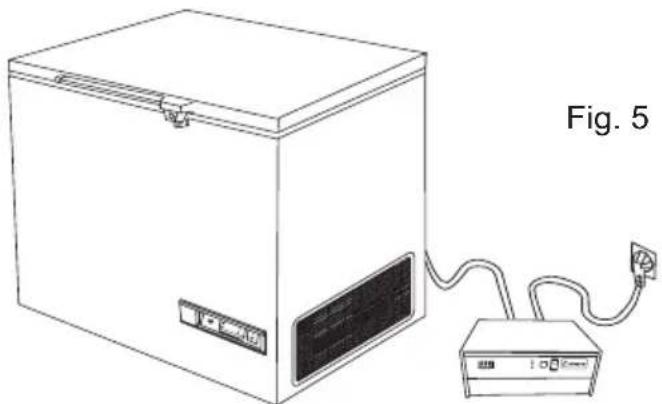
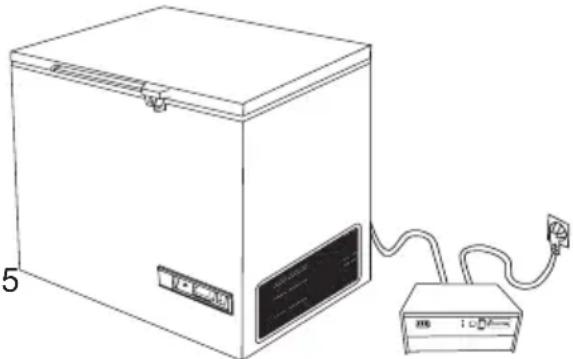
Connect the appliance to voltage stabilizer and connect voltage stabilizer to wall socket. (Fig 4 + 5)
natural_image
Line drawing of a rectangular box connected to a power strip unit with cable (no text or symbols)Cool down of the appliance
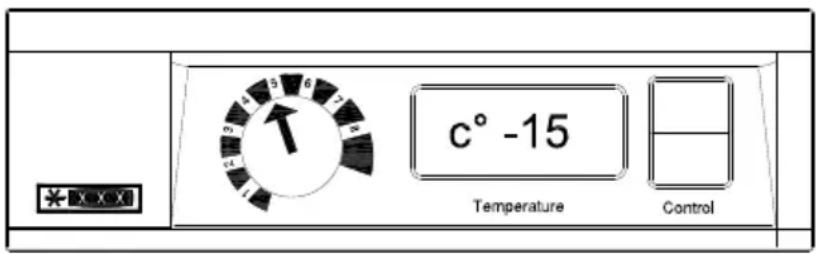
Fig. 6
Before the appliance is loaded with vaccines ensure that the temperature is below -15 °C:
- Set the thermostat at position 5
- Check the temperature on the thermometer
- If the temperature in the vaccine compartment is above -15^ the thermostat should be adjusted. The temperature in the vaccine compartment must always be monitored on the thermo meter and be within the range -15 to -25^ .
Due to the mechanical tolerance of the thermostats you should always control the temperatu re during cool down.
Temperature adjustment
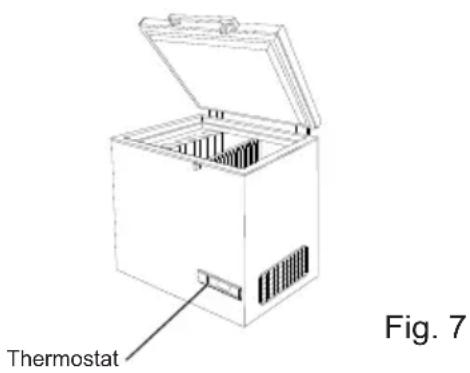
This appliance is equipped with one thermostat. See Fig. 6 and Fig. 7
The thermostat is a electronic thermostat that controls the temperature in the vaccine and icepack freezing compartments.
Setting 1 applies minimum cold and setting 8 maximum cold.
Loading the appliance
Loading vaccines
When the temperature in the freezer has stabilized, i.e. the temperature should be below -15 to -25^ C and the compressor stops and starts, vaccines can be loaded. The vaccines should be placed in the mid part.
Loading and freezing of icepacks
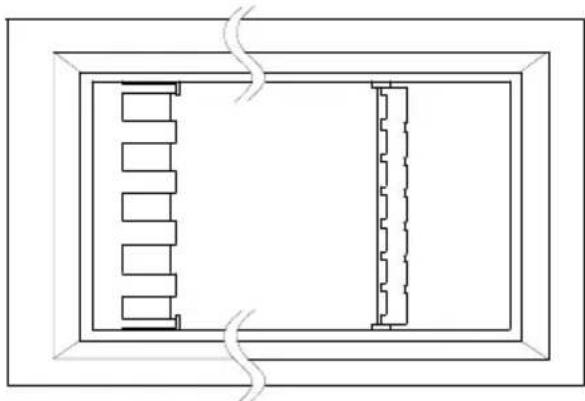
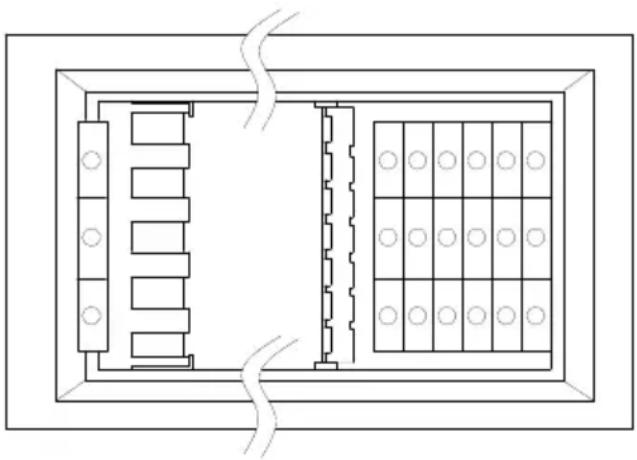
The icepacks should be placed in the icepack compartment and the suspended tray. Make sure you have a good contact between the icepack and the evaporator surface. Fig. 8
natural_image
Pure architectural floor plan lines without any text, numbers, or symbolsFig. 8
If thermostat is set to a warmer position, remember to check the temperature in the vaccine compartment
Defrosting and cleaning
For the appliance to operate well and to save energy, it is important that it is cleaned and defrosted regularly.
When opening the appliance, moisture enters and settles on inner cold surfaces and forms a layer of frost or ice.
The layer of ice makes the freezer less efficient and must be removed, "defrosted".
It is recommended that the appliance be defrosted every third month.
Defrosting
The water-packs stored and the humidity of the air gradually causes frost and ice to form in the freezer compartment. A thin layer of frost or ice does not affect freezer performance, but a thick layer could cause the freezer not to cool water-packs satisfactory. Small amounts of loose frost can be removed using a plastic scraper.
Never use electrical apparatus or sharp implements as these may damage the inside of the appliance.
When the layer of frost and ice exceeds 4-5 mm the freezer should be completely defrosted.
Proceed as follows:
-
Before defrosting, vaccines and/or water-packs must be moved to another working freezer or cold box with ice-packs.
-
Switch off the appliance.
-
Open the drainage plug placed inside the freezer compartment.
-
Place a tray under the defrost water drain.
-
Place a bowl of hot (but not boiling) water in the freezer, close the lid and wait approx. 30 minutes before removing loose frost with the plastic scraper.
- To prevent water from damaging the floor during defrosting, it is advisable to check the defrost water tray from time to time and to cover the floor around the defrost water drain to protect against ice and splashes. When all the frost and ice have melted, clean the inside cabinet, as well lid, lid gasket, and outside of the cabinet using water with a mild, perfume-free detergent.
- Dry the freezer with a soft cloth, and make sure no moisture is remaining after cleaning.
- Reinsert the internal drainage plug, and check lid gasket is not faulty.
- Switch on the appliance, and make sure it is freezing (Temperatures decreasing)
- Check water-packs are not leaking before returning them to the freezer compartment. Store water-packs and vaccines according instructions, approx. 5 minutes after having switched it on. Close the lid
Cleaning
- Once the appliance is defrosted it must be cleaned.
-
Clean the inside of the appliance with a mixture of lukewarm water and a mild detergent.
-
Allow the cleaned parts to dry completely.
- Clean the outside of the appliance with a mixture of lukewarm water and a mild detergent or soap.
- Close the lid and follow the procedures in "Cool down of the appliance" page 7
Trouble shooting
| Fault Possible cause Remedy | ||
| Compressor is not running, and the ice packs are not cold | Be patient, it is most likely that the compressor will start within a few minutes. | If this is not the case, check the following:- Check that power is connected.- Check the fuse and replace it if necessary.- If the above is OK, call technical supervisor. |
| Compressor is running, and the temperature is too high | The ventilation grille is blocked.The lid is not closed properly.The temperature in the room in which the appliance is installed is too high. | Ensure unhindered air circulation.Ensure that the lid is closed properly.Shield the appliance against direct sun light and ensure more ventilation to the room. |
| No temperature is displayed | The thermometer is broken.There is not enough light for the solar sensor. | Change the thermometer.Turn on the light. |
Warranty, spare parts and service
Warranty disclaimer
Faults and damage caused directly or indirectly by incorrect operation, misuse, insufficient maintenance, incorrect building, installation or mains connections. Fire, accident, lightning, voltage variation or other electrical interference, including defective fuses or faults in mains installations are not covered by the warranty.
Repairs performed by others than approved service centres and any other faults and damage that the manufacturer can substantiate are caused by reasons other than manufacturing or material faults are not covered by the warranty.
Please note that changes to the construction of the appliance or changes to the component equipment of the appliance will invalidate warranty and product liability, and the appliance cannot be used lawfully. The approval stated on rating plate will also be invalidated.
Transport damage discovered by the buyer is primarily a matter to be settled between the buyer and the distributor, i.e. the distributor must ensure that such complaints are resolved to the buyer's satisfaction.
Before calling for technical assistance, please check whether you are able to rectify the fault yourself. If your request for assistance is unwarranted, e.g. if the appliance has failed as a result of a blown fuse or incorrect operation, you will be charged the costs incurred by your call for technical assistance.
Spare parts
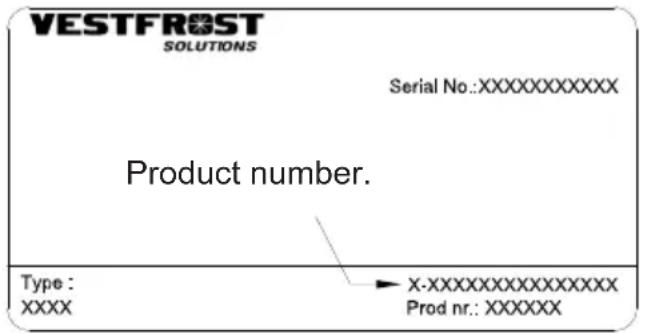
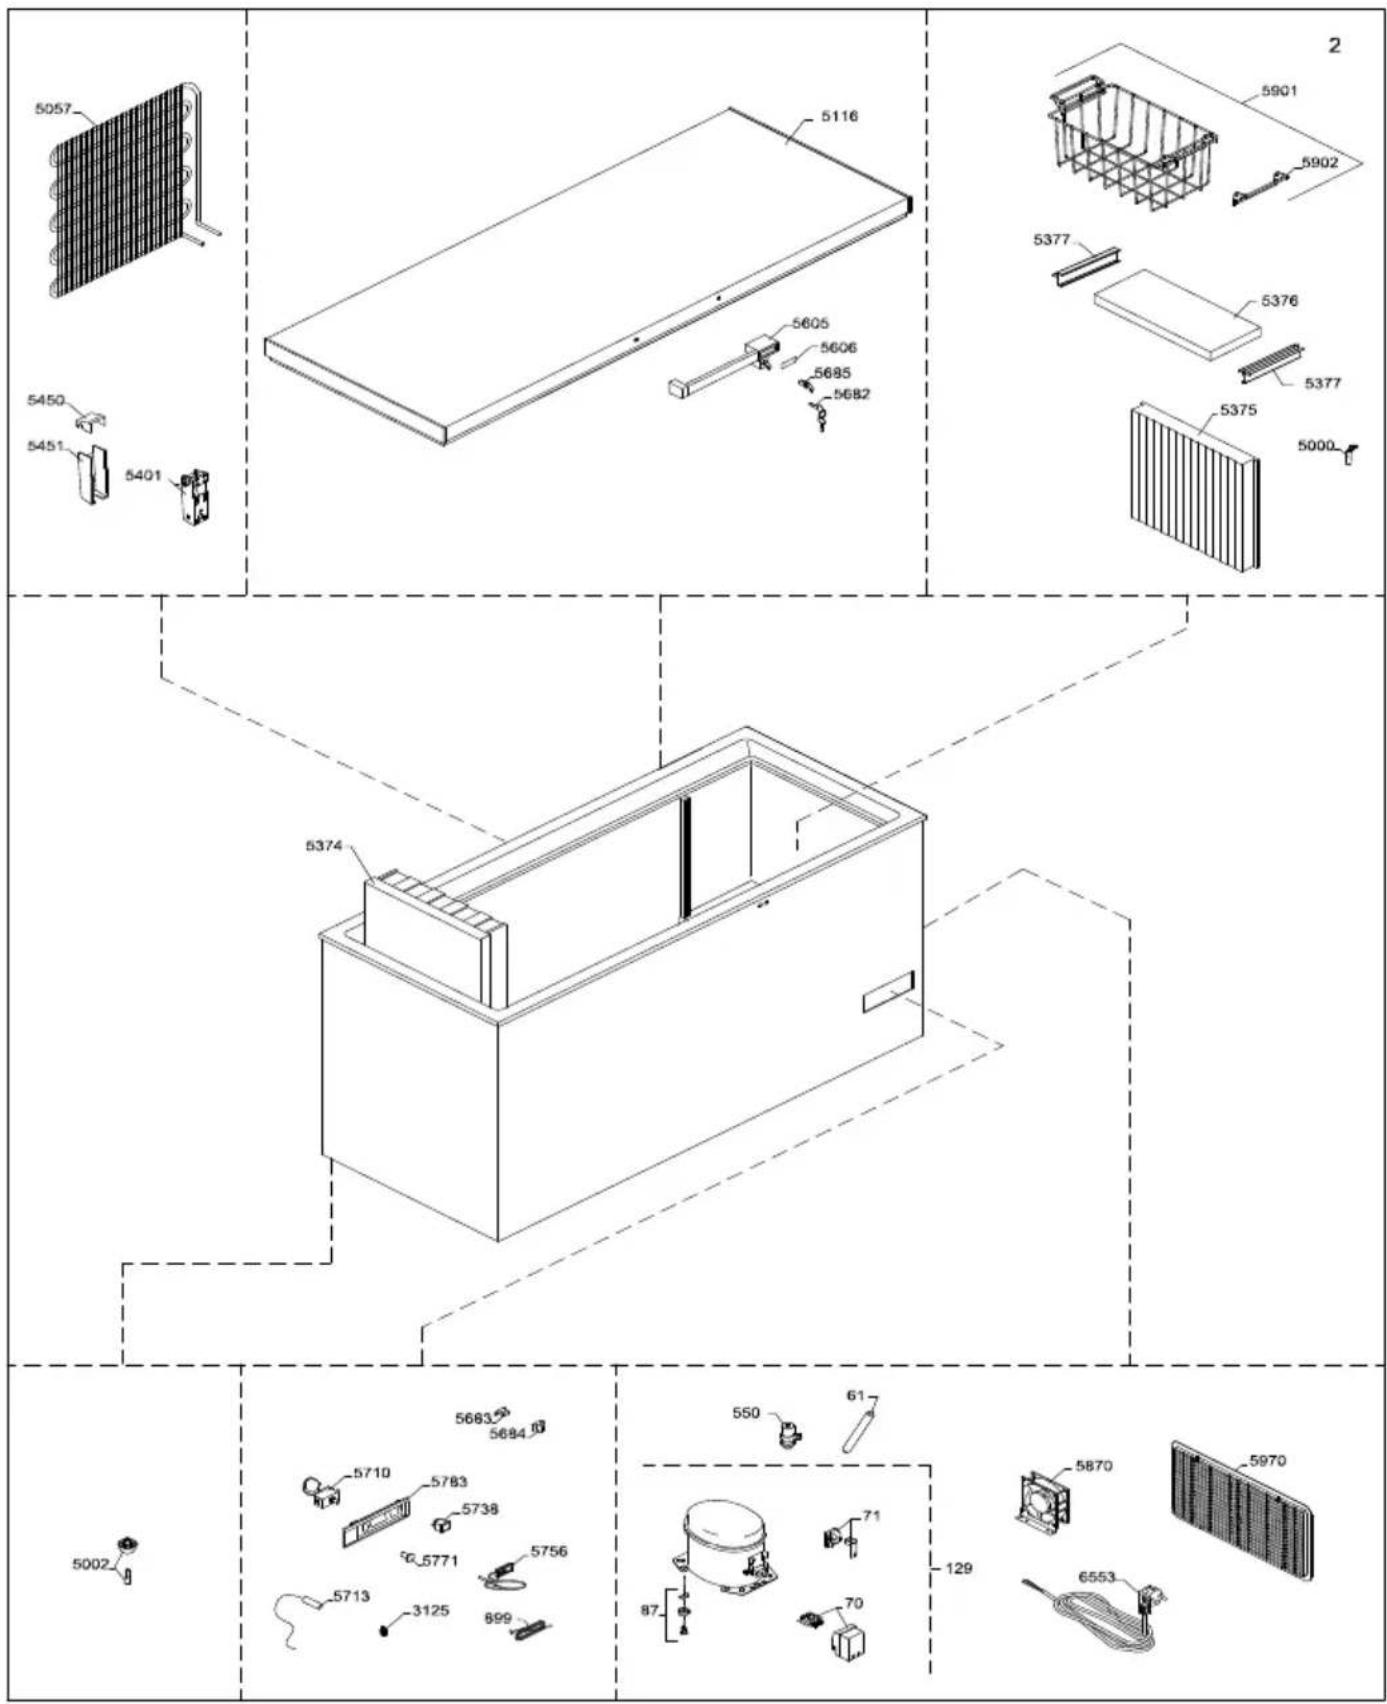
When ordering spare parts, please state the type, serial and product numbers of your appliance. This information is given on the rating plate. The rating plate contains various technical information, including type and serial numbers.
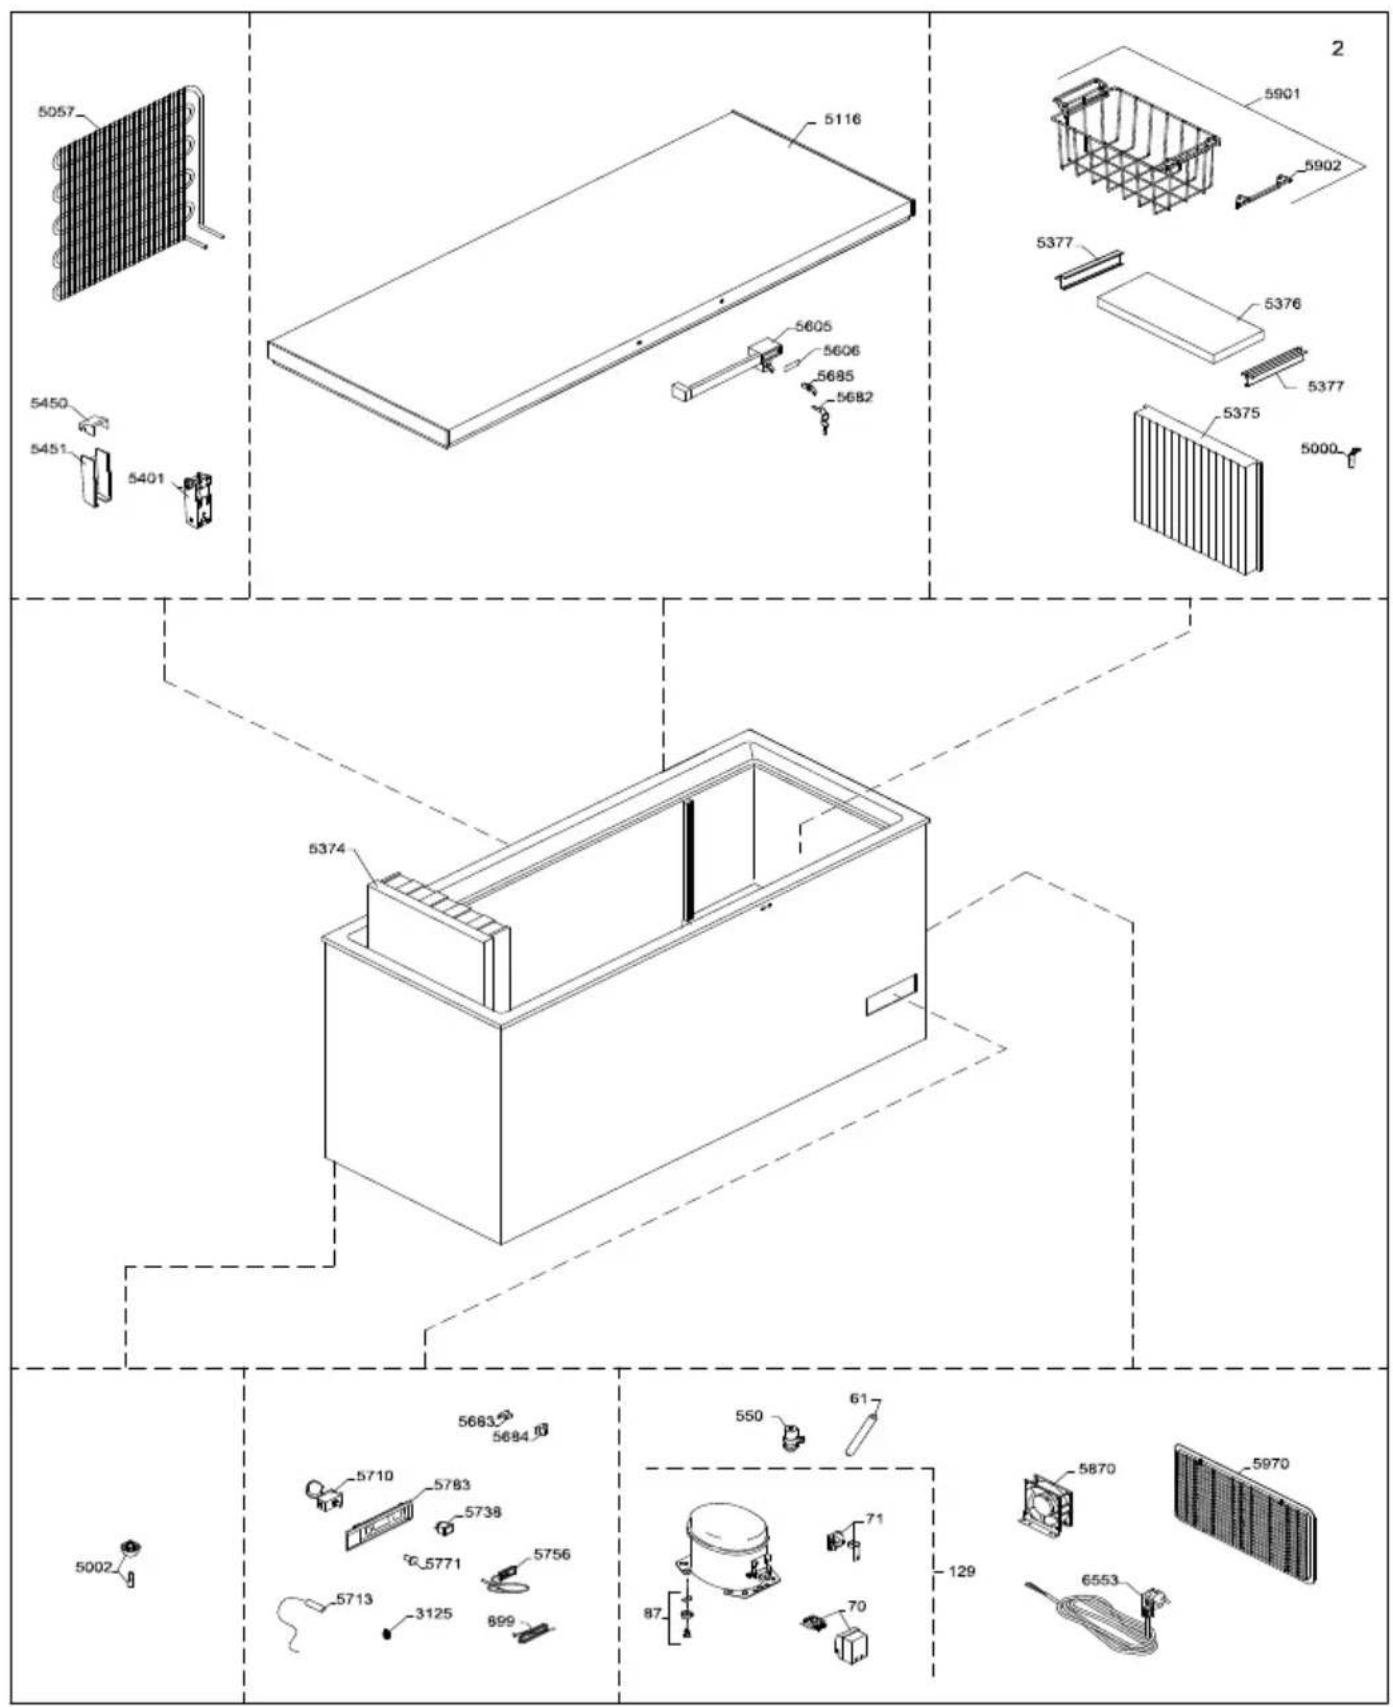
Spare parts list
Position Item number Item name
0061 0-6538001 Filter drier,
0070 A921001 Cover + wirring clamp
0071 A921115 Starting device, 103N0021
0087 0-6038175 Base plate fittings, complete
0129 8-036038255 Compressor - NLE 9KTK , Complete, R600a
0550 6520317 Run cap. 117-7119 4uF/4,8 receptacles
0899 7020983 Sensor
3125 3010457 Pipe holder ∅6
5000 3010049 Drain plug
5002 6000959 Foot with pin
5057 6010084 WOT condenser
5116 5000918651 Lid foamed without handle/hinges
5374 3040184 Ice pack tray
5375 6000965 Partition, complete
5376 5020105 Lid for fast freeze compartment
5377 3020245-23 Handle
5401 1510135 Hinge with spring
5450 3011135-01 Top part for hinge cover
5451 3010032-01 Bottom part for hinge cover
5605 304090501 Handle with lock (push and turn)
5606 8090342-94 Inlay for handle,
5682 1510046 Key, set - 2pc.
5683 2040145 Catch for handle
5684 3010265-01 Cover for catch
5685 600098801 Lock with keys,(push and turn)
5707 7020248 Voltage stabilize
5710 7020239 Thermostat, freezer
5713 7020960 Sensor NTC S1, Cool
5738 7010027 Pilot lamp, green
5756 7020164 Thermometer, solar
5771 3010051-01 Thermostat knob
5783 3040146 Control panel
5870 6000308 Fan
5901 353090001 Basket with handle, white
5902 3010107-01 Spare handle for basket
5970 3010308-01 Motor screen
6553 7535360 Mains lead, Schuko, 3G1/2600
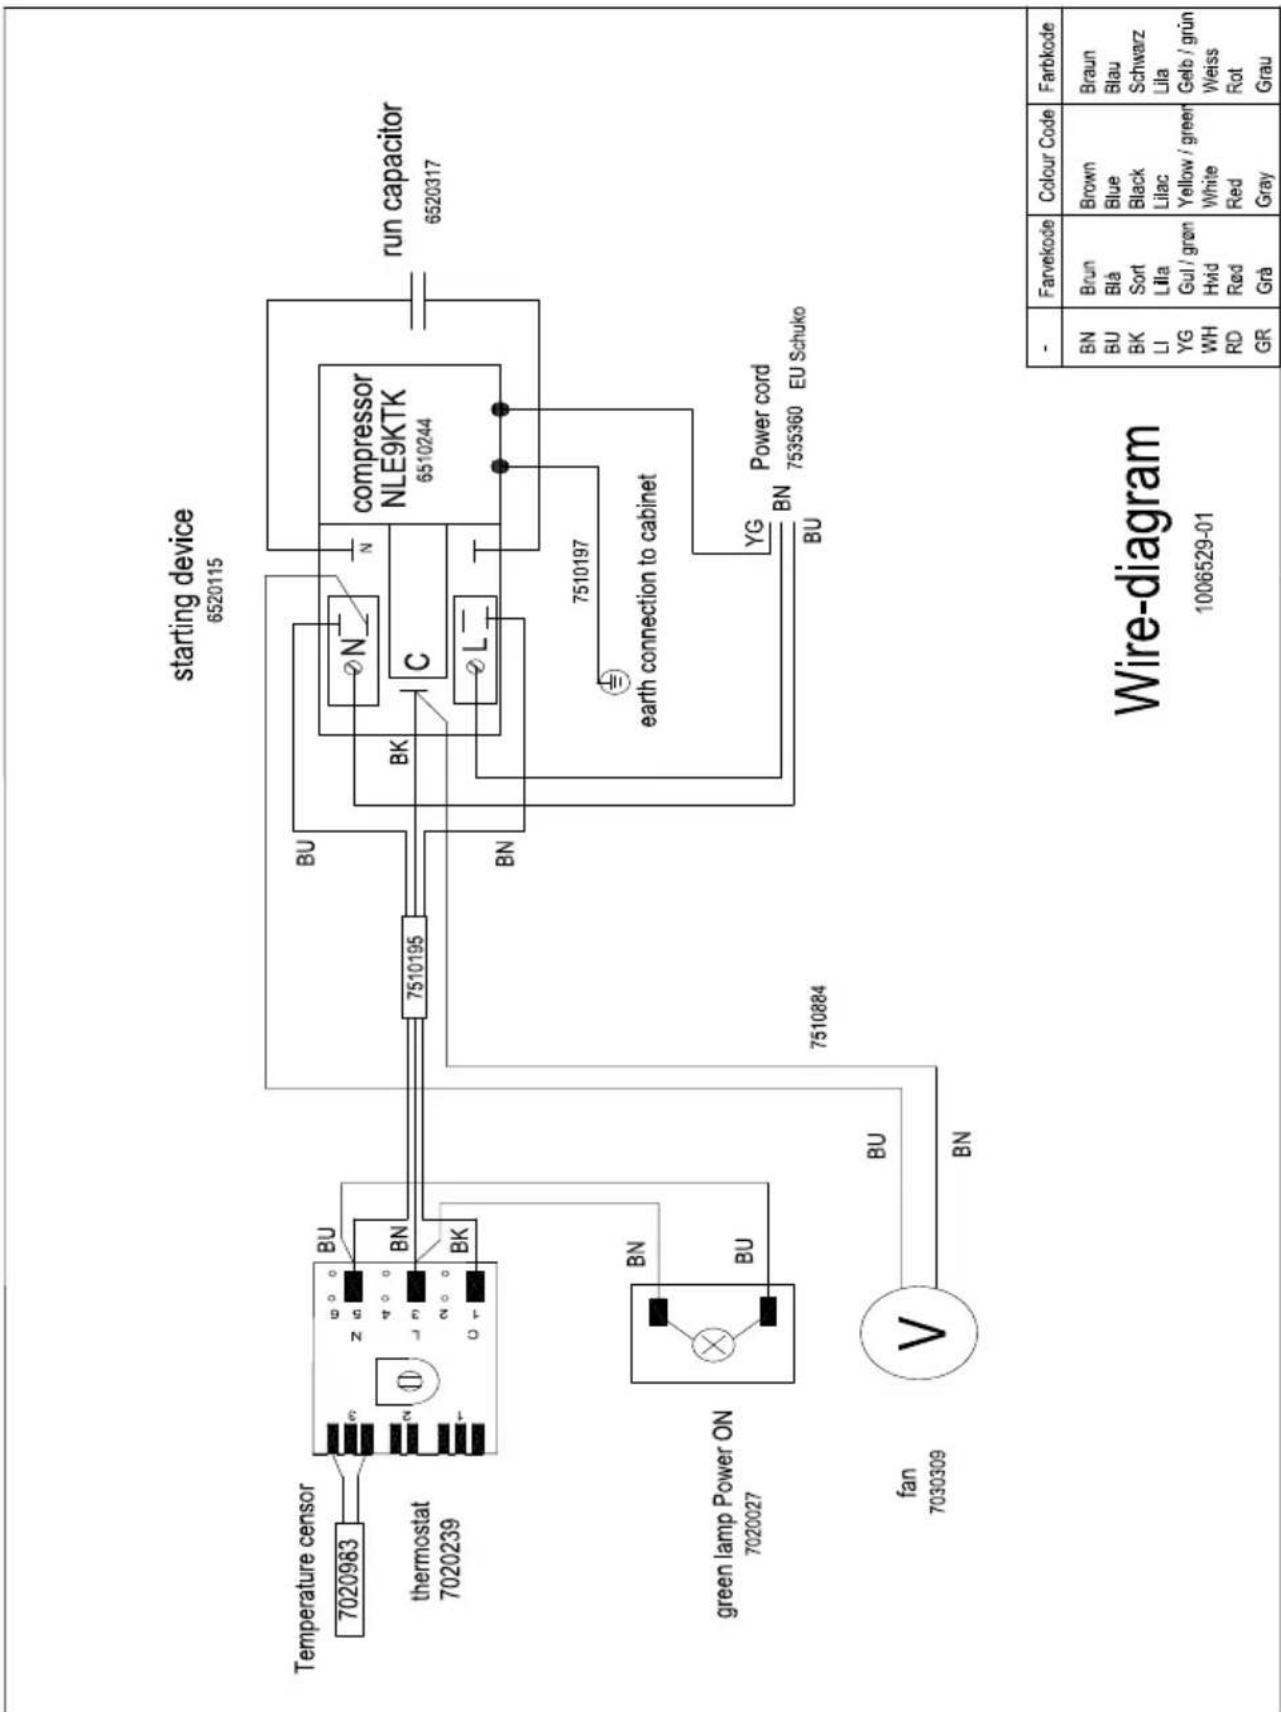
Wire-diagram

flowchart
graph TD
    A["7020983 Temperature censor"] --> B["7020239 thermostat"]
    B --> C["7510195"]
    C --> D["compressor NLE9KTK 6510244"]
    D --> E["run capacitor 6520317"]
    F["fan 7030309 green lamp Power ON"] --> G["V"]
    G --> H["7510884"]
    I["7510195"] --> J["BN"]
    K["7510884"] --> L["BN"]
    M["7510195"] --> N["BN"]
    O["7510884"] --> P["BN"]
    Q["7510195"] --> R["BN"]
    S["7510884"] --> T["BN"]
    U["7510195"] --> V["BN"]
    W["7510884"] --> X["BN"]
    Y["7510195"] --> Z["BN"]
    AA["7510884"] --> AB["BN"]
    AC["7510195"] --> AD["BN"]
    AE["7510884"] --> AF["BN"]
    AG["7510195"] --> AH["BN"]
    AI["7510884"] --> AJ["BN"]
    AK["7510195"] --> AL["BN"]
    AM["7510884"] --> AN["BN"]
    AO["7510195"] --> AP["BN"]
    AQ["7510884"] --> AR["BN"]
    AS["7510195"] --> AT["BN"]
    AU["7510884"] --> AV["BN"]
    AW["7510195"] --> AX["BN"]
    AY["7020983"] --> AZ["7020239"]
    BA["7510195"] --> BB["BN"]
    BC["7510884"] --> BD["BN"]
    BE["7510195"] --> BF["BN"]
    BG["7510884"] --> BH["BN"]
    BI["7510195"] --> BJ["BN"]
    BK["7510884"] --> BL["BN"]
    BM["7510195"] --> BN["BN"]
    BO["7510884"] --> BP["BN"]
    BQ["7510195"] --> BR["BN"]
    BS["7510884"] --> BT["BN"]
    BU["BU"] --> BV["BN"]
    BW["BN"] --> BX["BN"]
    BY["BN"] --> BZ["BN"]
    CA["BN"] --> CB["BN"]
    CC["BN"] --> CB
    CE["BN"] --> CB
    CF["BN"] --> GB["BN"]
    GB --> BC
    BI --> BC
    BJ --> BJ
    BK --> BK
    BL --> BL
    BM --> BM
    BN --> BN
    BB --> BB
    BC --> BC
    BD --> BD
    BE --> BE
    BF --> BF
    BG --> BG
    BH --> BH
    BI --> BI
    BJ --> BJ
    BK --> BK
    BL --> BL
    BM --> BM
    BN --> BN
    BB --> BN
    BC --> BN
    BD --> BN
    BE --> BN
    BF --> BN
    BG --> BN
    BH --> BN
    BI --> BN
    BJ --> BN
    BK --> BN
    BL --> BN
    BM --> BN
    BN --> BN
    CA --> BN
    BJ --> BN
    BK --> BN
    BL --> BN
    BM --> BN
    BN --> BN
    CA --> BN
    BJ --> BN
    BK --> BN
    BL --> BN
    BM --> BN
    BN --> BN
Disposal
Information for Users on Collection and Disposal of Old Equipment and used Batteries
These symbols on the products, packaging, and/or accompanying documents mean that used electrical and electronic products and batteries should not be mixed with general household waste. For proper treatment, recovery and recycling of old products and used batteries, please take them to applicable collection points, in accordance with your national legislation and the Directives 2002/96/EC and 2006/66/EC.
By disposing of these products and batteries correctly, you will help to save valuable resources and prevent any potential negative effects on human health and the environment which could otherwise arise from inappropriate waste handling.
For more information about collection and recycling of old products and batteries, please contact your local municipality, your waste disposal service or the point of sale where you purchased the items.
Penalties may be applicable for incorrect disposal of this waste, in accordance with national legislation.
For business users in the European Union.
If you wish to discard electrical and electronic equipment, please contact your dealer or supplier for further information.
[Information on Disposal in other Countries outside the European Union]
These symbols are only valid in the European Union. If you wish to discard this product, please contact your local authorities or dealer and ask for the correct method of disposal.
Note for the battery symbol:
This symbol might be used in combination with a chemical symbol. In this case it complies with the requirement set by the Directive for the chemical involved.
Avertissement
AVERTISSEMENT:
natural_image
Pure architectural floor plan lines without any text, numbers, or symbolsFig. 3
Installation
natural_image
Line drawing of a device with a hand holding a clip, showing internal components and wiring (no text or symbols)natural_image
Line drawing of a laboratory setup with a box, control panel, and connected device (no text or symbols)Fig. 6
natural_image
Pure architectural floor plan lines without any text, numbers, or symbolsFig 8
ADVERTENCIA:
natural_image
Pure architectural floor plan lines without any text, numbers, or symbolsFig. 3
Instalación
natural_image
Line drawing of a hand inserting a component into a device housing (no text or symbols)Fig. 4 Fig. 5
natural_image
Line drawing of a rectangular box connected to a power strip and a terminal device (no text or symbols visible)Fig 6
natural_image
Top-down schematic of a rectangular room with internal compartments and circular elements, no text or symbols presentFig 8
natural_image
Warning symbol of a flame inside a triangle (no text or numbers)ОСТОРОЖНО:
natural_image
Architectural floor plan diagram showing room layout and structural elements (no text labels)Установка
natural_image
Line drawing of a hand inserting a component into an electronic device labeled 'Рис. 4' (no other text or symbols)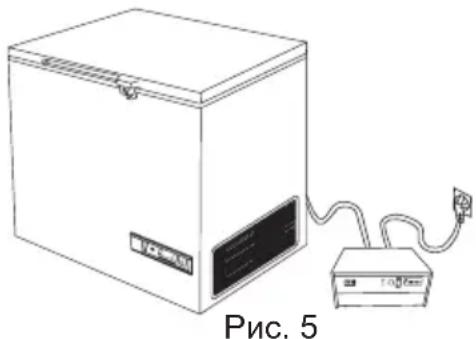
natural_image
Line drawing of a laboratory setup with a box, power cord, and connected unit (no text or symbols)Охлаждение ларя
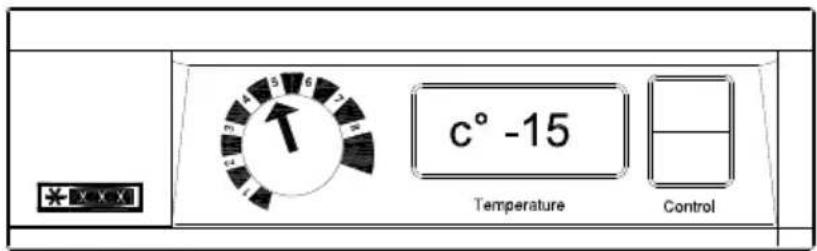
Рис. 6
natural_image
Top-down architectural floor plan showing room layout with walls, doorways, and grid pattern (no text or labels)Рис. 8
natural_image
Pure architectural floor plan lines without any text, numbers, or symbols图3
安装
natural_image
Line drawing of a hand inserting a component into a device housing (no text or symbols)图4
natural_image
Line drawing of a refrigerator with attached power supply unit (no text or symbols)设备降温
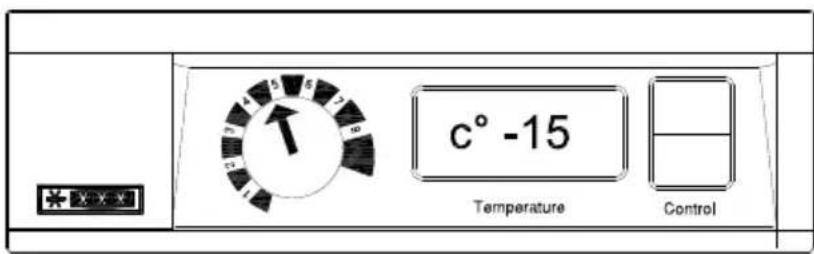
图6
natural_image
Architectural floor plan showing room layout with walls, doors, and grid compartments (no text or labels)图8
图9
| 位置 | 物料号编 |
0061 0-6538001
0070 A921001
0071 A921115
0087 0-6038175
0129 8-036038255
0550 6520317
0899 7020983
3125 3010457
5000 3010049
5002 6000959
5057 6010084
5116 5000918651
5374 3040184
5375 6000965
5376 5020105
5377 3020245-23
5401 1510135
5450 3011135-01
5451 3010032-01
5605 304090501
5606 8090342-94
5682 1510046
5683 2040145
5684 3010265-01
5685 600098801
5707 7020248
5710 7020239
5713 7020960
5738 7010027
5756 7020164
5771 3010051-01
5783 3040146
5870 6000308
5901 353090001
5902 3010107-01
5970 3010308-01
6553 7535360
物料名称
干燥 器过滤 ,
盖子+ 接线钳
启 装置动
底座配件,集,完整
机压缩KT排线编
操作 容4μF
温包
管子支架
排水塞子
地脚带钉
凝器结
无把手/ 活 盖页
冰包托盘
分割装置,成套
快速冷 室盖冻
理处
用 簧 弹 铰链
活 盖上部页
活 盖底部页
带锁扣手柄
手柄 嵌镶
键,设置 - 2PC。
手柄 止器闭
止器盖闭
锁与钥匙
电压稳定器
温度 器调节
感器使TC S1,冷却
指示灯,色绿
温度计,太阳能
温度 器旋调节 钮
控制板
扇风
带手柄的篮子
篮子备用手柄
机网罩电
源电,Schuko, 3G1/2600
处理
natural_image
Pure architectural floor plan lines without any text, numbers, or symbolsالشكل.
natural_image
Line drawing of a rectangular box connected to a battery with a cable, no text or symbols present
natural_image
Line drawing of a hand inserting a card into an electronic device (no text or symbols)natural_image
Pure architectural floor plan lines without any text, numbers, or symbolsالتركيب
تحذير:
natural_image
Exterior view of a white laboratory refrigerator with open lid and ventilation grilles (no visible text or symbols)