CEMG02N - Ice machine CONTINENTAL EDISON - Free user manual and instructions
Find the device manual for free CEMG02N CONTINENTAL EDISON in PDF.

| Product type | Ice machine |
| Brand | Continental Edison |
| Model | CEMG02N |
| Ice production capacity | 15 kg/24h |
| Ice storage capacity | 600 g |
| Water tank capacity | 2 L |
| Power supply | 220-240 V ~, 50 Hz, 120 W |
| Refrigerant | R600a (isobutane) |
| Ice types | Small, large, crushed |
| Functions | Ice making, ice dispensing, cold water |
| Display | LCD screen |
| Control panel | ON/OFF, SMALL/LARGE, CRUSHED ICE buttons |
| Included accessories | Measuring cup, filling hose, adapter, ice scoop, drain plug |
| Outputs | Crushed ice, ice cubes, cold water |
| Cleaning | Water and vinegar solution, rinse thoroughly |
| Safety | Clear ventilation, do not damage the refrigeration circuit |
| Warranty | Does not cover wear parts, incorrect use, or unauthorized repair |
| Use | Indoor and domestic use only |
| Dispensing panel | Button for crushed ice, button for ice cubes, button for water |
Frequently Asked Questions - CEMG02N CONTINENTAL EDISON
User questions about CEMG02N CONTINENTAL EDISON
0 question about this device. Answer the ones you know or ask your own.
Ask a new question about this device
Download the instructions for your Ice machine in PDF format for free! Find your manual CEMG02N - CONTINENTAL EDISON and take your electronic device back in hand. On this page are published all the documents necessary for the use of your device. CEMG02N by CONTINENTAL EDISON.
USER MANUAL CEMG02N CONTINENTAL EDISON
- FR (version originale)
- EN (translated from the original)
When using an electrical appliance, basic safety precautions should always be followed to reduce the risk of fire, electric shock, and / or injury, including:
- Read all instructions before using the appliance.
- Warning: fill the tank only with potable water
- CAUTION: Keep ventilation openings in the enclosure of the appliance or in the built-in structure clear.
- CAUTION: Do not use mechanical devices or other means to accelerate the defrosting process other than those recommended by the manufacturer.
-
CAUTION: Do not damage the refrigeration circuit.
-
CAUTION: Do not use electrical appliances inside the food storage compartment unless they are of the type recommended by the manufacturer.
- WARNING: When positioning the unit, make sure the power cord is not pinched or damaged.
- WARNING: Do not place mobile multioutlet cradles or portable power supplies on the back of the device.
-
This appliance is designed for indoor and household use only. It is not intended for use in applications such as:
-
kitchen areas reserved for staff in stores, offices and other professional environments; - farms and guest use of hotels, motels and other residential environments;
- bed and breakfast type environments;
-
catering and other similar applications except retail.
-
Remove all packing materials and carefully check that your icemaker is in good condition and that the icemaker, power cord, and plug are not damaged.
- Before using the ice maker for the first time, wait 2 hours after putting it on and leave the transparent cover open for at least 2 hours.
- Check that the voltage is within the voltage range indicated on the label and make sure that the grounding of the receptacle is in good condition.
- If the power cable is damaged, it must be replaced by the manufacturer, its after-sales service or similarly qualified persons in order to avoid any danger.
- Do not move this product or tilt at a 45^ angle.
- To protect yourself against the risk of electric shock, do not pour water on the cord, plug and vent. Do not immerse the device in water or any other liquid.
- Unplug the appliance after using it or
before cleaning it.
- Keep the device 8cm away from other objects to ensure good heat dissipation.
- Do not use accessories that are not recommended by the manufacturer.
- This device may be used by children of at least 8 years of age and by persons with reduced physical, sensory or mental capacities or without experience or knowledge, if (if they) are properly supervised. s or if they have been given instructions relating to the safe use of the device and if the risks involved have been understood. Children must not play with the device. Cleaning and user maintenance shall not be made by children without supervision. Do not use the device near open flames, hot plates or stoves.
- Do not turn on the power button frequently (make sure you have at least 5 minute intervals) to avoid damaging the compressor.
- Sheet metal or other electrical objects
must not be inserted into the device to avoid fires and short circuits.
- Do not use outdoors.
- Never clean with scouring powders or hard instruments.
- Please keep the instruction manual.
- Do not store explosive substances such as aerosols containing flammable propellants in this device.
- Children aged 3 to 8 are allowed to load and unload refrigeration devices.
-
To avoid contamination of food, the following instructions must be observed:
-
Extended door openings are likely to cause a significant increase in the temperature of the appliance compartments.
- Regularly clean surfaces likely to come into contact with food and accessible drainage systems. Clean water containers if they have not been used for 48 hours.
- If the refrigeration appliance remains empty for a long time,
turn it off, defrost, clean, dry it, and leave the door open to prevent mold growth inside the appliance.
- The blowing gas of the refrigerant and the insulation is flammable, when disposing of the device, do so only at an authorized waste disposal center. Do not expose to flame.
- If the icemaker is empty for an extended period of time, turn it off, defrost, clean, dry, and leave the door open to prevent mold from forming in the appliance.
- WARNING: When positioning the unit, make sure the power cord is not pinched or damaged.
- WARNING: Do not place mobile multioutlet cradles or portable power supplies on the back of the device.
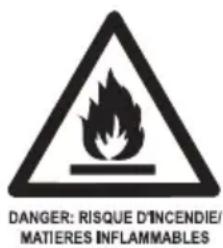
Danger; risk of fire / flammable materials
The refrigerant gas contained in the circuit of this device is isobutane (R 600a), a low-polluting but flammable gas. When transporting and installing the appliance, take care not to damage any part of the refrigeration circuit.
For installation, handling, cleaning and disposal of the device, refer to the following chapters of the user guide.

Designed to be in contact with food.
Information on the meaning of the conformity mark
Marking indicates that the product meets the main requirements of European Directives 2014/35/EU (Low Voltage), 2014/30/EU (Electromagnetic Compatibility), 2011/65/EU (Limitation of the use of certain hazardous substances in electronic equipment).
SUMMARY
Important safety warnings and tips
I.Description of the device -10-
II. Technical characteristics -11-
III. Before first use -12-
IV. Use
A. Control panel -13-
B. Accessories -14-
C. Instructions -15-
V. Cleaning and maintenance -17-
VI. Trouble shooting and solutions -19-
VII. Disposal -20-
VIII. Guarantee -21-
This user guide is available in the following languages:
- FR (version originale)
- EN (translated from the original)
Any other translation would be a translation of the original version.
This user guide, its possible modifications or any new version, is available on our website.
I. DESCRIPTION OF THE APPLIANCE
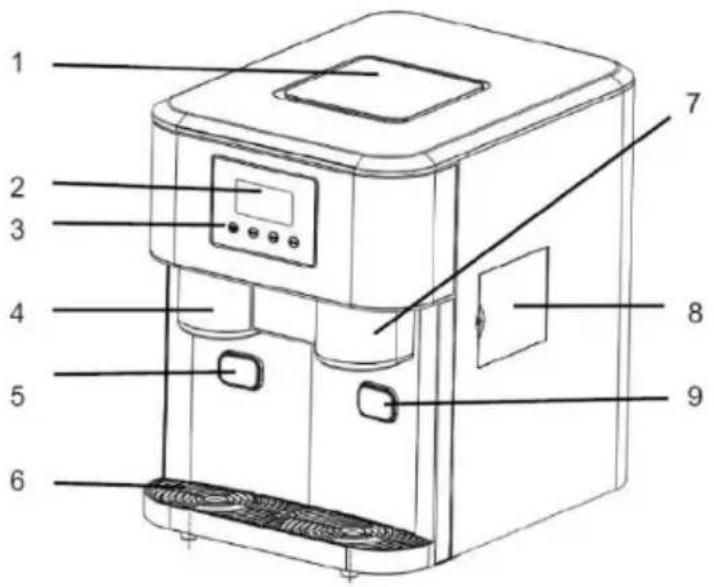
1 Viewing window
2 LCD screen
3 Control panel
4 Crushed ice outlet and water outlet
5 Button for the water outlet
6 Water collection tank
7 Release Ice cubes
8 Water tank door
9 Button for the ice cube exit
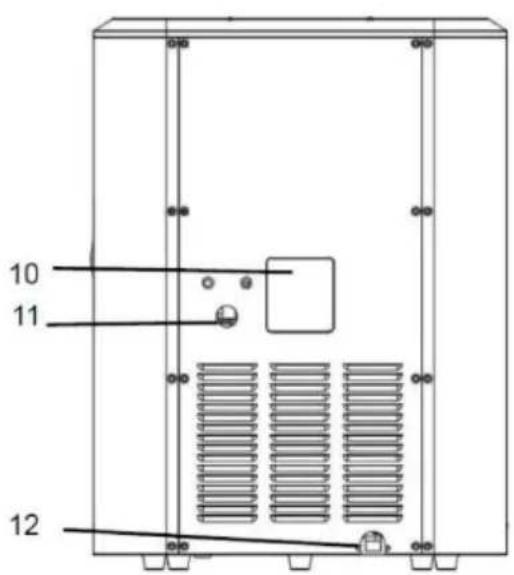
10 Nameplate
11 Connecting the water supply hose
12 Power cable
II. TECHNICAL CHARACTERISTICS
| Brand | CONTINENTAL EDISON |
| Commercial reference | CEMG02N |
| Model ZBS-15 | |
| Nominal voltage 220-240V ~ | |
| Power 120W | |
| Frequency 50Hz | |
| Refrigerant | R600a |
| Water tank capacity 2L | |
| Ice capacity: 15kg / 24h | |
| Ice storage capacity: 600g |
A.Unpacking the device and disposing of the packing materials:

- Remove all packing materials from around the device, as well as any protective material inside the device compartments.
-
The cardboard packaging and the sheets of paper are recyclable. They must be thrown in the collection bins provided for this purpose.
-
Materials bearing the symbol are recyclable:
PE <= polyethylene; > PP <= polypropylene
This means that they can be recycled by depositing them in the appropriate collection containers.
- The other packaging elements (adhesive, fasteners, etc.) must be disposed of with household waste.
To know more : www.quefaredemesdechets.fr
B.Before fir st use
- The device must be used and placed on a flat, stable and dry surface.
- Wash all accessories first and rinse with lukewarm water before drying them with a clean cloth. (See section: Cleaning and Maintenance).
- Remove the power cord from its storage box at the bottom of the device and plug it into the AC outlet.
IV. USE

A. CONTROL SCREEN
| Display | Explanation |
| X | If this symbol appears, please restart the machine. If it reappears, consult the after-sales service. |
| The bin is full | |
| There is no water in the water tank, please add water | |
| Ice cube distribution in progress | |
| Water tank to fill | |
| S | Ice being made. S(top right) = Small ice in manufacturing process L(bottom right) = large size ice in the manufacturing process |
| Crushed ice distribution in progress | |
| Button | Functioning |
| CRUSHED ICE | Press to dispense crushed ice. Press again and the appliance will stop dispensing the crushed ice in 5 seconds. |
| SMALL or LARGE | Press the SMALL button to turn « on / off » the small size ice maker function. Press the LARGE button to turn « on / off » the large ice maker function. |
| ON / OFF | Press this button to turn the device on or off. |
B. ACCESSORIES
| No | Description | Item | Qty | No | Description | Item | Qty | |
| 1 | Measuring cup | 1 2 | Water filling hose | 1 | ||||
| 3 | Adapter 1 4 Ice scoop 1 | |||||||
| 5 | Drain plug | 1 |
C. USE
Step 1: Connect the device to the electrical outlet.
Step 2: Add water as shown in diagram A or diagram B. Do not exceed the MAX line.
| Diagram A - Add water | Diagram B - Connection to the water tap |
| Add water |
When the appliance is making ice cubes and the indicator filling appears but you want to make more ice cubes first, remove the ice first and add some water to prevent the water tank from overflowing when the ice melts.
Step 3: Press ON / OFF to turn the device on or off.
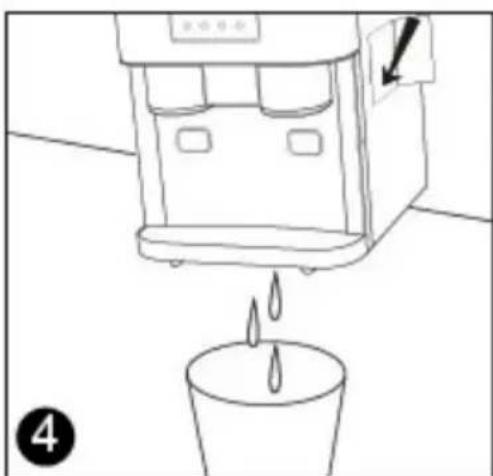
Step 4: The water will be automatically pumped into the water pan from the water tank, this process will take about 30 seconds.
Step 5: Select the « SMALL or LARGE » button to start ice making.
Note: When the room ambient temperature is lower than 15 degree, it is recommended to choose S / SMALL, and when the room ambient temperature is higher than 30 degree, it is recommended to choose L / LARGE.
Step 6: The ice making cycle begins to operate, the ice will be frozen in the outlet of the evaporator.
Note: The ice making time depends on the outside ambient temperature.
Step 7: When the ice-making cycle is complete, the water tray tilts forward, the remaining water returns to the water tank, and the ice cubes fall through the outlet (5).
Step 8: After approximately 15 to 35 seconds, the water pan will tilt backwards, the ice cubes formed during the previous cycle will be pushed directly into the ice container and the appliance will be able to operate from step 4 to 3 again. step 6.
Step 9: Press the ice cube dispenser button (9) to obtain ice cubes; the indicator
will light up.
Place your container directly under the water or ice outlet.
Note: If ice cubes are stored in the appliance for a long time, they may freeze and stick to each other, and in this case, no ice cubes will be ejected even if the dispenser is full. If so, you can use the scoop provided in the device to break the ice first and then press the dispense button (9).
Step 10: Press the crushed ice button to crush the ice and distribute it. Press it again, the appliance will stop crushing ice after 5 seconds.
WARNING: Please do not put your finger into the grinder. Risk of injury!
Step 11: Press the water dispenser button (5) to obtain water.
Step 12: Press the ON / OFF button to turn off the device.
Step 13: Press the button on the left side of the device to get cold water.
Note: If you need cold water, please turn on the ice making function.
Make sure that your container is under the cold water outlet to avoid overflowing.
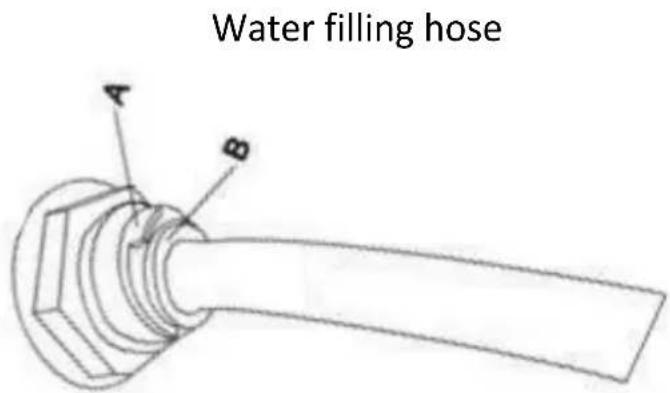
Step 14: If you need to remove the hose, replace it or use the drain plug, please remove the blue ring to position A, then press the white ring (lock) on the outer side to position B. The hose can be removed.
V. CLEANING AND MAINTENANCE
Frequently clean the interior lining, ice cube tray, water container, ice scoop and evaporator.
- When cleaning, unplug the appliance and remove the ice cubes. Use a dilute solution of water and vinegar to clean the interior and exterior surface of the ice maker.
Rinse thoroughly before lighting.
Wipe with a soft, clean cloth.
Warnings! Do not spray chemicals or diluted agents, such as acids, gasoline, or oil, on the ice maker.
The ventilation openings in the device housing or in the built-in structure must not be blocked under any circumstances.
Warnings! Do not use mechanical devices or other means to speed up the defrosting process; other than those recommended by the manufacturer.
- Always use fresh water before starting ice making, during initial setup, or after a long period of shutdown. Please change the water in the water tank at least once a day.
- If you do not use the device for a long time, please drain the water and clean it.
DRAIN
To empty the water remaining in the tank;
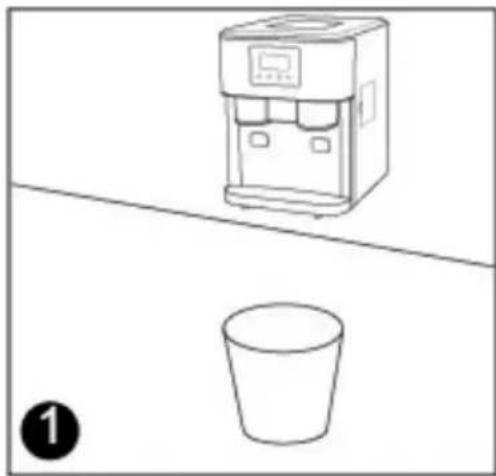
Step 1: Place a container under the device
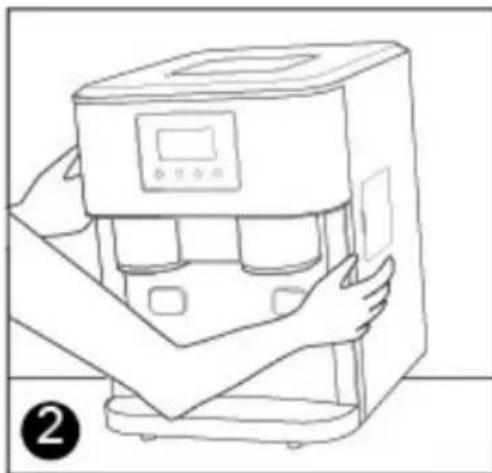
Step 2: Tilt the device forward
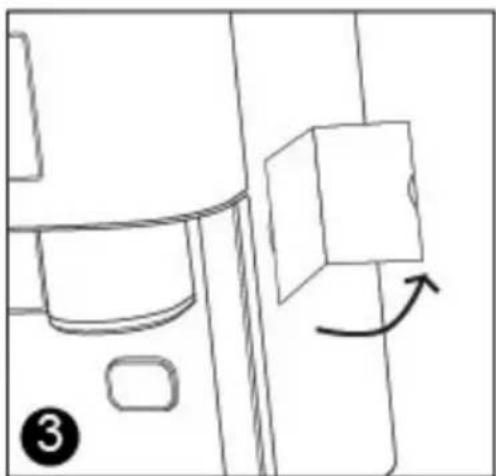
Step 3: Open the cap
Step 4 : Then remove the silicone plug inside the outlet to allow the water to drain.
When finished, put the cap back in place.
VI. TROUBLESHOOTING AND SOLUTIONS
| Breakdowns | Possible causes | Suggested solutions |
| The compressor operates abnormally with a humming noise. | Voltage is lower than recommended value | Turn off the ice maker and do not turn it on again until the voltage is normal. |
| The compressor was damaged during transport | Immediately stop the ice maker and leave it on a flat surface for 24 hours, then restart it. | |
| ADD WATER indicator lights up | The amount of water is not sufficient | Fill with water to the MAX line, then press the start button to restart. |
| The pump is blocked Clean | the water pump after removing it. | |
| The pump is broken Replace the pump | ||
| The indicator lights in the display are not on | Blown fuse / No power supply | Replace the fuse / Switch on the device |
| The ice cubes made are too big and pieces stick together. | The wrong size of the ice cubes selected | Select a small size if the temperature is cool |
| Ice from the previous batch remains in the ice bin | Immediately stop the appliance, restart it until the ice in the ice bin has melted. | |
| The evaporator is too low Slightly raise the evaporator. | ||
| Ice is made, but does not push the ice basket | The ice scoop is broken | Replace the ice scoop. |
| This function turns on | The water tray is blocked by an ice cube. | Clear the ice with the ice scoop, then restart the machine. |
| The engine no longer works | In standby mode, push the water container back until it clicks, then pull it forward until it clicks; do this 5 times. Then restart the device. | |
| The viewing window is open while the light is strong | Please always keep the viewing window closed when making ice. | |
| The appliance works, but the water is hotter than at the start | The magnetic valve is broken. | Switch on the appliance for 1 minute, switch it off and unplug it. Every 3 minutes, repeat the operation, then 5 times later, restart the machine. |
| The magnetic valve is broken. | Call after-sales service. | |
| Ice is produced, but it does not fall from the evaporator. | The magnetic valve is broken. | Call after-sales service. |
| The circuit board is broken | ||
| The ice making process is correct, but no ice is produced. | There is no refrigerant in the compressor. | Call after-sales service. |
For any other problem with your appliance: contact the After-Sales Service.
This logo affixed to the product means that it is a device whose treatment as waste falls within the framework of directive 2012/19 / EU of July 4, 2012, relating to waste electrical and electronic equipment. (WEEE). This means that this product must be taken care of by a selective collection system.in accordance with the European directive cited above in order to be able to either be recycled or dismantled in order to reduce any impact on the environment.
Hazardous substances contained in electrical and electronic equipment can have potentially dangerous effects for the environment and human health.
Thus, at the end of the life of this device, it must not be disposed of with unsorted municipal waste. Return and collection systems are made available to you by local authorities (waste reception centers) and distributors.
This device must not be thrown on the public highway. You have the obligation to use the selective collection systems made available to you.
The warranty does not cover wearing parts of the product, nor problems or damage resulting from:
(1) surface deterioration due to normal wear and tear of the product;
(2) defects or deterioration due to contact of the product with liquids and due to corrosion caused by rust or the presence of insects;
(3) any unauthorized incident, abuse, misuse, modification, disassembly or repair;
(4) any improper maintenance operation, use not in accordance with the instructions concerning the product or connection to an incorrect voltage;
(5) any use of accessories not supplied or approved by the manufacturer.

The warranty will be void in the absence of the nameplate and /
or serial number of the product.
Continental Edison - 120-126, Quai de Bacalan - CS 11584 - 33067 Bordeaux CEDEX
Imported by SCHNEIDER CONSUMER GROUP
12, rue Jules Ferry, 93110 Rosny-sous-Bois, FRANCE

Continental Edison
www.continentaledison.fr