CETI3BFLEX - Cooker CONTINENTAL EDISON - Free user manual and instructions
Find the device manual for free CETI3BFLEX CONTINENTAL EDISON in PDF.
| Product type | Induction cooktop |
| Brand | Continental Edison |
| Model | CETI3BFLEX |
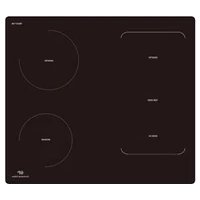
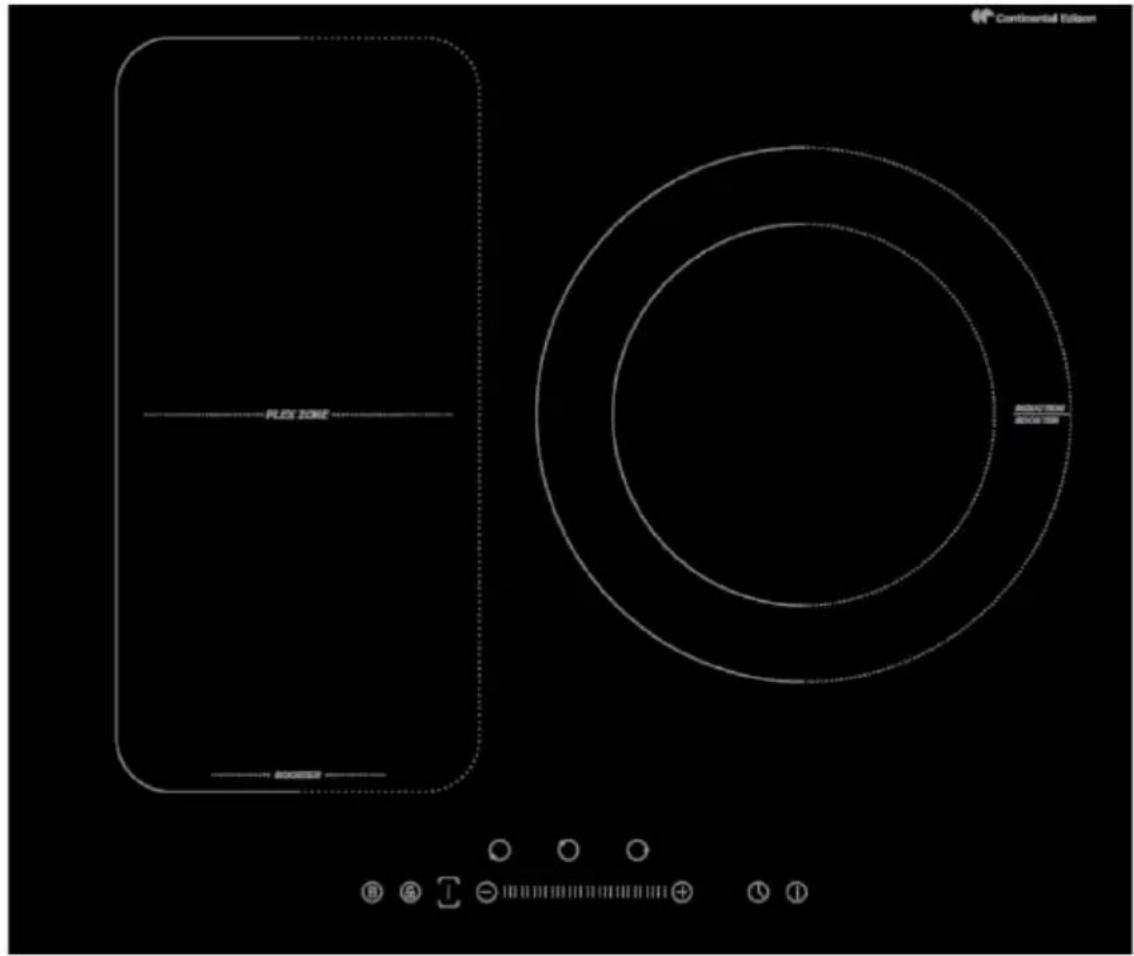
| Number of cooking zones | 3 zones (including 1 flexible zone) |
| Dimensions (W × D × H) | 59 × 52 × 5.5 cm |
| Cut-out dimensions (W × D) | 56 × 49 cm |
| Power supply voltage | 220-240 V~ |
| Total installed power | 5500-6900 W |
| Power per zone | Zone 1 : 2000 W (Boost 2600 W) Zone 2 : 1500 W (Boost 2000 W) Zone 3 : 2300 W (Boost 3000 W) Flexible zone : 2500 W (Boost 2800 W) |
| Boost function | Yes, key activation, duration 5 min |
| Flexible zone | Can be used as a large zone or two independent zones |
| Integrated timer | Yes, from 0 to 99 minutes, with automatic zone shut-off |
| Control lock | Yes, lock key, except ON/OFF |
| Automatic shut-off | Yes, according to cooking level (2 to 8 hours) |
| Pan detection | Yes, with display "U" if incompatible |
| Residual heat indicator | Yes, display "H" |
| Overheating protection | Yes, integrated temperature sensor |
| Surface material | Ceramic glass |
| Cleaning and maintenance | Soapy water, soft cloth, no abrasives |
| Warranty | Legal warranty of conformity (2 years) |
| Repairability | Error codes displayed (F3, F4, E1, etc.), contact customer service |
Frequently Asked Questions - CETI3BFLEX CONTINENTAL EDISON
User questions about CETI3BFLEX CONTINENTAL EDISON
0 question about this device. Answer the ones you know or ask your own.
Ask a new question about this device
Download the instructions for your Cooker in PDF format for free! Find your manual CETI3BFLEX - CONTINENTAL EDISON and take your electronic device back in hand. On this page are published all the documents necessary for the use of your device. CETI3BFLEX by CONTINENTAL EDISON.
USER MANUAL CETI3BFLEX CONTINENTAL EDISON
natural_image
Abstract geometric shapes in gray, no text or symbols presentContinental Edison
CETI3BFLEX
Table de cuisson induction / Induction hob
- FR (version originale)
- EN (translated from the original)
Seal = joint
| L(mm) | W(mm) | H(mm) | D(mm) | A(mm) | B(mm) | X(mm) |
| 590 | 520 | 55 | 51 | 560 | 490 | 50 mini |
natural_image
Diagram of a steam machine with cooling unit and two control panels, no text or symbols presentMarmite en fer
Circuit magnétique
natural_image
Simple line drawing of a cooking pot with a curved handle (no text or symbols)natural_image
Three identical cooking pots with crossed-out X marks on their bases, no text or symbols presentAttention aux surfaces chaudes

natural_image
Simple line drawing of a hand pointing upward with a circular icon on the index finger (no text or symbols)natural_image
Simple line drawing of a hand pointing upward with a circular mark on the index finger (no text or symbols)Grande zone
natural_image
Simple line drawing of a hand pointing at a square with dotted lines indicating alignment or measurement (no text or symbols)Sécurité enfants
natural_image
Simple line drawing of a hand pointing at a circle with a plus sign, no text or symbols presentnatural_image
Simple line drawing of a hand pointing at a circle with a plus sign, no text or symbols present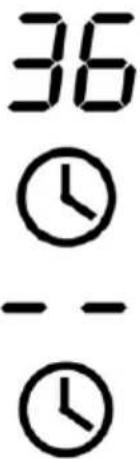
flowchart
graph LR
    A["Hand with head icon"] --> B["Timer: 30"]
    B --> C["Clock icon: 00"]
    C --> D["Clock icon: - -"]
natural_image
Symbol of a trash bin crossed with no text or labels, representing waste sorting or disposal (no text present)IMPORTANT SAFETY WARNINGS AND TIPS
We invite you to read carefully and thoroughly this user guide before installing and using your device.
It is important that this manual be kept with the appliance for further consultation. If this unit was to be transferred to another person, make sure that the manual follows the appliance so that the new user can be informed of this operation.
Safety instructions
- This device is intended for home use.
- WARNING: This device and its accessible parts become hot during use. Care should be taken not to
touch the heating elements. It should hold off children under 8 years old, unless they are under constant surveillance.
- This unit can be used by children from 8 years old and people with physical, sensory or mental capabilities or lack of experience and knowledge provided they have been placed under supervision or have received instructions for using the machine safely and that they understand the dangers involved. Children should not play with the appliance. The cleaning and maintenance by the user should not be made by children without supervision.
- CAUTION: Cook food unattended on the hob using fat or oil can be dangerous and cause a fire.
- WARNING: Please monitor the cooking. In particular the short
cooking times should be monitored continuously.
- Care should be taken not to touch the heating elements.
- NEVER attempt to extinguish a fire with water, but switch off the appliance and then cover flame eg with a lid or a fire blanket.
- WARNING: If the surface is cracked, disconnect the power supply unit to avoid a risk of electric shock.
- Do not use a steam cleaner.
- The device is not intended to be operated by means of an external timer or a separate remote control system.
- It is recommended not to deposit any metal objects such as knives, forks, spoons and lids on the cooking surface, as they can become hot.
- The temperature of accessible surfaces may be high when the
device is in operation.
- A network of power disconnection means having an opening distance of the contacts of all the poles must be provided in the fixed wiring in accordance with the installation requirements.
- If the power cable is damaged it must be replaced by the manufacturer, its after sales service or similarly qualified persons to avoid a hazard.
- CAUTION: Risk of fire: do not store items on the cooking surfaces.
- WARNING: Only use the cooktop protection devices designed by the cooking appliance manufacturer or specified by the device manufacturer in the instructions for use as suitable or cooktop guards integrated into the device. The use of unsuitable protective devices can cause accidents.
- After use, switch off the hob by its control and do not rely on the pan detector.
- WARNING: Ensure the unit is disconnected from the power supply before replacing the lamp to avoid the risk of electric shock.
- Do not use highly abrasive cleaning products or hard metal scrapers to clean the glass door of the hob, they can scratch the surface and cause the glass to shatter.
- For electrical connection, refer to section "Electrical connection" in the manual.
- For maintenance and cleaning of the unit, refer to "Maintenance and cleaning"
Installation
Risk of electric shock
- Disconnect the power plug device
before you perform any work or maintenance.
- The connection to a power grid with standard grounding is mandatory.
- The domestic wiring system changes can only be performed by a qualified electrician.
- Ignoring this advice may cause fatal electric shocks.
Health Hazard
- This device is compliant electromagnetic safety.
- However, those with a pacemaker or other electrical implants (such as insulin pumps) should consult their doctor or the implant manufacturer before using this device to make sure that their implants are not affected by the electromagnetic field.
- Ignoring this advice may result in a fatal accident.
Hazard: Hot Surface
- During use, the accessible parts of this appliance become hot enough to cause burns.
- Do not let your body, clothes, or anything other than the proper cookware in contact with the ceramic glass as the surface is not cooled.
- pans of the handles may be hoto the touch. Make sure that pans handles do not overhang the other homes that are on. Keep handles out of reach of children.
- Ignoring this advice can lead to burns.
Regarding the installation, handling, cleaning and disposal of the device, refer to the following sections of the User Guide.
Information on the meaning of conformity marking
CE
Marking indicates that the product meets the essential requirements of the
European Directives 2014/35 / EU (Low Voltage), 2014/30 / EU (electromagnetic compatibility), 2011/65 / EU (Reducing the Use of Certain Hazardous Substances in Electrical Equipment Electronic).
SUMMARY
Important Safety Warnings and Tips 1
Summary 9
I. Product Description 10
II. Technical characteristics 11
III. Installation 13
IV. Before use 18
V. Instruction to use 18
VI. Cleaning and maintenance 33
VII. Faults and solutions 34
VIII. Warranty 37
IX. Disposal 38
This user guide is available in the following languages:
- FR (original version)
- EN (translated from the original)
Any other translation would be a translation of the original version.
This user guide, any modifications or any new version, is available on our website.
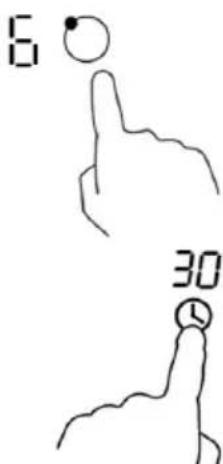
I. PRODUCT DESCRIPTION
Top view
- 2000 W Zone in booster 2600 W
- Area 1500 W, 2000 W in booster
- Zone 2300 W, 3000 W in Boost
- Flex 2500W area, booster 2800W
- ceramic Surface
- Control panel
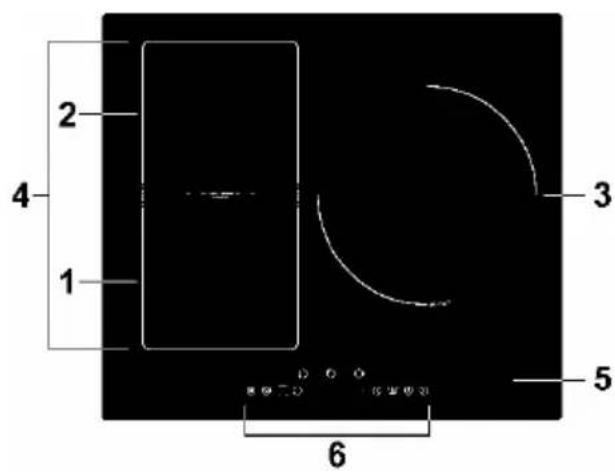
Control panel
- The cooking zone selection button
- Timer
- Key for setting the cooking power and timer
- Lock Key
- ON / OFF
- Boost
- Activation key and disabling the flexible region
- Keep warm
II. TECHNICAL CHARACTERISTICS
| Cooking CETI3BFLEX | |
| Cooking zones 3 areas | |
| Supply voltage | 220-240V ~ |
| Installed power | 5500-6900 W |
| Dimensions L x W x H (cm) 59X 52 X 5.5 | |
| Recessed Dimensions A × B (cm) | 56 X 49 |
Weight and dimensions are approximate. We continually strive to improve our products, we can also modify the specifications, drawings and models without notice.
Information about residential electric hotplates
| Symbol | Value Unit | ||
| Model Identification | CETI3BFLEX | ||
| Type plate | Induction | ||
| Number of areas and / or cooking areas | 3 | ||
| heating technology (areas and cooking areas induction conventional cooking zones, electric stove) | Cooking zones induction | ||
| For circular cooking zones or areas: diameter of the useful surface electric cooking zone, rounded to the nearest 5 mm | ∅ | Zone 1: 18Zone 2: 18Zone 3: 28 | cm |
| For non-circular zones or cooking areas: diameter of the useful surface area or electric cooking area, rounded to the nearest 5 mm | LW | - | cm |
| Energy usage per zone or cooking area, calculated per kg | EC_electric cooking | Zone 1: 193.4Zone 2: 190.5Zone 3: 190.9 | Wh / kg |
| Power consumption of the hob, calculated per kg | EC_electric plate | 190.3 | Wh / kg |
III. INSTALLATION
WARNINGS
- The hob must be installed by a qualified professional. Never perform the operation yourself.
- The hob is not installed directly above a dishwasher, refrigerator, freezer, washing machine or dryer, as moisture can damage the unit's electronics.
- The hob must be installed in order to maximize the thermal radiation and thus the functioning of the unit.
- The wall above the surface of the plate and the embedding materials must withstand the heat.
Before installing the hob, make sure that:
- the work surface is level and that no structural members interfere with the required spaces.
- the worktop is made of a heat resistant material.
- the plate is installed above an oven, the oven has an integrated cooling fan.
- the installation conforms to applicable standards and regulations.
- proper switch providing full disconnection from the power supply is integrated in the permanent wiring, mounted and positioned to comply with local installation rules and regulations.
- The switch must be of an approved type and provide a gap contact separation of 3 mm in all poles (or all live conductors [stage] if local wiring rules allow this change in requirements)
- the customer can easily access the switch once the hob installed
- using materials resistant to heat and easy to clean (eg. Tiles) for the surfaces of the walls surrounding the cooking area.
If in doubt about installing and regulations, check with local authorities.
When you installed the stove, make sure that:
- the power cable is easily accessible.
- there is sufficient air flow around the hob.
- if the plate is installed above a drawer or storage space, a heat protective barrier is installed in the base of the hob.
- The switch is easily accessible by the customer.
A. INSTALLATION OF THE HOB
- Cut the worktop according to the dimensions shown in the diagram below.
A minimum of 5 cm of space must be provided around the cutout. Make sure the thickness of the work plan to be greater than 30 mm. Please use worktop material heat resistant to avoid deformation caused by the heat of the griddle.
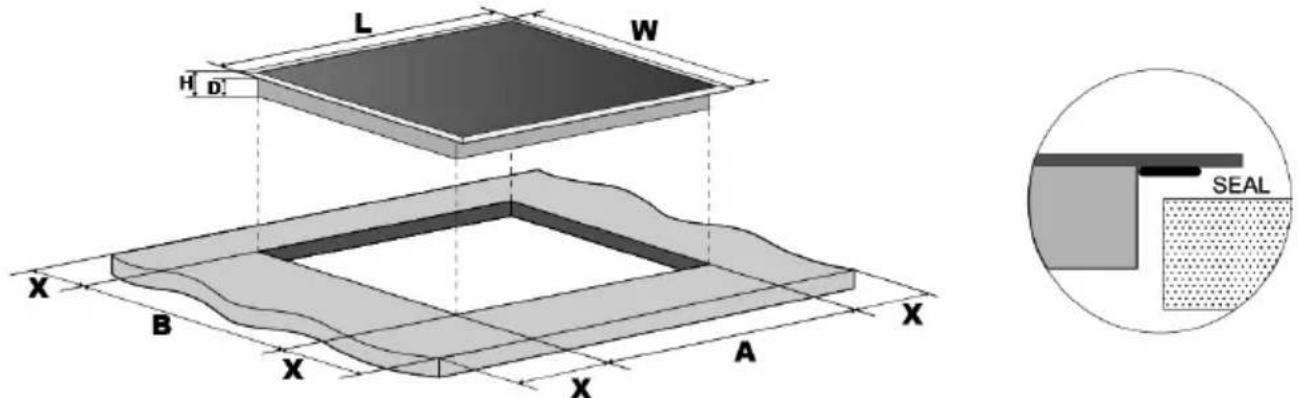
Seal = joint
| L (mm) | W (mm) | H (mm) | D (mm) | A (mm) | B (mm) | X (mm) |
| 590 | 520 | 55 | 51 | 560 | 490 | 50 Min |
- In all cases, ensure that the hob is well ventilated and the air inlet and outlet are not blocked. Make sure the cooktop is in good condition.

Note: the safety distance between the plate and the cabinet above the hob t be at least 760 mm.
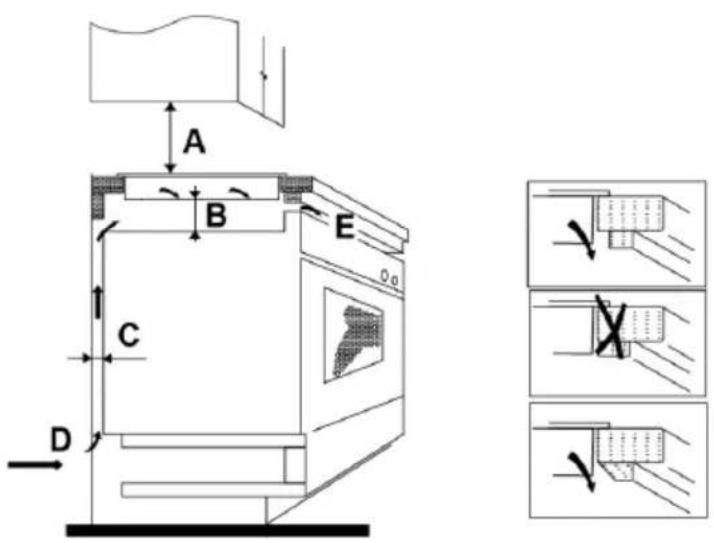
| A (mm) | B (mm) | C (mm) | D | E |
| 760 | 50 Min | 20 Min | Air inlet | Air outletMin. 5 mm |
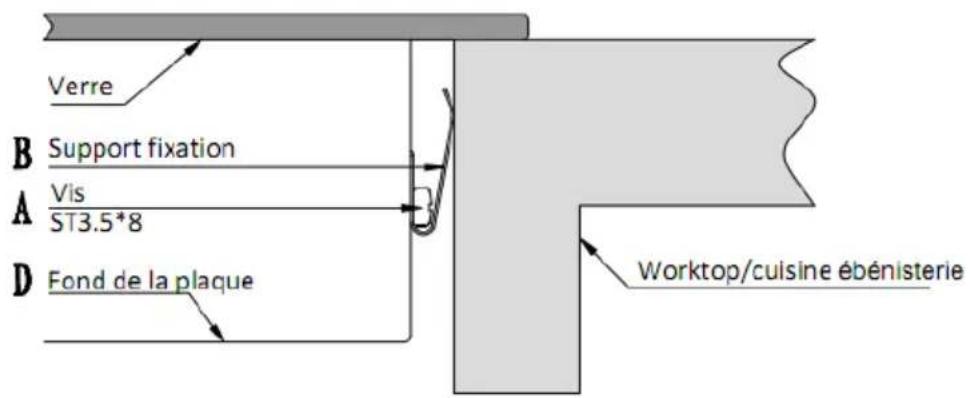
- Secure using mounting brackets, the baking tray on the worktop by tightening the screws on the bottom of the plate (as shown below).
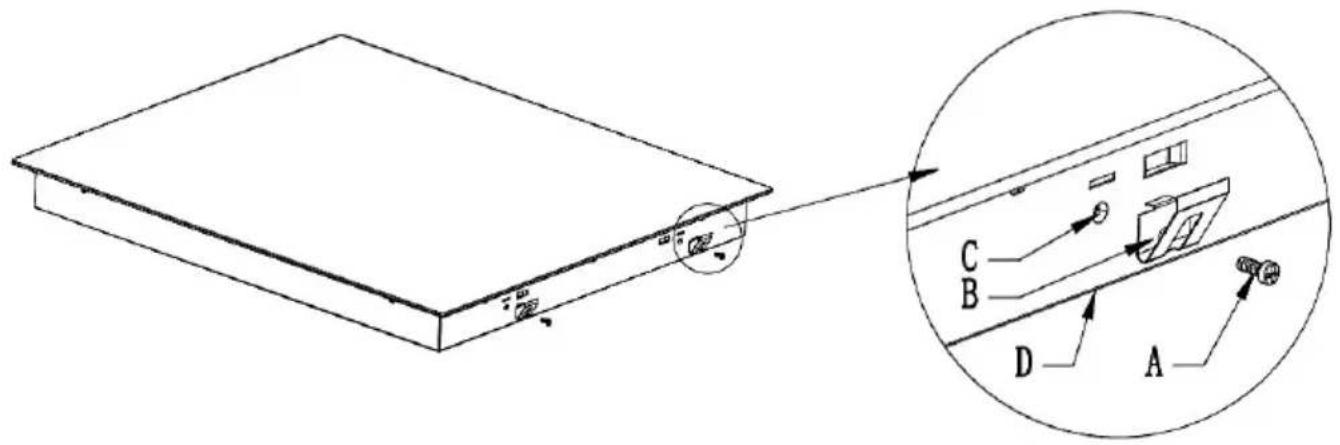
| A | B | C | D |
| Screw | Mounting bracket | Fixing hole | Bottom of the plate |
B. Unpacking and disposal of packaging elements
Remove all the packaging elements around the unit, and the protective elements located within the compartments of the unit.
- The carton and the paper is recycled. They must be thrown into the collection bins provided for this purpose.
■ The materials marked with the symbol are recyclable:
PE <= polyethylene; > PS <= polystyrene; > PE <= polypropylene; ... This means that they can be recycled by depositors in appropriate collection containers.
- other packaging elements (adhesive fasteners ...) must be disposed of with household waste.
To know more : www.quefairedemesdechets.fr
C. CONNECTION

WARNING
The cooktop must be installed by a qualified professional.
The device should not be connected with an extension or a multiple plug (fire hazard).
The power cable must not touch the hot parts.
The cable must not be bent or compressed.
The cable must be checked regularly and must be replaced only by a qualified technician. He must ensure that the electrical connection is correct and conforms to local standards.
If the power cable is damaged it must be replaced by the manufacturer, its after sales service or similarly qualified persons to avoid a hazard.
Before connecting the device to the power socket, check that:
- the internal wiring system is adapted to the power absorbed by the cooking plate.
- the voltage corresponds to the data given on the nameplate
- power cable sections can withstand the specified load on the plate.
Power must be connected in compliance with current standards, or a single-pole circuit breaker. The connection method is illustrated below.
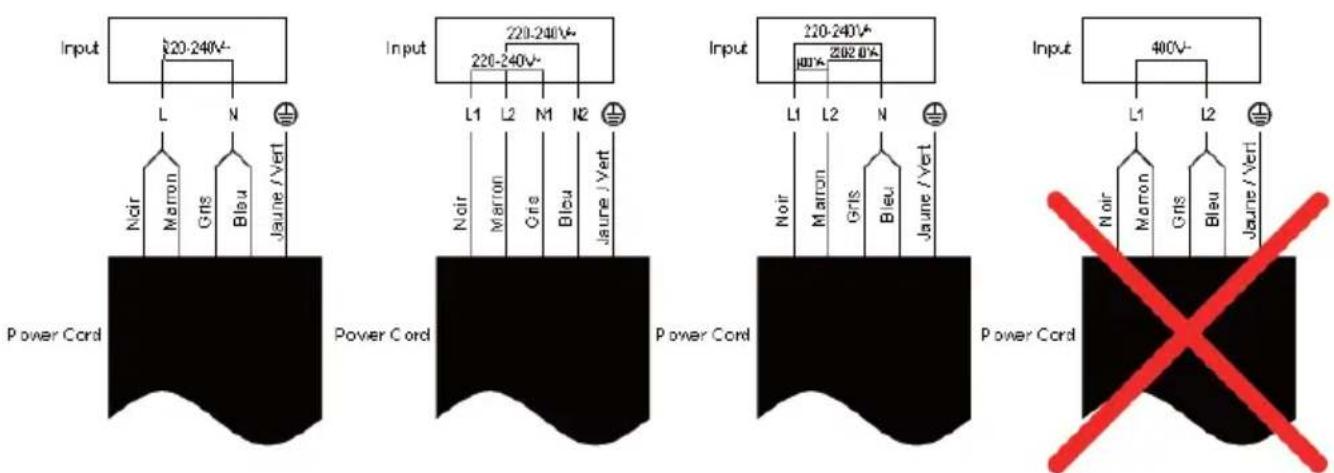
If the device is directly connected to the mains supply, a single-pole circuit breaker has to be installed with a spacing of at least 3 mm between the contacts.
IV. BEFORE USE
Before using your new plate Induction cooking:
- Read this guide, paying special attention to the "Safety Instructions".
- Remove any protective film that may still be on your induction hob.
V. INSTRUCTION TO USE
Induction cooking is a safe cooking technology, advanced, efficient and economical. It works by electromagnetic vibrations generating heat directly on the bottom of the baking dishes, rather than indirectly by the heating of the glass surface.
The glass is hot because it is warmed by the container.
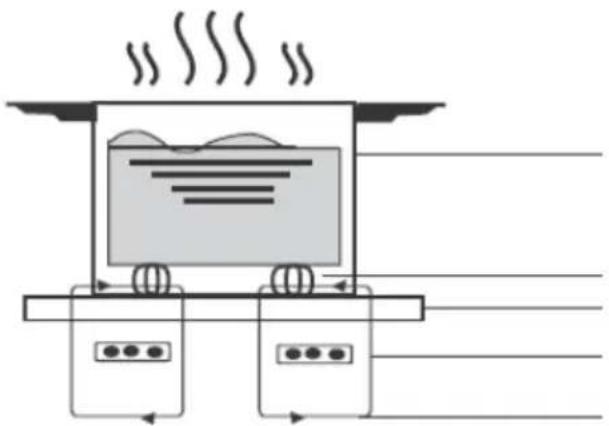
natural_image
Diagram of a steam locomotive with wheels and air flow indicators (no text or symbols)Iron pot
Magnetic circuit
Plate glass and ceramic
Inductor
Induction current
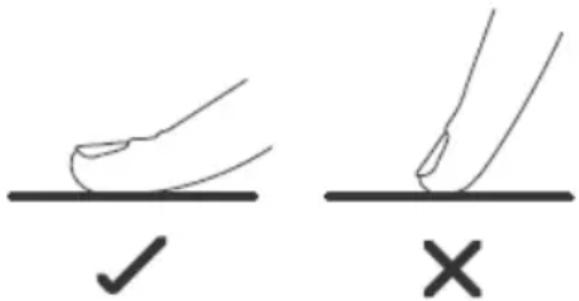
A. Use of softkeys
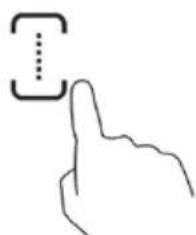
- Orders respond to the touch, so you do not need to press.
■ Use the round end of your finger, not the tip. - You will hear a beep each time an action is recorded.
■ Make sure the keys are always clean and dry, and there is no object (eg. A utensil or cloth) covering. Even a thin film of water can disrupt the use of touch-sensitive keys.
B. Choosing the right cookware
- Only use cookware with a base suitable for induction.
- You will find the symbol of induction on the packaging or on the bottom of the pan.
- You can check if your container is adapted by performing the test of the magnet. Move a magnet towards the bottom of the pan. If it is attracted, the pan is suitable for induction.
If you do not have magnet: Put a little water in the pan.
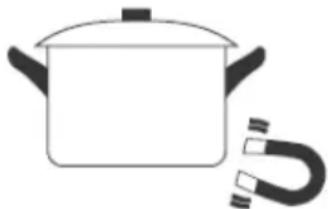
natural_image
Simple line drawing of a cooking pot with a U-shaped magnet attached (no text or symbols)- If not flashing on the control panel and the water heater, the pan is appropriate.
- The cookware made from the following materials are not suitable: pure stainless steel, aluminum or copper without magnetic base, glass, wood, porcelain, ceramics and earthenware.
Do not use cookware with serrated edges and a curved base.
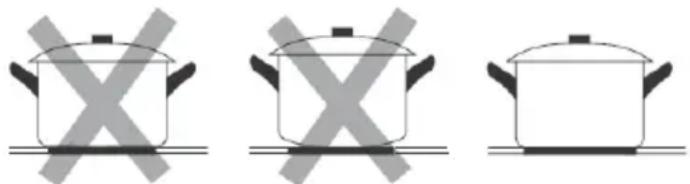
natural_image
Three identical cooking pots with crossed X marks on their bases, no text or symbols presentMake sure the bottom of your pan is smooth, is flat against the glass and is the same size as the cooking zone. Use pans whose diameter is larger than the screen printing of the selected area. Using a size pot slightly larger than the size of the household will be most effective. If you use a smaller pot, efficiency may be reduced. A less than 140 mm pot may not be detected by the hob. Always center your pan on the hob.
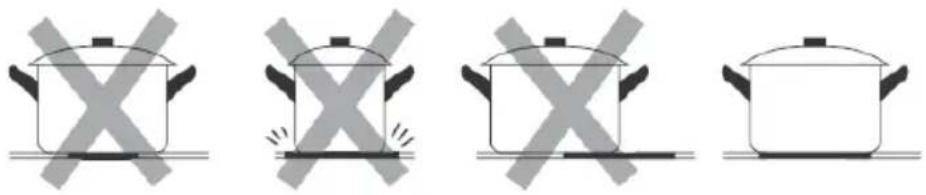
natural_image
Four identical cooking pots with crossed-out X marks, shown in different orientations (no text or symbols)Stand still pots of induction cooker - do not drag or they will scratch glass.
natural_image
Two cooking pots with directional arrows indicating heating or cooling (no text or symbols)C. Using your induction cooktop
To start cooking
- Press the ON / OFF button.
The buzzer beeps and the control panel displays "-" or "-" , indicating that the cooktop is ready for use.
- Place a suitable pan on the cooking zone you want to use.
- Make sure the bottom of the pan and the surface of the cooking area is clean and dry.
- Press the select key of the area cooking chosen and the indicator near the area blink.
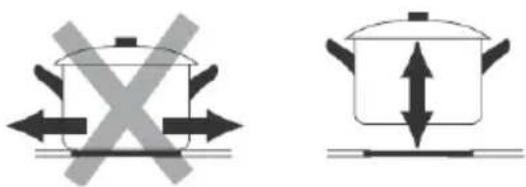
natural_image
Simple line drawing of a hand pointing upward and a cooking pot on a surface (no text or symbols)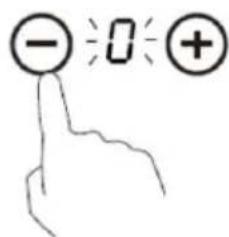
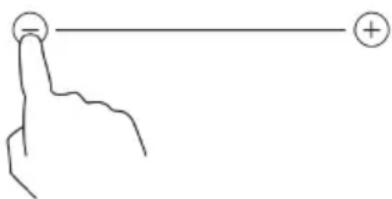
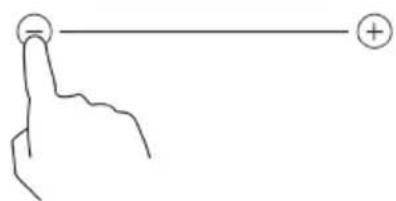
- Adjust cooking power with control buttons "-" or "+", or slide along the track bar "slider" or just touch anywhere on the track bar "slider".
- If you do not adjust the cooking power after one minute, the unit will stop automatically. You will need to repeat the procedure from step 1.
- You can change the cooking power at any time during cooking.
- If you drag along the track bar "slider", the power range from the power 2 to the power 8.
Press "-" power decreases from one step each time until the step 0.
Press "+", the power increases by one step each time until step 9.
If ≥slant U ≤slant flashes in alternation with the cooking setting that means:
- the pot you use is unsuitable for induction cooking or,
• the pan is too small or not properly centered on the cooking zone.
The cooktop will not heat until a suitable pan is detected on the cooking zone.
The screen automatically turns off after 1 minute if no suitable pan is placed on it.
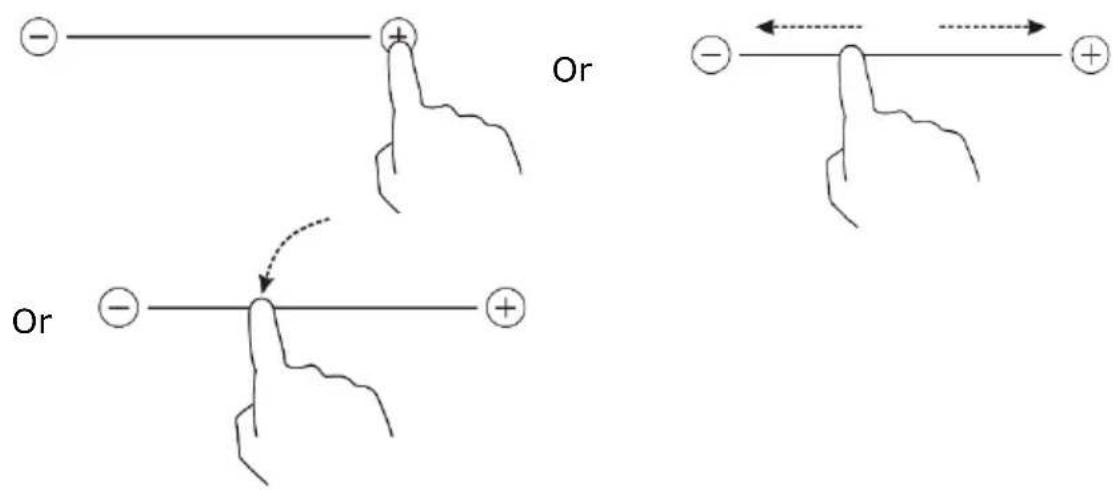
D. Shutdown
- Press the Cooking zone selection button that you want to turn.
- Turn off the hob settings by scrolling down to "0".
Slide your finger along the "slider" to the left, or touch the left point of the track bar "slider", and then touch the "-".
Make sure the display shows "0" and "H".
- T urn off the hob completely by pressing the ON / OFF switch.

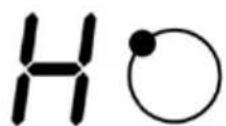
Beware of hot surfaces
Residual heat indicator
"H" indicates which cooking zone is hot to touch.
The indicator will disappear when the surface is cooled to a safe temperature.
If you want to heat other pans, use the zone is still hot for energy savings.

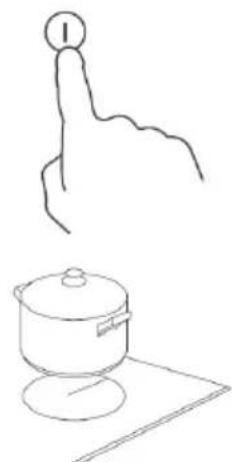
natural_image
Simple line drawing of a hand pointing upward with a circular mark on the index finger (no text or symbols)
Energy saving : To keep a dish warm, you can use the hot surface indicator ("H").
Boost
Boost is a function that can heat the selected area at a higher power for 5 minutes. So you can get a faster cooking. The Boost function is suitable for heating large volumes of water.
Using Boost
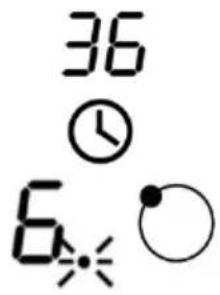
- Press the select key of the cooking zone in the home that you want to use the Boost function. Next to the button blinks.

natural_image
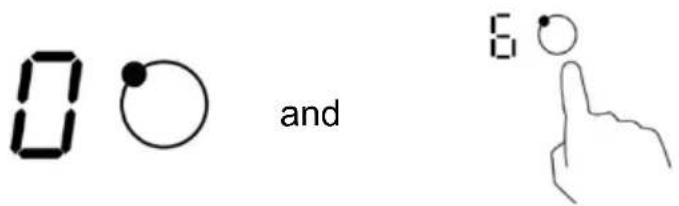
Simple line drawing of a hand pointing upward with a circular head (no text or symbols)- Press the Boost button, the cooking area will begin operating in Boost mode (maximum power). The power display shows "P" to indicate that the zone is in boost mode.

- T he Boost function will be active for 5 minutes. Then the power will return to the one set before the Boost mode.
- If you want to cancel the Boost, First select the cooking zone and then press the Boost button. Power returns to the set initially.
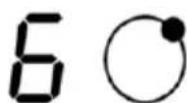
Restrictions when using the Boost (B)
All of the cooktop has a maximum power. When the Boost function is enabled and not to exceed the maximum power, the electronic control automatically reduces the level of cooking another heating zone.
Other cooking zones must not exceed 5 cooking level (see diagrams below).
Reducing the power required is indicated by a flashing symbol "P" and "9" alternately on the screen of the selected area. The cooking power is automatically limited to the power 9, which happens to be the max in normal mode.
The 3 cooking zones are divided into two groups (a) and (b).
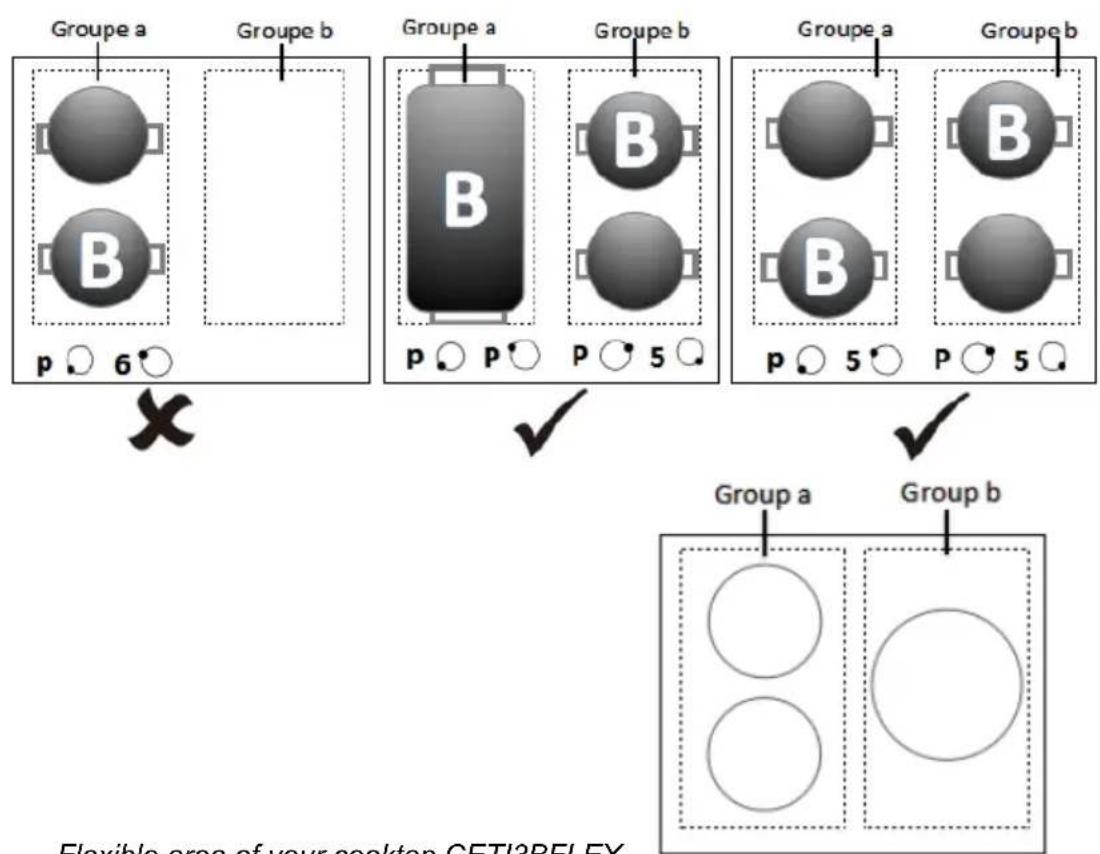
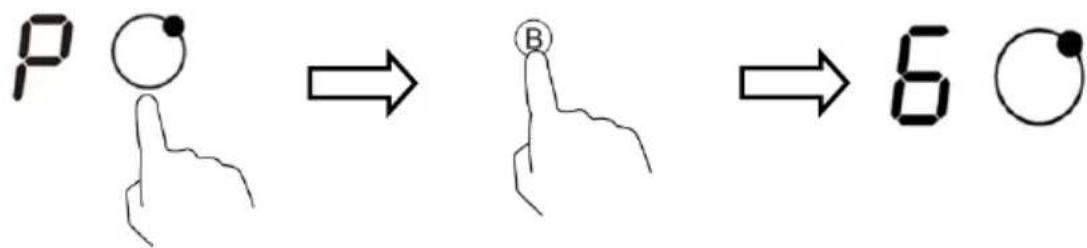
Flexible area of your cooktop CETI3BFLEX
Flexible area
- This area can be used as a large area or as two separate areas, depending on the cooking needs at any time.
- The flexible region consists of two independent inductors which can be controlled separately. When it comes to a single area, a cooking utensil can be moved from one home to another keeping the power level of the previous area. This will stop heating when it no longer detects the utensil.
- Important: Make sure the pan is centered on the independent cooking area. If you use a large pot, oval, rectangular, wide pans, make sure they are focused on the two areas and they cover both cross in the middle of homes.
Examples of good and bad investments :
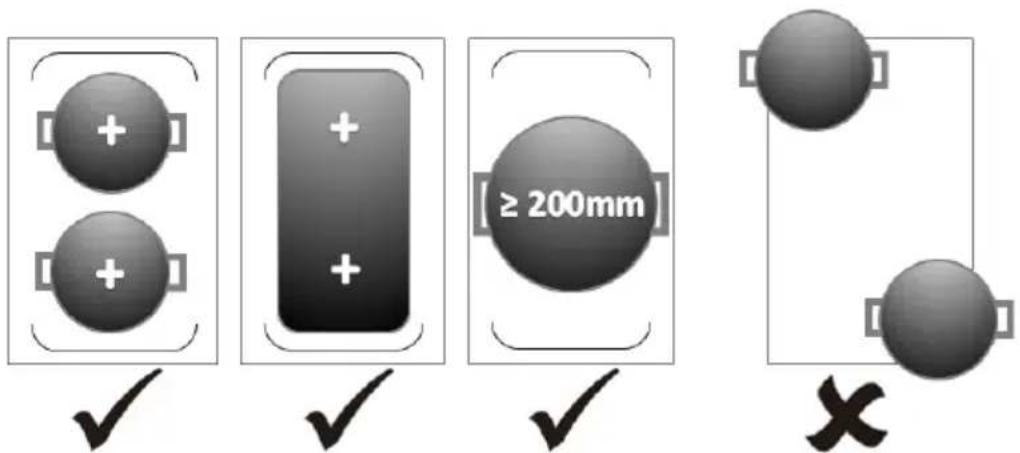
Great area
- To enable flexible area as one large area, just press the button below cons.
- To adjust the power, press the control buttons.
- Press again the following against key to use the flexible area as two independent areas. The cooking zones will operate independently of each other.
natural_image
Simple line drawing of a hand pointing at a square with dotted lines indicating alignment or measurement (no text or symbols)Child safety
You can lock the controls to prevent unintended use of the device.
To lock the controls
Press the lock button. "Lo" appears on the timer indicator.
All controls are locked except the ON / OFF control.
To unlock the controls
- Make sure the hob is on.
- Hold the lock button for a while. "Lo" will disappear from the display.
You can now start using your cooktop.

When the hob is in lock mode, all controls are locked except the ON / OFF control. You can always turn off the hob with the control ON / OFF in an emergency, but you must unlock the hob before the next use.
Protection against overheating
An integrated temperature sensor can monitor the temperature inside the induction plate. When excessive temperature is detected, the hob automatically stops heating.
Detection of small objects
When the size of a pot is inadequate or if the pan is not magnetic (eg aluminum), or other small items (eg knife, fork, keys) were left on the plate, the plate cooking automatically switches to standby mode for 1 minute. The fan will keep cooking slow cooking plate again for 1 minute.
Automatic shutdown
Auto Shutdown is a function of protecting your cooktop. The machine stops automatically if you forget to turn it off. The default operation time for different power levels is limited and indicated in the table below:
| Heat setting 1 2 3 4 5 6 | 7 8 9 | ||||||||
| Default operation time (hour) | 8 8 8 4 4 4 | 2 2 2 | |||||||
When a pot is removed, the cooking area will stop immediately and the hob switches off automatically after 2 minutes.
Using the timer
The timer can be set from 0 to 99 minutes for each zone.
- Setting the timer as a simple reminder
Note: You can use the recall timer even if you do not select a cooking zone.
-
Make sure the hob is on.
-
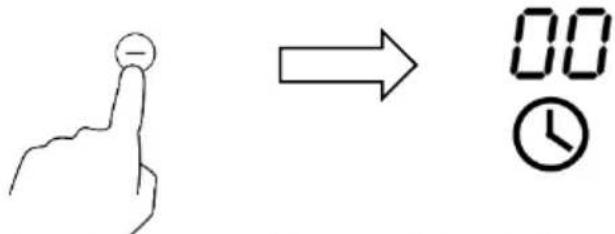
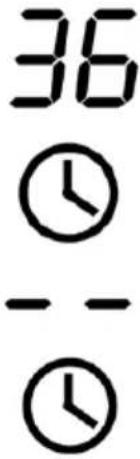
Press the timer, the indicator of the return timer will flash and "30" will be displayed.

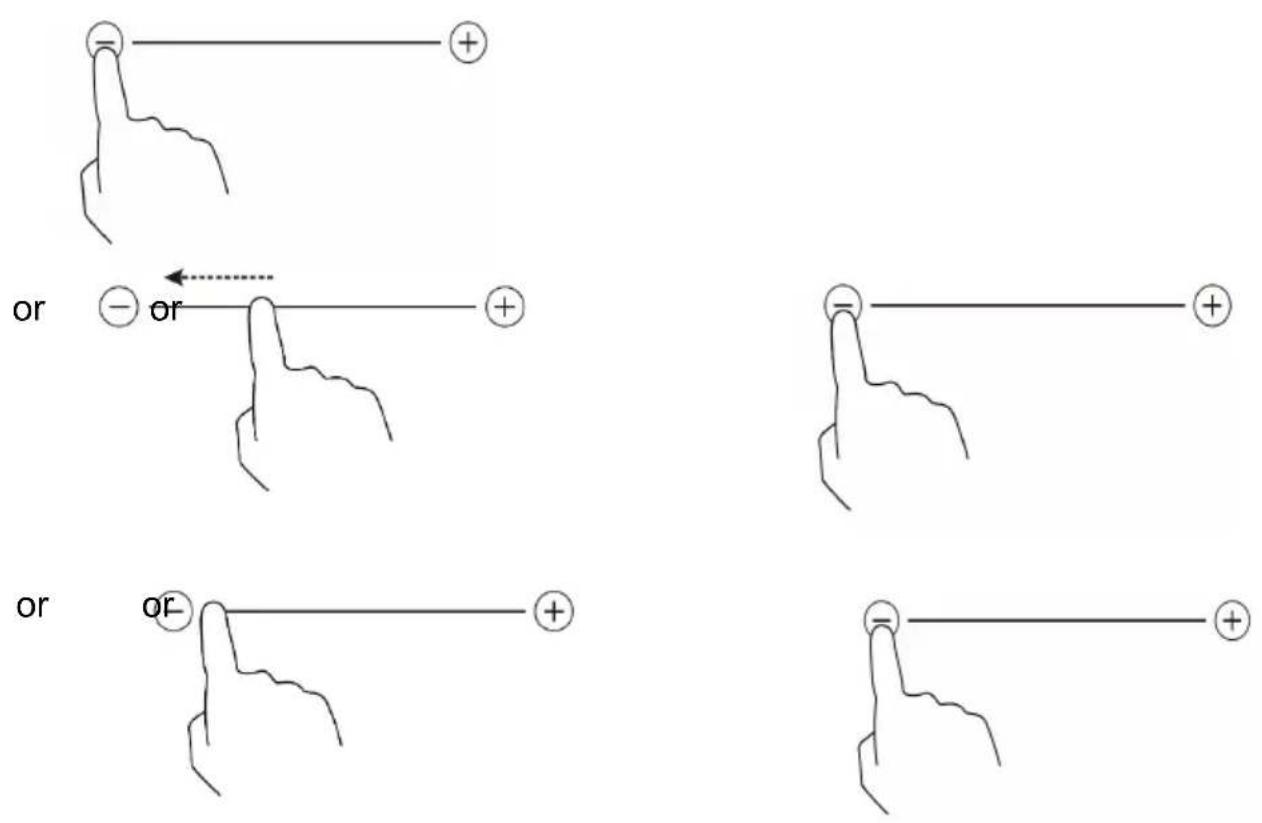
- S et the time by pressing the control buttons "+" or "-" of the timer.
advice : Press once on the "+" or "-" to increase or decrease the setting by one-minute interval.
Stay press the control key "+" or "-" to decrease or increase the setting by 10 minute intervals.
natural_image
Simple line drawing of a hand pointing at a circle with a plus sign, no text or symbols present- Press "-" to cancel the timer and "00" will be displayed.
-
When the timer is set, the countdown will begin immediately. The remaining time is displayed and the timer indicator will blink for 5 seconds.
-
Audible beeps will sound for 30 seconds and the timer indicator will display "-" when the set time has elapsed.
- Setting the timer to turn off one of the foci
Select a home to enable this feature:
-
Select the source for which you want to use the timer.
-
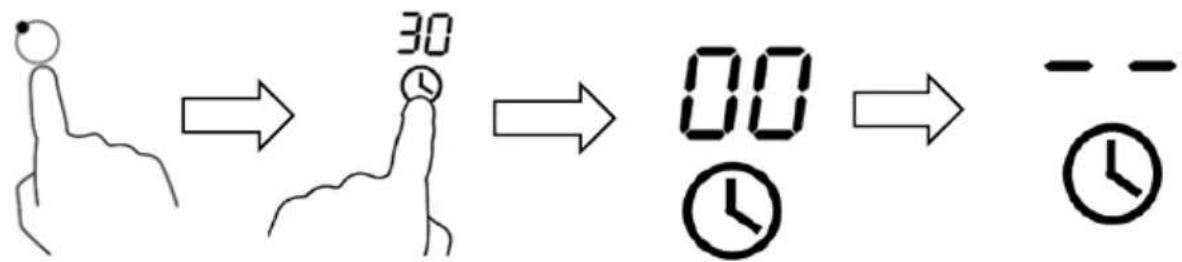
Then press the button on the timer, the timer indicator will start to flash and "30" will be displayed.
-
S et the desired time with the "+" or "-" of the timer.


Advice : Press once the control keys "-" or "+" to increase or decrease the setting by one-minute interval.
Stay press the control key "+" or "-" to decrease or increase the setting by 10 minute intervals.
natural_image
Simple line drawing of a hand pointing at a circle with a plus sign, no text or symbols present- When the timer is set, the countdown will begin immediately. The remaining time is displayed and the timer indicator will blink for 5 seconds.
Note : A red point next to the power indicator light indicating the selected area.
- Press on "-" to cancel the timer and "00" will be displayed.
flowchart
graph LR
    A["Hand icon"] --> B["30 timer"]
    B --> C["00 timer"]
    C --> D["-- timer"]
- When the timer period is finished, the cooking zone switches off automatically and indicates "H".

Other cooking zones continue to function normally if they were lit independently.
- Setting the timer to turn off several homes
- If you use this feature on several of the cooking zone, the timer indicator will show the shortest time.
(For example, if the timer zone 2 is set to 3 minutes, and zone 3 the time is set to 6 minutes, the timer indicator will indicate "3").
Note: A red dot beside the power indicator will light indicating the countdown of the cooking area.
If you want to check the set time of the timer of another cooking zone, press the corresponding area of the control key. The timer will show the set time.

(Setting: 6 minutes)
(Setting: 3 minutes)

- When the timer period has expired, the corresponding cooking zone will turn off automatically and display "H". Note If you want to change the time setting of the timer when he started, you should repeat the procedure from step 1.
Cooking tips

Be careful when frying because oil and grease hot very quickly, especially if you use the Boost function. At extremely high temperatures, oil and grease spontaneously ignite and cause a fire hazard.
- When the food arrives to a boil, reduce the temperature setting.
- The use of a cover reduces the cooking time and saves energy by trapping heat.
- Reduce the amount of liquid or fat to reduce cooking time.
- Start cooking at high temperatures and reduce the setting when the food is heated.
Low heat, cooking rice
- Simmer is below the boiling point, with approximately 85^ C, when the bubbles just occasionally rise to the surface of the cooking liquid. This is the key to delicious soups and tender stews because the flavors develop without over cooking. You should also cook based sauces egg and thicken below the boiling point.
- Some cooking such as cooking rice by the absorption method, may require higher setting to make sure that food is cooked properly in a recommended duration.
Searing steaks
To cook tasty juicy steaks:
- Place the meat at room temperature for about 20 minutes before cooking.
- Heat a frying pan with a thick bottom.
-
Brush both sides of steaks with oil. Sprinkle a little oil in the hot pan and then remove the meat in the hot frying pan.
-
Turn the steak only once during cooking. The exact cooking time depends on the thickness of the steak and cooking you want. The time may vary from about 2 to 8 minutes per side. Press the steak to assess how it is cooked - the more firm seems it will be "well done."
- Let the steak rest on a warm plate for a few minutes so he can relax and become tender before serving.
For skipped
- Choose a flat bottom wok compatible with induction or large skillet.
- Prepare all the ingredients and equipment. Sauté the food quickly. If you need to cook large quantities, cook the food into smaller lots.
- Preheat the pan briefly and add two tablespoons of oil.
- Cook all meats first, reserve and keep warm.
- Sauté the vegetables. When hot, crisp, turn the cooking zone to a lower setting, return the meat to the pan and add your sauce.
- Mix the ingredients carefully to ensure they are heated inside.
- Serve immediately.
Examples of power settings
The parameters below are only indicative. The exact adjustment depends on several factors, including your cookware and the amount you are cooking. Experiment with the hob to find the settings that best suit you.
| Power | Suitable for |
| 1-2 | heating small amounts of delicate foodsMelt the chocolate, butter and foods that burn quicklygentle simmerslow warming |
| 3-4 | reheatingrapid simmercooking rice |
| 5-6 • pancakes | |
| 7-8 | • blow• cooking pasta |
| 9 | • sauteed• grab• wear soup boiling• boiling water |
VI. CLEANING AND MAINTENANCE

Warning: Before cleaning, disconnect the device.
Let the appliance cool because risk of burns.
When the power supply to the hob is turned off, there will be no indication "hot surface", but the cooking zone may still be hot! Warning ! Hot surfaces.
Every day, dirt on the glass (fingerprints, marks, stains left by food or unsweetened overflows, spills fudge, hot sugars ...) and overflows onto the touch controls must be removed. Immediately remove sugar and sugar-containing foods.
- Clean cooking residues with water and washing up liquid or a product recommended for ceramic trade.
- Dry the unit with a clean, soft cloth.
- Wipe the surface of the touch controls with a soft cloth.
Do not use "Steam" devices or "pressure".
Do not use objects that can scratch the glass ceramic (such as abrasive pad or knife point ...).
Do not use abrasive cleaners that could damage the device.
Note: The cooktop may beep, turn off automatically or control buttons may not work in the presence of liquid. Make sure that you have wiped the surface of the touch controls before turning the hob.
VII. FAULTS AND SOLUTIONS
| Failures | Possible causes | What has to be done |
| The induction hob can not be switched on. | No power. Make sure the cooktop is connected to power and is turned on.Check it out if there is a power outage in your home or area. If you've checked everything and the problem persists, call a qualified technician. | |
| Control buttons do not respond. | The controls are locked. | Unlock the controls. See "Using your hob" section for instructions. |
| The touch controls are difficult to use. | There may be a slight film of water on the controls or you may use the tip of your finger when you touch the controls. | Make sure the surface is dry touch controls and use the round fingertip to touch the controls. |
| The glass is scratched. | Cookware with rough edges.Scouring pad adapted, or abrasive cleaning agents used. | Use cookware with flat and smooth bases. See "Choosing the right cookware."See "Maintenance and cleaning". |
| Some pans make noises crackling or rattling. | This can be caused by the construction of your kitchen utensils (layers of different metals vibrating differently). | This is normal for the cooking utensils and does not indicate a fault. |
| The induction cooker is low buzzing noise when used at a high temperature setting. | This is caused by the induction cooking technology. | This is normal, but the noise should subside or disappear completely when you decrease the heat setting. |
| Fan noise from the induction plate. | An integrated cooling fan to your induction hob is turned on to prevent the electronics from overheating. It can continue to run even if you have turned off the induction plate. | This is normal and does not require any action. Do not disconnect the cooktop making wall current while the fan is running. |
| The pans heat and displayed on the screen. | The cooktop can not detect the pan because it is not suitable for induction cooking.The cooktop can not detect the pan because it is too small for the cooking zone or not properly centered on the area. | Use cookware for induction cooking. See "Choosing the right cookware" section.Center the frying pan and make sure that its base is the size of the cooking zone. |
| The hob or a cooking zone has been extinguished itself unexpectedly, a beep sounds and an error code (usually alternating with one or two digits in the timer display Cooking) | Technical fault. | Please note the error code letters and numbers, remove the baking sheet from the wall outlet and contact a qualified technician. |
For any other problems occurring in your device: contact Customer Service.
Display of error codes
If a fault occurs, the induction hob automatically enters into security mode and displays the corresponding error codes:
| Error code | Possible causes | What has to be done |
| F3 / F4 | Temperature sensor failure of the induction coil | Please contact the After-Sales Service. |
| F9 / FA | Temperature sensor failure of an IGBT module. | Please contact the After-Sales Service. |
| E1 / E2 | Abnormal supply voltage | Check if the power supply is normal.Turn after the power supply is normal. |
| E3 | High temperature of the induction coil temperature sensor | Please contact the After-Sales Service. |
| E5 | High temperature of the temperature sensor of an IGBT module | Restart when the cooking plate is cooled. |
When another error appears: Contact After-Sales Service.
VIII. WARRANTY
The warranty does not cover product wear parts, no problems or damage resulting from:
(1) sur face damage due to normal wear and tear;
(2) defects or damage due to contact of the product with food or liquid and due to corrosion caused by rust or the presence of insects;
(3) any incident, abuse, misuse, modification, unauthorized removal or repair;
(4) the improper maintenance operation not in accordance with product instructions or connection to improper voltage;
(5) any use of accessories not supplied or approved by manufacturer.
The warranty is void if the elimination of plate and / or the product serial number.
IX. DISPOSAL
natural_image
Symbol of a trash bin crossed with no text or numbers, representing waste sorting or restriction (no text present)This device bears the selective sorting symbol relating to electrical and electronic equipment (WEEE).
This means that this product should be supported by a selective collection system in accordance with European Directive 2012/19/EU in order to either be dismantled or be recycled, thus reducing the impact on the environment.
For more information, you can contact your local authorities (town hall) or regional.
Electronic products which have not been sorted are potentially dangerous for the environment because of the presence of hazardous substances.
Under no circumstances should you throw this machine on public roads.
When this product reaches its end of life, you must file a separate collection center for it to be destroyed and / or recycled.
Continental Edison - 120/126 Quai Bacalan - CS 11584 - 33000 Bordeaux Imported by: SCHNEIDER CONSUMER GROUP
12, rue Jules Ferry, 93110 Rosny-sous-Bois, FRANCE

natural_image
Abstract geometric shapes resembling partial arcs or crescent, rendered in gray tones without any text or symbols.Continental Edison
www.continentaledison.fr

CETI3BFLEX_12 / 2018_v1