IAN 73837 - Paper cutter UNITED OFFICE - Free user manual and instructions
Find the device manual for free IAN 73837 UNITED OFFICE in PDF.
User questions about IAN 73837 UNITED OFFICE
0 question about this device. Answer the ones you know or ask your own.
Ask a new question about this device
Download the instructions for your Paper cutter in PDF format for free! Find your manual IAN 73837 - UNITED OFFICE and take your electronic device back in hand. On this page are published all the documents necessary for the use of your device. IAN 73837 by UNITED OFFICE.
USER MANUAL IAN 73837 UNITED OFFICE
Operating and safety information
FRCH
Massicor 2 en 1
Before starting to read the manual, fold out the page containing the illustrations and familiarise yourself with all the functions provided.
GBOperating and safety information Page 25
DEATCH
Lieferumfang:
1x2-in-1 Paper Trimmer,1x operating manual
Chere cliente, cher client,
We are please that you have chosen this high-quality device. The operating manual is a component part of the device. It contains important information regarding safety, use and disposal. Familiarise yourself with all the operating and safety information before starting to use the device. Only use the device in the way described and for its intended purpose. Hand over all the documents when passing the device on to third parties.
Contents
Selecting the Type of Cut 29.
Replacing the Blade 29
Changing a Cutting Head 29
Cleaning the Device 30
Troubleshooting 30
Disposal
Warranty 30.
Terms of Warranty 30
Period of Warranty and Legal Claims for Defects 30
Scope of Warranty 30
Processing Claims Under the Terms of Warranty 31
Consumables 31
Service 31
Manufacturer 31

Important Safety Information
Please observe the following safety information to ensure the paper trimmer is used reliably and safely:
- Read this manual thoroughly and observe the instructions and information in it when operating the device.
- Keep this operating manual in a safe place for future reference.
- Before starting to use the device, set it down on a level, stable working base.
- Never take hold of the blade when carrying the device or putting it away.
- Use both hands to operate the device.
- Keep loose clothing, ties, jewellery, long hair and other loose objects away from the cutting unit.
- The device has been exclusively designed to cut paper.
- Before cutting, remove any staples or paper clips from the document.
- The blades must be neither greased nor ground.
- The device must not be used if a blade or the housing of a blade is damaged.
- The device must not be used if the blade protection is not installed properly.
- Take care not to injure yourself when replacing a blade. Avoid contact with the blades at all times.
- Keep the device out of the reach of children.
- Children and minors may only use the device under the supervision of an adult.
- The device is not intended to cut fingernails or toenails.
.
| Attention: improper use of the device can result in severe injury! | |
| The device must not be operated by children! Keep children away from the device. |
Note: Failure to observe the safety labels can result in severe personal injury!
Exemption From Liability
We cannot guarantee that the information which relates to the technical properties of the product or to the product itself contained in this document is correct. The product and, where applicable, its accessories, described in this document are subject to constant improvement and further development. For this reason, we reserve the right to modify components, accessories, technical specifications and related documentation of the product described herein at any time without notice.
Intended Use
This paper trimmer may only be used to cut paper, card, photo paper and laminating foil.
Remove all paper clips and staples from paper before using the device to cut the paper!
Using the device for any purpose other than the intended use described is considered unintended use.
It is forbidden to complete any modifications to the device. Contravention results in the annulment of all rights to legal, guarantee and warranty claims.
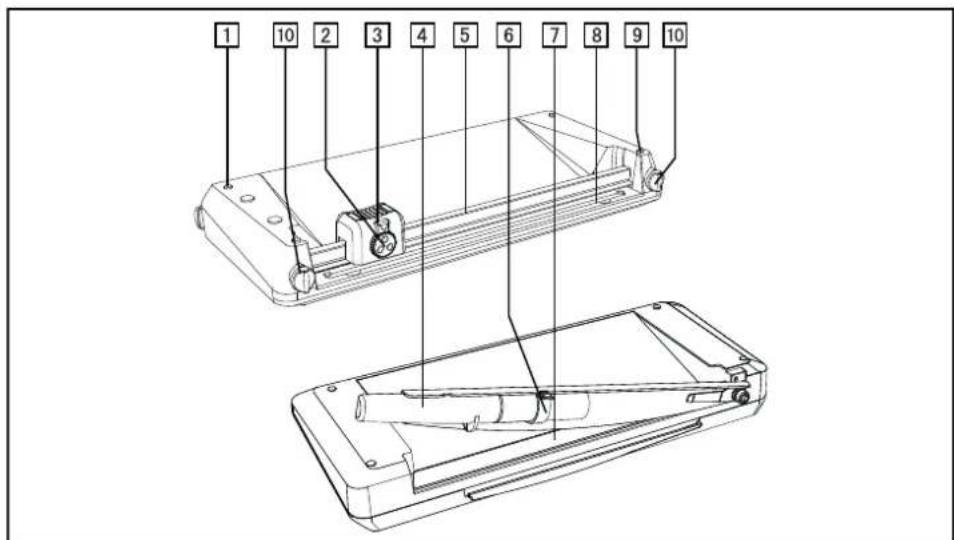
Overview
- Rubber footpads
- Selector knob
- Setting lock
- Guillotine arm
- Guide rail
- Lock
- Pressing rail with finger protection
8.Blade
9.End cap - Rotating knobs
Features
For cutting photos, card, printouts or laminated paper perfectly to size.
Guillotine including pressing rail with finger protection.
- Trimmer with 3 types of cut (straight cut, perforation and wave cut)
- Visual positioning aids in cm (lines, angles, scale)
Rubber footpads for secure, non-slip base
- Dimensions: 453 × 215 × 64 mm( L × W × H)
-Weight: 1.36kg
- Cutting length,guillotine: 320 mm
- Cutting length, reel trimmer: 320 mm
Guillotine
Guillotine with integrated pressing rail and finger protection, blade made of stainless steel and a cutting capacity of max. 10 sheets (80g / m^2) .
- Remove the device carefully from the packaging.
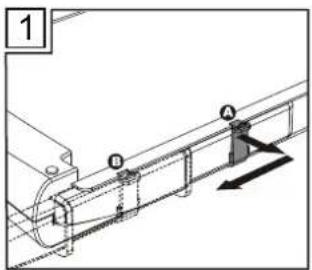
- Place the cutting unit on a stable, level working base with the guillotine side facing up.
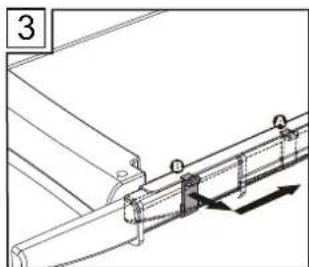
- The guillotine arm is locked on the underside of the cutting unit. To unlock the guillotine arm, pull the locking latch out to the right to Position A and
then slide the locking latch towards the front to Position B (Fig. 1).
- Move the guillotine arm upwards.
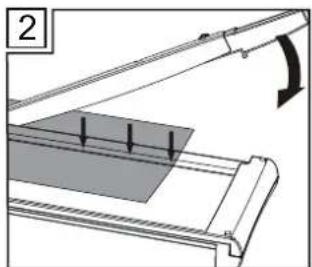
- Place the material to be cut in the required position under the pressing rail and press the pressing rail down (Fig. 2).
- Then use your other hand to move the guillotine arm down and cut the document (Fig. 2).
- In order to lock the guillotine arm again after finishing your work, move the guillotine arm down as far as possible, pull the locking latch at Position B out to the right and then slide the locking latch to the rear to Position A (Fig. 3).
Trimmer
Trimmer with integrated cut selector knob and setting lock.
Cutting function:
- Straight cut Cutting capacity: max. 10 sheets (80g / m^2)
Perforation Cutting capacity: max. 3 sheets (80g / m^2) - Wave cut Cutting capacity: max. 3 sheets (80g / m^2)
The blades are accommodated in a protected housing.
- Place the cutting unit on a stable, level working base with the trimmer side facing up.
- Slide the cutting head to one side of the guide rail
- Turn the left and right-hand rotating knobs to OPEN. Place the material to be cut under the guide rail. Then the rotating knobs to LOCK. The material is fixed and you can cut it.
Note: Hold the material to be cut securely, otherwise it could shift and be cut inaccurately. The raster and measuring system on the trimmer's working surface serve as positioning aids.
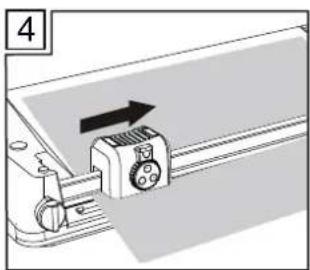
4. To complete the cut, press the cutting head down and slide it along the guide rail to the other side (Fig. 4).
Note: To prevent a faulty cutting edge, do not run the cutting head back again but remove the cut material directly after completing the cut.
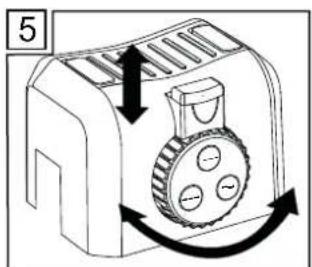
Selecting the Type of Cut
The trimmer has three different types of cut available for selection: straight cut, perforation cut and wave cut.
- Slide the lock on the cutting head upwards (Fig. 5).
- Turn the selector knob until the symbol representing the required type of cut is under the lock (Fig. 5).
- Press the lock on the cutting head downwards (Fig. 5).
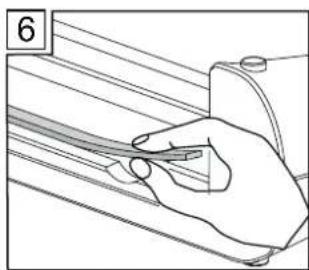
Replacing the Blade
The blade has four cutting edges (two on each side). When the quality of the cut is no longer clean, turn the blade so that one of the unused cutting edges will be used.
- Slide the cutting head to one end of the guide rail.
- Remove the blade out of the slot from the other side of the guide rail. Recesses are provided for this at both sides of the guide rail (Fig. 6).
- Turn the blade so that one of the cutting edges not yet used is moved to the cutting position. Lay the blade back in the slot. When all four cutting edges of the blade are worn, replace the blade.
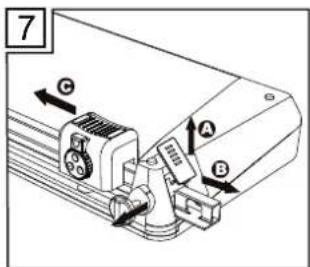
Changing a Cutting Head
When the blade of the cutting head is damaged or worn, the cutting head must be replaced.
- Remove the end cap of the guide rail from the base plate (Fig. 7, A) by simultaneously pressing it in a little at the bottom end and sliding it up.
-
Turn the rotating knobs so that the LOCK inscription is at the top. Pull the rotating knobs about 1 - 2 mm out of the device. Turn the rotating knobs about 30 degrees and pull them out completely. Pull the guide rail out of the base plate (Fig. 7, B).
-
Remove the cutting head from the guide rail (Fig. 7, C).
- Replace the old cutting head with a new one
- Slide the guide rail back in the base plate and install the new cutting head in the process.
- Slide the rotating knobs in the device, turning them a little while doing so (LOCK label at the top, the tips pointing inwards).
- Insert the end cap from above on the opening at the end of the guide rail.
Note: Only the entire cutting head can be replaced. To obtain a new cutting head, please telephone our hotline.
Cleaning the Device
Safety note: Avoid cleaning the blade of the guillotine/trimmer. Risk of injury!
Clean the outside of the device with a slightly damp cloth.
Note: Do not use any aggressive cleaning agents. Never use any chemicals (e.g. cleaning solvent, alcohol) to clean the housing
Troubleshooting
If problems occur when using the trimmer, check you are using it properly as described in the corresponding sections.
If this procedure does not solve the current problem, please telephone our hotline:
IAN73837
Hotline international 00800 100 22 100
Disposal
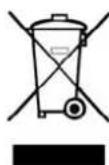
This symbol (crossed out waste bin) indicates that the product must be returned to an authorised recycling centre or collection point when it has reached the end of its service life. The symbol only applies to states within the EEA (^*)
*EEA = European Economic Area, which is comprised of the member states of the EU plus Norway, Island and Liechtenstein.
Warranty
Dear Customer,
This device has a 3 year period of warranty beginning on the purchase date. In the case of defects concerning this product, you have rights to assert legal claims against the product seller. These rights to legal claims are not affected by the warranty explained below.
Terms of Warranty
The period of warranty begins on the date of purchase. Please keep the original purchase receipt in a safe place. It is required as evidence of purchase.
If a material or manufacturing fault occurs to the product within three years of purchasing the product, the product will be repaired or replaced, according to our choice, free of charge. This warranty assumes that the defect device and the purchase receipt (sales receipt) are submitted within the three-year period together with a short description of the defect and when it occurred.
When the defect is covered by our terms of warranty, you will receive the repaired product or a new one. Receipt of a new or repaired product does not represent the start of a new period of warranty.
Period of Warranty and Legal Claims for Defects
The period of warranty is not extended by the guarantee. This applies to replaced and repaired parts. Any damage or defects present at the time of purchase must be reported immediately the device is unpacked. When the period of warranty has expired, any repairs are subject to a charge.
Scope of Warranty
The device was produced according to strict quality guidelines and carefully controlled prior to supply.
The warranty applies for all material or manufacturing defects. The warranty does not apply to product parts subject to normal wear and tear and can be considered wearing parts or to damaged to fragile parts, e.g. switches, batteries or glass parts.
There is no entitlement to the terms of warranty when the product damaged was not used or serviced prop
erly. Proper use of the product includes strictly observing all the instructions and information provided in the operating manual. It is essential to avoid using or handling the product in any way which deviates from that described in the operating manual or of which you have been warned.
The product is only intended for private use and not for commercial use. The terms of warranty are annulled in the case of misuse, unintended use, the use of force and tampering not performed by our authorised service centres.
Processing Claims Under the Terms of Warranty
In order to be able to process your claims quickly, please follow the information below:
- Please keep the purchase receipt and the Art. No. (e.g.IAN 12345) as evidence of the purchase.
- The Art. No. is engraved on the rating plate, on the cover page of the operating manual (bottom left) or on the label on the rear or underside of the device.
- If functional faults or other damage becomes apparent, please contact the Service department specified below by telephone or E-mail.
- When the product has been registered as defective, you can send it together with the purchase receipt, description of the problem and when it occurred, free of charge to the service centre we specify.
- This and many other manuals, product videos and software are available as downloads from our web site at www.lidl-service.com.
Consumables
If the cutting head or blade becomes worn, please contact the hotline. You will then receive a new cutting head with a detailed, illustrated manual.
Service
IAN73837
Hotline international 00800 100 22 100
service.uk@jet-servicenet.com
GSL Gesellschaft fur Service ^+ Logistik in Mitteldeutschland mbH
Am Weimarer Berg 6
D-99510 Apolda / Thuringen
GERMANY