CEME20BI - Coffee machine CONTINENTAL EDISON - Free user manual and instructions
Find the device manual for free CEME20BI CONTINENTAL EDISON in PDF.

| Brand | Continental Edison |
| Model | CEME20BI (CM8501B-GS) |
| Product type | Pump espresso machine |
| Power supply | 220-240 V~, 50-60 Hz |
| Power | 850 W |
| Pump pressure | 20 bars |
| Water tank capacity | 1.5 L |
| Main functions | Espresso 1 or 2 cups, cappuccino, steam, automatic shut-off after 25 min |
| Filter holder | Stainless steel for 1 or 2 cups, compatible with ground coffee, pods and capsules |
| Steam wand | Side, adjustable, for frothing milk or heating beverages |
| Water tank | Removable, lid, max level visible |
| Drip tray | Removable with grid |
| Maintenance and cleaning | Descaling recommended every 2-3 months; hand wash accessories |
| Safety | Automatic shut-off, overheating protection, do not immerse |
| Spare parts and repairability | Contact approved after-sales service; warranty does not cover normal wear |
| General information | Domestic use, indoors; grounding required; compatible with citric acid for descaling |
Frequently Asked Questions - CEME20BI CONTINENTAL EDISON
User questions about CEME20BI CONTINENTAL EDISON
0 question about this device. Answer the ones you know or ask your own.
Ask a new question about this device
Download the instructions for your Coffee machine in PDF format for free! Find your manual CEME20BI - CONTINENTAL EDISON and take your electronic device back in hand. On this page are published all the documents necessary for the use of your device. CEME20BI by CONTINENTAL EDISON.
USER MANUAL CEME20BI CONTINENTAL EDISON
natural_image
Abstract geometric shapes resembling partial crescent and angular segments (no text or symbols)Continental Edison
natural_image
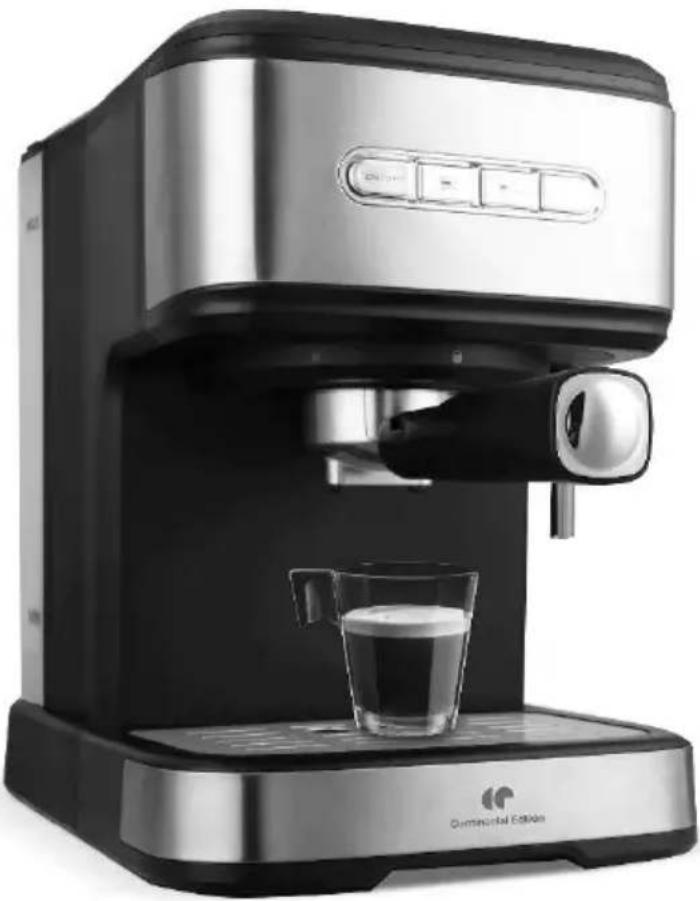
Exterior view of a modern espresso machine with a glass cup and control panel (no visible text or symbols)CEME20BI
MACHINE EXPRESSO/ ESPRESSO MACHINE
- FR (version originale)
- EN (translated from the original)
text_image
Technical diagram of a microwave oven with labeled parts including tray, fan, and speakertext_image
Diagram of a control panel with power, coffee cup, and smoke icons labeled in EnglishTOUCHE
Marche/Arrêt
TOUCHE 1 TASSE
DE CAFÉ
TOUCHE 2 TASSES
DE CAFÉ
TOUCHE VAPEUR
natural_image
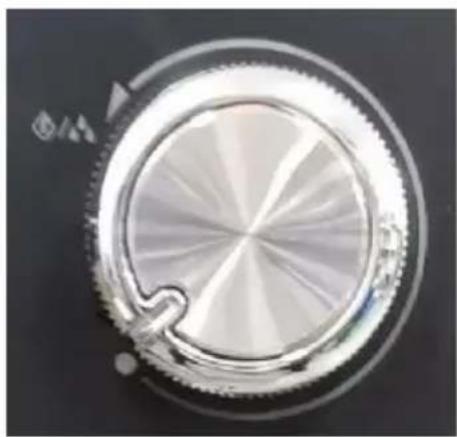
Close-up of a metallic circular object with radial grooves and a small protrusion, against a dark background (no text or symbols visible)BOUTON DE VAPEUR RÉGLABLE
A. PRÉCHAUFFAGE
natural_image
Close-up of a metallic hook or clip against a dark background (no text or symbols visible)natural_image
Symbol of a trash bin crossed with a diagonal line, no text or numbers presentIMPORTANT SAFETY WARNINGS AND TIPS
We invite you to read this user guide carefully and completely before installing and using your device.
It is important that this user guide be kept with the device for any further consultation. If this device were to be transferred to another person, make sure that the user guide follows the device so that the new user can be informed of its operation.
Check that the mains voltage corresponds to that indicated on the espresso machine before using the appliance.
- To avoid the risk of fire, electric shock, and personal injury, do not immerse the device in water or any other liquid. Unplug the appliance from the mains after each use. Be sure to let it cool before putting on or taking apart parts
and before cleaning.
-
Do not use the accessories not recommended by the manufacturer to avoid the risk of fire, electric shock and injury.
-
If the power cable is damaged, it must be replaced by the manufacturer, its after-sales service or similarly qualified persons in order to avoid any danger.
-
This device is intended for use in domestic and similar applications such as:
- kitchen areas reserved for staff in shops, offices and other professional environments;
- on farms;
- the use by customers of hotels, motels and other residential environments;
- bed and breakfast type environments.
- CAUTION: Avoid overflowing the
connector.
-
CAUTION: There is a risk of injury from improper use.
-
The surface of the heating element has residual heat after use.
-
Do not let the power cord hang over the table or counter, or let it come in contact with hot surfaces.
-
Do not place the appliance near a hot gas or electric burner, or in a hot oven.
-
To disconnect the appliance from the mains, press the On / Off button and then remove the electric plug from the wall socket, holding the plug. Never pull on the power cord to disconnect the plug.
-
Be careful not to burn yourself.
-
Some parts of the appliance become hot during operation.
-
This appliance is intended for domestic and indoor use only. The product must be installed in accordance with the national
installation rules.
-
The installation socket must always have an earth connection. If the power supply is not connected to earth, you do not need to connect the device.
-
This device may be used by persons with reduced physical, sensory or mental capacities or whose experience or knowledge is not sufficient, provided they are supervised or have received instructions on how to use this device. use the appliance safely and understand the potential dangers.
-
Children should not use the device as a toy.
-
This appliance may be used by children 8 years of age or older, provided that they are supervised or have been instructed in the safe use of the appliance and that they are understand the dangers involved. Cleaning and user maintenance shall not be made by children, unless they
are over 8 years of age and under adult supervision. Keep the device and its cable out of the reach of children under 8 years old.
-
Do not operate the appliance without water.
-
If you do not use the product for an extended period of time, you must turn it on and then release the steam for 3 minutes before leaving this product.
-
If you turn off the power supply while steam is releasing, the product will continue to release steam for a period of time due to residual heat. The product will stop releasing steam immediately after you deactivate the steam controller.
-
CAUTION: To avoid a danger due to overriding the thermal cutout, this appliance must not be powered by an external interrupting system, such as a timer, or connected to a circuit that is regularly turned on and then turned
off by its switch. utility.
- CAUTION: Do not open the fill port during use.

Designed for use in contact with food
Information on the meaning of the conformity mark

Marking

indicates that the product meets the main requirements of European Directives
2014/35 / EU (Low Voltage), 2014/30 / EU (Electromagnetic Compatibility), 2011/65 / EU (Limitation of the use of certain hazardous substances in electronic equipment).
SUMMARY
Important safety warnings and tips -2-
I. Description of the device -10-
II.Technical characteristics -11-
III. Before first use -12-
IV. Use -14-
A. Preheating
B. Prepare an espresso
C. Prepare a cappuccino
D. Using the steam nozzle
E. Auto power off function
V. Cleaning and maintenance -18-
VI. Trouble shooting and solutions -20-
VII. Disposal -21-
VIII. Guarantee -22-
This user guide is available in the following languages:
-FR (version originale)
- EN (translated from the original)
Any other translation would be a translation of the original version.
This user guide, its possible modifications or any new version, is available on our website.
I. DESCRIPTION OF THE APPLIANCE
text_image
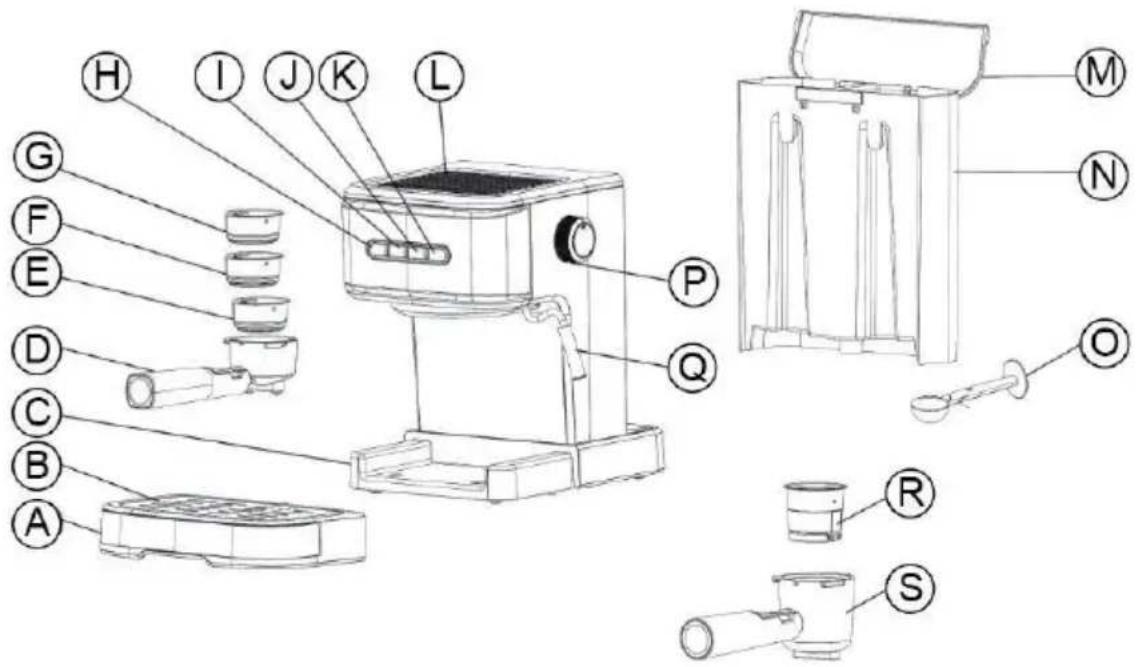
Technical diagram of a coffee maker with labeled parts and exploded viewA. Removable drip tray
B. Removable grid
C. Based
D. Percolator with stainless steel filter holder for 1 or 2 cups
E. Stainless steel filter for 2 cups of ground coffee
F. Stainless steel filter (∅ 4.5cm) for compact pod
G. Stainless steel filter for 1 cup of ground coffee
H. On / Off button
I. 1 cup of coffee button
J. 2 cups of coffee button
K. Steam button
L. Top cover
M. Water tank cover
N. Water reservoir
O. Measuring spoon with buffer
P. Adjustable steam button
Q. Side steam nozzle
R. Capsule filter
S. Percolator with filter holder for capsules
II. TECHNICAL CHARACTERISTICS
| Brand | CONTINENTAL EDISON |
| Commercial reference | CEME20BI |
| Model | CM8501B-GS |
| Nominal voltage | 220-240V ~ |
| Frequency | 50-60Hz |
| Power | 850W |
| Pump pressure | 20 bars |
| Water tank capacity | 1.5L |
A. Unpacking the device and disposing of the packing materials:

natural_image
Symbolic icon of a person walking with arrows, enclosed in a circle (no text or symbols)- Remove all packing materials from around the device, as well as any protective material inside the device compartments.
- The cardboard packaging and the sheets of paper are recyclable. They must be thrown in the collection bins provided for this purpose.
- Materials bearing the symbol 📁 are recyclable:
PE <= polyethylene ; > PP <= polypropylene
This means that they can be recycled by depositing them in the appropriate collection containers.
- The other packaging elements (adhesive, fasteners, etc.) must be disposed of with household waste.
To know more : www.quefairedemesdechets.fr
B. Before first use
- The device must be used and placed on a flat, stable and dry surface.
- Wash all accessories first and rinse with lukewarm water before drying them with a clean cloth. (See section: Cleaning the device).
- Remove the power cord from its storage box at the bottom of the device and plug it into the AC outlet.
TO GUARANTEE AN EXCELLENT TASTE FROM THE FIRST CUP OF COFFEE, YOU MUST RINSE THE APPLIANCE WITH HOT WATER AS BELOW:
- Pour water into the water tank, the water level must not exceed the "MAX" mark in the tank. Then replace the water tank cover.
Note : the device has a detachable tank for easy cleaning. You can first fill the tank with water and then put the tank in the device.
- Put the coffee filter (E) in the metal filter holder (D) without coffee.
- Place a cup under the filter holder. Make sure the steam button is in the "off" position.
- Connect the device to a power source. Press the «On / Off button once. », The red indicator lights up. The lights «touch 1 cup of coffee », « Touches 2 cups «f coffee »Flash, the machine starts preheating, once all the lights are on continuously, preheating is complete.
Note : if preheating has not yet been completed, press the «button 1 cup of coffee 📄 » Or «button 2 cups of coffee 📄», Its indicator light flashes rapidly. If the pump is not running, press this button again, its indicator will return to the preheating state.
- Press the «button 2 cups of coffee 📄», the appliance will pump water for about 25 seconds, pour the water into the cup and then clean them thoroughly. The appliance is now ready to make coffee.
Note : Noise may be emitted when water is pumped for the first time. This phenomenon is normal, the appliance releases the air present inside. After about 20 seconds, the noise disappears.
IV. USE
Control panel:
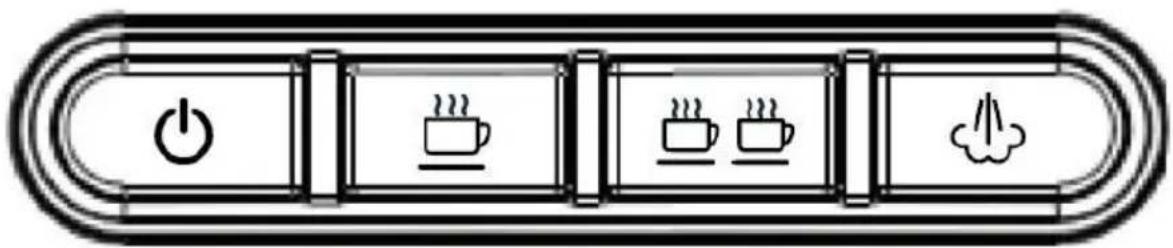
text_image
Diagram of a control panel with power, coffee cup, and cloud icons indicating energy and usage functionsON / OFF
BUTTON
1 CUP OF COFFEE BUTTON
2 CUPS OF COFFEE BUTTON
STEAM BUTTON
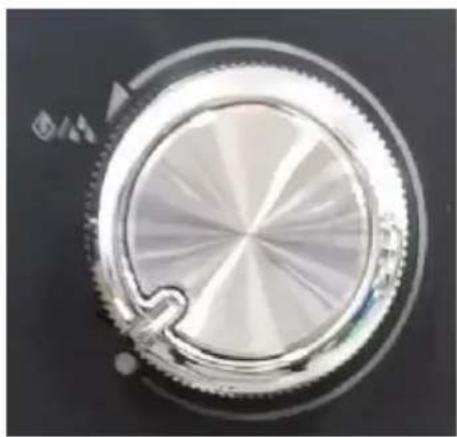
natural_image
Close-up of a metallic circular object with radial grooves, possibly a lens or dial (no text or symbols visible)ADJUSTABLE STEAM KNOB
A. PREHEATING
- Remove the detachable water tank and open the cover to fill it with the desired amount of water, the water level should not exceed the "MAX" mark.
- Then place the water tank correctly in the device.
The reservoir can also be filled without removing it. Pour the water directly into the tank.
- Plug in the device then press the On / Off button ⏻. The indicator light flashes and indicates that the appliance is heating up. As soon as the indicator light stops flashing, the device is ready.
B. PREPARE AN ESPRESSO
- Remove the percolator (D) by turning it clockwise.
-
Put a coffee filter in the metal filter holder, make sure it is aligned with the groove of the filter holder so that it can be inserted.
-
- If you are using ground coffee, add it to the ground coffee filter (E) using the measuring spoon, then press firmly on the coffee with the buffer.
-
If you are using a suitable compact pod, replace the stainless-steel filter for ground coffee with the stainless-steel filter for compact pod (F).
-
If you are using a capsule, use the percolator (R) with the capsule filter (Q).
-
Insert the percolator into the appliance and secure it firmly by turning it counterclockwise until it is in the "Lock" position.
-
Place 1 or 2 cups under the percolator then select a single or double espresso. To choose the desired amount of coffee, press the 1 cup button once 📋 or 2 cups 🏠When the desired quantity of coffee is reached, press the same button again to stop it.
Note : Memorization of the flow time for 1 cup and 2 cups
When the device is turned on, you can change the flow time as following :
- After preheating, hold the 1 cup button 📋 or 2 cups about 3 sec. until the pump starts.

- When the desired amount of espresso is reached, press again. the 1 cup or 2 cup button to stop the espresso flow. If you turn off the device and restart it, the change will be saved.
- When the preparation is finished, you can remove the percolator by turning it clockwise, then pour the coffee grounds with the steel sieve into your sink or a waste container and then rinse them under cold water.
C. PREPARE A CAPPUCCINO
To make a cappuccino, proceed as followings :
-
Prepare the espresso first and brew a cup large enough to froth the milk, making sure the adjustable steam button is in the off position. •".
-
Press the steam button, the Coffee indicator light comes on ( & ), wait for the steam indicator to light up
Note : During operation, the indicator of the steam button turns on and off alternately, indicating that the desired temperature has been maintained.
- Fill a jug with about 100 ml of milk for each cappuccino to be prepared. It is advisable to use all the milk at refrigerator temperature (and not hot milk!).
Note : Regarding the size of the jug, it is advisable to choose a diameter greater than or equal to 70 ± 5 mm. Please also note that the milk may double in volume: make sure the height of the jug is sufficient.
- Slowly turn the steam knob in the sense Counter-clockwise, steam comes out of the nozzle.
WARNING ! Never turn the steam control knob quickly, in order to avoid possible obstructions. Regularly clean the steam nozzle duct.
-
Insert the steam nozzle (P) about two centimeters into the milk, froth the milk by alternately moving the container up and down.
-
Once the desired result has been obtained, you can turn the steam button to the off position "●".
WARNING ! Clean the steam nozzle with a damp sponge immediately after use. Risk of burns !
-
Pour the frothed milk into the prepared espresso, the cappuccino is ready. Sweeten to your taste and if desired, sprinkle the foam with a little cocoa powder.
-
Press the On / Off switch to turn off the device. All indicators go out.
C. USE OF THE STEAM NOZZLE
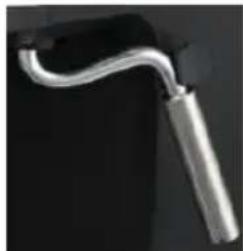
natural_image
Close-up of a metallic hook or clip against a dark background (no text or symbols visible)The steam nozzle (P) can be used to heat hot drinks such as chocolate, water or tea. You can use a mug, teapot, or any deep container such as a ceramic or stainless-steel pitcher.
Method:
- Open the lid of the water tank, remove the tank and fill it with the desired amount of water. The water level must not exceed the "MAX" mark in the tank. Then replace the tank correctly in the device.
- Replace the tank cover, then plug in the unit.
- Press the On / Off switch, its indicator light comes on.
- Remove the steam nozzle.
- Immerse the steam nozzle in the liquid to be heated. Slowly turn the steam flow knob counterclockwise to start steaming.
- Once the required temperature has been reached, you can turn the steam knob to the "off" position.●".
- Press the On / Off switch ⏻ to turn off the device.
D. AUTOMATIC POWER OFF FUNCTION
If no operation is performed for 25 minutes, the power will automatically turn off.
V. CLEANING AND MAINTENANCE
CLEANING
(1) Unplug the appliance and let it cool completely before cleaning it.
(2) Clean the body of the appliance often with a sponge and regularly clean the water tank, the drip tray and the removable support, then dry them.
WARNING ! Do not clean with alcohol or a solvent-based cleaner. Never immerse the body of the device in water to clean it.
(3) Detach the percolator with the metal filter holder (D) or (F) by turning it clockwise and discard the coffee grounds inside. You can then clean it with a cleaning product, but you should at least rinse it with clean water.
(4) Clean all accessories in water and dry them thoroughly. For the steam nozzle, use a damp sponge.
WARNING ! Do not put the accessories in the dishwasher.
DESCALING
Once the machine has been running for 500 cycles (including coffee, steam and other functions), all the lights flash quickly 5 times at the same time, reminding you of the descaling to be performed. After preheating is complete, if you do not descale, it will happen every hour you use the machine.
With the appliance on standby, simultaneously press the 1-cup coffee button and the 2-cup coffee button for 3 seconds. Both lights flash quickly 3 times, reminding you to cancel descaling. The number of duty cycles returns to zero.
- To ensure the efficient operation of your device, you should remove mineral deposits every 2 to 3 months.
- Fill the tank with a little water and a descaling product up to the MAX level (the proportion of water and descaling agent is 4: 1). For more details, see the descaling product instructions.
-
Please use a "household descaler", you can use citric acid (available in pharmacies or drugstores) instead of descaler (at the rate of 100 parts water for 3 parts citric acid).
-
Put a percolator with filter holder (without ground coffee in it) and a large enough container in place. See the "PREHEATING" paragraph.
-
Press the On / Off button once ⏻, its red light comes on. Press the coffee
button ( or ), making sure of the position of the Coffee / Steam selector. When the water is running out, press the coffee button ( or ) and wait a few moments, the appliance begins to heat up.
- When the coffee button indicator light (or) is on, heating is finished. Press the coffee button (or) and make two cups of
coffee (about 6 cl). Then press the coffee button (or to stop and wait 5 seconds.
-
Press the steam button 📄, the coffee button indicator light ( 🔊 or 🔒) goes out. Wait until the steam button light comes on. Steam for 2 minutes by turning the adjustable steam knob, then turn the steam knob to the “off” position. ●To stop steaming. Press the On / Off button ⏻ to stop the appliance immediately, allow the descaling agent to remove deposits from the appliance for at least 15 minutes.
-
Restart the device and repeat the steps in paragraph 4-6 at least 3 times.
-
Then press the steam button, the coffee button indicator light (or) lights up, then press the coffee button (or) to run the water until there is no descaler left.
-
Then prepare coffee (without ground coffee) by putting tap water in the tank up to the MAX level, repeat steps 5 to 7 3 times (it is not necessary to wait 15 minutes at step 7), then run the water until there is none left in the tank.
-
Repeat step 9 at least 3 times to make sure the inside of the device is clean.
VI. TROUBLESHOOTING AND SOLUTIONS
| Breakdowns | Cause | Solutions |
| The metal parts of the tank are rusted. | The descaler is not the recommended type. It can corrode the metal parts in the tank. | Use the descaler recommended by the manufacturer. |
| Water is leaking from the bottom of the appliance. | A large amount of water is present in the drip tray. | Please clean the tray. |
| The device presents dysfunctional | Please contact the authorized service center to request repair. | |
| Water is leaking from the outside of the filter. | Ground coffee is present on the edge of the filter. | Remove it. |
| Espresso coffee has an acidic taste (vinegar). | Cleaning was not performed properly after removing mineral deposits. | Clean the espresso machine several times as described in the “CLEANING” section. |
| The ground coffee has been stored in a hot and humid place for a long time. Ground coffee has lost its flavor. | Please use fresh ground coffee or store unused ground coffee in a cool, dry place. After opening a packet of ground coffee, seal it tightly and keep it clean and dry to maintain freshness. | |
| The device no longer works. | The electrical outlet is not properly connected. | Correctly plug the power cord into a wall outlet. If the device still does not work, please contact the authorized service center to request repair. |
| The steam does not generate foam. | The Steam ready light is not on. | Steam can be used to generate foam only if the Steam ready indicator is on. |
| The container is too large or the shape is not suitable. | Use a tall, narrow cup. | |
| You used skimmed milk | Use whole milk or semi-skimmed milk |
For any other problem with your appliance : contact the After-Sales Service.
natural_image
Symbol of a trash bin crossed with no text or numbers, representing waste sorting or disposal (no text present)This logo affixed to the product means that it is a device whose treatment as waste falls within the framework of directive 2012/19/EU of July 4, 2012, relating to waste electrical and electronic equipment. (WEEE). This means that this product must be taken care of by a selective collection system in accordance with the European directive cited above in order to be able to either be recycled or dismantled in order to reduce any impact on the environment.
Hazardous substances contained in electrical and electronic equipment can have potentially dangerous effects for the environment and human health.
Thus, at the end of the life of this device, it must not be disposed of with unsorted municipal waste. Return and collection systems are made available to you by local authorities (waste reception centers) and distributors.
This device must not be thrown on the public highway. You have the obligation to use the selective collection systems made available to you.
The warranty does not cover wearing parts of the product, nor problems or damage resulting from:
(1) surface deterioration due to normal wear and tear of the product;
(2) defects or deterioration due to contact of the product with liquids and due to corrosion caused by rust or the presence of insects;
(3) any unauthorized incident, abuse, misuse, modification, disassembly or repair;
(4) any improper maintenance operation, use not in accordance with the instructions concerning the product or connection to an incorrect voltage;
(5) any use of accessories not supplied or approved by the manufacturer.

The warranty will be void in the absence of the nameplate and / or serial number of the product.
Continental Edison - 120-126, Quai de Bacalan - CS 11584 - 33067 Bordeaux CEDEX
Imported by SCHNEIDER CONSUMER GROUP 12, rue Jules Ferry, 93110 Rosny-sous-Bois, FRANCE

natural_image
Abstract geometric shapes in gray, no text or symbols presentContinental Edison
www.continentaledison.fr