Eolos G5V003 - Fan G3 Ferrari - Free user manual and instructions
Find the device manual for free Eolos G5V003 G3 Ferrari in PDF.
| Brand | G3 Ferrari |
| Model | Eolos G5V003 |
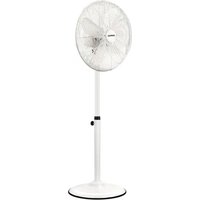
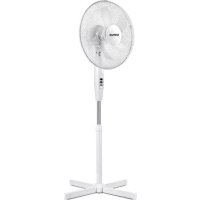
| Product type | Pedestal fan |
| Blade diameter | 40 cm |
| Number of speeds | 3 (low, medium, high) |
| Oscillation | Horizontal, can be activated/deactivated |
| Power supply | AC 230 V - 50 Hz |
| Maximum power | 55 W |
| Protection grille | Front and rear grille with ring fixation |
| Adjustable height | Yes, via telescopic tube with regulator |
| Base | Cross base with interlocking tubes |
| Cleaning | Unplug, wipe with non-abrasive damp cloth |
| Safety | Do not use with wet hands, do not immerse, do not leave unattended |
| Intended use | Domestic and similar (offices, hotels, etc.) |
| Lifespan and recycling | Comply with WEEE directive (2002/96/EC) |
Frequently Asked Questions - Eolos G5V003 G3 Ferrari
User questions about Eolos G5V003 G3 Ferrari
0 question about this device. Answer the ones you know or ask your own.
Ask a new question about this device
Download the instructions for your Fan in PDF format for free! Find your manual Eolos G5V003 - G3 Ferrari and take your electronic device back in hand. On this page are published all the documents necessary for the use of your device. Eolos G5V003 by G3 Ferrari.
USER MANUAL Eolos G5V003 G3 Ferrari
Technical model: FS-1615CII
Safety instructions p. 7
General information p. 9
G5V003 p. 10
Assembling. p. 10
Operating. p. 10
Oscillation. p. 10
Vertical adjustment. p. 10
Cleaning. p. 11
Technical features. p. 11
Waste of electric and electronic equipment (WEEE
(Directive) p. 25
PORTUGUES: .p. 11
FRANCAIS p. 15
DEUTsCH p. 20
CLASSI DI PROTEZION/PROTECTION CLASSES
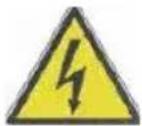
ATTENZIONE RISCHIO DISCOSSE ELETTRICHE NON ESPORRE A PIOGGIA E UMIDITA'
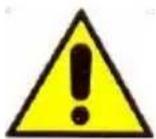
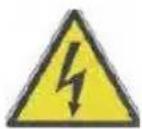
WARNING ELECTRIC SHOCK RISK DO NOT EXPOSE TO RAIN OR MOISTURE

ATTENZIONE: NON APRITE L'APPARECCHIO. ALL'INTERNO NON VI SONO COMANDI MANIPOLABILI DALL'UTENTE NE' PARTI DI RICAMBIO. PER TUTTE LE OPERAZIONI DI SERVIZIO RIVOLGERSI AD UN CENTRO DI ASSISTENZA AUTORIZZATO.
This symbol warns the user that un-insulated dangerous voltage inside the system may cause an electrical shock. Do not open the case.
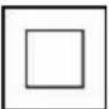
Class II Appliance symbol. The double insulated electrical appliance is one which has been designed in such a way that it does not require a safety connection to electrical earth/ground.

Caution: this symbol reminds the user to read carefully the important operations and maintenance instructions in this owner's guide.
AVVERTENZE DI SICUREZZA
ENGLISH: SAFETY INSTRUCTIONS
The following are important notes on the installation, use and maintenance; save this instruction manual for future reference; use the equipment only as specified in this guide; any other use is considered improper and dangerous; therefore, the manufacturer cannot be held responsible in the event of damages caused by improper, incorrect or unreasonable use.
Before use, ensure the equipment is undamaged; if in doubt, do not attempt to use it and contact the authorized service center; do not leave packing materials (i.e. plastic bags, polystyrene foam, nails, staples, etc.) within the reach of children as they are potential sources of danger; always remember that they must be separately collected.
Make sure that the rating information given on the technical label are compatible with those of the electricity grid; the installation must be performed according to the manufacturer's instructions considering the maximum power of the appliance as shown on the label; an incorrect installation may cause damage to people, animals or things, for which the manufacturer cannot be considered
responsible thereof.
If it is necessary to use adapters, multiple sockets or electrical extensions, use only those that comply with current safety standards; in any case do not exceed the power consumption limits indicated on the electrical adapter and / or extensions, as well as the maximum power shown on multiple adaptor.
Do not leave the unit plugged; better to remove the plug from the mains when the device is not in use. Always disconnect from power supply if you leave it unattended.
Cleaning operations should be carried out after unplugging the unit.
If the unit is out of order and you do not want to fix it, it must be made inoperable by cutting power cord.
- Do not allow the power cord to get closer to sharp objects or in contact with hot surfaces; do not pull it to disconnect the plug.
- Do not use the appliance in the event of damage to the power cord, plug, or in case of short circuits; to repair the product only address an authorized service center.
- Do not handle or touch the appliance with wet hands or bare feet. Do not expose the appliance to harmful weather conditions such as rain, moisture, frost, etc.. Always store it in a dry place.
- This appliance can be used by children of 8 years and above and persons with reduced physical, sensory or mental capabilities or lack of experience and knowledge if they received supervision or instruction concerning use of the appliance in a safe way and understand hazards involved; children shall not play with the appliance; cleaning and user maintenance shall not be made by children without supervision.
- Children must not play with the appliance.
- Keep the appliance and its cord out of reach of children less than 8 years.
If the power cord is damaged, or in case of failure and / or malfunction do not tamper with the unit. The reparation must be done by manufacturer or by service center authorized by the manufacturer in order to prevent any risk. Failure to comply with the above may compromise the unit safety and invalidate the warranty.
- This appliance is intended to be used in household as similar applications such as: staff kitchen areas in shops, offices and other working environments; by clients in hotels, motels and other residential type environments; farm houses, bed and breakfast type environments.
- The appliance is not intended to be operated by means of an external timer or separate remote-control system.
- Before every use, unroll the power cord.
- Use original spare parts and accessories only.
- Do not subject the product to strong impacts, serious damages may result.
GENERAL INFORMATION
Do not connect the electric plug since the installation is not complete.
Do not leave the appliance unattended while it is running. Unplug after each use.
Unplug the unit by pulling the plug and not the power cord.
Do not immerse product in water or other liquids and avoid splashing liquids reach the unit.
Before carrying out any cleaning, disconnect the unit from the electrical outlet.
Before each use, unroll the power cord. Do not insert anything through the protection grids.
Do not obstruct in any way the protection grids.
Place on solid and stable surfaces and away from windows or drafts.
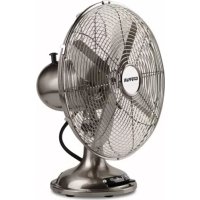
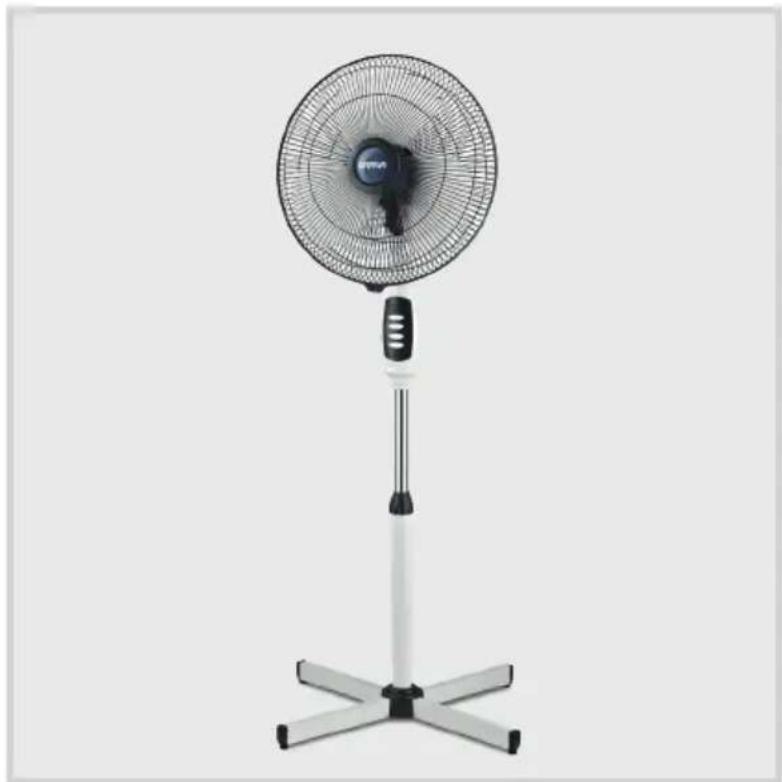
DESCRIPTION G5V003
1 Front protection grid 2 Fan 3 Rear protection grid
4 Motor protection 5 Oscillation pin
7 Motor unit fixing knob 8 Upper tube
10 Cover 11 Lower tube 12 Screws for the base
13 Drive shaft 14 Control panel
16 Fan stopper 17 Front grid fixing ring 18 Base
19 Vertical adjustment pin
6 Motor body
9 Adjusting height knob
15 Rear grid stopper
ASSEMBLING
The fan motor can work even if the protective grids have not yet been assembled and fixed. To ensure the maximum safety, perform the installation completely before operating.
1) Joint the 2 bars so as to form a cross.
2) Place the lower tube (11) at the center of the base (18) by aligning the holes in the base with the slots on the bottom of the tube. Tighten the 4 screws for fixing the base (12), squeezing them hard.
3) Unscrew and remove the tube from the height adjustment knob (9).
4) Insert the tube in the cover of the base (10) to cover the assembling screws (12)
5) Remove upper tube (8) from lower tube (11) to the desired length and secure by tightening the knob (9).
6) Insert the motor unit into the upper tube (8) and tighten the locking knob of the motor housing (7) to lock both sides.
7) Place the rear grid (3) near the plastic protective motor (4) with the metal handle facing upwards. Fit the holes placed in the central part of the grid with the pins in the plastic protection (4) and secure the two parts with the stopper (15).
8) Insert the fan (2) in the drive shaft (13) and thread the stopper (16) to the threaded end of the crankshaft.
9) Loosen the screw in the ring (17). Do not fully unscrew the screw.
10) Place the retaining ring (17) around the rear grid (3) with the screw located at the bottom.
11) Place the front grid (1) in front of the rear grid (3) matching the grooves on the ring (17) with the outer wires of the grids.
12) Tighten the screw fixing ring (17) to secure both the grids.
The fan is now correctly assembled.
OPERATING
Once finished assembling the unit, place the fan following the safety instructions, then plug it to the electrical outlet. By using the control panel (14) the rotation power can be adjusted on different speeds.
0: fan is OFF
1: low speed
2: medium speed
3: high speed
OSCILLATION
The oscillation of the head is only possible when the fan is turned on and it can be activated by pressing the pin (5) downwards until it locks. Lifting the pin (5) until the locking function is disabled.
It is recommended to enable or disable the oscillation of the fan only when the unit is off.
VERTICAL ADJUSTMENT
To ensure a always good ventilation, the fan can be adjusted vertically.
- Turn off the fan and wait for the blades to stop.
Loosen the pin (19). - Tilt the head of the fan to the desired position.
- Tighten the pin (19) by holding the fan in that position.
CLEANING
Disconnect the plug from the electrical outlet before attempting any cleaning operation.
Do not immerse the unit in water. In any case prevent splashes of water or other liquids reaching the motor body. Do not clean the unit with metallic sponges or abrasive cleaners, only use neutral detergents and a soft cloth moistened with water to clean the outer parts.
Dry the product completely before operating the unit.
TECHNICAL FEATURES
Power supply: AC 230V~50Hz. Max input power 55W
- 100% copper motor winding
Fan diameter: 40cm - Adjustable height
3 operation speeds - Oscillation
PORTUGUES: ADVERTÉNCIAS
The product is made of non-biodegradable and potentially polluting substances if not properly disposed of; other parts can be recycled. It's our duty to contribute to the ecological health of the environment following the correct procedures for disposal. The crossed out wheelie bin symbol indicates the product complies with the requirements of the new directives introduced to protect the environment (2002/96/EC, 2003/108/EC, 2002/95/EC, 2012/19/EC) and must be properly disposed at the end of its lifetime. If you need further information, ask for the dedicated waste disposal areas at your place of residence. Who does not dispose of the product as specified in this section shall be liable according to the law.
RESIDUOS DE APARELHIOS ELECTRICOS E ELECTRONICOS
To find the nearest service center, please call the telephone number 0541 694246, fax number 0541 756430 or contact us at assistenzatecnica@trevidea.it asking for the service centers supervisor.
Appliance is conform to the pertinent European regulation and is therefore marked with the CE mark.

www.g3ferrari.it TREVIDEA S.r.l.