
DR44WLB - Audio recorder TASCAM - Free user manual and instructions
Find the device manual for free DR44WLB TASCAM in PDF.
| Product type | Portable linear PCM audio recorder |
| Brand | TASCAM |
| Model | DR-44WL |
| Dimensions (W × H × D) | 79 × 162.2 × 42.5 mm |
| Power supply | 4 AA batteries (alkaline or NiMH), USB bus power, TASCAM PS-P520U AC adapter (sold separately) |
| Main features | 4-channel recording (4CH mode) or multitrack (MTR mode), built-in microphones, XLR/TRS input with 24/48V phantom power, built-in Wi-Fi for smartphone control (DR CONTROL app), built-in speaker, low-cut filter, pre-recording, dual recording |
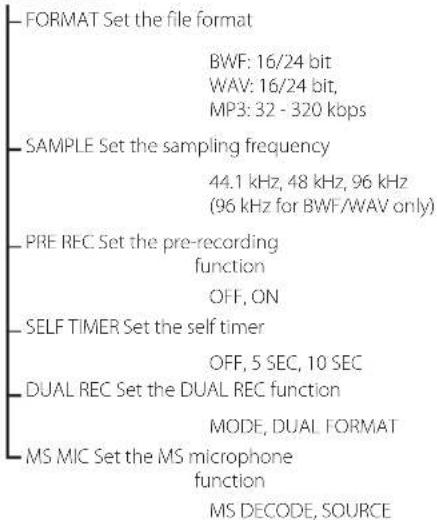
| Recording/playback formats | BWF, WAV (16/24 bit, 44.1/48/96 kHz), MP3 (32-320 kbps) |
| Media | SD card (64 MB - 2 GB), SDHC (4-32 GB), SDXC (48-128 GB) |
| Frequency response | 20-20 kHz (44.1 kHz), 20-22 kHz (48 kHz), 20-40 kHz (96 kHz) |
| Distortion | 0.05% or less (EXT IN to LINE OUT) |
| Signal-to-noise ratio | 92 dB or more (EXT IN to LINE OUT) |
| Connectivity | EXT MIC/LINE IN jack (XLR combo), LINE OUT jack (3.5 mm stereo mini-jack), micro-B USB port, Wi-Fi 802.11 b/g/n |
| Battery life (alkaline) | Approx. 16 hours (WAV 2-channel recording, 44.1 kHz, 16-bit) |
| Battery life (NiMH) | Approx. 12 hours (WAV 2-channel recording, 44.1 kHz, 16-bit) |
| Maintenance and cleaning | Wipe with a soft dry cloth. Do not use chemicals, thinner, or alcohol. |
| Safety | Use only the specified AC adapter. Do not expose to water or moisture. Maintain a minimum distance of 20 cm for RF exposure. |
| Spare parts and repairability | Contact TASCAM customer service or an authorized dealer. Do not open the unit; refer all repairs to qualified personnel. |
Frequently Asked Questions - DR44WLB TASCAM
User questions about DR44WLB TASCAM
0 question about this device. Answer the ones you know or ask your own.
Ask a new question about this device
Download the instructions for your Audio recorder in PDF format for free! Find your manual DR44WLB - TASCAM and take your electronic device back in hand. On this page are published all the documents necessary for the use of your device. DR44WLB by TASCAM.
USER MANUAL DR44WLB TASCAM
• TASCAM is a trademark of TEAC CORPORATION, registered in the U.S. and other countries.
• SDXC Logo is a trademark of SD-3C, LLC.

- Supply of this product does not convey a license nor imply any right to distribute MPEG Layer-3 compliant content created with this product in revenue-generating broadcast systems (terrestrial, satellite, cable and/or other distribution channels), streaming applications (via Internet, intranets and/or other networks), other content distribution systems (pay-audio or audio-on-demand applications and the like) or on physical media (compact discs, digital versatile discs, semiconductor chips, hard drives, memory cards and the like). An independent license for such use is required. For details, please visit http://mp3licensing.com.
- MPEG Layer-3 audio coding technology licensed from Fraunhofer IIS and Thomson.
- Wi-Fi is a trademark of Wi-Fi Alliance. The Wi-Fi CERTIFIED Logo is a certification mark of Wi-Fi Alliance.
- Microsoft and Windows are either registered trademarks or trademarks of Microsoft Corporation in the United States and/or other countries.
• Mac is trademarks of Apple Inc. in the United States and other countries. - IOS is a trademark or registered trademark of Cisco in the U.S. and other countries and is used under license.
• App Store is a service mark of Apple Inc.
• Google Play and Android are trademarks of Google inc. - Blackfin® and the Blackfin logo are registered trademarks of Analog Devices, Inc.
- Other company names, product names and logos in this document are the trademarks or registered trademarks of their respective owners.
IMPORTANT SAFETY INSTRUCTIONS
1 Read these instructions.
2 Keep these instructions.
3 Heed all warnings.
4 Follow all instructions.
5 Do not use this apparatus near water.
6 Clean only with dry cloth.
7 Do not block any ventilation openings. Install in accordance with the manufacturer's instructions.
8 Do not install near any heat sources such as radiators, heat registers, stoves, or other apparatus (including amplifiers) that produce heat.
9 Do not defeat the safety purpose of the polarized or grounding-type plug. A polarized plug has two blades with one wider than the other. A grounding type plug has two blades and a third grounding prong. The wide blade or the third prong are provided for your safety. If the provided plug does not fit into your outlet, consult an electrician for replacement of the obsolete outlet.
10 Protect the power cord from being walked on or pinched particularly at plugs, convenience receptacles, and the point where they exit from the apparatus.
11 Only use attachments/accessories specified by the manufacturer.
12 Use only with the cart, stand, tripod, bracket, or table specified by the manufacturer, or sold with the apparatus.
When a cart is used, use caution when moving the cart/apparatus combination to avoid injury from tip-over.
13 Unplug this apparatus during lightning storms or when unused for long periods of time.
14 Refer all servicing to qualified service personnel. Servicing is required when the apparatus has been damaged in any way, such as power-supply cord or plug is damaged, liquid has been spilled or objects have fallen into the apparatus, the apparatus has been exposed to rain or moisture, does not operate normally, or has been dropped.
• The apparatus draws nominal non-operating power from the AC outlet with its POWER or STANDBY/ON switch not in the ON position.
- The mains plug is used as the disconnect device, the disconnect device shall remain readily operable.
- Caution should be taken when using earphones or headphones with the product because excessive sound pressure (volume) from earphones or headphones can cause hearing loss.
- If you are experiencing problems with this product, contact TEAC for a service referral. Do not use the product until it has been repaired.

WARNING

To prevent possible hearing damage, do not listen at high volume levels for long periods.
CAUTION
- Do not expose this apparatus to drips or splashes.
- Do not place any objects filled with liquids, such as vases, on the apparatus.
- Do not install this apparatus in a confined space such as a book case or similar unit.
• The apparatus should be located close enough to the AC outlet so that you can easily grasp the power cord plug at any time.
- If the product uses batteries (including a battery pack or installed batteries), they should not be exposed to sunshine, fire or excessive heat.
- CAUTION for products that use replaceable lithium batteries: there is danger of explosion if a battery is replaced with an incorrect type of battery. Replace only with the same or equivalent type.
CAUTIONS ABOUT BATTERIES
This product uses batteries. Misuse of batteries could cause a leak, rupture or other trouble. Always abide by the following precautions when using batteries.
- Never recharge non-rechargeable batteries. The batteries could rupture or leak, causing fire or injury.
- When installing batteries, pay attention to the polarity indications (plus/minus ( / ) orientation), and install them correctly in the battery compartment as indicated. Putting them in backward could make the batteries rupture or leak, causing fire, injury or stains around them.
- When you store or dispose batteries, isolate their terminals with insulation tape or something like that to prevent them from contacting other batteries or metallic objects.
- When throwing used batteries away, follow the disposal instructions indicated on the batteries and the local disposal laws.
- Do not use batteries other than those specified. Do not mix and use new and old batteries or different types of batteries together. The batteries could rupture or leak, causing fire, injury or stains around them.
- Do not carry or store batteries together with small metal objects. The batteries could short, causing leak, rupture or other trouble.
- Do not heat or disassemble batteries. Do not put them in fire or water. Batteries could rupture or leak, causing fire, injury or stains around them.
- If the battery fluid leaks, wipe away any fluid on the battery case before inserting new batteries. If the battery fluid gets in an eye, it could cause loss of eyesight. If fluid does enter an eye, wash it out thoroughly with clean water without rubbing the eye and then consult a doctor immediately. If the fluid gets on a person's body or clothing, it could cause skin injuries or burns. If this should happen, wash it off with clean water and then consult a doctor immediately.
- The unit power should be off when you install and replace batteries.
- Remove the batteries if you do not plan to use the unit for a long time. Batteries could rupture or leak, causing fire, injury or stains around them. If the battery fluid leaks, wipe away any fluid on the battery compartment before inserting new batteries.
- Do not disassemble a battery. The acid inside the battery could harm skin or clothing.
■br European Customers
Disposal of electrical and electronic equipment
(a) All electrical and electronic equipment should be disposed of separately from the municipal waste stream via designated collection facilities appointed by the government or the local authorities.
(b) By disposing of the electrical and electronic equipment correctly, you will help save valuable resources and prevent any potential negative effects on human health and the environment.
(c) Improper disposal of waste equipment can have serious effects on the environment and human health as a result of the presence of hazardous substances in electrical and electronic equipment.
(d) The crossed out wheeled dust bin symbol indicates that electrical and electronic equipment must be collected and disposed of separately from household waste.
(e) The return and collection systems are available to the end users. For more detailed information about disposal of old electrical and electronic equipment, please contact your city office, waste disposal service or the shop where you purchased the equipment.
Disposal of batteries and/or accumulators
(a) Waste batteries and/or accumulators should be disposed of separately from the municipal waste stream via designated collection facilities appointed by the government or the local authorities.
(b) By disposing of waste batteries and/or accumulators correctly, you will help save valuable resources and prevent any potential negative effects on human health and the environment.
(c) Improper disposal of waste batteries and/or accumulators can have serious effects on the environment and human health as a result of the presence of hazardous substances in batteries and/or accumulators.
(d) The crossed out wheeled dust bin symbol indicates that batteries and/or accumulators must be collected and disposed of separately from household waste.
If the battery or accumulator Pb, Hg, Cd contains more than the specified values of lead (Pb), mercury (Hg), and/or cadmium (Cd) defined in the Battery Directive (2006/66/EC), then the chemical symbols for lead (Pb), mercury (Hg) and/or cadmium (Cd) will be indicated beneath the crossed out wheeled dust bin symbol.
(e) The return and collection systems are available to the end users. For more detailed information about disposal of waste batteries and/or accumulators, please contact your city office, waste disposal service or the shop where you purchased them.
Pb, Hg, Cd
Wireless equipment precautions
Compliance of radio transmitter and interference
Model for USA
This device complies with Part.15 of FCC Rules. Operation is subject to the following two conditions:
1) This device may not cause interference, and
2) This device must accept any interference, including interference that may cause undesired operation.
Labeling of authorization
Contains FCC ID: YOPGS2100MIP
Model for Canada
Compliance of radio transmitter
This device complies with Industry Canada licence-exempt RSS standard(s). Operation is subject to the following two conditions: (1) this device may not cause interference, and (2) this device must accept any interference, including interference that may cause undesired operation of the device.
Labeling of authorization
Contains IC: 9154A-GS2100MIP
Compliance of interference
This ClassB digital apparatus complies with Canadian ICES-003.
Model for EEA (European Economic Area)

Hereby, TEAC Corporation declares that the radio equipment type DR-44WL is in compliance with Directive 2014/53/EU, and the other Directives or Commission Regulations.
The full text of the EU declaration of conformity is available at the following internet address: Please contact us by e-mail.
https://tascam.eu/en/contact.html
EU Importer: TEAC Europe GmbH
Changes or modifications not expressly approved by the party responsible for compliance could void the user's authority to operate the equipment.
CAUTION
Authorization of wireless devices are different in countries or regions. Please use only in the country where you purchased the product.
• Depending on the country, restrictions on the use of Wi-Fi wireless technology might exist.
Confirm the laws and regulations of the country or region where you want to use the unit before use.
Radiation Exposure requirements
This equipment meets the regulation, which is recognized internationally, for the case of human exposure to radio waves generated by the transmitter.
Based on the following two conditions:
- End-users and installers must be provided with antenna installation instructions and transmitter operating conditions for satisfying RF exposure compliance.
- This equipment should be installed and operated with minimum distance 20 cm (8") between the radiator and your body.
Statement of compliance
Model for USA
This equipment complies with FCC radiation exposure limits set forth for an uncontrolled environment and meets the FCC radio frequency Exposure Guidelines.
Model for Canada
This equipment complies with IC RSS-102 radiation exposure limits set forth for an uncontrolled environment.
EEA (European Economic Area) model
This equipment complies with EN.62311; Assessment of electronic and electrical equipment related to human exposure restrictions for electromagnetic fields; the harmonised standard of DIRECTIVE 2014/53/EU.
Information for interference (FCC requirements)
This equipment has been tested and found to comply with the limits for a Class B digital device, pursuant to Part 15 of the FCC Rules. These limits are designed to provide reasonable protection against harmful interference in a residential installation. This equipment generates, uses, and can radiate radio frequency energy and, if not installed and used in accordance with the instructions, may cause harmful interference to radio communications.
However, there is no guarantee that interference will not occur in a particular installation. If this equipment does cause harmful interference to radio or television reception, which can be determined by turning the equipment off and on, the user is encouraged to try to correct the interference by one or more of the following measures.
- Reorient or relocate the equipment and/or the receiving antenna.
- Increase the separation between the equipment and receiver.
- Connect the equipment into an outlet on a circuit different from that to which the receiver is connected.
- Consult the dealer or an experienced radio/TV technician for help.
Declaration of Conformity
Model Number: DR-44WL
Trade Name: TASCAM
Responsible party: TEAC AMERICA, INC.
Address: 10410 Pioneer Blvd. Suite #1, Santa Fe Springs, California 90670, U.S.A.
Telephone number: 1-323-726-0303
This device complies with Part.15 of FCC Rules.
Operation is subject to the following two conditions:
1) This device may not cause interference, and
2) This device must accept any interference, including interference that may cause undesired operation.
Contents
IMPORTANT SAFETY INSTRUCTIONS....3
Wireless equipment precautions....3
Compliance of radio transmitter and interference...3
Radiation Exposure requirements 4
Information for interference (FCC requirements) 4
Introduction....5
Note about the Reference Manual ....5
Using the TEAC Global Site 5
About TASCAM customer support service....5
Product registration....5
Items included with this product ....5
About SD cards....5
Precautions....5
Precautions for placement and use ....5
Beware of condensation....5
Cleaning the unit 5
Names and Functions of Parts....6
Top panel 6
Front panel 6
Left side panel....6
Right side panel....6
Bottom panel....6
Home Screen 6
Preparation....7
Preparing the power supply....7
Starting up the unit....7
Selecting the language....7
If you accidentally select the wrong language.....7
Setting the built-in clock....7
Inserting the SD card....7
Preparing an SD card for use....7
Shutting down 8
Connecting monitoring devices and headphones....8
Basic menu operation procedures ....8
Menu structure 8
Recording 8
Recording Screen 8
Adjusting the input level 9
Set the low-cut filter....9
Using the level control function....9
Record 9
About the recording standby state....9
Recording menu structure....9
Playback 10
Playing back recordings....10
Selecting the playback file (skipping).... 10
Adjusting the playback volume....10
Connecting with a Computer.... 10
Exchanging files with a computer....10
Disconnecting the unit from a computer....10
Settings and Information Display.... 10
Turning the built-in speaker off....10
System settings....10
Connecting the unit to a smartphone via Wi-Fi.10
How to obtain and install the dedicated
application (DR CONTROL)....10
Selecting the Wi-Fi mode 10
Connecting the unit directly to external devices (smartphones, tablets and computers) by Wi-Fi (TO DEVICE mode) 10
Connecting the unit to external devices (smartphones, tablets and computers) by Wi-Fi (VIA ROUTER mode)....11
Remote control of the unit from a smartphone 12
Transferring files from the unit to a computer ... 12
Quick Reference for Using Various Functions .....13
Messages....14
Troubleshooting....14
Specifications....15
Ratings......15
Inputs and outputs....15
Audio performance....15
Recording times....15
Wi-Fi 15
General 15
Introduction
Thank you very much for purchasing the TASCAM DR-44WL Linear PCM Recorder. Before connecting and using this unit, please take time to read this manual thoroughly to ensure you understand how to properly set it up and connect it, as well as the operation of its many useful and convenient functions. After you have finished reading this manual, please keep it in a safe place for future reference.
Note about the Reference Manual
This Owner's Manual explains the main functions of this unit. Please see the Reference Manual for information about all the unit's functions. You can also download this Owner's Manual and the Reference Manual from the TEAC Global Site (https://teac-global.com/).
This product has a Blackfin® 16/32-bit embedded processor made by Analog Devices, Inc. This processor controls digital signal processing. Inclusion of this Blackfin® processor in the product increases its performance and reduces its power consumption.
Using the TEAC Global Site
You can download updates for this unit from the TEAC Global Site:
https://teac-global.com/
In the TASCAM Downloads section, select the desired language to open the Downloads website page for that language.
About TASCAM customer support service
TASCAM products are supported and warranted only in their country/region of purchase. To receive support after purchase, on the TASCAM Distributors list page of the TEAC Global Site (https://teac-global.com/), search for the local company or representative for the region where you purchased the product and contact that organization. When making inquiries, the address (URL) of the shop or web shop where it was purchased and the purchase date are required. Moreover, the warranty card and proof of purchase might also be necessary.
Product registration
Customers in the USA, please visit the following TASCAM website to register your TASCAM product online.
https://tascam.com/us/
Items included with this product
This product includes the following items.
Take care when opening the package to avoid damaging the items. Keep the packing materials for transportation in the future.
Please contact the store where you purchased this unit if any of these items are missing or have been damaged during transportation.
- Main unit....x 1
- AA alkaline batteries....x 4
- Owner's Manual (this document) including warranty ....x1
About SD cards
This unit uses SD cards for recording and playback. You can use 64 MB to 2 GB SD cards, 4 GB to 32 GB SDHC cards, and 48 GB to 128 GB SDXC cards with this unit.
A list of SD cards that have been confirmed for use with this unit can be found on our web site. Please access to a product page of this product from the TEAC Global Site (https://teac-global.com) to find the list or contact the TASCAM customer support service.
Precautions
SD cards are delicate media. Please refer to the below when using memory cards to prevent memory and/or card damage:
- Do not leave a memory card in extremely hot or cold places
- Do not leave a memory card in extremely humid places
- Do not spill any liquids on the memory card
- Do not bend the card or subject it to any excessive force
- Do not subject the card to any physical shock
- Do not remove the card while the unit is accessing data, or recording, playing, or making data transfer
• Always store the memory card in a case
Precautions for placement and use
- The environmental temperature operating range of this unit is 0–40°C (32–104°F).
- Do not install this unit in the following types of locations. Doing so could degrade the sound quality and/or cause malfunctions.
Places with significant vibrations
Near windows or other places exposed to direct sunlight
Near heaters or other extremely hot places Extremely cold places
Places with bad ventilation or high humidity Very dusty locations
- If this unit is placed near a power amplifier or other device with a large transformer, it could cause a hum. If this occurs, increase the distance between this unit and the other device.
- This unit could cause color irregularities on a TV screen or noise from a radio if used nearby. If this occurs, use this unit farther away.
- This unit might produce noise if a mobile phone or other wireless device is used nearby to make calls or send or receive signals. If this occurs, increase the distance between this unit and those devices or turn them off.
• To enable good heat dissipation, do not place anything on top of this unit. - Do not place this unit on top of a power amplifier or other device that generates heat.
Beware of condensation
If the unit is moved from a cold to a warm place, or used after a sudden temperature change, there is a danger of condensation; vapor in the air could condense on the internal mechanism, making correct operation impossible. To prevent this, or if this occurs, let the unit sit for one or two hours at the new room temperature before using it.
Cleaning the unit
Use a dry soft cloth to wipe the unit clean. Do not wipe with chemical cleaning cloths, thinner, alcohol or other chemical agents. Doing so could damage the surface or cause discoloration.
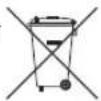
Names and Functions of Parts
Top panel
① Built-in stereo microphone
② PEAK indicator
③ Display
④ TRACK/INPUT button
⑤ ■/HOME button
⑥ Fast rewind button
⑦ ▶/II button
⑧ MENU button
⑨ MTR indicator
⑩ MIXER button
⑪ RECORD [●] button / RECORD indicator
⑫ Fast forward button
⑬ INPUT button
⑭ ENTER/MARK button
⑮ QUICK button
⑯ Wheel
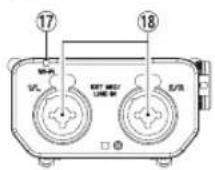
Front panel
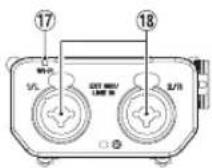
⑰ Wi-Fi indicator
⑱ EXT MIC/LINE IN 1/L and 2/R terminals (XLR/TRS)
Left side panel
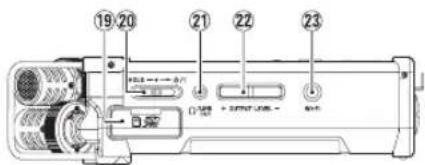
⑲ SD card slot
⑳ HOLD/ switch
②1 AONE OUT jack
⑳ OUTPUT LEVEL button
②3 Wi-Fi button
Right side panel
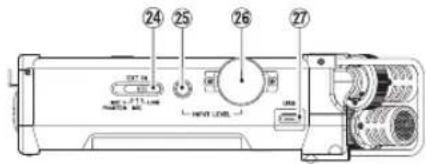
⑳ EXT IN switch
⑳ INPUT LEVEL button
26 INPUT LEVEL volume
⑳ USB port
Bottom panel
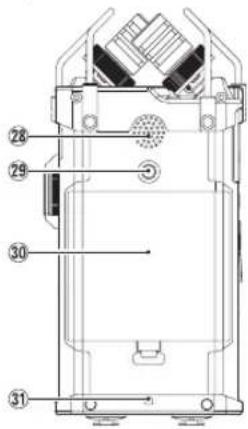
⑳ Built-in mono speaker
⑲ Tripod attachment thread (1/4 inch)
③0 Battery compartment cover
③1 Strap attachment
32 Battery compartment

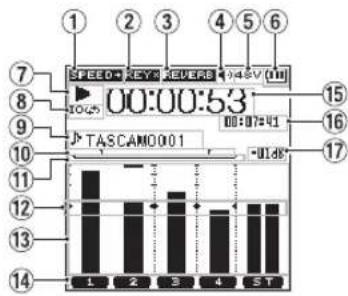
Home Screen
This is the screen that is usually shown when the unit is stopped.
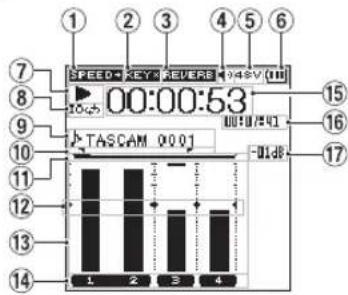
Home Screen in the 4 CH mode
bar
| Category | Value | |---|---| | 1 | 14 | | 2 | 12 | | 3 | 11 | | 4 | 9 | | ST | 8 | | 15 | 15 | | 16 | 16 | | 17 | 17 | SPEED KEY REVERB 00:00:53 III:07:41Home Screen in the MTR mode
① Playback speed status display
| Icon Playback speed | |
| Blank Playback speed not changed | |
| SPEED+ | 1.1×-2.0× |
| SPEED- | 0.5×-0.9× |
| SPEED# | Playback speed cannot be changed |
② Display of the key control function on/off status
| Icon On/off status | |
| Blank Key | control function off |
| KEY | Key control function on |
| KEY | Key control function on (setting disabled) |
③ Display of the reverb on/off status
| Icon On/off status | |
| Blank Reverb off | |
| REVERB | Reverb on(Recording with the effector on) |
| REVERB | Reverb on(SEND status) |
④ Speaker output display
displayed: Speaker output on
not displayed: Speaker output off
⑤ Phantom power supply display
Blank: No phantom power supply
48V : 48 V phantom power supplied
24V : 24 V phantom power supplied
⑥ Power supply status display
When power is supplied from the batteries, the battery icon shows the amount of remaining battery power in bars ( ).
When the icon displays no bar, blinks, and the power subsequently turns off (standby state) due to dead batteries.
When the dedicated AC adapter (TASCAM PS-P520U: sold separately) or USB bus power is used, hown.
⑦ Recorder operation status display
These icons show the recorder operation status.
| Indicator Meaning | |
| ■ | Stopped |
| || | Paused |
| ▶ | Playing back |
| ▶▶ | Fast-forwarding |
| ◀◀ | Fast-rewinding |
| ▶▶| | Skipping to the head of the next file |
| ◀◀◀ | Skipping to the head of the current file or of the preceding file |
⑧ Loop playback setting status display
During loop playback, the 100m is displayed.
⑨ File name/song name display
When the 4CH mode is selected, the name or tag information of the file being played back is shown.
When there are multiple files in the 4CH mode, only the format portion of the file names and the basic number of the recording files are displayed.
When the MTR mode is selected, the name of an opened song is shown.
⑩ Loop playback IN (starting) and OUT (ending) points setting state
Shows the IN (starting) and OUT (ending) points-setting state of loop playback.
When the IN (starting) point is set, the icon is displayed at the corresponding position on the playback position-displaying bar.
When the OUT (ending) point is set, the icon is displayed at the corresponding position on the playback position-displaying bar.
⑪ Playback position display
The current playback position is shown by a bar.
⑫ Level meter guide display
This is a level meter guide for adjusting the input and output levels.
It is displayed at the "-12 dB" position on the scale.
⑬ Level meter
Shows the level of sound being input or played back.
⑭ File state display
The file state is displayed in different ways, depending on the type of file to be played back.
⑮ Elapsed time display
Shows the elapsed time (hours : minutes : seconds) of the current file.
⑯ Remaining time display
Shows the remaining time (hours : minutes : seconds) of the current file.
⑰ Peak value displayed in decibel (dB)
Shows in decibels the maximum value of the playback level in a certain period of time.
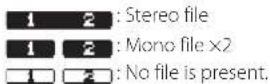
Preparation
Preparing the power supply
Using AA size batteries
- Remove the battery compartment cover on the bottom panel.
- Install four AA size batteries with their and marks as shown in the battery compartment.
- Attach the battery compartment cover.
natural_image
Technical diagram of an electronic device showing battery pack, casing, and internal components (no text or labels)NOTE
Set the type of batteries to use in the BATTERY TYPE item of the POWER/DISPLAY menu in order for the unit to accurately show the amount of remaining power and allow the unit to accurately determine whether enough power is available for its proper operation. (By default, the type is set to RLKAL for alkaline batteries.)
Using an AC adapter (sold separately)
Connect the dedicated AC adapter (TASCAM PS-P520U: sold separately) and the USB port of the unit with the USB cable (Type-A to micro-B: Included with TASCAM PS-P520U) as shown in the Illustration.
AC outlet
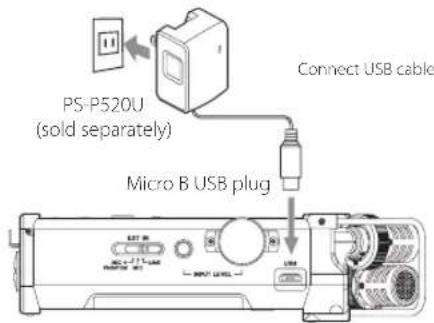
CAUTION
•Always use the AC adapter (TASCAM PS-P520U) when using this unit. Use of a different adapter could cause malfunction, fire or electric shock.
- Noise may occur when recording with a microphone if the unit is too close to the AC adapter. In such a case, keep sufficient distance between the AC adapter and the unit.
NOTE
When both batteries are installed and the AC adapter is connected, power will be supplied from the AC adapter.
Starting up the unit
When the unit is turned off (standby state), slide the HOLD/ switch in the direction end, when TRSCAN DR-44ML (start-up screen) is displayed, release the switch.
The Home Screen appears when the unit starts up.
Selecting the language
You can change the language shown on the display. The first time you turn the unit on after purchasing it, the LANGUAGE screen will open. You can set the language used on this screen. You can also change this setting with the SYSTEM screen LANGUAGE item.
- Turn the wheel to move the cursor and select the language.
- After making the selection, press the ENTER/MARK button to confirm it.
If you accidentally select the wrong language
Slide the HOLD/ switch to turn the power off. Then, slide the HOLD/ switch while pressing and holding the MENU button to turn the unit on again.
The language selection menu where you can set the language appears.
Setting the built-in clock
When the unit is started up for the first time (or after being left without batteries), the DATE/TIME screen appears before the start-up screen to allow the date and time to be set.
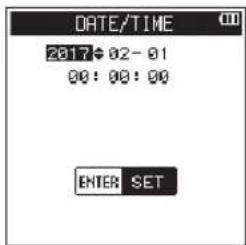
Use the ◀◀◀/▶▶▶ button and the wheel to enter the date and time, and press the ENTER/MARK button to set them.
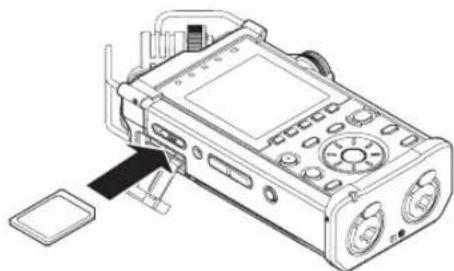
Inserting the SD card
- Open the SD card slot cover on the left side panel.
- Insert the SD card into the slot as shown in the following illustration until it clicks into place.
natural_image
Line drawing of a handheld electronic device with ports and control panel (no text or symbols)Preparing an SD card for use
In order to use an SD card in this unit, you must format it first.
- Confirm that an SD card is installed and turn the power ON.
- The following message appears when a new card or a card formatted by another device is inserted into the unit.

SD/SDHC card

SDXC card
- Press the ENTER/MARK button to start formatting.
CAUTION
Formatting an SD card erases all the data on it.
- When formatting is complete, it will return to the Home screen. You may format the card whenever required.
CAUTION
When formatting the SD card, make sure the unit is connected to the dedicated AC adapter (TASCAM PS-P520U: sold separately), a computer via USB bus power, or fully-charged batteries.
Shutting down
While the unit is turned on, slide the HOLD/⏻/1 switch of the left side panel in the direction and, when TRSCAM DR-44ML shutting down appears, release the switch.
The power turns off in a few seconds.
Connecting monitoring devices and headphones
To listen with headphones, connect them to the LINE OUT jack.
To listen with an external monitoring system (powered monitor speakers or an amplifier and speakers), connect it to the LINE OUT jack.
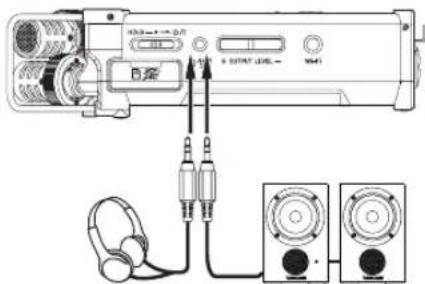
Headphones Powered monitor speakers or an amplifier and speakers
Basic menu operation procedures
- Press the MENU button to open the MENU screen.
- Use the wheel to select (highlight) one of the menu items, and then press the ENTER/MARK button to go to the desired setting screen.
- Use the wheel to select (highlight) an item to set.
- Press the ENTER/MARK button or ▶▶▶ button to move the cursor to the right and highlight the setting value.
- Use the wheel to change the setting.
- When setting a different item in the same menu, press the ENTER/MARK button or to move the cursor to the left.
- Repeat Steps 3. to 6. as necessary to set other items.
- When finished, press the ■/HOME button to return to the Home Screen.
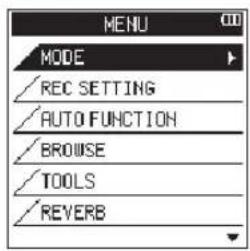
Menu structure
MENU
| _MODE | Select recording or playback mode |
| _REC SETTING Set for recording | |
| _AUTO FUNCTION | Convenient functions for recorded files |
| -BROWSE(only when the 4CH mode is selected) | Operate files and folders in the SD card |
| SONG(only when the MTR mode is selected) | |
| -TOOLS | Set other convenient functions |
| -REVERB Set reverb effects | |
| -POWER/DISPLAY | Set the power supply and the display |
| -SYSTEM | System settings of the unit |
Recording
Recording Screen
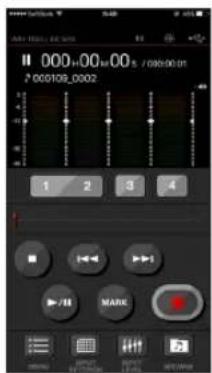
The screen below is shown when the unit is in the recording standby state or while recording is in progress.
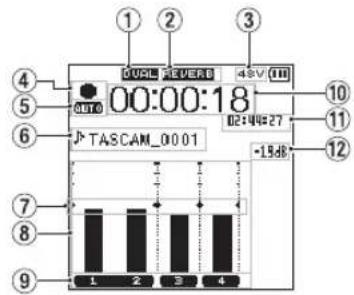
Recording screen in the 4 CH mode
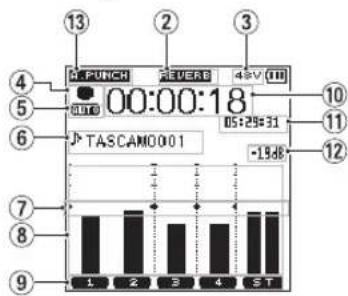
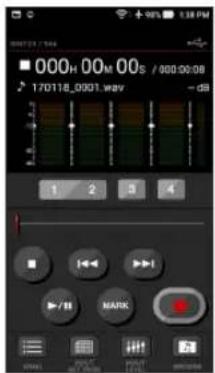
Recording screen in the MTR mode
① Display of the DUAL REC function on/off status (4CH mode only)
No display: DUAL REC function off
QUAL : DUAL REC function on
② Display of reverb on/off status
| Icon On/off status | |
| Blank Reverb off | |
| REVERB | Reverb on(Recording with the effector on) |
| REVERB | Reverb on(SEND status) |
③ Phantom power supply display
Blank: No phantom power supply
48V : 48 V phantom power supplied
24V : 24 V phantom power supplied
④ Recorder operation status display
These icons show the recorder operation status.
| Indicator | Meaning |
| ● II | Recording in standby or recording paused |
| ● | Recording in progress |
⑤ Display of the setting status of the PRE REC or AUTO REC function (4CH mode only)
When the PRE REC function is ON, the icon shown.
When the AUTO REC function is ON, the icon is shown.
⑥ File name/song name display
The file name that will automatically be given to a recorded file is shown.
When there are multiple files in the 4CH mode, only the format portion of the file names and the basic number of the recording files are displayed. When a single file is recorded, its name is shown.
When the MTR mode is selected, the name of an opened song is shown.
⑦ Level meter guide display
This is a level meter guide for adjusting the input and output levels. It is displayed at the “-12 dB” position on the scale.
⑧ Level meter
These show the levels of the input or playback audio.
⑨ File status display
The file state is displayed in different ways, depending on the type of file to be played back.

⑩ Elapsed recording time
The elapsed recording time of a recorded file is shown as hours : minutes : seconds.
⑪ Remaining recording time
The remaining recording time until the selected maximum file size is reached is shown (hours : minutes : seconds). If the remaining recording time on the SD card is less, that will be displayed instead.
⑫ Peak value in decibels (dB)
The peak value of the input level is shown in decibels.
⑬ Auto punch in/out function on/off status or master track loading status (MTR mode only)
No icon: auto punch in/out function off A.PUNCH : auto punch in/out function on MASTER : master track loaded
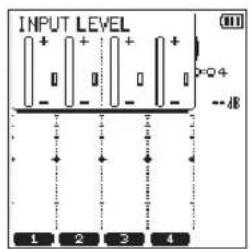
Adjusting the input level
- Press the INPUT LEVEL button on the right side panel to show the INPUT LEVEL setting screen on the display as a pop-up.
-
Press the TRACK/INPUT button to select a channel to adjust the input level for.
-
Use the INPUT LEVEL volume of the right side panel to adjust the input level.
When the input sound is too loud, the PEAK indicator of the top panel is lit in red.
A ▶◀ mark is visible at the "-12 dB" position on the level meter.
Set the input level so that the level changes near this mark without causing the PEAK indicator to light in red.
- When finished, press the ■/HOME button to return to the Home Screen.
Set the low-cut filter
Set the low-cut filter if you want to cut noise and other sounds at low frequencies. This function can be used to reduce air-conditioning noise, unpleasant wind noise, etc.
- Press the INPUT button to show the INPUT SETTING screen on the display.
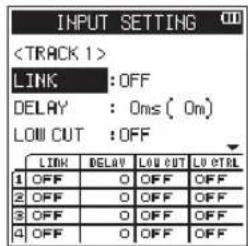
- Press the TRACK/INPUT button to select a channel to set the low-cut filter for.
- Use the wheel to select (highlight) LOW CUT, and then press the ENTER/MARK button or ▶▶1 button to display setting items as a pop-up.
- Use the wheel to set the cut-off frequency of the low-cut filter for microphone input. Setting values: OFF, 40Hz, 80Hz, 120Hz, 220Hz
- When you press the ENTER/MARK or I◄◄ button, the pop-up disappears and the function is enabled.
As the number (frequency) becomes larger, low frequencies across a wider band can be cut.
Using the level control function
You can set the level control function for recording through a microphone.
- Press the INPUT button to show the INPUT SETTING screen on the display.
- Press the TRACK/INPUT button to select a channel to set the level control function for.
- Use the wheel to select (highlight) LEVEL CTRL, and then press the ENTER/MARK or ▶▶1 button to display setting items as a pop-up.
- When you use the wheel to select (highlight) the desired function and then press the ENTER/MARK or I◄◄ button, the pop-up disappears and the function is enabled.
PEAK
This function is used to automatically lower the recording level to a more appropriate one when an input sound is too loud. You can raise the recording level manually. This function is useful for recording music with volume changes that affect the sound negatively. Even if this function is turned off after it has been set, the set level is retained.
LIMITER
This function prevents distortion due to sudden and excessive input. This is useful when you do not want to change the recording level.
In this mode, you can change the recording level manually even during recording.
Record
This recorder can record sounds in two modes: 4CH and MTR modes.
In the 4CH mode, up to four tracks can be recorded simultaneously from the built-in microphones and the external input terminal.
In the MTR mode, sounds can be recorded over an already recorded file in addition to recording of up to four tracks.
- Press the RECORD [●] button to enter recording standby. You can check recorded file names shown on the display before you start recording.
- Press the TRACK/INPUT button to select a channel for recording.
- Press the RECORD [●] button. Normal recording starts.
- Press the ■/HOME button to finish recording. To pause the recording, press the RECORD
[●] button. When you press the RECORD
[●] button again or press the ▶/■ button, recording in the same file resumes.
When you press the ■/HOME button after pausing the recording, an audio file of the sound recorded up to pausing is created.
About the recording standby state
This unit has a recording standby state like that of a recorder for professional use. In this standby state, you can perform operations such as configuring input level settings and then start recording quickly. In the recording standby state, the RECORD indicator blinks and the recording screen is shown.
Recording menu structure
You can configure various settings using the REC SETTING item on the MENU screen.
REC SETTING
Playback
Playing back recordings
While the Home Screen is open and playback is stopped, press the ▶/■ button to start playback.
Pausing
While the Home Screen is open and a track is playing back, press the ▶/■ button to pause playback at the current position.
Stopping
When you press the ■/HOME button while the Home Screen is open and a track is playing back, playback is paused.
If you press the ■ /HOME button again, playback will be stopped at the head of the file.
Fast-rewinding and fast-forwarding (search)
During playback when the Home Screen is open, press and hold the ◀◀◀/▶▶▶ button to search backward/forward.
Moving the playback position
You can move the playback position by turning the wheel while the Home Screen is open and a track is stopped or playing back.
After moving the playback position, the unit pauses.
Selecting the playback file (skipping)
While the Home Screen is open, press the ◀◀ or ▶▶I button to select the file that you want to play back.
If you press the ◀◀ button at the beginning of a file playback will skip to the beginning of the previous file.
If you press the ▶▶ button at the beginning of or in the middle of a file playback will skip to the next file.
Adjusting the playback volume
The volume of sound output through the ONLINE OUT jack can be adjusted by use of the OUTPUT LEVEL (+/-) button while the Home Screen is open.
Connecting with a Computer
You can transfer audio files on the SD card in the unit to a computer and also transfer audio files from a computer to the unit.
Connecting the unit to a computer by USB
- Use the USB cable to connect the unit to a computer. If the power is off, turn it on.
- On the USB SELECT screen, select STORAGE and press the ENTER/MARK button to connect this unit to the computer. USB connected will appear on the display.
- When you open Computer in Windows, this unit shows on the computer screen as an external drive named "DR-44WL".
Exchanging files with a computer
Click the "DR-44WL" drive on the computer to show the "MTR", "MUSIC" and "UTILITY" folders.
To transfer files to the computer, open the "MTR" or "MUSIC" folder and drag and drop the desired files where you want them to go.
To transfer files from the computer, drag and drop the desired audio files on the computer to the "MUSIC" folder.
Disconnecting the unit from a computer
Before disconnecting the USB cable, follow the proper procedures for the computer to unmount this unit.
The power turns off after the unit completes its shutdown process.
See the computer's operation manual for instructions about how to unmount an external device.
Settings and Information Display
Turning the built-in speaker off
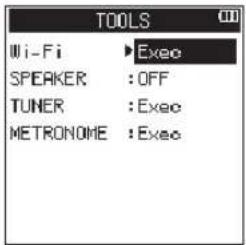
Set the items MENU → TOOLS → SPEAKER to OFF.
System settings
Use the SYSTEM menu to customize settings for using the unit. You can also perform operations such as initializing settings and formatting SD cards.
- Select MENU → SYSTEM and press the ENTER/MARK button.
- Configure necessary settings for each function.
Connecting the unit to a smartphone via Wi-Fi
CAUTION
This product has been designed to be compliant with rules and regulations in the sales area, display as needed has been.
This product is used in the country / region of the following has been approved.
United States, Canada, Europe (EU Member States), Australia, New Zealand, Japan
The use of wireless functions in a country other than those listed above could result in a violation of that country's wireless transmission laws.
Our company will bear no responsibility for use in countries other than those listed above.
You can operate this unit by remote control with a free dedicated application (DR CONTROL). In addition to transport control operations such as playback and stop, you can also adjust the input, transfer recorded files and more via Wi-Fi.
How to obtain and install the dedicated application (DR CONTROL)
- Connect your smartphone to the Internet.
- If your smartphone is an Android device, download and install the dedicated application (DR CONTROL) from Google Play. If it is an iOS device, download and install from the App Store.
Selecting the Wi-Fi mode
You can choose from two connection modes according to the use conditions.
TDEVICE mode
This unit operates as an access point, and computers, smartphones and other external devices can connect to it by Wi-Fi.
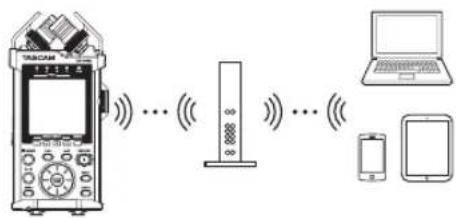
A ROUTER mode
This unit can connect to computers, smartphones and other external devices by Wi-Fi through an existing Wi-Fi router. This allows more flexibility. This also enables simultaneous connection to the Internet, allowing easier file sharing and location information checking, for example.
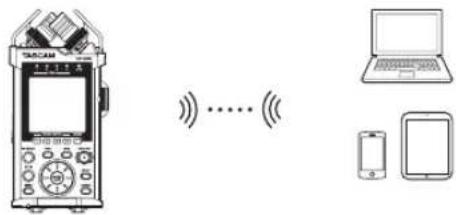
Connecting the unit directly to external devices (smartphones, tablets and computers) by Wi-Fi (TO DEVICE mode)
The DR-44WL can make a Wi-Fi/peer-to-peer connection with a smart phone via Wi-Fi, without the use of a router or other external devices. No Wi-Fi
network environment is required. It can make direct connection with your smart phone or tablet.
NOTE
During Wi-Fi/peer-to-peer connection, the smart phone or tablet cannot connect to an external Wi-Fi network.
Setting the Wi-Fi mode to TO DEVICE
- Press the MENU button to open the MENU screen.
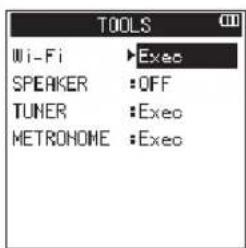
- Using the wheel, select (highlight) TOOLS and press the ENTER/MARK or ▶▶1 button. TOOLS screen appears.
- Use the wheel to select Wi-Fi and press the ENTER/MARK button.
Exec appears selected for the Wi-Fi item.
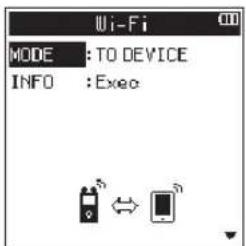
- Press the ENTER/MARK button to open the Wi-Fi screen.
- Use the wheel to select MODE and press the ENTER/MARK button.
- Use the wheel to set the Wi-Fi mode to TO DEVICE, and press the ENTER/MARK button to confirm it.
Options: TO DEVICE (default value), VIA ROUTER
●Connecting the DR-44WL to a smart phone or tablet via Wi-Fi for the first time
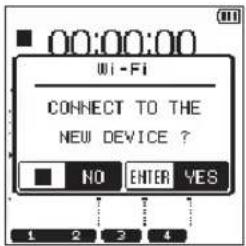
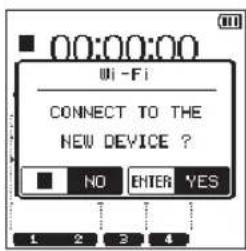
- Press the Wi-Fi button of the DR-44WL; the Wi-Fi indicator will start to flash.
A CONNECT TO THE NEW DEVICE ? pop-up message appears on the display to determine whether or not the connection is new. - You will be making a connection to a new smartphone, so press the ENTER/MARK button.
- SSID and PASSWORD appear on the display.
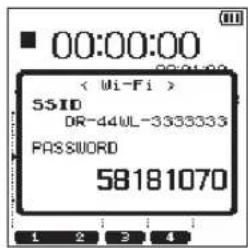
NOTE
The SSID is the name of the wireless LAN access point (wireless LAN device).
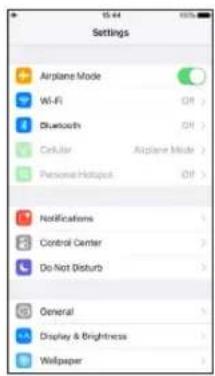
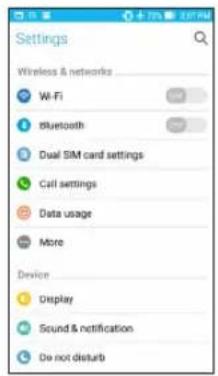
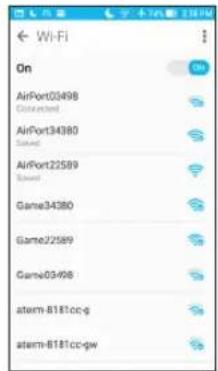
- Select "Settings" → "Wi-Fi" on the device.
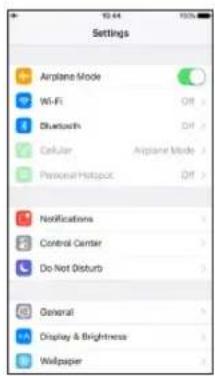
iOS device example
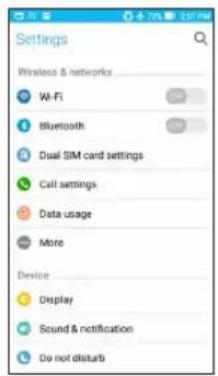
Android device example
- When Wi-Fi is enabled on for your device, it will display the SSID list of Wi-Fi equipment. Select the SSID displayed on the DR-44WL.
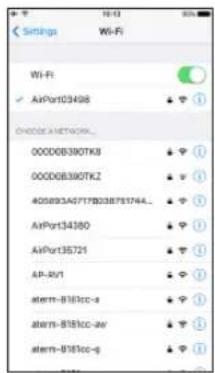
iOS device example
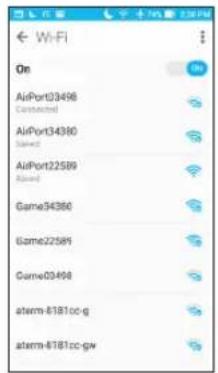
Android device example
- A password input screen appears on the device. Enter the password shown on the display of the unit.
- Wi-Fi connection is established between the DR-44WL and your smart phone, and the Wi-Fi indicator of the unit will light.
NOTE
The above description on operating the device are for reference only. Please refer to your smart phone's operation manual for more details.
■connecting the DR-44WL to a smart phone or tablet via Wi-Fi (from second time onward)
When you establish a connection between the DR-44WL and your smart phone for the first time and need to connect them again, you only need to select the SSID from the second time onward.
- Press the Wi-Fi button of the DR-44WL; the Wi-Fi indicator will start to flash.
A CONNECT TO THE NEW DEVICE ? pop-up message appears on the display to determine whether or not the connection is new. - Your smart phone already made a peer-to-peer connection; simply press the ■/HOME button.
- Pop-up message on the display disappears and the DR-44WL switches to a standby mode to connect to your smart phone.
- In your device, select "Settings" → "Wi-Fi".
- When Wi-Fi is enabled on for your device, it will display the SSID list of Wi-Fi equipment. Select the SSID displayed on the DR-44WL.
- Wi-Fi connection is established between the DR-44WL and your smart phone, and the Wi-Fi indicator of the unit will light.
NOTE
The above description on operating the device are for reference only. Please refer to your smart phone's operation manual for more details.
Connecting the unit to external devices (smartphones, tablets and computers) by Wi-Fi (VIA ROUTER mode)
Setting the Wi-Fi mode to VIA ROUTER
- Press the MENU button to open the HENU screen.
- Using the wheel, select (highlight) TOOLS and press the ENTER/MARK or ▶▶1 button. TOOLS screen appears.
- Use the wheel to select Wi-Fi and press the ENTER/MARK button.
Exec appears selected for the Wi-Fi item.
- Press the ENTER/MARK button to open the Wi-Fi screen.
- Use the wheel to select MODE and press the ENTER/MARK button.
- Use the wheel to set the Wi-Fi mode to VIA ROUTER, and press the ENTER/MARK button to confirm it.
Options: TO DEVICE (default value), VIA ROUTER
![Wi-Fi MODE : TO DEVICE INFO VIA ROUTER LIST : LACD SSID : [ ] PASSMD : [ ]](/content/2026/03/541877/images/4f7d7955fe6fd8471aedb34e1e7c3bb5c60dac9df8117b4820b9e353a91dddac.jpg)
- Connecting the unit to an external router
- When the Wi-Fi screen is open, use the wheel to select the LIST item, and press the ENTER/MARK or ▶▶▶ button.
Exec appears selected for the LIST item.
![Wi-Fi MODE : VIA ROUTER INFO : Execo LIST : Execo SSID : [ ] PASSMD : [ ]](/content/2026/03/541877/images/29c3bbc2a8f54e9e9d7339598b6c64b39495fc0fe13c29fc3d279a3bd0b27044.jpg)
- Press the ENTER/MARK button to open the SSID LIST screen.
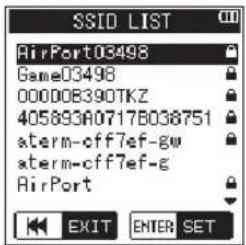
- From the list shown on the SSID LIST screen, use the wheel to select the router you want to connect, and press the ENTER/MARK button to set it.
- The selected SSID will be shown for the SSID item.
![Wi-Fi MODE : VIA ROUTER INFO : Exec LIST : Execo SSID : [AirPort343] PASSWORD : [**********]](/content/2026/03/541877/images/cfe9228419d78e08fa977cda95fbe4c1cda4c921fa5bc70c6d4824f6f40c5d17.jpg)
NOTE
The SSID can also be input directly using the Wi-Fi screen SSID item.
To do this, at the SSID item, use the ◀◀◀ and ▶▶◀1 buttons to move the cursor, and use the wheel to set the characters.
Press the ENTER/MARK button to confirm the SSID.
- When the Wi-Fi screen is open, use the wheel to select the PASSWD item, and press the ENTER/MARK or ▶▶1 button.
- At the PASSMD item, use the ◀◀ and ▶▶I buttons to move the cursor, and use the wheel to set the router password (encryption key).
Press the ENTER/MARK button to confirm the router password (encryption key).
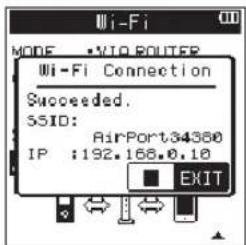
- The following message appears when connection with the router has succeeded. The Wi-Fi indicator on the unit lights.
- The following message appears if connection with the router fails. Input the correct password.
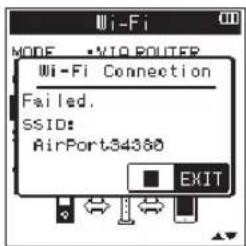
NOTE
• In many cases, the router password (encryption key) is on a label on the router itself or in its operation manual, for example. • After connection with a router has succeeded once, reconnection will be possible by just pressing the Wi-Fi button on this unit. Passwords for the two most recent connections are stored in this unit.
■connecting a smartphone or other device to an external router
- Select "Settings" → "Wi-Fi" on the device.
iOS device example
Android device example
- When the device Wi-Fi is turned on, a Wi-Fi device SSID list will appear. Select the SSID of the external router to use.
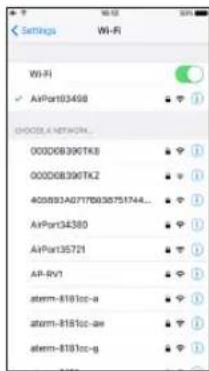
iOS device example
Android device example
- Input the password for that external router. A Wi-Fi connection between the smartphone and the external router will be established.
Remote control of the unit from a smartphone
Since the dedicated application (DR CONTROL) has the same display screen as that of the unit, you can operate the unit by remote control with the application almost the same way as operating from the unit. Before using the "DR CONTROL" application, confirm how to operate the unit. That way, you will be able to use the application smoothly.
- After completing the Wi-Fi connection, launch the DR CONTROL app (installed beforehand) on the smartphone or other device.
NOTE
Always use the latest version of DR CONTROL.
- A screen like the following will appear when the app launches, and remote operation of the device will be enabled.
iOS device example
Android device example
For a detailed explanation of the "DR CONTROL" application, see the "DR CONTROL Reference Manual", which can be downloaded from the TEAC Global Site (https://teac-global.com/).
Transferring files from the unit to a computer
File transfer with a computer is possible using the free TASCAM DR FILE TRANSFER software designed for this purpose. For details about the software download the TASCAM DR FILE TRANSFER Owners Manual from the TEAC Global Site (https://teac-global.com/).
Quick Reference for Using Various Functions
- Button names are shown as follows: MENU.
- Instructions are abbreviated. For example, 'On the Home Screen, press the MENU button, select the REC SETTING menu, and then select the PRE REC item' becomes: 'Home Screen → MENU → REC SETTING → PRE REC'
- Not all operation steps are given for complex operations. For detailed operation procedures, see the Reference Manual.
| Category Desi | red action Function name | Procedure, buttons used and explanation | |
| Basic functions | Return to the Home Screen | ■/HOMEReturn to the Home Screen if you become unsure about how to proceed. | |
| Record | Home Screen → RECORD → RECORDRecording will start with the current settings used. | ||
| Play back a file | Home Screen → ▶/IIPlays the file shown (selected). | ||
| Adjust the playback volume | OUTPUT LEVEL (+/-) buttonAdjusts the volume of headphones, speakers, etc. | ||
| Select a file to play back | Home Screen → ◄/▶The browse function is convenient for when there are many files. | ||
| Recording | Change the file format | Home Screen → MENU → REC SETTING → FILE FORMATSpecify a file format used for recording from the BWF format, WAV format, etc. | |
| Set the low-cut filter Low-cut filter function | Home Screen → INPUT → INPUT SETTING → LOW CUTThis function removes noise and other sounds at low frequencies. Select the cutoff frequency. | ||
| Adjust the input level manually | Home screen → INPUT LEVEL button → TRACK/INPUT button → INPUT LEVEL volumeAdjust the recording level by using the level meter guide display. | ||
| Adjust the input level automatically | Level control function | Home Screen → INPUT → INPUT SETTING → LEVEL CTRLThis function compresses only loud sounds to prevent recording over the maximum input level without changing the recording level. | |
| Simultaneously record two files at different input levels | DUAL REC function | Home Screen → MENU → REC SETTING → DUAL RECConfigure the settings for the DUAL REC function. | |
| Use MS microphone | Home Screen → MENU → REC SETTING → MS HICConfigure the settings for the MS microphone before using it. | ||
| Other recording features | Attach a mark while recording | Marking function | Recording screen → ENTER/MARKThis function attaches a mark to a file that can be used as an index during playback. |
| Switch files manually while recording | Manual track incrementation | Recording screen → ▶Use this function when you want to change a file to another and continue recording such as at the interval between songs. | |
| Configure the settings for automatic file change | Automatic track incrementation | Home Screen → MENU → AUTO FUNCTION → TRACK INCREMENTThis function automatically changes a file to a different one at the set size. | |
| Start recording from slightly before pressing RECORD | PRE REC function | Home Screen → MENU → REC SETTING → PRE RECWhen the unit is slow to change from recording standby to recording state, this function allows the unit to compensate the delay. | |
| File operation (only in the 4CH mode) | Check file information | Home Screen → MENU → BROWSE → Wheel → QUICK → INFORMATIONUse this function to check the date of recording, file size, etc. | |
| Delete a file | Home Screen → MENU → BROWSE → Wheel → QUICK → FILE DELETEYou can delete files that you do not need. | ||
| Delete a file | Home Screen → QUICK → DELETEYou can delete files that you do not need. | ||
| Delete all files in a folder at the same time | Home Screen → MENU → BROWSE → Wheel → QUICK → ALL DELETEYou can delete all the files in a folder at the same time. | ||
| Divide a file Dividing function | Home Screen → QUICK → DIVIDEUse this function to divide one file into two files. | ||
| Unit settings | Set the date and time | Home Screen → MENU → SYSTEM → DATE/TIMEUse this function to set the internal clock, which is used for purposes such as adding the recording date written to files. | |
| Check information about the unit and the card | Home Screen → MENU → SYSTEM → INFORMATIONChecks information such as the unit firmware version and the amount of remaining space on the card. | ||
| Change the automatic power saving function setting for power supply | Automatic power saving function | Home Screen → MENU → POWER/DISPLAY → AUTO PWR SAVEThis function automatically turns the unit off when it is not in use. | |
| Change the backlight setting | Home Screen → MENU → POWER/DISPLAY → BACKLIGHTChanges the display backlight setting. | ||
| Adjust the display contrast | Home Screen → MENU → POWER/DISPLAY → CONTRASTSets the gradation of shading shown on the display. | ||
| Set the battery type | Home Screen → MENU → POWER/DISPLAY → BATTERY TYPESelects the type of battery being used. This setting affects the accuracy of the remaining battery power display. | ||
| Set the voltage value of the phantom power supply | Home Screen → MENU → POWER/DISPLAY → PHANTOM VOLT | ||
| Restore the unit to its default settings | Initializing function | Home Screen → MENU → SYSTEM → INITIALIZERestores all settings to their factory defaults. | |
| Completely format a SD card | formatting function | Home Screen → MENU → SYSTEM → HEDIA FORMATFormats cards. | |
| Set the file name format | Home Screen → MENU → SYSTEM → FILE NAMEYou can change the characters used in the automatically assigned file names. |
Messages
The following is a list of pop-up messages.
Refer to this list if one of these pop-up messages appears and you want to check the meaning or determine the method of dealing with the problem.
| Message Meaning | and method of dealing with a problem |
| Battery Empty | The batteries are almost out of power. Replace the batteries. |
| Can't Divide | The selected division point used when DIVIDE was performed is not appropriate. (t is too close to the beginning or end of the file.) |
| Card Error | The SD card cannot be recognized properly. Change the card. |
| Card Full | The SD card has no remaining capacity. Delete unnecessary files or move them to a computer to make open space. |
| Current File MP3 | MP3 files cannot be divided. |
| Dup File Name | A file with the same name as that of a file created by DIVIDE exists in the same folder. The DIVIDE function adds "a" or "b" to the end of the file name. Before using the DIVIDE function, connect the unit to a computer and edit the file name. |
| File Full | The total number of folders and files exceeded 5000. Delete unnecessary folders and files or move them to a computer. |
| File Name ERR | DIVIDE caused the number of characters of a file name to exceed 200. The DIVIDE function adds "a" or "b" to the end of the file name. Before using the DIVIDE function, connect the unit to a computer and edit the file name to less than 198 characters. |
| File Not Found | The file cannot be found or the file may be damaged. Check the relevant file. |
| File Not Found Make Sys File | The system file is missing. This unit requires a system file for operation. While this message is shown, press the ENTER/MARK button to create a system file. |
| File Protected | The file is read only and cannot be deleted. |
| Format Error Format CARD | The SD card may not formatted properly or it may be broken. This message also appears if the card was formatted by use of a computer connected via USB or if an unformatted card is inserted in the unit.Always use the DR-44WL to format cards to be used with it. Change the SD card or press the ENTER/MARK button while this message is being shown to format the card. Formatting will erase all the data on the SD card. |
| Invalid Card Change Card | Something might be wrong with the SD card. Change the SD card. |
| Invalid SysFile Make Sys File | The system file required to operate this unit is invalid. While this message is shown, press the ENTER/MARK button to create a new system file. |
| I/O Too Short | The IN (starting) point and OUT (ending) point are too close. Set them with at least 1 second between them. |
| Max File Size | The file is larger than the designated size, or the recording time has exceeded 24 hours when the total number of folders and files was already at the limit (5000). |
| MBR Error Init CARD | The SD card may not formatted properly or it may be broken. Change the SD card or press the ENTER/MARK button while this message is being shown to format the card. Formatting will erase all the data on the SD card. |
| No Card | A SD card is not set. Insert a recordable SD card. |
| Non-Supported | The file format is not supported. See "Connecting the Unit to a Computer" in the Reference Manual for file formats that this unit can use. |
| Write Timeout | Writing to the SD card timed out.Back up files on the SD card to a computer and format the card. |
If any other errors occur, turn the unit off and restart it.
If the error message continues to appear frequently, please contact the store where you purchased this unit or a TASCAM customer support service.
Troubleshooting
If you are having trouble with the operation of this unit, please try the following before seeking repair.
If these measures do not solve the problem, please contact the store where you purchased this unit or TASCAM customer support service.
The unit does not turn on.
- Confirm that the batteries are not dead.
- Confirm that the batteries are installed in the correct ⊕ and ⊖ orientation.
- Confirm that the AC adapter (TASCAM PS-P520U: sold separately) with the unit securely connected to both the outlet and the USB connector of the unit.
- When using USB bus power, confirm that the USB cable is securely connected.
- When using USB bus power, confirm that the USB cable is not connected via a USB hub.
The unit turns off automatically.
- Confirm that the automatic power saving function is not turned on. (→ "Setting the automatic power saving function" in "Settings and Information Display" of the Reference Manual)
Since this unit complies with the European Standby Power Regulations (ErP), the automatic power saving function operates regardless of whether the unit is being powered by an AC adapter or batteries. If you do not want to use the automatic power saving function, set it to "OFF". (The factory default setting is "30 min".)
The unit does not function.
- Confirm that the HOLD / switch is not set to HOLD.
- Confirm that the unit is not connected to a computer by a USB cable. ("USB connected" is shown on the display.)
The SD card is not recognized.
- Confirm that the SD card is inserted completely.
The unit will not play back.
- If you are trying to play back a WAV file, confirm that the sampling frequency is supported by this unit.
- If you are trying to play an MP3 file, confirm that the bit rate is supported by this unit.
No sound is output from the speaker.
- Confirm that headphones are not connected.
- Confirm that SPEAKER is not set to OFF.
- Check the connection to the monitoring system.
- Confirm that the volume of the monitoring system is not minimized.
- Confirm that the output level setting of the unit is not minimized.
No sound is output.
- Check the connection to the monitoring system.
- Confirm that the volume of the monitoring system is not minimized.
- Confirm that the output level setting of the unit is not minimized.
The unit will not record.
• If you are using an external device, check the connection again.
- Check the input settings again.
- Confirm that the input level is not too low.
- Confirm that the SD card is not full.
- Confirm that the number of files has not reached the maximum that the unit can handle.
The input level is low.
- Confirm that the input level setting is not too low.
- Confirm that the output level of any connected device is not too low.
Sound recorded is distorted.
- Confirm that the input level setting is not too high.
- Confirm that the reverb function is off.
The playback sound sounds unnatural.
- Confirm that the playback speed has not been changed.
- Confirm that the playback equalizer is off.
- Confirm the level alignment function is disabled.
- Confirm that the reverb function is off.
Files cannot be deleted.
- Confirm that you are not trying to delete a file that has been copied from a computer after being write-protected.
This unit's files do not appear on the computer.
- Confirm that the unit is connected to the computer via its USB port.
- Confirm that a USB hub is not being used.
- Confirm that the unit is not recording or in the recording standby state.
The unit cannot be connected to a smartphone or communications between them stops.
- Confirm that the Wi-Fi device is turned on and Wi-Fi is on.
- Confirm that the distance between the Wi-Fi device and the unit is not too large.
Also confirm that there are no walls or obstacles between them.
When a Wi-Fi device is to the rear side of this unit, the unit itself may interrupt communications.
Change the positions of the Wi-Fi device and the unit.
- Turn the unit off, and then turn it on again.
- Delete the registration of "DR-44WL" of the Wi-Fi device and follow the steps in "Connecting the unit to a smartphone via Wi-Fi".
The wrong language was set accidentally.
- Slide the HOLD/ switch to turn the power off. Then, slide the HOLD/ switch while pressing and holding the MENU button to turn the unit on again.
The language selection menu will appear, and you will be able to select the language.
Specifications
Ratings
Recording media
SD card (64 MB - 2 GB), SDHC card (4 GB - 32 GB), SDXC card (48 GB - 128 GB)
Recording/playback formats
BWF: 44.1/48/96 kHz, 16/24 bit
WAV: 44.1/48/96 kHz, 16/24 bit
MP3: 44.1/48 kHz, 32/64/96/128/192/256/320 kbps
Number of channels
4 channels
-4CH mode mono: Up to 4 files
Stereo: Up to 2 files
Stereo (1 file) + mono (up to 2 files)
MTR mode mono: Up to 4 files
Inputs and outputs
EXT MIC/LINE IN jack (can provide phantom power supply)
Connector: XLR-3-31, φ6.3 mm (1/4") TRS standard jack
Ω/LINE OUT jack
Connector: φ3.5 mm (1/8") stereo mini jack
Built-in speaker
0.3 W (mono)
USB port
Connector: Micro-B type
Format: USB 2.0 HIGH SPEED mass storage class
Audio performance
Frequency response
20-20 kHz +1/-3 dB (EXT IN to LINE OUT, 44.1 kHz sampling frequency, JEITA)
20-22 kHz +1/-3 dB (EXT IN to LINE OUT, 48 kHz sampling frequency, JEITA)
20-40 kHz +1/-3 dB (EXT IN to LINE OUT, 96 kHz sampling frequency, JEITA)
Distortion
0.05% or less (EXT IN to LINE OUT, 44.1/48/96 kHz sampling frequency, JEITA)
S/N ratio
92 dB or higher (EXT IN to LINE OUT, 44.1/48/96 kHz sampling frequency, JEITA)
Note: JEITA indicates compliance with JEITA CP-2150
Recording times
| File format (setting when recording) | SDHC card capacity | |
| 4 GB | ||
| WAV/BWF 16 bit (STEREO) 44.1 kHz 6 hours 1 | 7 minutes | |
| WAV/BWF 24 bit (STEREO) 96 kHz 1 hours 55 | minutes | |
- The recording times shown above are theoretical values. Times may differ depending on the SD, SDHC, and SDXC cards in use.
- The recording times shown above are not continuous recording times, but rather they are the total possible recording times for the SD, SDHC, and SDXC cards.
- If recording in mono in the WAV format, the maximum recording time will be double the figures above.
- If DUAL REC recording in the WAV/BWF format or 4-channel recording, the maximum recording time will be half the figures above.
Wi-Fi
Wireless standard
Compliant with IEEE 802.11b/g/n (2.4 GHz only)
Wireless communication mode
TO DEVICE mode
Simple access point (Limited AP)
VIA ROUTER mode
Infrastructure (Station)
Security
WPA2-PSK (WPS2.0-supported)
General
Power supply
4 AA batteries (alkaline or NiMH)
USB bus power from a computer
Dedicated AC adapter (TASCAM PS-P520U; sold separately)
Power consumption
2.5 W (maximum)
Battery operation time (continuous operation)
• Using alkaline batteries (EVOLTA)
| Format | Operation time | Note |
| Recorded in 2ch WAV, 44.1 kHz, 16 bit | About 16 hours | When MIC input is selected (phantom is not used) |
• Using NiMH batteries (eneloop)
| Format | Operation time | Note |
| Recorded in 2ch WAV, 44.1 kHz, 16 bit | About 12 hours | When MIC input is selected (phantom is not used) |
NOTE
- When phantom power supply is used, the operation time may be shorter depending on the microphone you use.
- The battery operation times (during continuous operation) could vary depending on the media being used.
Dimensions
346 g/251 g (including batteries/not including batteries)
Operating temperature range
0°C-40°C
• Illustrations in this manual may differ in part from the actual product.
- Specifications and external appearance may be changed without notice to improve the product.
• Detailed specifications are provided in the Reference Manual.
INSTRUCTIONS DE SÉCURITÉ IMPORTANTES
Contains IC: 9154A-GS2100MIP
Compliance of interference
CET APPAREIL NUMÉRIQUE DE LA CLASSE B EST CONFORME À LA NORME NMB-003 DU CANADA.
① Microphone stéréo intégré
② Voyant PEAK
③ Écran
④ Touche TRACK/INPUT
⑤ Touche ■/HOME
⑥ |◀◀ Touche de retour rapide
⑦ Touche ▶/II
⑧ Touche MENU
⑨ Voyant MTR
⑩ Touche MIXER
⑪ Touche RECORD [●] / voyant RECORD
⑫ Touche ▶▶▶ l d'avance rapide
⑬ Touche INPUT
⑭ Touche ENTER/MARK
⑮ Touche QUICK
⑯ Molette
Face avant
⑰ Voyant Wi-Fi
⑱ Prises EXT MIC/LINE IN 1/L et 2/R (XLR/TRS)
bar
| Position | Value | |---|---| | 1 | 1 | | 2 | 2 | | 3 | 3 | | 4 | 4 | | ST | 5 | | TASCAM0001 | -0.18 | | 10-11 | 10-11 | | 12-13 | 12-13 | | 14-15 | 14-15 | The chart displays a single bar for category 10 (labeled '10-15') and includes a vertical scale labeled '00:00:53' and an identifier '15'. The bars are grouped in columns 1-7 and 12-13, indicating possible groupings or categories within the data. The label '15' appears twice in the image, likely corresponding to the top of the chart.NOTE
natural_image
Line drawing of a handheld electronic device with ports and a close-up view showing internal components (no text or symbols)Mode À ROUTEUR
WAV : 44,1/48/96 kHz, 16/24 bits
MP3 : 44,1/48 kHz, 32/64/96/128/192/256/320 kbit/s
Nombre de canaux
4 canaux
346 g/251 g (piles comprises/piles non comprises)
③ Estado on/off de reverb
NOTA
natural_image
Line drawing of a handheld electronic device with ports and buttons, showing internal components and a separate panel (no text or symbols)- When formatting is complete, it will return to the Home screen. You may format the card whenever required.
CUIDADO
■odo VIA ROUTER
BWF: 44.1/48/96 kHz, 16/24 bits
WAV: 44.1/48/96 kHz, 16/24 bits
MP3: 44.1/48 kHz, 32/64/96/128/192/256/320 kbps
Número de canales
4 canales
●Modo 4CH Mono: Hasta 4 ficheros
Stereo: Hasta 2 ficheros
Stereo (1 fichero) + mono (hasta 2 ficheros)
●Modo MTR Mono: Hasta 4 ficheros
Entrada/salida
WPA2-PSK (compatible WPS2.0)
General
Alimentación
natural_image
Diagram showing a device with an arrow pointing to a component, next to a square plate (no text or symbols present)BWF: 44,1/48/96 kHz, 16/24 Bit
WAV: 44,1/48/96 kHz, 16/24 Bit
MP3: 44,1/48 kHz, 32/64/96/128/192/256/320 Kbit/s
Anzahl der Kanäle
4 Kanäle
•4-Kanal-Modus
Format: USB 2.0 High-Speed, Mass Storage Class
NOTA
natural_image
Line drawing of a handheld electronic device with ports and a small inset showing a square component (no text or symbols)Modalità VIA ROUTER
Dispositivo iOS Dispositivo Android
Scheda SD (64 MB - 2 GB), scheda SDHC (4 GB - 32 GB),
scheda SDXC (64 GB - 128 GB)
BWF : 44,1/48/96 kHz, 16/24 bit
WAV : 44,1/48/96 kHz, 16/24 bit
MP3 : 44,1/48 kHz, 32/64/96/128/192/256/320 kbps
Numero di canali
4 canali
This warranty gives you specific legal rights and you may also have other rights which vary from state to state. This warranty is only valid within the country the unit was originally purchased.
WHAT IS COVERED AND WHAT IS NOT COVERED
Except as specified below, this warranty covers all defects in materials and workmanship in this product. The following are not covered by the warranty:
- Damage to or deterioration of the external cabinet.
- Damage resulting from accident, misuse, abuse or neglect.
- Damage resulting from failure to perform basic daily maintenance and/or calibration or otherwise resulting from failure to follow instructions contained in your owner's manual.
- Damage occurring during shipment of the product. (Claims must be presented to the carrier)
- Damage resulting from repair or attempted repair by anyone other than TEAC or an authorized TASCAM service station.
- Damage resulting from causes other than product defects, including lack of technical skill, competence, or experience of the user.
- Damage to any unit which has been altered or on which the serial number has been defaced, modified or is missing.
WHO IS COVERED UNDER THE WARRANTY
This warranty may be enforced only by the original purchaser. This warranty is not valid if the product was purchased through an unauthorized dealer.
LENGTH OF WARRANTY
All parts except heads and disk drives are warranted for one (1) year from the date of original purchase. Heads and disk drives are warranted for ninety (90) days from date of original purchase. Labor is warranted for ninety (90) days from date of original purchase.
WHAT WE WILL PAY FOR
We will pay all labor and material expenses for items covered by the warranty. Payment of shipping charges is discussed in the next section of this warranty.
HOW YOU CAN GET WARRANTY SERVICE
Your unit must be serviced by an authorized TASCAM service station in the United States. (This warranty is not enforceable outside the U.S.) If you are unable to locate an authorized TASCAM service station in your area, please contact us. We either will refer you to an authorized service station or instruct you to return the unit to the factory. Whenever warranty service is required, you must present a copy of the original dated sales receipt from an Authorized TASCAM Dealer.
You must pay any shipping charges if it is necessary to ship the product to service. However, if the necessary repairs are covered by the warranty, we will pay return surface shipping charges to any destination within the United States.
LIMITATION OF IMPLIED WARRANTIES
Any implied warranties, INCLUDING WARRANTIES OF MERCHANTABILITY AND FITNESS FOR A PARTICULAR PURPOSE, are limited in duration to the length of this warranty.
EXCLUSION OF DAMAGES
TEAC's liability for any defective product is limited to repair or replacement of the product, at TEAC's option. TEAC shall not be liable for:
-
Damages based upon inconvenience, loss of use of the product, loss of time interrupted operation or commercial loss; or
-
Any other damages, whether incidental, consequential or otherwise.
Some states do not allow limitations on how long an implied warranty lasts and/or do not allow the exclusion or limitation of incidental or consequential damages, so the above limitations and exclusions may not apply to you.
To locate an Authorized Service Center in Your Area
CALL 1-323-726-0303
This product is subject to the legal warranty regulations of the country of purchase. In case of a defect or a problem, please contact the dealer where you bought the product.
< In other countries/areas >
This warranty gives you specific legal rights, and you may also have other rights that vary by country, state or province.
If you have a warranty claim or request, please contact the dealer where you bought the product.
If you require repair services for your TASCAM equipment, please contact the dealer where the product was purchased from or the TASCAM Distributor in your country. A list of TASCAM Distributors can be found on our website at: https://teac-global.com/
TASCAM
TEAC CORPORATION
Phone: +81-42-356-9143
1-47 Ochiai, Tama-shi, Tokyo 206-8530 Japan
10410 Pioneer Blvd. Suite #1, Santa Fe Springs, California 90670, U.S.A.
TEAC UK Ltd. https://www.tascam.eu/en/
Phone: +44-1923-797205
Luminous House, 300 South Row, Milton Keynes, Buckinghamshire, MK9 2FR, United Kingdom
TEAC EUROPE GmbH https://www.tascam.eu/de/
Phone: +49-611-71580
Room 817, Xinian Center A, Tairan Nine Road West, Shennan Road, Futian District, Shenzhen, Guangdong Province 518040, China
0321.MA-3255A Printed in China

WARRANTY
Model/Modèle/Modell
Modello/Modelo/型号
DR-44WL
Black Edition (DR-44WLB)
Serial No./No de série/Seriennummer
Address/Adresse/Adresse
https://teac-global.com
Dealer's address/Adresse du revendeur/Adresse des Händlers
- IMPORTANT SAFETY INSTRUCTIONS
- WARNING
- CAUTION
- CAUTIONS ABOUT BATTERIES
- ■br European Customers
- Disposal of electrical and electronic equipment
- Disposal of batteries and/or accumulators
- Wireless equipment precautions
- Compliance of radio transmitter and interference
- Model for USA
- Model for Canada
- Compliance of radio transmitter
- Compliance of interference
- Model for EEA (European Economic Area)
- Radiation Exposure requirements
- Based on the following two conditions:
- Statement of compliance
- EEA (European Economic Area) model
- Information for interference (FCC requirements)
- Declaration of Conformity
- Contents
- Introduction
- Note about the Reference Manual
- Using the TEAC Global Site
- https://teac-global.com/
- About TASCAM customer support service
- Product registration
- Items included with this product
- About SD cards
- Precautions
- Precautions for placement and use
- Beware of condensation
- Cleaning the unit
- Names and Functions of Parts
- Home Screen
- ④ Speaker output display
- ⑤ Phantom power supply display
- ⑥ Power supply status display
- Preparation
- Preparing the power supply
- Using AA size batteries
- NOTE
- Using an AC adapter (sold separately)
- Starting up the unit
- Selecting the language
- If you accidentally select the wrong language
- Setting the built-in clock
- Inserting the SD card
- Preparing an SD card for use
- Shutting down
- Connecting monitoring devices and headphones
- Basic menu operation procedures
- Menu structure
- Recording
- Recording Screen
- ⑦ Level meter guide display
- ⑧ Level meter
- ⑨ File status display
- ⑩ Elapsed recording time
- ⑪ Remaining recording time
- ⑫ Peak value in decibels (dB)
- ⑬ Auto punch in/out function on/off status or master track loading status (MTR mode only)
- Adjusting the input level
- Set the low-cut filter
- Using the level control function
- PEAK
- LIMITER
- Record
- About the recording standby state
- Recording menu structure
- Playback
- Playing back recordings
- Pausing
- Stopping
- Fast-rewinding and fast-forwarding (search)
- Moving the playback position
- Selecting the playback file (skipping)
- Adjusting the playback volume
- Connecting with a Computer
- Exchanging files with a computer
- Disconnecting the unit from a computer
- Settings and Information Display
- Turning the built-in speaker off
- System settings
- Connecting the unit to a smartphone via Wi-Fi
- How to obtain and install the dedicated application (DR CONTROL)
- Selecting the Wi-Fi mode
- TDEVICE mode
- A ROUTER mode
- Connecting the unit directly to external devices (smartphones, tablets and computers) by Wi-Fi (TO DEVICE mode)
- Setting the Wi-Fi mode to TO DEVICE
- ●Connecting the DR-44WL to a smart phone or tablet via Wi-Fi for the first time
- ■connecting the DR-44WL to a smart phone or tablet via Wi-Fi (from second time onward)
- Connecting the unit to external devices (smartphones, tablets and computers) by Wi-Fi (VIA ROUTER mode)
- Setting the Wi-Fi mode to VIA ROUTER
- - Connecting the unit to an external router
- ■connecting a smartphone or other device to an external router
- Remote control of the unit from a smartphone
- Transferring files from the unit to a computer
- Quick Reference for Using Various Functions
- Messages
- Troubleshooting
- The unit does not turn on.
- The unit turns off automatically.
- The unit does not function.
- The SD card is not recognized.
- The unit will not play back.
- No sound is output from the speaker.
- No sound is output.
- The unit will not record.
- The input level is low.
- Sound recorded is distorted.
- The playback sound sounds unnatural.
- Files cannot be deleted.
- This unit's files do not appear on the computer.
- The unit cannot be connected to a smartphone or communications between them stops.
- The wrong language was set accidentally.
- Specifications
- Ratings
- Recording media
- Recording/playback formats
- Number of channels
- Inputs and outputs
- EXT MIC/LINE IN jack (can provide phantom power supply)
- Ω/LINE OUT jack
- Built-in speaker
- USB port
- Audio performance
- Frequency response
- Distortion
- S/N ratio
- Wi-Fi
- Wireless standard
- Wireless communication mode
- Security
- General
- Power supply
- Power consumption
- Battery operation time (continuous operation)
- Dimensions
- Operating temperature range
- INSTRUCTIONS DE SÉCURITÉ IMPORTANTES
- Mode À ROUTEUR
- Nombre de canaux
- NOTA
- CUIDADO
- ■odo VIA ROUTER
- Número de canales
- Entrada/salida
- Alimentación
- Anzahl der Kanäle
- Modalità VIA ROUTER
- Numero di canali
- WHAT IS COVERED AND WHAT IS NOT COVERED
- WHO IS COVERED UNDER THE WARRANTY
- LENGTH OF WARRANTY
- WHAT WE WILL PAY FOR
- HOW YOU CAN GET WARRANTY SERVICE
- LIMITATION OF IMPLIED WARRANTIES
- EXCLUSION OF DAMAGES
- To locate an Authorized Service Center in Your Area
- < In other countries/areas >
- TASCAM
- WARRANTY
Brand : TASCAM
Model : DR44WLB
Category : Audio recorder