
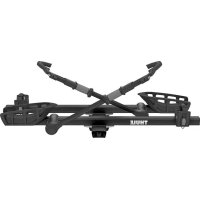
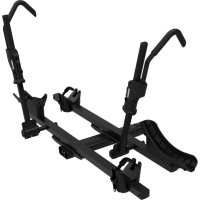
Round Trip 699 - Bike rack THULE - Free user manual and instructions
Find the device manual for free Round Trip 699 THULE in PDF.
| Product Type | Bike Rack |
| Brand | Thule |
| Model | Round Trip 699 |
| Dimensions (approx) | 60 x 30 x 20 cm |
| Weight (approx) | 5 kg |
| Power Supply | None (manual operation) |
| Max Number of Bikes | 2 |
| Max Load per Bike | 20 kg |
| Attachment Type | Hatchback mounting |
| Support Arms | Adjustable arms with rubber pads |
| Fastening Straps | Ratchet straps to secure the bike |
| Compatibility | Most bikes, including MTB and road bikes |
| Main Functions | Bike transport, quick installation, folding for storage |
| Maintenance and Cleaning | Clean with a damp cloth and mild soap; avoid high-pressure cleaners |
| Storage | Foldable for compact storage |
| Safety | Regularly check tightness of straps and fastenings; do not exceed maximum load |
| Spare Parts | Available from Thule customer service |
| Warranty | Limited manufacturer warranty (see manual) |
| Origin | Sweden |
Frequently Asked Questions - Round Trip 699 THULE
User questions about Round Trip 699 THULE
0 question about this device. Answer the ones you know or ask your own.
Ask a new question about this device
Download the instructions for your Bike rack in PDF format for free! Find your manual Round Trip 699 - THULE and take your electronic device back in hand. On this page are published all the documents necessary for the use of your device. Round Trip 699 by THULE.
USER MANUAL Round Trip 699 THULE
| part description part number qty. | |||
| A | top shell | 05325 | 1 |
| B | bottom shell | 05327 | 1 |
| C | strap harness | 05310 | 1 |
| D | plastic shield | 05328 | 1 |
| E | protective foam | 05329 | 2 |
| F | tie-down strap | 10169 | 2 |
| PARTS BAG | 05360 | 1 | |
| G | caster | 05331 | 2 |
| H | lock nut | 05338 | 8 |
| I | screw | 05340 | 8 |
| J | washer | 05339 | 8 |
| PARTS BAG | 05314 | 1 | |
| K | tote bag | 05311 | 1 |
| L | tool bag | 05312 | 1 |
| M | chain/tube wrap | 05313 | 2 |
WARNINGS/LIMITATIONS
- The Round Trip is designed to accommodate bicycles of a variety of sizes and frame designs, which may require extra protection in areas susceptible to scratches and dents.
- Wheels should be carefully packed to avoid damage to spokes.
ACCESSORIES
TRANSPORTING THE ROUND TRIP™ – [RFM] ROOF MOUNT KIT (SOLD SEPARATELY)
Also available from Thule is the RFM Roof Mount Kit for transporting the Round Trip on top of your car. The RFM consists of heavy-duty nylon straps and weather stripping for protection from the elements and is suitable for Thule standard and Xsporter load bars, Yakima ^® , and most factory installed racks.
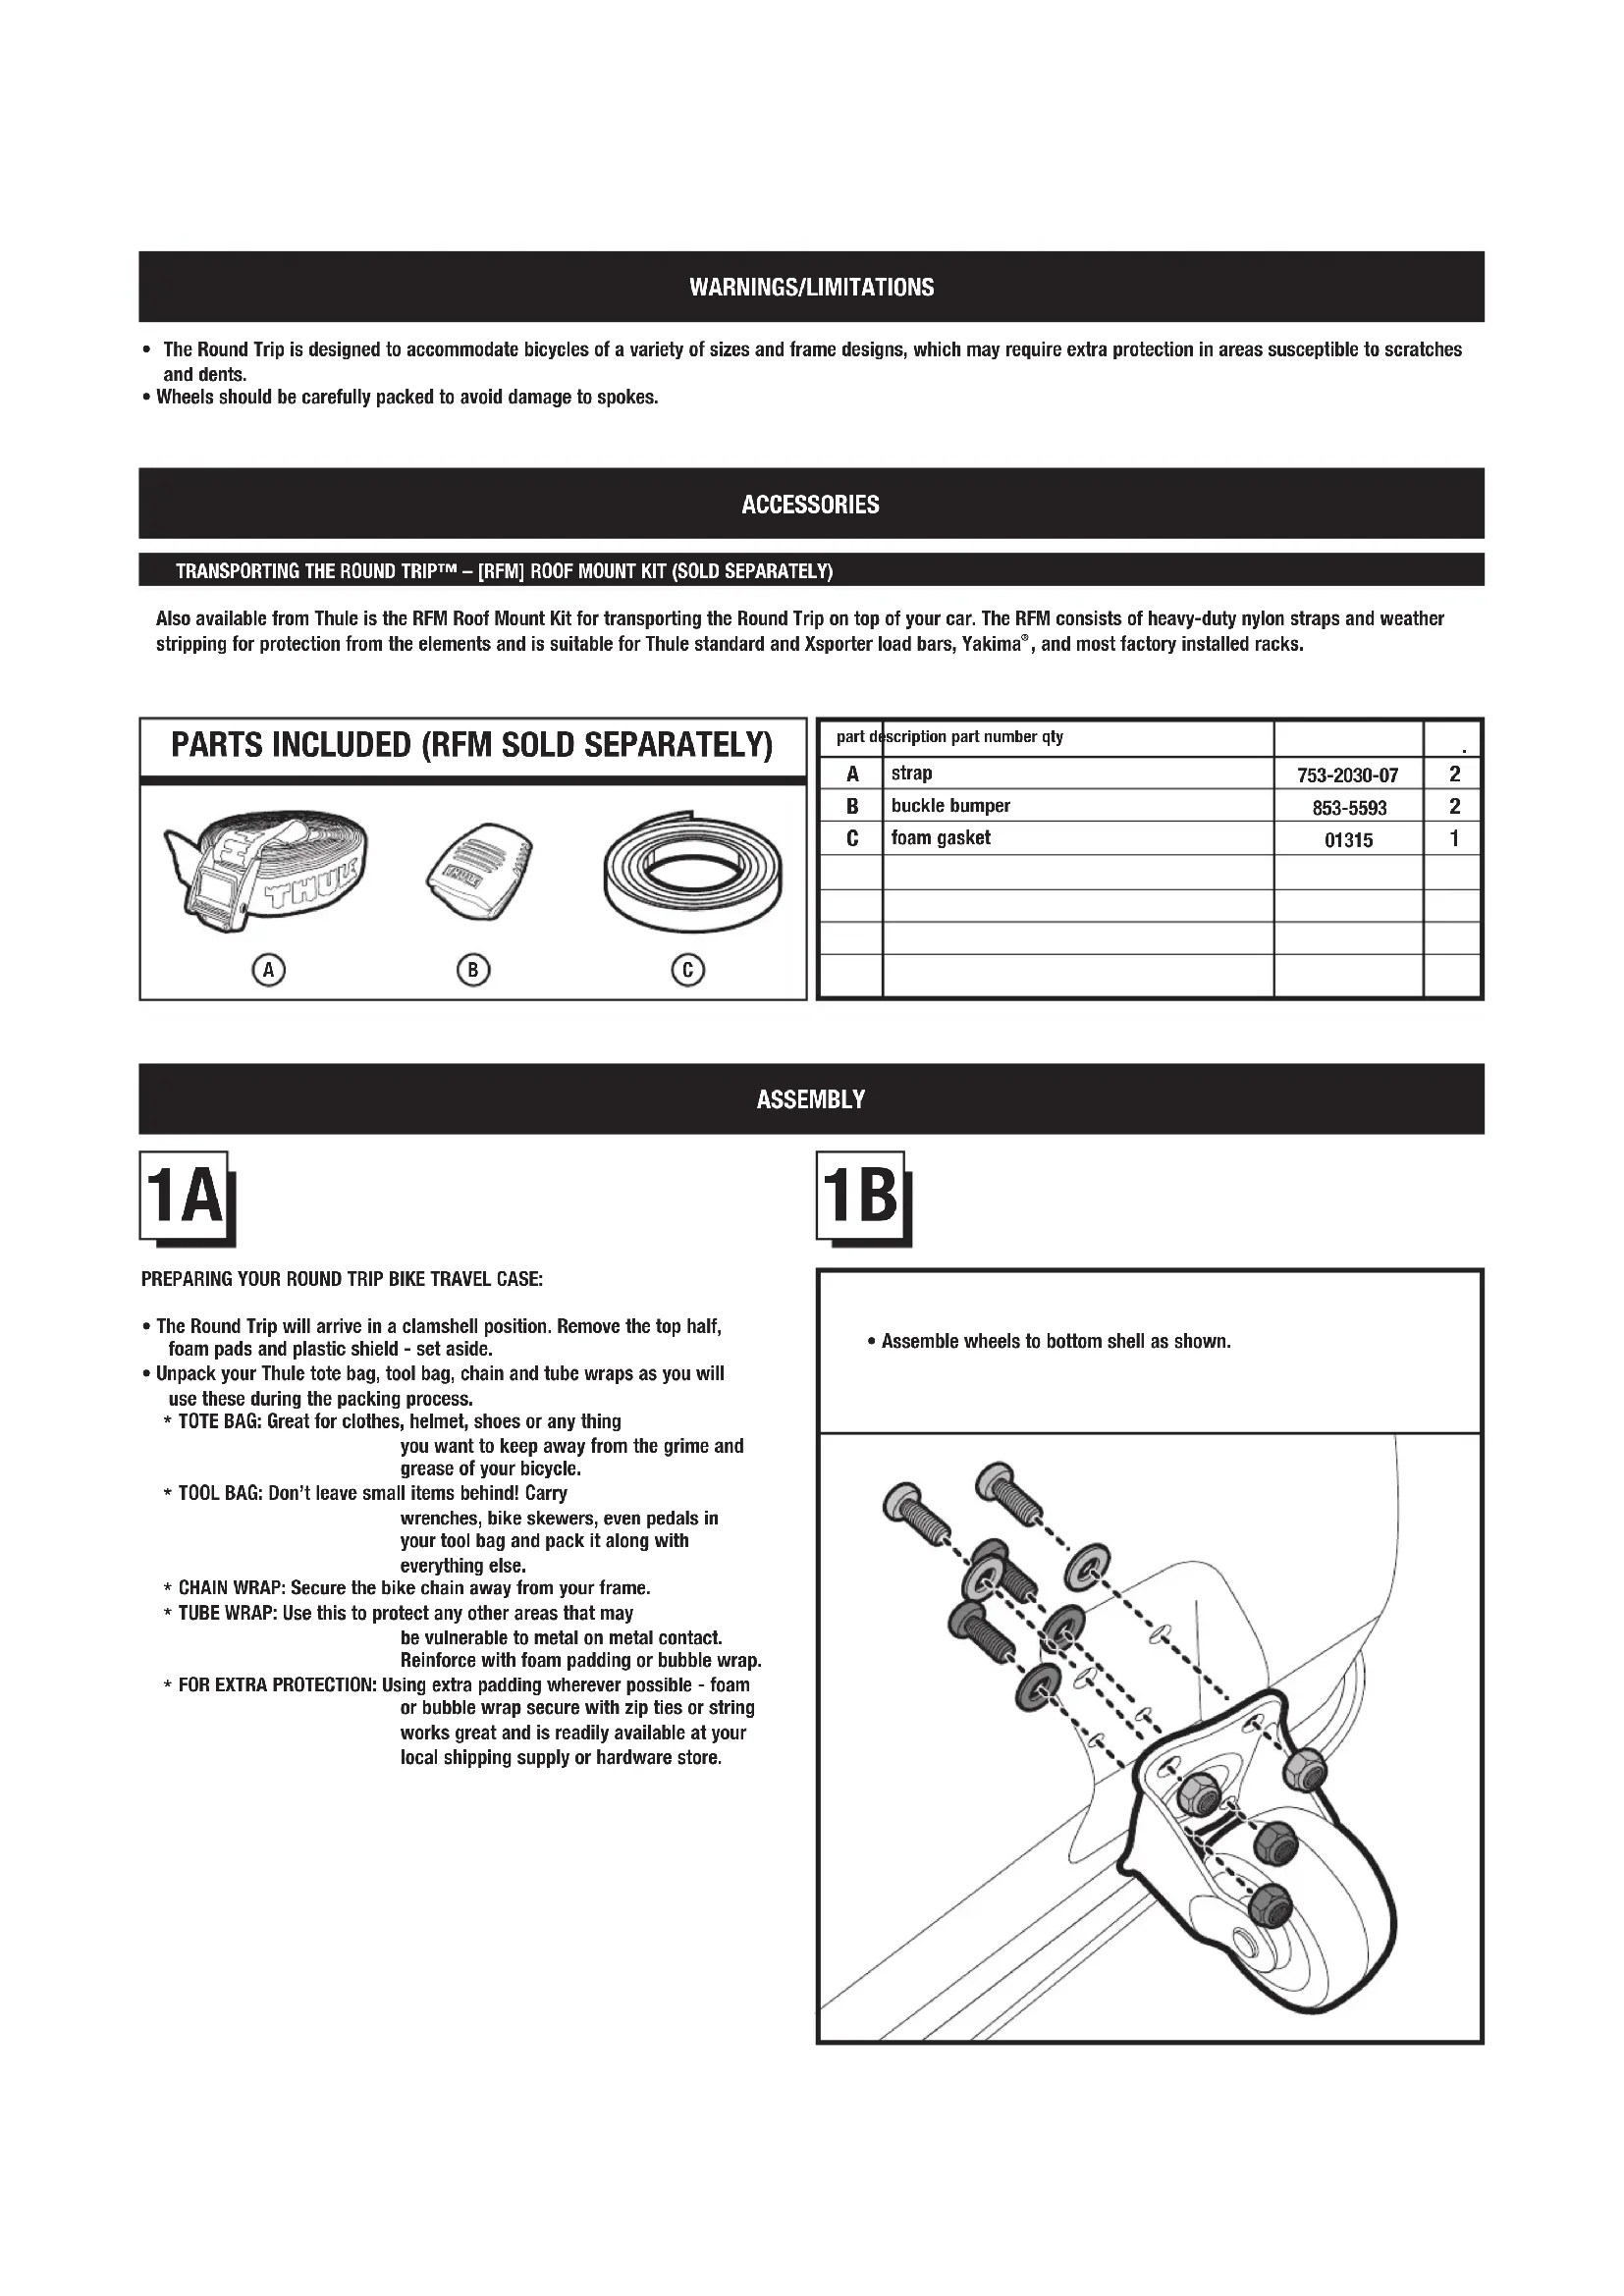
| part description part number qty | |||
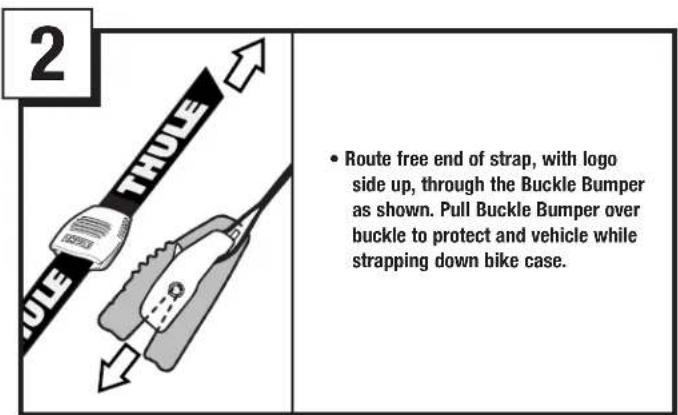
| A | strap | 753-2030-07 | 2 |
| B | buckle bumper | 853-5593 | 2 |
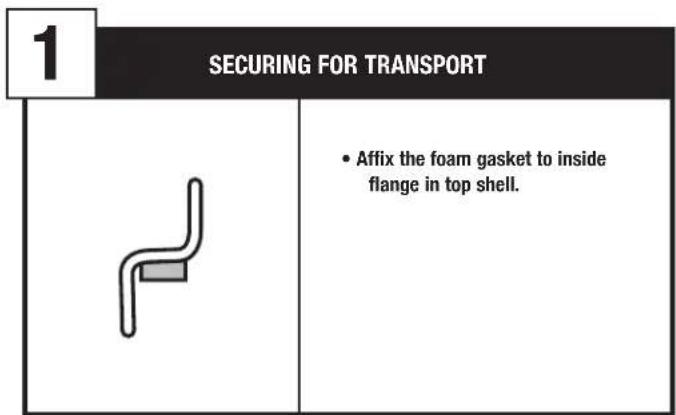
| C | foam gasket | 01315 | 1 |
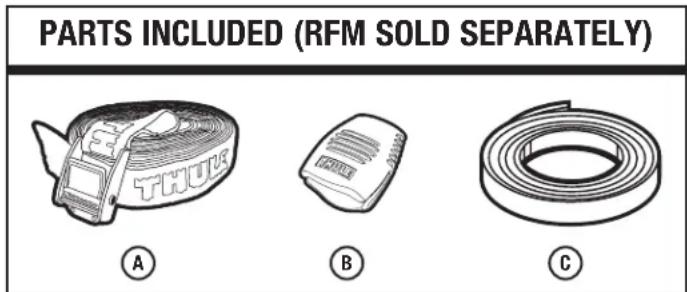
ASSEMBLY

PREPARING YOUR ROUND TRIP BIKE TRAVEL CASE:
- The Round Trip will arrive in a clamshell position. Remove the top half, foam pads and plastic shield - set aside.
- Unpack your Thule tote bag, tool bag, chain and tube wraps as you will use these during the packing process.
* TOTE BAG: Great for clothes, helmet, shoes or any thing you want to keep away from the grime and grease of your bicycle.
* TOOL BAG: Don't leave small items behind! Carry wrenches, bike skewers, even pedals in your tool bag and pack it along with everything else.
* CHAIN WRAP: Secure the bike chain away from your frame.
* TUBE WRAP: Use this to protect any other areas that may be vulnerable to metal on metal contact. Reinforce with foam padding or bubble wrap.
* FOR EXTRA PROTECTION: Using extra padding wherever possible - foam or bubble wrap secure with zip ties or string works great and is readily available at your local shipping supply or hardware store.

2
PACKING YOUR BIKE
natural_image
Illustration of two bicycles with spokes and wheel hub, enclosed in a decorative border (no text or symbols)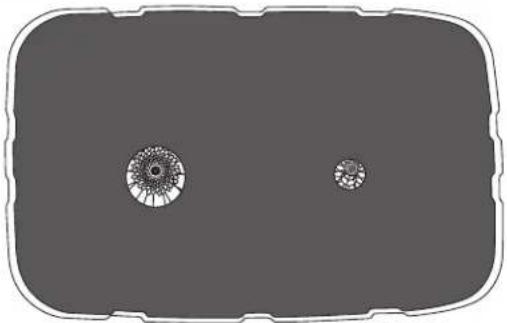
natural_image
Simple diagram of two circular objects with radiating lines inside a rounded rectangle (no text or symbols)
natural_image
Blank gray rounded rectangle with white border (no text or symbols)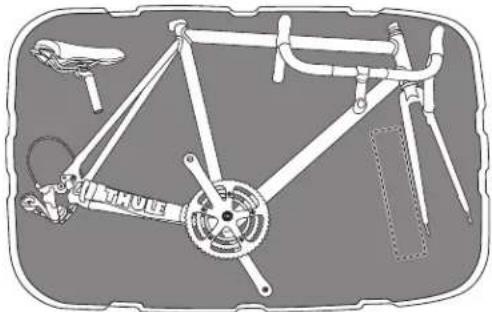
natural_image
Technical line drawing of a bicycle frame with levers and wheel (no text or symbols)
natural_image
Top-down technical drawing of a vehicle chassis with labeled parts (no readable text or symbols)a PREPARING YOUR BIKE:
- Position your bike for disassembly. Place items in your tote bag and tool bag to ensure nothing is left behind.
- Remove front and rear wheels. Remove skewers.
HINT: Pack these in your Thule tool bag.
- Unthread pedals.
HINT: Place these in your Thule tote or tool bag.
- Remove seat/seat post. DON'T FORGET to loosely tighten the binder bolt after the seat post has been removed.
HINT: Mark the position of your seat with tape for easy reassembly.
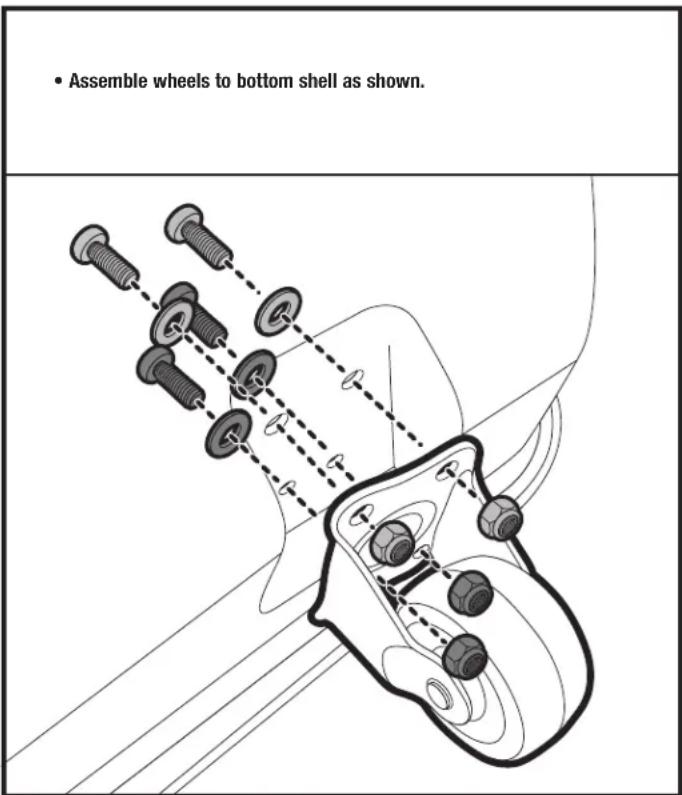
b Lay rear wheel into the rear of bottom shell cog side up followed by the front wheel. Place plastic shield over the wheels so that it rests on the shelf around the perimeter of the bottom shell. The larger hole should be positioned over the cog set. Place one layer of foam over plastic shield.
c Disassemble handlebars. Depending on your frame style you may need to either loosen handlebars and position along the top tube or remove handlebars completely and position along the fork.
HINT: Reinforce this area against metal-on-metal contact!
d Line up the right crank arm (chain side) with the chain stay tube. Capture the slack in the chain with the Chain Wrap then secure to chain stay tube. The Chain Wrap will prevent chain oil and dirt from contacting bike case contents.
HINT: To prevent damage in while in transit, you may wish to secure the derailleur tension pulley to the chain stay using your own zip
e Secure the bike frame into a center position by threading the tie-down straps, which we have provided, through the frame and metal rings attached to the inside of the bike case.
f Place seat/post either inside frame triangle or behind seat stay.
HINT: This area may require additional security against metal-on-metal contact by using your own foam padding or bubble
g Lay second foam sheet over frame. Make sure no bicycle parts are touching sides of case.
h Place the Tool Bag and Tote Bag in this layer to ensure they will be held in position by protective foam.
i Place top shell over bottom shell of case.
HINT: Handle and Wheel icons at the top and bottom of the top shell indicate proper alignment.
j Loosen all straps. Latch buckles then pull tabs to cinch straps snugly.
k For extra security, rings on both sides of case will accept most padlocks.

THULE RACK GUIDELINES
When using Thule Car Racks and accessories, the user must understand the precautions. The points listed below will assist you in using the rack system and will encourage safety. Please review the instructions and warranty carefully. Assembly and installation are the end user's responsibility and beyond Thule's control. Therefore, Thule exclusively limits its warranty to the repair or replacement of a defective Thule product for up to five years from retail purchase. Damage to your vehicle, cargo, or to any person or property is excluded.
- Check the Thule Fit Guide or the manufactures' guidelines for any restrictions about using hitch-mounted boxes.
- Check local and state laws governing projection of objects beyond your vehicle. Be aware of the width and height of your cargo since clearance of speed bumps and other low-lying objects can affect the load. All cargo will affect the vehicle's driving behavior. Never drive with any lock, knob, or rack in the open or unlocked position.
- Make sure all knobs, bolts, screws, straps, and locks are firmly attached, tightened and locked before every trip. Knobs, bolts, screws, straps, and locks must be periodically inspected for signs of wear, corrosion, and fatigue. Check your load at stops during the trip to insure continued fastening security.
- Remove your Thule rack and accessories when they are not in use and before entering automatic car washes.
- For safety to your vehicle and rack system, obey all posted speed limits and traffic cautions. Adapt your speed to the conditions of the road and the load being carried.
- Do not use Thule Car Racks and accessories for purposes other than those for which they were designed. Do not exceed their carrying capacity. Failure to follow these guidelines or the product's instructions will void the warranty.
- Consult with your Thule dealer if you have any questions regarding the operations and limits of Thule products. Review all instructions and warranty information carefully.
- All locks must be turned and moved periodically to ensure smooth operation. Use graphite or similar dry lubricant to help this. Thelocks are designed to deter vandalism and theft. Remove valuable gear if your vehicle is unattended for an extended period. Place at least one key in the glove compartment. Replacement keys are available through your dealer or Thule direct at www.thuleracks.com.
• Not intended for off-road use. - Do not install on a trailer or other towed vehicle.
THULE CAR RACK SYSTEMS LIMITED LIFETIME WARRANTY [EFFECTIVE JANUARY 1, 2006]
Register online at www.thuleracks.com/register
THULE will warranty all THULE brand car rack systems and its accessories manufactured by THULE during the time that an original retail purchaser owns the product. This warranty terminates if a purchaser transfers the product to any other person.
Subject to the limitations and exclusions described in this warranty, THULE will remedy defects in materials or workmanship by repairing or replacing, at its option, a defective product without charge for parts or labor. In addition, THULE may elect, at its option, not to repair or replace a defective product but rather issue to a purchaser a refund equal to the purchase price paid for the product or a credit to be used toward the purchase of a new THULE load carrier system.
No warranty is given for defects caused by normal wear and tear, cosmetic rust, scratches, accidents, unlawful vehicle operation, or modification of, or any types of repair of, a load carrier system other than those authorized by THULE.
No warranty is given for defects resulting from conditions beyond THULE's control including, but not limited to, misuse, overloading, or failure to assemble, mount or use the product in accordance with THULE's written instructions or guidelines included with the product or made available to the purchaser.
No warranty is given for Thule products purchased outside of the United States, Canada and Mexico.
In the event that a product is defective, the purchaser should contact the THULE dealer from whom it purchased the product or an Authorized Thule Service Center. If the dealer or Authorized Thule Service Center is not able to correct the defect, the purchaser should contact THULE in writing or by phone at:
THULE 42 Silvermine Road Seymour, Connecticut 06483 Attn: Customer Service 203 881-9600
In the event that a product needs to be returned to THULE, a THULE technician at the address or telephone number listed above will provide the purchaser with the appropriate mailing address and any additional instructions. Please note that the purchaser will be responsible for the cost of mailing the product to THULE and that proof of purchase in the form of an original purchase invoice or receipt and a detailed description of the defect must be included in the mailing.
DISCLAIMER OF LIABILITY
REPAIR OR REPLACEMENT OF A DEFECTIVE PRODUCT OR THE ISSUANCE OF A REFUND OR CREDIT (AS DETERMINED BY THULE) IS A PURCHASER'S EXCLUSIVE REMEDY UNDER THIS WARRANTY. DAMAGE TO A PURCHASER'S VEHICLE, CARGO AND/OR TO ANY OTHER PERSON OR PROPERTY IS EXCLUDED.
THIS WARRANTY IS EXPRESSLY MADE IN LIEU OF ANY AND ALL OTHER WARRANTIES, EXPRESS OR IMPLIED, INCLUDING THE WARRANTIES OF MERCHANTABILITY AND FITNESS FOR A PARTICULAR PURPOSE.
THULE'S SOLE LIABILITY TO ANY PURCHASER IS LIMITED TO THE REMEDY SET FORTH ABOVE. IN NO EVENT WILL THULE BE LIABLE FOR ANY LOST PROFITS, LOST SALES, OR FOR ANY CONSEQUENTIAL, DIRECT, INDIRECT, INCIDENTAL, SPECIAL, EXEMPLARY, OR PUNITIVE DAMAGES OR FOR ANY OTHER DAMAGES OF ANY KIND OR NATURE.
SOME STATES DO NOT ALLOW THE EXCLUSION OR LIMITATION OF INCIDENTAL OR CONSEQUENTIAL DAMAGES, SO THE ABOVE LIMITATIONS MAY NOT BE APPLICABLE.
THIS WARRANTY GIVES YOU SPECIFIC LEGAL RIGHTS, AND YOU MAY ALSO HAVE OTHER RIGHTS WHICH VARY FROM STATE TO STATE.

- WARNINGS/LIMITATIONS
- ACCESSORIES
- TRANSPORTING THE ROUND TRIP™ – [RFM] ROOF MOUNT KIT (SOLD SEPARATELY)
- ASSEMBLY
- 2
- PACKING YOUR BIKE
- a PREPARING YOUR BIKE:
- THULE RACK GUIDELINES
- THULE CAR RACK SYSTEMS LIMITED LIFETIME WARRANTY [EFFECTIVE JANUARY 1, 2006]
- Register online at www.thuleracks.com/register
- DISCLAIMER OF LIABILITY
Brand : THULE
Model : Round Trip 699
Category : Bike rack