
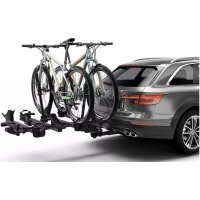
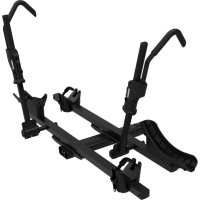
T2 Pro XT 9036XT - Bike rack THULE - Free user manual and instructions
Find the device manual for free T2 Pro XT 9036XT THULE in PDF.

| Product type | Bike rack |
| Brand | Thule |
| Model | T2 Pro XT 9036XT |
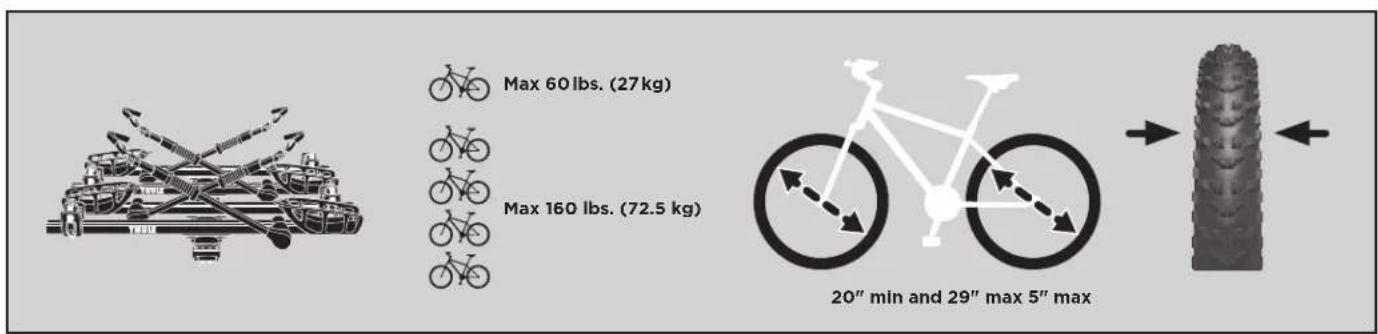
| Bike capacity | 2 bikes |
| Maximum load | 60 kg (30 kg per bike) |
| Dimensions (unfolded) | Approx. 120 x 60 x 80 cm |
| Weight | Approx. 18 kg |
| Material | Steel with anti-corrosion coating |
| Hitch type | 50 mm ball hitch (class III) |
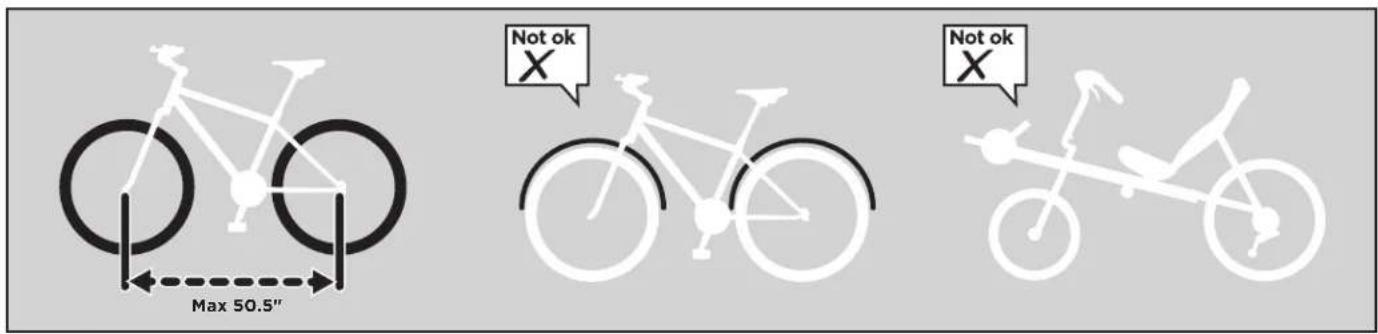
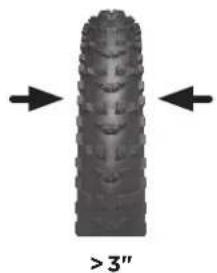
| Bike compatibility | Round, oval and carbon frames, wheels up to 3 inches |
| Attachment | Cam arms with wheel straps |
| Tilt | Tilting for trunk access |
| Security | Bike lock and hitch lock included |
| Lighting | Integrated license plate bracket and taillights |
| Maintenance | Clean with soapy water, lubricate locks with graphite |
| Warranty | Limited lifetime warranty |
Frequently Asked Questions - T2 Pro XT 9036XT THULE
User questions about T2 Pro XT 9036XT THULE
0 question about this device. Answer the ones you know or ask your own.
Ask a new question about this device
Download the instructions for your Bike rack in PDF format for free! Find your manual T2 Pro XT 9036XT - THULE and take your electronic device back in hand. On this page are published all the documents necessary for the use of your device. T2 Pro XT 9036XT by THULE.
USER MANUAL T2 Pro XT 9036XT THULE
natural_image
Black and white illustration of a fleet with triceps and bowels, no text or symbols present
flowchart
graph TD
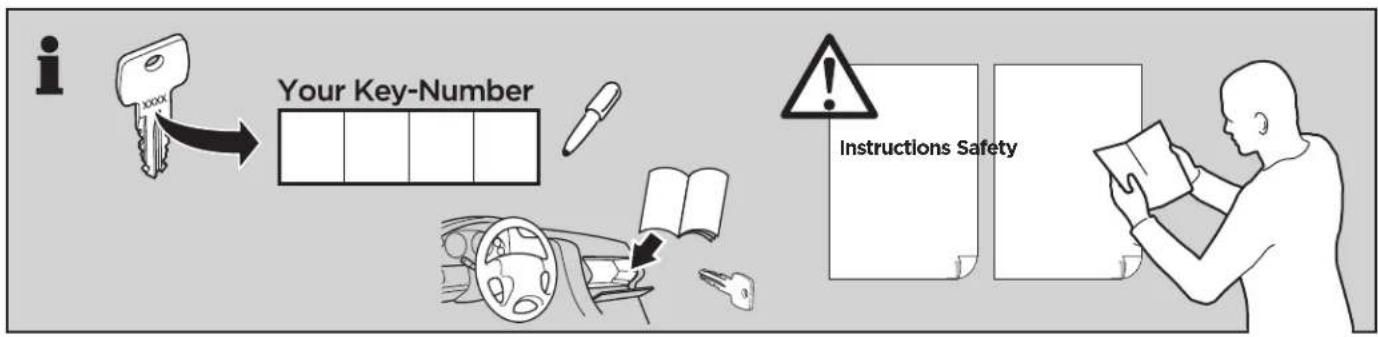
A["Key"] --> B["Your Key-Number"]
B --> C["Instructions Safety"]
C --> D["Person reading a document"]
style A fill:#f9f,stroke:#333
style B fill:#ccf,stroke:#333
style C fill:#cfc,stroke:#333
style D fill:#fcc,stroke:#333

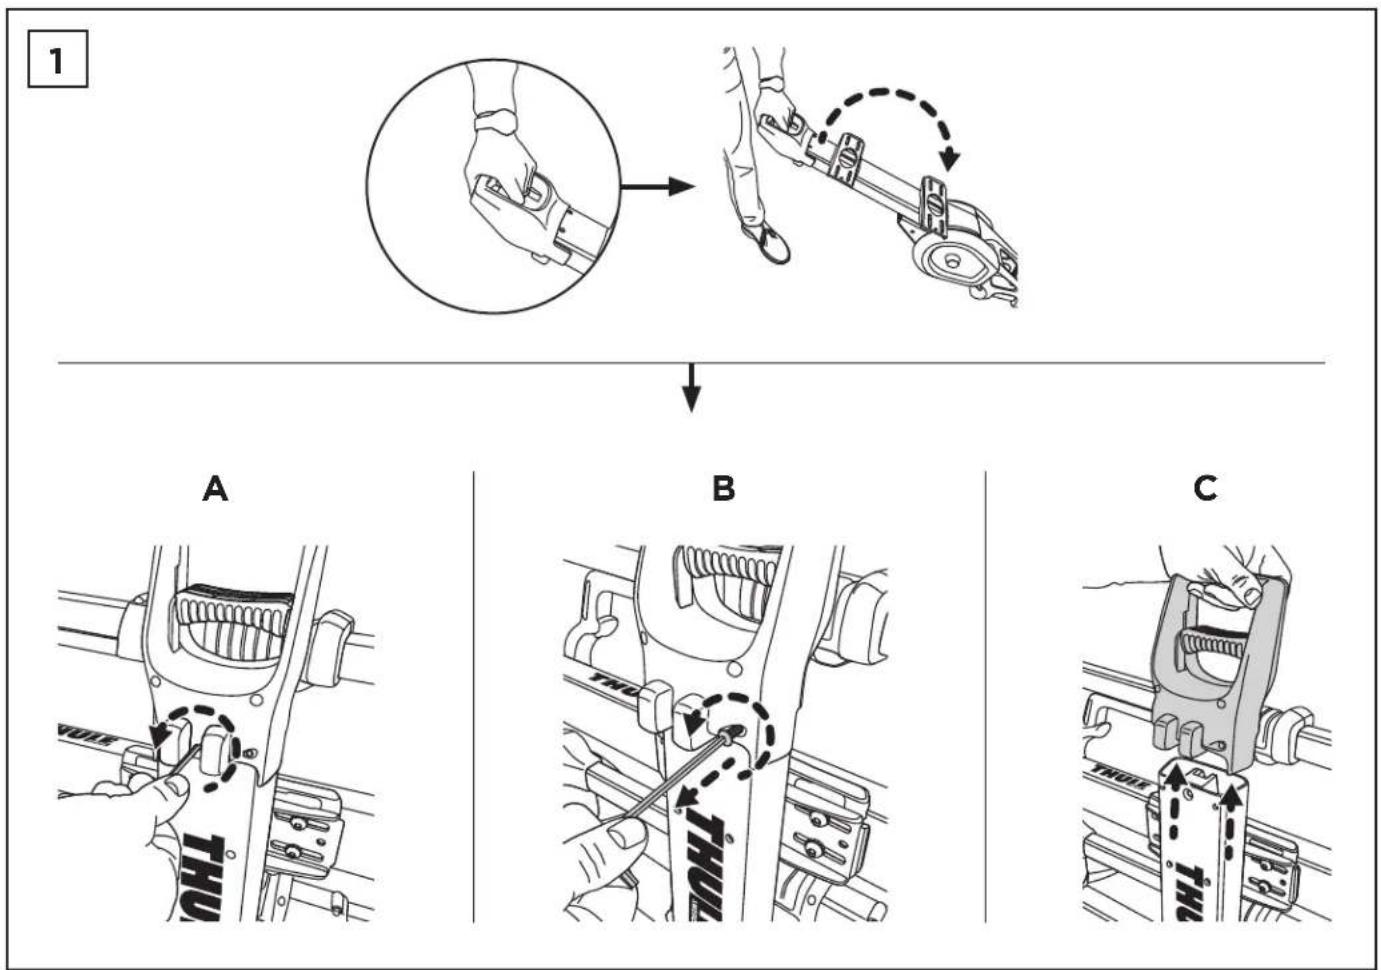
2
A
natural_image
Technical line drawing of a mechanical assembly with no visible text or symbols
natural_image
Simple line drawing of a mechanical component inside a circular frame (no text or symbols)B
natural_image
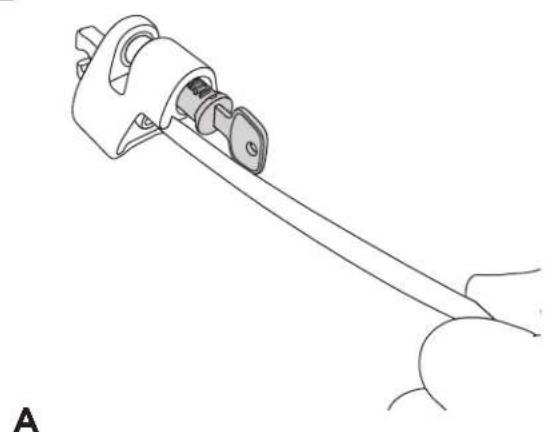
Line drawing of a hand inserting a component into a device (no text or symbols)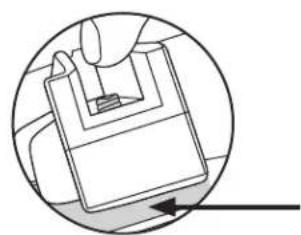
natural_image
Illustration of a hand holding a clipboard with a small rectangular object, enclosed in a circular frame (no text or symbols)C
natural_image
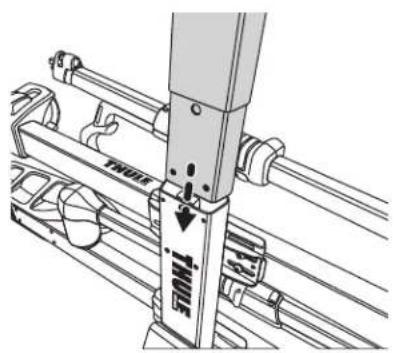
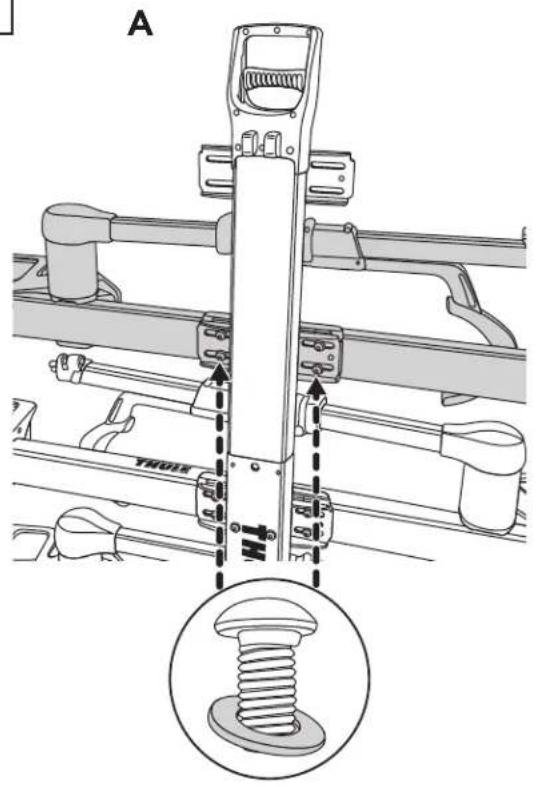
Technical line drawing of a mechanical assembly with labeled parts (no readable text or symbols)3
A
natural_image
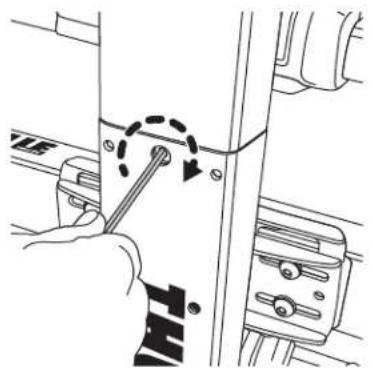
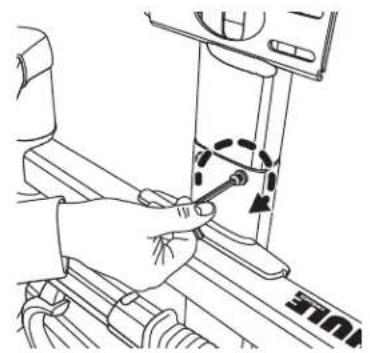
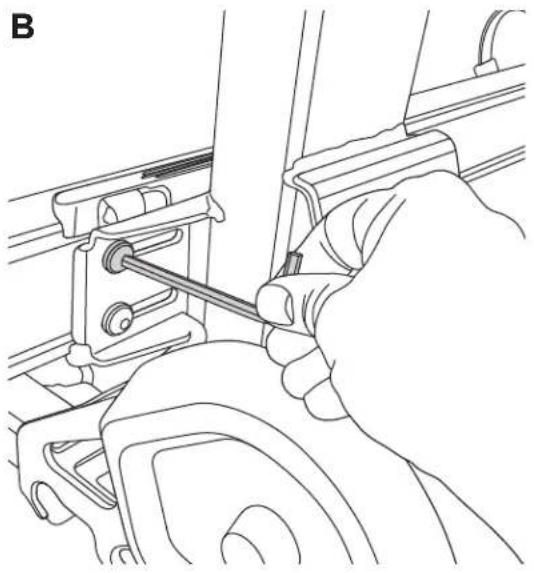
Hand using a screwdriver to adjust a component with a dashed arrow indicating rotation (no text or symbols present)B
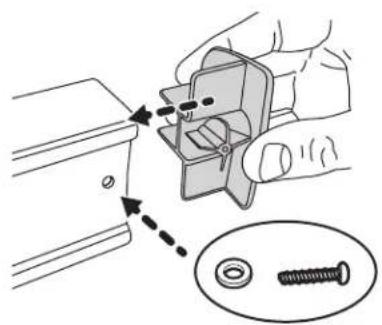
natural_image
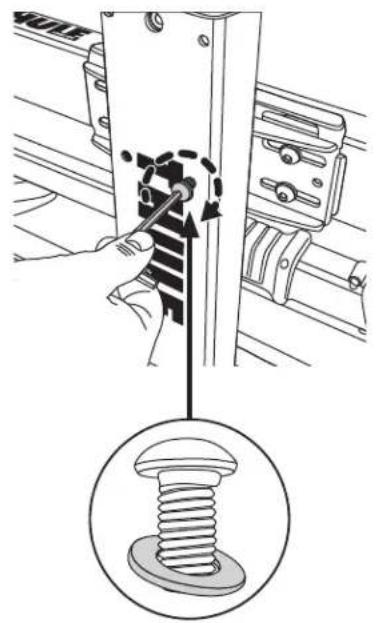
Illustration of a hand using a tool to adjust a bolt, with an inset showing the bolt being inserted (no text or symbols present)C
natural_image
Line drawing of a hand using a tool to adjust or install a mechanical component (no text or symbols visible)4
A
natural_image
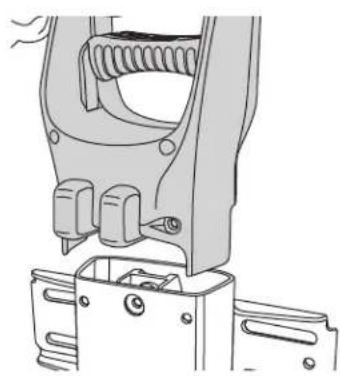
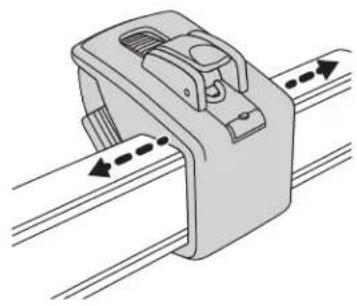
Technical line drawing of a mechanical clamp or bracket assembly (no text or symbols)B
natural_image
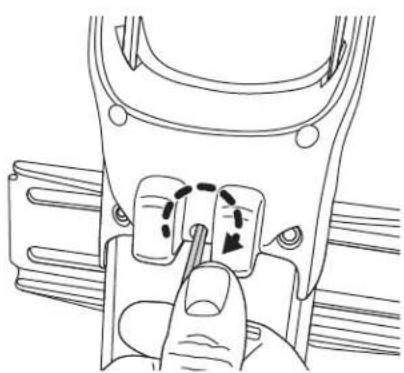
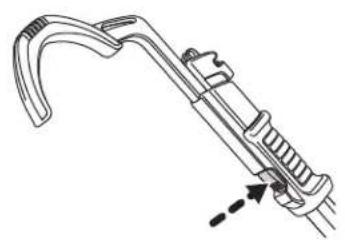
Line drawing of a hand pressing a button on a mechanical component (no text or symbols)C
natural_image
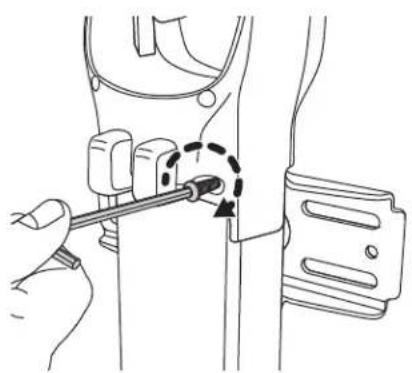
Line drawing of a hand using a tool to adjust or install a mechanical component, with no visible text or symbols.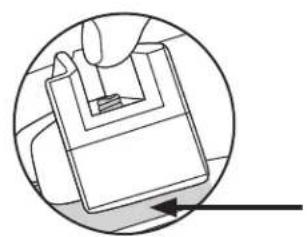
natural_image
Diagram of a hand holding a small electronic component, enclosed in a circular frame with an arrow indicating rotation (no text or symbols)5
natural_image
Line drawing of a hand using a tool to adjust or install a mechanical component (no text or symbols visible)6
A
natural_image
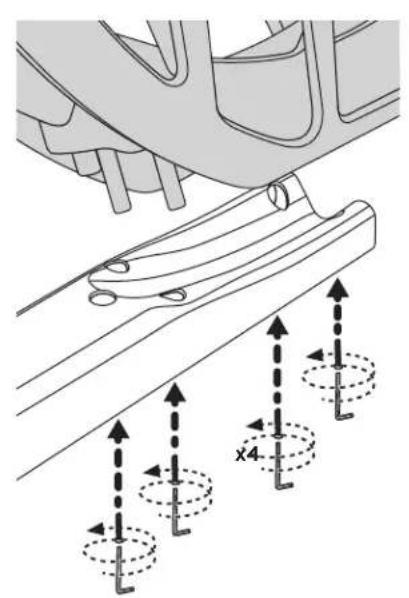
Mechanical assembly diagram showing a bracket with four circular motion indicators and dimension lines (no text or symbols)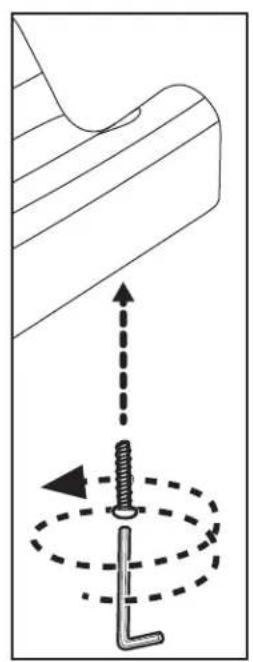
natural_image
Diagram showing a mechanical assembly with a spring and a tool, no text or symbols presentB
natural_image
Mechanical component diagram showing a bracket with directional arrows indicating movement or force (no text or symbols present)C
7
A
natural_image
Technical line drawing of a mechanical device with a curved handle and lever (no text or symbols)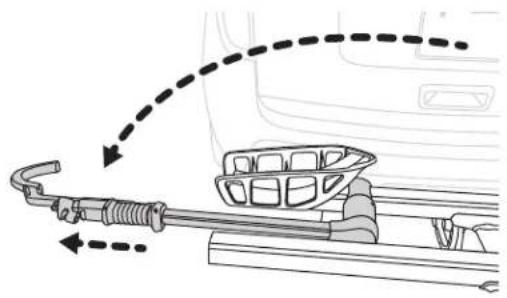
natural_image
Diagram of a car interior showing a mechanical component with dashed arrows indicating motion or force direction (no text or symbols present)B

natural_image
Technical line drawing of a mechanical assembly with no visible text or symbols8
ABCD
natural_image
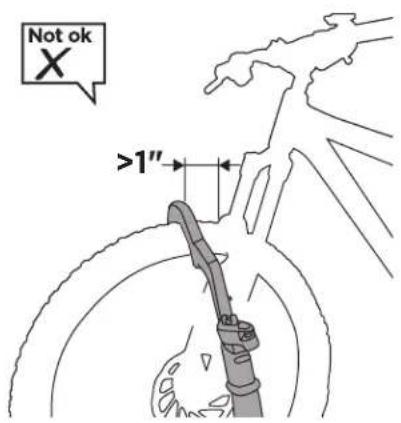
Close-up of a tire with visible tread pattern and two black arrows pointing left, labeled '>3''' below (no other text or symbols)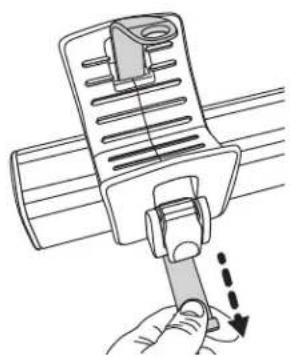
natural_image
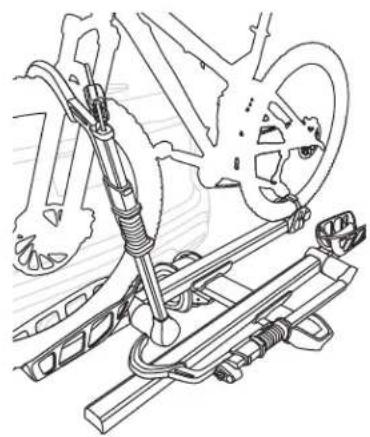
Illustration of a hand using a cable buckle to lift a seatbelt, with no text or symbols present.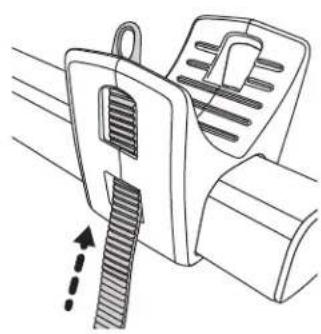
natural_image
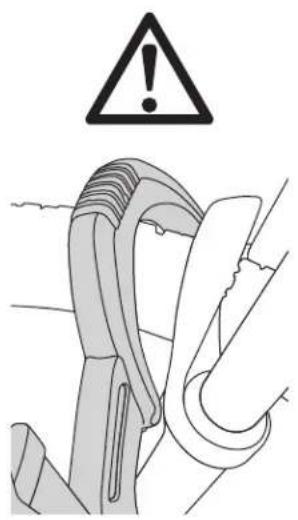
Diagram of a mechanical device with a handle and internal components, showing motion direction (no text or symbols)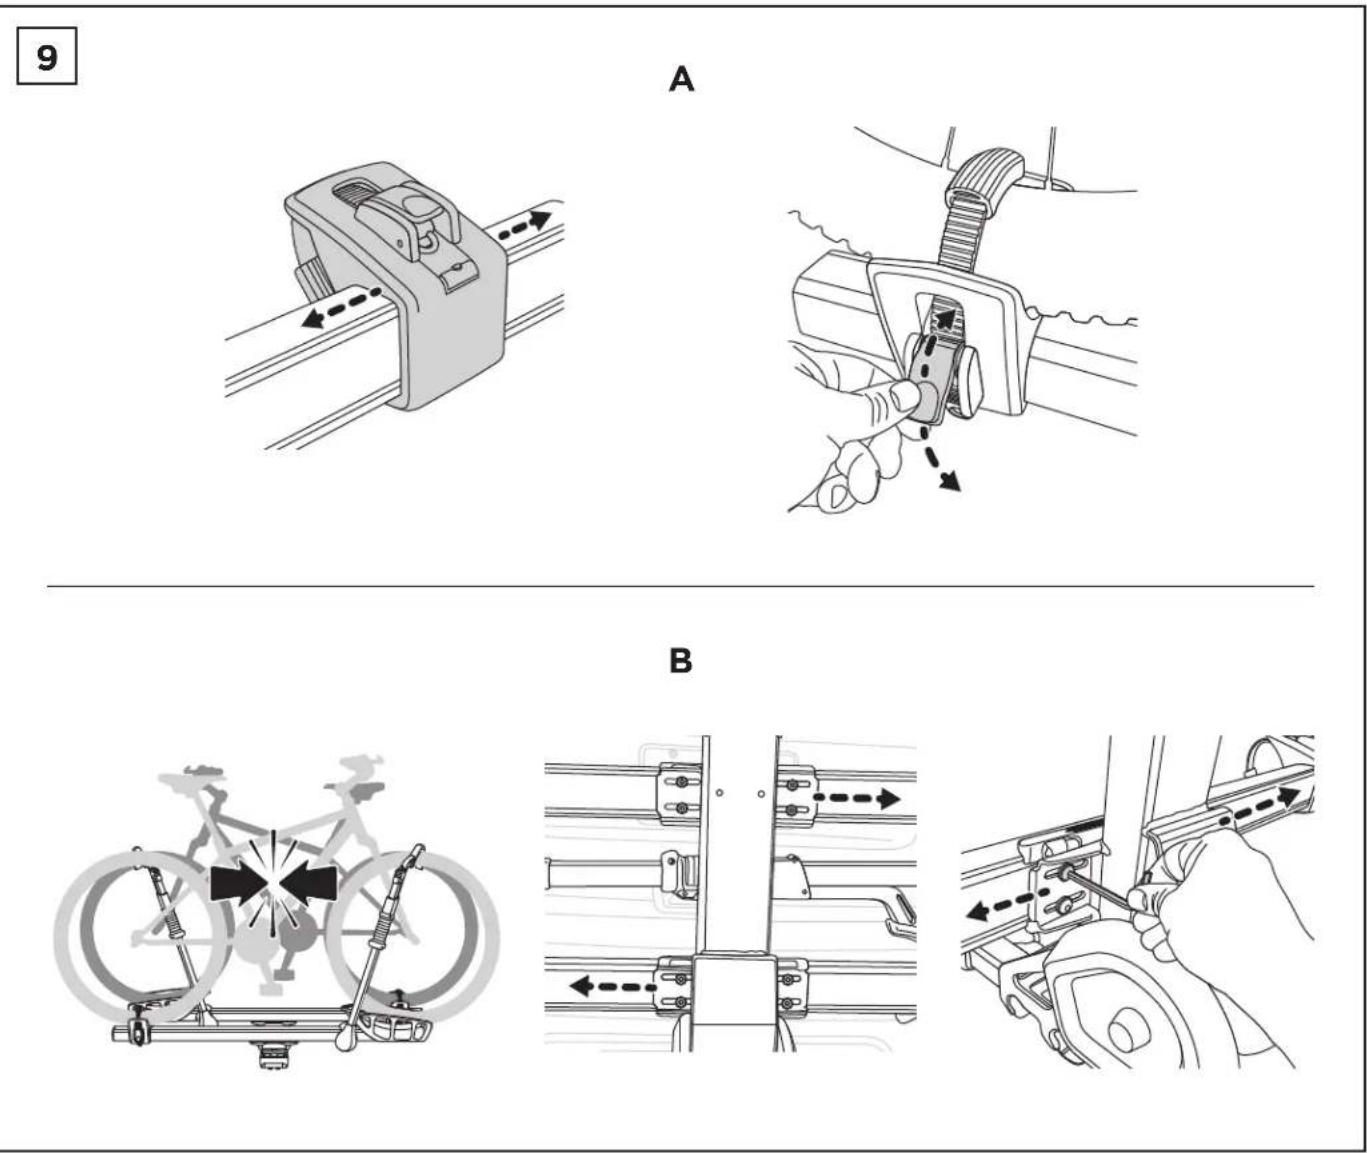
10
natural_image
Line drawing of a mechanical device with a lever and handle (no text or symbols)B
natural_image
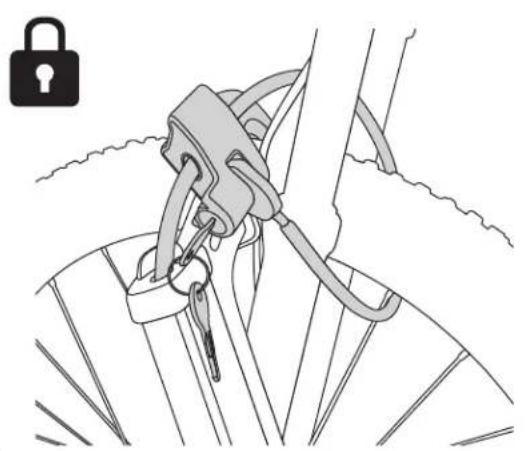
Line drawing of a bicycle skeleton with key inserted and lock symbol (no text or labels)THULE RACK GUIDELINES DIRECTRICES PARA LOS PORTAEQUIPAJES THULE
When using Thule Load carriers and accessories, the user must understand the precautions. The points listed below will assist you in using the rack system and will encourage safety.
- For quality fits and safety, use only the recommended rack or accessory as stated in Thule's current Fit Guide. Do not assume a rack will fit, always check the current Fit Guide when obtaining a new vehicle.
- The maximum load specified in the assembly instructions is not to be exceeded. However, this limit is always subordinate to the maximum load recommended by the manufacturer of the car itself. It is always the lower maximum recommended load that applies. Max roof load = load carrier weight + any fitted carrier accessories + the weight of the load itself.
- Always make sure all doors are open when mounting a roof rack system. Make sure all knobs, bolts, screws, straps, and locks are firmly attached, tightened and locked before every trip. Knobs, bolts, screws, straps and locks must be periodically inspected for signs of wear, corrosion, and fatigue. Check your load at stops during the trip to ensure continued fastening security.
- Check local and state laws governing projection of objects beyond the perimeter of a vehicle. Be aware of the width and height of your cargo since low clearance branches, bridges, and parking garages can affect the load. All cargo will affect the vehicle's driving behavior. Never drive with any lock, knob or rack in an open or unlocked position. All long loads such as, but not limited to, sailboards, surfboards, kayaks, canoes, and lumber must be tied down front and rear to the bumpers or tow hooks of the vehicle.
- Remove your Thule rack and accessories when they are not in use and before entering automatic car washes.
- All locks must be turned and moved periodically to ensure smooth operation. Use graphite or dry lubricant to help this. Thule locks are designed to deter vandalism and theft but should not be considered theft proof. Remove valuable gear if your vehicle is unattended for an extended period. Place at least one key in the glove compartment.
- For safety to your vehicle and rack system, obey all posted speed limits and traffic cautions. Adapt your speed to the conditions of the road and the load being carried.
- Do not use Thule load carriers and accessories for purposes other than those for which they were designed. Do not exceed their carrying capacity. Failure to follow these guidelines or the product's instructions will void the warranty.
- All loads must be secured using the provided straps.
- Consult with your Thule dealer if you have any questions regarding the operations and limits of Thule products. Review all instructions and warranty information carefully.
- Not for use on trailers or towed vehicles.
- Not for offroad use.
- Keep bicycle tires away from hot exhaust.
Register online at www.thule.com/warranty
THULE will warranty all THULE brand car rack systems and its accessories manufactured by THULE during the time that an original retail purchaser owns the product. This warranty terminates if a purchaser transfers the product to any other person.
Subject to the limitations and exclusions described in this warranty, THULE will remedy defects in materials or workmanship by repairing or replacing, at its option, a defective product without charge for parts or labor. In addition, THULE may elect, at its option, not to repair or replace a defective product but rather issue to a purchaser a refund equal to the purchase price paid for the product or a credit to be used toward the purchase of a new THULE load carrier system.
No warranty is given for defects caused by normal wear and tear, cosmetic rust, scratches, accidents, unlawful vehicle operation, or modification of, or any types of repair of, a load carrier system other than those authorized by THULE.
No warranty is given for defects resulting from conditions beyond THULE's control including, but not limited to, misuse, overloading, or failure to assemble, mount or use the product in accordance with THULE's written instructions or guidelines included with the product or made available to the purchaser.
In the event that a product is defective, the purchaser should contact the THULE dealer from whom the product was purchased or an Authorized Thule Service Center. If the dealer or Authorized Thule Service Center is not able to correct the defect, the purchaser should contact THULE in writing or by phone using the contact information listed at the bottom of this page.
In the event that a product needs to be returned to THULE, a THULE technician at the address or telephone number listed below will provide the purchaser with the appropriate mailing address and any additional instructions. Please note that the purchaser will be responsible for the cost of mailing the product to THULE and that proof of purchase in the form of an original purchase invoice or receipt and a detailed description of the defect must be included in the mailing.
DISCLAIMER OF LIABILITY
REPAIR OR REPLACEMENT OF A DEFECTIVE PRODUCT OR THE ISSUANCE OF A REFUND OR CREDIT (AS DETERMINED BY THULE) IS A PURCHASER'S EXCLUSIVE REMEDY UNDER THIS WARRANTY. DAMAGE TO A PURCHASER'S VEHICLE, CARGO AND/OR TO ANY OTHER PERSON OR PROPERTY IS EXCLUDED.
THIS WARRANTY IS EXPRESSLY MADE IN LIEU OF ANY AND ALL OTHER WARRANTIES, EXPRESS OR IMPLIED, INCLUDING THE WARRANTIES OF MERCHANTABILITY AND FITNESS FOR A PARTICULAR PURPOSE.
THULE'S SOLE LIABILITY TO ANY PURCHASER IS LIMITED TO THE REMEDY SET FORTH ABOVE. IN NO EVENT WILL THULE BE LIABLE FOR ANY LOST PROFITS, LOST SALES, OR FOR ANY CONSEQUENTIAL, DIRECT, INDIRECT, INCIDENTAL, SPECIAL, EXEMPLARY, OR PUNITIVE DAMAGES OR FOR ANY OTHER DAMAGES OF ANY KIND OR NATURE.
SOME STATES DO NOT ALLOW THE EXCLUSION OR LIMITATION OF INCIDENTAL OR CONSEQUENTIAL DAMAGES, SO THE ABOVE LIMITATIONS MAY NOT BE APPLICABLE.
THIS WARRANTY GIVES YOU SPECIFIC LEGAL RIGHTS, AND YOU MAY ALSO HAVE OTHER RIGHTS WHICH VARY FROM STATE TO STATE.
GARANTÍA DE POR VIDA LIMITADA PARA LOS SISTEMAS
PORTAEQUIPAJES PARA AUTOS THULE
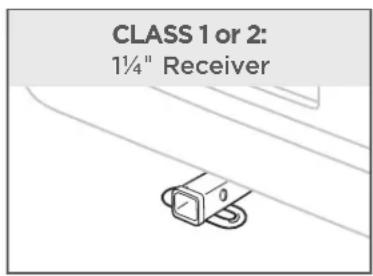
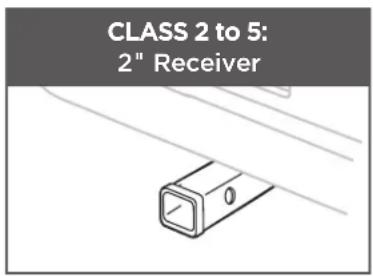
What size is the consumer's hitch?

What class is the consumer's hitch?
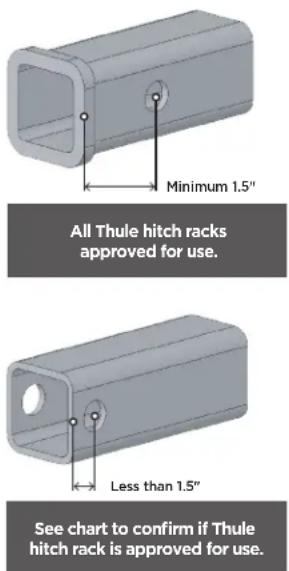
Consumer's hitch pin hole depth?
| PLATFORM | Hitch Rack Pin Hole | Depth Requirement |
| T2 Pro XT/XTR | ||
| 9034XT/9034XTR | 1.125" | |
| 9035XT/9035XTR | 1.5" | |
| 9034XT/XTR + 9036XT | 1.5" | |
| Helium Patform | ||
| 903900/904010 1.5" | ||
| T2 Classic | ||
| 9044 1.5" | ||
| 9045 1.5" | ||
| 9044 + 9046 | 1.5" | |
| TI | ||
| 9041 1.5" | ||
| Doubletrack Pro XT | ||
| 9054/905402 1.5" | ||
| EasyFold XT | ||
| 903202 1.5" | ||
| SWING | Hitch Rack Pin Hole | Depth Requirement |
| Apex XT Swing | ||
| 9027XT | 1.5" | |
| TILT | Helium Pro | |
| 9042Pro | 1.5" | |
| 9043Pro | ||
| Apex XT | ||
| 9024XT | 1.5" | |
| 9025XT | ||
| 9026XT | ||
| Camber | ||
| 9056/9058 | 1.5" | |
| Range | ||
| 5057 | 1.5" | |
Technical information
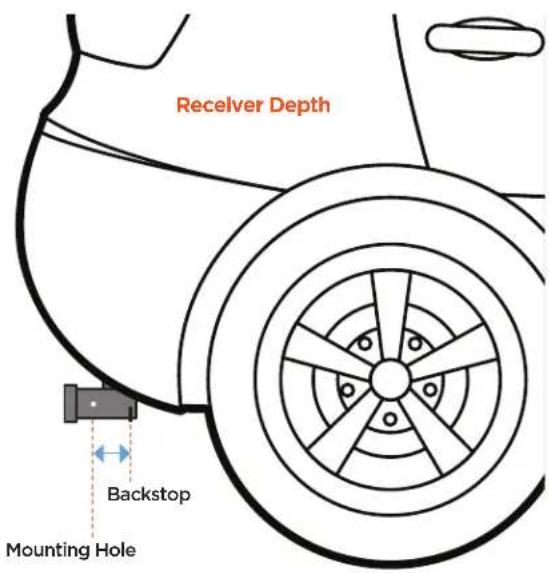
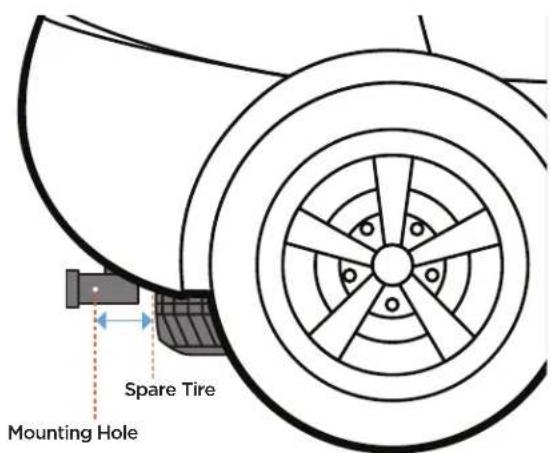
Consumer's hitch receiver depth?
To ensure proper fit, it's important to know the depth of your receiver.
Determine this by doing the following:
- With a ruler inserted in the receiver, measure from the center of the hitch mounting hole to the point where you make contact with an obstacle. This is your receiver depth.
- If you do not contact a back-stop or your hitch receiver does not have a backstop, another potential point of contact could be an undercarriage-mounted spare tire or the undercarriage itself.
- Using the table in the next page, compare your measurement to see which hitch racks will work with your vehicle.
Your receiver depth must be equal to or greater than the product measurement listed in the table for a proper fit.
| PLATFORM | Hitch Rack Receiver Depth | |
| EasyFold XT | ||
| 903202 1.4" | ||
| Hellum Platform | ||
| 903900 | 2.3" | |
| 904010 | 2.3" | |
| T2 Pro XT/XTR | ||
| 9034XT/9034XTR | 2.5" | |
| 9035XT/9035XTR | 1.4" | |
| 9034XT/XTR + 9036XT | 2.5" | |
| T2 Classic | ||
| 9044 | 2.6" | |
| 9045 | 1.4" | |
| 9044+9046 | 2.6" | |
| T1 | ||
| 9041 | 1.5" | |
| DoubleTrack Pro XT | ||
| 9054/905402 | 1.5" | |
| SWING | Apex XT Swing | |
| 9027XT 2.5" | ||
| TILT | Helium Pro | |
| 9042PRO, 9043PRO 1.4" | ||
| Apex XT | ||
| 9024XT 1.4" | ||
| 9025XT 1.4" | ||
| 9026XT 1.4" | ||
| Camber | ||
| 9058/9056 1.5" | ||
| Range | ||
| 9057 2.4" | ||
Technical information
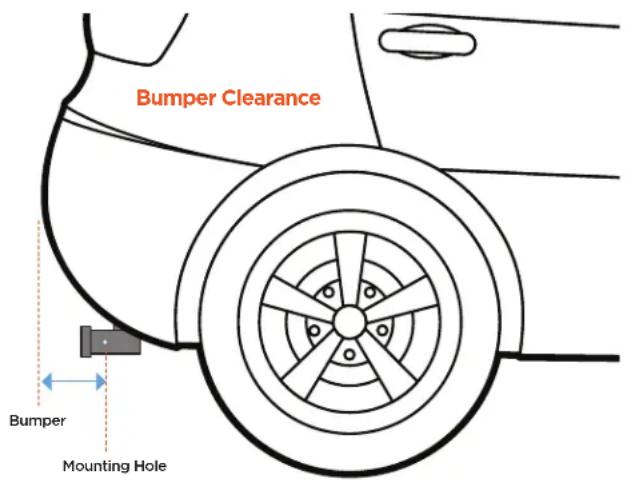
Consumer's hitch bumper clearance?
Make sure your bumper will not interfere with the Thule hitch rack. Measure the distance from the center of the mounting hole on your hitch to the end of your bumper.
This is your bumper clearance.
Your bumper clearance must be equal to or less than the product measurement listed in the table for a proper fit.
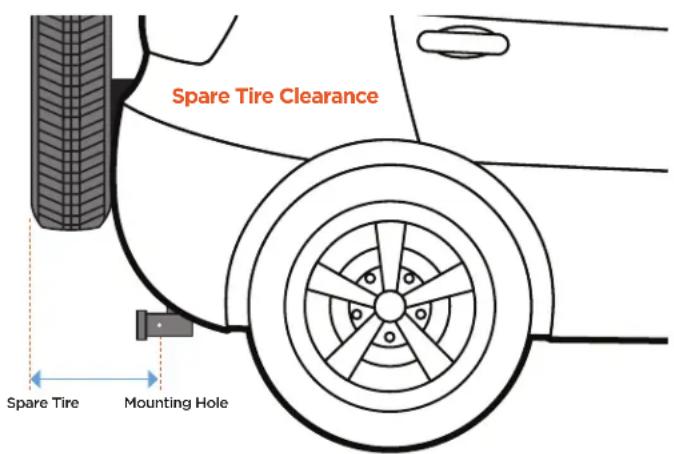
Consumer's spare tire clearance?
If you have a spare tire on the back of your vehicle it may interfere with the installation of your Thule hitch rack. Measure the distance from the center of the mounting hole on your hitch receiver to the end of your spare tire. This is your spare tire clearance.
Your spare tire clearance must be equal to or less than the product measurement listed in the table for a proper fit.
| PLATFORM | Hitch Rack Bumper Clearance | |
| EasyFold XT | ||
| 903202 9.5" | ||
| T2 Pro XT/XTR | ||
| 9034XT/9034XTR | 6.3" | |
| 9035XT/9035XTR | 6.3" | |
| 9034XT/XTR + 9036XT | 6.3" | |
| Hellum Platform | ||
| 903900 3" | ||
| 904010 3" | ||
| T2 Classic | ||
| 9044 4.5" | ||
| 9045 3.5" | ||
| 9044+9046 | 4.5" | |
| T1 | ||
| 9041 6.5" | ||
| DoubleTrack Pro XT | ||
| 9054/905402 6.0" | ||
| SWING | Apex XT Swing | |
| 9027XT 7.3" | ||
| TILT | Helium Pro | |
| 9042Pro/9043Pro 10.8" | ||
| Apex XT | ||
| 9024XT 7.0" | ||
| 9025XT 7.0" | ||
| 9026XT 7.0" | ||
| Camber | ||
| 9058/9056 5.3" | ||
| Range | ||
| 9057 5.4" | ||
| PLATFORM | Hitch Rack | Stowed Spare Tire Clearance | In-Use Spare Tire Clearance |
| EasyFold XT | |||
| 903202 12.0" 12.0" | |||
| T2 Pro XT/XTR | |||
| 9034XT/9034XTR | 6.3" | 20.5" | |
| 9035XT/9035XTR | 6.3" | 20.5" | |
| 9034XT/XTR + 9036XT | 6.3" | 20.5" | |
| Hellum Platform | |||
| 903900 | N/A | 11.0" | |
| 904010 | N/A | 11.0" | |
| T2 Classic | |||
| 9044 3.5" 20.0" | |||
| 9045 | 3.5" | 20.0" | |
| 9044+9046 | 2.5" | 20.0" | |
| T1 | |||
| 9041 | 6.0" | 19.3" | |
| DoubleTrack Pro XT | |||
| 9054/905402 | 6.0" | 6.0" | |
| SWING | Apex XT Swing | ||
| 9027XT | 8.8" | 8.8" | |
| TILT | Helium Pro | ||
| 9042Pro/9043Pro | 13.3" | 13.3" | |
| Apex XT | |||
| 9024XT | 10.3" | 10.3" | |
| 9025XT | 10.3" | 10.3" | |
| 9026XT | 10.3" | 10.3" | |
| Camber | |||
| 9058/9056 | 7.3" | 7.3" | |
| Range | |||
| 9057 | 6.9" | 6.9" | |
Technical information
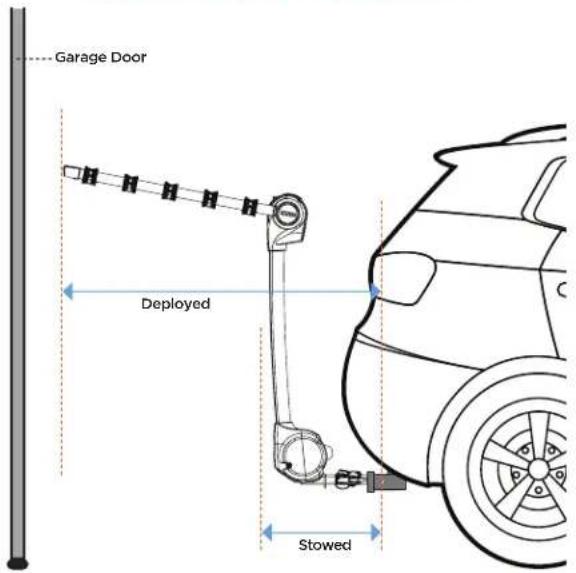
Consumer's garage clearance?
If you will be parking your vehicle in a garage with the rack mounted, you can use these measurements to help you determine if there will be any interference issues with fitting your vehicle into your garage space with the rack in the stowed position or deployed position.
Garage Clearance - Platform Models

Garage Clearance - Swing & Tilt Models
| PLATFORM | Hitch Rack Stowed | Clearance | Deployed Clearance |
| T2 Pro XT/XTR | |||
| 9034XT/9034XTR | 20.5" 41.5" | ||
| 9035XT/9035XTR | 20.5" 41.5" | ||
| 9034XT/XTR + 9036XT | 20.5" 60.1" | ||
| T1 | |||
| 9041 14.3" 28.5" | |||
| T2 Classic | |||
| 9044 16.3" 35.3" | |||
| 9045 16.3" 34.3" | |||
| 9044+9046 | 16.3" 55.0" | ||
| DoubleTrack Pro XT | |||
| 9054/905402 | 14.5" 33" | ||
| Helium Platform | |||
| 903900 13.5" 20.8" | |||
| 904010 13.5" 30.7" | |||
| EasyFold XT | |||
| 903202 32" 32" | |||
| TILT | Hitch Rack Stowed | Clearance | Deployed Clearance |
| Helium Pro | |||
| 9042PRO | 20.7" | 32.0" | |
| 9043PRO | 21.9" 39.0" | ||
| Apex XT | |||
| 9024XT | 14.7" 28.2" | ||
| 9025XT | 14.7" | 38.1" | |
| 9026XT | 14.7" | 42.1" | |
| Camber | |||
| 9058 | 14.8" 28.3" | ||
| 9056 | 14.8" 42.2" | ||
| Range | |||
| 9057 | 14.4" 42.0" | ||
| SWING | Apex XT Swing | ||
| 9027XT | 15.2" | 42.2" | |
Technical information
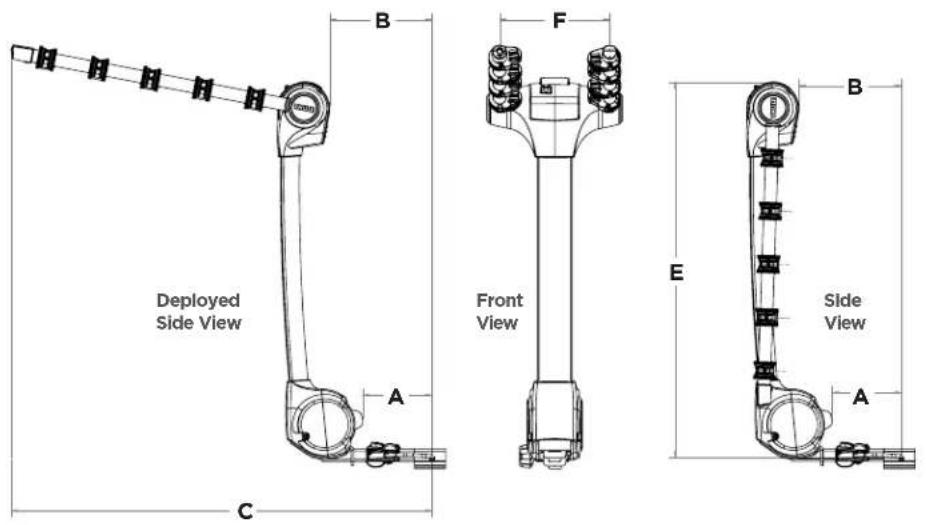
Hitch dimensions
Though we design our hitch-mounted bike carriers to be as universal as possible, all vehicles are designed differently. These diagrams have been designed to help you better understand the "room" our hitch-mounted bike racks need to function properly.
Tilt hitch racks
Swing away hitch racks
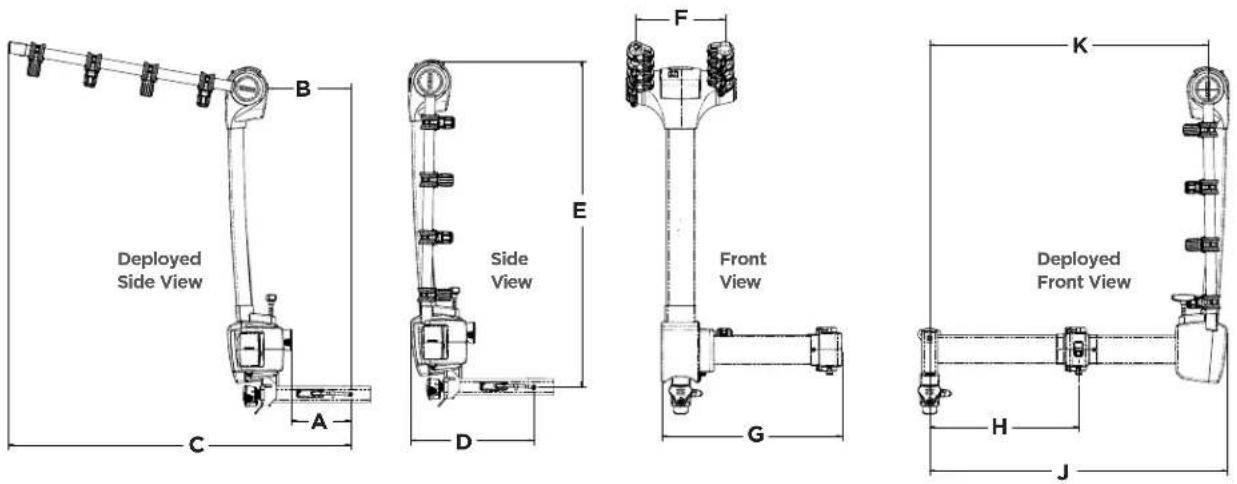
| MODEL A B C D E F G H J K | ||||||||||
| 9027XT | 7.3" | 10.3" | 42.2" | 15.2" | 40.2" | 11.1" | 22.2" | 18.4" | 36.7" | 34.3" |
Technical information
Platform hitch racks
Deployed
Side View
MODEL ABCDE
| 903900 4.4" 21" 5.6" 8" 18.5" | ||||
| 904010 5" 31" 5.6" 8" 28" | ||||
| 903202 | 6" | 32" | 9.5" | N/A |
| 9034XTR | 7.6" | 41.5" | 6.25" | 7.9" |
| 9035XTR | 7.9" | 41.5" | 6.25" | 7.9" |
| 9034XTR + 9036XTB | 9.6" | 60.1" | 6.26" | 7.9" |
| 9044 | 6.4" | 35.3" | 4.5" | 8.9" |
| 9045 | 7.9" | 34.3" | 3.5" | 10.4" |
| 9044 + 9046 | 7.9" | 55" | 4.5" | 8.9" |
| 9041 | 4.5" | 28.5" | 3.5" | 15.3" |
| 9054 | 5" | 33.9" | 5.8" | 14.25" |
Technical information
Thule Access 9037

Failure to follow WARNINGS, THULE GUIDELINES or PRODUCT INSTRUCTIONS could result in the following: DAMAGE TO VEHICLE, PROPERTY DAMAGE AND SERIOUS PERSONAL INJURY OR DEATH.
Warnings
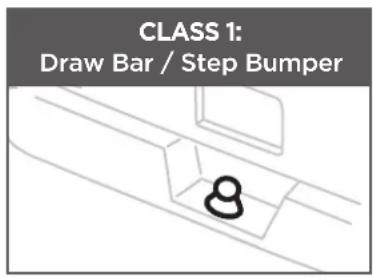
- Do not exceed the HITCH manufactures MAX TONGUE WEIGHT capacity.
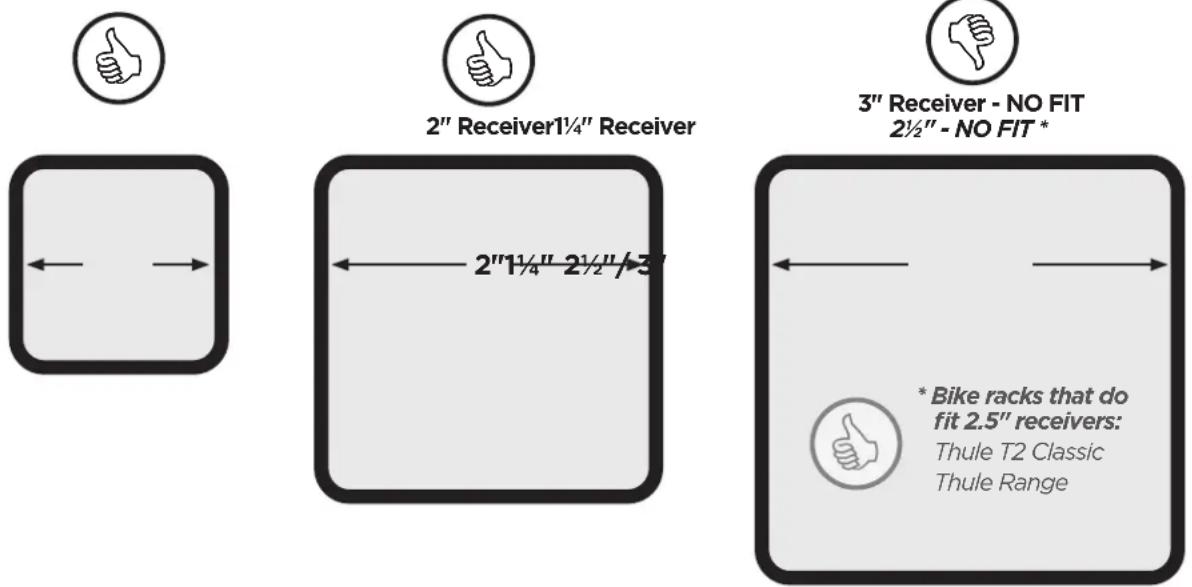
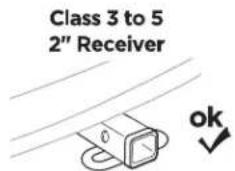
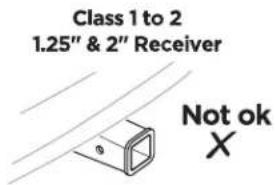
- This accessory is rated for Class 3 or greater 2" receiver hitches only.
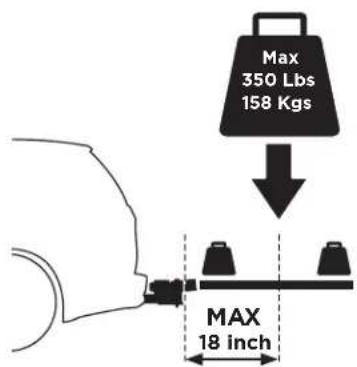
With load centered less than 18" from Access pin hole, do not exceed 350 lbs max capacity.
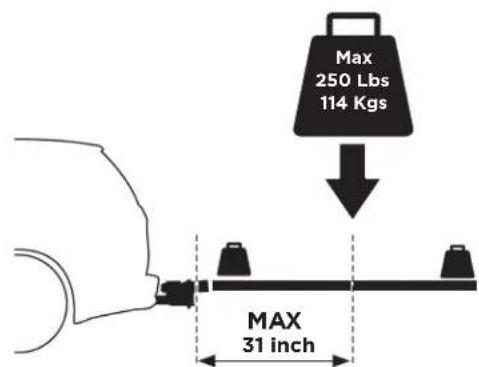
With load centered greater than 18" from Access pin hole, do not exceed 250 lbs max capacity.
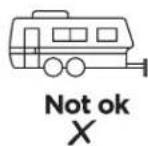

• This product is not for towing use.
- Do not use on towed vehicle.
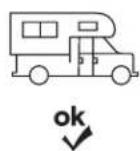
- Do not use this product on RV's or trailers.
• This product is not approved for off-road use.
natural_image
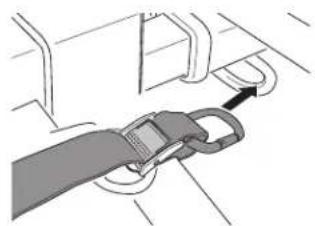
Illustration of a belt buckle securing a car seatbelt (no text or symbols)• Always use the safety strap, do not operate if damaged or missing.
- Keep hands away from PIVOTING AREAS.
- Do not allow children in the work area of this product when not in use.
- Do not attempt to move vehicle with adapter in open position.
Caution!
- Confirm the product you intend to use is approved for use on Thule Access.
- Do not use this product upside down.
- Periodically check tightness of Thule Access in vehicle receiver.
-
Make sure your rack and receiver are in good working order before use.
-
Must mount to your vehicles receiver directly. Do not use hitch extenders.
- Do not take through automatic carwash.
- Obey all traffic posted traffic laws when using this product.
- The added distance and weight will amplify deflection. Drive responsibly.
Technical information
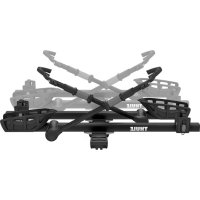
Approved Thule bike rack fits:
| Product / Part number | Weight (lbs.) | Rack compatibility | Number of bike positions | Capacity (lbs.) | Lbs. | ||
| Each bike position | Max load | Rack weight | Total Rack and Bikes | ||||
| Thule Access | |||||||
| 9037 | 55 | Thule T2 Pro XT/XTR - 2 Bike | 2 | 60 | 120 | 52 | 172 |
| Thule T2 Pro XT/XTR - 4 Bike | 4 | 39 | 156 | 93 | 250 | ||
| Thule T2 Classic - 2 Bike | 2 | 60 | 120 | 50 | 170 | ||
| Thule T2 Classic - 4 Bike | 4 | 40 | 160 | 89.5 | 250 | ||
| Thule Range - 4 Bike | 4 | 37.5 | 150 | 42 | 192 | ||
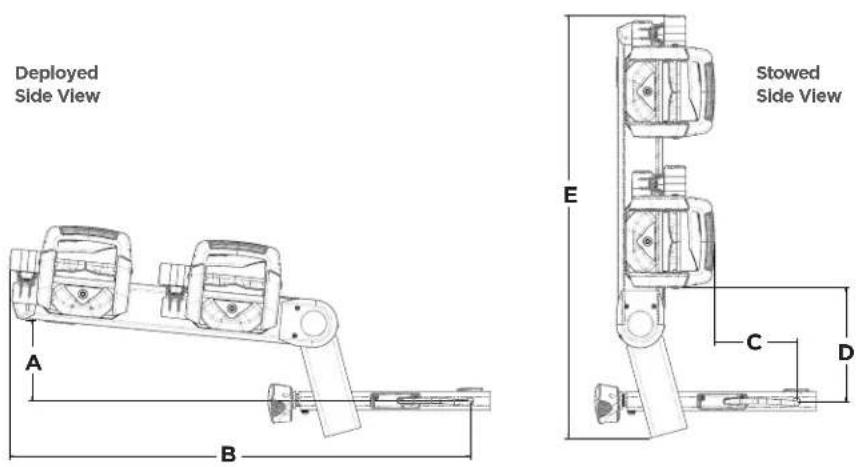
Dimensions
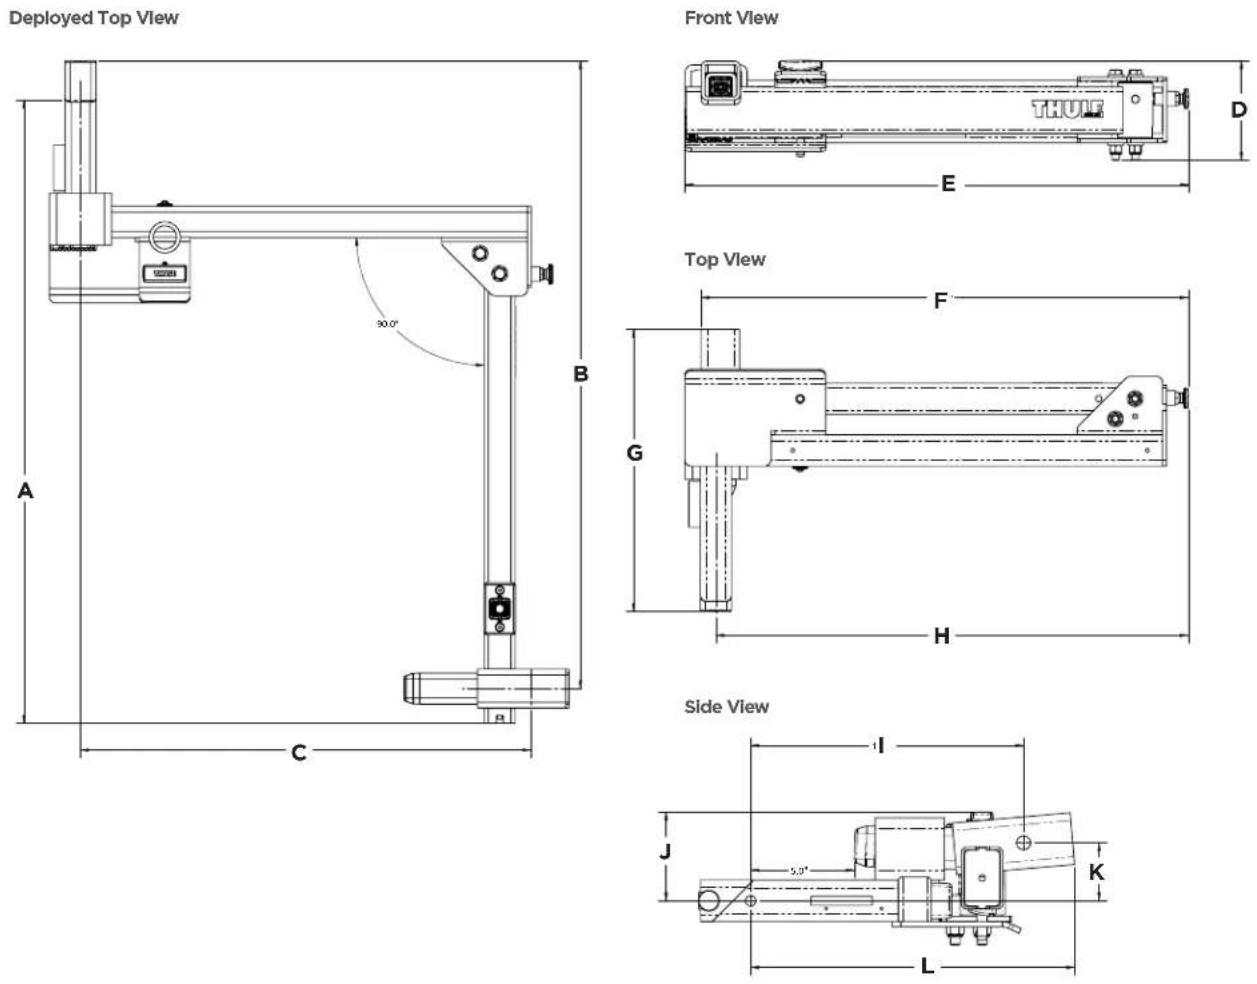
MODEL ABCDEFGHIJKL
| 9037 | 40.1" | 40.4" | 29" | 6.4" | 32.4" | 31.3" | 18.1" | 30.4" | 13.2" | 4.3" | 2.8" | 15.6" |
THULE ^ SWEDEN
Congratulations and thank you
for buying a high quality product from Thule. In order to keep you informed about relevant product news and important warranty and product safety information, please go in and register your product at our website:
www.thule.com/register
Note down Production Date/Serial Number
THULE
GUARANTEE

THULE.COM

- THULE RACK GUIDELINES DIRECTRICES PARA LOS PORTAEQUIPAJES THULE
- DISCLAIMER OF LIABILITY
- GARANTÍA DE POR VIDA LIMITADA PARA LOS SISTEMAS
- PORTAEQUIPAJES PARA AUTOS THULE
- Technical information
- Consumer's hitch receiver depth?
- Consumer's hitch bumper clearance?
- Consumer's spare tire clearance?
- Consumer's garage clearance?
- Hitch dimensions
- Thule Access 9037
- Warnings
- Caution!
- THULE ^ SWEDEN
- Congratulations and thank you
Brand : THULE
Model : T2 Pro XT 9036XT
Category : Bike rack