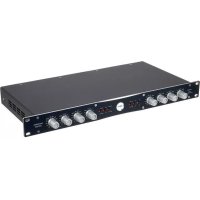
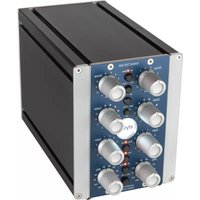
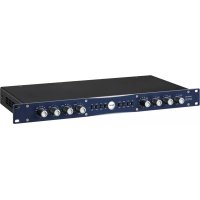
Xfilter 500 - Mixer Elysia - Free user manual and instructions
Find the device manual for free Xfilter 500 Elysia in PDF.
User questions about Xfilter 500 Elysia
0 question about this device. Answer the ones you know or ask your own.
Ask a new question about this device
Download the instructions for your Mixer in PDF format for free! Find your manual Xfilter 500 - Elysia and take your electronic device back in hand. On this page are published all the documents necessary for the use of your device. Xfilter 500 by Elysia.
USER MANUAL Xfilter 500 Elysia
text_image
VPR ALLIANCEWelcome to filter wonderland!
Thank you very much for purchasing the xfilter 500 – one of the quite few true linked stereo EQs in the market.
The xfilter 500 gives you the expensive sound of an all class-A equalizer in a surprisingly affordable package, with a precise stereo image based on computer-selected, stepped potentiometers and low tolerance film capacitors.
This EQ is serious about flexibility. It offers high and low shelf bands which can be switched into high and low cut filters with resonance, two mid peak filters with wide and narrow Q, plus additional passive LC stages with shielded coils for a glorious top end.
With its exceptionally open sound, straight transient projection and solid punch, the xfilter is the perfect match for your xpressor – or any other piece of delicious outboard gear!
Compatibility....3
Installation 3
Controls 4
Connectors....6
Passive Massage 7
Low Shelf/Cut....8
High Shelf/Cut....9
Low Mid 10
High Mid 11
Appendix....12

Deutsches Handbuch ... 16

Manuel Français ... 30
elysia
Compatibility
The xfilter 500 module requires installation into an API 500 series compatible rack frame (not included). It needs the power supply and the audio connectors provided by this frame, and cannot be used for its intended purpose by itself.
The current consumption is 210 milliamperes (105 mA per slot) at +/- 16 volts DC. This is actually more than some other 500 series modules consume as a result of the class-A design of the audio path of the xfilter 500.
Most API 500 compatible racks meet this requirement without problems, but there might be a limit on how many units can be installed in a single rack. In case of doubt, please check with the manufacturer of your specific rack.
Installation
Just follow these easy steps to install the xfilter 500 module:
- Switch your API 500 series compatible rack off and disconnect the power cable from mains.
- Insert the module into two free slots of your rack. Make sure both PCB connectors match with the rack connectors.
- Gently push the module in place – do not use any excessive force!
- Tighten the front panel with four screws provided by your rack manufacturer.
- Connect your XLR audio cables (see page 6 for more info) and power up your rack.
That should do it. Have lots of fun with your xfilter 500!
text_image
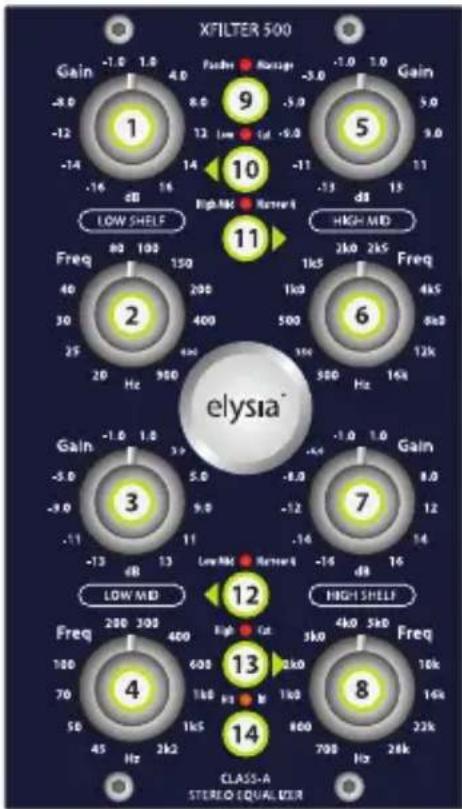
XFILTER 500 Gain -1.0 1.0 4.0 -8.0 8.0 5.0 -12 12 Low Std -9.0 -14 -16 dB 16 14 2B 16 LOW SHELF Freq 80 100 150 40 200 400 30 500 12k 25 Hz 900 20 Hz 16k High MID ELYSIA® Gain -1.0 1.0 5.0 -5.0 5.0 -8.0 -9.0 9.0 -12 -11 11 -14 dB 13 -13 dB 13 LOW MID Freq 200 300 400 High Mod High SHELF Freq 280 300 400 High Mod High SHELF Freq 180 200 300 High Mod High SHELF Freq 70 800 900 High Mod High SHELF Freq 45 Hz 2kΩ High Mod High SHELF Freq 3 Hz 4kΩ High Mod High SHELF Freq 2 kHz 3kHz High Mod High SHELF Freq 1 kHz 2kHz High Mod High SHELF Class-A STEREO-EQUALIZERControls
① Gain (Low Shelf)
Boosts or cuts the low frequency range » p. 8
② Frequency (Low Shelf)
Sets the frequency for the low shelf filter » p. 8
3 Gain (Low Mid)
Boosts or cuts the low mid frequency range » p. 10
4 Frequency (Low Mid)
Sets the center frequency for the low mid peak filter » p. 10
5 Gain (High Mid)
Boosts or cuts the high mid frequency range » p. 11
elysia
6 Frequency (High Mid)
Sets the center frequency for the high mid peak filter » p. 11
⑦ Gain (High Shelf)
Boosts or cuts the high frequency range » p. 9
8 Frequency (High Shelf)
Sets the frequency for the high shelf filter » p. 9
9 Passive Massage
Activates a special passive LC filter network (LED on) or deactivates this additional fixed band (LED off) » p. 7
10 Low Cut
Switches the low shelf filter (LED off) into a low cut filter with resonance (LED on) » p. 8
11 Narrow Q (High Mid)
Changes the Q factor of the high mid filter from a wide curve (LED off) to a narrow curve (LED on) » p. 11
12 Narrow Q (Low Mid)
Changes the Q factor of the low mid filter from a wide curve (LED off) to a narrow curve (LED on) » p. 10
13 High Cut
Switches the high shelf filter (LED off) into a high cut filter with resonance (LED on) » p. 9
14 Hit It!
Activates the xfilter 500 (LED on) or deactivates it with a hard-wire bypass (LED off)
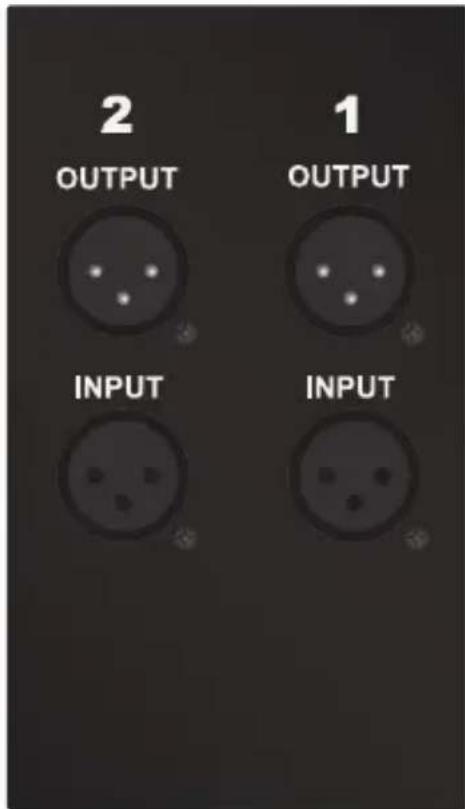
text_image
2 OUTPUT 1 OUTPUT INPUT INPUT
Connectors
Audio outputs (+4 dBu)
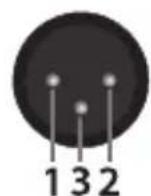
Pin assignment balanced: 1 ground 2 hot (+) 3 ground Pin assignment unbalanced: 1 ground 2 hot (+) 3 idle
Audio inputs (+4 dBu)
Pin assignment balanced: 1 ground 2 hot (+) 3 cold (-) Pin assignment unbalanced: 1 ground 2 hot (+) 3 ground
Mono operation: Connect either input and output 1 or 2 – both will work identically.
Stereo operation: Connect both inputs and outputs 1 and 2 – the choice which channel is left and which is right is up to you.
elysia
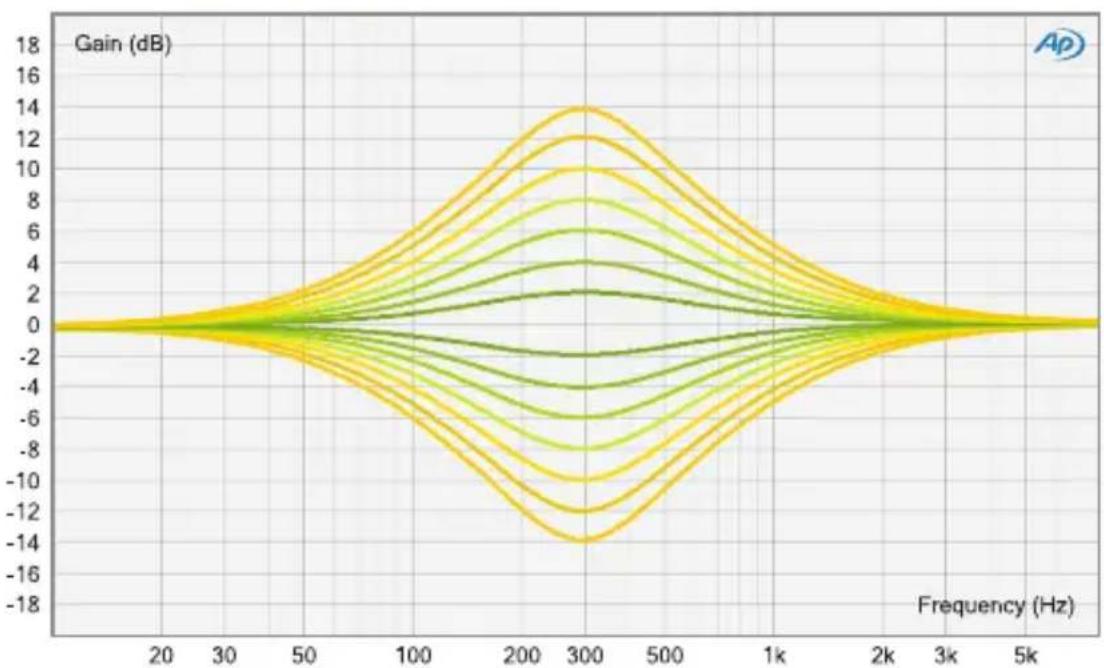
Passive Massage
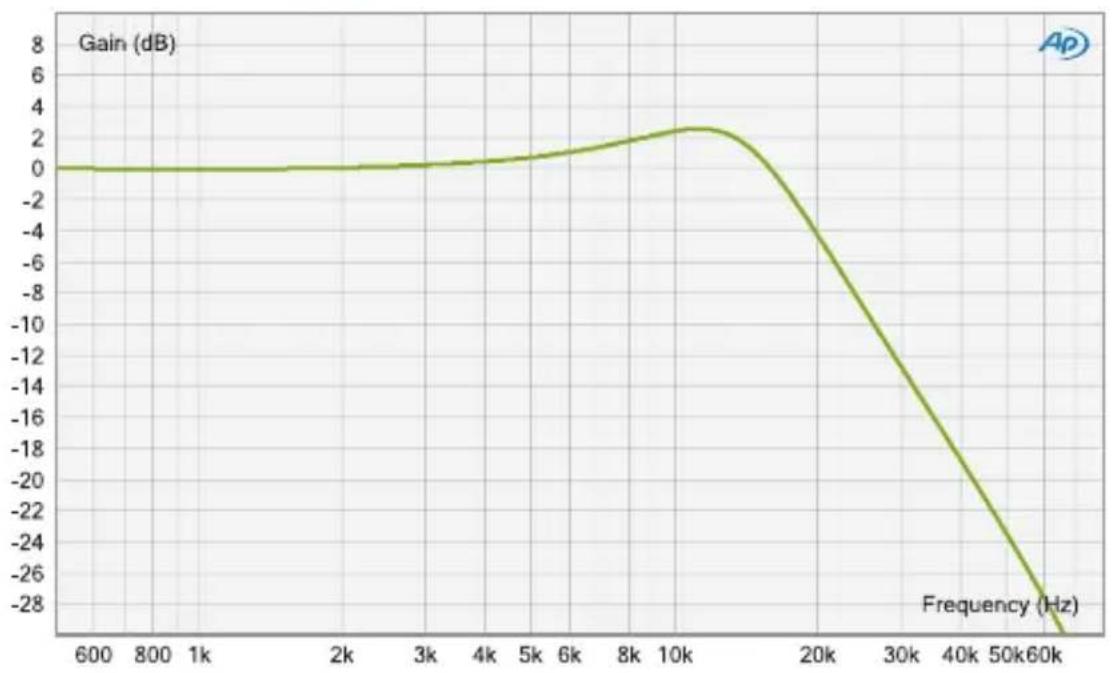
line
| Frequency (Hz) | Gain (dB) | | -------------- | --------- | | 600 | 0 | | 800 | 0 | | 1k | 0 | | 2k | 0 | | 3k | 0 | | 4k | 0 | | 5k | 0 | | 6k | 0 | | 8k | 0 | | 10k | 2 | | 20k | -6 | | 30k | -12 | | 40k | -18 | | 50k | -24 | | 60k | -28 |Mmm... The beautiful sheen a passive EQ adds on top of everything. We all love it, we all need it!
Well, here is the good news: In addition to its four flexible active bands, the xfilter 500 features a switchable fixed LC filter for polishing the high frequency range.
The filter mainly consists of a capacitor and a coil per channel, but unlike the standard shelving designs, it has a slight resonance peak at 12 kHz and starts to fall off at 17 kHz.
This way, the saturation-like storage effect of the shielded coil focuses on the area around the peak without pushing the complete high frequency spectrum too much.
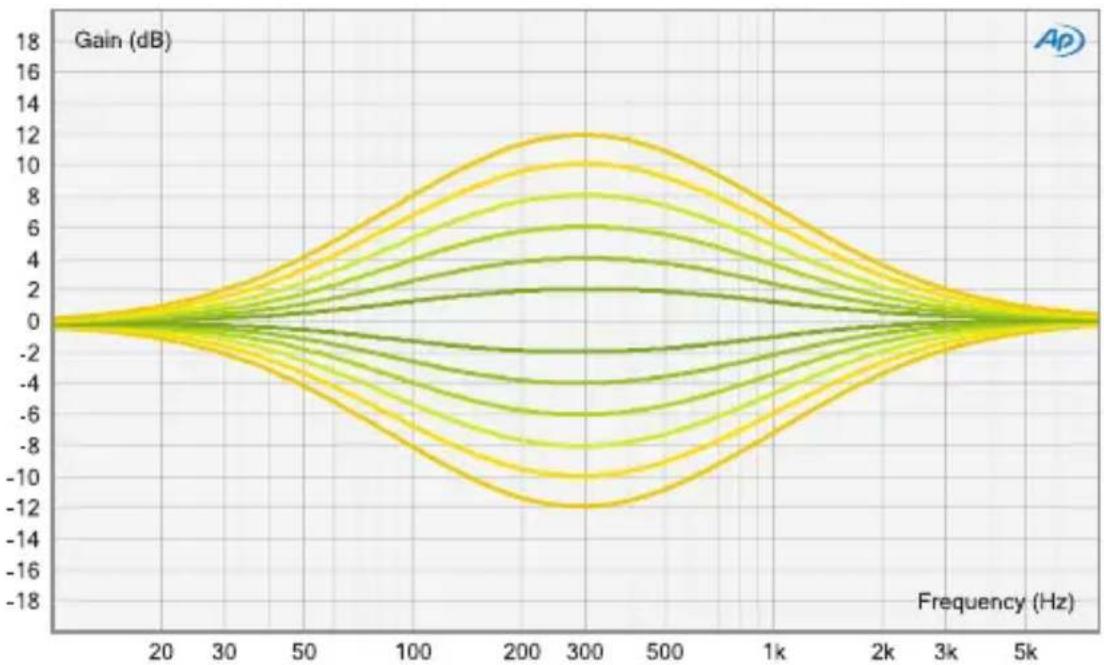
Low Shelf
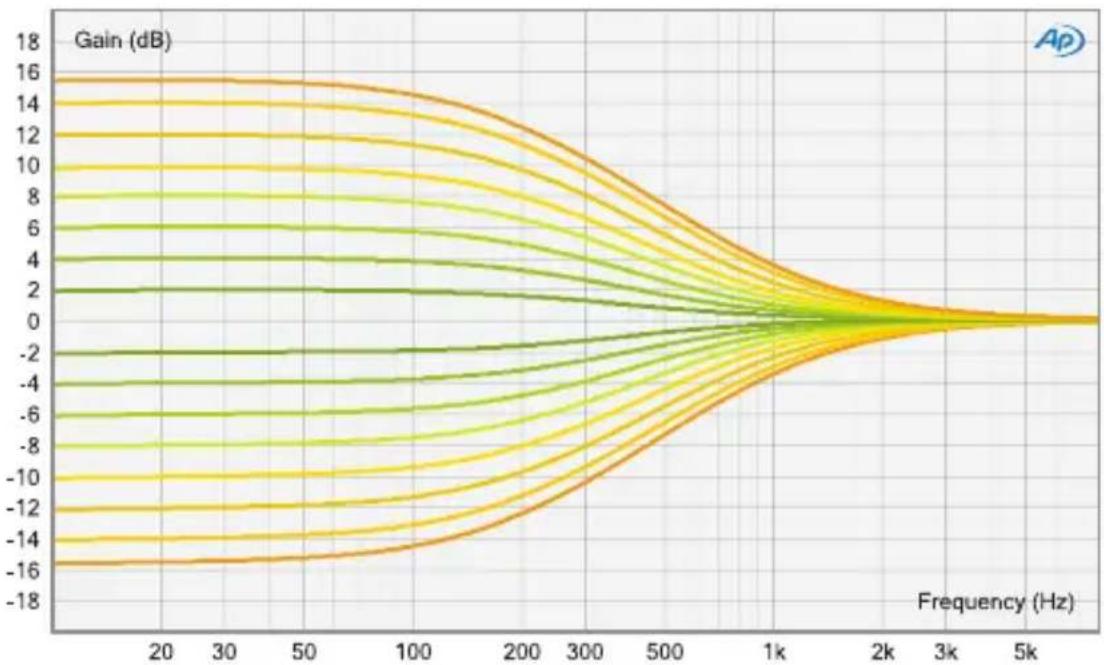
line
| Frequency (Hz) | Gain (dB) | | -------------- | --------- | | 20 | 16 | | 30 | 15 | | 50 | 14 | | 100 | 12 | | 200 | 8 | | 300 | 4 | | 500 | 2 | | 1k | 0 | | 2k | -2 | | 3k | -4 | | 5k | -6 | | 1k | -8 | | 2k | -10 | | 3k | -12 | | 5k | -14 | | 1k | -16 | | 2k | -18 | | 3k | -16 | | 5k | -14 |Low Cut
line
| Frequency (Hz) | Gain (dB) | | -------------- | --------- | | 0 | -18 | | 20 | -14 | | 30 | -10 | | 50 | -6 | | 100 | -2 | | 200 | 8 | | 300 | 4 | | 500 | 2 | | 1k | 0 | | 2k | 0 | | 3k | 0 | | 5k | 0 |elysia
High Shelf
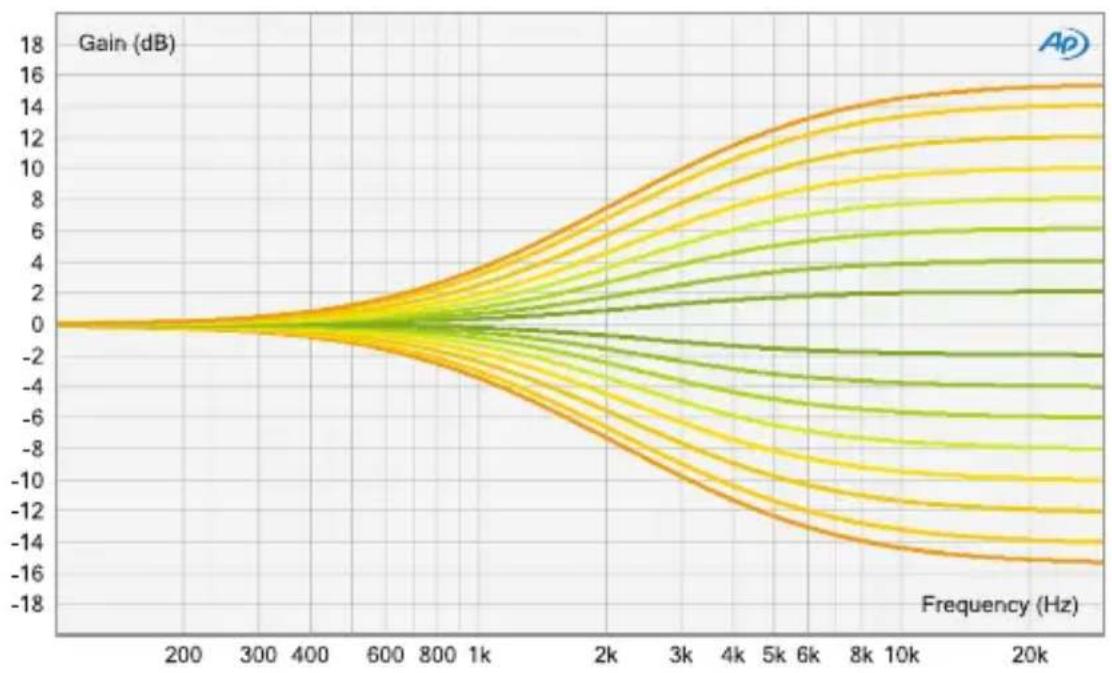
line
| Frequency (Hz) | Gain (dB) | | -------------- | --------- | | 200 | 0 | | 300 | 0 | | 400 | 0 | | 600 | 0 | | 800 | 0 | | 1k | 0 | | 2k | 0 | | 3k | 0 | | 4k | 0 | | 5k | 0 | | 6k | 0 | | 8k | 0 | | 10k | 0 | | 20k | 0 |High Cut

line
| Frequency (Hz) | Gain (dB) | | -------------- | --------- | | 200 | 0 | | 300 | 0 | | 400 | 0 | | 600 | 0 | | 800 | 0 | | 1k | 0 | | 2k | 1 | | 3k | 3 | | 4k | 5 | | 5k | 7 | | 6k | 6 | | 8k | 3 | | 10k | -2 | | 20k | -8 |Low Mid (Wide Q)
line
| Frequency (Hz) | Gain (dB) | | -------------- | --------- | | 20 | 0 | | 30 | 0 | | 50 | 0 | | 100 | 0 | | 200 | 0 | | 300 | 0 | | 500 | 0 | | 1k | 0 | | 2k | 0 | | 3k | 0 | | 5k | 0 |Low Mid (Narrow Q)

line
| Frequency (Hz) | Gain (dB) | | -------------- | --------- | | 20 | 0 | | 30 | 0 | | 50 | 0 | | 100 | 0 | | 200 | 0 | | 300 | 0 | | 500 | 0 | | 1k | 0 | | 2k | 0 | | 3k | 0 | | 5k | 0 |elysia
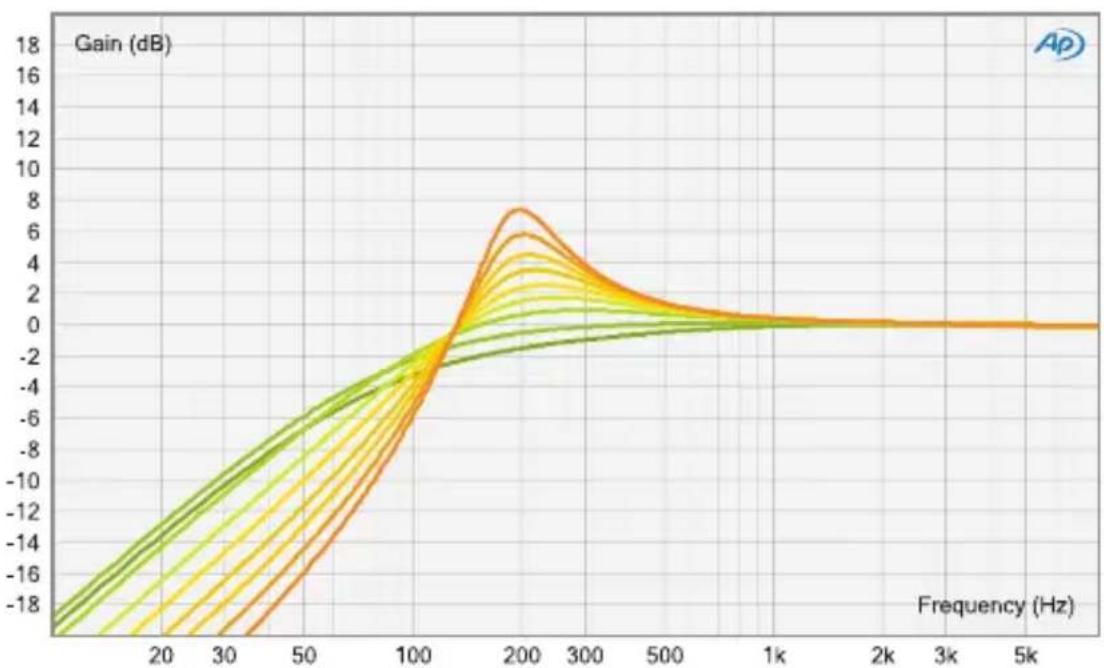
High Mid (Wide Q)
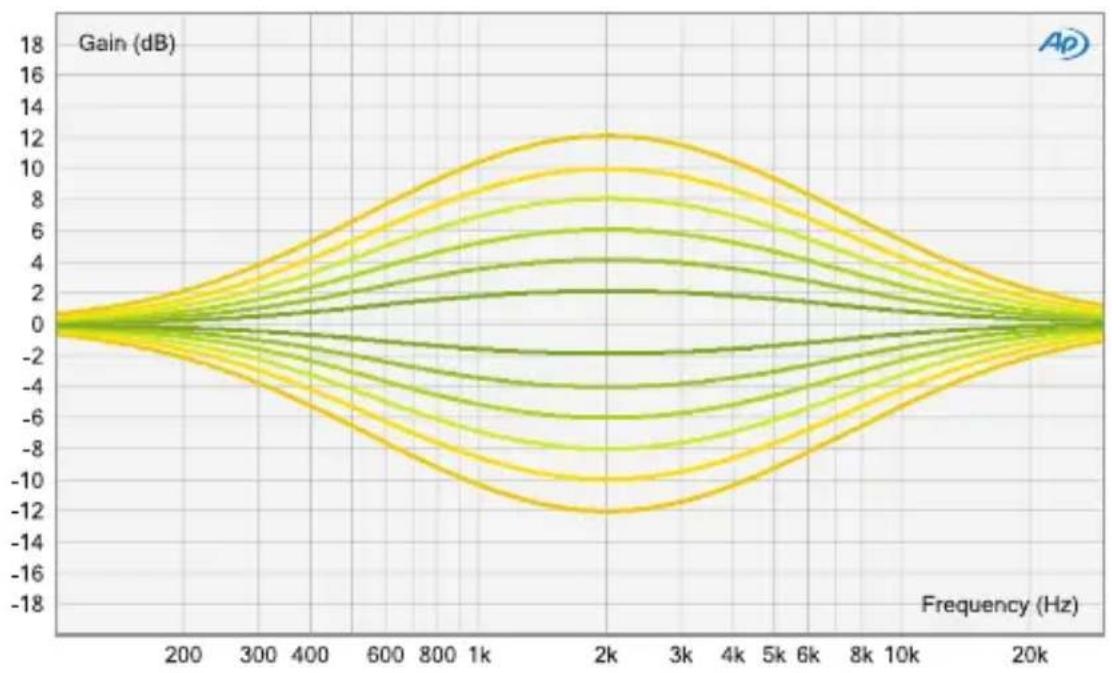
line
| Frequency (Hz) | Gain (dB) | | -------------- | --------- | | 200 | 0 | | 300 | 2 | | 400 | 4 | | 600 | 6 | | 800 | 8 | | 1k | 10 | | 2k | 12 | | 3k | 10 | | 4k | 8 | | 6k | 6 | | 8k | 4 | | 10k | 2 | | 20k | 0 |High Mid (Narrow Q)

line
| Frequency (Hz) | Gain (dB) | | -------------- | --------- | | 200 | 0 | | 300 | 0 | | 400 | 0 | | 600 | 0 | | 800 | 0 | | 1k | 0 | | 2k | 0 | | 3k | 0 | | 4k | 0 | | 5k | 0 | | 6k | 0 | | 8k | 0 | | 10k | 0 | | 20k | 0 |Technical Details
Frequency response: <10 Hz - 400 kHz (-3.0 dB)
THD+N @ 0 dBu, 20 Hz - 22 kHz: 0.0018 %
THD+N @ +10 dBu, 20 Hz - 22 kHz: 0.005 %
Noise floor, 20 Hz - 20 kHz (A-weighted): -98 dBu
Dynamic range, 20 Hz - 22 kHz: 120 dB
Maximum input level: +21 dBu
Maximum output level: +21 dBu
Input impedance: 10 kOhm
Output impedance: 68 Ohm
CE Conformity

The conformity of this device to the EU directives is confirmed by the CE mark on the device.
This declaration becomes invalid by any unapproved modification of the device.
CAUTION: Electricity
- Make sure to operate your API 500 series compatible rack at the specific mains voltage of your country.
- Replace rack frame fuse with the same type and value only.
- Your rack frame must be connected to ground.
- Do not use a damaged power cord.
- Never place containers with liquid on the rack.
- Do not expose this device to rain or moisture.
- Do not use this device near water.
• Refer service to qualified service staff only.
CAUTION: Temperature
- Surfaces of the device may become hot during operation.
- Do not install this device near any heat source such as radiators, stoves or other heat sources.

CAUTION: Connecting & Mounting
- Never connect to the output of a power amplifier.
- Do not apply extensive force when installing this device.
- Use the device according to this manual only.

CAUTION: Humidity
- If this device is moved from a cold place to a warm room, condensation can occur inside the device. To avoid damaging the unit please allow it to reach room temperature before switching it on.
Warranty Info
The xfilter 500 is covered by a limited warranty for a period of 2 years against defects in parts and labor from the date of purchase. Natural wear is not covered by this warranty. Repairs or replacements will not extend the warranty period.
The warranty is given to the original purchaser only and is not transferable. elysia will only give warranty on products purchased through authorized elysia dealers. The warranty will only be valid in the country of the original purchase unless otherwise pre-authorized by elysia.
All warranties become void when the product has been damaged by misuse, accident, neglect, modification, tampering or unauthorized alteration by anyone other than elysia authorized service personnel.
The warrantor assumes no liability for property damage or any other incidental or consequential damage whatsoever which may result from failure of this product. Any and all warranties of merchantability and fitness implied by law are limited to the duration of the expressed warranty.
elysia will not pay for express or overnight freight service or pay for shipments to locations outside Germany. All damages caused by transport are not covered by this warranty.
This warranty gives you specific legal rights and you may also have other rights which vary from state to state. Some of the above limitations may not apply to you.
elysia
Legal Info
The information in this document is subject to change without further notice and shall not be deemed as an obligation or warranty of any kind by the manufacturer. No warranties, express or implied, are made with regard to the quality, suitability or accuracy of this document.
The manufacturer reserves the right to change the contents of this document and/or the associated products at any time without the provision of prior notice. The manufacturer shall not be held liable for damages of any kind arising from the use, or the inability to use this product or its documentation.
The information in this document is subject to copyright. All rights, technical changes and errata are reserved. No part of this manual may be reproduced or transmitted in any form or for any purpose without the explicitly written permission of the copyright holders.
elysia and xfilter are registered trademarks of elysia GmbH. Other product and brand names contained in this document are used for identification purposes only. All registered trademarks, product designations or brand names used in this document are the property of their respective owners.


The product has been manufactured in compliance with the RoHS directive. The purpose of this directive of the European Union is the Restriction of Hazardous Substances (RoHS) in electronic equipment in order to protect health and nature. Dispose separately!
Version 1.3 © 2019 elysia GmbH
English Manual ... 2

② Frequency (Low Shelf)
4 Frequency (Low Mid)
6 Frequency (High Mid)
8 Frequency (High Shelf)
11 Narrow Q (High Mid)
12 Narrow Q (Low Mid)
line
| Frequency (Hz) | Gain (dB) | | -------------- | --------- | | 200 | 0 | | 300 | 0 | | 400 | 0 | | 600 | 0 | | 800 | 0 | | 1k | 0 | | 2k | 0 | | 3k | 0 | | 4k | 0 | | 5k | 0 | | 6k | 0 | | 8k | 0 | | 10k | 0 | | 20k | 0 |High Cut

line
| Frequency (Hz) | Gain (dB) | | -------------- | --------- | | 200 | 0 | | 300 | 0 | | 400 | 0 | | 600 | 0 | | 800 | 0 | | 1k | 0 | | 2k | 0 | | 3k | 2 | | 4k | 4 | | 5k | 7 | | 6k | 6 | | 8k | 2 | | 10k | -2 | | 20k | -8 |Low Mid (Wide Q)

line
| Frequency (Hz) | Gain (dB) | | -------------- | --------- | | 20 | 0 | | 30 | 0 | | 50 | 0 | | 100 | 0 | | 200 | 0 | | 300 | 0 | | 500 | 0 | | 1k | 0 | | 2k | 0 | | 3k | 0 | | 5k | 0 |Low Mid (Narrow Q)
line
| Frequency (Hz) | Gain (dB) | | -------------- | --------- | | 20 | 0 | | 30 | 0 | | 50 | 0 | | 100 | 0 | | 200 | 0 | | 300 | 0 | | 500 | 0 | | 1k | 0 | | 2k | 0 | | 3k | 0 | | 5k | 0 |elysia
High Mid (Wide Q)

line
| Frequency (Hz) | Gain (dB) | | -------------- | --------- | | 200 | 0 | | 300 | 2 | | 400 | 4 | | 600 | 6 | | 800 | 8 | | 1k | 10 | | 2k | 12 | | 3k | 10 | | 4k | 8 | | 6k | 6 | | 8k | 4 | | 10k | 2 | | 20k | 0 |High Mid (Narrow Q)

line
| Frequency (Hz) | Gain (dB) | | -------------- | --------- | | 200 | 0 | | 300 | 0 | | 400 | 0 | | 600 | 0 | | 800 | 0 | | 1k | 0 | | 2k | 0 | | 3k | 0 | | 4k | 0 | | 5k | 0 | | 6k | 0 | | 8k | 0 | | 10k | 0 | | 20k | 0 |Technische Daten
English Manual ... 2

Deutsches Handbuch ... 16
elysia
Compatibilité
② Frequency (Low Shelf)
4 Frequency (Low Mid)
⑥ Frequency (High Mid)
8 Frequency (High Shelf)
11 Narrow Q (High Mid)
12 Narrow Q (Low Mid)
line
| Frequency (Hz) | Gain (dB) | | -------------- | --------- | | 200 | 0 | | 300 | 0 | | 400 | 0 | | 600 | 0 | | 800 | 0 | | 1k | 0 | | 2k | 0 | | 3k | 0 | | 4k | 0 | | 5k | 0 | | 6k | 0 | | 8k | 0 | | 10k | 0 | | 20k | 0 |High Cut
line
| Frequency (Hz) | Gain (dB) | | -------------- | --------- | | 200 | 0 | | 300 | 0 | | 400 | 0 | | 600 | 0 | | 800 | 0 | | 1k | 0 | | 2k | 1 | | 3k | 3 | | 4k | 5 | | 5k | 7 | | 6k | 6 | | 8k | 3 | | 10k | -2 | | 20k | -8 |Low Mid (Wide Q)
line
| Frequency (Hz) | Gain (dB) | | -------------- | --------- | | 20 | 0 | | 30 | 0 | | 50 | 0 | | 100 | 0 | | 200 | 0 | | 300 | 0 | | 500 | 0 | | 1k | 0 | | 2k | 0 | | 3k | 0 | | 5k | 0 |Low Mid (Narrow Q)
line
| Frequency (Hz) | Gain (dB) | | -------------- | --------- | | 20 | 0 | | 30 | 0 | | 50 | 0 | | 100 | 0 | | 200 | 0 | | 300 | 0 | | 500 | 0 | | 1k | 0 | | 2k | 0 | | 3k | 0 | | 5k | 0 |elysia
High Mid (Wide Q)

line
| Frequency (Hz) | Gain (dB) | | -------------- | --------- | | 200 | 0 | | 300 | 2 | | 400 | 4 | | 600 | 6 | | 800 | 8 | | 1k | 10 | | 2k | 12 | | 3k | 10 | | 4k | 8 | | 6k | 6 | | 8k | 4 | | 10k | 2 | | 20k | 0 |High Mid (Narrow Q)

line
| Frequency (Hz) | Gain (dB) | | -------------- | --------- | | 200 | 0 | | 300 | 2 | | 400 | 4 | | 600 | 6 | | 800 | 8 | | 1k | 10 | | 2k | 12 | | 3k | 10 | | 4k | 8 | | 5k | 6 | | 6k | 4 | | 8k | 2 | | 10k | 0 | | 20k | 0 |Données techniques
Bande passante: <10 Hz - 400 kHz (-3,0 dB)
THD+N @ 0 dBu, 20 Hz - 22 kHz: 0,0018 %
THD+N @ +10 dBu, 20 Hz - 22 kHz: 0,005 %
Niveau de bruit, 20 Hz - 20 kHz (A-weighted): -98 dBu
Plage dynamique, 20 Hz - 22 kHz: 120 dB