Summit Kamado E6 - Barbecue WEBER - Free user manual and instructions
Find the device manual for free Summit Kamado E6 WEBER in PDF.
User questions about Summit Kamado E6 WEBER
0 question about this device. Answer the ones you know or ask your own.
Ask a new question about this device
Download the instructions for your Barbecue in PDF format for free! Find your manual Summit Kamado E6 - WEBER and take your electronic device back in hand. On this page are published all the documents necessary for the use of your device. Summit Kamado E6 by WEBER.
USER MANUAL Summit Kamado E6 WEBER
natural_image
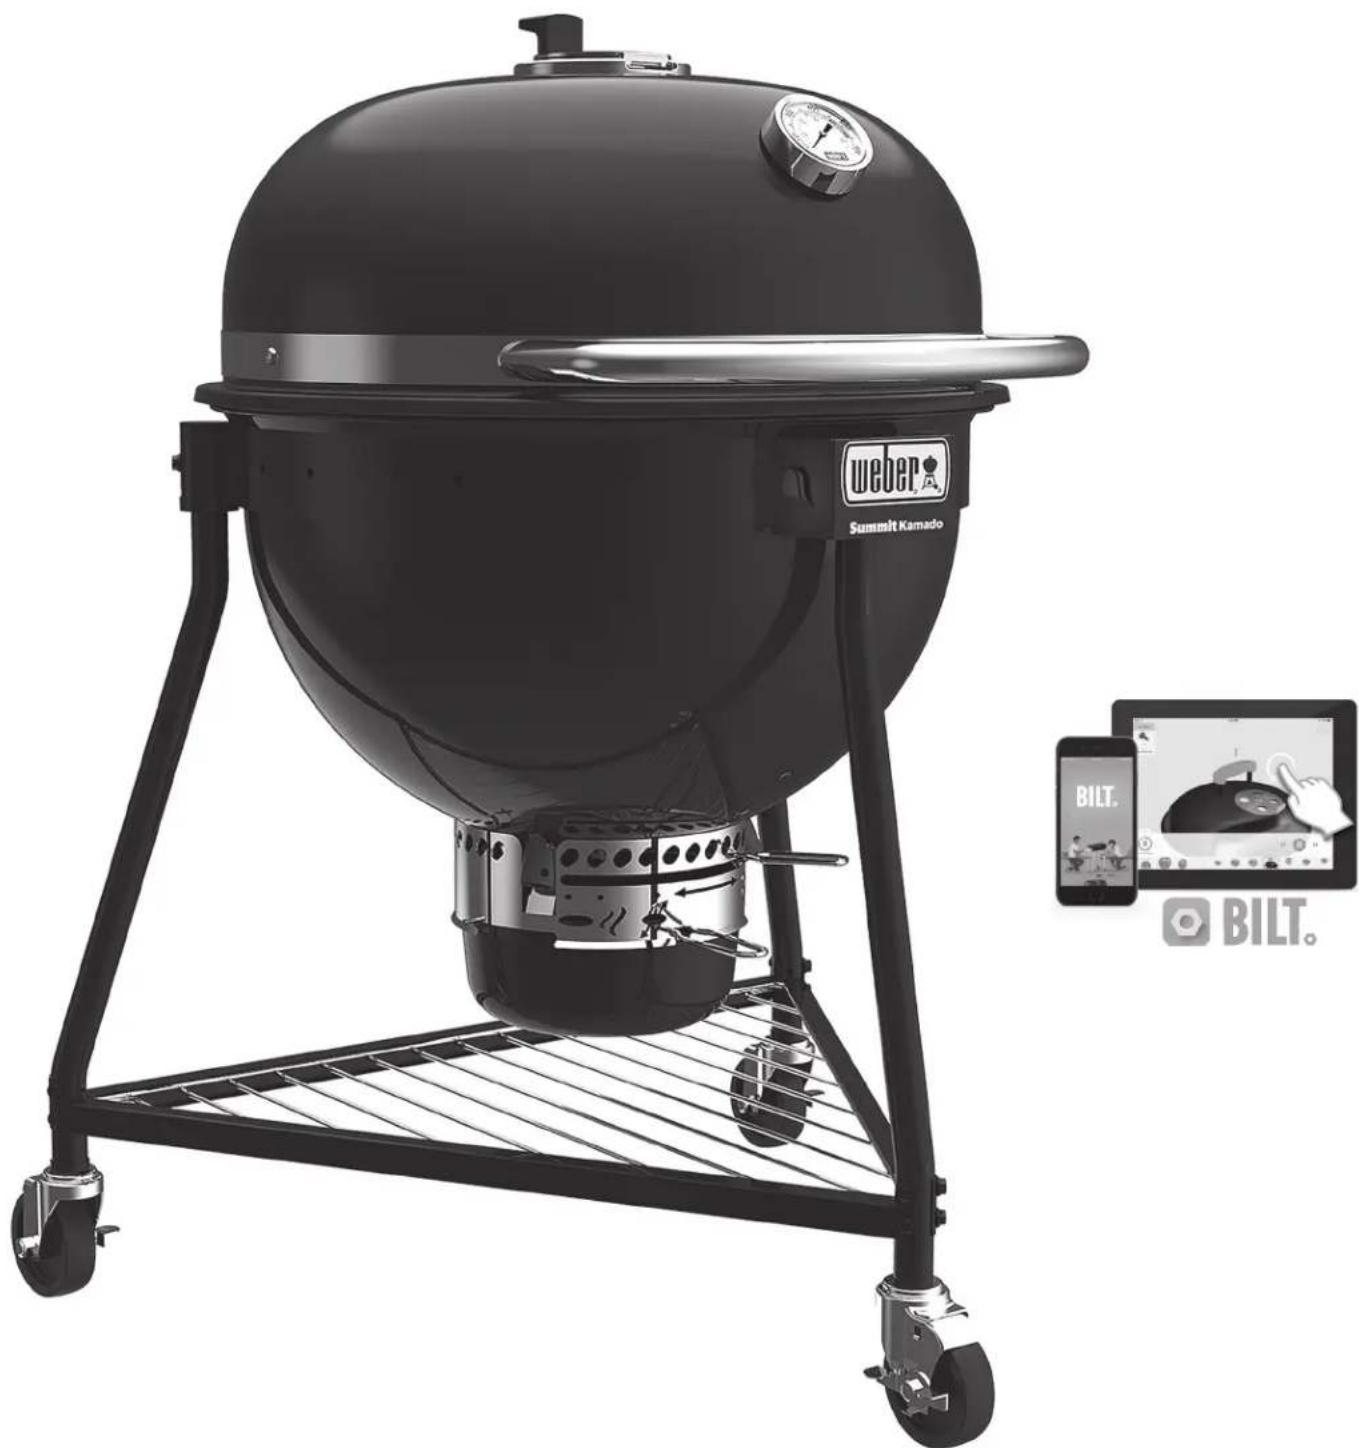
Black Webb kegg grill with a radar gauge and a BILT logo, displayed on wheels (no text or symbols on the main subject)Do not discard. This owner's guide contains important product dangers, warnings, and cautions.
For assembly instructions, refer to the assembly guide. Do not use the barbecue indoors!
Visit weber.com, select your country of origin, and register your barbecue today.
Failure to follow the DANGERS, WARNINGS, and CAUTIONS contained in this owner's guide may result in serious bodily injury or death, or may result in a fire or an explosion causing damage to property.
DANGER:
Indicates a hazardous situation which, if not avoided, will result in death or serious injury.
△ Only use the grill outdoors in a well-ventilated area. Do not use in a garage, building, breezeway, tent, any other enclosed area, or beneath overhead combustible construction.
⚠ The grill is not intended for and should never be used as a heater.
⚠ Keep the cooking area clear of flammable vapors and liquids such as gasoline, alcohol, etc., and combustible materials.
Do not use gasoline, alcohol, or other highly volatile fluids to ignite charcoal. If using charcoal starter fluid (not recommended), remove any fluid that may have drained through the bowl vents before lighting the charcoal.
Do not add charcoal starter fluid or charcoal impregnated with charcoal lighter fluid to hot or warm charcoal. Cap starter fluid after use, and place a safe distance away from the grill.
⚠️ Should a grease fire occur, leave grill lid closed until fire is out.
The grill should never be used by children. Accessible parts of the grill may be very hot. Keep children and pets away while the grill is in use.
Do not put a grill cover or anything flammable on, or in the storage area under the grill, while grill is in operation or is hot.
WARNING:
Indicates a hazardous situation which, if not avoided, could result in death or serious injury.
⚠ The grill should never be left unattended or moved while in operation.
Do not use the grill unless all parts are in place. Grill must be properly assembled according to the assembly instructions. Improper assembly may be dangerous.
⚠ Do not build this model of grill in any built-in or slide-in construction.
⚠️ Never use grill without the ash catcher installed.
⚠️ Never lean over an open grill while igniting or cooking.
⚠ Use heat-resistant barbecue mitts or gloves at all times when operating the grill.
⚠ Use proper tools, with long, heat-resistant handles.
Exercise caution when operating your grill. It will be hot during cooking or cleaning, and should never be left unattended.
This grill will become very hot, do not move it during operation.
⚠ Do not place hands or fingers on the front edge of the bowl while the grill is hot or the lid is open.
The use of alcohol, prescription drugs, non-prescription drugs, or illegal drugs may impair the consumer's ability to properly and safely assemble, move, store, or operate the grill.
⚠ Always put charcoal on top of the fuel grate. Do not put charcoal directly in the bottom of the bowl or on the diffuser plate.
⚠ The grill should be thoroughly cleaned on a regular basis.
⚠️ Never dump hot charcoal where it might be stepped on or be a fire hazard. Never dump ashes or charcoal before they are fully extinguished.
⚠ When cooking, the grill must be on a level, stable surface in an area clear of combustible material.
⚠ Grill brushes should be checked for loose bristles and excessive wear on a regular basis. Replace brush if any loose bristles are found on cooking grate or brush. WEBER recommends purchasing a new stainless steel bristle grill brush at the beginning of every spring.
⚠ Do not wear clothing with loose flowing sleeves while lighting or using the grill.
⚠️ Never touch the cooking or fuel grate, diffuser plate, ashes, charcoal, or the grill to see if they are hot.
This WEBER grill is not intended to be installed in or on recreational vehicles and/or boats.
⚠ Do not use lighter fluid, gasoline, alcohol, or other highly volatile fluids to ignite or reignite charcoal.
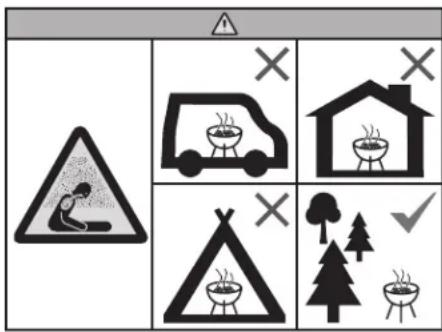
⚠ WARNING! Do not use the grill in a confined and/or habitable space e.g. houses, tents, caravans, motor homes, boats. Danger of carbon monoxide poisoning fatality.
text_image
Warning sign with pictograms and symbols for heating, cooking, and outdoor activitiesCAUTION:
Indicates a hazardous situation which, if not avoided, could result in minor or moderate injury.
⚠ Do not remove ashes until all charcoal is completely burned out and fully extinguished and grill is cool.
⚠ Lining the bowl with aluminum foil will obstruct the air flow. Instead, use a drip pan to catch drippings from meat when cooking using the indirect method or smoking.
⚠ Do not store grill until ashes and charcoal are fully extinguished.
⚠ The grill is not intended for commercial use.
⚠ Do not use water to control flare-ups or to extinguish charcoal.
⚠ Do not use grill in high winds.
Extinguish charcoal when finished cooking. To extinguish, close bowl vent, lid and RAPIDFIRE lid damper.
CALIFORNIA PROPOSITION 65
⚠ WARNING: Combustion byproducts produced when using this product contain chemicals known to the state of California to cause cancer, birth defects, or other reproductive harm.
⚠ PROPOSITION 65 WARNING: Handling the brass material on this product exposes you to lead, a chemical known to the state of California to cause cancer, birth defects, or other reproductive harm. Wash hands after handling this product.
Thank you for purchasing a WEBER product. Weber-Stephen Products LLC, 1415 S. Roselle Road, Palatine, Illinois 60067 ("WEBER") prides itself on delivering a safe, durable, and reliable product.
This is WEBER's Voluntary Warranty provided to you at no extra charge. It contains the information you will need to have your WEBER product repaired in the unlikely event of a failure or defect.
Pursuant to applicable laws, the customer has several rights in case the product is defective. Those rights include supplementary performance or replacement, abatement of the purchasing price, and compensation. In the European Union, for example, this would be a two-year statutory warranty starting on the date of the handover of the product. These and other statutory rights remain unaffected by this warranty provision. In fact, this warranty grants additional rights to the Owner that are independent from statutory warranty provisions.
WEBER'S VOLUNTARY WARRANTY
WEBER warrants, to the purchaser of the WEBER product (or in the case of a gift or promotional situation, the person for whom it was purchased as a gift or promotional item), that the WEBER product is free from defects in material and workmanship for the period(s) of time specified below when assembled and operated in accordance with the accompanying Owner's Manual. (Note: If you lose or misplace your WEBER Owner's Manual, a replacement is available online at www.weber.com, or such country-specific website to which Owner may be redirected.) Under normal, private single family home or apartment use and maintenance, WEBER agrees within the framework of this warranty to repair or replace defective parts within the applicable time periods, limitations, and exclusions listed below. TO THE EXTENT ALLOWABLE BY APPLICABLE LAW, THIS WARRANTY IS EXTENDED ONLY TO THE ORIGINAL PURCHASER AND IS NOT TRANSFERABLE TO SUBSEQUENT OWNERS, EXCEPT IN THE CASE OF GIFTS AND PROMOTIONAL ITEMS AS NOTED ABOVE.
OWNER'S RESPONSIBILITIES UNDER THIS WARRANTY
To ensure trouble-free warranty coverage, it is important (but it is not required) that you register your WEBER product online at www.weber.com, or such country-specific website to which Owner may be redirected. Please also retain your original sales receipt and/or invoice. Registering your WEBER product confirms your warranty coverage and provides a direct link between you and WEBER in case we need to contact you.
The above warranty only applies if the Owner takes reasonable care of the WEBER product by following all assembly instructions, usage instructions, and preventative maintenance as outlined in the accompanying Owner's Manual, unless the Owner can prove that the defect or failure is independent of non-compliance with the above mentioned obligations. If you live in a coastal area, or have your product located near a pool, maintenance includes regular washing and rinsing of the exterior surfaces as outlined in the accompanying Owner's Manual.
WARRANTY HANDLING / EXCLUSION OF WARRANTY
If you believe that you have a part which is covered by this Warranty, please contact WEBER Customer Service using the contact information on our website (www.weber.com, or such country-specific website to which Owner may be redirected). WEBER will, upon investigation, repair or replace (at its option) a defective part that is covered by this Warranty. In the event that repair or replacement are not possible, WEBER may choose (at its option) to replace the grill in question with a new grill of equal or greater value. WEBER may ask you to return parts for inspection, shipping charges to be pre-paid.
This WARRANTY lapses if there are damages, deteriorations, discolorations, and/or rust for which WEBER is not responsible caused by:
- Abuse, misuse, alteration, modification, misapplication, vandalism, neglect, improper assembly or installation, and failure to properly perform normal and routine maintenance;
- Insects and rodents;
- Exposure to salt air and/or chlorine sources such as swimming pools and hot tubs/spas;
- Severe weather conditions such as hail, hurricanes, earthquakes, tsunamis or surges, tornadoes or severe storms.
The use and/or installation of parts on your WEBER product that are not genuine WEBER parts will void this Warranty, and any damages that result hereby are not covered by this Warranty. Any conversion of a gas grill not authorized by WEBER and performed by a WEBER authorized service technician will void this Warranty.
PRODUCT WARRANTY PERIODS
Bowl, lid, and center ring:
10 years, rust through/burn through
ONE-TOUCH cleaning system:
5 years, rust through/burn through
Plastic components:
5 years, excluding fading or discoloration
All remaining parts:
2 years
DISCLAIMERS
APART FROM THE WARRANTY AND DISCLAIMERS AS DESCRIBED IN THIS WARRANTY STATEMENT, THERE ARE EXPLICITLY NO FURTHER WARRANTY OR VOLUNTARY DECLARATIONS OF LIABILITY GIVEN HERE WHICH GO BEYOND THE STATUTORY LIABILITY APPLYING TO WEBER. THE PRESENT WARRANTY STATEMENT ALSO DOES NOT LIMIT OR EXCLUDE SITUATIONS OR CLAIMS WHERE WEBER HAS MANDATORY LIABILITY AS PRESCRIBED BY STATUTE.
NO WARRANTIES SHALL APPLY AFTER THE APPLICABLE PERIODS OF THIS WARRANTY. NO OTHER WARRANTIES GIVEN BY ANY PERSON, INCLUDING A DEALER OR RETAILER, WITH RESPECT TO ANY PRODUCT (SUCH AS ANY "EXTENDED WARRANTIES"), SHALL BIND WEBER. THE EXCLUSIVE REMEDY OF THIS WARRANTY IS REPAIR OR REPLACEMENT OF THE PART OR PRODUCT.
IN NO EVENT UNDER THIS VOLUNTARY WARRANTY SHALL RECOVERY OF ANY KIND BE GREATER THAN THE AMOUNT OF THE PURCHASE PRICE OF THE WEBER PRODUCT SOLD.
YOU ASSUME THE RISK AND LIABILITY FOR LOSS, DAMAGE, OR INJURY TO YOU AND YOUR PROPERTY AND/OR TO OTHERS AND THEIR PROPERTY ARISING OUT OF THE MISUSE OR ABUSE OF THE PRODUCT OR FAILURE TO FOLLOW INSTRUCTIONS PROVIDED BY WEBER IN THE ACCOMPANYING OWNER'S MANUAL.
PARTS AND ACCESSORIES REPLACED UNDER THIS WARRANTY ARE WARRANTED ONLY FOR THE BALANCE OF THE ABOVE MENTIONED ORIGINAL WARRANTY PERIOD(S).
THIS WARRANTY APPLIES TO PRIVATE SINGLE FAMILY HOME OR APARTMENT USE ONLY AND DOES NOT APPLY TO WEBER GRILLS USED IN COMMERCIAL, COMMUNAL OR MULTI-UNIT SETTINGS SUCH AS RESTAURANTS, HOTELS, RESORTS, OR RENTAL PROPERTIES.
WEBER MAY FROM TIME TO TIME CHANGE THE DESIGN OF ITS PRODUCTS. NOTHING CONTAINED IN THIS WARRANTY SHALL BE CONSTRUED AS OBLIGATING WEBER TO INCORPORATE SUCH DESIGN CHANGES INTO PREVIOUSLY MANUFACTURED PRODUCTS, NOR SHALL SUCH CHANGES BE CONSTRUED AS AN ADMISSION THAT PREVIOUS DESIGNS WERE DEFECTIVE.
Weber-Stephen Products LLC
Customer Service Center
1415 S. Roselle Road
Palatine, IL 60067
U.S.A.
For replacement parts, call:
1-800-446-1071
TABLE OF CONTENTS
2 Safety
3 Warranty
4 Assembly
14 Cooking System
15 Features
16 Before Lighting
Choose a Proper Location to Grill
Choose How Much Charcoal to Use
The Very First Time You Grill
Preparing the Grill for Lighting
17 Lighting Charcoal
Lighting the Charcoal Using a Chimney Starter
Lighting the Charcoal Using Lighter Cubes
Lighting the Charcoal Using CHAR-BASKETS
18 Grilling Methods
Direct Heat
Indirect Heat
Smoking
21 Tips and Tricks for Grilling Success
22 Maintenance
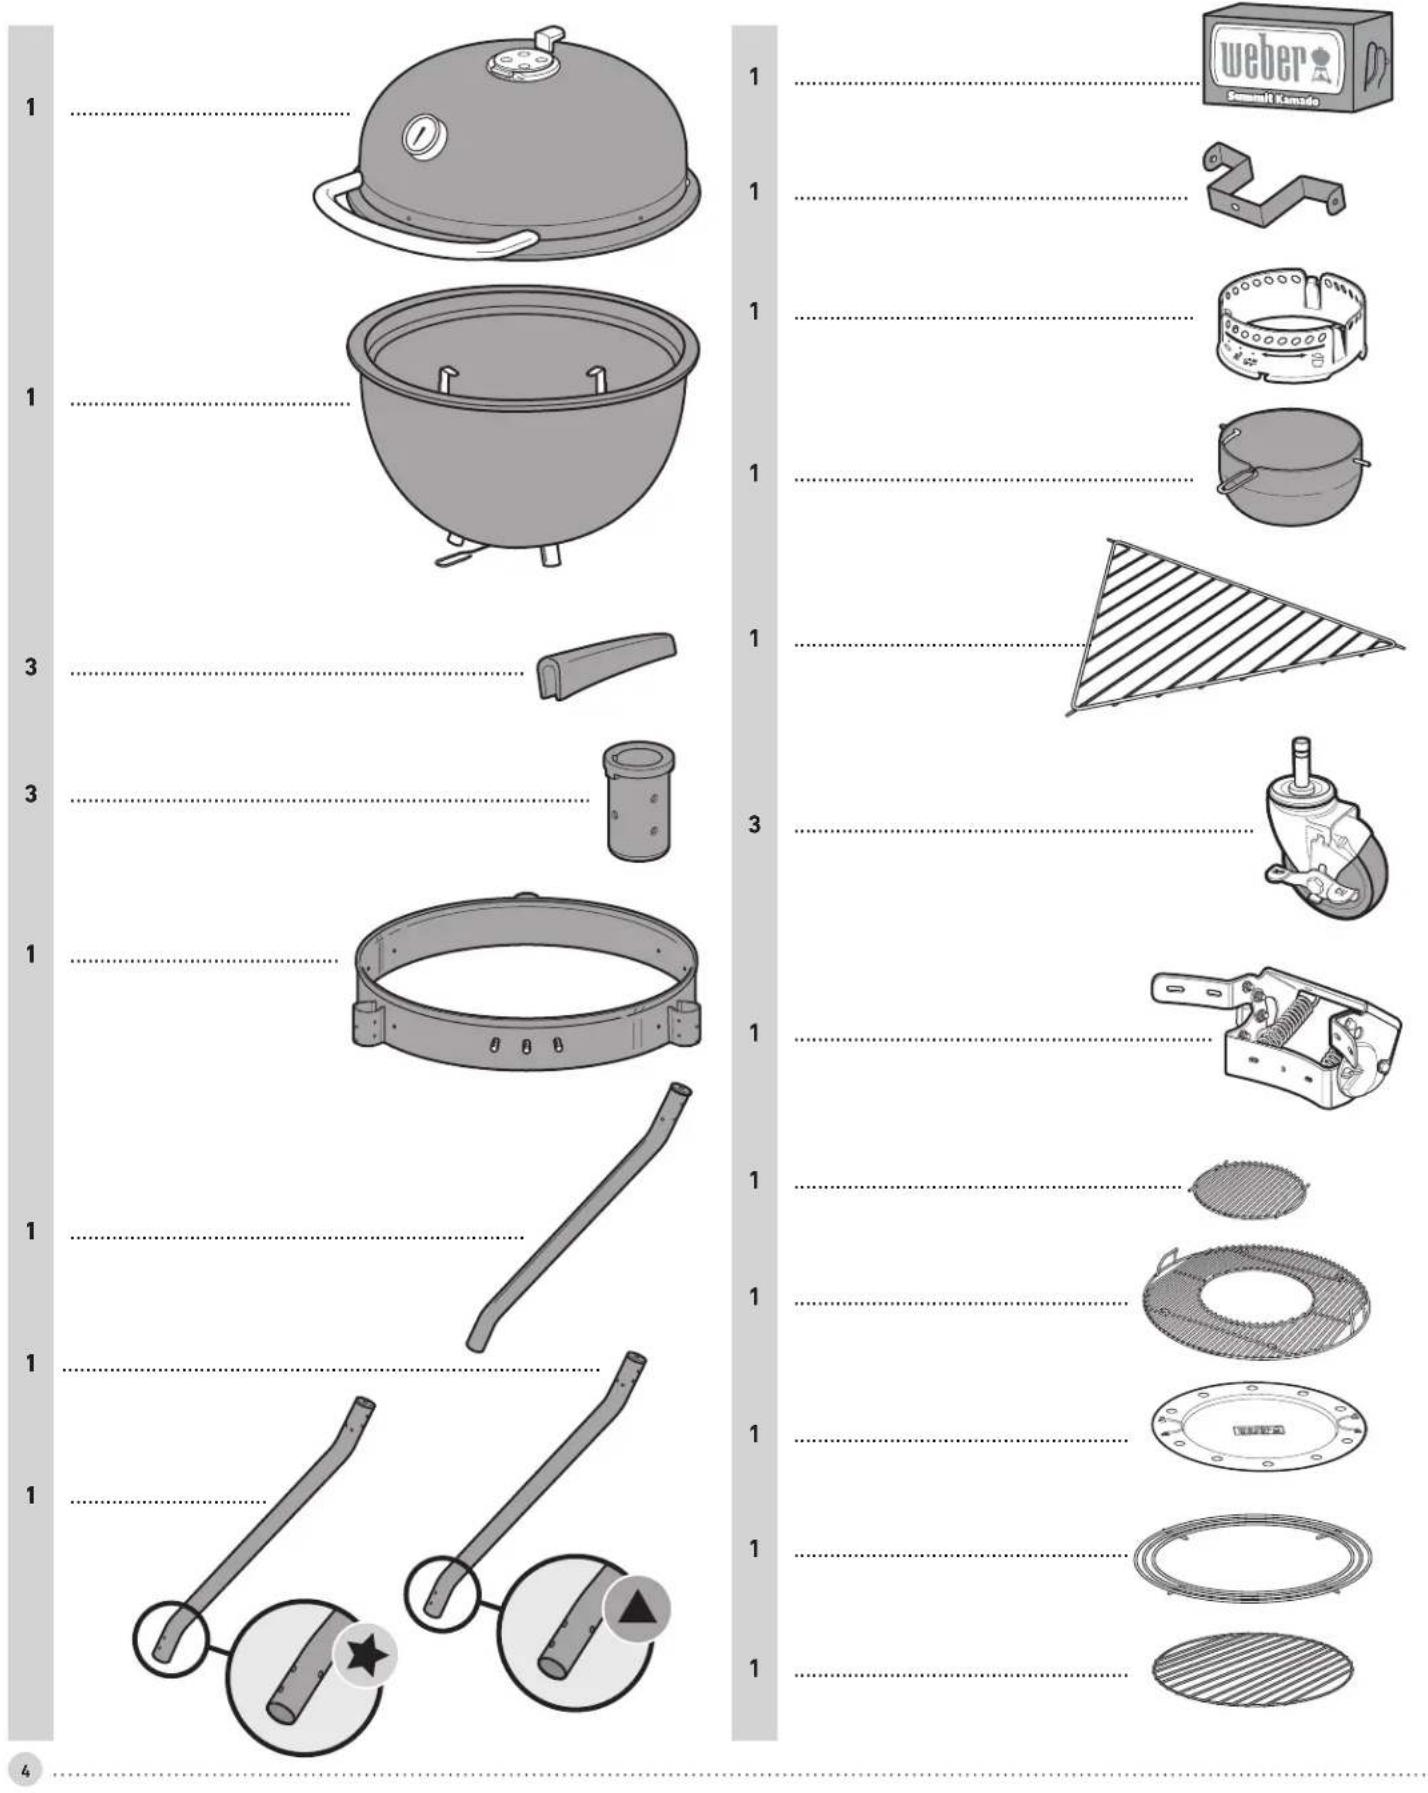
23 Replacement Parts
Visit www.weber.com, select your country of origin, and register your barbecue today.
ASSEMBLY ARMADO ASSEMBLAGE
ASSEMBLY
ARMADO
ASSEMBLAGE
natural_image
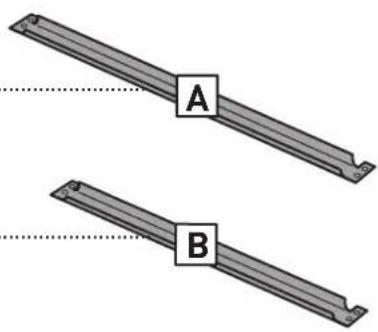
Two identical metal strips labeled A and B, with dotted alignment lines (no text or symbols beyond labels)
⚠ Remove protective film from stainless steel parts before installing.
⚠️ Retire la película protectora de las piezas de acero inoxidable antes de la instalación del asador.
Avant de procéder à l'assemblage, retirez le film protecteur qui recouvre les pièces en acier inoxydable.


natural_image
Technical line drawing of a mechanical stand with a circular top and triangular base (no text or symbols)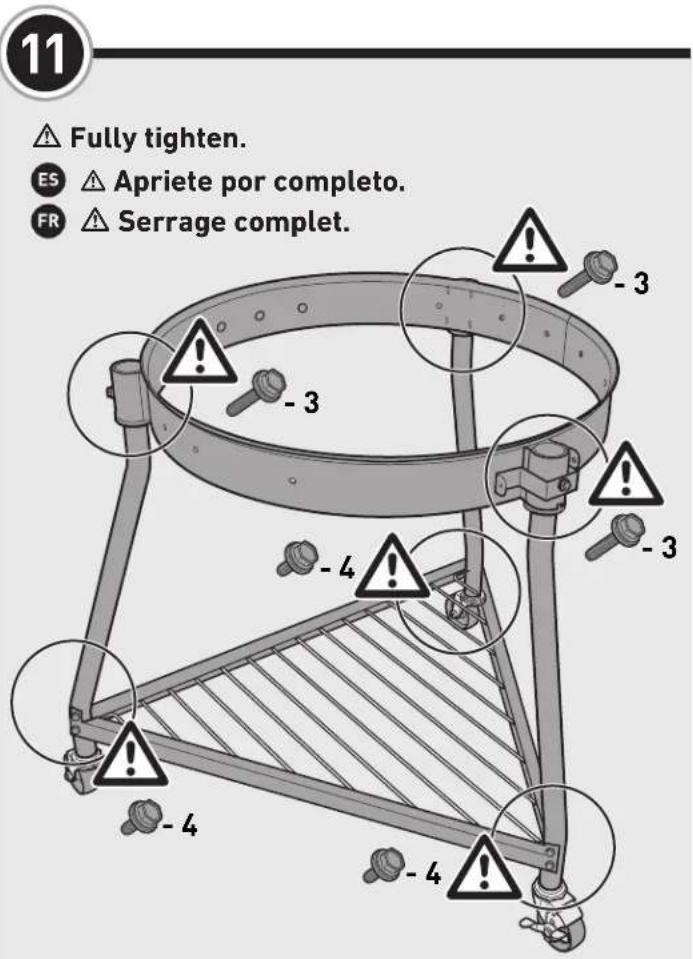
text_image
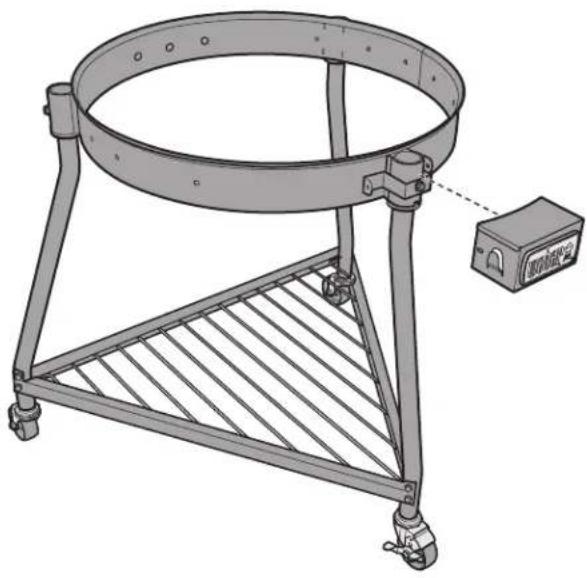
11 ▲ Fully tighten. ES ▲ Apriete por completo. FR ▲ Serrage complet.ASSEMBLY
ARMADO
ASSEMBLAGE
12
-2
natural_image
Technical line drawing of a circular mechanical device with a triangular base and a small labeled component (no text or symbols present)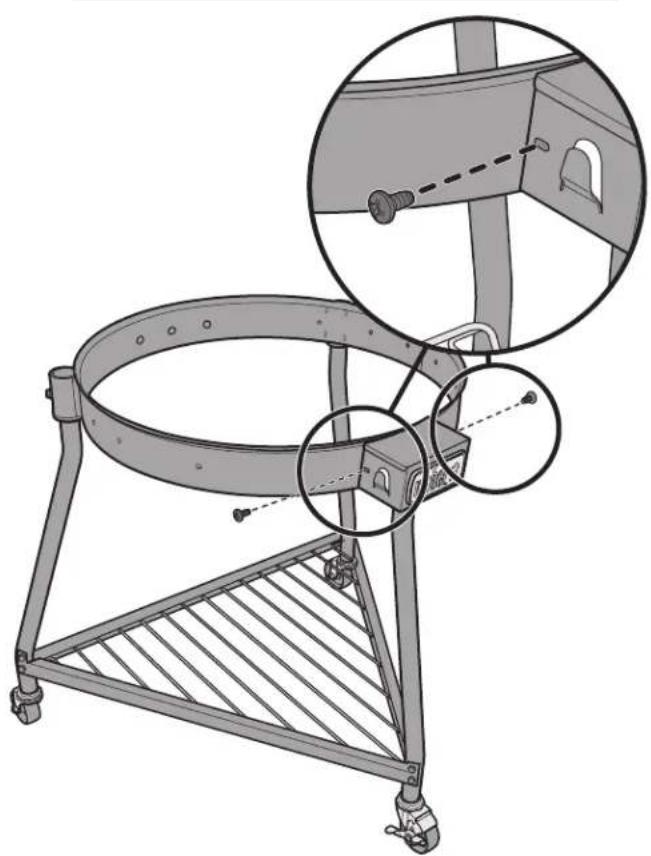
natural_image
Technical illustration of a mechanical device with circular components and a triangular base, showing internal components and alignment views (no text or symbols)13
-3
natural_image
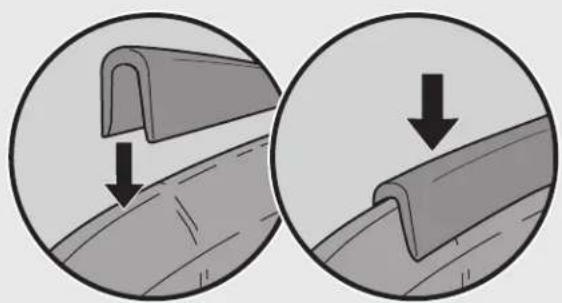
Two circular diagrams showing a curved pipe or channel with downward arrows indicating flow direction (no text or symbols)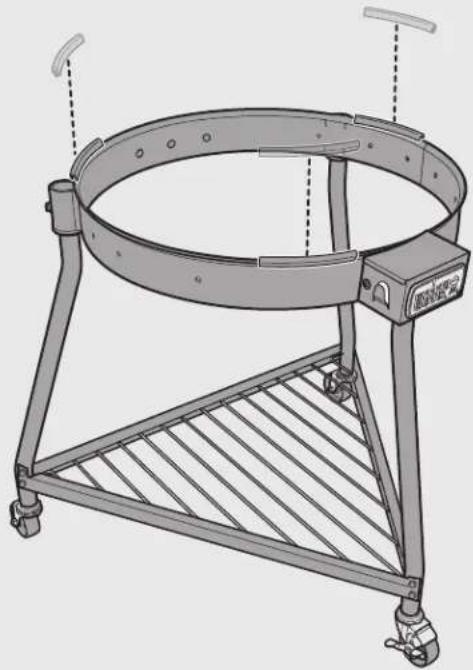
natural_image
Technical line drawing of a circular mechanical device with wheels and a base plate (no text or symbols)ASSEMBLY ARMADO ASSEMBLAGE
14
natural_image
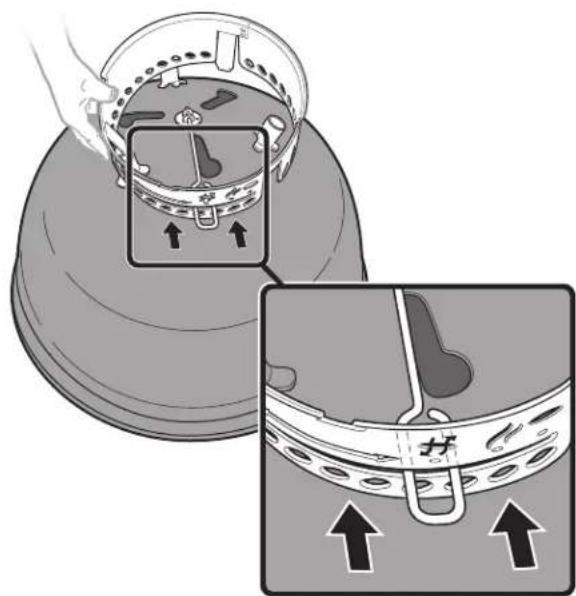
Diagram showing a device with a magnified inset of its internal structure, no text or symbols present.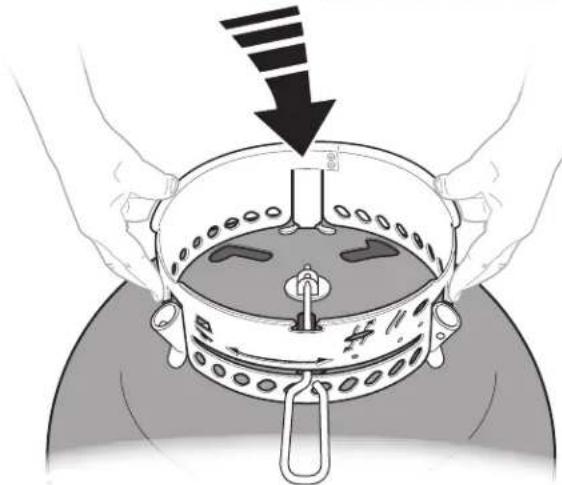
natural_image
Illustration of hands operating a metal pot with a handle, showing a downward arrow indicating compression or cooling process (no text or symbols present)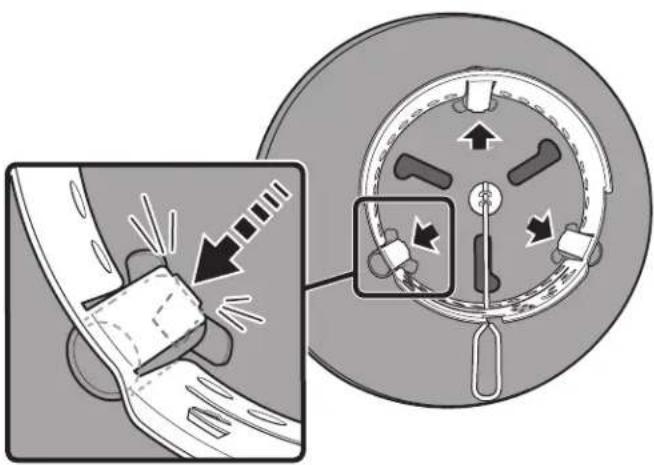
text_image
Diagram illustrating car seatbelting technique with magnified view of mechanical components and directional arrows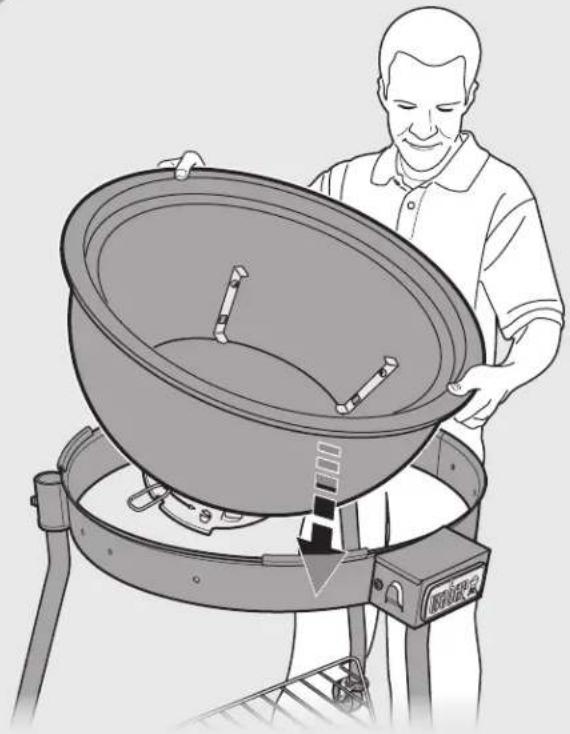
natural_image
Illustration of a person operating a large cylindrical device with a mechanical base (no text or symbols visible)ASSEMBLY
ARMADO
ASSEMBLAGE
16

⚠ WARNING: DO NOT REMOVE SAFETY BOLTS UNTIL LID INSTALLATION IS COMPLETE.
⚠ ADVERTENCIA: NO RETIRE LOS PERNOS DE SEGURIDAD HASTA QUE LA TAPA ESTÉ COMPLETAMENTE INSTALADA.
⚠ AVERTISSEMENT : NE RETIREZ
PAS LES BOULONS DE
SÉCURITÉ AVANT QUE LE COUVERCLE
NE SOIT TOTALEMENT INSTALLÉ.
natural_image
Circular diagram showing a mechanical switch or lever mechanism with no visible text or symbols
natural_image
Technical illustration of a mechanical assembly with a lever and component, showing alignment lines without any text or symbols.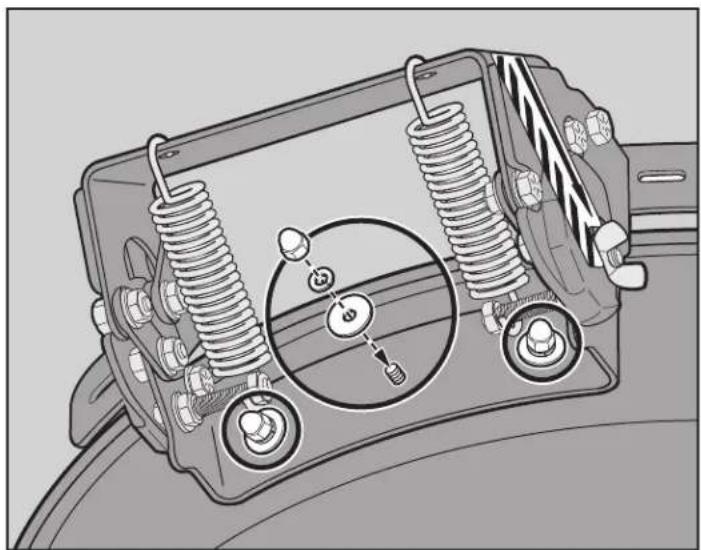
natural_image
Technical diagram of a mechanical device with springs and adjustment knobs (no text or symbols)17


natural_image
Technical line drawing of a kettlebell with attached clamps and a dome top (no text or symbols)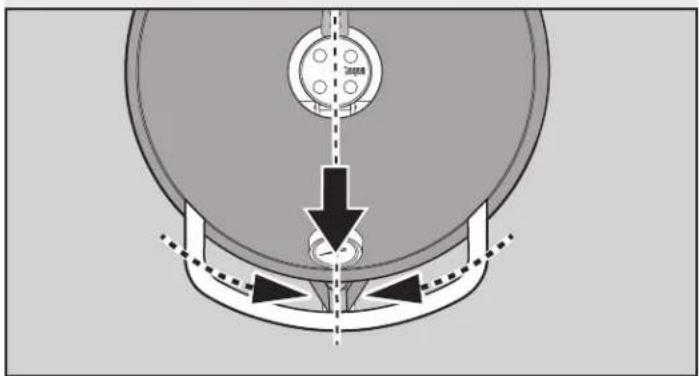
natural_image
Pure mechanical diagram showing a gear or cam mechanism with no text, numbers, or symbols
natural_image
Mechanical assembly diagram showing a bearing housing with mounting brackets and adjustment knobs (no text or labels)ASSEMBLY ARMADO ASSEMBLAGE
18
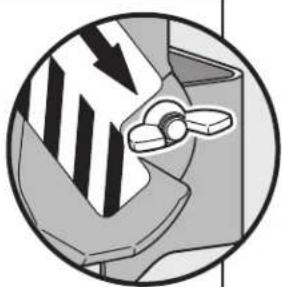
⚠ WARNING: DO NOT LIFT THE LID UNTIL THE SAFETY BOLTS ARE REMOVED.
ADVERTENCIA: NO LEVANTE LA TAPA SIN RETIRAR ANTES LOS PERNOS DE SEGURIDAD.
⚠ AVERTISSEMENT : NE SOULEVEZ PAS LE COUVERCLE AVANT QUE LES BOULONS DE SÉCURITÉ NE SOIENT RETIRÉS.

natural_image
Diagram of a mechanical component with a propeller and directional arrows, no text or symbols present
text_image
Technical diagram showing mechanical assembly with springs and bolts, labeled with directional arrows and component names.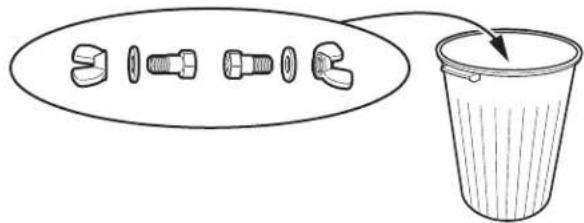
text_image
Diagram showing a series of mechanical components and a trash bin with an arrow indicating rotation or movement.19

natural_image
Illustration of a large gray griffon with a horizontal support frame and wheels, no text or symbols present.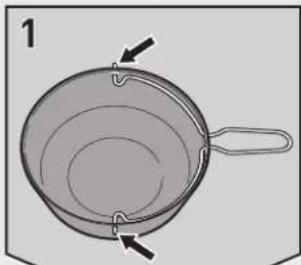
natural_image
Simple line drawing of a pan with a handle and two arrows indicating direction (no text or symbols)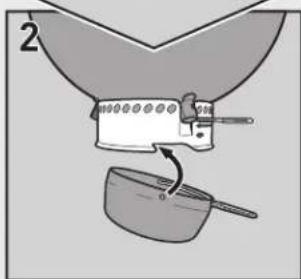
text_image
2
text_image
3
text_image
4ASSEMBLY ARMADO ASSEMBLAGE
natural_image
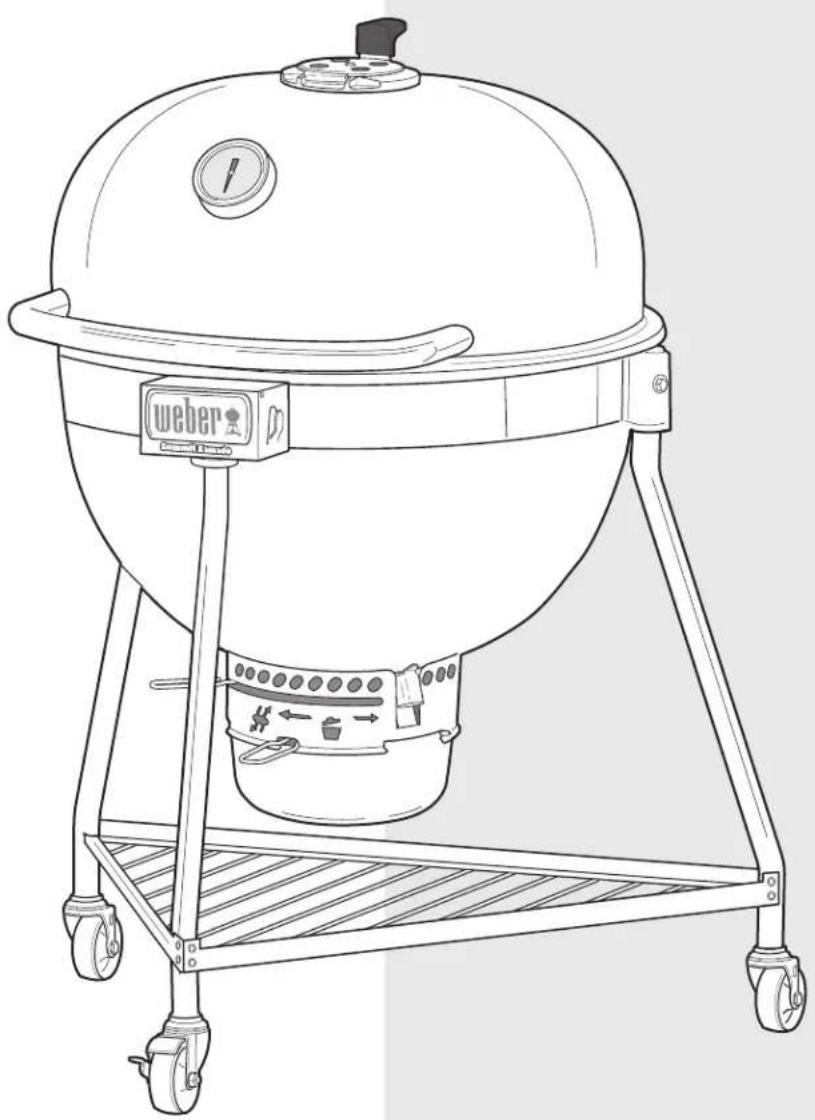
Line drawing of a Gorka grill with a blue dome top and wheels, no text or symbols present.US Make sure that all parts are assembled and hardware is fully tightened before operating the grill.
Asegúrese de montar todas las partes y de que estas queden bien apretadas antes de usar el asador.
Accurez-vous que toutes les pièces sont assemblées et que toute la visserie est bien serrée avant de mettre le barbecue en marche.

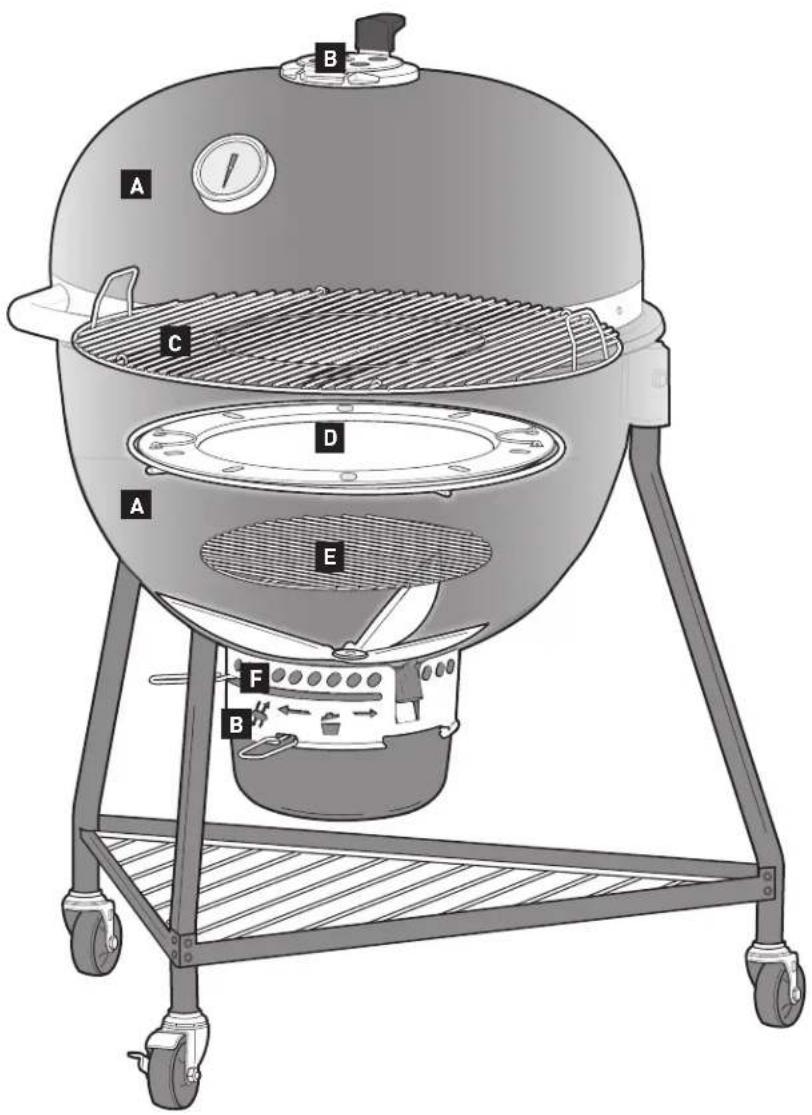
COOKING SYSTEM
Extensive thought was put into how your charcoal grill was designed. WEBER grills are designed so that you never have to worry about flare-ups, hot and cold spots, or burnt food. Expect excellent performance, control, and results every time.
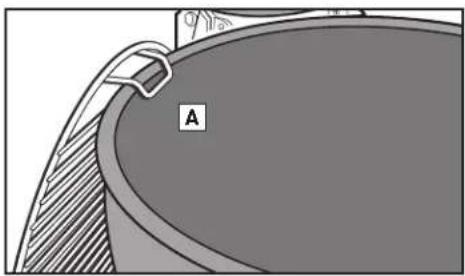
A Bowl and Lid
The air-insulated, double-wall bowl and lid retain heat for longer cook times and excellent temperature control. The unique kettle shape of your SUMMIT charcoal grill allows for true convection cooking.
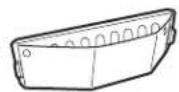
B Dampers and Vents
A major component in charcoal grilling is air. The more air allowed into the grill, the hotter the fire will grow (to a point) causing the charcoal to burn much faster. The bowl vent on the bottom of the grill should be open while grilling or in the smoke position while smoking. The top damper is used to control the temperature within the grill; however, should never be completely closed.
C Cooking Grate
Made of heavy-duty stainless steel, the cooking grate provides ample area to make all of your favorite meals.
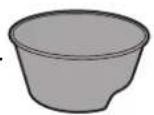
D Diffuser Plate
The stainless steel diffuser plate is used to maintain a consistent temperature and to direct heat and smoke around the food. It is always used while smoking. However, it can also be used while cooking indirectly to maximize grilling space.
E Fuel Grate
The fuel grate has what it takes to withstand the heat of any charcoal fire. Made of heavy-duty steel, this durable grate will not warp or burn through. The grate can be moved to a higher position in the bowl for grilling and lower position for smoking.
F ONE-TOUCH Cleaning System
The stainless steel ONE-TOUCH cleaning system makes cleanup hassle free. As you move the handle back and forth, the three blades in the bowl move ash from the bottom of the grill into the high capacity ash catcher for quick and clean ash removal. These same vents act as a bowl damper, to help bring oxygen up to the fire or to allow you to easily extinguish the fire.
text_image
A B C D E F B
FEATURES
The WEBER SUMMIT KAMADO E6 isn't just your typical grill. The top-of-the-line features and innovative design allow you to grill or smoke your food with convenience and ease.
A Gourmet BBQ System
The GOURMET BBQ SYSTEM cooking grate is the circular center grate within the hinged cooking grate. It is removable and can be replaced with any of the WEBER GOURMET BBQ SYSTEM inserts (sold separately). For a full product line of GOURMET BBQ SYSTEM inserts, visit our website at www.weber.com.
B Stainless Steel Diffuser Plate
This specially designed diffuser plate is used specifically for smoking food, as well as indirect cooking.
c Built-In Thermometer
The large, durable, built-in lid thermometer allows you to easily monitor your grill's temperature. The "smoke" zone on the thermometer indicates when the grill has reached the ideal temperature for smoking.
D High Capacity Ash Catcher
The fully enclosed high capacity ash catcher keeps ashes from blowing around and easily detaches for quick and clean ash removal.
E Tool Hook Handles
The tool hooks are built right in so you have a convenient place to hang your cooking tools.
F Bowl Vents for Low Temperature Grilling
The new shape of these bowl vents allow the perfect amount of airflow for low temperature grilling and smoking. (Not pictured)
G Bottom Wire Rack
The bottom wire rack (G) supplies additional storage.
H RAPIDFIRE Lid Damper
The hinged RAPIDFIRE lid damper maximizes airflow and increases temperature quickly to get you up and grilling within 20 minutes. It also aids in a quick temperature recovery rate.
I Easy-Open Lid Hinge
The lid of your grill was designed with a spring hinge to make opening and closing the lid simple and safe. The hinge prevents the lid from slamming shut, preventing possible injury or damage to the grill. (Not pictured)
text_image
A
natural_image
Cross-sectional diagram of a mechanical bearing or housing with concentric rings and mounting holes (no text or symbols)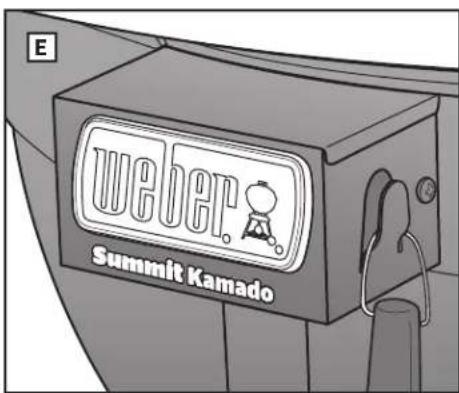
text_image
E WEJET Summit Kamado
text_image
C weber
natural_image
Diagram of a cooking apparatus with a pan and lever, no text or symbols present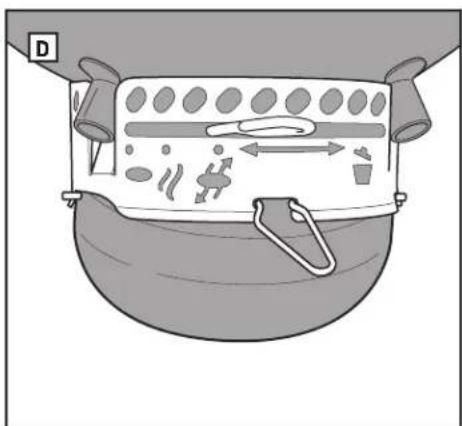
natural_image
Diagram of a mechanical device with internal components and directional arrows, no readable text or symbols present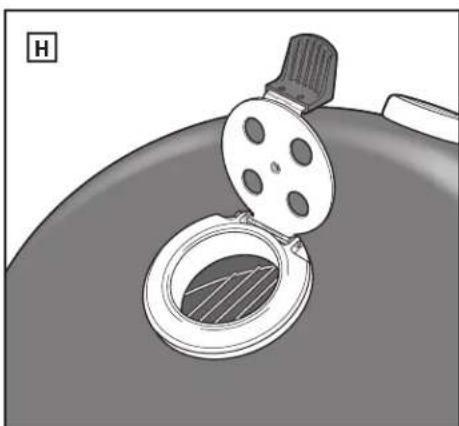
natural_image
Illustration of a cooking pot with a lid and lid removed, showing a circular opening (no text or symbols)
BEFORE LIGHTING
Choose a Proper Location to Grill
- Only use this grill outdoors in a well-ventilated area. Do not use in a garage, building, breezeway, or any other enclosed area.
- Keep the grill on a secure, level surface at all times.
- Do not use the grill within 5 feet (1.5 M) of any combustible material. Combustible materials include, but are not limited to, wood or treated wood decks, patios, and porches.
Choose How Much Charcoal to Use
Choosing charcoal or briquette quantity depends on what you are grilling and the size of your grill. If you are grilling small, tender pieces of food that take less than 20 minutes, refer to the Charcoal Quantity for Direct Heat chart. If you are grilling or smoking larger cuts of meat that require 20 minutes or more of grilling time, or delicate foods, refer to the Charcoal Quantity for Indirect Heat chart. For more details about the difference between direct and indirect cooking, refer to the GRILLING METHODS section of this manual.
The Very First Time You Grill
It is recommended that the grill be heated up and the fuel kept red hot, with the lid on, for at least 30 minutes prior to cooking for the first time to burn off any manufacturing residue.
Preparing the Grill for Lighting
- Open the lid.
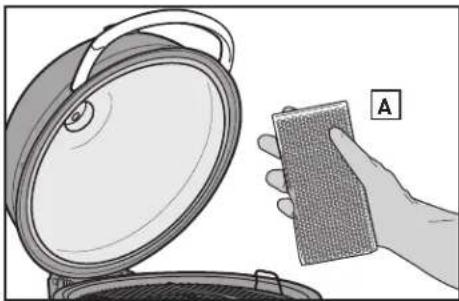
- Remove the cooking grate from the grill. For convenience, hang the cooking grate on the bowl of your grill by its curved handles (A).
- Remove the charcoal (bottom) grate and clear ashes or chunks of old charcoal from the bottom of the bowl. Charcoal requires oxygen to burn, so be sure that nothing clogs the vents. Using the ONE-TOUCH cleaning system, move the handle back and forth to move ash from the bottom of the grill into the ash catcher (B).
- Squeeze the ash catcher handle to release it from the grill (C).
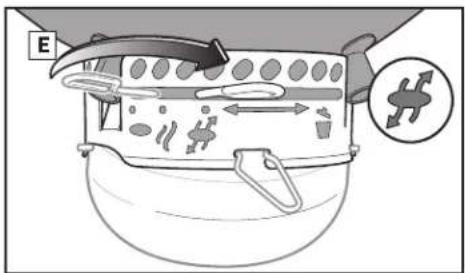
- Open bowl vent by moving the handle all the way to the right (D) or by moving the handle to the open position (E).
- Reinstall the charcoal (bottom) grate.
Note: Instructions for using lighter fluid was purposely left out of this owner's guide. Lighter fluid is messy and can transmit a chemical taste to your food, while lighter cubes (sold separately) do not. If you choose to use lighter fluid, follow the manufacturer's instructions and NEVER add lighter fluid to a burning fire.
natural_image
Cross-sectional diagram of a mechanical component with labeled section A (no text or symbols beyond label)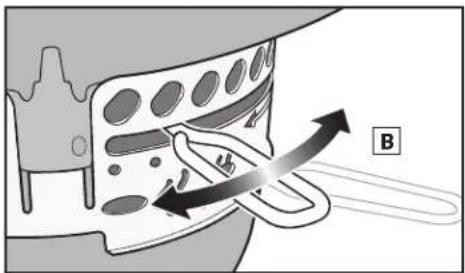
natural_image
Diagram of a mechanical component with directional arrows indicating motion or force (no text or symbols)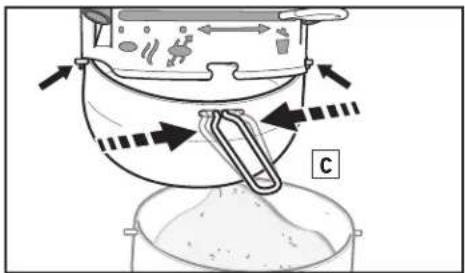
text_image
Diagram illustrating a mechanical or filtration process with labeled components and directional arrows indicating flow or movement.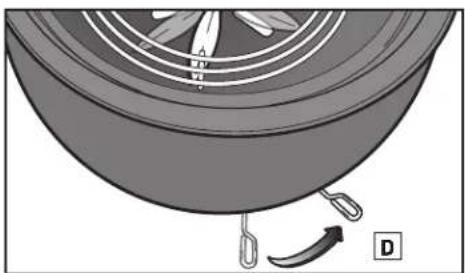
natural_image
Diagram of a mechanical component with hanging weights and a curved arrow indicating motion (no text or symbols)Charcoal Quantity for Direct Heat
Charcoal Briquettes Lump
Charcoal\* WEBER Briquettes
60 briquettes (1½ cups) 3½ cups 40 briquettes (1 cup)
When measuring charcoal quantities, use the charcoal measuring cup provided with your grill.
Charcoal Quantity for Indirect Heat
| Charcoal Briquettes for first hour (per side) | Charcoal Briquettes to add for each additional hour (per side) |
30 briquettes (¾ cup) 9 briquettes (¼ cup)
Lump Charcoal* for first hour (per side)
Lump Charcoal* to add for each additional hour (per side)
2 cups 12 cup
WEBER Briquettes for first hour (per side)
WEBER Briquettes to add for each additional hour (per side)
20 briquettes (½ cup) 8 briquettes (¼ cup)
* When measuring charcoal quantities, use the charcoal measuring cup provided with your grill.
text_image
E
LIGHTING CHARCOAL
Lighting the Charcoal Using a Chimney Starter
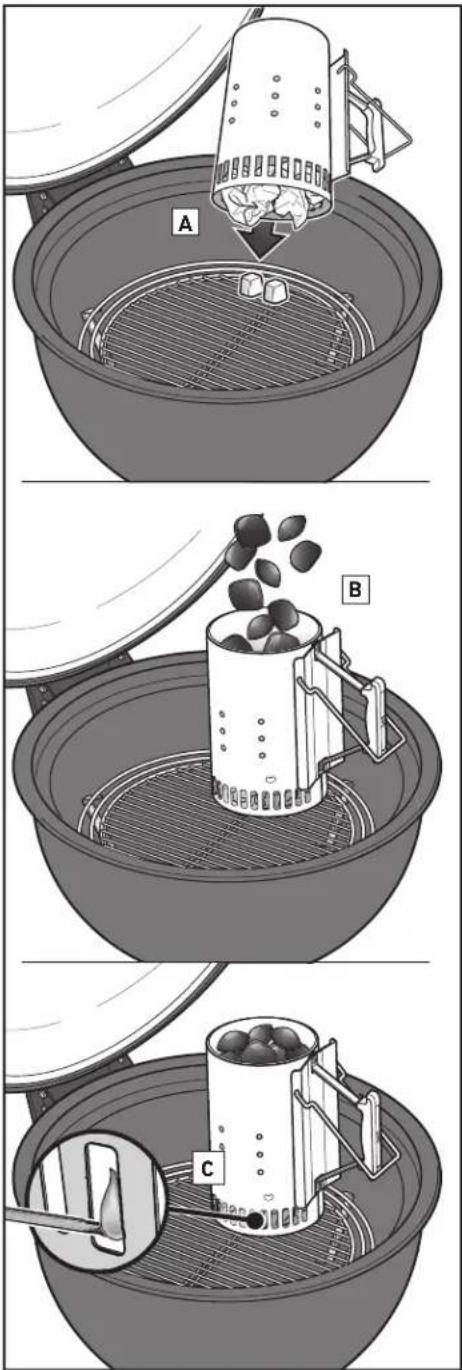
The simplest way to light any kind of charcoal is to use a chimney starter; the WEBER RAPIDFIRE chimney starter (sold separately). Refer to the cautions and warnings included with the RAPIDFIRE chimney starter before lighting. When igniting fuel ensure all dampers are fully opened.
- Put a few sheets of wadded up newspaper in the bottom of the chimney starter and set the chimney starter on the charcoal grate (A); or put a few lighter cubes near the center of the charcoal grate and place the chimney starter over them.
- Fill the chimney starter with charcoal (B).
- Light the lighter cubes or newspaper through the holes on the side of the chimney starter (C).
- Keep the chimney starter in place until the charcoal is fully lit. You can tell when the charcoal is fully lit when it is covered with a coating of white ash. This can take anywhere from 15 to 30 minutes. Never close the lid with the chimney starter inside the grill.
Note: The lighter cubes used must be completely consumed and the coals ashed over before placing food on the cooking grate.
- Once the charcoal is fully lit, continue to the following pages for instructions on how to arrange your charcoal and begin cooking according to your desired cooking method.
Lighting the Charcoal Using Lighter Cubes
When igniting charcoal, ensure all lid and bowl dampers are fully opened.
- Build a pyramid of charcoal in the center of the charcoal (bottom) grate and insert a couple of lighter cubes (sold separately) within the pyramid (D).
- Using a long match or lighter, light the lighter cubes. The lighter cubes will then ignite the charcoal.
- Wait for the charcoal to fully light. You can tell when the charcoal is fully lit when it is covered with a coating of white ash. This can take anywhere from 15 to 30 minutes.
Note: The lighter cubes used must be completely consumed and the coals ashed over before placing food on the cooking grate.
- Once the charcoal is fully lit, continue to the following pages for instructions on how to arrange your fuel and begin cooking according to your desired cooking method.
Lighting the Charcoal Using CHAR-BASKETS
When igniting charcoal, ensure all lid and bowl dampers are fully opened.
- Place the CHAR-BASKETS on the center of the charcoal grate and fill the CHAR-BASKETS with charcoal (E).
- Insert a couple of lighter cubes (sold separately) into each of the CHAR-BASKETS (F). Make sure to nestle them within the charcoal.
- Using a long match or lighter, light the lighter cubes. The lighter cubes will then ignite the charcoal (G).
- Wait for the fuel to fully light. You can tell when the charcoal is fully lit when it is covered with a coating of white ash. This can take anywhere from 15 to 30 minutes.
Note: The lighter cubes used must be completely consumed and the coals ashed over before placing food on the cooking grate.
- Once the charcoal is fully lit, continue to the following pages for instructions on how to arrange your charcoal and begin cooking according to your desired cooking method.
text_image
A B C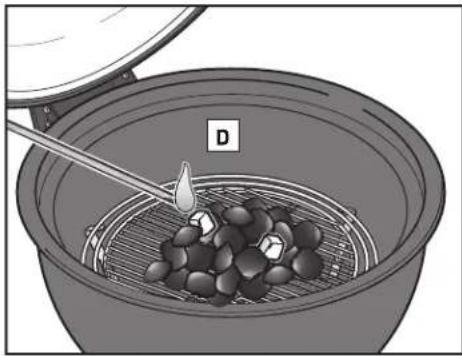
natural_image
Illustration of a cooking step with a ladle and a tray holding seeds, no text or symbols present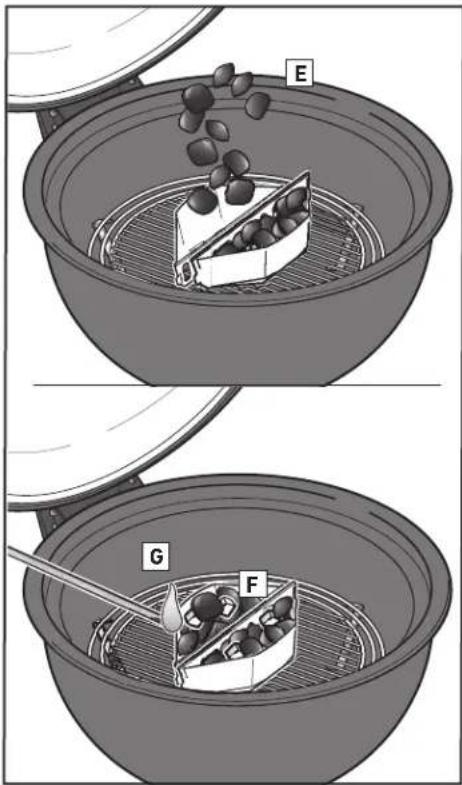
text_image
E G FUse heat-resistant barbecue gloves or mitts while cooking, adjusting air vents (dampers), adding charcoal, and handling thermometer or lid.
⚠️ Never close the lid with the chimney starter in the barbecue.

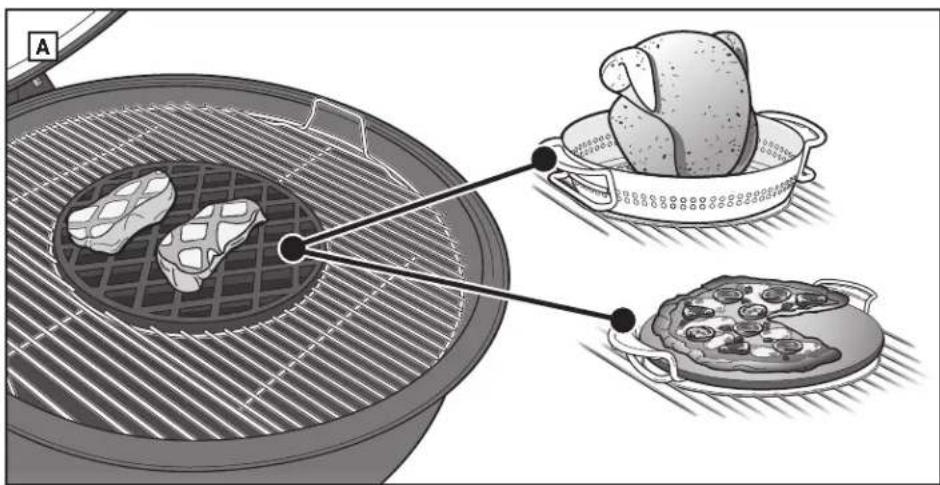
GRILLING METHODS - DIRECT HEAT
The WEBER SUMMIT KAMADO can be used for three cooking methods: Direct grilling, Indirect grilling, and Smoking. Before continuing, determine which cooking method will be used and follow the appropriate instructions in this owner's guide.
NOTE: Grilling in a colder climate or higher altitude will extend your cooking time. Windy weather conditions will raise the grill's temperature.
GRILLING WITH DIRECT HEAT
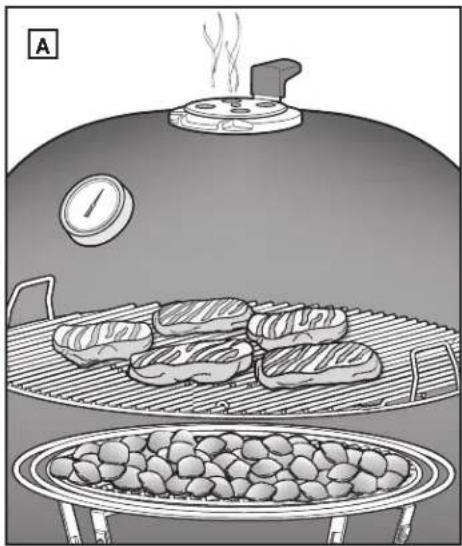
Use the direct grilling method for small, tender pieces of food that take less than 20 minutes to cook, such as: hamburgers, steaks, chops, kabobs, boneless chicken pieces, fish fillets, shellfish, and sliced vegetables.
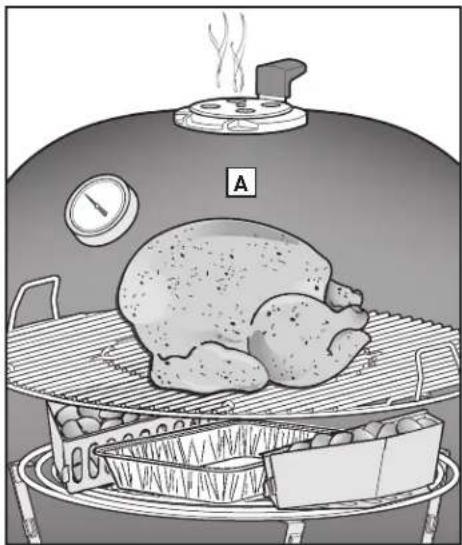
With direct heat, the fire is right below the food (A). It sears the surfaces of the food, developing flavors, texture, and delicious caramelization while cooking the food all the way to the center.
A direct fire creates both radiant and conductive heat. Radiant heat from the charcoal quickly cooks the surface of the food closest to it. At the same time, the fire heats the cooking grill rods, which conducts heat directly to the surface of the food and creates those unmistakable and lovely grill marks.
Grill Setup For Direct Heat
- Place the support ring (B) in the middle position of the bowl, then place the charcoal grate (C) within the center of the support ring.
- Ignite the charcoal. Refer to the "LIGHTING CHARCOAL" section in this owner's guide.
NOTE: Lid, dampers, and vents must remain open when igniting charcoal.
- Once the charcoal is lit, put on barbecue mitts or gloves. Using long tongs or a charcoal rake, spread the charcoal evenly across the charcoal grate (D). Make sure lit charcoal is in contact with unlit charcoal.
- Place the cooking grate in the top position of the bowl (E).
- Close the grill lid and flip open the RAPIDFIRE lid damper (F).
- Preheat the cooking grate for approximately 5-10 minutes or until desired grill temperature is reached.
- Once the cooking grate is preheated, using a stainless steel bristle grill brush or scraper, clean the cooking grate (G).
NOTE: When using a stainless steel bristle grill brush, replace brush if any loose bristles are found on cooking grate or brush.
- Place the food on the cooking grate and close the grill lid. Rotating the RAPIDFIRE lid damper will increase or decrease the desired heat inside the grill (H). Consult recipe for recommended cooking times and temperature. Reference the lid thermometer for the desired internal grill temperature.
When Finished Cooking
Close the lid damper and bowl vents to extinguish the charcoal.
natural_image
Illustration of a griddle with steaming bread rolls and a large pot, no text or symbols present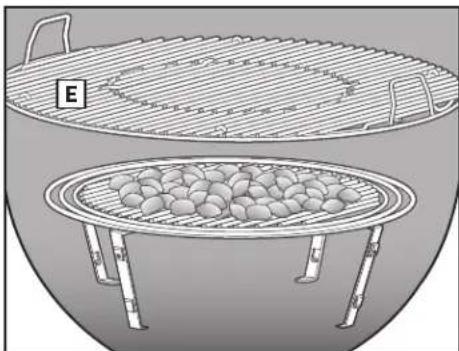
natural_image
Illustration of a bamboo steamer with a lid and two circular trays filled with round fruits (no text or symbols)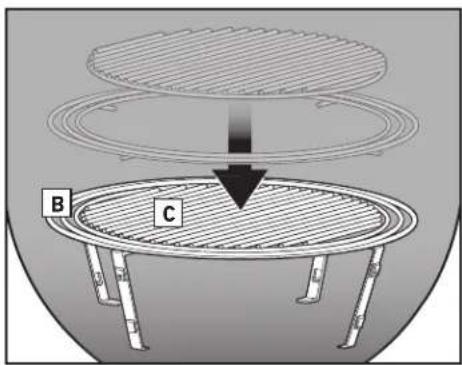
text_image
B C
natural_image
Diagram showing a mechanical component being inserted into a circular basin, with an arrow indicating force direction (no text or symbols present)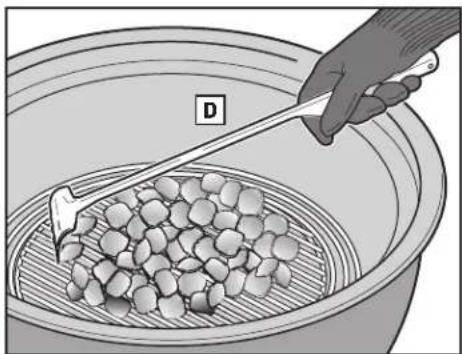
natural_image
Illustration of a hand using a tool to handle seeds in a steamer basket (no text or symbols)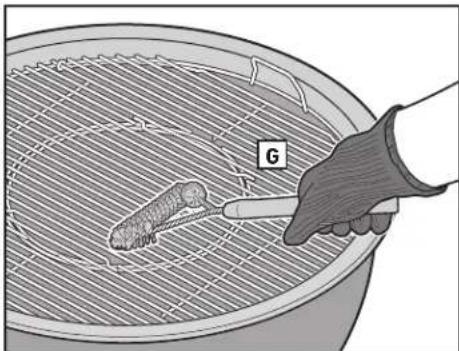
natural_image
Illustration of a hand holding a tool inside a steamer basket with a small object inside (no text or symbols)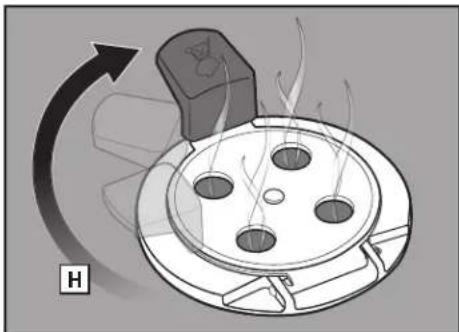
natural_image
Diagram of a fire extinguisher with flame inside, showing airflow direction (no text or symbols)
GRILLING METHODS - INDIRECT HEAT
GRILLING WITH INDIRECT HEAT
Use the indirect method for larger cuts of meat that require 20 minutes or more of grilling time, or for foods so delicate that direct exposure to the heat would dry them out or scorch them, such as: roasts, bone-in poultry pieces, whole fish, delicate fish fillets, whole chickens or turkeys, and ribs. Indirect heat can also be used for finishing thicker foods or bone-in cuts that have been seared or browned first over direct heat.
With indirect heat, the heat is on both sides of the grill (A), or off to one side of the grill. The food sits on the portion of the cooking grate without charcoal directly below it.
The radiant and conductive heat are still factors, but they are not as intense while indirect cooking. However, if the lid of the grill is closed, as it should be, there is another kind of heat generated: convection heat. Heat rises, reflects off the lid and inside surfaces of the grill, and circulates to slowly cook the food evenly on all sides. Convection heat doesn't sear the surface of the food the way radiant and conductive heat do. It cooks it more gently all the way to the center, like the heat in an oven.
NOTE: Grilling in a colder climate or higher altitude will extend your cooking time. Windy weather conditions will raise the grill's temperature.
Grill Setup For Indirect Heat
-
Place the support ring (B) in the middle position of the bowl, then place the charcoal grate (C) within the center of the support ring.
-
Ignite the charcoal. Refer to the "LIGHTING CHARCOAL" section in this owner's guide.
NOTE: Lid, dampers, and vents must remain open when igniting charcoal.
- Once the charcoal is lit, put on barbecue mitts or gloves. Using long tongs, separate the CHAR-BASKETS so they will be set on both sides of the food (D).
NOTE: A disposable drip pan should be placed between the CHAR-BASKETS to collect drippings and minimize cleaning time.
NOTE: Alternatively, this grill has ample cooking space to cook indirectly and directly simultaneously. By moving both CHAR-BASKETS to one side of the grill, you can cook directly over the baskets and use the remaining side of the cooking grate to cook indirectly.
-
Place the cooking grate in the top position of the bowl, ensuring the hinged sections are over the CHAR-BASKETS (E) to add more charcoal if needed.
-
Close the grill lid and flip open the RAPIDFIRE lid damper (F).
-
Preheat the cooking grate for approximately 5-10 minutes or until desired grill temperature is reached.
-
Once the cooking grate is preheated, using a stainless steel bristle grill brush or scraper, clean the cooking grate (G).
NOTE: When using a stainless steel bristle grill brush, replace brush if any loose bristles are found on cooking grate or brush.
- Place the food on the cooking grate in between the CHAR-BASKETS and close the grill lid. Rotating the RAPIDFIRE lid damper will increase or decrease the desired heat inside the grill (H). Consult recipe for recommended cooking times and temperature. Reference the lid thermometer for the desired internal grill temperature.
When Finished Cooking
Close the lid damper and bowl vents to extinguish the charcoal.
natural_image
Illustration of a roasted chicken on an inverted griddle with a steaming pot and a pressure gauge, no text or symbols present.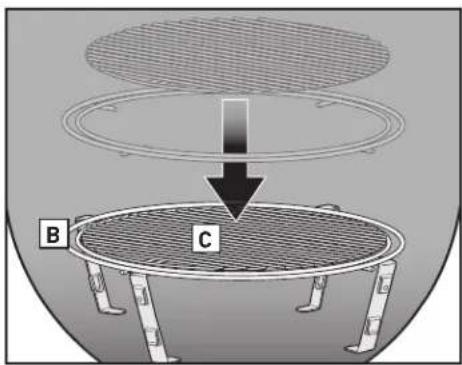
text_image
B C
natural_image
Illustration of a steamer with two trays containing granular material, one being filled with a tool (no text or symbols)
natural_image
Line drawing of a bamboo steamer with labeled components (no text or symbols)
natural_image
Diagram showing a mechanical component being inserted into a circular opening, with an arrow indicating force direction (no text or symbols present)
natural_image
Illustration of a hand holding a tool inside a mesh basket containing a small object, with no visible text or symbols.
natural_image
Diagram of a fire extinguisher with flame inside, showing airflow direction (no text or symbols)
GRILLING METHODS - SMOKING
SMOKING
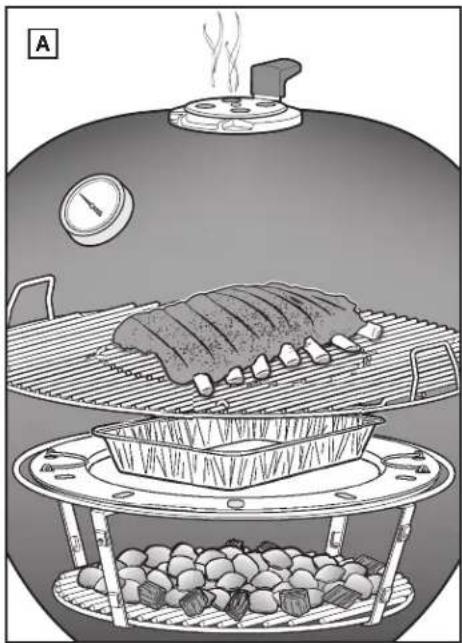
Smoking is cooking food at a low temperature over an extended period of time using chunks or chips of genuine hardwood (A). This technique is also referred to as the "low and slow method". Cooking low and slow keeps the juices and flavor in your food to produce an extremely tender piece of meat. Smoking works great for large cuts of meat such as: brisket, turkey, pork shoulder, ribs, and whole chicken.
NOTE: Grilling in a colder climate or higher altitude will extend your cooking time. Windy weather conditions will raise the grill's temperature.
Grill Setup For Smoking
- Place charcoal grate (B) in the bottom position of the bowl then place the support ring in the middle position of the bowl (C).
NOTE: 35-45 briquettes will provide 8-10 hours of cooking time. For foods that require longer to cook, more charcoal will be needed. Refer to the "Smoking & Cooking Times" chart for more information. - Ignite the charcoal. Refer to the "LIGHTING CHARCOAL" section in this owner's guide.
NOTE: Lid, dampers, and vents must remain open when igniting charcoal. - Once the charcoal is lit, put on barbecue mitts or gloves. Using long tongs, add WEBER wood chunks or chips to the perimeter of the lit charcoal (D).
- Place the diffuser plate within the center of the support ring (E).
NOTE: A disposable drip pan should be placed on the diffuser plate to collect drippings and minimize cleaning time. Add two drip pans when smoking larger pieces of meat.
- Place the cooking grate in the top position of the bowl (F).
- Close the grill lid.
- Once the grill reaches the smoke zone on the thermometer (G), slide the bowl vent arm to the smoking position (H) and rotate the RAPIDFIRE lid damper (I) accordingly to maintain recommended smoking temperature.
- Open the grill lid and clean the cooking grate using a stainless steel bristle grill brush or scraper.
NOTE: When using a stainless steel bristle grill brush, replace brush if any loose bristles are found on cooking grate or brush.
- Place the food on the center of the cooking grate. Consult recipe for recommended cooking times.
When Finished Cooking
Close the lid damper and bowl vents to extinguish the charcoal.
natural_image
Illustration of a bamboo steamer with meat inside, showing its interior and exterior view (no text or symbols)
text_image
F E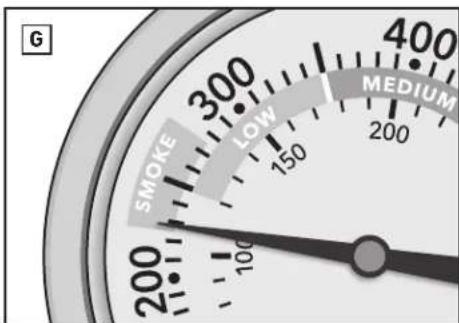
text_image
G SMOKE LOW MEDIUM 200 100 200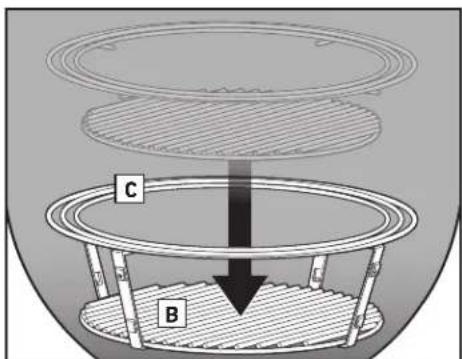
text_image
C B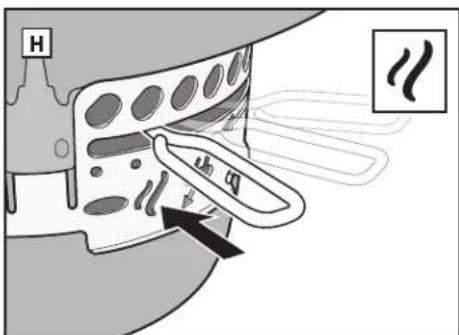
text_image
Diagram illustrating fluid flow through a vessel with labeled components and directional arrows indicating flow direction
natural_image
Illustration of a cooking step with a hand using a tool to handle a bowl containing gravel (no text or symbols)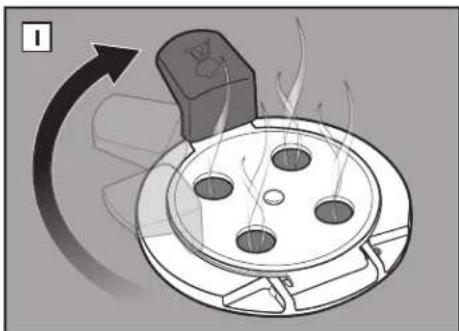
natural_image
Diagram of a moving car with motion arrows indicating speed (no text or symbols)Charcoal Quantity for Smoking & Cooking Times
| Weight Cooking Time Charcoal Briquettes Wood Chunks | |||
| FISH | 1 lb to 3 lb(0.45 - 1.36 kg) | 1 to 2 12 hours 60 to 80 briquettes (1 14 cups) 2 to 4 | |
| 3 lb to 6 lb(1.36 - 2.7 kg) | 2 12 to 4 hours 60 to 80 briquettes (1 14 cups) 2 to 4 | ||
| POULTRY | 2 lb to 3 lb(0.9 - 1.36 kg) | 2 to 3 12 hours 60 to 80 briquettes (1 14 cups) 1 to 3 | |
| 4 lb to 8 lb(1.81 - 3.62 kg) | 3 12 to 4 hours 80 to 100 briquettes (2 14 cups) 2 to 4 | ||
| 8 lb to 12 lb(3.62 - 5.44 kg) | 4 to 5 hours 80 to 100 briquettes (2 14 cups) 3 to 4 | ||
| 12 lb to 18 lb(5.44 - 8.1 kg) | 8 to 10 hours 100 to 120 briquettes (2 34 cups) 3 to 5 | ||
| PORK | 4 lb to 8 lb(1.81 - 3.62 kg) | 5 to 8 hours 80 to 100 briquettes (2 14 cups) 3 to 4 | |
| 8 lb to 12 lb(3.62 - 5.44 kg) | 8 to 12 hours 100 to 120 briquettes (2 34 cups) 3 to 5 | ||
| BEEF | 4 lb to 8 lb(1.81 - 3.62 kg) | 7 to 12 hours 80 to 120 briquettes (2 12 cups) 3 to 5 | |
| 8 lb to 12 lb(3.62 - 5.44 kg) | 12 to 18 hours 120 to 140 briquettes (3 14 cups) 3 to 5 | ||
Cooking times for beef use the USDA's definition of medium doneness. Cooking times listed are for foods that have been completely thawed. The weights, charcoal quantities, and cooking times are meant to be guidelines rather than hard and fast rules. Factors such as altitude, wind, and outside temperature can affect cooking times.
⚠ WARNING: Never use charcoal impregnated with charcoal lighter fluid.
Wood Flavors for Smoking
| Wood Flavor | Characteristics | Pairs With |
| Apple | SUBTLESlightly sweet with a dense, fruity smoke flavor | FishPoultryPork(particularly ham)Vegetables |
| Cherry | SUBTLESlightly sweet with a fruity smoke flavor | FishPoultryPorkVegetables |
| Hickory | RICHPungent and smoky with a bacon-like flavor | PoultryPorkBeef |
| Beech | SUBTLEDelicate with a mildly smoky flavor | FishPoultryPorkLambVegetables |
| Pecan | RICHPungent with a sweet flavor. Ideal for smoking at a very low heat. | FishPoultryPorkLambBeef |
| Mesquite | BOLDBig, bold smoke flavor with a borderline bitter finish. | PorkLambBeef |
TIPS & TRICKS FOR GRILLING SUCCESS
Choose a Proper Location to Grill
- Only use this grill outdoors in a well-ventilated area. Do not use in a garage, building, breezeway, or any other enclosed area.
- Keep the grill on a secure, level surface at all times.
- Do not use grill within two feet of any combustible material. Combustible materials include, but are not limited to, wood or treated wood decks, patios, and porches.
Preheat the Grill
Preheating your grill is a key factor when grilling directly, indirectly, and smoking. When the grill has preheated, the heat loosens pieces of food stuck to the grate, making it easy to brush off with a stainless steel bristle grill brush or a wood scraper. Preheating also gets the grate hot enough to sear properly and helps prevent food from sticking to the grate.
Wear Gloves
Always wear barbecue mitts when using your charcoal grill. Vents, dampers, handles, and the bowl will all get hot during the grilling process, so be sure to keep your hands and forearms protected.
Igniting the Charcoal
WEBER recommends using a chimney starter (sold separately) and lighter cubes (sold separately) to ignite charcoal. Refrain from using lighter fluid as it is messy and can transmit a chemical taste to your food.
Oil the Food, Not the Grate
Lightly oiling your food adds flavor and moisture, while also preventing the food from sticking to the grate. We do not recommend oiling the grate, as this could cause unnecessary flare-ups.
Put a Lid On It
Keep the lid closed as much as possible for these reasons:
- Keeps the grate hot enough to sear the food when cooking directly.
- Traps the smokiness that develops when fat and juices vaporize in the grill.
- Prevents flare-ups by limiting oxygen.
Diffuser Plate Do's and Don'ts
When smoking, the diffuser plate helps to maintain consistent low temperatures and redirects the heat and smoke around the food. However, the diffuser plate can also be used when cooking indirectly to maximize cooking space. Never put food or fuel on the diffuser plate.
Tame the Flame
Flare-ups happen, which is typically good because the flames sear the surface of the food. However, too many flare-ups can cause the food to burn. Keeping the lid closed as much as possible limits the amount of oxygen inside the grill, which will help extinguish any flare-ups. If the flames become out of control, temporarily move the food over indirect heat until they die down.
Watch the Time and Temperature
Grilling in a colder climate or higher altitude will extend your cooking time. Windy weather conditions will raise the grill's temperature.
Keep It Clean
Follow the basic routine maintenance instructions to keep your grill looking and functioning great for years to come. Be sure to remove accumulated ashes and old charcoal from the bottom of the bowl and the ash catcher before every use.
Smoking with Wood
Experimenting with different woods while smoking is encouraged to find the perfect balance of sweet and savory. While smoking over long periods of time, be sure to always use wood chunks instead of wood chips. Chunks allow for a longer smoke that penetrates slowly over a long cooking time. Wood chips work best for a shorter cooking time because they do not last as long during a long smoke.
CLEANING THE INSIDE OF THE GRILL
Cleaning the inside of your grill before each use is essential to keep your grill operating at peak performance for years to come.
⚠ WARNING: Wait for grill to cool before giving it a thorough cleaning.
Cleaning the Lid
From time to time you may notice "paint-like" flakes on the inside of the grill lid. During use, grease and smoke vapors slowly change into carbon and deposit on the inside of your lid. This deposit will eventually peel, and looks very similar to paint. These deposits are non-toxic, but the flakes could fall onto your food if you do not clean the lid regularly.
You will need: A non-abrasive, nylon mesh scrubbing pad and a paper towel.
- Scrub the carbonized grease on the inside of the grill lid with a scrubbing pad (A). To minimize future grease buildup, wipe the inside of the lid with a paper towel after each use; do so when the grill is warm (not hot) to the touch.
Cleaning the Grates & Diffuser Plate
If you have been cleaning your cooking grates routinely after preheating, the debris on them should be minimal. You should also make an effort to keep the debris and buildup on your diffuser plate to a minimum between meals. Utilization of a disposable drip pan will minimize the amount of cleaning needed.
You will need: A stainless steel bristle grill brush or a wood scraper.
- While the cooking grate is installed, brush the debris off your cooking grate with a stainless steel bristle grill brush or wood scraper (B).
CAUTION: Grill brushes should be checked for loose bristles and excessive wear on a regular basis. Replace brush if any loose bristles are found on cooking grate or brush. WEBER recommends purchasing a new stainless steel bristle grill brush at the beginning of every spring. - Remove the cooking grate from the grill.
- With diffuser plate installed, brush the debris off the plate with a stainless steel bristle grill brush.
- Remove the diffuser plate.
- With charcoal grate installed, brush the debris off the charcoal grate with a stainless steel bristle grill brush.
Cleaning the Bowl
For proper air flow and a better grilling experience, remove accumulated ashes and old charcoal from the bottom of the bowl and empty the ash catcher before every use.
- Open the grill lid and remove the cooking grate, diffuser plate, and charcoal grate.
- Clear ashes or chunks of old charcoal from the bottom of the bowl. Charcoal requires oxygen to burn, so be sure that nothing clogs the vents. Move the handle of the ONE-TOUCH cleaning system back and forth to move ash from the bottom of the bowl into the ash catcher (D).
- Squeeze the ash catcher handle to release it from the grill (E). Once completely cooled, dump cold ashes in a safe container to dispose of and replace the high capacity ash catcher.
CLEANING THE OUTSIDE OF THE GRILL
The outside of your grill may include stainless steel, porcelain-enameled, and plastic surfaces. WEBER recommends the following methods based on the surface type. Make sure that all of the charcoal is fully extinguished and the grill is cool before cleaning the exterior.
Stainless Steel Surfaces
Clean exterior stainless steel surfaces using a non-toxic, non-abrasive stainless steel cleaner or polish designed for use on outdoor products and grills, or just soap and water. Do not risk scratching your stainless steel with abrasive pastes that do not clean or polish, but change the color of the metal by removing the top chromium oxide film coating. Do not use paper towels. Instead, use a microfiber cloth to wipe down stainless steel surfaces.
You will need: A microfiber cloth, stainless steel cleaner, or soap and water.
- Spray cleaner onto the stainless steel areas of the grill. Using a microfiber cloth, clean in the direction of the grain of the stainless steel and let dry.
- If using soap and water, use a microfiber cloth to apply soapy water, then rinse with water and let dry.
Painted, Porcelain-Enameled Surfaces, and Plastic Components
Clean painted, porcelain-enameled, and plastic surfaces on the outside of your grill with warm soapy water.
You will need: Warm soapy water, paper towels or a microfiber cloth.
- Wipe down the surfaces with warm soapy water. Rinse and dry thoroughly.
△ IMPORTANT: Do not use any of the following to clean your grill: abrasive stainless steel polishes or paints, cleaners that contain acid, mineral spirits or xylene, oven cleaner, abrasive cleansers (kitchen cleansers), and abrasive cleaning pads.
CLEANING THE OUTSIDE OF GRILLS THAT ARE IN UNIQUE ENVIRONMENTS
If your grill is subject to a particularly harsh environment, you will want to clean the outside more often. Acid rain, pool chemicals, and salt water can cause surface rusting to appear. Wipe down the outside of your grill with warm soapy water. Follow up with a rinse and thorough drying. Additionally, you may want to apply a non-abrasive stainless steel cleaner weekly to prevent surface rust.
natural_image
Illustration of a hand cleaning a surface next to an open alarm clock (no text or symbols)
natural_image
Illustration of a hand using a tool to filter meat on a steamer (no text or symbols)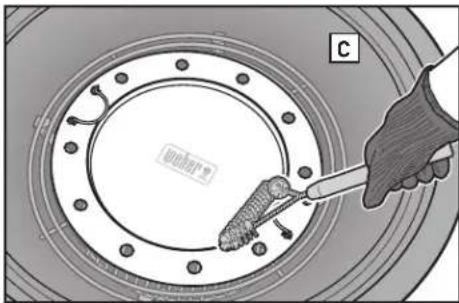
natural_image
Illustration of a hand using a tool to clean or inspect a circular mechanical component (no text or symbols visible)
text_image
Diagram showing mechanical component with labeled directional arrow and letter D, likely illustrating a motion or force system.
text_image
Diagram illustrating a mechanical or fluid system with labeled components and directional arrows, including a container and valve.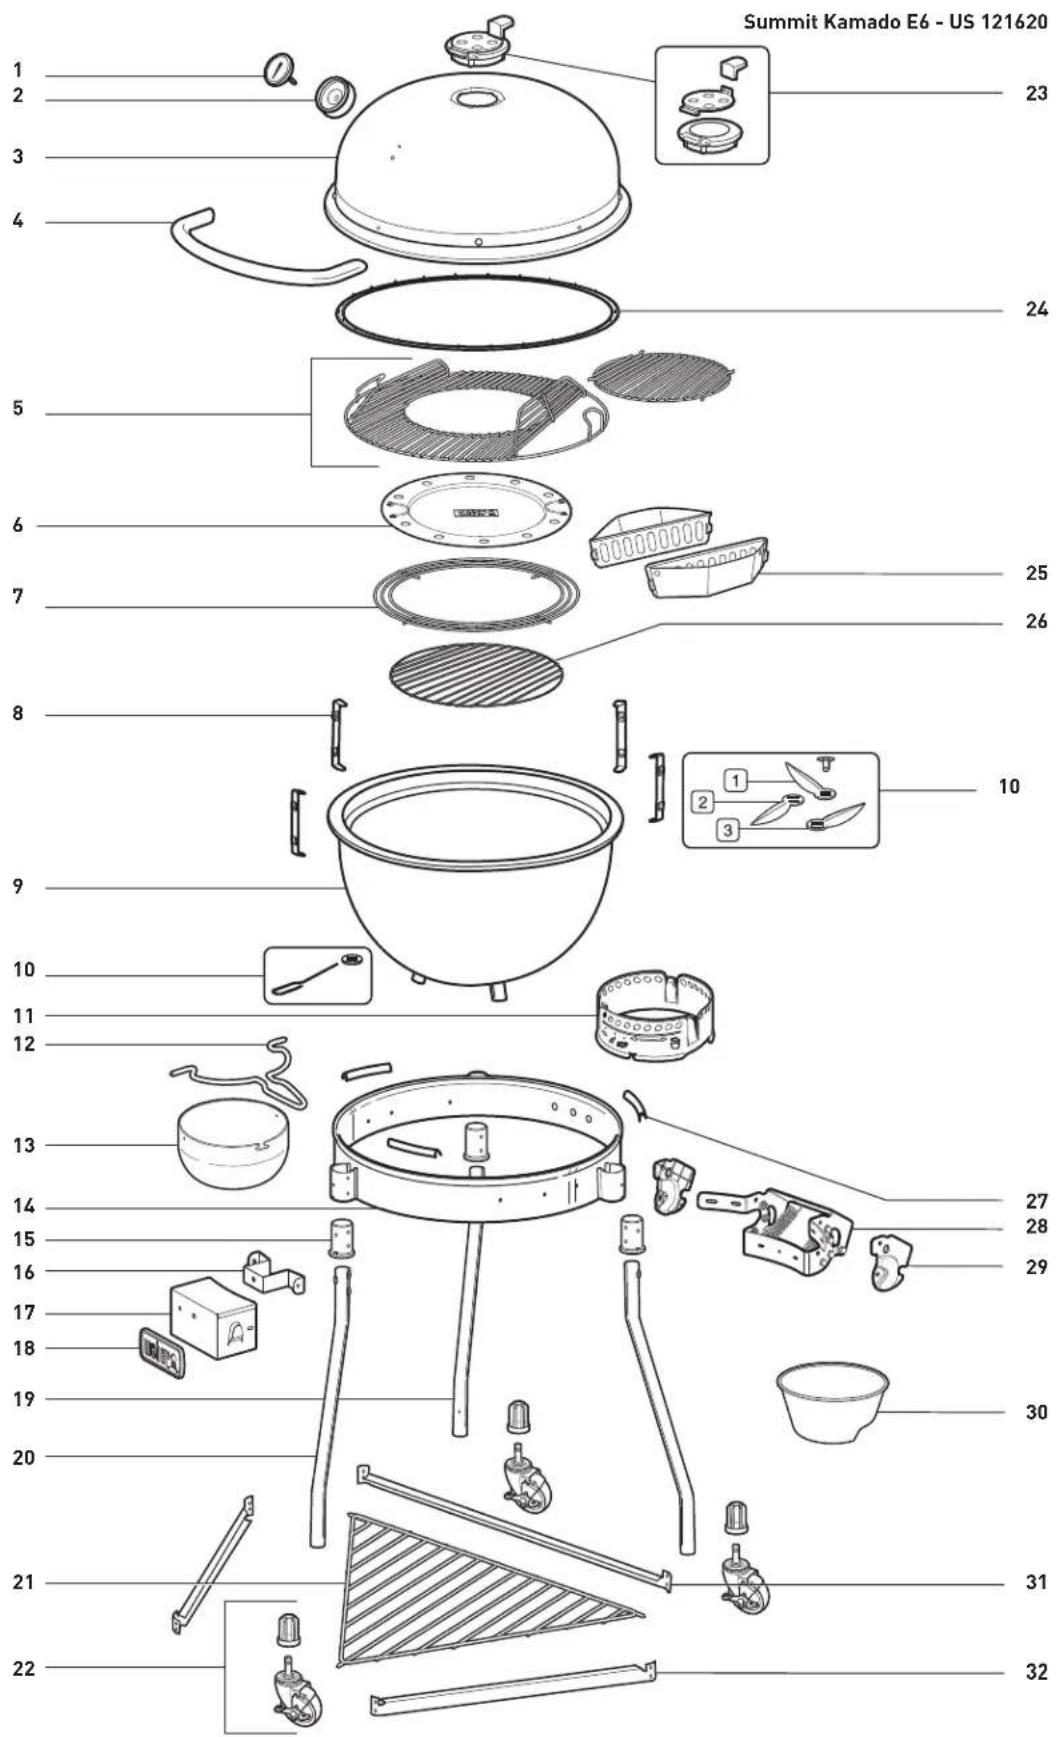
text_image
Summit Kamado E6 - US 121620 1 2 3 4 5 6 7 8 9 10 11 12 13 14 15 16 17 18 19 20 21 22 23 24 25 26 27 28 29 30 31 32
Weber-Stephen Products LLC
www.weber.com
Summit. Kamado E6
natural_image
Black Webb kegg grill with a radar gauge and a BILT logo, displayed on wheels (no text or symbols on the main subject)text_image
Safety warning diagram showing four scenarios: a person sleeping in a triangular warning symbol, a van and house with cooking pots, a tent with steam cooking pots, and a tree with checkmark.PRECAUCIÓN:
Weber-Stephen Products LLC
natural_image
Cross-sectional diagram of a mechanical component with concentric rings and mounting holes (no text or symbols)
text_image
E WEJET Summit Kamado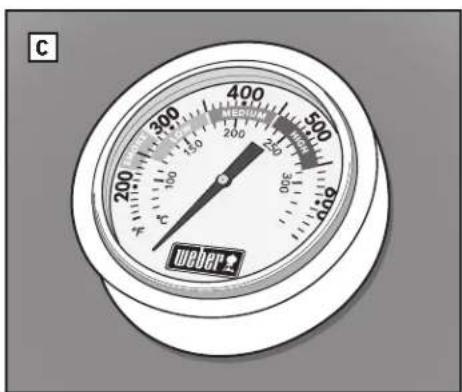
text_image
C weber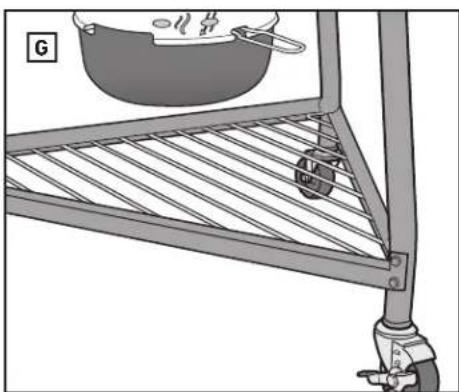
natural_image
Diagram of a metal frame structure with a cooking pan above it, showing internal components and a valve (no text or symbols)
natural_image
Diagram of a mechanical device with internal components and directional arrows, no readable text or symbols present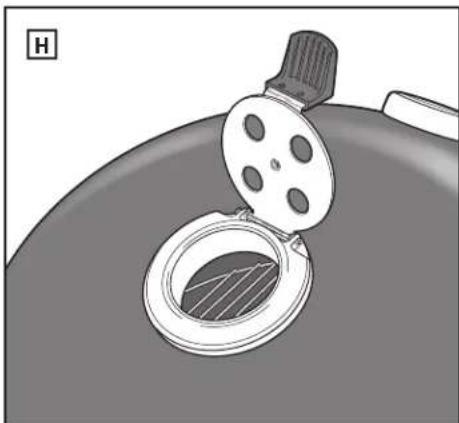
natural_image
Illustration of a cooking pot with a lid and lid open, showing a circular opening (no text or symbols)
ANTES DEL ENCENDIDO
natural_image
Illustration of a robotic arm pouring contents into a large bowl with a grater inside (no text or symbols)
natural_image
Illustration of a traditional loom with a cylindrical container and spools, placed in a bowl with a mesh base (no text or symbols)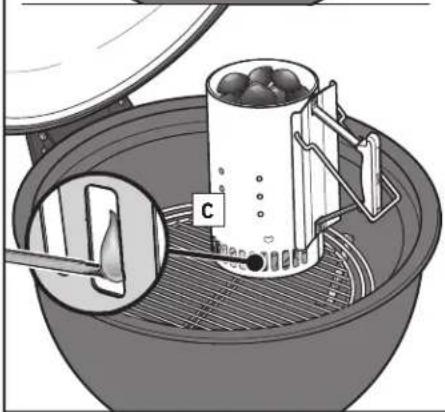
natural_image
Illustration of a steamer with a container and lid, showing internal components (no text or symbols)natural_image
Illustration of a cooking step with a ladle and a tray holding seeds, no text or symbols present
natural_image
Illustration of a food preparation setup with a steamer basket and beans being poured into it (no text or symbols)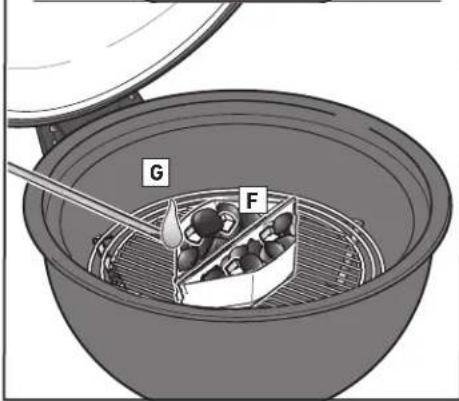
text_image
G Fnatural_image
Illustration of a griddle with steaming bread rolls and a large pot, no text or symbols present
natural_image
Illustration of a bamboo steamer with a lid and basket filled with round food items (no text or symbols)
text_image
B C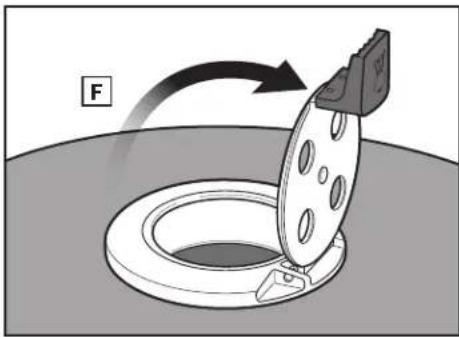
natural_image
Diagram showing a mechanical component being inserted into a circular basin, with an arrow indicating force direction (no text or symbols present)
natural_image
Illustration of a hand using a tool to handle seeds in a steaming basket (no text or symbols)
natural_image
Illustration of a hand holding a tool inside a steamer basket with a small object inside (no text or symbols)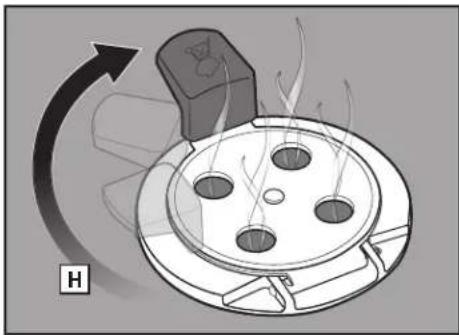
natural_image
Illustration of a fire extinguisher with flame inside, showing motion and heat transfer (no text or symbols)
natural_image
Illustration of a roasted chicken on an inverted griddle with a steaming pot and a pressure gauge, no text or symbols present.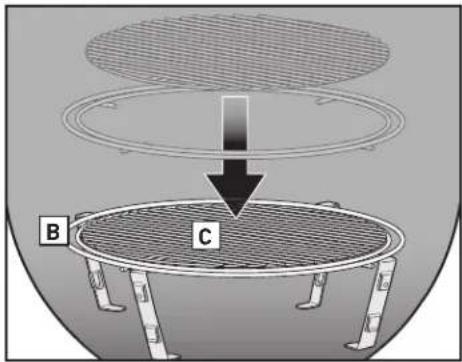
text_image
B C
natural_image
Illustration of a steamer with two trays filled with nuts, one being stirred by a tool (no text or symbols)
natural_image
Line drawing of a bamboo steamer with labeled components (no text or symbols)
natural_image
Diagram showing a mechanical component being inserted into a circular opening, with an arrow indicating force direction (no text or symbols present)
natural_image
Illustration of a hand holding a tool inside a mesh basket containing a small object labeled 'G' (no text or symbols on the object itself)
natural_image
Diagram of a fire extinguisher with flame inside, showing airflow direction (no text or symbols)
natural_image
Illustration of a bamboo steamer with meat inside and a tray of baked goods on the sides (no text or symbols)
text_image
F E
text_image
G SMOKE LOW MEDIUM 200 100
text_image
C B
text_image
Diagram illustrating fluid flow around a vehicle with labeled components and directional arrows indicating flow direction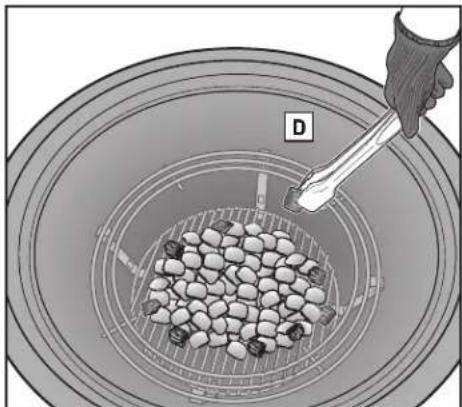
natural_image
Illustration of a cooking step with a hand using a tool to handle a bowl containing gravel (no text or symbols)
natural_image
Illustration of a movie reel with motion arrows indicating rotation (no text or symbols)natural_image
Illustration of a hand cleaning a surface next to an open alarm clock (no text or symbols)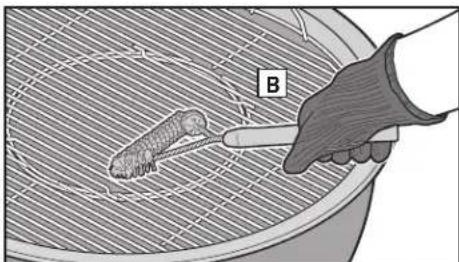
natural_image
Illustration of a hand using a tool to clean food items on a steamer (no text or symbols)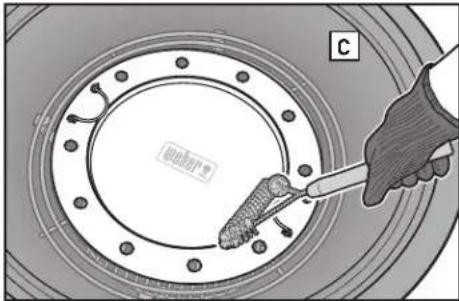
natural_image
Illustration of a hand using a tool to clean or inspect a circular mechanical component (no text or symbols visible)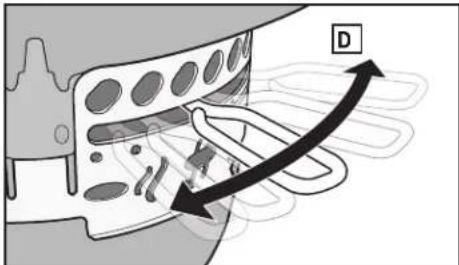
text_image
Technical diagram showing mechanical component with directional arrow and label D, likely illustrating a process or assembly.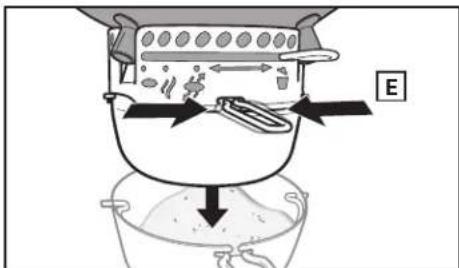
text_image
Diagram illustrating a mechanical or fluid system with labeled components and directional arrows, including a container and valve.
text_image
Summit Kamado E6 - US 121620 1 2 3 4 5 6 7 8 9 10 11 12 13 14 15 16 17 18 19 20 21 22 23 24 25 26 27 28 29 30 31 32
Weber-Stephen Products LLC
www.weber.com
Summit. Kamado E6

natural_image
Black Webb kegg grill with a radar gauge and BILT branding, displayed on wheels (no text-heavy elements)text_image
Warning sign with pictograms and symbols for heating, cooking, and outdoor activitiesATTENTION :
Weber-Stephen Products LLC Customer Service Center
1415 S. Roselle Road
Palatine, IL 60067
U.S.A.
natural_image
Cross-sectional diagram of a mechanical component with concentric rings and mounting holes (no text or symbols)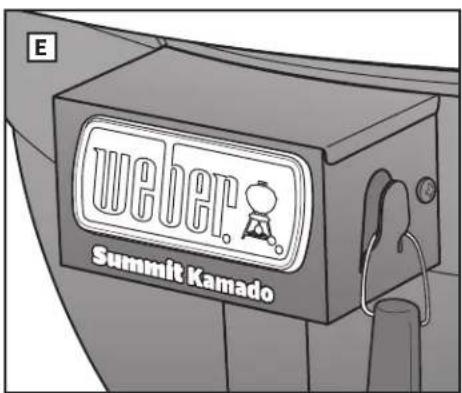
text_image
E WE08P Summit Kamado
text_image
C weber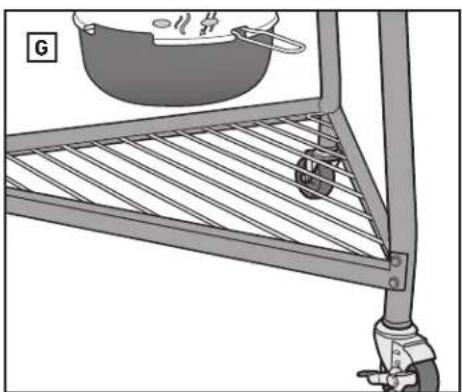
natural_image
Diagram of a cooking apparatus with a pan and lever, no text or symbols present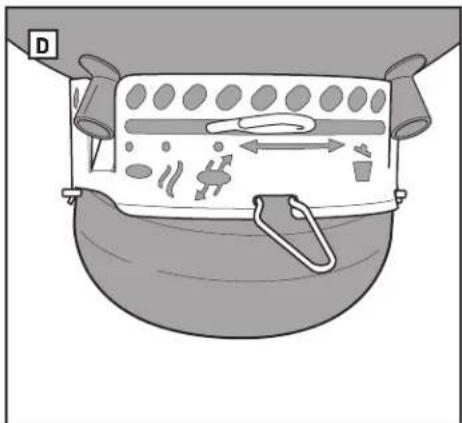
natural_image
Diagram of a mechanical device with internal components and directional arrows, no readable text or symbols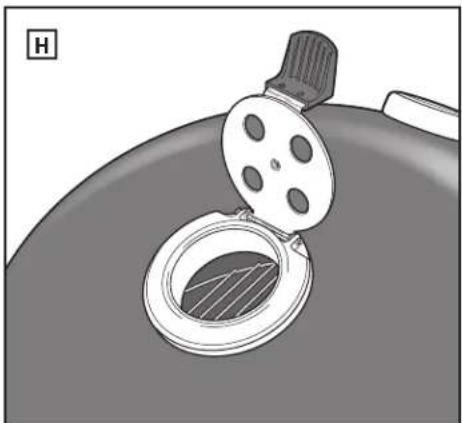
natural_image
Illustration of a cooking pot with a lid and lid removed, showing a circular opening (no text or symbols)
AVANT L'ALLUMAGE
natural_image
Illustration of a robotic arm pouring contents into a large bowl with a grater inside (no text or symbols)
natural_image
Illustration of a traditional loom with a cylindrical container and spools, placed in a bowl with a mesh base (no text or symbols)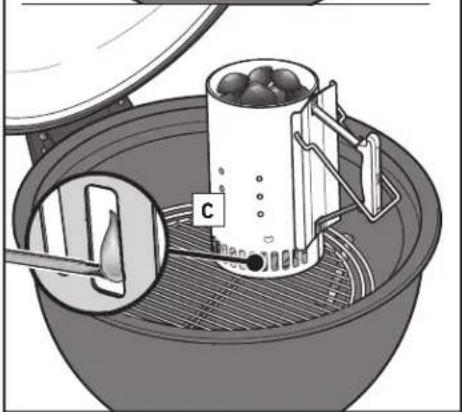
natural_image
Illustration of a cooking process with a steamer and bowl, no text or symbols presentnatural_image
Illustration of a cooking step with a ladle and a tray holding seeds, no text or symbols present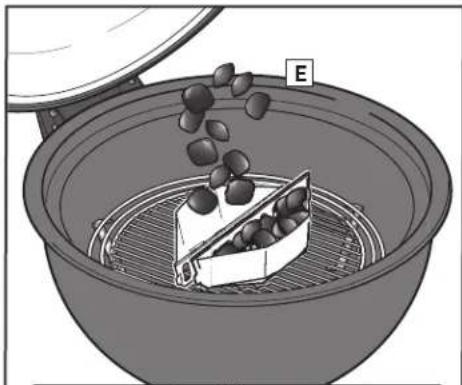
natural_image
Illustration of a food preparation setup with a steamer basket and beans being poured into it (no text or symbols)
text_image
G Fnatural_image
Illustration of a griddle with steaming bread rolls and a large pot, no text or symbols present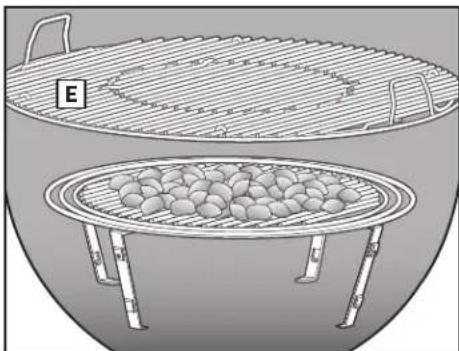
natural_image
Illustration of a bamboo steamer with a lid labeled 'E' and its empty base filled with round fruits (no text or symbols on the steamer itself)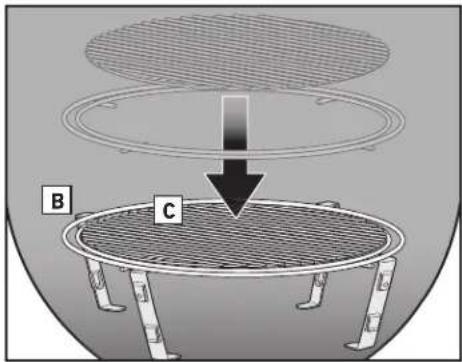
text_image
B C
natural_image
Diagram showing a mechanical component being inserted into a circular opening, with an arrow indicating force direction (no text or symbols present)
natural_image
Illustration of a hand using a tool to handle seeds in a steamer basket (no text or symbols)
natural_image
Illustration of a hand holding a tool inside a steamer basket with a small object inside (no text or symbols)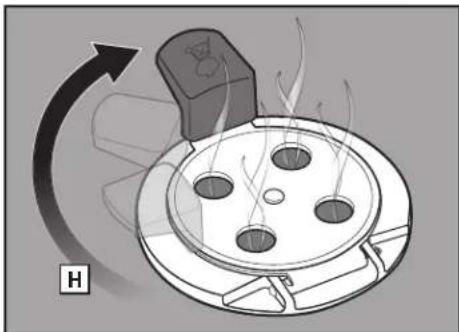
natural_image
Diagram of a fire extinguisher with flame inside, showing airflow direction (no text or symbols)
MÉTHODES DE CUISSON — CUISSON INDIRECTE
MÉTHODE DE CUISSON INDIRECTE
natural_image
Illustration of a roasted chicken on an inverted griddle with a steaming pot and a pressure gauge, no text or symbols present.
text_image
B C
natural_image
Illustration of a steamer with two trays filled with nuts, one being stirred by a tool (no text or symbols)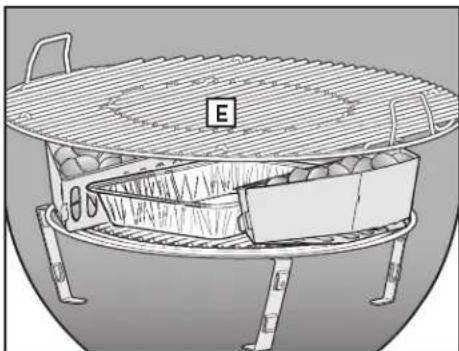
natural_image
Line drawing of a bamboo steamer with labeled components (no text or symbols)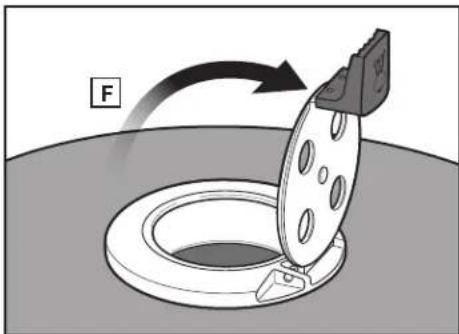
natural_image
Diagram showing a mechanical component being inserted into a circular opening, with an arrow indicating force direction (no text or symbols present)
natural_image
Illustration of a hand holding a tool inside a mesh container with a small object labeled 'G' (no text or symbols on the main subject)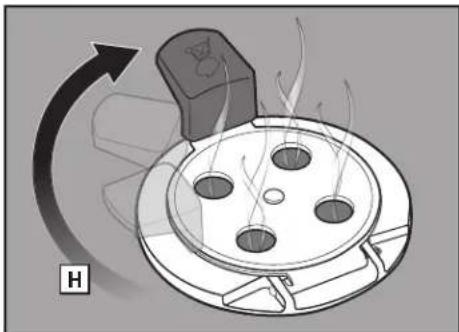
natural_image
Diagram of a fire extinguisher with flame inside, showing airflow direction (no text or symbols)
MÉTHODES DE CUISSON — FUMAGE
FUMAGE
natural_image
Illustration of a bamboo steamer with meat inside, showing its interior and exterior view (no text or symbols)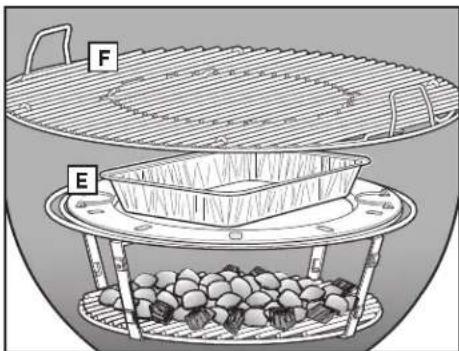
text_image
F E
text_image
G SMOKE LOW MEDIUM 200 100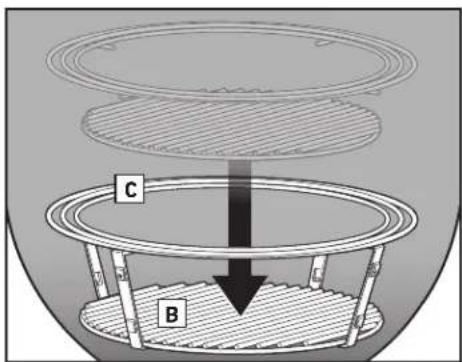
text_image
C B
text_image
Diagram illustrating fluid flow around a vehicle with labeled components and directional arrows indicating flow direction
natural_image
Illustration of a cooking step with a hand using a tool to handle a bowl containing gravel (no text or symbols)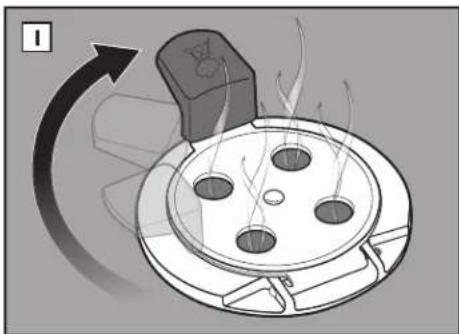
natural_image
Illustration of a movie reel with motion arrows indicating rotation (no text or symbols)natural_image
Illustration of a hand cleaning a surface next to an open alarm clock (no text or symbols)
natural_image
Illustration of a hand using a tool to clean food items on a steamer (no text or symbols)
natural_image
Illustration of a hand using a tool to clean or inspect a circular mechanical component (no text or symbols visible)
text_image
Diagram showing mechanical component with labeled directional arrow and letter D, likely illustrating a motion or force system.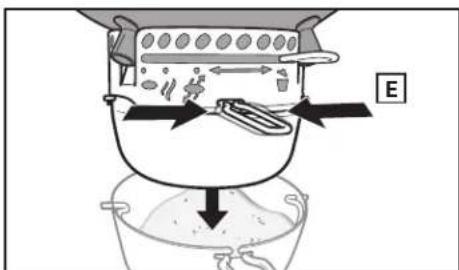
text_image
Diagram illustrating a mechanical or fluidic process with labeled components and directional arrows indicating flow or movement.
text_image
Summit Kamado E6 - US 121620 1 2 3 4 5 6 7 8 9 10 11 12 13 14 15 16 17 18 19 20 21 22 23 24 25 26 27 28 29 30 31 32
Weber-Stephen Products LLC
www.weber.com