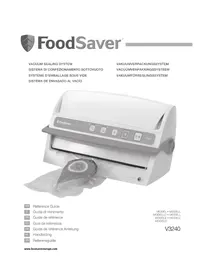
V3240 - Vacuum packaging FOODSAVER - Free user manual and instructions
Find the device manual for free V3240 FOODSAVER in PDF.



User questions about V3240 FOODSAVER
0 question about this device. Answer the ones you know or ask your own.
Ask a new question about this device
Download the instructions for your Vacuum packaging in PDF format for free! Find your manual V3240 - FOODSAVER and take your electronic device back in hand. On this page are published all the documents necessary for the use of your device. V3240 by FOODSAVER.
USER MANUAL V3240 FOODSAVER
Important Safeguards
For your own safety, always follow these basic precautions when using a FoodSaver® appliance:
- Read the User Manual carefully for operating instructions. Read all instructions in this manual before use.
- Do not use appliance on wet or hot surfaces, or near a heat source.
- To protect against electric shock, do not immerse any part of the appliance, power cord or plug in water or other liquid. Unplug from outlet when not in use and before cleaning.
- To disconnect, unplug power cord from electrical outlet. Do not disconnect by pulling on cord.
- Do not operate the appliance with a damaged power cord or plug. Do not operate the appliance if it malfunctions or is in any way damaged. Take it to the nearest Authorised Service Centre for examination, repair or electrical or mechanical adjustment.
- Use appliance only for its intended use.
- Caution: A short power cord is provided to reduce risks from entanglement or tripping over a longer cord. An extension cord may be used when marked electrical rating is no less than electrical rating of this appliance. All cords should not drape over counter or tabletop where cords can be tripped over or pulled on unintentionally, especially by children.
- Do not place on or near a hot gas or electric burner, or heated oven. Extreme caution must be used when moving products containing hot liquids.
- Wait 20 seconds between seals to allow appliance to cool.
- No user servicing
- This appliance is not intended for use by persons (including children) with reduced physical, sensory or mental capabilities, or lack of experience and knowledge, unless they have been given supervision or instruction concerning use of the appliance by a person responsible for their safety.
- Close supervision is necessary when any appliance is used by or near children to ensure they do not play with the appliance.
If the plug is not suitable for the socket outlets in your home, it can be removed and replaced by a plug of the correct type. Please refer to "Installation of a plug" below.
Installation of a plug applicable to U.K. and Ireland.
NOTE: If the terminals in the plug are not marked or if you are unsure or in doubt about the installation of the plug, please contact a qualified electrician. If a 3A 3-pin plug is fitted, it must be an ASTA approved plug, conforming to BS1363 standard.
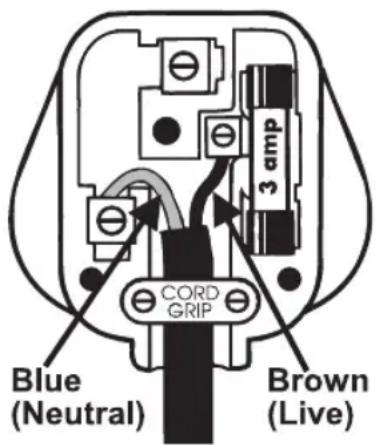
Replacement 3A fuses must be BSI or ASTA BS1362 approved.
The wires in the mains lead are coloured as such:
BROWN-LIVE
BLUE-NEUTRAL
Please note that the colour of these mains wires may not correspond with the colour markings that identify the terminals in your plug.
Please proceed as follows:
The BROWN coloured wire must be connected to the terminal, which is marked with the letter "L" or is coloured RED.
The BLUE coloured wire must be connected to the terminal, which is marked with the letter "N" or is coloured BLACK.
For Household Use Only SAVE THESE INSTRUCTIONS
Welcome to FoodSaver® Vacuum Sealing System
Congratulations...
You are about to enjoy the freshness benefits of FoodSaver®, The #1 Selling Brand of Vacuum Packaging Systems. For years, the FoodSaver® Vacuum Packaging System has helped millions of households keep food fresh longer in the refrigerator, freezer and pantry. The FoodSaver® system is designed to remove air and extend freshness up to five times longer than conventional storage methods. Keep your FoodSaver® appliance on your worktop, and you will soon discover its convenience and versatility.
Why Vacuum Package?
Exposure to air causes food to lose nutrition and flavour, and also causes freezer burn and enables bacteria, mould and yeast to grow. The FoodSaver® vacuum packaging system removes air and seals in flavour and quality. With a full line of FoodSaver® Bags, Canisters and Accessories to expand your options, you can now enjoy the benefits of a scientifically proven food storage method that keeps food fresh up to five times longer.
The FoodSaver® Vacuum Packaging System Saves Time and Money.
- Spend less money. With the FoodSave® system, you can buy in bulk or buy when needed and vacuum package your food in desired portions without wasting food.
- Save more time. Cook ahead for the week, preparing meals and saving them in FoodSaver® Bags.
- Marinate in minutes. Vacuum packaging opens up the pores of food so you can get that great-marinated flavour in minutes instead of hours.
Make entertaining a breeze. Make your signature dish and holiday treats in advance so you can spend quality time with your guests. - Enjoy seasonal or specialty foods. Keep highly perishable or infrequently used items fresh longer.
Control portions for dieting. Vacuum package sensible portions and write calories and/or fat content on the bag. - Protect non-food items. Keep camping and boating supplies dry and organised for outings. Protect polished silver from tarnishing by minimising exposure to air.
Do not return this product to place of purchase.
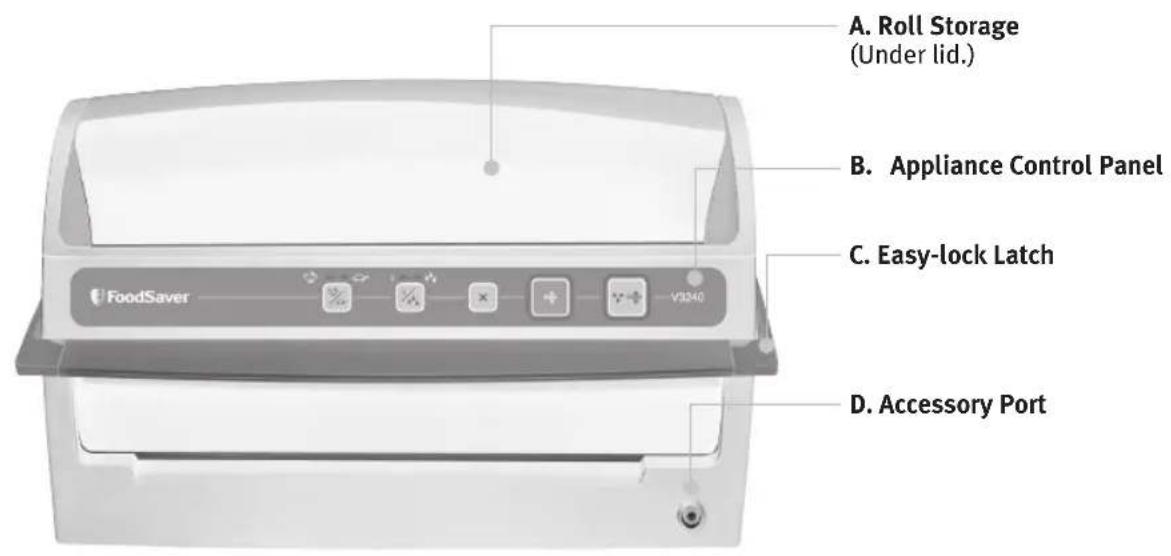
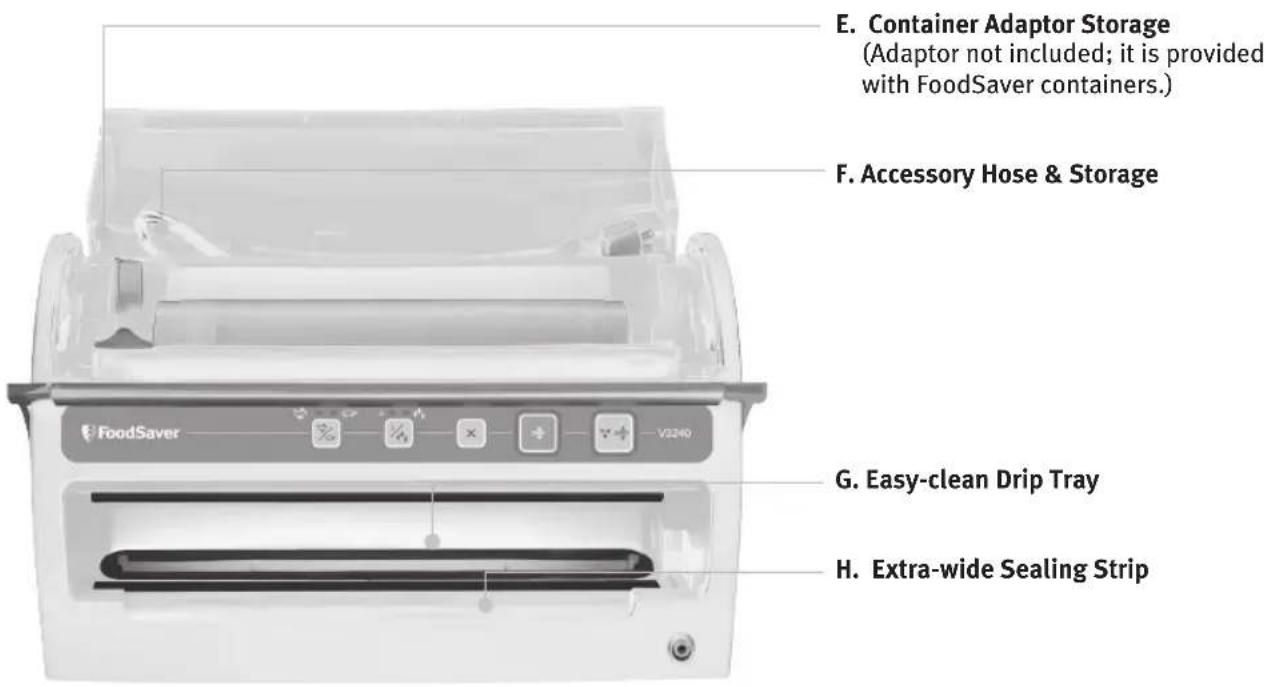
Features of Your FoodSaver® Appliance
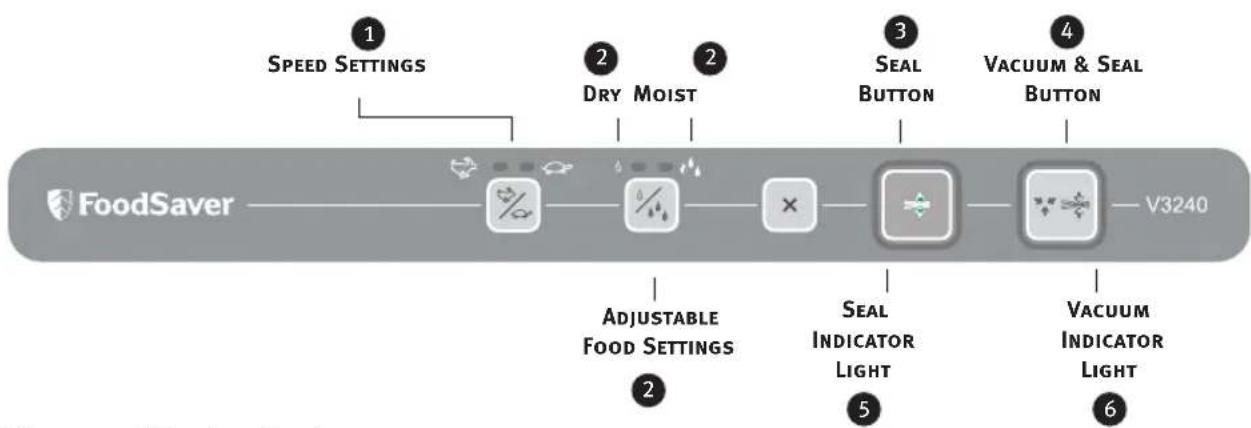
Advanced Design Features
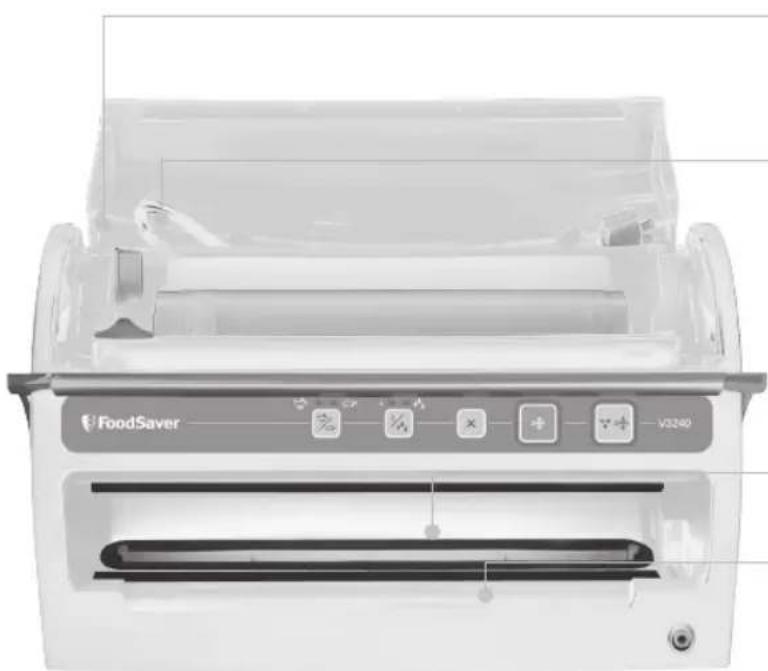
The user-friendly control panel makes it easy for you to get the most out of your FoodSaver® System, and the touchpad design allows you to easily wipe it clean.
To Use: Lower bar to close door, when lights illuminate on control panel, you can select seal or vacuum and seal.
Speed Settings
Select speed to optimize vacuum - Gentle for delicate foods; Normal for bags, canisters and all accessories.
2 Adjustable Food Settings
Select food type to optimize the seal - Dry (normal seal time) for foods without liquid; Moist (longer seal time) for juicy foods.
3 SEAL BUTTON
Crush Free Instant Seal feature - This button has four uses:
- Press to immediately stop the vacuum process and begin sealing the bag. This prevents crushing delicate items such as bread, biscuits and pastries.
- Press to create a seal when making bags from a FoodSaver® Roll.
- Press to create a seal on most Mylar bags (such as a potato crisp bag) to keep food sealed airtight.
Vacuum & Seal Button
This button has two uses:
- Press to vacuum package and seal food airtight. Appliance shuts off automatically.
- Press to cancel any process at any point.
Seal Indicator Light
This light has two uses:
- Constant light indicates sealing process is engaged.
- Flashes to indicate error.
6 Vacuum Indicator Light
Shows progress of vacuum and seal process. Shut off when the full process is finished.
How to Make a Bag from a FoodSaver® Vacuum Sealing Roll
- Open the appliance door and place the roll into the Roll Storage Compartment (Fig.1). For Best results, insert the roll with material flap down. Note: Bags can be sealed with the appliance door either open or closed.
- Lift up the Roll Cutter Bar and place bag material beneath the cutter bar (Fig.2).
- Pull out enough bag material to hold the item being vacuum packed, plus 4 inches (10 cm). Lower the Cutter Bar and slide the Roll Cutter across the Cutter Bar (Fig.3).
- Lift Bar, place bag over sealing strip, gently lower bar, press Seal button. Once red light goes off, lift bar and remove bag (Fig. 4).
- You now have one sealed end.
- Now you are ready to vacuum seal with your new bag (Fig. 5).
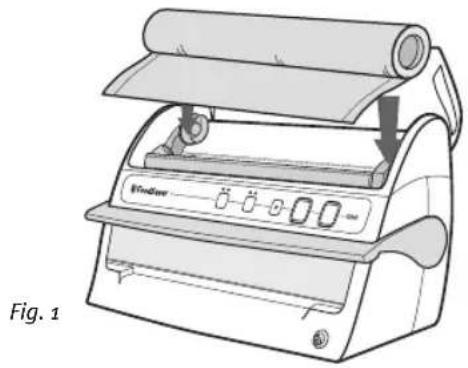
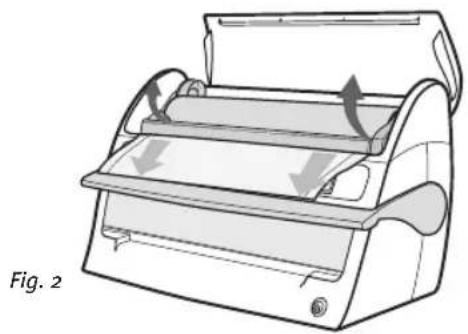
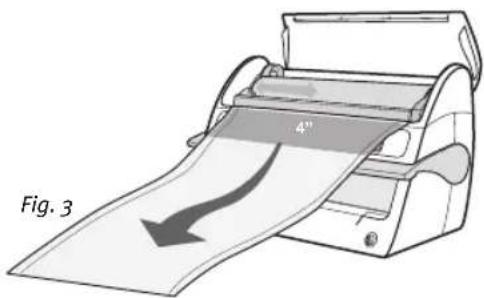
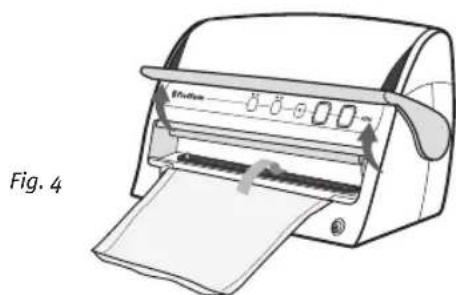

Fig. 5
How to Vacuum Seal with FoodSaver® Vacuum Sealing Bags
- Begin with a FoodSaver Vacuum Sealing System Bag (or create a bag as described in the "How to Make a Bag from a Roll" section).
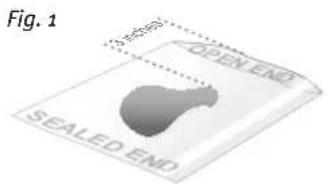
- Place item(s) in bag, allowing at least 8cm (3 inches) of space between bag contents and top of bag (Fig. 1).
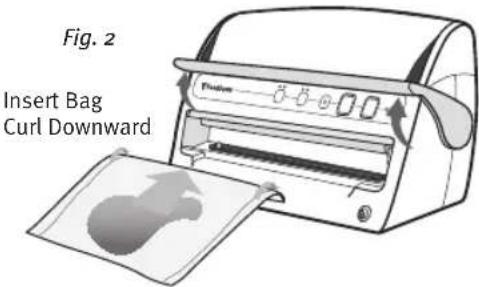
- Using two hands, insert open end of bag curl side down into Vacuum Channel (Fig. 2).
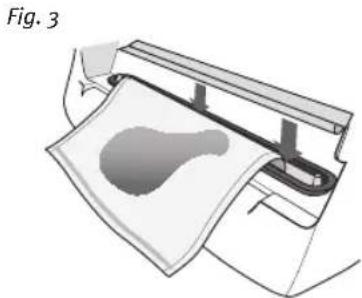
- Place bag end into Drip Tray (Fig. 3).
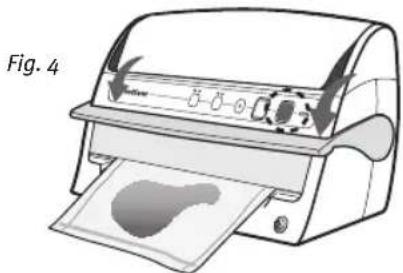
- Lower Bar, press Vacuum & Seal button (Fig. 4).
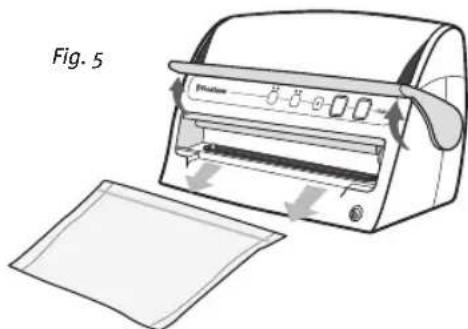
- Once Seal light goes off, lift bar and remove sealed bag (Fig. 5).
Guidelines for Vacuum Packaging
Vacuum Packaging and Food Safety
The vacuum packaging process extends the life of foods by removing most of the air from the sealed container, thereby reducing oxidation, which affects nutritional value, flavour and overall quality. Removing air can also inhibit the growth of microorganisms, which can cause problems under certain conditions:
Mould - Easily identified by its fuzzy characteristic. Mould cannot grow in a low oxygen environment, therefore vacuum packaging can slow the growth of mould.
Yeast - Results in fermentation, which can be identified by smell and taste. Yeast needs water, sugar and a moderate temperature to grow. It can also survive with or without air. Slowing the growth of yeast requires refrigeration, while freezing stops it completely.
Bacteria - Results in an unpleasant odour, discolouration and/or soft or slimy texture. Under the right conditions, anaerobic bacteria such as Clostridium Botulinum (the organism that causes Botulism) can grow without air and sometimes cannot be detected by smell or taste. Although it is extremely rare, it can be very dangerous. To preserve foods safely, it is critical that you maintain low temperatures. You can significantly reduce the growth of microorganisms at temperatures of 4^ (40^) or below. Freezing at -17^ (0^) does not kill microorganisms, but stops them from growing. For long-term storage, always freeze perishable foods that have been vacuum packaged, and keep refrigerated after thawing.
It is important to note that vacuum packaging is NOT a substitute for canning and it cannot reverse the deter rio ration of foods. It can only slow down the changes in quality. It is difficult to predict how long foods will retain their top-quality flavour, appearance or texture because it depends on the age and condition of the food on the day it was vacuumed packaged.
IMPORTANT: Vacuum packaging is NOT a substitute for refrigeration or freezing. Any perishable foods that require refrigeration must still be refrigerated or frozen after vacuum packaging.
Food Preparation and Reheating Tips Thawing and Reheating Vacuum Packaged Foods
Always thaw foods in either a refrigerator or microwave — do not thaw perishable foods at room temperature.
To reheat foods in a microwave in a FoodSaver® Bag, always cut the corner of the bag before placing it on a microwave-safe dish. However, to avoid hot spots, do not reheat bone-in meat or greasy foods in microwave within a FoodSaver® Bag. You can also reheat foods in FoodSaver® Bags by placing them in water at a low simmer below 75^ (170^) .
Preparation Guidelines for Meat and Fish:
For best results, pre-freeze meat and fish for 1-2 hours before vacuum packaging in a FoodSaver Bag. This helps retain the juice and shape, and guarantees a better seal. If it is not possible to pre-freeze, place a folded paper towel between meat or fish and the top of the bag, but below the seal area. Leave a paper towel in the bag to absorb excess moisture and juices during the vacuum packaging process.
Note: Beef may appear darker after vacuum packaging due to the removal of oxygen. This is not an indication of spoilage.
Preparation Guidelines for Hard Cheeses:
To keep cheese fresh, vacuum package it after each use. Make your FoodSaver® Bag extra long, allowing 2.5 cm (1-inch) of bag material for each time you plan to open and reseal in addition to the 8 cm (3-inch) room you normally leave between the contents and the seal. Simply cut the sealed edge and remove cheese. When you are ready to repackage the cheese, just drop it in the bag and reseal.
IMPORTANT: Due to the risk of anaerobic bacteria, Soft cheeses should never be vacuum packaged. Preparation Guidelines for Vegetables:
Vegetables need to be blanched before vacuum pack ag ing. This process stops the enzyme action that could lead to loss of flavour, colour and texture. To blanch vegetables, place them in boiling water or in the microwave until they are cooked, but still crisp. Blanching times range from 1 to 2 minutes for leafy greens and peas; 3 to 4 minutes for sugar snap peas, sliced courgettes or broccoli; 5 minutes for carrots; and 7 to 11 minutes for corn on the cob. After blanching, immerse vegetables in cold water to stop the cooking process. Finally, dry vegetables on a towel before vacuum packaging.
Note: All vegetables (including broccoli, brussels sprouts, cabbage, cauliflower, kale, turnips) naturally emit gases during storage. Therefore, after blanching, they must be only stored in the freezer. When freezing vegetables, it is best to pre-freeze them for 1-2 hours or until solidly frozen. To freeze
Guidelines for Vacuum Packaging
vegetables in individual servings, first place on a baking sheet and spread them out so they are not touching. This prevents them from freezing together in a block. Once they are frozen, remove from baking sheet and vacuum package vegetables in a FoodSaver® Bag. After they have been vacuum packaged, return them to the freezer.
IMPORTANT: Due to the risk of anaerobic bacteria, fresh mushrooms, onions, & garlic should never be vacuum packaged.
Preparation Guidelines for Leafy Vegetables:
For best results, use a canister to store leafy vegetables. First wash the vegetables, and then dry with a towel or salad spinner. After they are dried, put them in a FoodSaver Canister or Container and vacuum package. Store in the refrigerator.
Preparation Guidelines for Fruit:
When freezing soft fruit or berries, it is best to prefreeze them for 1-2 hours or until solidly frozen. To freeze fruit in individual servings, first place on a baking sheet and spread them out so they are not touching. This prevents them from freezing together in a block. Once they are frozen, remove from baking sheet and vacuum package fruit in a FoodSaver® Bag. After they have been vacuum packaged, return them to the freezer.
You can vacuum package portions for baking, or in your favourite combinations for easy fruit salad all year round. If storing in the refrigerator, we recommend using a FoodSaver® Canister or Container.
Preparation Guidelines for Baked Goods:
To vacuum package soft or airy baked goods, we recommend using a FoodSave Canister or Container so they will hold their shape. If using a bag, pre-freeze for 1-2 hours or until solidly frozen. To save time, make cookie dough, pie shells, whole pies, or mix dry ingredients in advance and vacuum package for later use.
Preparation Guidelines for Coffee and Powdery Foods:
To prevent food particles from being drawn into the vacuum pump, place a coffee filter or paper towel at the top of the bag or canister before vacuum packaging. You can also place the food in its original bag inside a FoodSaver® Bag.
Preparation Guidelines for Liquids:
Before you vacuum package liquids such as soup stock, pre-freeze in a casserole dish, loaf tin or ice cube tray until solid. Remove frozen liquid from the pan and vacuum package in a FoodSaver® Bag. You can stack these "frozen bricks" in your freezer. When you're ready to use, just cut the corner of the bag and place in a dish in microwave or drop into water at a low simmer, below 75^ (170^) .
To vacuum package non-carbonated bottled liquids, you can use a FoodSaver® Bottle Stopper with the original container. Remember to leave at least 2.5cm (1 inch) of room between the contents and the bottom of the Bottle Stopper. You can re-seal bottles after each use.
Preparation Guidelines for Make-ahead Meals, Leftovers and Sandwiches:
Efficiently store your make-ahead meals, leftovers and sandwiches in the stackable, lightweight FoodSaver® containers. They are microwaveable, top rack dishwasher safe and come with a custom adaptor. The lightweight containers will be ready to go to the office or school when you are!
Preparation Guidelines for Snack Foods:
Your snack foods will maintain their freshness longer when you vacuum package them. For best results, use a FoodSaver® Canister or Container for crushable items like biscuits.
Vacuum Packaging Non-Food Items
The FoodSaver® vacuum packaging system also protects non-food items from oxidation, corrosion and moisture. Simply follow the directions to vacuum package items using FoodSaver® Bags, Canisters, Containers and Accessories.
To vacuum package silver, wrap fork tines in soft cushioning material, such as a paper towel, to avoid puncturing the bag. Your FoodSaver® Bags are ideal for outdoor excursions. For camping and hiking, keep your matches, maps and food dry and compact. To have fresh water for drinking, simply fill a FoodSaver® Bag with ice, seal it and when needed, let the ice pack melt. If you are going sailing or boating, vacuum package your food, film and a dry change of clothes. Just remember to bring scissors or a knife to open the bag. To keep emergency kits safe and dry, vacuum package flares, batteries, torches, matches, candles and other necessities. Your emergency items will stay dry and organised in your home, car or boat.
Tips for Successful Vacuum Sealing
General Tips
Tips for Successful Vacuum Sealing
- Vacuum sealing is NOT a substitute for the heat process of canning. Perishables still need to be refrigerated or frozen.
- For best results, use FoodSave® brand Bags, Canisters, Containers and Accessories.
- During the vacuum sealing process, small amounts of liquids, crumbs or food particles can be pulled inadvertently into the Drip Tray, clogging the pump and damaging your appliance.
To prevent this, follow these tips:
a. For moist and juicy foods: Freeze first and avoid overfilling bags. You can also place a folded paper towel inside top of bag, and below the seal area, before vacuum sealing.
b. For soups, sauces and liquids: Freeze first and avoid overfilling bags. Or, use a canister or container in refrigerator.
c. For powdery or fine-grained foods: Avoid overfilling bags or use a canister or container. You can also place a coffee filter or paper towel inside before vacuum packaging.
d. Empty the Drip Tray after each use.
- To avoid overfilling, always leave at least 8cm (3 inches) of bag material between the bag contents and the top the of bag. Then leave at least one additional inch of bag material for each time you plan to reuse the bag.
- Do not create your own side seams for a FoodSave® brand Bag. Our bags are manufactured with a special side seam, which is sealed all the way to the outer edge.
- To prevent wrinkles in a seal when vacuum sealing bulky items, gently stretch bag flat while inserting into the vacuum channel and hold until the pump begins.
-
If you are unsure whether your bag was sealed properly, simply reseal the bag.
-
When you are vacuum sealing items with sharp edges (dry spaghetti, silverware, etc.), protect the bag from punctures by wrapping item in soft cushioning material, such as a paper towel. You may want to use a canister or container instead of a bag.
- When using accessories, remember to leave 2.5cm (1-inch) of space at top of canister or container.
- Pre-freeze fruits and blanch vegetables before vacuum sealing for best results. Refer to the Guidelines in the Vacuum Packaging section for more information.
- If the appliance does not function, or the Seal button flashes to signal an error:
a. Check the power cord to see if it is firmly plugged into an electrical outlet.
b. Examine the power cord for any damages.
c. See if the electrical outlet is working by plugging in another appliance.
d. Check to be certain that the Upper Bag Detection Tray is properly inserted.
e. Make sure the bag is placed correctly inside the Vacuum Channel. (See How to Vacuum Seal with FoodSaver® Vacuum Sealing Bags)
f. Check to ensure the Easy-lock latch is in the closed position.
g. Check the Foam Gasket around the Drip Tray to make sure it is free from food material and is properly inserted into the gasket channel.
h. Check the Upper Gasket around the Upper Bag Detection Tray to be sure it is free from food material.
i. If overheated, allow the appliance to cool for 20 minutes.
j. For more usage tips visit our website at www.foodsavereurope.com.
Tips on Removing Air from a Bag
Avoid wrinkles when inserting the bag into the Vacuum Channel
Wrinkles in the seal may cause a leakage and allow air to return into the bag. To eliminate any wrinkles while inserting the bag into the vacuum channel, hold the bag with two hands gently stretching the bag flat until the vacuum pump begins. If you find wrinkles after sealing the bag, simply cut the bag open and vacuum seal again.
If motor runs for more than 30 seconds without stopping, consider the following:
If you are vacuum sealing with a bag, make sure the bag is properly sealed (See "How to Make a Bag From a Roll"). Check the foam gasket around the Drip Tray to make sure it is free from food material and is properly inserted into the gasket channel.
If vacuum sealing with an accessory, check the Accessory Hose connections to ensure a tight fit.
Tips for Successful Vacuum Sealing (continued)
Tips on Sealing a Bag
When making a bag from a roll:
Press the Seal Button before placing the bag material into the Vacuum Channel. Once the bag is inserted the Seal process will begin immediately.
Note: If you forget to press the Seal Button before inserting the bag into the Vacuum Channel, the vacuum pump will turn on. This is not a problem, simply press the Seal Button to prevent the pump from running continuously, and the sealing process will begin.
How to Prevent moisture or liquid from being pulled into the Drip Tray or getting trapped in the seal:
Either pre-freeze moist food such as raw meat for 1-2 hours before vacuum sealing, or place a folded paper towel between food and the end of the bag to absorb excess liquid. Be sure to leave at least 8cm (3 inches) between the paper towel and the end of the bag so that the bag seals properly with the paper towel inside and not positioned in the seal area.
Make sure appliance has time to cool down.
Wait at least 20 seconds between seals. Under very heavy usage, the appliance will stop operating to prevent overheating. If it does, wait 20 minutes to allow the appliance to cool down.
Tips on Vacuum Sealing with Accessories
How to prepare FoodSaver® Accessories for Vacuum packaging
Accessories include FoodSaver® Vacuum Packaging Canisters, Containers and Bottle Stoppers.
-
Always leave at least 2.5cm (1 inch) of space between the contents and the rim.
-
Wipe rim of canister, container or bottle to ensure it is clean and dry.
-
Place lid on canister or container, or place stopper in bottle.
-
For accessories with a large knob on lid, turn knob to Vacuum. Vacuum package using the instructions below. When the vacuum process is complete, turn the knob to Closed before removing the Accessory Hose.
-
For Accessories without a large knob on the lid, vacuum package using instructions below.
Marinating with your FoodSaver® Appliance
The FoodSaver® Quick Marinator Canister is the perfect FoodSaver® Accessory for marinating foods. Foods will marinate in minutes when vacuum sealed because the vacuum process opens the pores of the food and absorbs the marinade more quickly.
Important Note: Use the FoodSaver® Quick Marinating Canister with clear lid and large white knob. To marinate, make sure the knob on the accessory lid is set to Vacuum/Canister position.
-
Prepare enough of your favourite marinade to fully cover food inside a marinating canister. Always leave at least 2.5cm (1-inch) of space between the contents and the top of the rim.
-
Make sure the rubber gasket underneath the lids as well as the rim of the marinating canister is free from food materials.
-
Make sure the Accessory Hose is securely inserted into the port on the FoodSaver® Quick Marinator lid.
-
Make sure the knob on the accessory lid is set to Vacuum/Canister.
-
Make sure lid is firmly attached to marinator base.
-
Press the Vacuum & Seal button on the control panel.
-
Your FoodSaver® Vacuum Sealing System will now begin the Quick Marinate Cycle. The Vacuum Indicator Light will flash to indicate the marinating process has begun.
-
While Marinating, the Vacuum Progress Display will blink during the Vacuum Hold or Rest Cycle.
-
To preserve food safely, after completing the marinating cycle, the appliance will signal with short beeps to indicate your Quick Marinate Cycle is completed. Press any button to silence the signal. You may now cook or refrigerate your marinated food.
Storage Guide
Meat, Cheese, Vegetables, Fruits
| Foods | Where to Store | Recommended FoodSaver® Bag/Accessory | Storage Life with FoodSaver® | Normal Storage Life |
| Meat | ||||
| Beef, Pork, Lamb | Freezer | FoodSaver® Bag 2-3 years | 6 months | |
| Ground Meat Freezer FoodSaver | ® Bag 1 year 4 months | |||
| Poultry Freezer FoodSaver | ® Bag 2-3 years 6 months | |||
| Fish Freezer FoodSaver | ® Bag 2 years 6 months | |||
| Hard Cheeses (Do not vacuum package soft cheese) | ||||
| Cheddar, Swiss Refrigerator FoodSaver | ® Bag, Canister | 4-8 months | 1-2 weeks | |
| Parmesan | Refrigerator FoodSaver | ® Bag, Canister | 4-8 months | 1-2 weeks |
| Vegetables (Do not vacuum package fresh mushrooms, onions & garlic) | ||||
| Asparagus | Freezer FoodSaver | ® Bag | 2-3 years 8 months | |
| Broccoli, Cauliflower | Freezer FoodSaver | ® Bag | 2-3 years 8 months | |
| Cabbage, Brussels Sprouts | Freezer FoodSaver | ® Bag | 2-3 years 8 months | |
| Corn (cob or kernel) Freezer FoodSaver | ® Bag | 2-3 years 8 months | ||
| Green Beans | Freezer FoodSaver | ® Bag | 2-3 years 8 months | |
| Lettuce, Spinach | Refrigerator | FoodSaver® Canister | 2 weeks 3-6 days | |
| Mangetout, Sugar snap Peas | Freezer FoodSaver | ® Bag | 2-3 years 8 months | |
| Fruits | ||||
| Apricots, Plums | Freezer FoodSaver | ® Bag | 1-3 years | 6-12 months |
| Peaches, Nectarines | Freezer FoodSaver | ® Bag | 1-3 years | 6-12 months |
| Softer Berries | ||||
| Raspberries, Blackberries | Refrigerator | FoodSaver® Canister 1 week | 1-3 days | |
| Strawberries | Refrigerator | FoodSaver® Canister 1 week | 1-3 days | |
| Harder Berries | ||||
| Blueberries | Refrigerator | FoodSaver® Canister | 2 weeks 3-6 days | |
| Cranberries | Refrigerator | FoodSaver® Canister | 2 weeks 3-6 days | |
Baked Goods, Coffee, Snacks and Liquids
| Foods | Where to Store | Recommended FoodSaver® Bag/Accessory | Storage life with FoodSaver® | Normal Storage Life |
| Baked Goods | ||||
| Bagels, Bread, Pastries | Freezer FoodSaver | ® Bag | 1-3 years | 6-12 months |
| Nuts | ||||
| Almonds, Peanuts | Pantry FoodSaver | ® Bag, Canister 2 years 6 months | ||
| Sunflower Seeds | Pantry FoodSaver | ® Bag, Canister 2 years 6 months | ||
| Coffee | ||||
| Coffee Beans Freezer FoodSaver | ® Bag 2-3 years 6 months | |||
| Coffee Beans | Pantry FoodSaver | ® Bag, Canister 1 year 3 months | ||
| Ground Coffee Freezer FoodSaver | ® Bag | 2 years | 6 months | |
| Ground Coffee | Pantry FoodSaver | ® Bag, Canister | 5-6 months | 1 month |
| Prepared Liquids | ||||
| Sauces, Soups, Stews | Freezer FoodSaver | ® Bag 1-2 years | 3-6 months | |
| Bottled Liquids | ||||
| Oils | Pantry | FoodSaver® Bottle Stopper | 1-11/2 years | 5-6 months |
| Dry Foods | ||||
| Beans, Grains | Pantry FoodSaver | ® Bag, Canister | 1-2 years | 6 months |
| Pasta, Rice | Pantry FoodSaver | ® Bag, Canister | 1-2 years | 6 months |
| Powdery Foods | ||||
| Dry Milk | Pantry FoodSaver | ® Bag, Canister | 1-2 years | 6 months |
| Dried Coconut | Pantry FoodSaver | ® Bag, Canister | 1-2 years | 6 months |
| Flour Pantry FoodSaver | ® Bag, Canister | 1-2 years | 6 months | |
| Sugar, Brown Sugar | Pantry FoodSaver | ® Bag, Canister | 1-2 years | 6 months |
| Snack Foods | ||||
| Crisps | Pantry | FoodSaver® Canister | 3-6 weeks | 1-2 weeks |
| Biscuits, Crackers | Pantry | FoodSaver® Canister | 3-6 weeks | 1-2 weeks |
To Clean Appliance:
Remove Power Cord from electrical outlet. Do not immerse in liquid.
Check Gaskets and around Drip Tray to make sure they are free from food materials. Wipe off gasket with warm soapy cloth if needed.
Bottom gasket may be removed for cleaning. Clean with warm, soapy water. The top gasket is not removable.
The Removable Drip Tray makes cleanup easy when small amounts of liquids are inadvertently pulled into the Vacuum Channel during vacuum process.
Empty Drip Tray after each use. Wash in warm soapy water or place in top rack of dishwasher. Dry thoroughly before re-inserting into the appliance.
Always leave lid latch in open or store position, never leave in closed position. When appliance is left in closed position, the gaskets become compressed and the unit may not function properly.
Do not leave appliance outside in the environment while not in use.
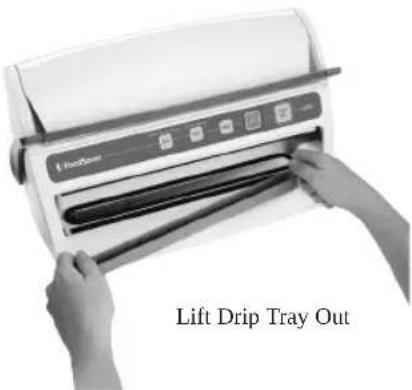
Remove All Food Around Gaskets
Trouble-Shooting
| Problem | Solution |
| Red Seal LED Flashing | ·Unit is overheated. Always allow 20 seconds between seals. Under heavy usage, appliance will shut off automatically and Red Light will flash. Wait for 20 min for unit to cool off. ·Wait 20 seconds between seals. ·Vacuum pump running more than 120 seconds. Under heavy usage, appliance will shut off automatically and Red Light will flash. See next section “Vacuum Pump is running, but bag is not evacuating”. |
| Vacuum Pump is running, but bag is not evacuating | ·If making a bag from a roll, make sure one end of bag is sealed. See “How to Make a Bag from a FoodSaver® Vacuum Sealing Roll”. ·Adjust the bag and try again. Make sure the open end of the bag in down inside the vacuum channel. ·Check for wrinkles in bag along Sealing Strip. To prevent wrinkles in the seal, gently stretch bag flat while inserting bag into vacuum channel. ·Open unit and make sure gaskets are inserted properly and there are no foreign objects, dirt or debris on the top or bottom gasket (see “Care and Cleaning”). ·Appliance has been left in the latched position: Gaskets may be compressed. Unlatch and allow 10 to 20 minutes for gaskets to expand. ·Make sure the accessory hose is not attached to accessory port. |
| Gasket is loose or has a tear | ·If it is the lower gasket, take out the lower gasket, clean it and reinsert the gasket into the vacuum channel. ·If it is the upper gasket, please contact Customer Service. |
| Bag is not sealing properly | ·Liquid in bag, make sure unit is on moist food setting. ·Too much liquid in bag, freeze before vacuuming. ·Check for food debris around seal area. If present, take out the Gasket, clean it and reinsert the Gasket into the Vacuum Channel (see “Care and Cleaning”). ·Bag has wrinkles: To prevent wrinkles in the seal, gently stretch bag flat while inserting bag into vacuum channel. |
| No lights on the control panel | ·Make sure unit is plugged in ·Make sure wall outlet is functional ·Make sure lid is all the way down, and the bar is in the closed position. |
Trouble-Shooting (cont.)
| Problem | Solution |
| Nothing happens when bar is closed and button is pressed | • Make sure unit is plugged in. • Make sure wall outlet is functional. • Lower bar, make sure door is all the way down. |
| Cannot insert bag into machine | • Make sure there is enough bag material to reach center of drip tray. Always allow three inches (7.62mm) extra space to allow the bag to seal tightly around food contents. • Gently stretch bag flat while inserting. Insert bag CURL DOWN into Vacuum Channel. |
| Air was removed from the bag, but now air has re-entered | • Examine the seal. A winkle along the seal may cause air to re-enter the bag. To prevent wrinkles in the seal, gently stretch bag flat while inserting bag into vacuum channel. • Sometimes moisture or food material (such as juices, grease, crumbs, powders, etc.) along seal prevents bag from sealing properly. Cut bag open, wipe top inside of bag and reseal. • Sharp food items may have punctured bag. Use a new bag if there is a hole. Cover sharp food items with a soft cushioning material, such as a paper towel, and reseal. • Fermentation or the release of natural gases from inside the foods may have occurred. When this happens, food may have begun to spoil and should be discarded. |
| Bag Melts • Sealing Strip | Bag Melts • Sealing Strip may have become too hot. Always wait at least 20 seconds for appliance to cool down before you vacuum package another item. • Use FoodSaver brand bags. Our FoodSaver® Bags and Rolls are specially designed for FoodSaver® units. |
| If you need further assistance: | • Call Consumer Services at your country. • For additional tips and answers to frequently asked questions, go to www.foodsavereurope.com |
Get the most out of your FoodSaver® appliance with easy-to-use FoodSaver® Bags, Canisters and Accessories.
FoodSaver Bags and Rolls
The design of FoodSaver® Bags and Rolls features special channels that enable the efficient and complete removal of air. The multi-ply construction makes them an especially effective barrier to oxygen and moisture, preventing freezer burn. FoodSaver® Bags and Rolls come in a variety of sizes.
IMPORTANT: To avoid possible illness, do not reuse bags after storing raw meats, raw fish or greasy foods. Do not reuse bags that have been microwaved or simmered.
FoodSaver Vacuum Packaging Canisters
FoodSaver Canisters are simple to use and ideal for vacuum packaging delicate items such as muffins and other baked goods, liquids and dry goods.
The canisters come in a variety of styles and sizes and can be used on the countertop, in the refrigerator or in the pantry.
The Quick Marinator is an excellent way to marinate foods in minutes instead of hours. Any FoodSaver Canister can be used for marinating, but we recommend the square or rectangular shapes because less marinade is needed. Canisters should not be used in the freezer.
The stackable, lightweight containers are a convenient option to store make-ahead meals, leftovers and snacks.
Note: Allow hot foods to cool to room temperature before vacuum packaging. Otherwise contents may bubble up out of canister.
FoodSaver® Bottle Stopper
Use FoodSaver® Bottle Stoppers to vacuum package wine, non-carbonated liquids and oils. This will extend the life of the liquid and preserve the flavour. Avoid using the Bottle Stopper on plastic bottles.
Note: Do not vacuum package carbonated or sparkling beverages as gas removal will cause them to go flat.
How to Purchase FoodSaver® Bags, Rolls and Accessories
FoodSaver® products are available at most major retailers.
Please keep your receipt as this will be required for any claims under this guarantee.
This appliance is guaranteed for 2 years after your purchase as described in this document.
During this guaranteed period, if in the unlikely event the appliance no longer functions due to a design or manufacturing fault, please take it back to the place of purchase, with your till receipt and a copy of this guarantee.
The rights and benefits under this guarantee are additional to your statutory rights, which are not affected by this guarantee. Only Holmes Products (Europe) Ltd. ("Holmes") has the right to change these terms.
Holmes undertakes within the guarantee period to repair or replace the appliance, or any part of appliance found to be not working properly free of charge provided that:
you promptly notify the place of purchase or Holmes of the problem; and
the appliance has not been altered in any way or subjected to damage, misuse, abuse, repair or alteration by a person other than a person authorised by Holmes.
Faults that occur through, improper use, damage, abuse, use with incorrect voltage, acts of nature, events beyond the control of Holmes, repair or alteration by a person other than a person authorised by Holmes or failure to follow instructions for use are not covered by this guarantee. Additionally, normal wear and tear, including, but not limited to, minor discoloration and scratches are not covered by this guarantee.
The rights under this guarantee shall only apply to the original purchaser and shall not extend to commercial or communal use.
If your appliance includes a country-specific guarantee or warranty insert please refer to the terms and conditions of such guarantee or warranty in place of this guarantee or contact your local authorized dealer for more information.
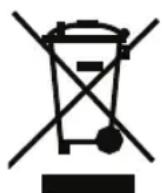
This marking indicates that this product should not be disposed with other household wastes throughout the EU. To prevent possible harm to the environment or human health from uncontrolled waste disposal, recycle it responsibly to promote the sustainable reuse of material resources. To return your used device, please use the return and collection systems or contact the retailer where the product was purchased.
They can take this product for environmental safe recycling.
Holmes Products (Europe) Limited
1 Francis Grove
London
SW19 4DT
UK

Holmes Products (Europe) Limited
1 Francis Grove
London
SW19 4DT
UK
Importantes Mesures de Précautions
Crush Free Instant Seal feature - This button has four uses:
Preparation des collations:
Holmes Products (Europe) Limited
1 Francis Grove
London
SW19 4DT
UK

Holmes Products (Europe) Limited
1 Francis Grove
London
SW19 4DT
UK

IMPORTANT: Due to the risk of anaerobic bacteria, fresh mushrooms, onions, & garlic should never be vacuum packaged.
Holmes Products (Europe) Limited
1 Francis Grove
London
SW19 4DT
UK

D. Accessorieopening
Holmes Products (Europe) Limited
1 Francis Grove
London
SW19 4DT
UK

Holmes Products (Europe) Limited
1 Francis Grove
London
SW19 4DT
UK


Refer to manual for precautions and use
- Consulta il manuale di istruzioni per l'utilizzo
- Veuillez vous reférer à votre manuel pour toutes précautions et utilisations
- Consulte el manual de instrucciones para precauciones y uso
- Bitte die Gebrauchsanweisungen beachten
- Raadpleeg de handleiding voor de voorzorgsmaatregelen en gebruik
- Se manualen for forsiktighetsatgärder och användning.
Notes
UK:
Holmes Products (Europe) Ltd.
1 Francis Grove, London SW19 4DT, England
Fax: 020 8947 8272
Email: enquiriesEurope@jardencs.com
UK Free Phone Customer Service Helpline: 0800 052 3615
For replacement bags and rolls please call: 0870 060 1855
FRANCE:
Holmes Products France
Electra Sweden AB c/o B Lindholm AB,
Box 730, 391 27 Kalmar, Sweden
Tel: 054 137660
Email: info@linderholms.se
info@linderholms.se
ITALIA:
MACOM s.r.l, Via G. da Procida, 10
© 2011 Sunbeam Products, Inc. doing business as Jarden Consumer Solutions. All rights reserved. Distributed by Holmes Products (Europe) Ltd., 1 Francis Grove, London SW19 4DT, United Kingdom.