
Albatros - Mp3 player ZipyLife - Free user manual and instructions
Find the device manual for free Albatros ZipyLife in PDF.
| Product type | MP4/MP5 player with touchscreen, FM radio, photo camera, video camera |
| Brand | ZipyLife |
| Model | Albatros |
| Screen | TFT touchscreen 240 x 320 pixels, 260,000 colors |
| Internal memory | 4 GB (base model) |
| External storage | Micro SD card up to 8 GB |
| Supported audio formats | MP3, WAV |
| Supported video formats | RM, XVID, WMV, FLV, AVI |
| Supported image formats | JPEG, BMP, etc. |
| FM radio | Yes, with automatic and manual search, bands Europe, USA, Japan, China |
| Recording | Built-in microphone (WAV/MP3), FM radio recording |
| Photo camera | Resolutions up to 1280x960 pixels |
| Video camera | Resolutions up to 320x240 pixels, AVI format |
| PC camera | Yes, usable under Windows with included software |
| Additional functions | Ebook reader (TXT), games, calculator, calendar, stopwatch, notepad |
| Connectivity | USB 2.0 high speed, 3.5 mm headphone jack, TV out (3.5 mm to RCA) |
| Power supply | Rechargeable lithium battery, charge via USB or Micro-USB charger (400-500 mA) |
| Charging time | Approximately 6 hours on PC USB |
| Operating temperature | -5°C to 35°C |
| Compatible operating systems | Windows XP/2K/ME/98, Linux 9+, Mac OS 10 |
| Warranty | 2 years (1st year labor and parts, 2nd year only manufacturing defect) |
| Included accessories | Earphones, USB cable, Micro-USB charger, TV cable (3.5 mm to RCA), software on CD |
Frequently Asked Questions - Albatros ZipyLife
User questions about Albatros ZipyLife
0 question about this device. Answer the ones you know or ask your own.
Ask a new question about this device
Download the instructions for your Mp3 player in PDF format for free! Find your manual Albatros - ZipyLife and take your electronic device back in hand. On this page are published all the documents necessary for the use of your device. Albatros by ZipyLife.
USER MANUAL Albatros ZipyLife
Interface do Menu Principal 7
Modo de Música 8
Interface do Menu Principal
- Please read this user manual carefully before using.
- AIDigital is committed with a Sustainable Environment and is concerned about battery disposal. Please make sure NOT TO THROW AWAY your device at the trash container. Your store has adequate recycle bins."
- The information of this manual is based on the current version of the product.
- The material in this manual is for informative purposes only. The products that are described are subject to changes without prior notice due to the continuous process of development of the brand.
- Do not expose this device to high temperatures since that may affect the system. This can invalidate the device guarantee.
- We reserve the rights to change with out prior notice.
- Please turn on the player when charging.
- Prevent friction with hard things, or it may lead surface abrasion, battery fall off and hardware damage.
- When the player is at pause state for a period of time, it will turn off automatically.
- Do not disconnect the device when formatting, uploading and downloading date. Cause this can lead to loss of data.
- Please don't replace battery by oneself or break battery and throw in fire.
Otherwise it will hurt yourself.
- Please don't dismantle or unload this machine without authorization, if have any question please contact with dealer or our head company. 91.129.80.80.-82
Table of Contents
Table of Contents 2
Revision History 4
Precautions 4
Basic Features 4
System Configuration 4
Power On 4
Power Off. 4
Lock/Unlock 5
Volume Adjustment 5
Reset 5
Connection to PC and Data Exchange 5
Charging. 5
Low Power. 5
File Storage 5
How to use Micro SD card. 6
How to insert and pull out Micro SD card. 6
Geneal Button /Icon Description 6
Main Menu Interface 6
Music Mode 7
Music Interface Description. 7
Music Setting Interface 8
Lyrics Display 9
Video Mode 9
Picture mode 10
Radio Mode 11
FM Recording Interface. 12
Ebook Mode 13
Camera Mode. 15
Camera Setting Interface. 15
Video Camera Setting Interface 16
Video Camera Interface 17
PC Camera 17
Explorer Mode 17
Application 18
Recorder. 18
Calendar 18
Stopwatch 19
19
Notebook 20
Input Method 20
System Setting 21
Player Information 21
Set Time 21
Language 21
Display 21
Calibrate 22
Power Off Setting 22
Default Settings 22
Upgrade 22
Other Settings 22
Video Conversion Tool 23
Operating Platform 23
What format can files be converted into 23
What format can video files be recorded into 23
What format can picture files be taken into 23
Software Installation 24
Automatic Installation 24
Manual Installation 24
Video File Conversion 24
Recording Video and Taking Pictures 26
Notices 28
Firmware Upgrade 28
Connection to TV/ VCR 29
Revision History
| Date | Version | Description |
| 2010-09-16 | 1.0 | New version released; |
| 2010-10-1 | 1.0.1 | Minor changes |
Precautions
For the correct use and good performance of the player, the user must fully understand the manual as well as strictly follow the instructions provided.
Avoid high temperature (above 35^ ) or low temperature (below -5^ ).
I Never knock the main machine violently.
Never contact with chemicals such as benzene, thinner etc.
Do not close to strong magnetic field, electric field etc.
Keep away from direct sunlight or heating appliances.
I Never privately disassemble, repair or modify the player.
Using the player and the earpiece during bicycling, car and motorcycle driving is likely to cause danger.
Never use higher volume, which may damage your hearing ability.
Divide scraped packing, batteries, old electronic products and dispose them properly.
Basic Features
2.8-inch touch screen TFT display
1 320× 240 pixels display resolution
Built-in Micro-SD card slot, supports up to 8GB
Built-in 0.3 Megapixel digital video camera
Built-in TV Output
Plays AVI, MPEG-4, FLV video format files
Plays WAV, WMA, MP3 audio format files
Picture browsing of JPEG format files
Built-in 500mAh Li-poly battery
Built-in FM Radio (optional)
Built-in microphone
Built-in loudspeaker
Multi-language support
Available in wide range of attractive colors
System Configuration
OS: Windows XP/2K/ME/98 (driver installation needed) /Linux9 and above /Mac OS 10
CPU: Pentium-133MHz at least
Memory: 32MB at least
Hard disk free space, 100MB at least
Video card: above 640*480, enhanced color at least (16 bits)
Power On
Slide the switch to "On" and the player will be powered on in 3 second. The player will prompt "Welcome" and then enter the main interface.
Power Off
When the player is on, slide the switch to "Off" and the player will be powered off in 3 seconds.
Lock/Unlock
In Video, Music or Radio mode, move the power switch to the lock position to lock the player so as to avoid careless button operation.
Unlock: move the power switch back to the original position and button and touch operation will be enabled again.
Volume Adjustment
Under Music, FM radio or Video mode, press + , - button to adjust volume. Press + to add volume, and press - to reduce volume.
Reset
If the player encounters dead halt during use, press RESET button to restart the player.
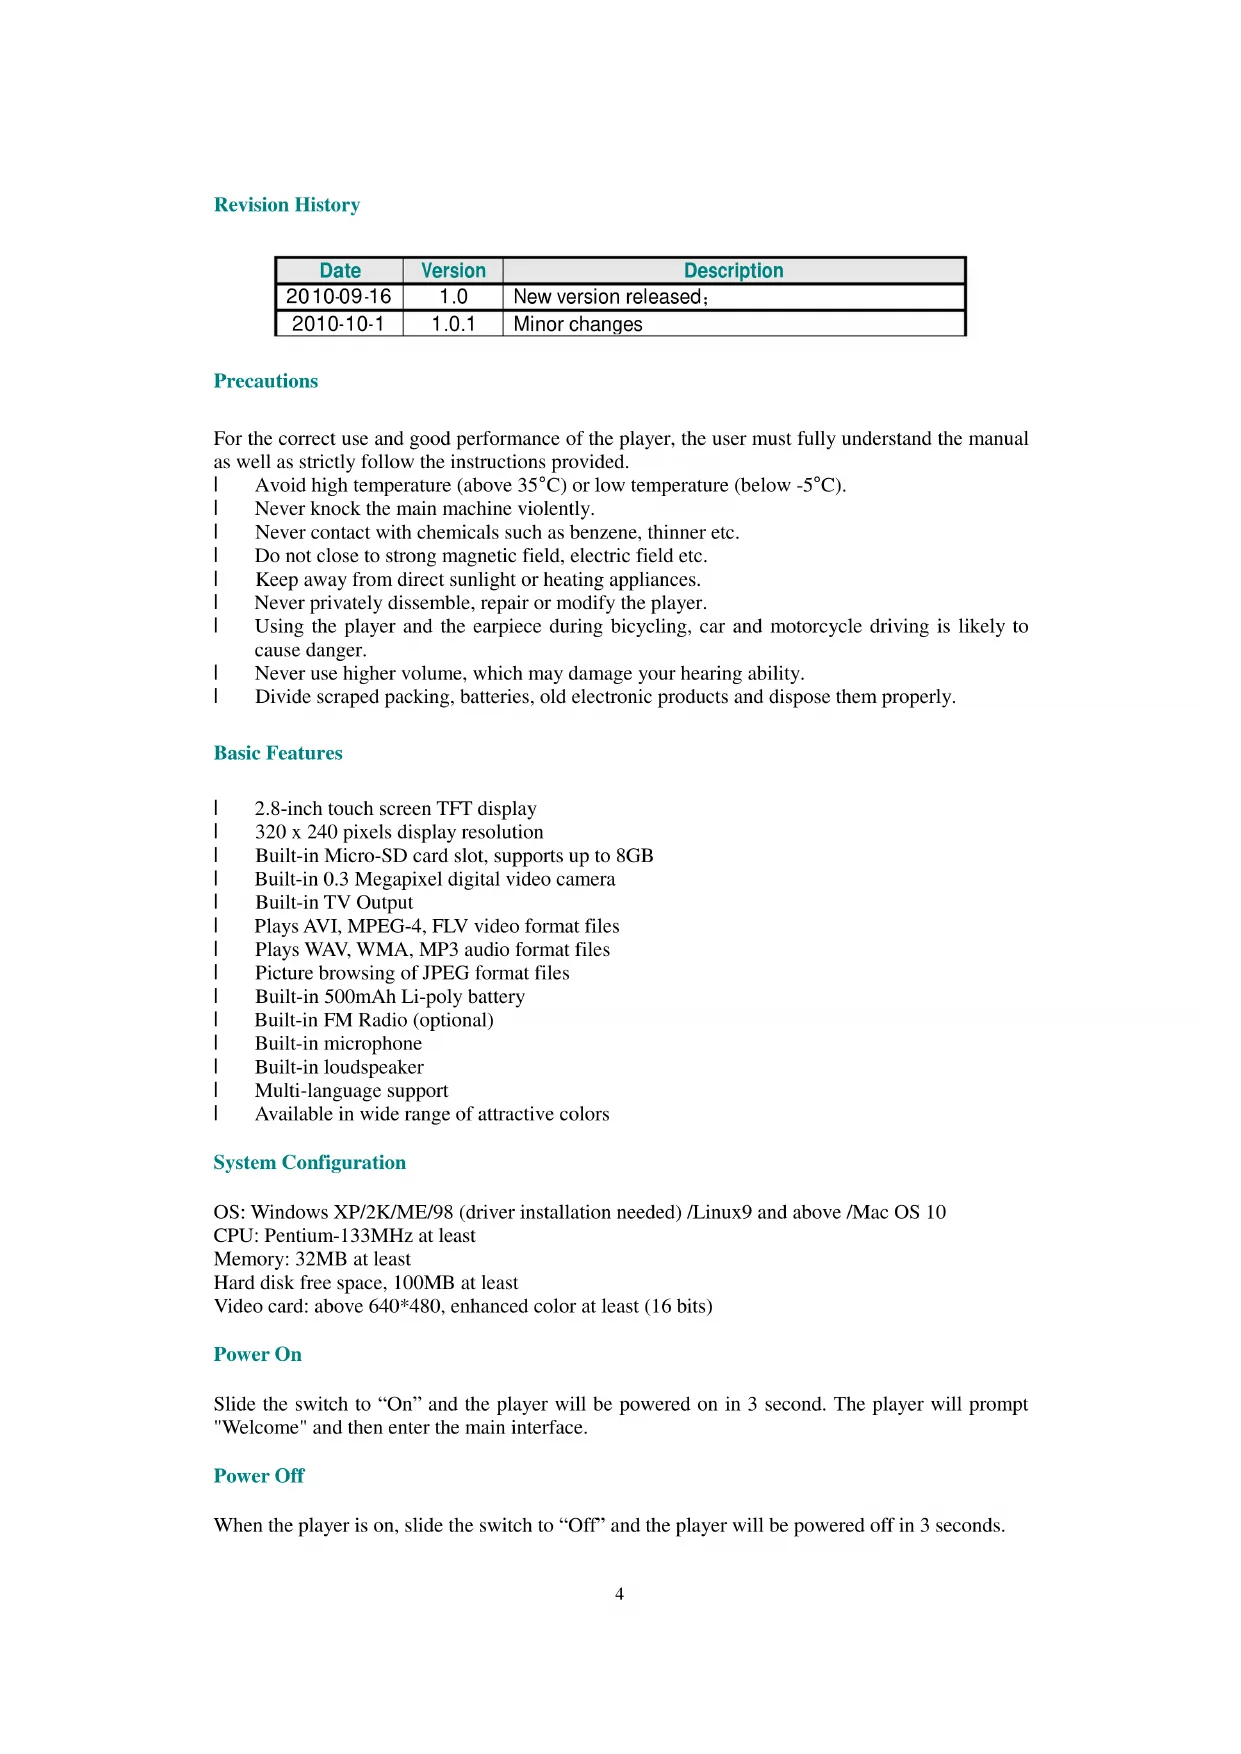
Connection to PC and Data Exchange
Connect the player to PC with the USB cable, and the player will enter "U disk" mode. Press MENU button or safely remove U disk, and the player will be under USB charging mode. In USB charging mode, touch the screen or press MENU to enter the main applications interface.

Charging
This player has high capacity lithium battery. For charging, connect the player to the USB port of the PC or to a Micro-USB Charger.
Low Power
When battery power is low, the player will prompt and power off and enter Standby mode automatically. Do not power on and charge the player instead. To fully charge the player, it takes around 6 hours via USB port of PC, you can also choose to buy an extra Micro-USB Charger, the recommended power current of the Micro-USB charger is: 400 - 500mA .
File Storage
Files of different types should be stored under different directories. For example, music file should be stored under MUSIC dir. Record file stored under RECORD dir. Picture files under PICTURE dir. Video files VIDEO dir. Text files TXT dir. the corresponding application unable to find the file
If it is not saved in this way,
How to use Micro SD card
When this player is connected to PC, two movable disks will be found. The first one is the internal memory, and the second one is Micro SD card. If no card is inserted, the second disk can not be opened. This player is compatible with maximum 8GB Micro SD card.
How to insert and pull out Micro SD card
How to insert: with the front (the side with characters) of the Micro SD card up (towards the screen of the player), slightly push to insert into the card holder of the player to connect. After the card is inserted, the player can play the files in the Micro SD card.
How to pull out: slightly push the Micro SD card and the Micro SD card will partly come out, and then pull the card out.
Note: please insert or pull out the card when the player is off, or the internal files of the player will be lost or damaged.
Geneal Button /Icon Description
| Button /Icon | Description |
| Return to upper directory | |
| Return to main menu | |
| Delete file or folder | |
| Return to previous operation interface |
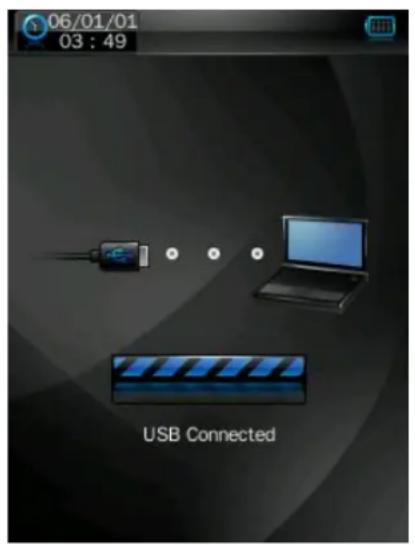
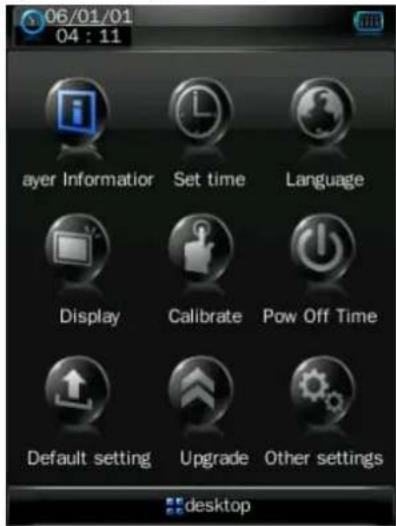
Main Menu Interface
This player provides a touch screen OS for direct operation. The main menu interface is shown in the picture below:
- The system date and time is shown on the upper left corner of the main menu interface. The battery is shown on the upper right corner of the main menu interface.

-
Under the main menu interface, touch an icon on the screen, and the player will enter the selected mode.
-
After the player enters a mode, touch the Desktop icon on the bottom right corner or press and hold the MENU button to return to the main menu interface.
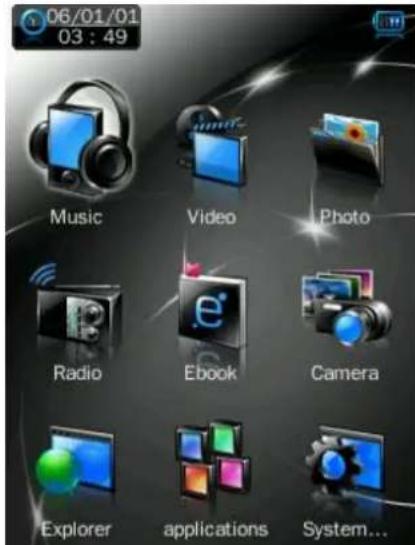
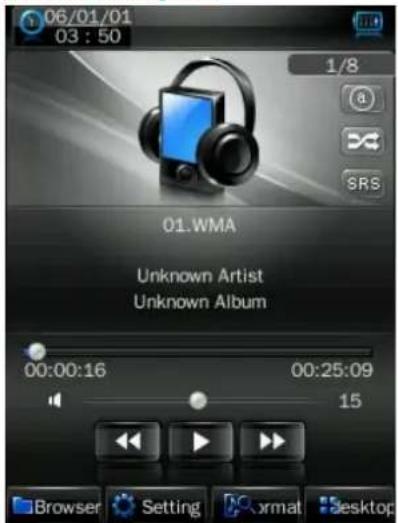
Music Mode
In the main interface, touch the "Music" icon to enter music mode.
Music Interface Description
| Button /icon | Description |
| 1001/1099 | Number of the song being played / Total songs |
| 23 | Playing mode |
| 4 | Playing sequence |
| SR3 | Playing style |
| 00:02:20 00:05:12 | Song playing progress bar. Drag the bar to adjust playing progress. |
| 12 | Volume bar. Drag the bar to adjust volume. |
| Touch it to switch to previous song, long press for fast rewind | |
| Play /pause /stop the current song. Click the play button, and the button will be change to pause button. After a song is finished, it will change to stop button. |

Touch it to switch to the next song, press and long press for fast forward
Music Setting Interface
Click one of the 4 buttons at the bottom of the interface to enable an appropriate function.
| Icon D esciption | |
| Browser | Click Browser to enter different song lists - main directory, card directory, all songs, ID3 list, play list, and tag list. |
| Setting | Click Settings to choose SRS setting: WOW, WOWHD, USER Click USER to enter user setting interface. Drag the bar or chick the options to set the functions. Click OK to confirm the settings. |
| EQ setting: click to enter User EQ setting interface, move up or down the bar to select sound effect, and click OK to confirm. | |
| Add list | |
| Add tag Click Back return to play screen. | |
| xmat | Song information display. |
Lyrics Display
The player is compatible with lyrics files of *.LRC" format and enables playing song with synchronous lyrics. The name of the lyrics file should be the same as that of the song file. When there are the lyrics with the same name of the song being played under the play list directory, the lyrics of the song will be displayed on the playing interface.
Video Mode
In main interface, click the "video" icon to enter Video mode.
Directly click the video file on the screen to start playing the selected video.
When play a video file, the up/down buttons and the progress bar will appear automatically by touching the screen.
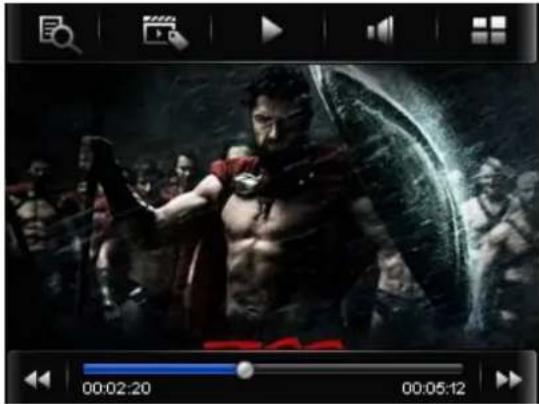
| Button D | escription |
| Browse: local directory, card directory, tag list | |
| Tag: directly click the icon and a box pops out and prompts“tag saved”. | |
| Play: click and it will change to pause buttonand click again to continue playing. | |
| Touch it and the Volume bar will pop out at the bottom. Drag the bar to adjust volume. | |
| Return to main menu | |
| Fast rewind: long press for fast rewind. Short press for the previous video file. | |
| Fast forward: long press for fast forward. Short press for the next video file. |
Picture mode
- In main interface, click the "Picture" icon to enter Picture mode.
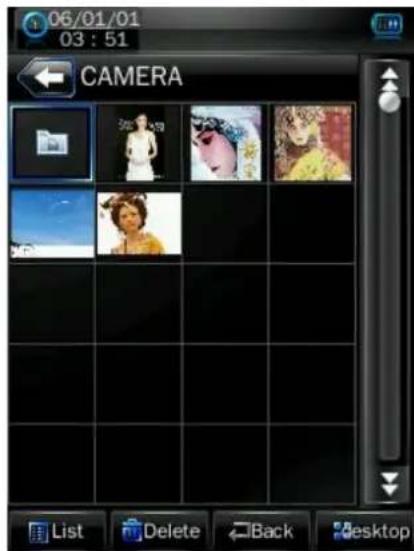
Click List to change to the List mode.
- Directly click the thumbnail to browse pictures. Click the picture, and the buttons will appear
automatically at the bottom of the screen.
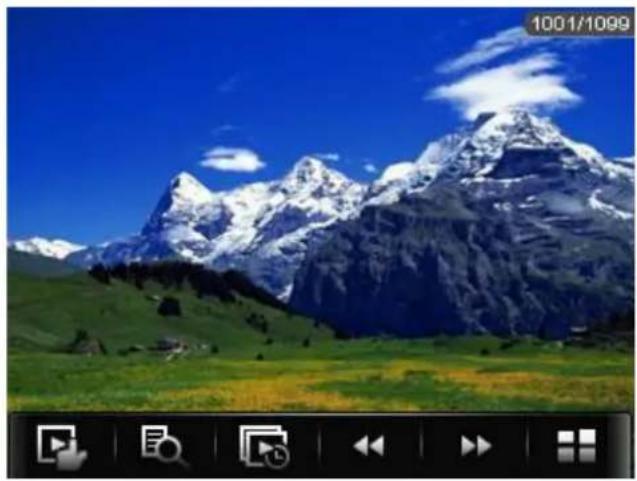
| Button D | Description |
| Manual play: click the button, and the button will change to and click again to enter auto play mode. | |
| Main dir and card dir. return to upper directory to browse picture list. | |
| Slide interval: 1 -5 seconds | |
| Previous picture | |
| Next picture | |
| Return to the main menu |
Radio Mode
- In the main interface, click the "Radio" icon to enter radio Mode.
- If no headphone, the player will prompt the user to insert a headphone.
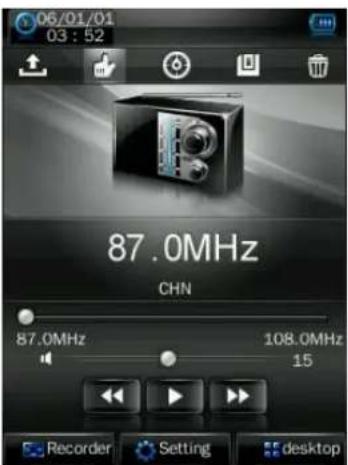
| Button /Icon | Description |
| Radio channel list, click to show radio channel list. | |
| Manual search: click to enter manual search mode; short press or button to manually search up /down for radio channels, and the player is mute where no channel being found. | |
| Auto search: click to enter auto search mode. All channels can be automatically searched and saved. After search is completed, the player will play radio at the preset channel 1. During channel search, click or button to stop auto search. | |
| Save channel | |
| Delete channel | |
| Change to channel of lower frequency | |
| Change to channel of higher frequency | |
| Radio mode change: click and the button will change to and channel search will be paused. | |
| Recorder | Enter FM station recording interface |
| Setting | Select frequency range: China, Japan, Europe and US. |
FM Recording Interface
- In Radio mode, click Record station recording interface.
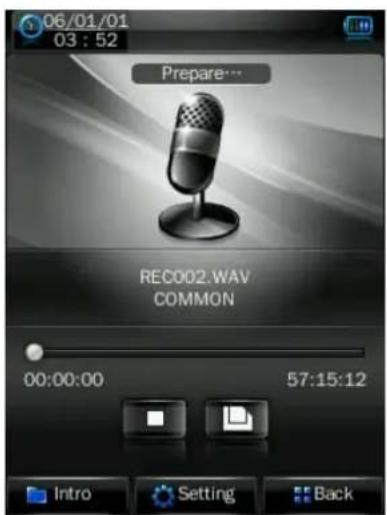
| Button /Icon | Description |
| Stop, click it and it will change to play icon to enter recording mode | |
| Save the recorded file. | |
| View recorded file. | |
| Record settings 1. Recording format: WAV &MP3 formats. 2. Quality: high, medium, low. 3. Recoding gain volume: level 1, 2, 3. |
EBook Mode
- In the main interface, click the Ebook icon to enter the mode.
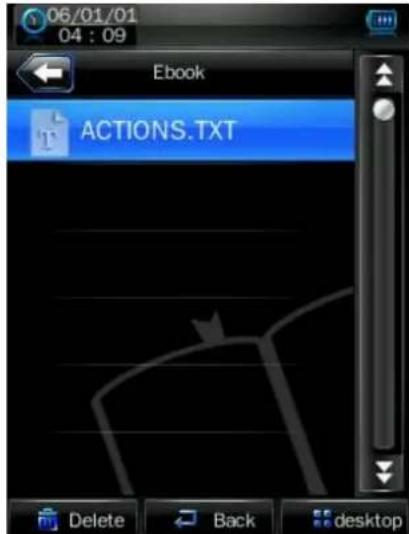
- Select a TXT file to enter Ebook browser interface.

| Button /Icon | Description |
| Manual browse: click it and it will change to to enter auto browser mode. | |
| Auto browser time setting: 10 seconds, 15 seconds, 20 seconds, 25 seconds, 30 seconds. | |
| Save and pick tag, click to show the tag list, and then click to save or select tag. Click or the part outside Save tag box to exit from the tag setting box. | |
| 06/01/01 04 : 09 1/6 Actio sign sifyir ing ketp Actio , an ded h exp ,Ho n Va Browser PgpUp PgDn desktop | |
| Skip to: click to show “Skip to” dialogue box, and click or to select the skip percentage. Click outside part of the “Skip to” box to exit. | |
| 06/01/01 04 : 09 1/6 Actions: An integrated circuit de sign company leading by a diver sifying professional team and jo ining the global competitive mar ketp Actio 17% an to design company is found ded by a strong design team wit h experienced staffs from China Hong Kong, Taiwan, and Silico n Valley, and a well-known worl Browser PgUp PgDn desktop | |
| TXT file browser: local directory, card directory. | |
| Previous page | |
| Next page |
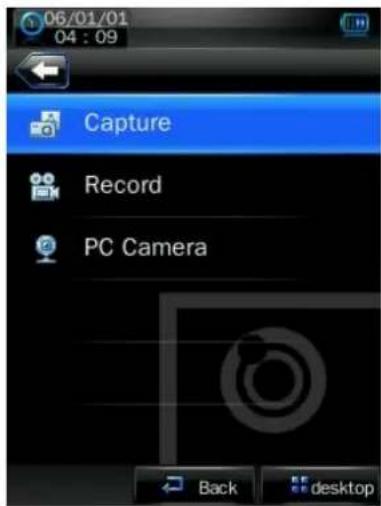
Camera Mode
- In the main interface, click the "Camera" icon to enter the mode.
- In the menu, select one of 3 functions: camera, video camera
- and PC camera.
Camera Setting Interface
- Click "camera" to enter the mode.
- In frame interface, touch the screen and top & bottom button bar will appear. Touch again, and the up/down button bar will disappear.
| Button D | Description |
| Switch to video camera mode. | |
| Number of pictures that can be taken. | |
| Self Shooting time setting: 5 seconds, 15 seconds, 20 seconds, off. Default setting is off. | |
| Return to the main menu. | |
| View the pictures. | |
| Picture mode settings 1. Special effect: White balance: auto, indoor, outdoor. Default setting is auto Brightness: value range -3 to +3. Default setting is 0. Exposure mode: auto, indoor, outdoor. Default setting is auto Special effect: off, black & white, sepia, negative. Default setting is off. 2. Save path: local device, card device. The default is local device Shutter sound: off, sound effect 1, sound effect 2 and sound effect 3; Default setting is sound effect 1. 3. Date stamp: off, date stamp or date and time stamp. Default setting is off. To make no settings, touch the screen outside the menu to exit. | |
| 1280x960 | Resolution switch: 320x240, 640x480, 1024x768, 1280x960. |
| Take picture |
Take white balance setting as an example:
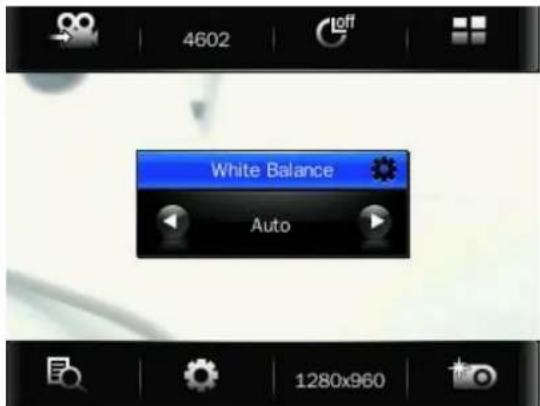
Click or to select among different mode, then click screen to confirm selection and exit.
Video Camera Setting Interface
- Touch the screen and top/bottom button bar will appear. Touch again and the button bar will disappear.
| Button | Description |
| Change to camera mode. | |
| AUTO | 3 exposure modes: Auto (default), indoor (lamp) and outdoor (sun). |
| 4 types of special effects: black & white, negative, sepia, off (default). | |
| Return to the main menu. | |
| View video file. | |
| Video camera mode setting 1. Brightness: value range -3 to +3. Default setting is 0. 2. Save path: local device, card device. The default is local device. To make no settings, touch the screen outside the menu to exit. | |
| 176x144 | Resolution switch: 176x144, 224x176, 320x240. |
| Start video recording |
Video Camera Interface
Click to enter video recording interface, touch the screen and a button bar will be displayed at the bottom.
| Button | Description |
| Video recording: click to pause video recording. | |
| Save video file, and return to video setting interface. | |
| Note: the video recording time is shown in the middle, on the left is the recorded time, and on the right is the available time remaining for video recording. | |
PC Camera
Select "PC Camera" function to enter PC camera mode, the player will detect if USB cable has been connected.

With the video conversion tool, this player can be used as a PC camera on PC to produce video or picture files. Please refer to Chapter Video Conversion Tool for more details on how to use the tool.
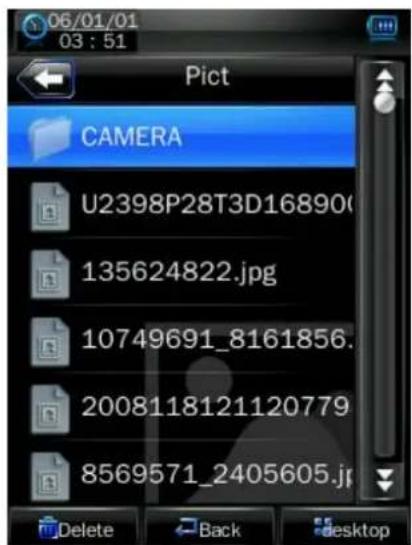
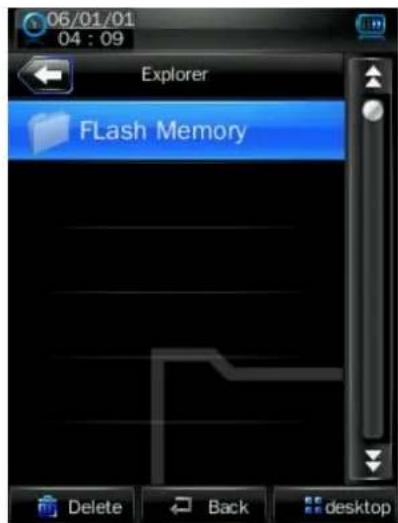
Explorer Mode
In the main interface, click the "Explorer" icon to enter the mode: Flash Memory and Card Memory (not displayed if no card inserted). All files and file folders in the player can be listed, and the user may play the compatible music, video, e-book and picture files under this interface; or, the user may directly delete the selected files.
Application
In the main interface, click the "Application" to enter the mode.
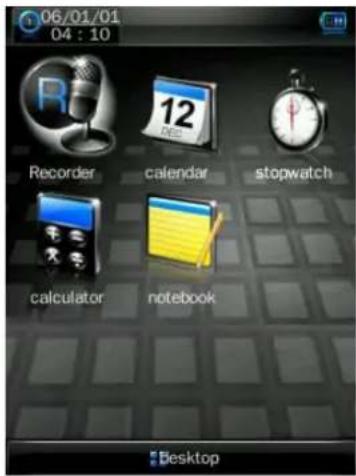
Recorder
Click recorder to enter internal MIC recorder interface. The operation is the same as that of FM recorder.
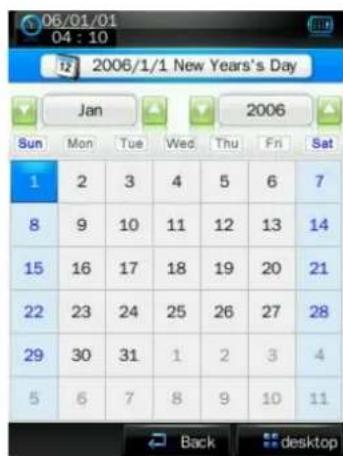
Calendar
Click or button to select month and year. Select date by directly clicking the number on the screen and the number will become blue color.
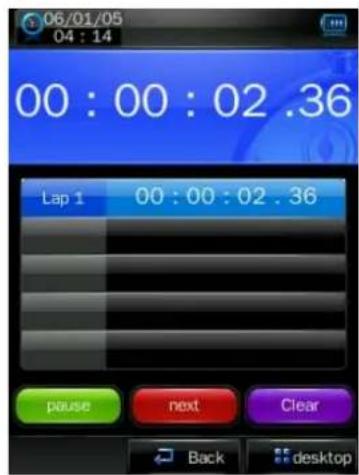
Stopwatch
Click "Start counting", "Next" or "Clear" at the bottom to realize different functions. As counting begins, "Start counting" will change to "Pause".
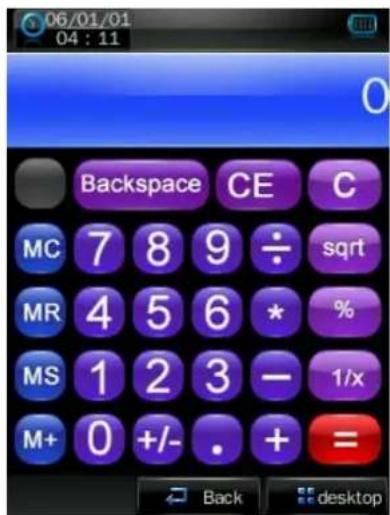
Calculator
Simply press the corresponding button.
Notebook
Only valid in Simplified Chinese and English environment. Input characters in the input box.
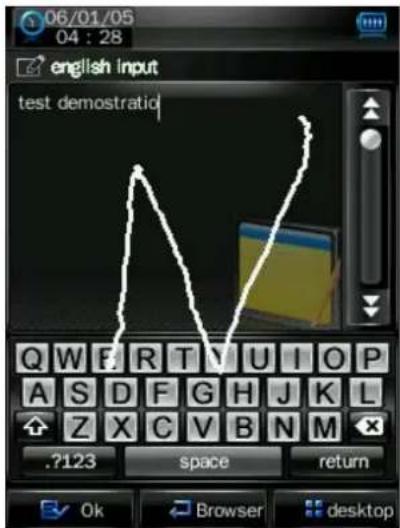
Input Method
| ABCabc | .?123 | plitted Chh | All | Switch input methods, from left to right: English, numbers & symbols, Chinese, all input methods (can be used to recognize three types of characters). | ||||||
| 1. Click “Chinese” button to use Chinese input mode, as shown above. After input, choose the appropriate Chinese character on the keyboard. | ||||||||||
| From left to right: delete the character before cursor, space and enter. | ||||||||||
| 2. Click button .?123 to enter numbers & symbols input mode, and the keyboard is as follows: | ||||||||||
| 0 | 1 | 2 | 3 | 4 | 5 | 6 | 7 | 8 | 9 | |
| ? | ||||||||||
| ¥ | * | () | # | |||||||
| 3. Click “return” to return to Chinese input interface, or click ABCabc to enter English input interface. | ||||||||||
- After input, click

button at the left bottom to save, and the player will
automatically jump to notebook file list interface. Click Back to return to the input interface.
System Setting
In the main interface, click the "system settings" icon to enter the mode.
Player Information
Relevant read-only product information
Set Time
-
Time format: on or off.
-
Time and date: click and to set.
Language
Three languages available for selection: English, Simplified Chinese and Traditional Chinese. Simply click to select the appropriate language.
Display
- Backlight time
Click

and

to set.
There are 9 options: 0 second, 5 seconds, 10 seconds, 15 seconds, 30 seconds, 1 minute, 5 minutes, 15 minutes and 30 minutes.
2. Brightness adjustment
There are 5 options: 1, 2, 3, 4, 5. The higher the level is, the brighter the LCD is.
Click the corresponding 1 to 3 icon to set.
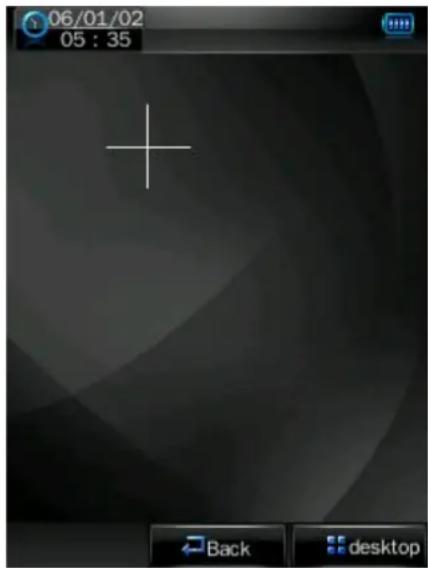
Calibrate
When the touch screen position is not accurate, recalibrate with this function.
After the player enters this mode, touch the center of calibration sign + to calibrate.
Power Off Setting
Sleep time: click


There are 6 options: off, 10 minutes, 15 minutes, 30 minutes, 60 minutes and 120 minutes. The setting will change to the default value "Off" if re-start the player.
Default Settings
After the player enters this mode, the player will prompt an auto warning about whether to restore system default setting or not.
Click "Ok" to restore factory default settings. Click "Cancel" to abandon this restoration.
Upgrade
After clicking this icon, the player will enter "hardware upgrading" warning interface. At this point, connect the player to the USB port of a PC to update the firmware of the player. Touch "cancel" on the screen to abort this upgrading.
Other Settings
Format device: click "format system disk" or "format card" to start formatting, and the selected item will become blue color. The system will pop up a confirmation box as follows:
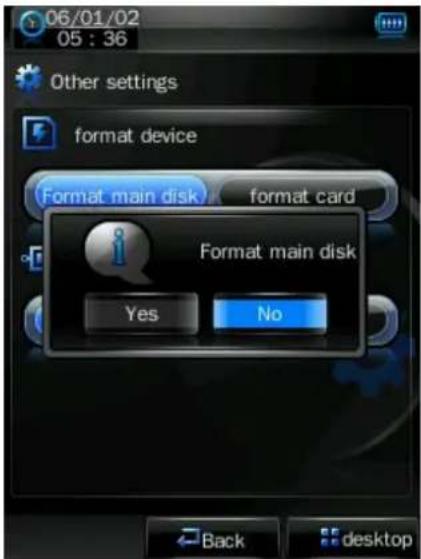
Select device: click "U disk" or "MTP device" to select the device connection mode with PC, and the selected item will become blue color.
Video Conversion Tool
Video conversion tool is used to convert AV files into advanced AVI or WMV video file format to make them viewable on this player; or to take pictures or record video files when this player is used as a PC Camera.
Operating Platform
For Windows2000, Windows XP, Vista, DirectX, Version 9.0 or above should be used. It is not recommended to use this tool under Windows98 or Windows Me.
What format can files be converted into
This tool can converted the video files of the following formats:
1).AVI format files;
2).ASF and .WMV Windows Media format files;
3).MPG, .MPEG and .DAT MPEG1 format files;
4).RM.RAM and .RMVB Real Play format files;
5).MOV Quick Time format files;
6). VOB MPEG2 format files;
7). SWF Flash format files (unable to convert into WMV files now);
8).AVI and .WMV files can be converted into .AVI files again;
9).AVI and .WMV files can be converted into .WMV files again.
What format can video files be recorded into
This tool can be used to record video files of 320*240, 30-frame AVI format.
What format can picture files be taken into
This tool can be used to take picture files of 320^*240 , JPG format file.
Software Installation
Automatic Installation
Start PC, enter Windows system, place the tool installation CD into the CD-Rom, and the installation will be automatically run. Please follow instructions to click "next step" button, and click "off" button when installation is completed successfully.
Manual Installation
If automatic run is not set up in the PC, then the installation needs to be started manually: First, double click the Setup.exe file under the root directory of the CD to start the installation guide; follow instructions to click "next step" button, and click "off" button when installation is completed successfully.
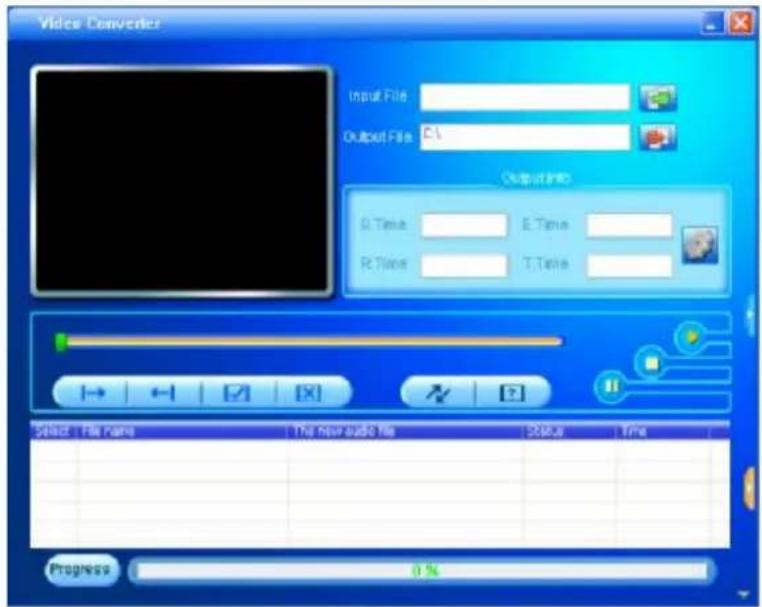
Video File Conversion
1. Running this tool.
Click [start] button - 【program】menu, select "MP3player management tool" - "video converting tool" to enter the main interface.
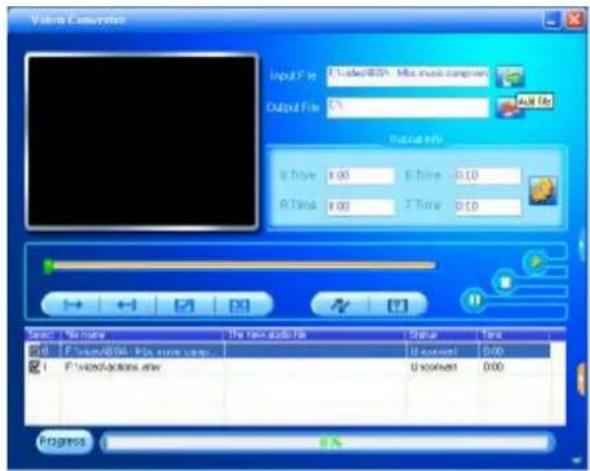
2.Adding AV files
Run software, click the "add file" button

on the right side of the "input file" column to add
AV files to be converted, and a dialogue box will automatically pop out for adding one or more AV files.
After the file is added, the path of the AV file will be displayed in the "input file" field as shown below; and, relevant information of the added file, such as the check box, file name and path, status and file length, will be displayed in the status column.
3. File conversion
1) Select the file to be converted
In status column, on the left side of each AV file name, there is a check box and a sequence number. The check box is used to choose a plurality of AV files to be converted, and the newly added AV files are checked as default setting. If a file is not checked, it indicates that this AV file will not be converted. In addition to directly tick the check box, the AV file may also be selected or removed by right clicking the mouse over the file and choosing "select" or "remove" in the pop-out window. To remove any AV file from the adding list, simply right click the mouse over one or more AV files, select "remove", and the files will be removed from the list.
2) Select the storage path of the video files
This conversion tool uses C:\ as the default path for storage of video files. Before file conversion,
click the video storage path button on the right side of the "output file" column to specify the location for saving the video file. When the "browse file folder" dialogue box pops out, select the specified storage path, and then click "confirm" button.
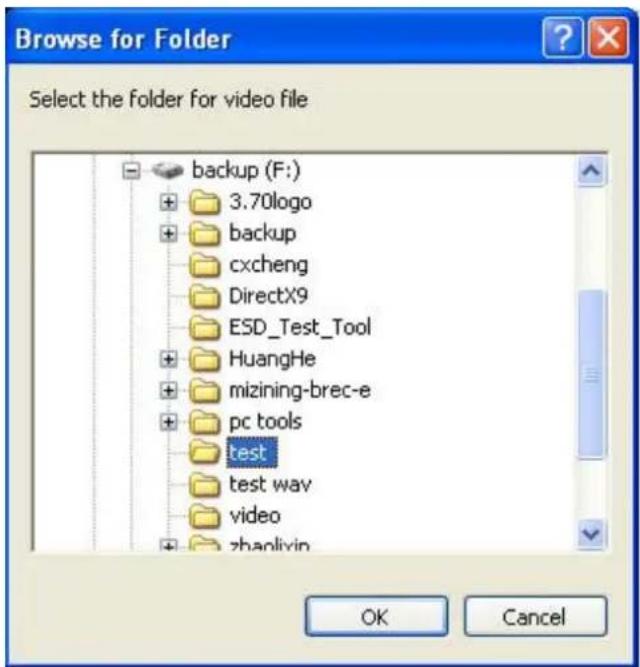
Afterwards, the path in which the video files are stored will be displayed in the "output file" column of the conversion tool interface.
3) Properties setting
Before converting AV files, some important parameters of the video files need to be set, such as the type (AVI or WMV), the intercepted part and the length of the video file, image exchange, image quality. There are two methods to enter the properties setting interface:

in the "output
A. After selecting one or more AV files, click the settings button information" column to enter;
B. After selecting one or more AV files, right click the mouse and select "settings" to enter;
"Select" here does not mean checking the AV file in the check box, but using the mouse to click file name to make the file background color blue.
4) Start converting file
Confirm that the check box of the AV file to be converted is checked. Press the conversion button

in the tool interface to start, the tool begins to convert all selected AV files of which
the check box has been checked, and the file status will be changed from "not processed" into "being converted", and the conversion progress bar will be displayed in the conversion progress column at the same time.
In addition to the above file conversion methods, the AV files stored in the hard disk may also be selected and converted by right clicking the mouse and selecting the "start video conversion" in the pop-out menu, and the tool will automatically run and directly start file conversion.
Recording Video and Taking Pictures
1. Opening the video window
When the PC camera is connected, the tool will automatically pop out the video window; when the

PC camera connection is completed, and the video window is in hidden status, click the icon
on the right side of the tool interface to make the video window shown. If the PC camera is not connected, click the button and the tool will prompt "PC camera not connected".
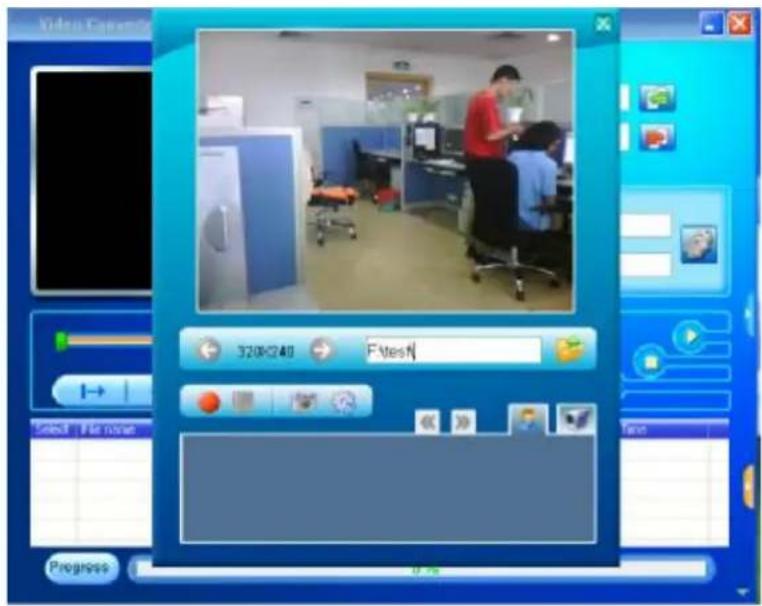
2. Recording video and taking pictures
Default storage directory is the same as the storage directory of the converted video files, which
can be specified by clicking the icon in the "select directory" window. The changed path
will be displayed in the path column. Click icon to enter the PC camera setting interface to change parameters for recording video or taking pictures.
3. Recording and playing video
Record: in the viewfinder status of the video interface, click the icon to start recording video files, and "video recording" will be displayed at the bottom of the video interface. When a video file is being recorded, the start icon becomes a pause icon, and at the same time the stop icon is active.
Pause: under the recording mode, click the icon to pause recording, and at the same time the start and stop record icons are active.
Stop: under recording or pause recording mode, click the icon to stop recording and save the video file to the specified directory, and at the same time the start icon is active; return to the viewfinder interface, the thumbnail icon of the video file will be displayed at the bottom of the viewfinder interface.
Play video: when the recorded video file is saved, click the icon in the video interface to
Preview the thumbnail icon of the video file, and click icon to switch between thumbnails; double click the thumbnail icon of the file to open a play window and start playing the video files.
4. Taking and previewing pictures
Taking pictures: in the video interface under viewfinder mode, directly click the icon to take pictures, and at the same time picture files are saved under the specified directory.
Previewing pictures: upon completion of storage, pictures are displayed in thumbnail icons at the
bottom of the interface; click icon to switch between thumbnails, and double click the thumbnail icon of the pictures to start preview.
Notices
- To convert files of RealPlay, QuickTime or MPEG2 formats, please first install appropriate decoder.
- To convert files of RealPlay, QuickTime or MPEG2 (DVD) formats, if the files cannot be directly played with the Windows Media Player in the PC, then an appropriate decoder for the Windows Media Player shall be installed. Until the files can be played properly with the Windows Media Player can proper conversion be completed, or this tool will not run properly.
- This tool cannot be used to produce sound or display Chinese characters in the AVI video file converted from Flash animation (SWF file).
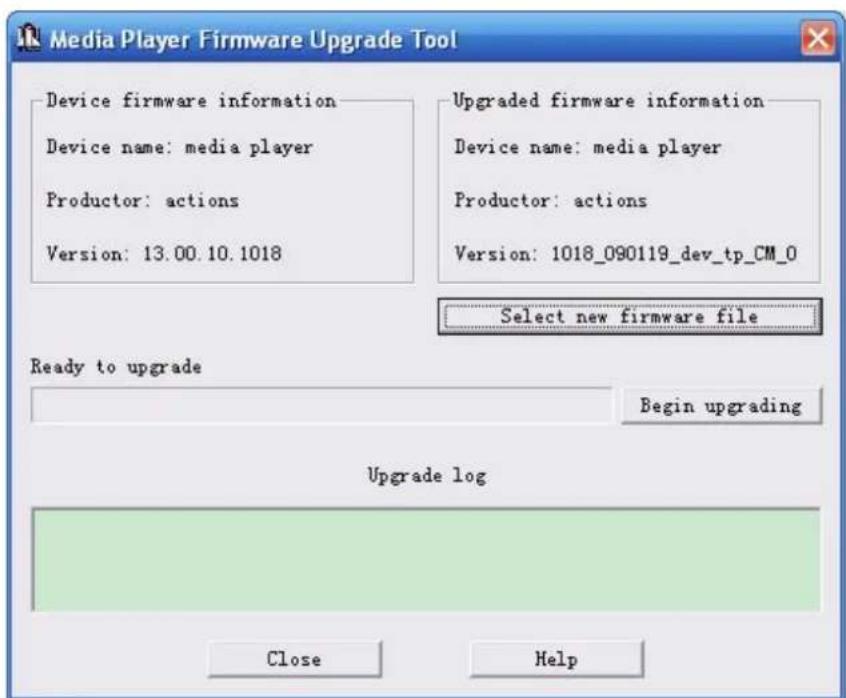
Firmware Upgrade
This player provides with firmware upgrading tool to upgrade or repair the firmware in the player.
- Down load the latest firmware.
- Connect the player to PC's USB port correctly; make sure no other movable disks are connected to the PC at the same time.
- Run this tool.
If the firmware in the player is in good condition, the tool will shift to firmware upgrading mode; it displays the information of the player's firmware such as version etc in the box on the upper left corner of the tool interface. Click button "Select new version firmware file" to select the firmware file to be upgraded. After the firmware file detected to be correct by the tool, it displays the information of the selected firmware such as version etc in the box on the upper right corner of the tool interface. Now click button "Start upgrading" to upgrade the firmware. If the internal firmware of the player has been damaged, the tool will change to firmware restoration mode. The version information of the player's internal firmware now will not be displayed in the box on the upper left corner of the software interface. It requires the user to select a correct firmware file to repair the damaged one. At the same time, the information such version etc of the firmware file to be repaired is displayed in the box on the upper right corner of the interface; click button "Start upgrading" to upgrade the firmware.
- Do not disconnect the player from the PC during firmware upgrading or repairing. After the upgrading is completed, a prompt "firmware upgrading succeeded, the program will exit automatically!" pops out. Now confirm, the tool will shut down and reset the player, the whole upgrading is completed.
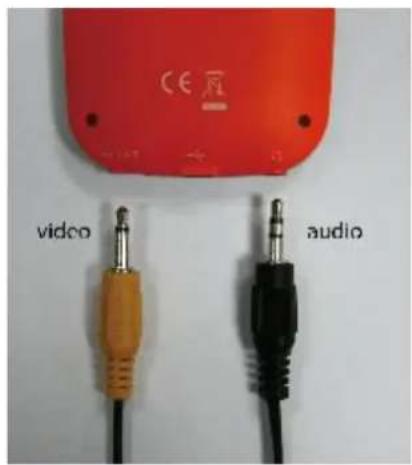
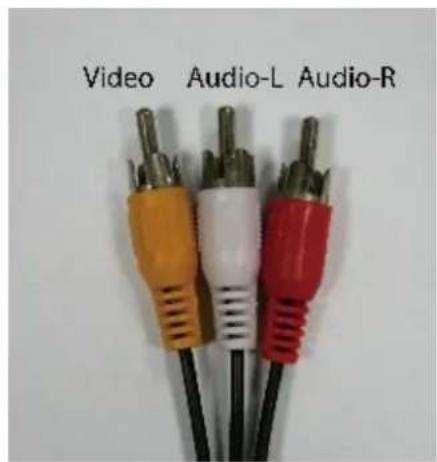
Connection to TV/VCR
This player can output audio/video signals to TV/VCR, with the following adapter cables:
- For stereo audio signals, an adapter cable that has one stereo 3.5mm male plug and goes into two RCA male plugs (RED/WHITE) is required.
Connect the 3.5mm plug to earphone socket of this player and connect the RCA plugs to the RCA audio (RED / WHITE) sockets of the TV/VCR.
- For video signals, an adapter cable that has one stereo 3.5mm male plug and goes into one RCA male plug (YELLOW) is required.
Connect the 3.5mm plug to TV-OUT socket of this player and connect the RCA plugs to the RCA video (YELLOW) socket of the TV/VCR.
AID WARRANTY CONDITIONS
AID, in compliance with the Customer Protection Law (Ley 23/2003, July 10th, of Warranty in the Sale of Consumer Goods, BOE no. 165, 11/07/2003), offers Direct Warranty to Spain and Portugal customers for all our brands' products: ZIPY, MUSE, NEW ONE, AC-RAYAN, TNB, BARKAN, BRASFORMA, THE COMPLEMENTS, and GO BY ZIPY, under the following conditions:
A - Our products have a two year warranty. During the first year original defects that may be detected are repaired. In those cases stipulated by law, the buyer will be entitled to the replacement of the device by a new one, provided that the defects are not due to the negligence or exclusive fault of the buyer in handling the device. During the second year the buyer will need to prove that the malfunctioning of the device is due to a manufacturing defect. In both cases the warranty will apply provided that:
- The product has been used for its destined purpose alone.
- It was not opened, manipulated or altered in any way by someone other than the Official Technical Service.
- It has not undergone shock, flood, overheating, electric overcharge or any other external circumstance that may constitute a possible reason of INVALIDATING the warranty.
- The product will be returned to AID in proper packaging together with the receipt where the brand and type of product, the date of the purchase, the name and address of the shop that sold it and the reason for the malfunctioning should be clearly stated.
Any of the following circumstances invalidates the present warranty:
- Breaking the ports, the screen or the glass.
- Loss of liquid from the screen.
- Wearing out, obvious marks of incorrect manipulation, inappropriate use, ill-treatment, shock, falls, dirt, and so on.
- The data contained in the products are under no circumstances covered by any warranty whatsoever, nor are they to be considered during the physical repairing process of the products. AID guarantees absolute confidentiality of the data.
- AID does not cover the incorrect configuration or installation of the software / hardware on the part of the client, neither as a component nor as a peripheral, included prives / controllers included.
- The legislation on guarantees sets certain limits. "the guarantee does not cover additional components such as batteries, nor any elements that are subject to maintenance due to its use such as earphones". These accessories have a 6 months guarantee.
- Waterproof bags have a 48-hour trial period, such as indicated on the product itself,
therefore once this time period is elapsed they will no longer be covered by any guarantee.
- Final users do not need to send us the device accessories, especially if they are not the original ones, since we will not be held responsible for them.
CASES:
- If the product is out our guarantee, the AID technical department will facilitate a budget for the repair by fax or e-mail. Said budget will need to be authorized in writing, sealed and signed, and the user will have to satisfy the repair fee as well as the freight.
- If the budget is not accepted a diagnosis fee will be charged. (6€)
- Repairs have a 90 days guarantee, provided that the breakdown is under the same concept and in the case of budgeted breakdowns alone.
B - All the freight costs for the product will be covered by AID using only the transportation company designed by AID following the authorization procedure.
The expenses derived from incorrect or unjustified returns on the part of the client will be covered by the client alone.
C - Any incidence detected at the moment of the reception of the merchandise must be immediately notified at the AID Post-Sales Department: maria@accessiosdigital.com
In compliance with Article 366 from the Code of Commerce, AID will not consider complaints about breakages, shocks or absence of boxes or pieces 24 hours after the delivery of the merchandise.
In the case of shipments originated in Canarias, Ceuta and Melilla, AID will not pay the customs tax nor any kind of reimbursable expenses.
DECLARATION OF CONFORMITY
ACCESORIOS INTELIGENTES DIGITAL S.A.
6 CARPINTEROS, OF-13 VILLAVICIOSA DE ODON. 28670 MADRID
We hereby declare, under our exclusive responsibility, our conformity with the product:
MP/5: ALBATROS by ZIPY made in China
To which this declaration refers with the following directives:
EN55013:2001+A1:2003+A2:2006
EN55022:2006+A1:2007
EN55020:2007
EN55024:1998+A1:2001+A2:2003
In compliance with the resolutions of the Directive 99/05/CE, of the European Parliament and the March 9^th 1999 Council, included in the Spanish law system by El Real Decreto 1890/2000, November 20^th .
Issue location and date
Signed by: Miguel Fauro
29/09//2010


Waste management for all of your containers and domestic packagings that you deposit in the recycling bin
The packaging contains removable materials in order to treat them later in waste management
Do not deposit the device or the battery in the bin. Please, put it in a recycling bin or carry it to your local nearby store
Deposit the packaging materials in the yellow bin
This device conforms to the EU directives
This unit conforms to the ROHS regulations
Symbol of frequency restriction in some countries of European Union