
IC SB10 - Loudspeaker Ecler - Free user manual and instructions
Find the device manual for free IC SB10 Ecler in PDF.

| Product Type | Ceiling installation speaker, 10" (25 cm) subwoofer |
| Brand | Ecler |
| Model | IC SB10 |
| Nominal Power | 100 W RMS under 8 Ω |
| Impedance | 8 Ω (low impedance) or 100 V / 70 V line |
| Sensitivity (1 W/1 m) | 96 dB SPL |
| Internal low-pass filter | Cut-off frequency 150 Hz |
| Built-in transformer (100 V) | 7.5 / 15 / 30 / 60 W |
| Built-in transformer (70 V) | 3.75 / 7.5 / 15 / 30 W |
| External diameter | 335 mm |
| Cut-out diameter | 307 mm |
| Weight | Approximately 5 kg |
| Enclosure material | Plastic and metal (steel grille) |
| Color | White (paintable) |
| Installation type | Flush-mounted in ceiling, 4 rotating tabs |
| Included accessories | Protective grille, cut-out/painting template, C-shaped metal ring, 2 fixing bridges, screws, grille hook |
| Power supply | Via audio line (low impedance or 100/70 V) |
| Main features | Bass reinforcement, power selector, cone protection with internal disc, suitable for suspended ceilings |
| Maintenance and cleaning | Clean with a dry cloth; do not use water or solvents |
| Safety | Do not expose to water or heat sources; use only recommended accessories |
| Spare parts and repairability | Parts available from the manufacturer; maintenance by authorized service |
| General information | Designed for ceiling installation, indoor use, manufacturer warranty |
Frequently Asked Questions - IC SB10 Ecler
User questions about IC SB10 Ecler
0 question about this device. Answer the ones you know or ask your own.
Ask a new question about this device
Download the instructions for your Loudspeaker in PDF format for free! Find your manual IC SB10 - Ecler and take your electronic device back in hand. On this page are published all the documents necessary for the use of your device. IC SB10 by Ecler.
USER MANUAL IC SB10 Ecler
Congratulations! You are the owner of a carefully designed and manufactured equipment. Thank you for choosing our IC SB10 model inceiling subwoofer.
In order to get the optimum operation and efficiency from this unit, it is VERY IMPORTANT - before you plug anything - to read this manual very carefully and bear in mind all considerations specified within it. We strongly recommend that its maintenance be carried out by our Authorized Technical services.
2. WARNINGS

Never use this unit in the proximity of water. Do not expose the unit to water splashing, nor place liquid containers on top of it.
Avoid placing the unit next to heat sources such as spotlights or heaters.
Use only the accessories specified by the manufacturer, employing the correct accessories for each application.
3. INTRODUCTION
The IC SB10 model incorporates carefully selected components in an easy-to-use design that is quick and reliable to install. It also provides excellent bass sound quality thanks to our infinite baffle philosophy and a top-performance transducer.
The IC SB10 has a built-in transformer, making it extremely versatile and easy to use both in applications with low impedance and in applications running at 100V/70V. All you have to do is shift the position of the built-in selector switch.
The technical specifications of the IC SB10 include:
- 10" inceiling woofer
• Power: 100W RMS @ 8Ω - Sensitivity (1W/1m): 96 dB SPL
• Built-in transformer: 7.5 / 15 / 30 / 60 W @100V
3.75 / 7.5 / 15 / 30W @70V - Internal Low Pass Filter: fc = 150Hz
• External diameter: 335mm
• Cut-out diameter: 307mm - Installation system: four points fixed with a revolving fastener. Accessories included.
4. CONNECTIONS
The connection terminals are of spring clamp type for peeled cable. Once they are connected, all you have to do is choose the unit's power and mode of operation using a simple screwdriver. Always pay attention to the polarity.
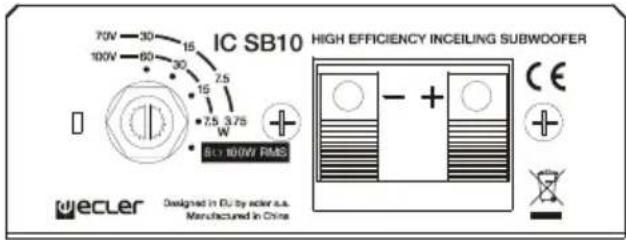
The IC SB10 is delivered with the switch in the 100V/70V position. If you accidentally hook it up to a low-impedance system, no damage will be done to the speaker, but it will perform far under its real capabilities. If you accidentally connect the speaker to a 100V/70V network in the 8Ω position, serious damage will be caused to the speaker.
It is easy to install the IC SB10 with the four revolving fasteners incorporated. For more information on how to install the IC SB10, please see section 5 of this manual.
5. LOCATION AND ASSEMBLY
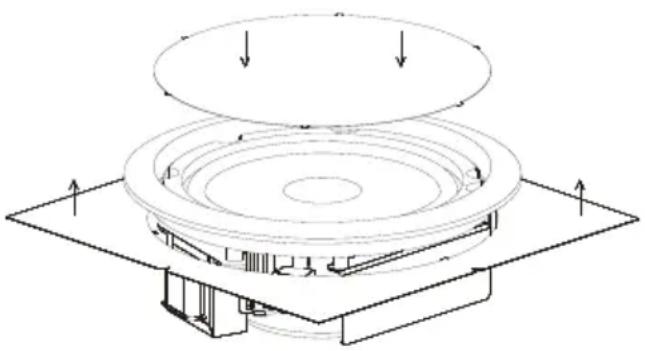
To install this product correctly, you must be prepared to cut circular holes where you would like to place the speakers and have the wiring necessary for each unit.
In order to install the speakers correctly:
- Remove the protective grating from the speaker using the hook provided in the packaging.
- Cut a circular hole in the false ceiling.
A template for cutting/painting is included with each unit to simplify this process. Once the unit is separated into two parts, the outside part can be used as a template to make the hole in the ceiling, and the inner disk can be used to protect the speaker cone if you would like to paint the plastic another colour.
- Use the clamps to connect the unit to the wiring of the system where the speaker is being installed.
- Place the speaker in the newly cut hole. Hold it in place with your hand and push it into place, all the while making sure that the 4 revolving fasteners are drawn back.
- Press each of the 4 screws that are accessible from the front side of the speaker. The speaker is now fixed in its final position.
- Reattach the protective grille.
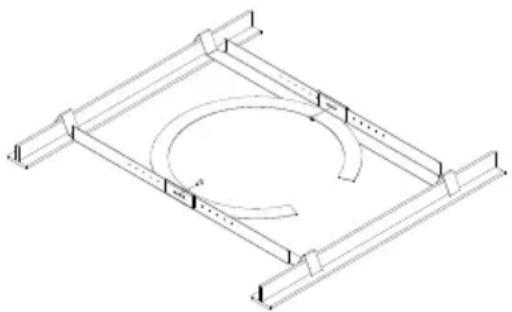
Each IC SB10 speaker comes with a set of accessories that make it easy to install in drop ceilings, resulting in an installation that is even more solid and reliable.
- A C-shaped metal ring.
-
Two brackets especially designed for use in 600mm ceiling grids.
-
Insert the ring in the hole previously drilled in the ceiling according to the procedure described on the preceding page.
- Place the ring in the hole as illustrated. It is important that the tabs on the side of the ring are placed exactly as shown.
- Insert the brackets into the hole, fix them in place on the tabs on the side of the metal ring and line them up so that both V-shaped ends rest on the ceiling's existing grid.
- Use the screws provided to attach the brackets to the ring.
natural_image
Isometric line drawing of a mechanical frame with a central circular component and evenly spaced supports (no text or symbols)The metal ring can also be use for non-drop ceilings, being as it distributes the weight uniformly across the contact surface.
N.B.: The high performance of the IC SB10 speaker can result in substantial vibrations, which may be transmitted to the existing materials and structures of the ceiling where it is installed. Depending on the materials and structures in place, we recommend using shock absorbing materials, such as neoprene, to eliminate undesired vibrations.
6. PAINTING
The IC SB10 is designed to be painted, meaning it can be installed anywhere, regardless of the design and look of the place where it will be used.
Follow these instructions to paint the speaker:
- Remove the protective grating from the speaker using the hook provided in the packaging.
- Once the cut/paint template has been separated into two parts, use the inside disk to protect the speaker cone. Place it tight on the cone. The points still on disk after it has been separated help to fix it tight into place. The outside part of the template can be put
on the back part of the speaker, lining it up with the plastic circle, to protect the back part from splattering if you are using spray paint.
-
Paint the protective grating and the speaker separately. Make sure that the small holes in the grating are not blocked by paint. Use an appropriate air drying paint.
-
When the paint is dry, remove the protectors. The unit is ready to be installed.
natural_image
Technical line drawing of a mechanical assembly with concentric circular components and mounting base (no text or symbols)natural_image
Isometric line drawing of a mechanical frame with a central circular cutout and two side supports (no text or symbols)natural_image
Technical line drawing of a mechanical assembly with concentric circular components and mounting base (no text or symbols)NOTICE D'EMPLOI
- NOTE IMPORTANTE 12
- PRÉCAUTIONS 12
- INTRODUCTION 12
- CONNEXIONS 13
- MISE EN PLACE ET MONTAGE 13
- PEINTURE 14
- CARACTÉRISTIQUES TECHNIQUES 19
natural_image
Isometric line drawing of a mechanical frame with a circular component and curved arrows indicating rotation (no text or symbols)natural_image
Technical line drawing of a circular mechanical component with mounting base and top plate (no text or symbols)BEDIENUNGSANLEITUNG
natural_image
Isometric line drawing of a mechanical frame with a circular cutout and evenly spaced supports (no text or symbols)natural_image
Technical line drawing of a mechanical assembly with concentric circular components and mounting base (no text or symbols)- TECHNICAL CHARACTERISTICS 7. CARACTERÍSTICAS TÉCNICAS
- CARACTÉRISTIQUES TECHNIQUES 7. TECHNISCHE DATEN
| Nominal low impedance | 8Ω |
| RMS power | 100W |
| 100V Transformer Taps | 7.5, 15, 30, 60W |
| 70V Transformer Taps | 3.75, 7.5, 15, 30W |
| Frequency response without LP filter (-10dB) | 75Hz – 750Hz |
| LP passive filter cut off frequency | 150Hz |
| Sensitivity 1W/1m (Filter off) | 93dB |
| Sensitivity 1W/1m (Filter on, 80-200Hz) | 91dB |
| External diameter | 335mm |
| Internal diameter | 305mm |
| Recommended cut out diameter | 307mm |
| Required depth | 126mm |
| Weight | 5.3kg |

Brand : Ecler
Model : IC SB10
Category : Loudspeaker